
This chapter will cover the use of audio within the Unreal Engine, so that you will be able to add dialogue, music, and sound effects to your game. The Audio folder in the Starter Content contains some existing audio assets you can use as you read this chapter.
Audio Overview and Sound Waves
Unreal Engine uses .wav files, pronounced “wave,” to import audio. If you have some audio you want to use that’s in a different format, such as an MP3, you will first need to convert it to a wave file, which will be covered later in the chapter.
When you import a wave file into Unreal Engine, it will be stored internally in a proprietary, compressed format and will become a Sound Wave
asset in the Content Browser. Its icon will have a black background with the actual waveform of that sound shown in white, as seen in Figure 9-1. If the wave has more than one channel, there will be a separate waveform for each channel.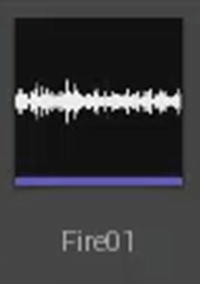
Figure 9-1
A Sound Wave
If you want to combine sounds and/or add effects to them, you can do so using a Sound Cue, which is represented by an icon with a blue background and a picture of a speaker and waveform (Figure 9-2). Note that, unlike the Sound Wave, the waveform on the Sound Cue icon is generic and doesn’t represent the actual waveform that is produced by the asset.
Figure 9-2
A Sound Cue
Ambient Sound Actor
If you drag either a Sound Wave or a Sound Cue into your Level, it will create what’s called an Ambient Sound Actor
(Figure 9-3).
Figure 9-3
An Ambient Sound Actor
It will automatically assign whatever asset you dragged in, as the asset for that Actor’s Sound property (Figure 9-4).
Figure 9-4
The Sound category of an Ambient Sound Actor
If you want to preview the sound, you can use the Play and Stop buttons, located above the Sound property. For Sound Cues, you can use the Edit button to open the Sound Cue in the Sound Cue Editor
. If you want to create a new Sound Cue to use for the Actor, you can use the New button.
Below, you’ll see four properties with “Priority” in their name. These properties are used when this Actor is playing multiple instances of its sound concurrently. The concept of concurrency will be covered later in the section.
By default, any sounds coming from an Ambient Sound Actor will be paused when the game is paused. If you want a sound to be able to play while the game is paused, you would need to set the Is UISound property to True.
If your Sound Cue or Sound Wave has subtitles, you can turn them off by setting the Suppress Subtitles property to True.
You can use the Volume Multiplier property
to increase or decrease the volume of the sound. Note, however, that setting the volume too high could cause clipping in your waveform which will cause distortion in the audio.
The Envelope Follower Attack Time property will set the amount of time, in milliseconds, that it takes for the sound to reach its peak amplitude. Conversely, the Envelope Follower Release Time property sets how long it takes for the sound to decay back to silence. Note that these properties only apply when the Sound Cue or Sound Wave is used in the audio mixer.
The Pitch Multiplier property can be used to increase or decrease the pitch of the sound.
Down in the Activation category is the Auto Activate property. By default, an Ambient Sound Actor’s Auto Activate property is set to True. With it set to True, the sound will play as soon as the Actor is created.
By default, the Ambient Sound Actor will only play its sound once. If you want the sound to be continuous, you will need to set it to loop. With a Sound Wave, this can be accomplished by setting its Looping property to True. With a Sound Cue, this is done by using a Looping Node. The Looping property can be found on the Sound Wave Properties page.
Sound Wave Properties
If you want to edit the properties of a Sound Wave, you simply need to double-click it in the Content Browser.
Starting at the top in the Format category (Figure 9-5) is the Is Ambisonics property. Ambisonics is a specific type of surround sound format. If your wave file is in that format, you would want to set this to True.
Next, there are two properties under the Quality category that can be used to balance the quality of the wave file vs. its size.
First, you can set the compression of the wave using the Compression property. This can have a value from 1 to 100, where lower numbers represent more compression and higher numbers represent better quality. So if you want the sound to sound as good as it can, and you’re not worried about the file size, you would want to set this to a high number. If you don’t care about the quality of the sound and you just need to save space somewhere, you could set this to a low number.
Figure 9-5
The Format category of a Sound Wave
If you need to lower the file size even more, you can use the Sample Rate property to lower the sample rate of the wave; otherwise you should just leave the value at Max.
In the Sound category (Figure 9-6), you can adjust the volume and pitch of the Sound Wave, and you can also place it into a Group. So you can specify if it should go in Effects, UI, Music, or Voice. Or, if it doesn’t fit into any of those categories, you can just leave it in the Default group. Groups are useful for being able to apply a setting to an entire group of related Sound Waves, instead of having to apply that setting to each individual one.
Figure 9-6
The Sound category of a Sound Wave
The Class property is similar in concept to Group, except it’s more robust, you can save and reuse classes, and you can create your own custom groupings.
In the Subtitles category (Figure 9-7), you can add subtitles to the Sound Wave and edit their properties. To add a subtitle, go to the Subtitles property and click the plus sign. Then you enter the text of the subtitle in the Text property and the time it should appear on the screen in the Time property. The Time property refers to the amount of time that has elapsed since the Sound Wave began playing.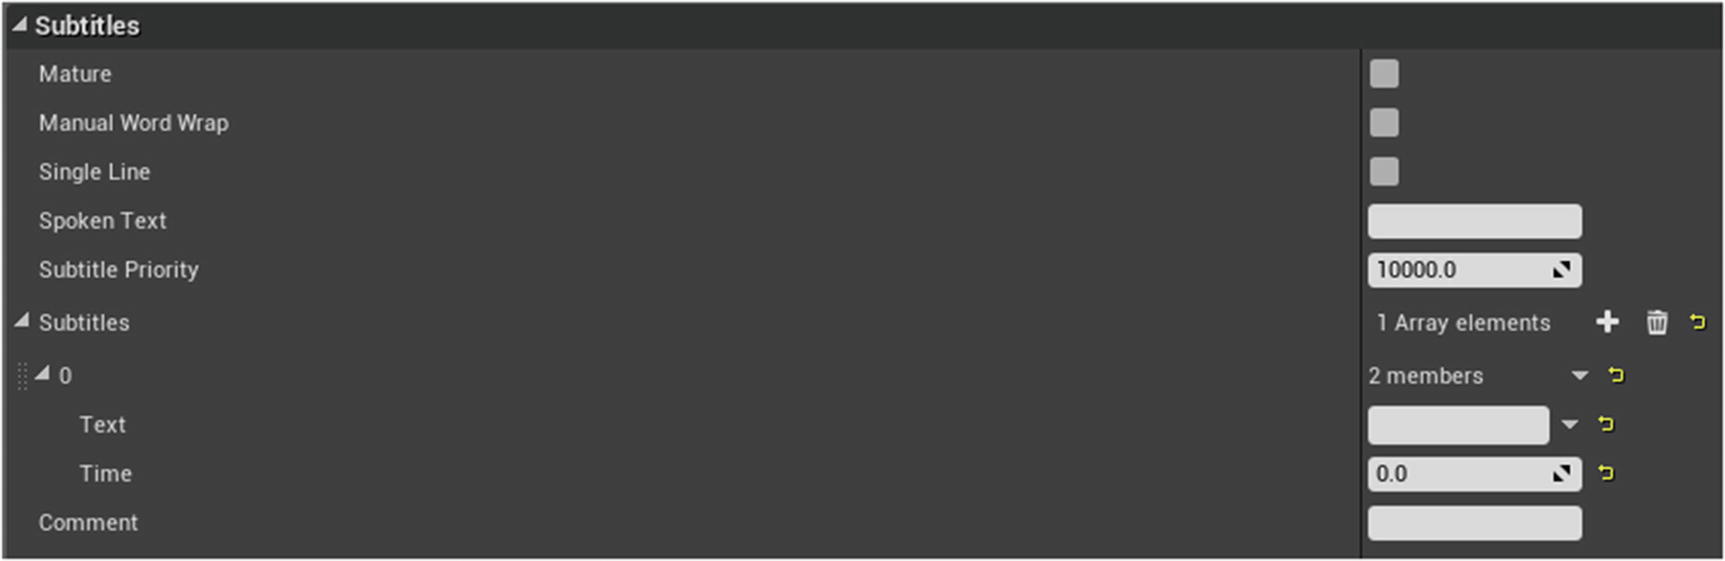
Figure 9-7
The Subtitles category of a Sound Wave
There is also a Spoken Text property. The difference between the Spoken Text property and the Text property is that the Text property is for the text that should appear on the screen, while the Spoken Text property is for the dialogue that was actually spoken. For example, there might be the word “angrily” in brackets indicating that the speaker is speaking in an angry tone. Or if the subtitles are in a different language, then obviously the two texts will be different.
The Mature property is used to flag a piece of audio that contains mature content, such as adult language. This can be used to more easily create a “clean” version of your game later, by having the ability to filter out all mature content.
By default, the Engine will automatically wrap your subtitles to the next line if they get too long, but if you don’t want the Engine to do this – for example, if you have already split the subtitles manually – you can set Manual Word Wrap to True to disable automatic wrapping. If you want to force all subtitles to only display on one line, you can set the Single Line property to True.
Next is the Subtitle Priority property
. If two pieces of audio are playing at the same time and both have subtitles, which subtitle will appear on the screen will be determined by the Subtitle Priority, with higher numbers representing a higher priority. You will remember that there were two properties on an instance of a sound – Override Subtitle Priority and Subtitle Priority. The Subtitle Priority property on the Sound Wave Properties page will, by default, be used for all instances of that sound. But you can override this on an individual basis by setting the instance’s Override Subtitle Priority to True and then entering a new value in the instance’s Subtitle Priority property.
The final Subtitle property is Comment. If you plan on having your game translated into other languages, the Comment property can be useful for adding contextual information about the piece of dialogue that the translator can use to create a more accurate translation.
A few categories down is the Voice Management category (Figure 9-8). Within that, under the Concurrency sub-category, there are several properties used to specify what should happen when multiple instances of the Sound Wave are played at the same time. If you want to use preexisting Concurrency Settings, you will need to set the Override Concurrency property to False and then select the settings using the dropdown. If you want to specify new concurrency settings, then you need to set Override Concurrency to True, and then you will be able to expand the Concurrency Overrides property.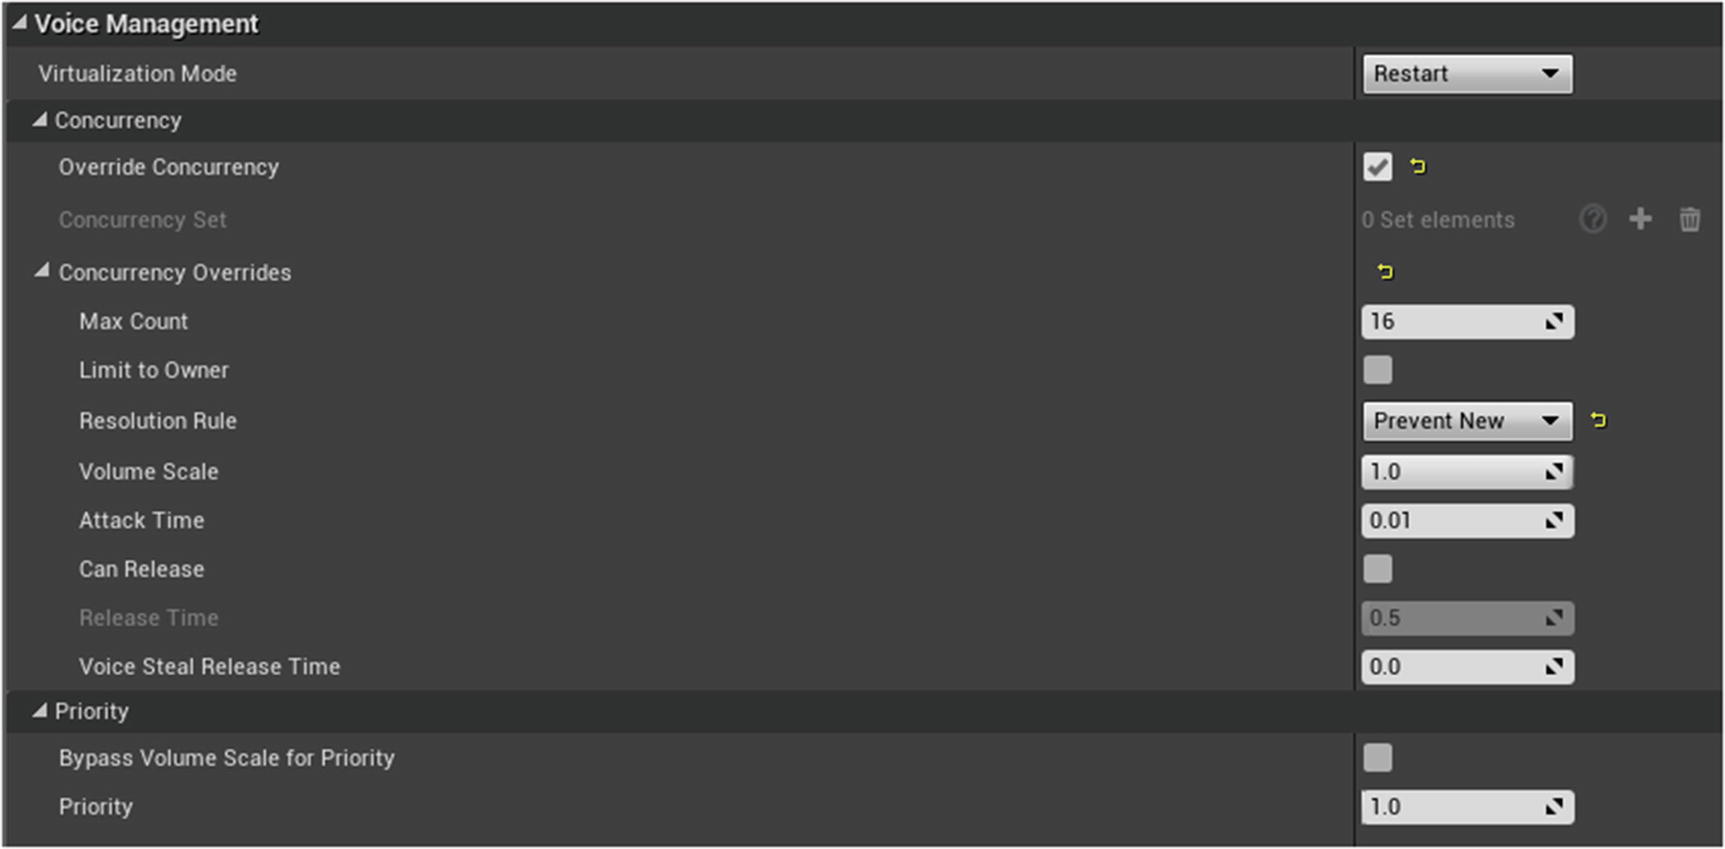
Figure 9-8
The Voice Management category of a Sound Wave
The Max Count property specifies how many instances of the sound are allowed to be playing at once. The Limit to Owner property specifies if the Max Count should only be applied per sound Actor, or if it should be applied to all instances of the Sound Wave that are being played from any sound Actor.
If the Max Count is reached and another instance of the sound tries to play, you can set how the conflict should be resolved using the Resolution Rule property. For example, you could set it to prevent the new instance from being played, or set it so that the oldest instance is stopped to make room for the new instance, and so on.
With the Volume Scale property, you can cause older instances to become quieter as new instances of this sound are played. With this set to 1.0, there will be no difference in volume. But if you set this below 1.0, older instances will become quieter and quieter as newer instances are played, and the lower the number is, the more dramatic the effect.
The Attack Time property determines how long it takes for an instance to become quieter once a new instance starts playing.
If the Can Release property is set to True, an instance that has gone quieter can get louder again if another instance stops playing. The amount of time that this takes to happen after the other instance stops playing is determined by the Release Time property.
If a sound instance is forced to stop completely due to another instance starting, the amount of time it takes for the older sound to fade out is determined by the Voice Steal Release Time. With this at 0, the sound will stop immediately.
In addition to there being a limit to the number of the same sounds that can play at once, there is also a limit to the number of sounds in general that can play at once. If this limit is met, by default, the Priority property, combined with the volume of the sound, will be used to determine which sound is stopped and which keeps playing. If the Bypass Volume Scale for Priority property is set to True, then the Priority property alone will be used to make that determination, and the volume of the sound will be ignored.
In the Details Panel of an individual instance of a sound, there is an Override Priority property you can use to override the priority on an individual basis, which allows you to set a new value in the instance’s Priority property.
Play Sound Nodes
We already saw how to have a sound play immediately when the Level begins, but oftentimes, you won’t want a sound to be played until certain conditions are met or a certain event is triggered. In these cases, you can use Blueprints to specify when the sound should be played.
If you go into the Level Blueprint, open the Node Menu, and type “Play Sound,” you will see several Nodes available for playing a sound, as seen in Figure 9-9. For one thing, you can choose to either play a sound or spawn a sound. The difference is that when you spawn a sound, you have control over it. You can choose to stop playing the sound at any point or modify its properties. But when you play a sound, you don’t have any control over it. You can’t modify it or stop it. It will continue playing until it’s finished, and if it’s set to loop, it will continue playing repeatedly.
Figure 9-9
There are various Nodes you can use to play a sound
You can also choose to have a sound come from a certain location in the game or make it a 2D sound which will be heard at the same volume, and the same stereo position, regardless of your location in the game. If you use one of the location Nodes, such as Play Sound at Location, you will need to pass in the location where you want the sound to play from. If you wanted it to play from the location of a certain Actor, you could use the GetActorLocation Node to get that Actor’s location, as shown in Figure 9-10. Or, with the Spawn Sound Attached Node, you can attach a sound to an Actor directly and the sound will travel with that Actor.
Figure 9-10
This logic will play a sound, emanating from the location of a Trigger Volume, whenever any Actor enters the Trigger Volume
Sound Cues
Sound Cues use existing Sound Waves to create new sounds, by combining Sound Waves and/or adjusting their properties or adding effects to them. To create a new Sound Cue, click the Add New button in the Content Browser, scroll down to Sounds, select Sound Cue, and then give it a name.
To edit a Sound Cue, simply double-click it to open it in the Sound Cue Editor. The Sound Cue Editor uses a node-based graph very similar to Blueprints. However, it uses its own specialized Nodes instead of the types of Nodes that are available in Blueprints.
The basic idea is that you start with one or more Nodes on the left that represent Sound Waves, and then you connect those Sound Waves to Nodes in the middle that will combine and modify them. Finally, whatever gets outputted to the Output Node
on the right (Figure 9-11) is the sound that the Sound Cue will actually play.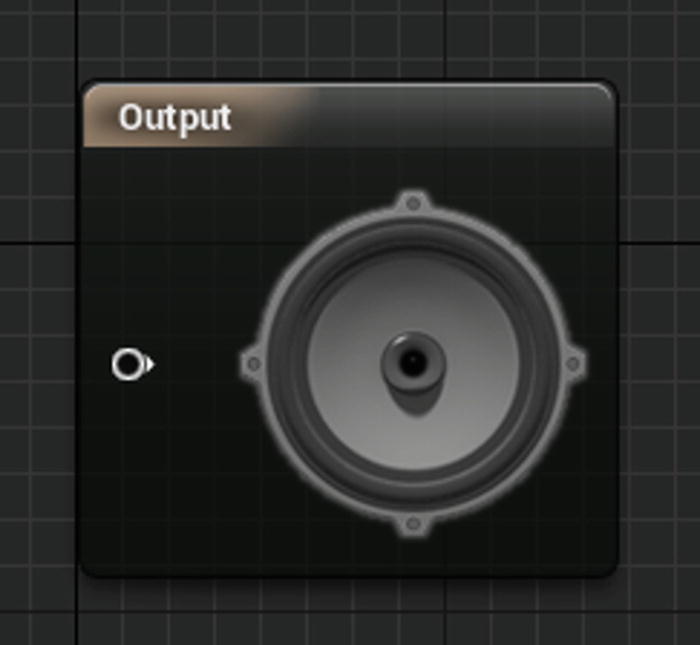
Figure 9-11
The sound that is passed into the Output Node is the sound that the Sound Cue will play
To hear what the output will sound like, click the Play Cue button in the Toolbar (Figure 9-12). To hear what an individual Node sounds like by itself, select that Node and click the Play Node button.
Figure 9-12
The Play Cue and Play Node buttons
You can add Nodes like you do in Blueprints, by right-clicking the graph and selecting from a Node Menu. Or you can drag and drop Nodes from the Palette window on the right side of the Editor (Figure 9-13).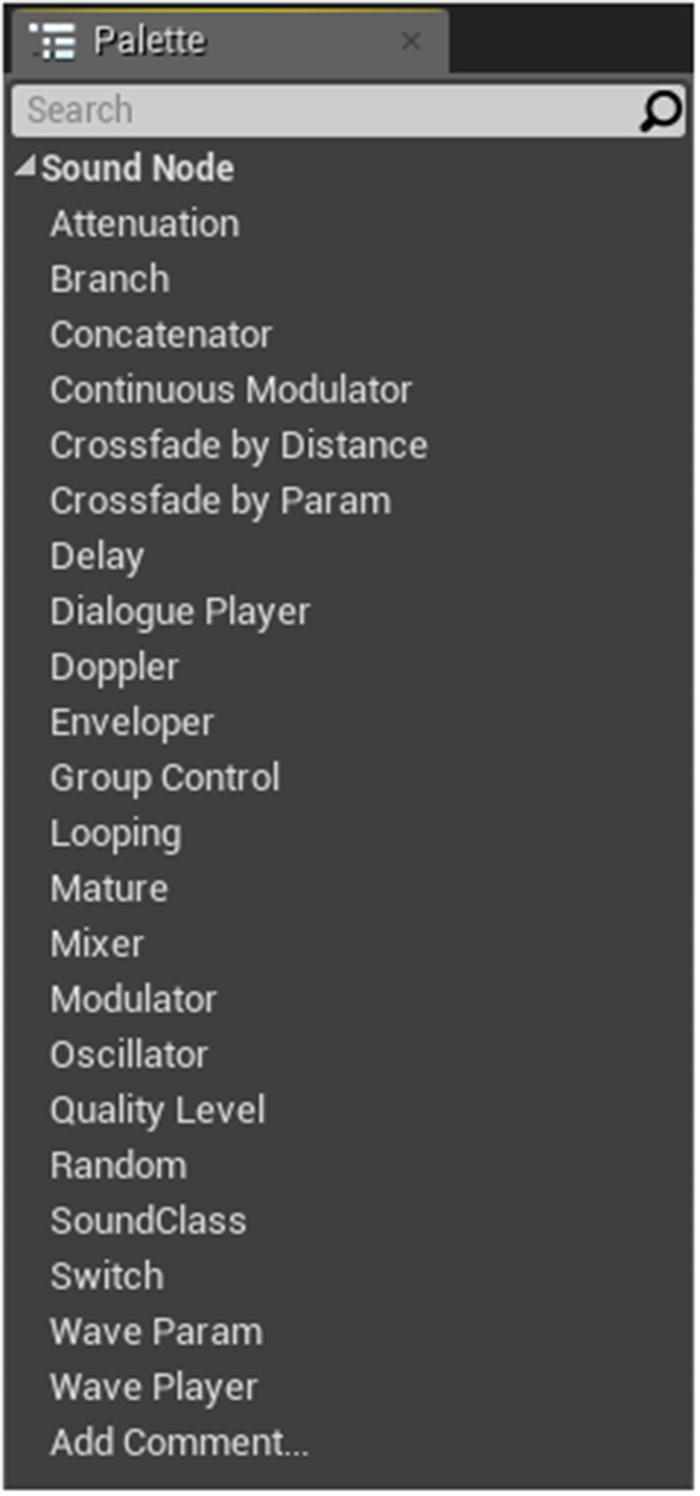
Figure 9-13
The Palette window in the Sound Cue Editor contains several Nodes you can use to modify sounds
Audio Nodes
A Wave Player Node
, shown in Figure 9-14, is used to output Sound Waves. If you select it, you can edit its properties in the Details Panel on the left. The Sound Wave property will specify which Sound Wave the Node should output (Figure 9-15).
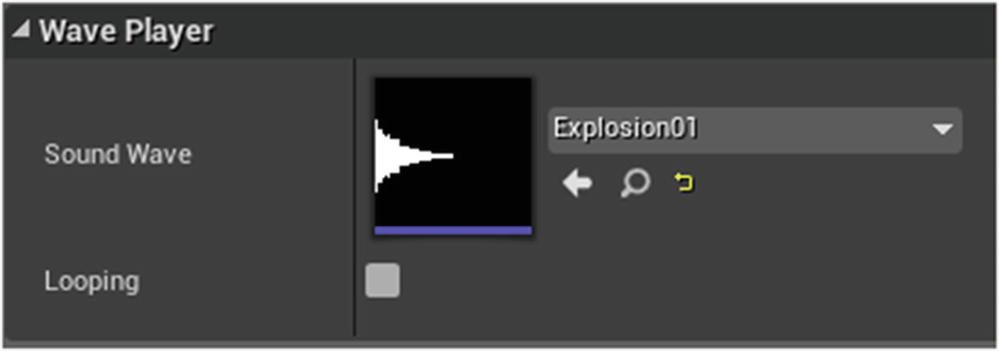
Figure 9-14
The Wave Player Node
Figure 9-15
Properties of the Wave Player Node
A Looping Node
(Figure 9-16) will take a sound as input and output that sound as a loop. In the Details Panel, you can choose to have it loop a specific amount of times or have it loop continuously (Figure 9-17).
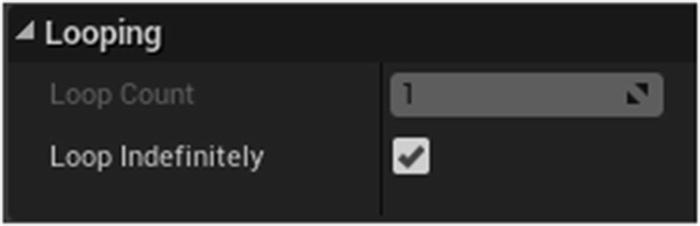
Figure 9-16
The Looping Node
Figure 9-17
Properties of the Looping Node
The Delay Node
(Figure 9-18) can be used to add a delay before a sound is played. Each time the Delay Node is activated, the amount of delay will be a random value between the Delay Min and Delay Max (Figure 9-19). So if you set this to 1 and 3, for example, each time the sound is played, the delay will be between 1 and 3 seconds. If you wanted the delay to always be the same value, you would need to enter that value for both the Min and Max properties.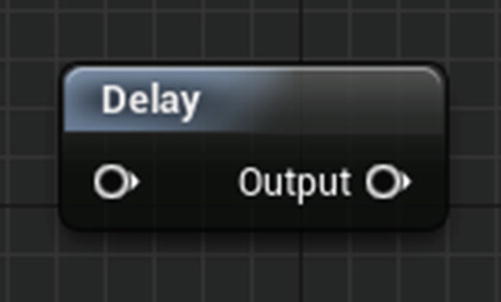
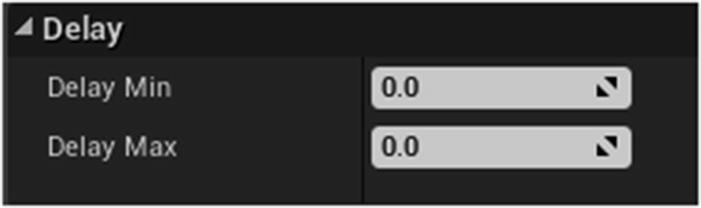
Figure 9-18
The Delay Node
Figure 9-19
Properties of the Delay Node
The Doppler Node
(Figure 9-20) can be used to add the Doppler effect to a sound. This is the effect that occurs when sounds, such as the siren of an ambulance, increase in pitch as they move toward you and decrease in pitch as they move away. The Doppler Intensity property (Figure 9-21) can be used to specify how pronounced this effect should be, with higher values increasing the effect.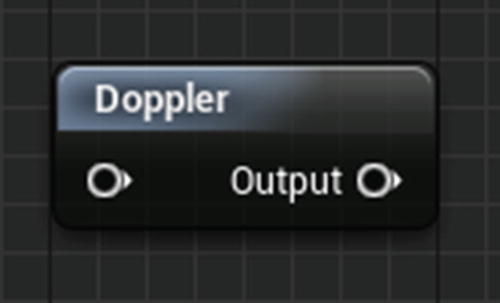
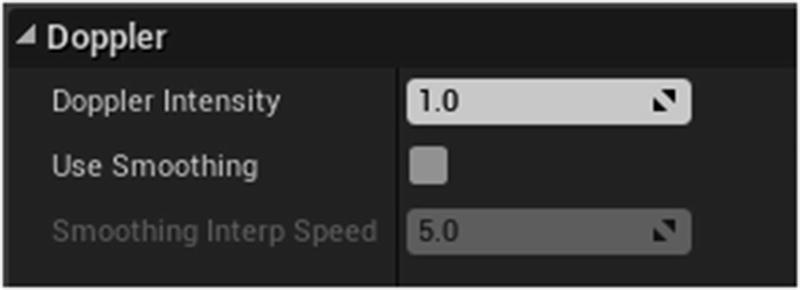
Figure 9-20
The Doppler Node
Figure 9-21
Properties of the Doppler Node
The Modulator Node
(Figure 9-22) can be used to play a sound at a random pitch and volume each time it’s played. This can be used to make the audio sound slightly different each time so as not to get repetitive. The range of the random values generated can be set in the Details Panel (Figure 9-23).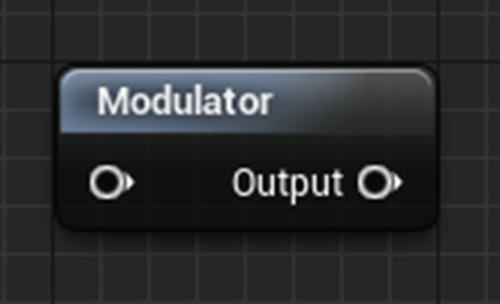
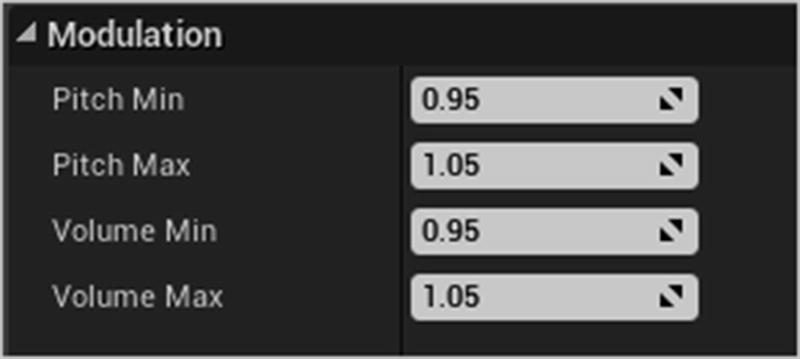
Figure 9-22
The Modulator Node
Figure 9-23
Properties of the Modulator Node
The Oscillator Node
(Figure 9-24) can be used to add a continuous modulation of volume and pitch within a single instance of a sound being played. The first two properties are used to enable the modulation of the volume and/or pitch (Figure 9-25). Amplitude refers to the height of the Sound Wave, with larger waves producing louder volumes. Frequency affects the pitch of a sound, with higher frequencies resulting in higher pitches. The remaining properties deal with more advanced wave physics, with the Offset properties controlling the wave’s phase and the Center properties controlling the center of oscillation.

Figure 9-24
The Oscillator Node
Figure 9-25
Properties of the Oscillator Node
In addition to Nodes that alter sounds, the Palette also contains many useful Nodes for combining sounds. A Mixer Node
, shown in Figure 9-26, takes two or more sounds as input and outputs all of those sounds being played simultaneously. In the Details Panel, you can adjust the volumes of each input (Figure 9-27).

Figure 9-26
The Mixer Node in use – this logic combines two different sounds and plays them simultaneously
Figure 9-27
Properties of the Mixer Node
The Concatenator Node
(Figure 9-28) is just like the Mixer Node, except that instead of playing its input sounds simultaneously, it plays them one after the other.
Figure 9-28
The Concatenator Node
A Random Node
(Figure 9-29) will randomly output just one of its input sounds each time it’s activated. By default, each sound has an equal chance of being played each time, but you can change this using the Weights property (Figure 9-30). For example, if you set the weight of the first sound to 2 and leave the weight of the second sound at 1, then the first sound has twice the chance of being played each time.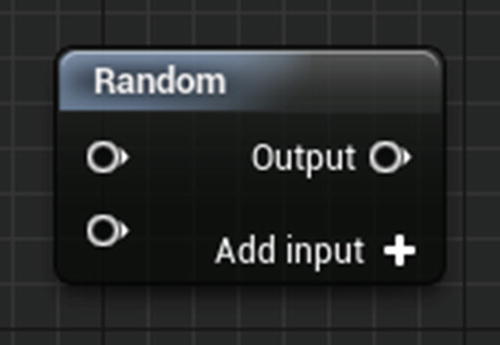
Figure 9-29
The Random Node
You can use the Preselect at Level Load property to trim down the number of possible inputs that can be selected from. For example, if the Random Node has ten inputs and Preselect at Level Load is set to 5, then as soon as the Level loaded, it would randomly select five of the inputs and then only randomly select from those five each time the Sound Cue was played. This can be used to trim down memory usage for Random Nodes that have several inputs. Note that this Node doesn’t have any effect when simulating your game, it will only work when playing a build outside of the Editor.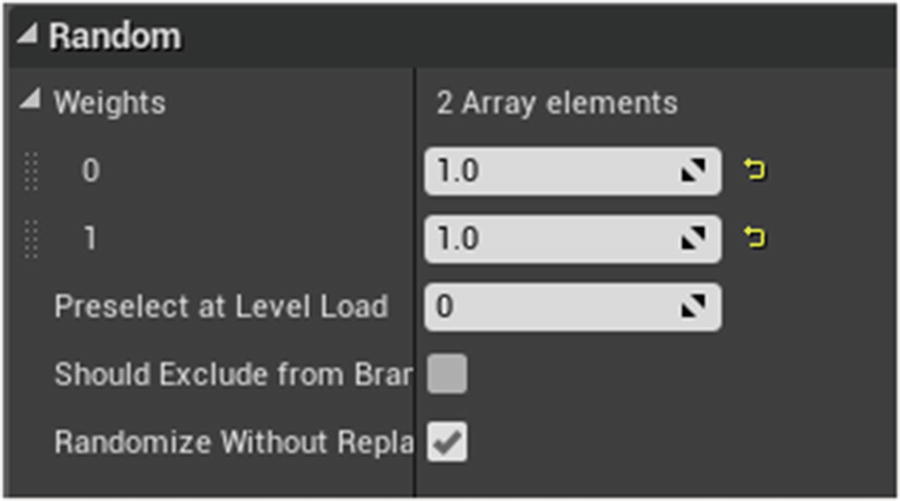
Figure 9-30
Properties of the Random Node
With the Randomize Without Replacement property checked, it will ensure that each sound gets played once before the same sound can be randomly selected again.
The Branch Node
(Figure 9-31) will output one of its input sounds based on the value of a Boolean variable. In the Details Panel, you use the Bool Parameter Name property to specify the name of the Boolean variable that should be evaluated (Figure 9-32). If that Boolean has a value of True, whatever sound is connected to the True pin will be outputted. If the value is False, the sound connected to the False pin will be outputted, and if the Boolean has a value of Null, then the sound connected to the Parameter Unset pin will be used.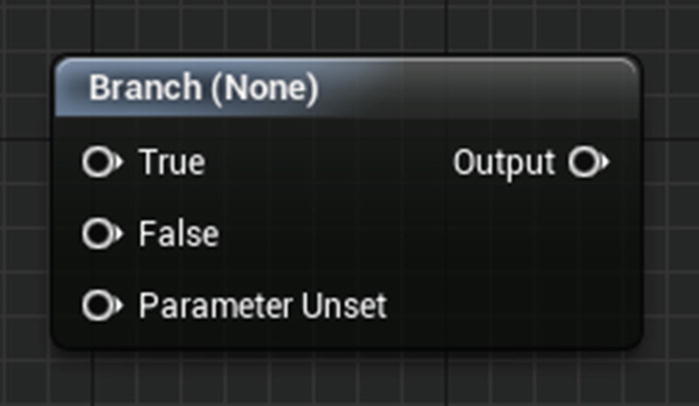

Figure 9-31
The Branch Node
Figure 9-32
Properties of the Branch Node
The Switch Node
(Figure 9-33) is just like the Branch Node, except it outputs a sound based on the value of an Integer variable instead of a Boolean variable.
Figure 9-33
The Switch Node
Attenuation
Attenuation
is a scientific term that refers to the reduction in strength of a signal. In the case of an audio signal, this refers to the decrease in volume that occurs due to distance. In Unreal Engine, you have the ability to edit the attenuation properties of the sounds in your game, affecting the rate at which their volumes decrease across distances.
When it’s selected, the Ambient Sound Actor will have two spheres around it, an inner sphere and an outer sphere, as seen in Figure 9-34. At any point within the inner sphere, the sound will be heard at 100% volume. Going from the outer edge of the inner sphere to the outer edge of the outer sphere, the volume will decrease from 100% to zero.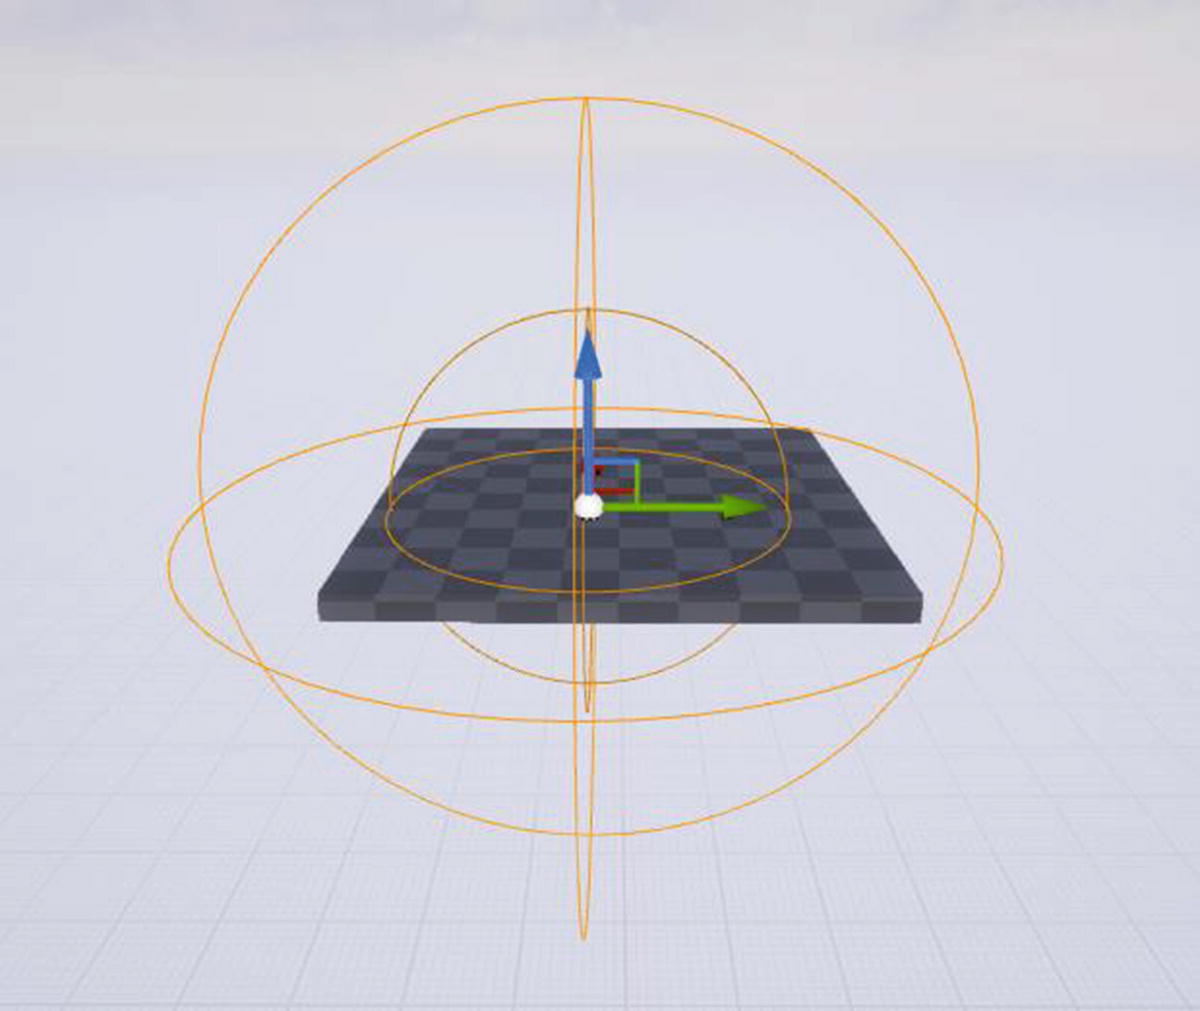
Figure 9-34
The inner and outer attenuation spheres of an Ambient Sound Actor
In the Details Panel, under the Attenuation Distance category (Figure 9-35), you can edit the sizes of these spheres. Note that the Override Attenuation property, in the Attenuation category (Figure 9-36), needs to be checked in order to edit the attenuation properties.
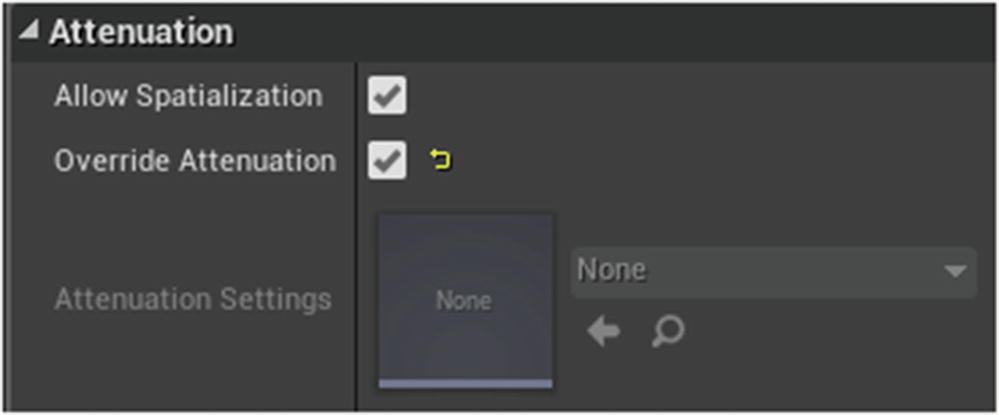
Figure 9-35
The Attenuation Distance category of an Ambient Sound Actor
Figure 9-36
The Attenuation category of an Ambient Sound Actor
To change the size of the inner sphere, the area in which the sound is heard at full volume, you use the Inner Radius property. As you change the size of the inner sphere, the size of the outer sphere changes as well. This is because the outer sphere is defined by the Falloff Distance
, the distance from the edge of the inner sphere to the edge of the outer sphere, as opposed to being defined by absolute size. When you adjust the Falloff Distance, it will change the size of the outer sphere, making the sound audible at greater distances.
You also have the ability to change the Attenuation Shape. By default, spheres are used, as this is the most natural way that sound will attenuate. But if, for example, you had a sound coming from within a rectangular room, you might want to use the Box shape in order to better fit the attenuation to the shape of the room.
Attenuation Curves
As mentioned already, in the area described by the Falloff Distance, the sound will go from 100% volume to zero. But the rate at which this occurs can be adjusted, by setting the Attenuation Function that should be used to define the Attenuation Curve
. By default, this will use a Linear curve, meaning the volume will decrease evenly.
Using the Logarithmic curve, the volume will decrease more rapidly at first, then the rate of decrease will slow as the sound approaches the bounds of the attenuation shape. The LogReverse curve, as its name indicates, is the reverse of that. The volume will decrease slowly at first, then more rapidly.
The Inverse curve is similar to the Logarithmic curve except the volume decreases extremely rapidly at first, then very slowly for the remainder of the distance. The NaturalSound curve is somewhere in between the Logarithmic curve and the Inverse curve and is supposed to represent the most natural attenuation curve that sounds have in the real world.
Finally, you can create your own custom attenuation curves, using the tool of the Custom Attenuation Curve property (Figure 9-37), which creates curves the same way the Timeline Editor did in the section on Timelines. So you hold down the Shift key and left-click the graph to add a new point on the curve. Then you can click and drag those points, or manually adjust their locations, to change the shape of the curve.
Figure 9-37
Creating a custom attenuation curve
Attenuation Hierarchy
At the highest level, you can create an Attenuation asset that can be saved and applied to multiple sound assets. To create a new Sound Attenuation asset
, click Add New, go to Sounds, then select Sound Attenuation (Figure 9-38). You can double-click it to edit its properties, which are the standard set of attenuation properties that were just covered.
You can apply this Sound Attenuation to as many sound objects as you want, and then you only need to make changes for the entire group in one place. For example, if you open a Sound Cue, under the Attenuation Settings property, you can select the Sound Attenuation asset you created, and it will apply those attenuation properties to the Sound Cue.
Figure 9-38
Applying a Sound Attenuation asset to a Sound Cue
But if you decide you want to set different settings for the Sound Cue, you can check the Override Attenuation property, and that will cause the Attenuation Settings property to be ignored and will instead use the settings defined in the Sound Cue itself.
Now let’s say you drag several instances of the Sound Cue into your Level and you want to change the settings for just one of the instances, without changing the settings of the Sound Cue itself. You can select that instance and then edit its Attenuation properties directly in the Details Panel by checking the Override Attenuation property. Or you can choose an existing Sound Attenuation asset to use just for that instance.
Importing and Converting Audio
Most of the time, importing audio files into Unreal Engine will be as straightforward as importing any other type of file. You can either click the Import button in the Content Browser and browse to the file you want to import or you can simply drag and drop the file directly into the Content Browser.
If the file is a wave file, it will be converted to a Sound Wave asset which you can then use as you like. But if you have a file in a different format that you want to use, such as an MP3 file, you would need to convert it to a wave file before you can use it in Unreal.
Audacity
To get the file into the proper format so that the Engine can import it, you simply need to open the file in an application that can read it and then export it back out in the proper format. One program that can do this is Audacity, shown in Figure 9-39. It is free to download and use, can read many different types of audio files in various formats, and can export those files in a format which the Unreal Engine can read.
To download Audacity, go to www.fosshub.com/Audacity.html. If you have Windows, you can click the “Audacity Windows Installer” link and then run the .exe file that is downloaded. If you have a Mac, you’ll need to download the .dmg file, and if you have Linux, you will have to download the source code and compile it yourself.
Once you have Audacity installed, converting your audio files into the proper formatting is pretty simple. First, go to “File ➤ Open,” and open the file you want converted. Now, go back up to the File menu and choose “Export ➤ Export As WAV.” Now click “Save,” and when the Edit Metadata box pops up, you can simply press OK without making any changes.
Figure 9-39
The free software application Audacity can be used to convert sound files into a format that Unreal Engine will accept
Summary
In this chapter, you learned about using audio in UE4 and how to add and manipulate dialogue, sound effects, and music. In the next chapter, you will learn about various topics that didn’t fit neatly into one of the other chapters, such as migrating content between projects, finding existing content to use, importing 3D objects into your project, and packaging your project so it can be played outside of the editor.