
![]()
HTML5 and JavaScript Apps with MVVM and Knockout
In Chapter 1 we built an XAML-based app using MVVM and in this chapter we build a JavaScript-based data-driven app using HTML5, CSS, and Knockout JS.
Knockout JS is a popular open source MVVM JavaScript framework. This framework helps us to adpot some of the principles like BaseModel, inheritance, and data binding in a way that helps us write code that remains manageable, testable, and maintainable.
This chapter begins by helping you get started with Knockout, going through the resources and tools needed to start with Knockout and use it with Visual Studio. We then provide a demonstration using MVVM with Knockout, data binding, and jQuery to develop a Pocket (Read it later) client Windows 8 App.
Every web application developer either has used or at least heard of jQuery, which is designed to greatly simplify JavaScript programming. jQuery is not a solution for every problem, as when developing a complex web application it becomes tricky to make the UI and data communicate with each other dynamically. Also jQuery doesn’t have a concept of an underlying data model, so for data manipulation jQuery always infers with DOM. Hence there is a need for a library that provides a more sophisticated means of communication between the UI and the underlying data model; that solution is Knockout.
Understanding Knockout
Knockout is a JavaScript library that helps create rich, desktop-like web UIs. It simplifies user interactions and is fully amenable to any data source changes. Using observations, Knockout helps the UI stay in sync with the underlying data model.
- Knockout is a free, open source JavaScript library.
- Knockout implements the MVVM pattern for JavaScript that we discussed in Chapter 1.
- Knockout is a small and lightweight library.
- Knockout is compatible with Internet Explorer 6+, Firefox 2+, and the latest versions of Chrome, Safari, and Opera.
- Knockout provides a complementary, high-level way to link a data model to a UI.
- Knockout itself doesn’t depend on jQuery, but can certainly use jQuery at the same time.
Knockout is entirely built on three core concepts (see Figure 2-1):
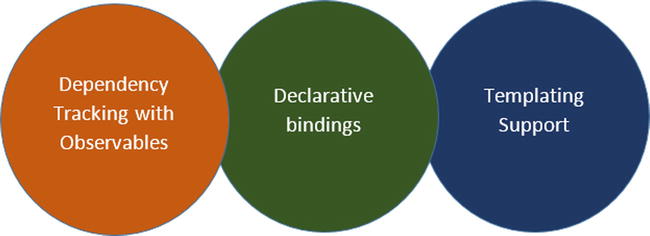
Figure 2-1. Knockout core concepts
- Dependency tracking with observables: If one is familiar with XAML technologies, then this concept can be related to the INotifyPropertyChanged interface. For instance, if a property is loaded or changed, it will automatically notify the UI to bond to it in one or more places whereas the changes have been made. The UI will reflect the changes and will also have an option for whether the UI can change the value to automatically update the source object again.
- Declarative bindings: This concept helps in connecting parts of the UI to the data model in a simple and convenient way. This is where source objects are bonded to the target elements through the HTML itself. Instead of using JavaScript code to find an element by ID, or by some other means embedded in the value by a JavaScript object with JSON data and then pushing it in and pulling it out of the UI, it can be accomplished through declarative bindings. This is done within the HTML binding by setting the element’s ID to fetch particular attributes, properties, or values from the source object.
- Templating: Repetitive structures in a web page, like rows or list boxes, can created using templates. This is similar to item templates or data templates in WPF/Silverlight and XAML-based Windows 8 Apps. jQuery templates can also be used as a template with Knockout along with the native templates with Knockout or some other templating engine.
Creating the Pocket (Read It Later) App
Pocket is a very popular bookmark service that allows users to catalog articles and create a personal archive of items they are interested in. In this chapter, we create a Windows 8 App for Pocket bookmark services named Read It Later using HTML5, JavaScript, CSS, and Knockout JS.
Read It Later is a very basic app that displays bookmarked articles (see Figure 2-2). In building this app, we will be learning about some of the following Windows 8 concepts and practices.
- Learn to allow apps to use Internet authentication and authorization protocols like OpenID or OAuth to connect to online identity providers like Facebook, Twitter, Google, and Microsoft Account.
- Learn to use the WinJS.xhr JavaScript function to make cross-domain requests and intranet requests. Some of the common scenarios are uploading and downloading files and connecting to a web service to GET and POST to REST API.
- Learn JavaScript data binding by data-binding data from JavaScript objects to HTML elements.
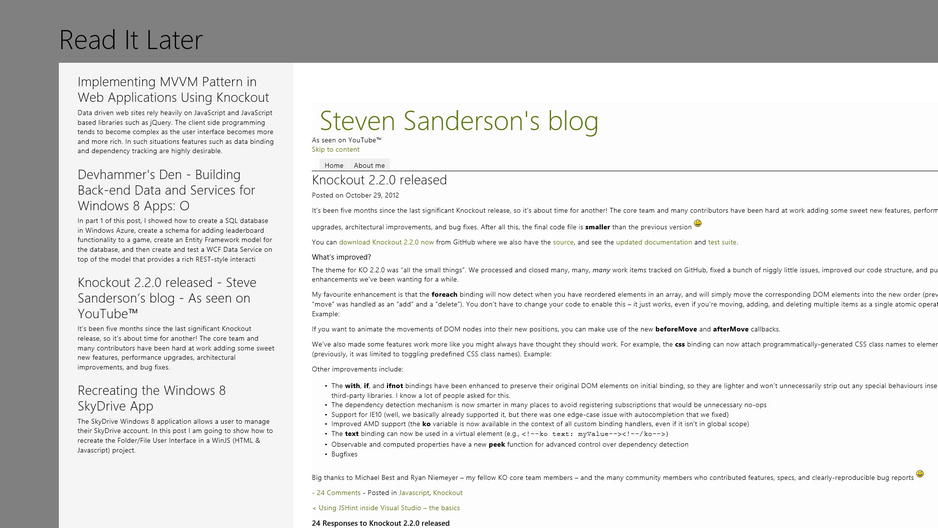
Figure 2-2. Read It Later Windows 8 App displays articles from Pocket bookmark services
Using tools and extensions not only makes the developer’s life easier; it also increases productivity and reduces startup time for new projects. Let’s take a look at some of the tools and extensions that we can use in our Read It Later app.
JsFiddle is a free online shell editor that eases writing JavaScript code by creating convention environs based on JavaScript frameworks and for snippets built from HTML, CSS, and JavaScript, hosted at http://jsFiddle.net. This free code-sharing tool has an interface that is divided into four sections, as shown in Figure 2-3.
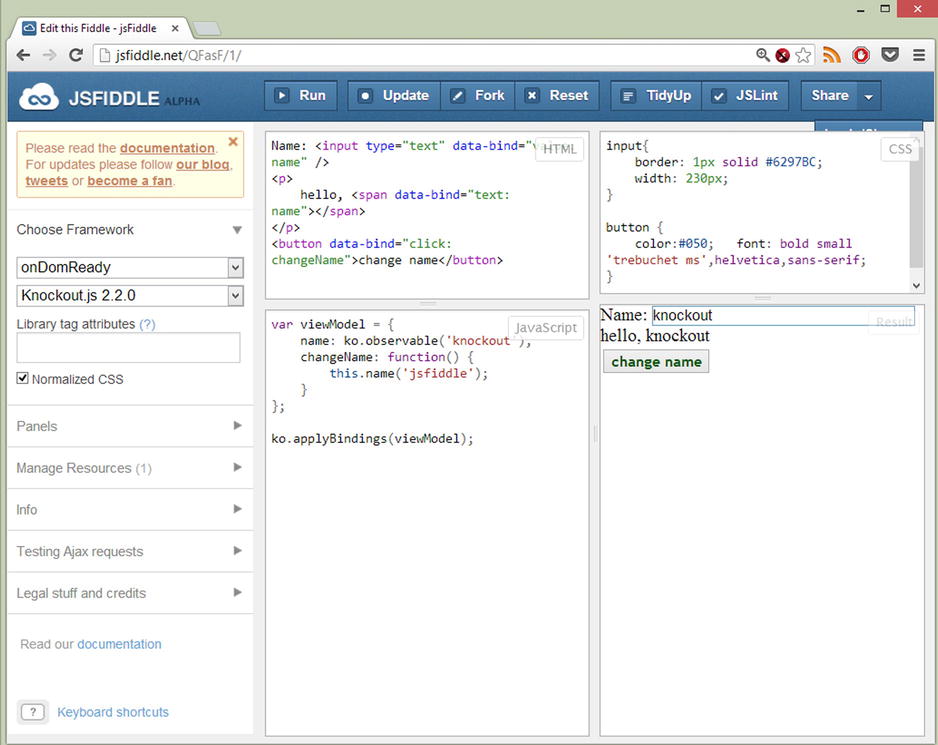
Figure 2-3. JsFiddle Online Editor tests the knockout dependency tracking and declarative binding
![]() Note Visit http://jsfiddle.net/QFasF/1/ to experiment with the live sample.
Note Visit http://jsfiddle.net/QFasF/1/ to experiment with the live sample.
Sometimes when there is a need to build a POC or ideas quickly, that’s where JsFiddle comes in handy, as you can quickly set up and run the code without having a full-blown IDE. Out of the box, JsFiddle provides an option to share the work, along with built-in version control, debugging, and code forking.
JsFiddle has the ability to share and save the code with a unique URL generated and one can choose a default JavaScript framework like JQuery, Mootools, Prototype, Vanilla, and so on, and can also add new resources like the Knockout plug-in or a JQuery UI.
One of the best things about development with JavaScript inside Visual Studio 2012 is using the various Visual Studio extensions that can enhance the experience. The following are some of the recommended extensions.
- NuGet : This free extension is used to manage third-party libraries and references.
- Web Essentials : This is used for code collapsing, adding vendor-specific CSS properties and much more.
- JSLint : This linting tool for JavaScript helps to spot mistakes in the code.
- CSSCop : This makes it easy to perceive the best practices for writing stylesheets and helps users catch common issues that affect browser compatibility.
- Resharper : This is one of the best productivity tools for Visual Studio, but it is not free.
Getting Started
To start, let’s create a new Windows Store Blank App (JavaScript) project and name it ReadItLater. Blank Application (see Figure 2-4) is a single-page project for Windows 8 App that has no predefined controls or layouts.
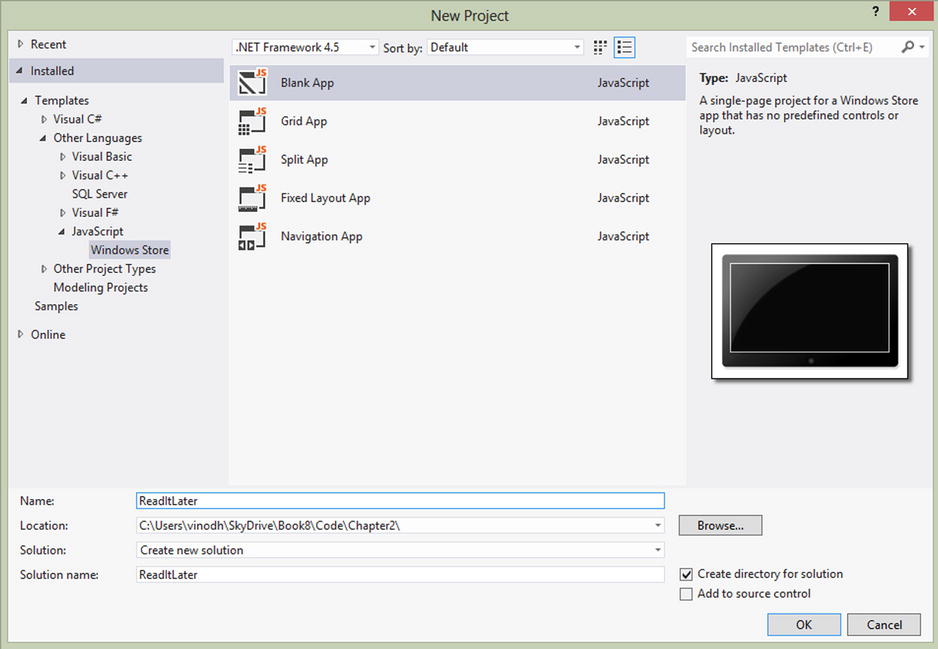
Figure 2-4. Visual Studio templates for JavaScript creates a Blank App with HTML,CSS, and JavaScript files
![]() Note Like Blank Application, Visual Studio also provides a few more templates, like Split Application, Fixed Layout Application, Navigation Application, and Grid Application.
Note Like Blank Application, Visual Studio also provides a few more templates, like Split Application, Fixed Layout Application, Navigation Application, and Grid Application.
Blank App incudes files that are essential for the Windows 8 Apps using JavaScript, as shown in Figure 2-5.
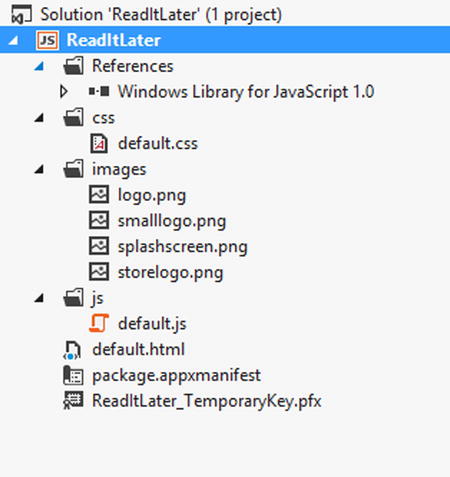
Figure 2-5. Visual Studio Soution Explorer displays the default files and project structure for the Blank App template
KnockoutJS can be referenced to the project in two ways: one by getting the Knockout.js file directly from http://knockoutjs.com and other by using NuGet to add reference to Knockout and JQuery as shown in Figure 2-6.
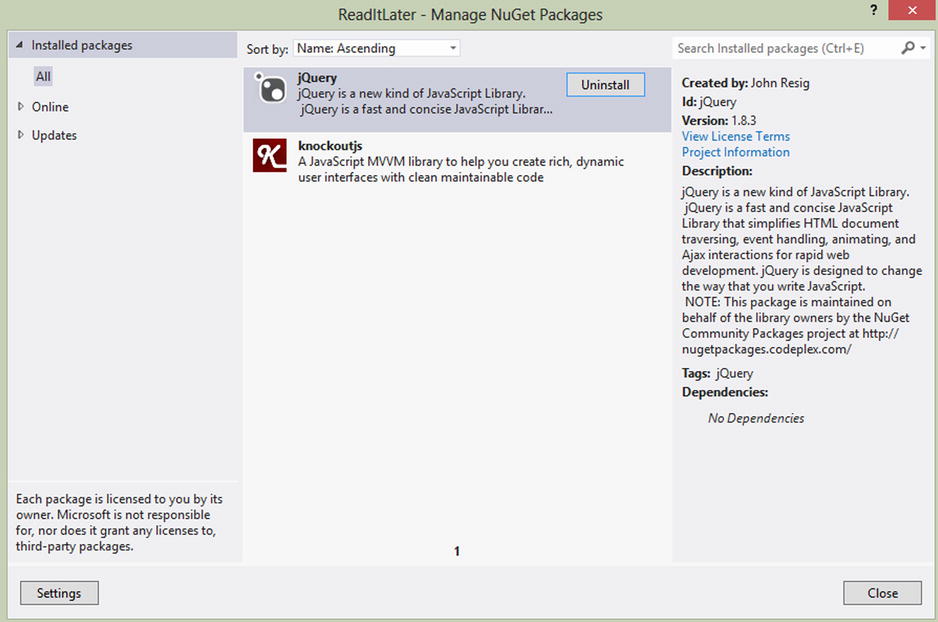
Figure 2-6. Using NuGet to add a reference to Knockoutjs and JQuery
As you saw in Figure 2-4, the Visual Studio Blank App template creates default.html as our app start page. This page contains references to the app’s code files and style sheets. We update this page layout as shown in Listing 2-1. The layout consists of a header section that displays the app title. The right column has the necessary HTML elements for displaying list of bookmarked articles and the left column shows the content of the selected article.
Listing 2-1. Updated default.html Page with Two-Column Layout
<!DOCTYPE html>
<html>
<head>
    <meta charset="utf-8" />
    <title>Read It Later</title>

    <!-- WinJS references -->
    <link href="//Microsoft.WinJS.1.0/css/ui-dark.css" rel="stylesheet" />
    <script src="//Microsoft.WinJS.1.0/js/base.js"></script>
    <script src="//Microsoft.WinJS.1.0/js/ui.js"></script>

    <!-- ReadItLater references -->
    <link href="/css/default.css" rel="stylesheet" />
    <script src="/js/default.js"></script>

    <!--Thirdy Party Reference -->
    <script src="/scripts/jquery-1.8.3.js"></script>
    <script src="/scripts/knockout-2.2.0.js"></script>

</head>
<body>
    <div
        class="fragment homepage">
        <header
            aria-label="Header content" role="banner">
            <button
                class="win-backbutton"
                aria-label="Back"
                disabled
                type="button" />
            <h1 class="titlearea win-type-ellipsis">
                <span class="pagetitle">Read It Later</span>
            </h1>
        </header>
        <section
            aria-label="Main content"
            role="main">
            <div class="colmask leftmenu">
                <div class="colleft">
                    <!--left col-->
                    <div class="col1"
                        data-bind="with: selectedItem">
                        <!-- Main Content Start-->
                        <h2>
                            <span data-bind="text: $root.ShowContent(url)"/>
                        </h2>
                            <div id="siteloader"></div>
                        <!-- Main Content end -->
                    </div>
                      <!--right col-->
                    <div class="col2">
                        <!-- Articlet List start -->
                        <div data-bind="foreach: model">
                            <div data-bind="foreach: keys"
                                class="link-container">
                                <h2>
                                    <span  data-bind="click: $root.setItem, text: title" />
                                </h2>
                                <p><span data-bind="text: excerpt"></span></p>
                            </div>
                        </div>
                         <!-- Articlet List End -->
                    </div>
                </div>
            </div>
        </section>
    </div>
</body>
</html>
Enabling Windows 8 Web Authentication
The Pocket service implements oAuth authorization to access the data when the Pocket API is called. The calls to the APIs are signed with encrypted details that include an expiry time. There are many services similar to Pocket, like Facebook, Digg, and Google, that use oAuth and learning oAuth authorization will be a great help in developing Windows 8 Apps that consume web services.
The first step is to register the app with the Pocket service. A consumer key is provided on registration as shown in Figure 2-7.
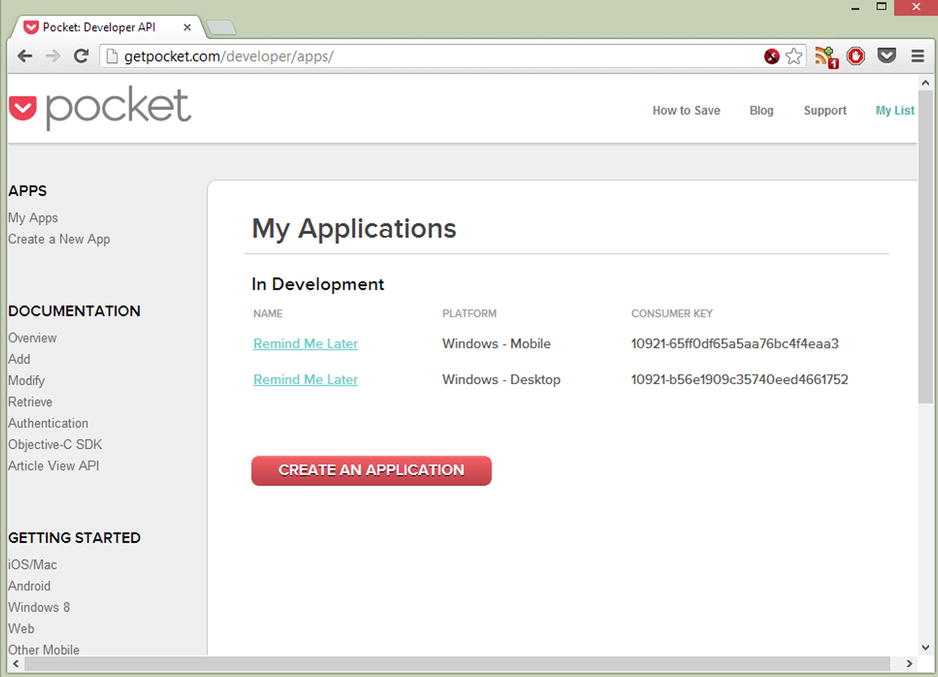
Figure 2-7. Pocket developer dashboard
To begin the process, one needs to pass the consumer key and redirect URL to the service to acquire a Request Token. WinRT provides the WinJS.xhr function to send cross-domain requests and intranet requests. WinJS.xhr abstracts all the complexity of XMLHttpRequest and provides a simple interface that uses Promises to handle the asynchronous responses, as shown in Listing 2-2.
Listing 2-2. WinJS.xhr Function Used to Consumer Key as HTTP POST to Pocket Service
    function launchPocketWebAuth() {
    var pocketReqUrl = " https://getpocket.com/v3/oauth/request ";
    var callbackURL = "readitlater123:authorizationFinished";
    var dataString = "consumer_key=" + consumer_id
                        + "&redirect_uri=" + callbackURL;
    try {
        WinJS.xhr({
            type: "post"
            , data: dataString
            , url: pocketReqUrl
            , headers: {
                "Content-type": "application/x-www-form-urlencoded; charset=UTF8"
            }
            }).done(
                function (request) {
                    request_code = getParameterByName("code", request.responseText);
                    var pocketAuthUrl = " https://getpocket.com/auth/authorize?request_token= ";
                    var authCallbackURL = " http://www.myweb.com ";
                    pocketAuthUrl += request_code
                        + "&redirect_uri=" + encodeURIComponent(authCallbackURL)
                        + "&webauthenticationbroker=1";
                    var startURI = new Windows.Foundation.Uri(pocketAuthUrl);
                    var endURI = new Windows.Foundation.Uri(authCallbackURL);
                    Windows.Security.Authentication.Web.WebAuthenticationBroker.authenticateAsync(
                        Windows.Security.Authentication.Web.WebAuthenticationOptions.useTitle,
                        startURI,
                        endURI).then(callbackPocketWebAuth, callbackPocketWebAuthError);
                },
                function error(error) {
                    //handle error here
                },
                function progress(result) {
                    //Do somehting to show the progress
                });

    }
    catch (err) {
        /*Error launching WebAuth"*/
        return;
    }
}
One of the prerequisites of the Pocket API is that we have to POST the request and set the request header manually to application/x-www-form-urlencoded; charset=UTF8 as shown in Listing 2-2. Different services will have different requirements, and the best way to determine what they are is to look in the developer documentation provided by the service.
Exchanging Request Token for Access Token
The next step is to exchange a request token with an access token. WinRT has a built-in API named Web Authentication Broker that provides the necessary infrastructure for apps to use Internet authentication and authorization protocols such as OAuth and OpenID. When the Web Authentication Broker is invoked using the WebAuthenticationBroker.authenticateAsync function (see Listing 2-3), the user see a dialog box like the one shown in Figure 2-8, which displays the Pocket service authorization page for the user to sign in.
Listing 2-3. Invoking Pocket Login Windows Using Web Authentication Broker
var pocketAuthUrl = " https://getpocket.com/auth/authorize?request_token= ";
var authCallbackURL = " http://www.myweb.com ";
pocketAuthUrl += request_code
    + "&redirect_uri=" + encodeURIComponent(authCallbackURL)
    + "&webauthenticationbroker=1";
var startURI = new Windows.Foundation.Uri(pocketAuthUrl);
var endURI = new Windows.Foundation.Uri(authCallbackURL);
Windows.Security.Authentication.Web.WebAuthenticationBroker.authenticateAsync(
    Windows.Security.Authentication.Web.WebAuthenticationOptions.useTitle
    , startURI
    , endURI).then(callbackPocketWebAuth, callbackPocketWebAuthError);
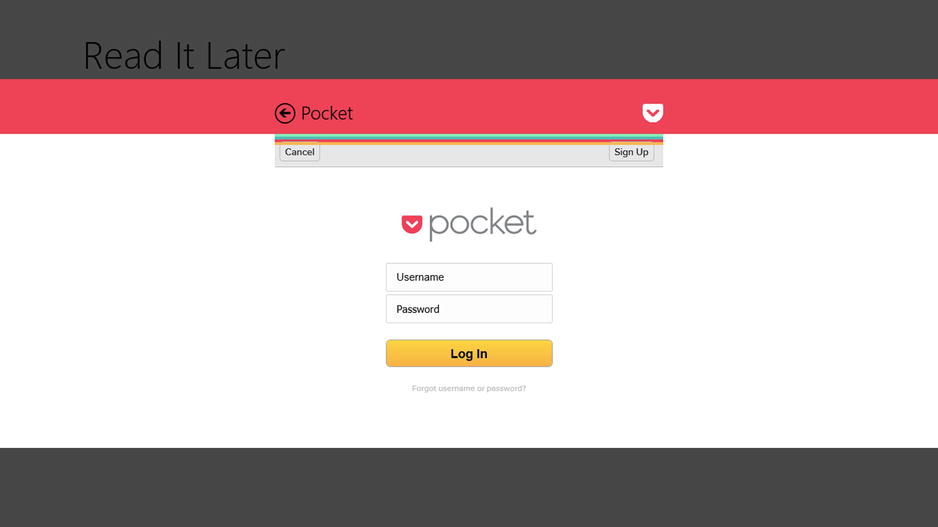
Figure 2-8. Modal dialog box opens at the start of the app to authorize the user
Once logged into the Pocket service, and the Read It Later app has the necessary authorization to use the service, the dialog box closes and the Pocket service will return an access token as shown in Listing 2-4. This access token will be stored locally for future requests.
Listing 2-4. Callback Method That Stores the Access Token
function callbackPocketWebAuth(result) {
    var pocketAuthUrl = " https://getpocket.com/v3/oauth/authorize ";
    var dataString = "consumer_key=" + consumer_id
        + "&code=" + request_code;

    WinJS.xhr({
        type: "post"
        , data: dataString
        , url: pocketAuthUrl
        , headers: { "Content-type": "application/x-www-form-urlencoded; charset=UTF8" }
    }).done(
            function (request) {
                var access = request.responseText;
                access_token = getParameterByName("access_token", access);
                var username = getParameterByName("username", access);
                var localSettings = applicationData.localSettings;
                localSettings.values["pocket_access_token"] = access_token;
                localSettings.values["pocket_username"] = access_token;
                retriveList(access_token);
            },
            function error(error) {
                //handle error here
            },
            function progress(result) {
                //Do something to show the progress
            });

    if (result.responseStatus == 2) {
        response += "Error returned: " + result.responseErrorDetail + "
";
    }
}
![]() Note Pocket provides a set of Rest APIs to accomplish various actions like retrieving, adding, modifying, and deleting bookmarks. For more details go to http://getpocket.com/developer/docs/overview.
Note Pocket provides a set of Rest APIs to accomplish various actions like retrieving, adding, modifying, and deleting bookmarks. For more details go to http://getpocket.com/developer/docs/overview.
Retrieving Bookmarks Using oAuth Credentials (Access Token)
For retrieving the bookmarks, we will post the consumer ID along with the access token to the Pocket /v3/get endpoint using WinJS.xhr as shown in Listing 2-5. This request responds with a JSON list object that contains titles and URLs of each item as the detailType specified in the request URL is simple.
Listing 2-5. Retrieving Bookmarks from the Pocket Service
function retrieveList(token) {
    var pocketGetUrl = " https://getpocket.com/v3/get ";
    var dataString = "detailType=simple&consumer_key=" + consumer_id
        + "&access_token=" + token;
    WinJS.xhr({
        type: "post"
        , data: dataString
        , url: pocketGetUrl
        , headers: { "Content-type": "application/x-www-form-urlencoded; charset=UTF8" }
    })
    .done(
        function (response) {
            var json = JSON.parse(response.responseText);
            ko.applyBindings(new ArticleViewModel(response.responseText));
        },
        function error(error) {
            //handle error here
        },
        function progress(result) {
            //Do something to show the progress
        });
}
![]() Note Visit http://getpocket.com/developer/docs/v3/retrieve to learn more about the various types of information that can be accessed using Pocket API.
Note Visit http://getpocket.com/developer/docs/v3/retrieve to learn more about the various types of information that can be accessed using Pocket API.
Defining the ViewModel and Binding It to the View
Now that we have the data from the Pocket service, the next step is to bind the data to the View using the KnockoutJS framework. For this we create a ViewModel ArticleViewModel (see Listing 2-6). ArticleViewModel will have a selectedItem observable to track the currently selected article and a method ShowContent that will display the article content in the right column.
Listing 2-6. Defining ArticleViewModel with Function and Properties
function ArticleViewModel(data) {
    var self = this;
    self.selectedItem = ko.observable();
    self.setItem = function (item) {
        self.selectedItem(item);
    }

    self.ShowContent = function (url) {
        $.get(url, function (data) {
            var szStaticHTML = toStaticHTML(data);
            $('#siteloader').html(szStaticHTML);
        });
    };
    self.model = ko.utils.arrayMap(data, function (jsonData) {
        return new ListStatus(jsonData.list);
    });
}
Also to make the JSONObject useful in Knockout, we need to do some computing. For that we use Knockout’s mapping plug-in to map the value of the array of objects by using ko.utils.arrayMap (see Listing 2-6), which executes a function for each item in an array and pushes the result of the function to a new array that is returned, as shown in Listing 2-7.
Listing 2-7. Mapping the JavaScript Object to the ArticleViewModel
function Item(item) {
        var self = this;
        self.title = item.given_title;
        self.url = item.given_url;
        self.excerpt = item.excerpt;
    }

    function ListStatus(list) {
        var self = this;
        self.keys = ko.observableArray(ko.utils.arrayMap(list, function (article) {
            return new Item(article);
        }));
    }
![]() Note The mapping plug-in gives us a straightforward way to map the Pocket bookmark JavaScript object into an ArticleViewModel with the appropriate observables instead of us manually writing our own JavaScript code that creates a view model based on the data.
Note The mapping plug-in gives us a straightforward way to map the Pocket bookmark JavaScript object into an ArticleViewModel with the appropriate observables instead of us manually writing our own JavaScript code that creates a view model based on the data.
To tie the view model to the view we simply need to call the KnockoutJS applyBinding function and pass it in a new instance of the ArticleViewModel that takes the JSON object from the Pocket service as a parameter (see Listing 2-8).
Listing 2-8. ArticleViewModel Object Is Used to Bind the Data to the Page
ko.applyBindings(new ArticleViewModel(response.responseText));
The ko.applyBindings method activates Knockout and wires up the view model to the view.
Rendering Article List Using foreach Binding
Now that we have a ViewModel, we create the bindings as shown in Listing 2-9 to generate the bookmared article list in the left column. In Knockout.js, we do this by adding data-bind attributes to HTML elements. The foreach binding iterates through the array and creates child elements for each object (read article) in the array.
Listing 2-9. Binding the Article List to the HTML Element
<!-- Article List start -->
<div data-bind="foreach: model">
    <div data-bind="foreach: keys" class="link-container">
        <h2><span  data-bind="click: $root.setItem, text: title"></span></h2>
        <p><span data-bind="text: excerpt"></span></p>
    </div>
</div>
<!-- Article List End -->
Bindings on the child elements can refer to properties on the array objects; for example, the <div> element occurs within the scope of the foreach binding. That means Knockout.js will render the element once for each article in the articles array. All of the bindings within the <div> element refer to that article instance. We use the text binding to set the values for article title and excerpt. The <span> element is also bound to the click binding, where the article instance is passed as a parameter to each function.
Now with all the codes in place, when we run the Read It Later app, it shows the Pocket service login page (see Figure 2-8) and after authenticating the user, the bookmarked articles by the logged user will be retrieved from the Pocket service and will be displayed in the app as shown in Figure 2-2.
Conclusion
This chapter introduced us to developing a Windows 8 App using HTML, JavaScript, and CSS, not in a traditional approach of using WinJS UI controls, but instead using a JavaScript MVVM framework, KnockoutJS. In Chapters 5 and 8 we will see the recommended approach for developing a data-driven Windows 8 App using HTML, JavaScript, and CSS. Also in this chapter we learned to implement oAuth authorization, using JsFiddle as an online HTML editor and various Visual Studio extensions to complement our app development experience.
In the next chapter we discuss various data storage options that can be considered while building Windows 8 Apps along with the various WinRT APIs that can be used.