
So far, you've learned how to create and reorganized projects. Everything you've learned so far deals exclusively with the project document. But project documents don't contain anything that generates code or anything else for that matter. To do that, you have to add sources—files that contain actual content—to the project.
Note
Except for the project structure and settings, everything used to build a project comes from source files stored somewhere else.
Program files, headers, folders, libraries, frameworks, window layouts, image files, Info.plist files, help files, documentation, QuickTime movies, you name it—every piece used to build your final product comes from separate files and folders stored somewhere else. They are not stored in the project document.
The information stored in the project document is a reference to those sources. Whenever Xcode needs the content of any source file in your project, it uses its reference to locate and access it. In this chapter, you will learn about the different kinds of references and how to create, organize, and maintain them.
Every file, folder, and framework that you see in the project group of your project window represents a reference to a file or folder in your file system. Each reference consists of two attributes:
Path
Reference type
The path attribute is a POSIX path, including its name, to the file or folder. The reference type determines from where the path originates. There are five reference types:
Absolute references are the easiest to understand. The path of an absolute reference specifies an absolute path to the source file or folder. Absolute references are usually used for referencing system components, such as libraries and frameworks, that never move. You would never use an absolute reference to a source file that you've created.
Project-relative references are also pretty easy to comprehend. A project-relative path is the path from the root folder of the project to the source file or folder. In the project pictured in Figure 5-1, the reference to the file libz.1.dylib is set to project-relative.
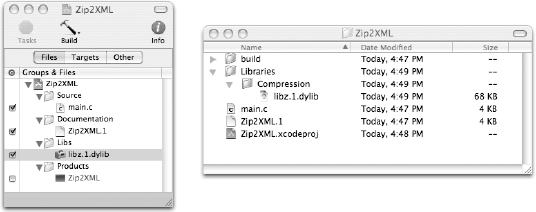
The path of the reference is Libraries/Compression/libz.1.dylib. That is the relative path from the project's folder to the library file.
Enclosing-group references are where references get complex. The basic definition is simple. In addition to defining a logical container in the project structure group, each source group has a reference to a real folder on the file system. Any item contained in that group can have a reference that is relative to the enclosing group's folder. This includes the folder references of subgroups. You can see the recursive nature of this definition. Any reference can be relative to the folder referenced by its enclosing group, which itself can be relative to its enclosing group, which can be relative to its enclosing group, and so on. You will see many more examples of enclosing group references as you read through this chapter.
The last two reference types are specialized types that are more fully explained in other chapters. They are mentioned here only for completeness. For most of your Xcode development, you will only be working with the first three references types.
Source-tree references are just like project-relative references, except that the starting location is defined by a named source tree folder. Source trees are ways of organizing folders of source files outside of the project folder. They can used to share source between projects or between developers. Source trees are discussed in detail in Chapter 18. For now, just know that source-tree paths are paths relative to some predefined location on the disk and otherwise act just like project-relative paths.
Product references are relative to the location of the active product build folder. The location of a product produced by a target is fluid because Xcode can produce variations of a target based on different build configurations. Xcode keeps these variations separate by outputting each variation to its own folder. The product folder reference changes depending on which build configuration is active. When Xcode creates references in the special Products group, they are automatically set to have product references. You would normally never need to create your own product references, but if for some reason you needed to add a product, or some piece of a product, to a special build phase, it should have a product reference. This ensures that the reference points to the version of the product that corresponds to the current build configuration.
You can examine the path and reference type of any source item in the project using the Inspector palette or an Info window. The General tab contains the reference attributes. Figure 5-2 shows the reference information for a C source file.

To illustrate how references can be used in a project, this section uses the very simple project pictured in Figure 5-3.
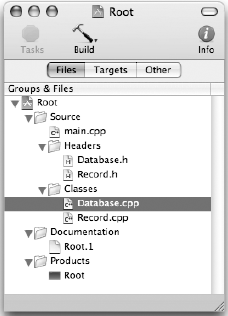
This project is, ostensibly, a C++ program built from three source files: main.cpp, Database.cpp, and Record.cpp. The two class files have matching header files, and there is a documentation file. Use this project to explore different configurations of source files and references.
This section organizes this project four different ways, using different kinds and combinations of references. Open the Root1, Root2, Root3, and Root4 projects as you work through this section to explore these projects at the same time. As you progress through these different reference schemes, keep the following in mind:
Source items and groups are objects in the project. Source files and folders are the physical items in the file system.
Every source item has a reference to its source file.
Every source group references a folder.
The name of a source group, and its location in the project structure group tree, is completely independent of the name and location of the folder it references.
The folder referenced by the top project structure group (also known as the project group) is always the project folder.
In Chapter 3, you created, renamed, and deleted source groups. You then moved groups around and moved source files into and out of groups. If you used what you've learned in Chapter 3 to create the example project previously shown in Figure 5-3, you would end up with a project folder that looks like Figure 5-4.

You were probably unaware that every group you created had a folder reference. The Database.cpp file is relative to the folder referenced by group group, which is relative to the folder referenced by the Source group, which is relative to the folder referenced by the project structure group.
At this point, you probably have two questions: where are all of these folders that are being referenced and why did all of the files end up in the project folder? The answer is explained by the default settings for new groups.
When you create a new group using the File
It doesn't matter how you reorganize the groups, every one will (indirectly) reference the folder of the top group. This is always the project structure group, and that always references the project folder.
Thus, the default organization of Xcode projects places all of the source files directly in the project folder. You are free to reorganize the hierarchy of your source groups and items to any depth you want; the organization of the actual files will remain flat. For small- to medium-sized projects that are self-contained and have no duplicate file names, this is the easiest organization. It is uncomplicated and shouldn't cause any surprises. Better yet, you don't have to worry about source group folder references. If your project falls into this category, feel free to skip ahead to the next section now and come back here when your projects get more complex.
However, if you want to control the physical organization of the files in your project, read on.
Figure 5-6 shows a reorganization of the source files by type. All of the C++ source files in the Root2 project have been moved into the Source folder and the one documentation file has been moved into the Docs folder.
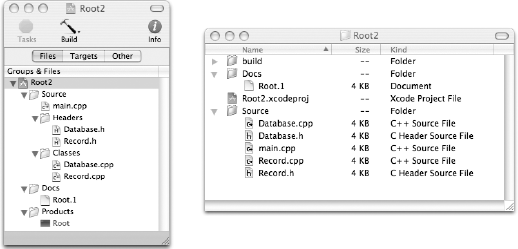
The folder references for the Source and Docs groups were changed from enclosing group to project-relative. The paths of those groups were set to Source and Docs, respectively. To illustrate the relationship between the items and groups, the references of the items are listed in the following table.
Item | Reference Type | Path | Complete Path |
|---|---|---|---|
Root2 | fixed | project | ~/Root2 |
Source | Project-relative | Source | ~/Root2/Source |
Headers | Enclosing-group | none | ~/Root2/Source |
Classes | Enclosing-group | none | ~/Root2/Source |
Docs | Project-relative | Docs | ~/Root2/Docs |
main.cpp | Enclosing-group | main.cpp | ~/Root2/Source/main.cpp |
Database.h | Enclosing-group | Database.h | ~/Root2/Source/Database.h |
Database.cpp | Enclosing-group | Database.cpp | ~/Root2/Source/Database.cpp |
Record.h | Enclosing-group | Record.h | ~/Root2/Source/Record.h |
Record.cpp | Enclosing-group | Record.cpp | ~/Root2/Source/Record.cpp |
Root.1 | Enclosing-group | Root.1 | ~/Root2/Docs/Root.1 |
In essence, this is a variation of the default references you looked at in Root1. The subgroups, Headers and Classes, are still relative to the enclosing group with empty paths. These groups, like all of the groups in the first project, refer to the folder of whatever group they are contained in, but instead of letting this percolate all the way up to the project group, the folder reference for the source group has been set to be the Source folder inside the project folder.
Likewise, the Docs group now references the Docs folder inside the project folder.
The main.cpp item is relative to its enclosing group, which is the Source group. Thus, the main.cpp file is in the Source folder. Database.h is also relative to its enclosing group, which is the Headers group. But as you just saw, Headers references the folder of its enclosing group, Source, which puts the Database.h file in the same folder as main.cpp. Database.cpp, Record.h, and Record.cpp follow suit.
Interestingly, the reference type of the Source and Docs groups could either be project-relative or enclosing-group, and the organization would be identical. That's because these groups are all subgroups of the project structure group, which is synonymous with the project folder. The situation would change if the Source or Docs groups were moved.
This is a good organization for projects of moderate size, or where you would like to keep the main project folder uncluttered. Source files can be subdivided by type (such as program source, NIB files, property lists, image files, and help documents), using top-level groups that reference a subfolder in the project. By using the default references for new subgroups, you can create any arbitrary hierarchy of groups and files within the source group, while the physical files will all be in the one Source folder.
For large projects, the method most often employed for regaining some sense of control over the project's source files is to organize them into functional hierarchies. Java projects are naturally organized this way. The Java convention is to store each Java source file in a folder that has the same name as the package the class belongs in. The functional hierarchy of packages and classes parallels a hierarchy of folders and file names.
Figure 5-7 shows the reorganized project and folder structure. You'll have to use your imagination and pretend that there are scores of other source files, with base and subclasses in each group, and other groups like Query, Connection, and Utilities. In the real world, there would be little to gain in spending this much effort organizing a project containing only six source files.

In this project, you really want the organization of the groups to parallel the organization of the folders on the disk. To accomplish this, all of the groups have enclosing group references. But instead of having empty paths, the path of each group references the subfolder immediately contained within the enclosing group's folder. The following table lists the modified references.
Item | Reference Type | Path | Complete Path |
|---|---|---|---|
Root3 | fixed | project | ~/Root3 |
Source | Enclosing-group | Source | ~/Root3/Source |
Database | Enclosing-group | Database | ~/Root3/Source/Database |
Records | Enclosing-group | Records | ~/Root3/Source/Database/Records |
Docs | Enclosing-group | Docs | ~/Root3/Docs |
main.cpp | Enclosing-group | main.cpp | ~/Root3/Source/main.cpp |
Database.h | Enclosing-group | Database.h | ~/Root3/Source/Database/Database.h |
Enclosing-group | Database.cpp | ~/Root3/Source/Database/Database.cpp | |
Record.h | Enclosing-group | Record.h | ~/Root3/Source/Database/Records/Record.h |
Record.cpp | Enclosing-group | Record.cpp | ~/Root3/Source/Database/Records/Record.cpp |
The Record.cpp file is contained in the folder referenced by the Records group. The folder reference of the Records group specifies the Records subfolder inside the folder of its enclosing group. The enclosing group is Database, which references the Database folder inside the folder of its enclosing group. The Database group is contained in the source group that references the Source subfolder inside the folder of its enclosing group. That group is, thankfully, the project structure group that always references the project folder. Through four layers of indirection, Xcode determines that Record.cpp is stored at ~/Root3/Source/Database/Records/Record.cpp.
The core concept is the use of groups that all assume a corresponding subfolder relative their enclosing group. Why you do this will become more evident when it's time to reorganize the project. As an example, you may decide that the Records group should be a peer of Database rather than a subgroup. If the Records group was moved into the source group and the Records subfolder was moved into the Source folder, all of the references would still be valid.
You might think that setting up all of these references would be difficult and tedious—especially for the imagined project containing dozens, possibly hundreds, of source files. Fear not. Xcode has tools, which you will soon use, that create any number of nested groups exactly in this fashion with a single command.
Conveniently, all of the references so far have been to folders inside the folder of the enclosing group or project. But this does not have to be the case. In Figure 5-8, the files in the Root4 project have been rearranged again. The Records folder containing Record.h and Record.cpp has been moved to the Source folder, making it a peer of the Database folder.
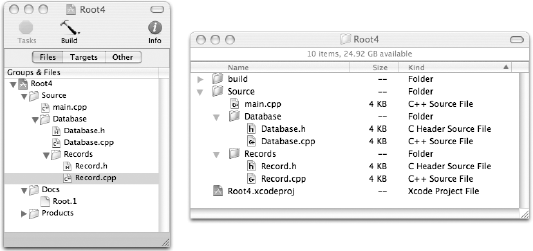
The Records group in the project has not been moved; it is still a subgroup of the Database group. This breaks the reference to the Records folder and to the files it contains, because those are both relative to the Records folder. To fix the reference, the path of the Records group was changed to ../Records. The following table lists the modified references.
Item | Reference Type | Path | Complete Path |
|---|---|---|---|
Root4 | fixed | project | ~/Root4 |
Source | Enclosing-group | Source | ~/Root4/Source |
Database | Enclosing-group | Database | ~/Root4/Source/Database |
Records | Enclosing-group | ../Records | ~/Root4/Source/Records |
Record.h | Enclosing-group | none | ~/Root4/Source/Records/Record.h |
Record.cpp | Enclosing-group | none | ~/Root4/Source/Records/Record.cpp |
Paths are standard POSIX paths that can refer to the current (.) and parent (..) folders. The path ../Records path starts at the Database folder, moves to the parent of that folder (Source), then to the sub-folder named Records.
In a little more extreme example, the Docs folder has been removed from the Root4 project entirely, and the path of Docs group has been changed to ../Root3/Docs. The following table lists the new paths.
Item | Reference Type | Path | Complete Path |
|---|---|---|---|
Root4 | fixed | project | ~/Root4 |
Docs | Project-relative | ../Root3/Docs | ~/Root3/Docs |
The reference in the Docs group now points to a subfolder in the Root3 project, in the same folder as the Root4 project (see Figure 5-9).

The problem with relative paths like this is the danger of breaking the reference when project folders are moved or renamed. If the project folder Root3 is moved, the reference to the Docs folder in Root4 no longer works.
It's just as important to know what kind of references you should not create. I left this last project open overnight, and some mischievous pixies snuck in and decided they would have a little fun with it.
At first glance, the Root Rot project looks pretty much like project Root4, as you can see in Figure 5-10.

All of the references are valid, and the project builds and runs. So things can't be all bad, can they? The following table lists the references in the project.
Item | Reference Type | Path | Complete Path |
|---|---|---|---|
Root Rot | fixed | project | ~/Root Rot |
Source | Absolute | ~/Root Rot/Source | ~/Root Rot/Source |
Database | Enclosing-group | Database | ~/Root Rot/Source/Database |
Record.h | Enclosing-group | ../Records/Record.h | ~/Root3/Source/Records/Record.h |
Record.cpp | Project-relative | Source/Records/Record.cpp | ~/Root3/Source/Database/Record.cpp |
Docs | Project-relative | ../Root3/Docs | ~/Root3/Docs |
Root.1 | Enclosing-group | ../../Root Rot/Docs/Root.1 | ~/Root Rot/Docs/Root.1 |
The source group has an absolute reference to the Source folder. If the project was renamed or moved, or any folder names that contain it were altered, this reference (and every reference that depends on it) would break.
The Database group references the Database subfolder relative to the Source folder. It and the references to Database.h and Database.cpp are as they were in the Root4 project.
Notice that the Records group was deleted, but the Records folder is still in the project. So how do the items Records.h and Records.cpp reference their respective files? The path to Records.h was changed to ../Records/Records.h. Being relative to the Database folder, the path traverses to the Database parent, and then into the Records subfolder. Using a slightly different approach, the reference of the Record.cpp item has been made project-relative with a path of Source/Records/Record.cpp. If the Database folder were renamed, the reference to Records.h would break, but the reference to Records.cpp would still be valid.
In the Docs group, you'll find true insanity. Like the Root4 example, the Docs group contains a project-relative reference to a folder outside the project folder. In a truly diabolical move, the reference to the Root.1 item has been made relative to the enclosing group, but with a path that traverses up the folder tree and back into the Docs folder of this project. So the project folder contains a file that is dependent on the name and location of not only a second project, but of this project as well.
It has been said that the difference between programming in BASIC and programming in C is the difference between using safety scissors and a surgeon's scalpel. You can't perform brain surgery using safety scissors, but you also don't have to count your fingers afterwards. Xcode, like many powerful tools, gives you great freedom in how you construct your projects, regardless of how ill-conceived that construction might be.
Despite its permissiveness, Xcode provides a number of tools for creating orderly and maintainable projects. It also has a few tricks for whipping projects like Root Rot back into shape.
Xcode uses four different types of source items to organize and reference the files in a project.
Source Item Type | Reference |
|---|---|
Source File | Any file used to build the project |
Source Group | A folder that members of the group can refer to |
Source Folder | A folder used to build the project |
Framework | A folder containing a framework |
A source file item is a reference to a data file on the disk. It can be a program source file, a header, a NIB file, an XML file, an image file, or a font—it doesn't matter. Every source file item references exactly one file.
You've already spent some time working with source groups. They are the logical containers of the project. Each source group references a real folder on the file system, but what the group contains (in the project structure group) may have little or no correspondence with the files in that folder. The folder it references is of primary interest to the items it contains, which can have references relative to that folder.
There are two more source item types that also refer to a folder but much more directly. A source folder item is very much like a source file item, but references a folder instead. The visual differences between a source group and source folder are very slight, but their behavioral differences are profound.
Figure 5-11 shows two projects. In the one on the left, the Help item is a source group containing three items (index.html, help.css, and background.png). In the project on the right, the Help item is a source folder containing three files. Do they look the same? In a black-and-white illustration, or if you're color blind, it's going to be hard to tell the difference. The source group (left) is yellow in the Xcode interface, while the source folder (right) is blue. Looking at the attributes of the two items in Figure 5-12 reveals that the item on the right is of type "folder."


The key difference is that a source group is a logical container for other source items. A source folder is a source item. Although the interface lets you browse the contents of both, a source folder is treated as a single opaque object. The individual files in the folder are not treated as separate source items. Xcode does not compile any C source files in a source folder. The items in a source folder do not have any attributes or references.
You can see this difference in the interface. Look again at Figure 5-11. A target membership attribute appears next to the source folder, but not next to any of its items. The situation for the source group is reversed.
Note
Like smart groups, the items in a source folder item dynamically reflect the contents of the folder on the disk. Add a file to the folder and it appears in the source folder item—well, sometimes. Xcode can be lazy about updating its display. Collapse and re-expand a folder item to see any changes made to the folder.
Finally, a framework item is yet another kind of folder item. The only difference between a framework item and a folder item is that Xcode automatically recognizes framework folders and integrates them into the project. It indexes the headers of the framework, includes symbols defined in the framework in auto-completion, and correctly links to the dynamic libraries in the framework. In the project, treat it as you would a single library that your project links to. Xcode takes care of the details.
Unless your project is trivial, you will soon want to create new source files. The File
Figure 5-13 shows the New File Assistant where you choose a file template. Most templates are self-explanatory, and simply produce skeletal files with some basic comments and sometimes an #include or #import statement. The C++, Java, and Objective-C templates will include an empty class definition with the same name as the file.

All of the templates produce a plain text file, except they are the Data Model and Class Model templates, which have their own assistant for creating the model files. Creating data and class models is covered in Chapter 11 and Chapter 12.
Click the Next button to accept your template choice. Xcode prompts for the name and location of the new file, along with some additional options as shown in Figure 5-14.

In the File Name field, edit the name of the file. Be careful not to alter the file's extension. If the template is for a source file type that normally has a companion header file (C, C++, and Objective-C templates), Xcode offers to create both files at the same time. Uncheck this option to skip the creation of the companion .h file.
The Location field displays the path to the folder where the new file will be created. This is always the folder referenced by the source group where the new item will be created. New file references are always relative to the enclosing group. Think twice before navigating to another folder, as Xcode will construct a relative path from the group's folder to the new file.
If you do need to change the location, enter the path to the folder or click the Choose button to select an existing folder. You can also create one new subfolder at the same time by typing the name of the new folder at the end of the Location path. Before the new folder is created, a dialog box like the one shown in Figure 5-15 asks if you really want to create a new folder. Alternatively, you can use the New Folder button in the Choose browser to create any number of new folders before selecting one.
The Add to Project pop-up menu enables you to select the project that the new source item will be added to. The default is the active project, but you can choose another open project or None. Selecting None creates the file, or files, but does not add any new source items to the project.

The Targets list shows all of the targets that accept the type of file being created. Only targets in the project selected in the Add to Project pop-up menu are considered. The list will be empty if the project is "none," or if there are no targets in the selected project that accept the type of file being created.
Each target in the list has a check box next to it. If checked, the newly created source item will be added to that target. If you are creating both a source file and its companion header file, checking a target will add both files to the target—unless the target only accepts one of the two types. This can actually be a hazard for targets that accept both types, because you often want to add the source file to a target but not the header. The "Ridding Targets of Unwanted Files" section has a trick for quickly getting unwanted headers out of a target.
Once the new file has a name, a location, a project, and a list of targets, click the Finish button to create the file and add the item to the project. The new file opens automatically in an editor window.
If you try to create a file that already exists, Xcode warns you with the dialog box shown in Figure 5-16.
You have three choices, obtusely explained in the dialog box. The first choice, which is probably the best, is to cancel the operation.
Your second choice is to check the boxes next to the files you want to replace and click the Overwrite Selected Files button. Despite the fact that the button reads Overwrite, the checked files are not overwritten. They are first moved to a new subfolder named with a numeric suffix and the extension .moved-aside, as shown in Figure 5-17. The folder will be in the same folder where the new files are being created.
The third choice is to click the Remove Old then Create button. The action of this button is equivalent to first checking all of the files listed and clicking the Overwrite Selected Files button. When the dialog box is first presented, all of the files are checked, making the action of the two buttons identical.
After the files are moved aside, new files are created in the same location from the template. If there were already source items for these files, you now have duplicate source items. You Find and delete these duplicate items.
The files that were moved aside are no longer referenced from the project. You can examine the files, recover what you want, and then trash them along with the spontaneously generated folder that contains them.


The File

If you accept, you are presented with the same options you're given when you add any existing source file to a project. These options are explained fully in the next section.
Xcode projects can include many different types of files, well beyond the editable text files created by the New File command. At some point, you are going to need to add these files to your project. You may also want to import existing text files into a project.
The process of adding one or more files that already exist can be started in one of two ways. The first is to use the Project
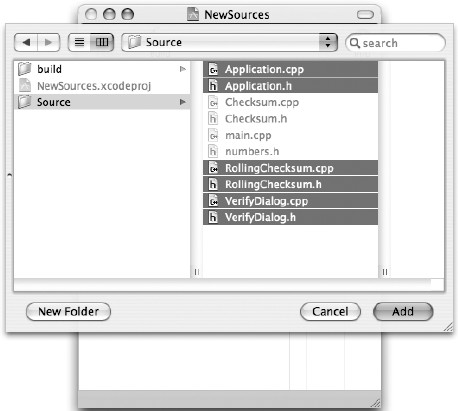
The second method is more direct. Select any group of files and folders in the Finder and simply drag them into the source tree of your project. A drop indicator shows you where in the source group the new item, or items, will be created—exactly as it does when you're dragging items around in the tree. Figure 5-20 shows two files and a folder being added to the source group.
One very useful advantage of using the drag-and-drop technique is that symbolic links and aliases are not resolved for the files being dropped. The source item created refers to the alias, not to the file or folder the alias resolves to. This is important if you need to add a dynamic library or framework that is actually an alias to the current version of that library. The only significant disadvantage of the drag-and-drop method is that Xcode permits you to create duplicate items to files that are already referenced in the project.

As soon as Xcode knows where to create the new source items in the project and what files will be used to create those items, it presents the dialog box shown in Figure 5-21.
This dialog box contains several controls that will determine what kind of source items are created, the type of references they will have, and where the final source files will reside. The effect of these options is often interconnected. Some options behave differently depending on the choices you make for other options.

Use the Copy Items into Destination Group's Folder (If Needed) option to make physical copies of the original files or folders inside the group's folder. The group's folder is the folder referenced by the group that the new source items are being added to. If you select this option, all of the files and folders being added are first copied into the group's folder. Each source item created references the copy made in the group's folder, not the original. Note that items contained inside subfolders of the group's folder are not considered to be in the group's folder. Files or folders in any other folder on the file system are copied, which could easily create duplicate source files inside your project folder. Use this option only to import sources from locations outside of the project folder.
The "(If Needed)" qualifier is there because this option is ignored if the files are already in the group's folder. Well, not entirely ignored. Due to a long-standing bug in Xcode, this works with files but not folders. If you check this option when you're adding a folder to a group whose folder already contains that folder, Xcode displays an error that it can't copy the folder to itself. No harm will come of this, but you will have to perform the operation again, this time turning the Copy option off.
The Reference Type option controls what type of reference each item will have. The choice you make will apply to all items being added. Choosing the special reference type of Default individually selects a reference type best suited for each item's location, as listed in the following table.
Default Reference Type | |
|---|---|
In the group's folder | Enclosing-group |
Inside any subfolder in the group's folder | Enclosing-group, with a path into the subfolders |
Anywhere inside the project folder but not inside the group's folder | Project-relative |
Anywhere outside the project folder but within the /Users directory of the logged-in user | Project-relative, with a path that extends outside the project folder |
Anywhere outside the /Users folder | Absolute |
Another volume | Absolute |
Files already inside the folder of the group, or files that were copied there using the Copy option, get a reference relative to that group. Items outside the group's folder, but inside the project folder, get a project-relative reference. Items outside the /Users domain, in locations like /System/Library/Frameworks, get absolute paths. The grey area contains those files within /Users that are outside the project folder. These get project-relative references with a path that extends outside the project folder. Earlier in this chapter, one of these was shown in the Root4 project. You will probably want to fix those references, or consider using the Copy option to copy those files into the group's folder.
If you select any other type of reference, all items created will have that reference type regardless of their location. If you have source trees defined (see Chapter 18), each source tree will also appear in the menu.
The Text Encoding option applies only to source items created for text files. It sets the text encoding for the file, which determines how the bytes in the file are translated into characters when the file is opened for editing. Normally, you wouldn't need to change this for regular program source files. The gcc compiler always assumes plain ASCII text, so all program source files must be ASCII text files. Change this option if you are adding things like XML files that are in UTF-8 or UTF-16 encoded Unicode, or text files in any other ISO encoding. You can always change the encoding later if you need to. See the "Source Attributes" section later in this chapter to find out how to change the encoding of a file.
The two radio buttons, Recursively Create Groups for Any Added Folder and Create Folder References for Any Added Folders, determine if folders added to the project will create source groups or folder items.
With the Recursively Create Groups radio button selected, adding a folder creates a source group. Following that, every file and folder in that folder is recursively added to the new group using the same settings. The folder reference of the new group points to the folder that was added, using the reference type selected. The recursively added items get the same treatment.
If the reference type is Default—all of the recursively added items will (by definition) have enclosing-group references regardless of the reference type or location of the first new group. Does that organization sound familiar? Look again at the Root3 project. Each source group references a single subfolder in the folder of its enclosing group, and every source item references a file in the folder of its enclosing group. When you use these Add to Project settings, Xcode turns an entire folder hierarchy into an equivalent tree of source groups and source items with a single command. With the Create Folder References option selected instead, any folders added to the project create a single source folder item. No further processing of the files in that folder occurs.
At this point you may be wondering how framework folders are added. Xcode examines each folder being added to a project to determine if it is a framework folder. If it is, Xcode always creates a framework item and ignores the Recursively Create Groups and Create Folder References options.
At the bottom of the dialog box is a list of targets defined in the project. If you checking the box next to a target, Xcode attempts to add each source item created to that target. The key word is "attempt." Some targets only accept, or understand, certain types of source items. An item is added to a target only if the target accepts that type of item.
When everything is set, click the Add button to add the items to the project.
Now that you know how to create new source items en masse, take a look at the attributes of each to see how they can be changed individually or in batches.
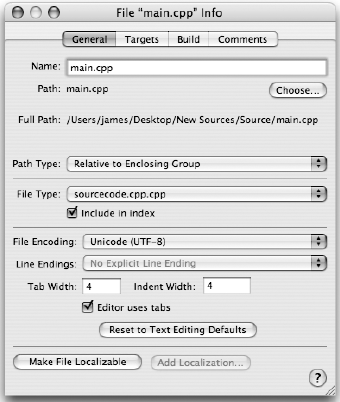
Use the Inspector palette or an Info window to examine the attributes of a source item. Click the General tab to show the item's general attributes. Figure 5-22 shows a typical source file item.
The Name field contains the name of the item. If the item can be renamed, this field is editable. The name of a file, folder, or framework item is always the same as the actual item. Editing the name of a file, folder, or framework item also renames the file or folder it references. Renaming a source group merely renames the group and does not alter the name of the group's folder.
The Path and Path Type fields define the item's reference, and is what most of this chapter has been about. The Full Path field displays the ultimate path to the file or folder. This is how Xcode interprets the path using the given reference type. You can change the reference type using the pop-menu. Xcode recalculates an equivalent path. To change the path, click the Choose button. Select a file or folder from the browser. For file, folder, and framework items, the name of the item changes to match that of the selected file or folder.
Note
If you want to quickly see the file or folder that an item references, select the item in the project and choose Reveal in Finder from the Control-/right-click menu, or hold down the Option key and choose File
The next section in the Info window is the item's type. This is an internal categorization based on the file's file type and extension so that Xcode knows how to treat this item. It is used to determine if an item can be included in a target, and to what phase of the target the item belongs in. It determines how, or if, Xcode will display the item in an editor window and what language of syntax coloring should be used. You can change how Xcode treats an item by selecting a different type. But this type only extends to how Xcode treats the file. The operating system, external build systems, and compilers still interpret the file based on the file's type and extension. Changing the type of a .m file from source.c.objc to source.c.cpp will not cause the file to be compiled as a C++ file.
The File Encoding, Line Endings, and Tab attributes apply only text files and are disabled for all other types of source items. The File Encoding defines the binary format the characters in the file are expected to be in. Change this setting if the assumption is wrong. The Line Endings attribute is also an assumption, but one that is largely superfluous. Xcode determines what line endings are being used when the file is opened.
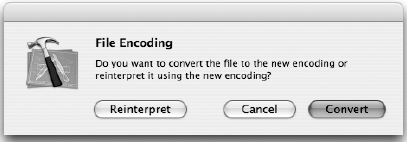
Changing the File Encoding for a text file presents the dialog box shown in Figure 5-23. The Convert button interprets the file using the previous encoding, and then rewrites the file using the new encoding. Use this option if the encoding of the file is correct, but you want to change the format of the file to a different encoding. The Reinterpret button simply changes the encoding attribute in the source item; it does not alter the file. Select Reinterpret if the encoding set for a file is incorrect.
Returning to the General attributes (Figure 5-22), the Tab Width, Indent Width, and Editor Uses Tabs options are explained in the next chapter. Normally, you will want to use the same settings for all files, but you can change them for an individual file here, or by using the View
Many files can be localized so that the language and location specific information in the file can be customized for different regions and populations. File localization is covered in the next chapter.
The Targets tab lists the targets in the project. The item is included in targets that have a check mark next to them. If a target does not accept items of this type, the target is unchecked and disabled (grey).
The Comments tab is for storing comments about this item in the project document.
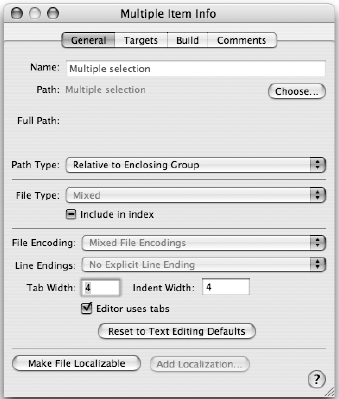
In Chapter 3, you learned how to use the Inspector palette or an Info window to display the aggregate attributes for multiple items. Settings that are common to all of the items are shown. If all of the items have the same value for a particular setting, that value is displayed. If a value differs for some items, the value displayed is some kind of Mixed value, as shown in Figure 5-24. For check boxes, this displays as a dash. Changing any of the settings in a multi-item Info window changes that setting for all of the items to the same value.
Some settings require special handling when they are changed for multiple items. This is particularly true of the Path attribute. You wouldn't want Xcode to literally set the same path attribute for multiple items. All of the items would suddenly point to the same file or folder. Instead, the Choose button in a multi-item Info window allows you to choose the folder that contains all of the items. The name of each item is not altered, and a new path for each is constructed by combining the chosen folder and the item's file or folder name. This can cause item references to be broken if the folder chosen does not contain one or more of the items.
You're going to use this ability of Info windows in the next few sections. They will help you reorganize some large projects and fix the properties of targets.
It is very easy, when you're adding lots of new source files to a project, to end up with files in targets where they don't belong. This most often happens when you're adding source and header files at the same time. Targets that compile C source into object files (native targets) normally only accept C, C++, or Objective-C source files. Trying to add the companion header files to those targets at the same time does nothing. But some native targets have a Copy Files phase that accepts any kind of file. The end result is that all of the .h files get added to the target's Copy Files phase, and the target dutifully copies all of the headers files in your project into the final application. This is probably not what you want.
To fix this, select the project structure group in the Groups & Files list to display all of the files in the project in the details window (choose View
You can adapt this technique to make similar changes in other types of files.
This section walks you through reorganizing the files in a project. This entails rearranging the actual files and altering the source item references to agree.
When you're working with source item references, it's useful to know when an item's reference is valid and when it's broken. Whenever Xcode discovers that a reference no longer refers to a file or folder, the item in the source group turns red. Figure 5-25 shows invalid references for the main.cpp and NewSources items.

Again, this is hard to see in black-and-white. Red items are usually a clue that the item's reference needs to be fixed—but not always. Whenever you create a new project or target, a source item is created for the product that will be produced. Until you successfully build a target, its product doesn't exist and its product item in the source tree will be red. This is perfectly normal and expected.
There are two ways of fixing a reference: open the Info window for the item and correct its Path attribute, or put the file or folder the item is pointing to where the reference expects it to be. Xcode immediately recognizes that the reference is valid again, and changes the item's color to black.
The first example will be to relocate a couple of files from one existing folder to another.
Try It Out: Moving Files
Start with the ReorganizeMe1 project, shown in Figure 5-26.

ReorganizeMe1 has two subfolders: Client and Utilities. You decide that the C++ files Namer.cpp and Namer.h need to be moved into the Utilities group and folder. Follow these steps:
Open the ReorganizeMe1 project.
Drag the Namer.h and Namer.cpp items from the Client group into the Utilities group.
Select the Source group. Control-/right-click the Source group and choose Reveal in Finder.
In the Finder window, move the two source files, Namer.h and Namer.cpp, from the Client folder into the Utilities folder.
Switch back to the project window. Notice that the two source items are now red. Select both items and choose File

In the multi-item Info window, click the Choose button. Select the folder Utilities and click Choose. The item references are now valid.
How It Works
Whenever you move a source item, Xcode adjusts the path of the item so the item continues to refer to the same file or folder. This is convenient in one sense, because it allows you to freely reorganize your source items without breaking any references. The disadvantage is that it permits you to quickly create convoluted item references and an organization that no longer agrees with the organization of the physical files.
All of the items in this exercise use enclosing-group references. When you moved the two source file items from one group to the other in step 2, Xcode recalculated new paths starting from the new group back to the old one's folder. If you had stopped and looked at the attributes of the two items after step 2, their paths would have been ../Utilities/Namer.h and ../Utilities/Namer.cpp. This also explains why the two items were still valid after the move.
In step 4, you moved the actual files. As a result, the files were no longer in the Client folder and the references broke. When you switched back to the project window, Xcode displayed the two items in red.
In steps 5 and 6, you examined the attributes of the two items and used the multi-item Info window to point both items to their respective files in the Utilities folder. The path for each was constructed using relative path to the Utilities folder (which is nothing, because the enclosing group's folder is the Utilities folder) and their respective file names. The references were once again valid.
Now you are going to relocate entire folders. This demonstrates the principle advantage of using enclosing group references in your project.
Try It Out: Moving Folders
Start with the ReorganizeMe2 project, shown in Figure 5-27. All of the items in this project have enclosing-group references.

ReorganizeMe2 has two subfolders: Product and Order. The project is about to grow into a client and server. The source codes for the client and server need to be kept apart, and the common code moved into a shared tree. Follow these steps:
Open the ReorganizeMe2 project.
Select the Order group. Control-/right-click the Order group and choose Reveal in Finder. In the Finder window, create three new folders inside the Source folder: Common, Client, and Server. Drag the Product and Order folders into the Common folder.
Switch back to the project window. Select the Product and Order groups and choose File
Select the Common group. Control-/right-click the Common group and choose Get Info. In the Info window, click the Choose button and select the Common folder in the project. Click Choose to change the path.
Repeat step 4 for the Client and Server groups, choosing the Client and Server folders respectively.
How It Works
The Order and Product source groups refer to the Order and Product subfolders in their enclosing group's folder. Moving the Order and Product folders into the newly created Common folder broke the references to those folders, and the references of all of the items contained in them.
In step 3, the new groups Common, Client, and Server were created with relative references that referred to the folder in the source group (remember that this is the default for all newly created source groups). Although the Order and Product groups are now enclosed in the Common group, they still indirectly refer to the same location and are still broken.
In step 4, you changed the Common group's folder from the Source folder to the new Common subfolder. As soon as that happened, the references in the Order and Product folder were valid again.
Step 5 simply prepared the other two groups, Client and Server, so they reference files in their respective folders.
When you're using enclosing-group references, it is usually easier to rearrange folders than it is to move individual files around. Xcode only adjusts the path of the group being moved. Items within that group are not adjusted and continue to have the same relative relationship to their enclosing group. After the parent group references are fixed, all of the child references are valid again.
You can see how using the multi-item Info window and relative references can save a lot of time when changing references for large groups of files and folders. But even this can be a fair amount of work.
Another technique is to simply throw the whole thing away and let Xcode rebuild all of the relationships from scratch.
Try It Out: Fast Reorganization
Start with the ReorganizeMe3 project, shown in Figure 5-28. All of the items in this project have enclosing-group references.

ReorganizeMe3 has several subfolders: Database, Product, Order, ShoppingCart, and Utilities. Create three new folders in the Source folder: Common, Client, and Server. Move the Database folder into the Server folder. Move the ShoppingCart folder into the Client folder. Move the Product, Order, and Utilities folders into the Common folder. The files structure should now look like Figure 5-29.

Now follow these steps:
Open the ReorganizeMe3 project.
Select the Source group. Control-/right-click the Source group and choose Delete. In the dialog box, choose Delete References.
Select the Project Structure group. Choose Project
In the Add to Project dialog box, uncheck the Copy option, set Reference Type to Default, and select Recursively Create Groups for Any Added Folders. Click the Add button.
How It Works
Remember that the project document doesn't contain any of the source material for your project; just references to those files. In step 2, you deleted all of the references to the source files in this project—but just the references; the original source files are still in the project folder.
In steps 2 and 3, you used the Add to Project command to recreate new groups and source file items that match the reorganized folder hierarchy exactly.
If you have a major project reorganization, the fastest and easiest way to reorganize your groups and source items can be to simply start over. This might inadvertently include others files, or place files in targets that don't belong there, but these aberrations can usually be dealt with swiftly.
Note
Why you would not want to let Xcode rebuild all the groups and items? Deleting the source items also deletes any other attributes associated with those items. File encoding, custom tab settings, specific target membership, comments, and build options are lost when the source items are deleted. The newly created source items have default attributes. If you need to preserve attributes for a large number of source items, you probably have no choice but to reorganize the groups and folders "the hard way," as shown in the first two examples.
You should now have a clear understanding of how Xcode refers to source files in a project. As you work with Xcode, keep these key concepts in mind:
Every source item has a path to the file or folder that it references.
A path can be absolute, relative to the project folder, or relative to the folder of the enclosing group.
File, folder, and framework items have the same name as the source file or folder they reference. Renaming the source item renames the physical file or folder. In contrast, the name of a source group is independent of the folder it references.
The path and reference type of an item can be changed in an Info window. A multi-item Info window can change the location or reference type for several items at once.
Moving an item in the source tree adjusts its path so that it continues to reference the same file or folder.
Now that you can add new and existing source files to your project, you will undoubtedly want to edit them. Editing text is the topic of the next chapter.
The existing MakeMe folder, shown in Figure 5-30, contains three files: main.cpp, SieveOfEratosthenes.cpp, and SieveOfEratosthenes.h.

Turn these files into an Xcode project and then add a new Application class to the project:
Create a new project.
Create a source group and a matching Source folder. Put the three existing files into the source group and folder.
Create two new source files named Application.cpp and Application.h. Add those files to the project and Source folder.