
Software development has always been characterized as a rather solitary vocation. However, the stereotype of a single programmer working into the wee hours of the night, isolated in a basement or attic room, is now mostly the purview of fiction writers. Most modern development is done in teams—even when those teams are scattered across the globe and connected only by the Internet. Members of a team need ready access to the assets of projects they are working on. They need to collaborate on changes and distribute their work to other team members.
Software projects themselves may also need to share resources. A suite of applications developed for a single corporation might need to include a common set of graphics, or share a set of preprocessor definitions. It's impractical to put all of the applications into a single project, and (as you saw in Chapter 5) source file references outside the project folder can be problematic.
Closely related to the subject of sharing source files is the concept of "source control management" (SCM). Source control management systems store and track the changes made to source files over time. It is usually the basis of a collaboration system among multiple developers, acting as a mediator between developers, arbitrating changes, and communicating those changes to others. But individual developers have come to appreciate the discipline, security, and accountability that source control systems bring to their development. Even if you are a single programmer working on a single project, you may still want to set up a source control system.
Source control is used for many, if not most, open source projects. If you want to participate in an open source project, you'll want to "plug" your Xcode project directly into the source control system used by that project. After it is configured, you'll be able to browse the comments and revisions for the project right in the Xcode interface. You can see what new files are available and immediately update your local copy to stay in synchronization.
Xcode provides two facilities for sharing source files between projects and developers: shared source trees and source code management.
Source trees define folder locations where shared source files reside. There is no restriction on where these locations are or how the source files located there are maintained. An earlier chapter mentioned a suite of application projects that all need to include the same corporate artwork. A source tree folder could be defined for those graphic files. Any number of projects can reference those source files relative to that source tree's location. Changing the location of the source tree changes all of the references in all of those projects simultaneously. For example, if the graphics art department sends you a new CD with updated artwork, all you have to do is pop the disc in the CD-ROM drive, point that source tree to a folder on the CD, and rebuild your projects. Source tree locations are defined individually for each user, so a different programmer can use the same project with source tree locations specific to their environment.
Source control, often referred to as version control, is the principle method of sharing source files among a group of developers. It provides three important services. The first service is that it stores the master copy of all source files in a central repository. Changes made to a source file by one developer are sent back to the central repository, where those changes can then be distributed to other developers. This allows multiple developers to work on the same project files in a rational manner. The second service is that it also provides a degree of security, protecting against accidental damage to project files and providing a point for centralized backups. The third service is that source control systems keep a record of all changes made to a project over time. Developers can quickly see exactly what has changed in each file, and review comments made by the programmer that explain why. Source control can also be used like a time machine. You can reconstruct the state of a project at any point during its lifetime. You don't need to archive a copy of your entire project at every point in its development. For example, if you're working on version 1.6 of your application, but suddenly need to debug version 1.2, simply query the source control system for a copy of your project as it existed on the day you finished version 1.2.
Source trees and source control serve different needs and each is designed to solve a different problem. Some aspects overlap, but generally they complement each other. They can be used independently or in combination. What source file sharing and control techniques you employ will depend entirely on your needs and work environment.
A source tree is a named path to a folder on your system. A tree consists of a symbolic name, a display name, and the path to the tree's location on your system. Any source file reference in a project can be relative to a source tree location. The location of the tree is independent of the location of the project folder. For example, if you define a source tree named "buttons" and set it to the location /Users/yourname/Development/Common/Buttons, any project that has a source reference relative to the buttons source tree will look for that file in the Buttons folder inside your local Development folder. If you move that folder, or decide to use a different folder, you simply redefine the buttons source tree and every source file reference based on that tree changes.
The "your" in "the source trees on your system" is important. Source trees are defined individually for each user account. For someone else to use a project that references files in the buttons source tree, they must also have defined a source tree named "buttons." It doesn't have to have the same display name or be the same path, but it does have to have the same symbolic name. In fact, it makes sense that it wouldn't have the same path—another developer wouldn't have access to your /Users/yourname directory.
The source trees defined for your account are global to all Xcode projects that you open. Consider this when deciding on a name for your source tree.
Open the Source Tree tab of the Xcode Preferences, shown in Figure 18-1.
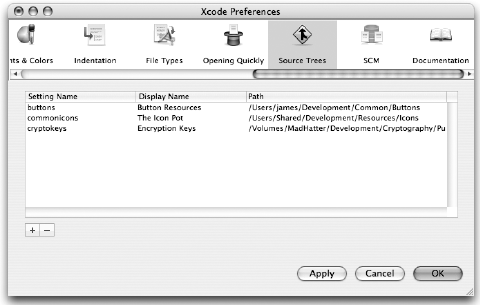
Click the + button below the list to define a new source tree. Give it a symbolic name or key, a display name, and a path where the tree can be accessed on your system. The display name is the title of the source tree as it will appear in all of your project windows and dialog boxes. You will rarely see the tree's symbolic name anywhere outside the Source Tree tab of the Xcode Preferences. To delete a tree, select it in the list and click the - button.
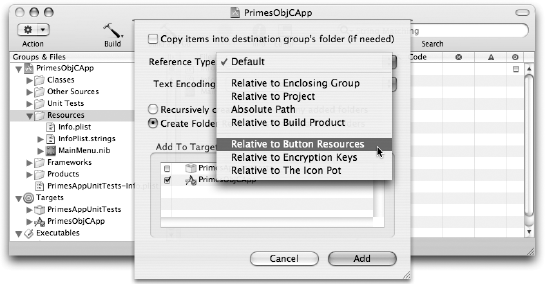
After you've defined a tree, use it to reference source files in your project. The source trees you've defined automatically appear in all dialog boxes that add an existing file, folder, or framework to your project, as shown in Figure 18-2.
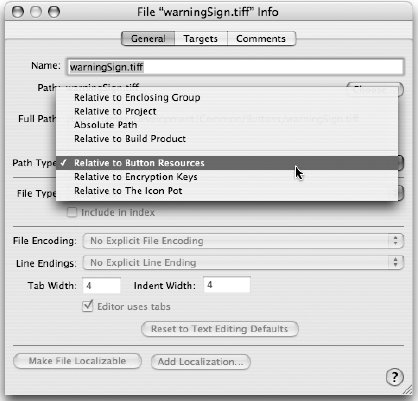
Source trees also appear in the reference section of every source file's Info window, as shown in Figure 18-3. You can make any source file's path type relative to any source tree that you've defined. If you are reorganizing a project to use source trees, select a group of source file references and change their reference type to new source tree as a group. Alternatively, you can set the reference type of a group folder to that of a source tree, and leave the members of that group as Relative To Enclosing Group.
If you open a project that references a source tree that is not defined on your system, Xcode will attempt to locate the file at the same path it used the last time that tree was defined. If this path is wrong, the file will turn red, indicating that it cannot be located. Define the required source tree, close, and reopen the project to resolve the reference.
To redefine your source trees, close all projects, redefine your source trees, and open the projects again. Xcode resolves the source file paths using the new source tree locations.
Source control systems work by storing the master copies of your project files in a separate repository. A repository is a database of files. A repository might be on the same file system or on a remote system. You might access a repository using direct file access or by sending requests over a network to a source control server. Regardless of the implementation, you interact with the source control system using a source control client.
When you want to work with a file, you request that the client check out a file from the repository. The copy of the file you checked out is called the working copy. If you make changes to the working copy, you later check in the file to record those changes in the central repository. After the changes have been recorded, other developers can check out the file to incorporate your changes into their working projects. You can also compare your working copy with other versions in the repository to see exactly what has changed. You also have the option of checking out an earlier version of any file and using it instead (maybe because you don't like the changes made by another developer).
Xcode has integrated support for three major source control systems: Concurrent Versions System (CVS), Subversion, and Perforce. CVS is the reigning king of open source control systems and comes bundled with OS X. You can get more information about CVS at http://www.nongnu.org/cvs/. Subversion is the heir apparent and is poised to replace CVS as the preferred source control system. Perforce is a commercial source control system available from Perforce Software Inc. If you need a full-featured, and reasonably priced, source control management system, you'll want to check out Perforce at http://perforce.com/perforce/products.html.
This chapter concentrates on setting up Subversion and configuring Xcode to use it. Subversion was chosen for this book over CVS and Perforce for two reasons. It is in many ways superior to CVS and it costs much less than Perforce (it's free). However, Subversion is not pre-installed in Mac OS X but that's a trivial problem to solve.
Note
Setting up and using any of these systems to their full potential is not trivial. The instructions in this chapter are the bare minimum required to install, configure, and start using a source control system. Although tightly integrated and convenient, the commands available through Xcode barely scratch the surface of what you can do with a modern source control system. Entire books have been written about CVS and Subversion. If you are serious about integrating source control into your projects, or need to set up source control for a group of developers, you should explore the literature and documentation. The book Version Control with Subversion is available at http://svnbook.red-bean.com/. You can purchase a printed copy of the book, or download the electronic version for free.
The first step to using Subversion is to install it. If you plan to use a different source control system, then follow its installation instructions—assuming it's not already installed. The principle steps involved in configuring and using any of the source control systems with Xcode are the same, except for minor differences in the syntax of the client commands. Refer to the documentation for CVS or Perforce if you are using those systems instead. Subversion is intended to be "command-for-command" compatible with CVS in most cases, so the syntax differences between these two systems will be minimal. Perforce uses its own syntax and you should refer to the Perforce documentation for the equivalent commands.
Most source control systems are distributed in separate client and server packages. The Subversion client package installs the tools necessary to access local repositories stored on your computer's file system and to communicate with a remote repository server. This chapter will explain how to share a repository between multiple users on the same system and also how to set up a repository server suitable for access by remote users via a network. But to get started, take a look at how you create a local repository accessible to your user account. Ultimately, it doesn't matter that much how your source control system is installed and configured. After you have it set up, using source control from within Xcode is essentially the same for all systems and implementations.
The easiest and quickest way of installing the Subversion client is to install the binary client package for OS X. For alternate methods of installing Subversion, see the "Installing a Subversion Server" section, later in this chapter. For now, follow these steps to install the OS X binary client package:
Go to the Subversion home page at
http://subversion.tigris.org/.Locate the Downloads section. Find the pre-built client binary installer package for Mac OS X. At the time this book was written, this was being maintained at
http://metissian.com/projects/macosx/subversion/.Download the disk image, open it, and double-click the installer package. This is a standard Mac OS X installer package. It places all of the binaries and supporting libraries in their correct location.
If you have not already done so, modify your shell environment to include /usr/local/bin in the command search path. For bash, add the following command to either your local
~/.bash_profileor the global/etc/profilescript.
PATH="$PATH:/usr/local/bin"
           If you are using tcsh, add the following to your local ~/.tcshrc or the global /etc/csh.cshrc script.
           set path = ( $path /usr/local/bin )
These instructions assume that the Subversion installer installed the Subversion tools in /usr/local/bin. Different installers use different locations, so refer to the ReadMe file that came with the installer or package for the correct path.
Open a new Terminal window and test your installation by issuing the following command.
svn cat http://svn.collab.net/repos/svn/trunk/README
This command fetches the current README file from the Subversion project repository at svn.collab.net and echoes it to the Terminal window (this requires Internet access). If it worked, then the Subversion client is installed and is capable of accessing a remote source control repository. If you don't have Internet access, just try the svn help command.
You now need to create a local repository. The following command creates an empty repository named Subversion in your Documents folder:
svnadmin create ~/Documents/Subversion
Note
You are free to create this repository in any local folder that your account has access to, but you will have to adjust the paths in the subsequent examples accordingly.
You are now ready to start storing and using your Xcode projects under source control.
To begin managing a project using source control requires the following three steps:
Add the project files to a source control repository.
Check the project out from the repository to create a working copy.
Configure the project to use source control.
The second step is critical. When you check out a project from a repository, the source control client creates invisible files that contain information about the repository it came from, the status of the files in the repository, and so on. Unless these invisible files are present, Xcode cannot integrate the project into source control.
Xcode does not provide any facility to add a project to a repository or to check out an entire project from a repository. You can easily see that this is a chicken-and-egg problem—how can Xcode check out a project before it's been initially checked out and configured to use that repository? You will have to use the source control client to perform the initial check-in and to obtain the first working copy. After the project has been checked out and configured, Xcode can add, remove, update, and refresh any of the project files. Except for more advanced source control functions, the initial check-in and check-out will be your only use of the command-line tools.
To add a project to a repository, as outlined earlier, follow these steps.
Close the project.
Delete its local build folder and/or any products or other intermediate build files produced by the project that are inside the project folder.
Use the source control client to add the entire project folder to the repository.
When you're checking in a new project, first close the project and delete its local build folder. Do not check in a project's build folder into source control. Only source files and the project document package itself should be in source control. Intermediate build files and products should never be checked in. Some developers like to store copies of finished products in source control for easy retrieval. If you do that, do it in a different location in the repository. Don't include those files in the project folder.
Now that your project is in source control, you need to check it back out again:
If you plan to continue using the project in its current location, move the project folder to the trash or rename it and put it a safe location until you have verified that you can check it back out from the repository.
Check out the entire project folder from source control. Open the project and verify that it contains all of the necessary source files and functions as expected. Consider comparing the files you just checked out with the originals using a diff such as the FileMerge utility. FileMerge is briefly described later, in the "Comparing Revisions" section.
You can now delete the original copy of your project.
The last step is to configure the project to use source control. Open the Info window for the project group, or choose the Project
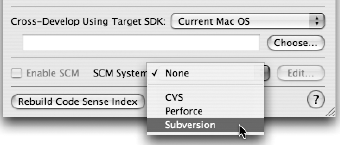
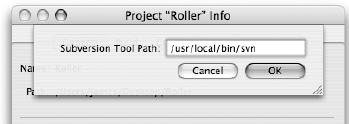
First, select the source control system you are using from the SCM System pop-up menu. In the example shown in Figure 18-4, Subversion is selected as the source control system. To the right of the SCM System menu is an Edit button. Click it to verify the location and name of the source control client you installed, as shown in Figure 18-5. As mentioned earlier, where your source control client tool resides may vary depending on how you choose to install it. If you are using CVS or Perforce, you will have other options to configure. These may include security, account, and server configuration parameters. Refer to the CVS or Perforce documentation for the values you need to configure.
Next, check the Enable SCM option to turn on source control for this project. Xcode uses the client tool you just configured to access the source control management system and places all project files that were checked out of the repository under source control.
Try It Out: Put a Project in Subversion
Put the Roller project under the control of Subversion as follows:
If you haven't already, create a local Subversion repository. Open a Terminal window and enter the following command.
svnadmin create ~/Documents/Subversion
Make sure the Roller project is not open in Xcode. Open the project folder and trash its build folder.
Open a new Terminal window and
cdto the folder that contains the Roller project folder (do notcdinto the Roller project folder itself):cd ~/Development/Projects
Add (import) the unmanaged project folder and all of its documents into the local repository using the following command. Note that the
-margument specifies a comment that will be recorded with this action in the repository. It should be something descriptive and explanatory, like-m 'Initial check in of Roller project'. You're using"Hello"here only for brevity. If you omit this argument,svnprompts you for a comment using the shell's default editor.james$ svn import -m "Hello" Roller file:///Users/james/Documents/Subversion/Roller Adding Roller/RollingChecksum.h Adding Roller/RollingByteArrayChecksum.h Adding Roller/RollingChecksum.m Adding Roller/Roller_Prefix.pch Adding Roller/RollingByteArrayChecksum.m Adding Roller/Roller.m Adding Roller/Roller.xcodeproj Adding Roller/Roller.xcodeproj/james.mode1 Adding Roller/Roller.xcodeproj/james.pbxuser Adding Roller/Roller.xcodeproj/project.pbxproj Adding Roller/Roller.1 Committed revision 1.
Drag the existing Roller project folder to the Trash.
Check the entire project folder out again using the Subversion client:
james$ svn checkout file:///Users/james/Documents/Subversion/Roller Roller
A    Roller/RollingChecksum.h
A    Roller/RollingByteArrayChecksum.h
A    Roller/RollingChecksum.m
A    Roller/Roller_Prefix.pch
A    Roller/RollingByteArrayChecksum.m
A    Roller/Roller.m
A    Roller/Roller.xcodeproj
A    Roller/Roller.xcodeproj/james.mode1
A    Roller/Roller.xcodeproj/james.pbxuser
A    Roller/Roller.xcodeproj/project.pbxproj
A    Roller/Roller.1
Checked out revision 1.
Open the project and build it.
Open the project's Info window by choosing the Project

How It Works
You created a local Subversion repository in your Documents folder and added the Roller project folder to it. You then discarded the unmanaged Roller project and replaced it with a working copy of the Roller project checked out from the repository.
The working copy of the project was then configured to use the Subversion source control system directly.
Use this project to explore Xcode's SCM interface in the next section.
Note
The example given here checks the project folder directly into the root of the Subversion repository. While this is sufficient for the purposes of this chapter and possibly sufficient for your needs as well, you might want a different organization.
The book Version Control with Subversion explains how to manage branches and create tagged versions of your project using a structure of subdirectories within the repository. Read through the basics of source control for your chosen SCM before setting up your repository for actual use.
Interaction with source control in Xcode is done primarily through the commands in the SCM (Source Control Manager) menu and the SCM tab in various Info widows. File specific commands apply to either the selected file or group of files in the project window, or to the currently active editor pane. This chapter refers to selecting a file before executing one of the SCM commands. It's implied that the same command would apply equally to the file in the active source file editor pane.
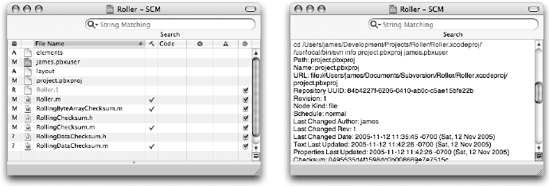
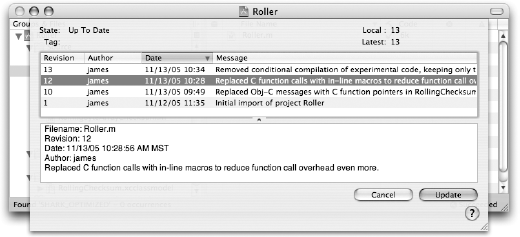
As soon as you enable source control for a project, a new SCM tab appears in the project's Info window, as shown in Figure 18-6. A similar SCM tab appears in the Info window of all project source files that are under source control.
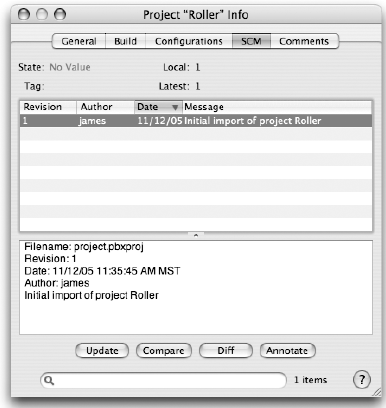
The State field shows the current status of the project document or source file. This tells you if the file is up-to-date (that is, it is the same as the most recent version of the file stored in the repository), if it has been modified locally, if it needs to be updated, and so on. The Local field is the version of the file that you last checked out of the repository, and the Latest field is the most recent version stored in the repository.
Below the file's status is the list of revisions. Each revision has a number, an author, a date, and a comment. Select one to show the full details of the revision in the lower pane of the window.
Use the four buttons below the detailed description to update or see the annotation view of a selected revision in the list. You can select one revision in the list and compare or diff it against the working copy of the file, or you can select two revisions in the list and compare them to each other. All of these commands are explained later in this chapter.
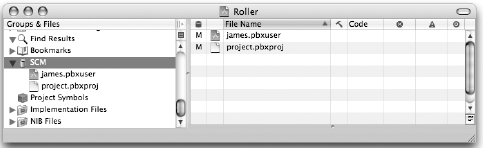
Expanding the SCM smart group in the Groups & Files pane displays the pending source control operations for the project, as shown in Figure 18-7. The details pane for the SCM smart group displays an additional source control status column—the left column, next to the document icons shown in Figure 18-7.
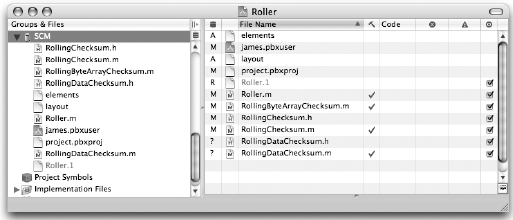
The SCM column shows the status of any pending source control actions or conflicts. When you make changes to a project in Xcode, you are only changing the local copy of the project. None of the changes you make propagate back to the source control repository until you commit those changes. As you work on the project—adding, removing, and editing files—Xcode keeps track of all of the changes that you've made. These appear in the SCM smart group. When you commit your changes, Xcode executes the pending actions in the SCM smart group, dutifully adding, removing, and modifying files in the repository to mirror those in your project.
You can also view the SCM status of files in any other details pane by enabling the SCM column (see Figure 18-8). Control-/right-click the column titles to show or hide the SCM column.
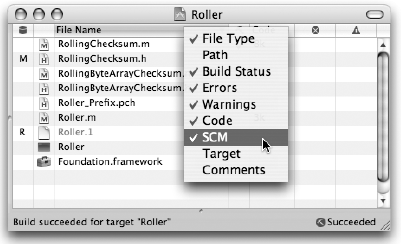
The SCM column contains a single character that indicates the status or pending SCM operation of each file, as described in the following table.
Description | |
|---|---|
(blank) | The file is up-to-date. It is the same file as the latest version in the repository. You have not modified it, nor are there any newer versions available to be checked out. |
M | The file has been modified locally. The changes will be written to the repository the next time the file is committed. |
U | The file needs updating. The file has not been modified locally, but the repository now contains a newer version of the file than the one you have checked out. |
C | The modifications to the file are in conflict. There is a newer version of this file in the repository and you have modified the local copy of the file. This usually occurs when two or more developers are making changes to the same file simultaneously. The "Resolving Conflicts" section tells you how to merge your changes which those in the repository. |
A | The file will be added to the repository. The file is not currently in the repository, but you have instructed Xcode to add it the next time you commit this project. |
R | The file will be removed from the repository. You have deleted (or renamed) the local file. The next time you commit the project, the corresponding file in the repository will also be deleted. |
? | The repository has no information about this file. This is usually because it is a new file that hasn't yet been added to the repository. |
- (dash) | The file is in a directory that does not exist in the repository. When you're adding folders to your project, you first add them to the repository using your source control client. After the enclosing folder is added, you can add files to the repository using either Xcode or your client tool. |
Choose the SCM
Double-clicking the SCM smart group or choosing the SCM
This window shows the same information as the details pane of the SCM smart group, just in a separate window. In the lower-right corner of the window is a small log button. Click it to show the SCM transaction log, as shown on the right in Figure 18-9. The log shows the commands issued to, and the results from, the source control client used for this project.
No change occurs in the repository until you commit it. You can commit all changes made to a project by choosing the SCM
Committing individual files is usually safe, as long as you are sure the changes being checked in will be valid in the absence of other changes that you have yet to commit. Whenever a commit includes the addition or removal of files, you must be very careful to commit those actions along with the corresponding changes made to the project document. The safest action in this situation is to commit the entire project. The "SCM and the Project Document" section will provide an explanation for this.
Note
In general, your goal when checking in changes should be to maintain the integrity of the project in the repository. If you make changes in two files that depend on each other, check both of those files in together. If you don't you'll have a version of the project in the repository that won't build because a change made to a source file was checked in, but the matching change made in its header file was not. Some source control systems, such as Subversion, guarantee atomic updates. That is, all of the changes being checked in will be stored in the repository or none of them will. There is no grey area, where some of the changes were stored but others failed. The documentation for your chosen SCM system should explain what actions are atomic and how this might affect the repository. Regardless, get into the habit of committing complete changes that leave the project in the repository in a useable condition.
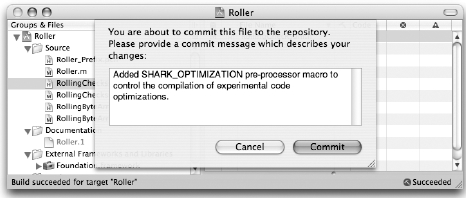
When you commit a change, Xcode prompts you for a comment (see Figure 18-10). You should be descriptive and complete. The comments you enter will be attached to every transaction required to complete the commit. Source control comments are another form of documentation. The modifications made in your project are only comprehensible if you explain what you changed and why, both clearly and accurately.
In the SCM tab of the Xcode preferences window (shown later in Figure 18-17) is an option to Save Files Before SCM Operations. Normally this is checked, causing Xcode to save all open files before performing any SCM command. This avoids the unpleasant occurrence of committing a file without all of the changes that have been made to it. In most cases, you should leave this option checked, but you may turn if off if you ever need to perform SCM commands without forcing files to be saved first.
If, for whatever reason, you decide to abandon the changes that you've made to a file, you can discard them and revert to the version you originally checked out from source control. This is not necessarily the latest version of the file in the repository—it is the revision of the file you last checked out or updated to. This is also referred to as the base revision of your file. When you discard changes to a file, Xcode presents the warning dialog box shown in Figure 18-11.
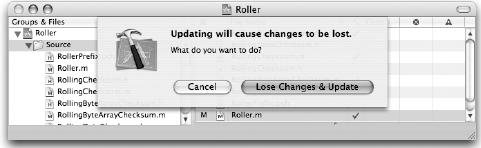
You can't discard changes by simply checking out a different revision of the file (as discussed in the "Updating Files" section). Xcode won't overwrite your local file with a revision from the repository until you explicitly discard your changes. This prevents Xcode from accidentally wiping out hours, if not days, worth of work. If you do try to update a modified file, you will only end up changing the base revision associated with that file. This action will either associate the file with the latest revision (containing as-yet uncommitted changes), or it will put the file in conflict mode. The "Resolving Conflicts" section explains how to merge conflicting changes.
Adding a file to the project involves first adding the file to the project and then adding it to the repository. How you add the file to the project is entirely up to you. You can use any method discussed in the book so far for adding an existing file or creating a new one. (Chapter 5 contained detailed instructions on adding files to a project.) After the file is added to the project, the SCM status of the file may be?, -, or blank, indicating that the file, or the folder that contains the file, is unknown to the repository.
In the case of an unknown file (?), choose the file in the source group or details pane and choose the SCM
If the files exist in a folder that is not in the repository, use your SCM client tool to either add that folder or both the folder and the files to the repository. If you add just the folder, the status of the files will change from - to ?. You can now use Xcode to add the files to the repository.
A more reliable, and quicker, method (because it only requires a single command) is to use the import command of your SCM client to create the folder in the repository and add all of the new source files simultaneously—just as you did when you added the original project folder. Here is an example of adding a subfolder, and all of the source files it contains, to an existing project folder using Subversion:
svn import Roller/Data file:///Users/james/Documents/Subversion/Roller/Data
Whenever you manually alter the repository using the client tool, choose SCM
Deleting a file requires that you remove it from both the project and the source control repository. When you delete a file reference from a project, Xcode gives you the option of removing just the file reference or physically deleting the source file. If you choose the latter, and the file exists in the repository, Xcode presents a second dialog box, shown in Figure 18-12.
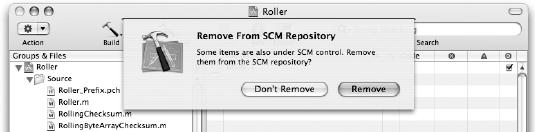
If you choose to remove the file, a repository remove action is added to the SCM smart group and the file is removed from the repository the next time the project is committed. If you choose not to remove the file, the file is deleted locally but remains in the repository. If you choose to remove the repository file as well, the project displays a grey (disabled) reference to the file in the project, indicating a reference to a file that has been deleted. After the action has been committed and the file in the repository has been removed, the phantom reference to the deleted file will disappear.
Renaming a file in a source control repository consists of removing an existing file and adding a new file with a different name. When you rename a source file in Xcode, it presents the dialog box shown in Figure 18-13.
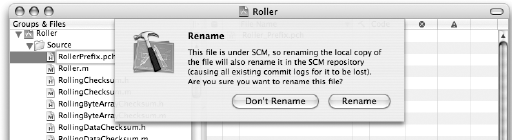
If you choose to rename the file in the repository, Xcode creates two SCM actions. The first action removes the old file and the second action adds the same file back into the repository with its new name. Commit these two actions together to complete the rename.
When a newer version of a file exists in the repository, Xcode displays a U as the SCM status for the file. This indicates that you must update this file if you want the latest version.
If you want retrieve the latest version of a file, select one or more files in the project window and choose the SCM
You can also retrieve an earlier version of a file. Select a single file and choose the SCM
You can also update (check out) multiple files at or near a specific revision using the SCM
When you revert to an older revision of a file, the SCM information about that file may revert as well. This depends on which source control system you are using. If it does revert, then the file's SCM history appears to be current when it isn't, listing only the revision information up to the revision you retrieved. The file does not display a U indicating that a newer version of the file is available. Use the SCM
You can bring an entire project up-to-date by selecting the project group in the Groups & Files pane of the project window and choosing the SCM
Note
Whenever you update the project document itself, close the project and reopen it. Changes made to the project document by updating will not be "seen" by Xcode until it is forced to reread the project document.
You can compare the files in your project with other revisions using the SCM
Choose the file you want to compare, and then choose the Latest, Base, Revisions, or Specific Revision... command from either the Compare With or Diff With submenu. Latest compares your working file against the latest revision in the repository. Base compares your working file against the revision that you most recently checked out, which may or may not be the most recent revision available. If your working file is already the same as these revisions, the appropriate commands are disabled. If you want to browse the revisions and their comments, choose the Revision command. A sheet lists the revisions of the file along with their comments. Choose a revision and click the Compare button. If you know the specific revision number you want to examine, choose the Specific Revision command and enter the revision number you want. Xcode retrieves that revision, or the latest revision older than that revision.
By default, the Compare With commands use the FileMerge utility included with the Xcode development tools. When launched by Xcode, the window shows a side-by-side comparison of the two files (see Figure 18-15).
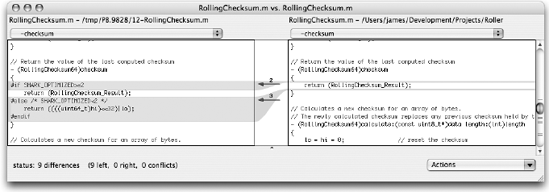
The windows graphically illustrate the changes made between the two files. In the example shown in Figure 18-15, four lines were removed from the working source file (on the right) that were present in the latest revision of the file in source control (on the left). Scroll through the file to see other differences, or use the Find
The Compare With commands gives you one additional command not available in the Diff With submenu. SCM
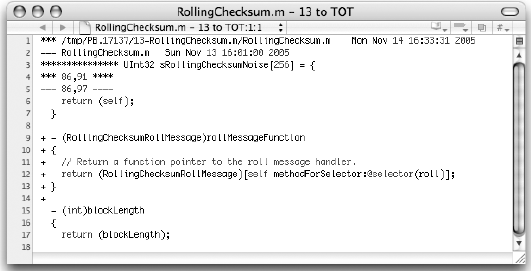
If you use one of the Diff With commands, Xcode opens a text window that displays the output of the diff command (see Figure 18-16).
You can customize the program used to compare files, and some options to the diff tool, in the SCM tab of the Xcode Preferences (see Figure 18-17).
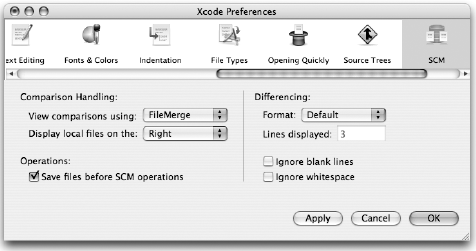
The Comparison Handling options select the application to be used to compare files. The choices are FileMerge, BBEdit, and Other. BBEdit requires that the BBEdit application is installed. The Other option prompts for an application that will perform the comparison. The Display Local File On The option selects whether your working file is displayed in the right or the left pane or window of the comparison application.
For diffs, you have a choice of formats and what whitespace to ignore. The Format choices are Default, Contextual, Side By Side, and Unified. Default uses diff's default format, which outputs each difference as blocks of text—a "before" block and an "after" block. The Contextual format is the same, except that it includes a number of additional lines before and after each region of text that changed to give the changes some context. This is most useful if you have a lot of one- or two-line changes and it's difficult to tell where in the file the change is. The Unified format shows the text that was removed, added, and changed in a single block of text, indicating which by including symbols in the margin. It too has the option of including addition context lines before and after each block of differences. Finally, the Side By Side format shows the original text on the left and the modified text on the right, with symbols between them to indicate which ones have been added, removed, or changed. Side By Side truncates long lines to fit the display.
The Ignore Blank Lines and Ignore Whitespace options cause diff to treat differences in blank lines or runs of whitespace characters within a single line as equivalent. Similar options are available for the Compare With commands, but those options must be set in the preferences of the FileMerge and BBEdit applications.
The file comparison and merge utilities can also be used to combine the differences between two files. This is useful in a number of situations. One of the very liberating aspects of working with a source control system is the freedom to make experimental changes to your code. If you decide that you don't like the changes, you can compare your working copy with an earlier version of your source code stored in the repository. The file comparison utilities let you "undo" your changes by selectively moving blocks of code from the earlier version back into your working one. This is a much more surgical correction than merely discarding all of the changes in a file.
Both the FileMerge utility and BBEdit's compare files function place both old and new versions of the file on the screen side by side. Both highlight the blocks of text that differ between the two. For each difference, you can choose whether to keep it as it is or revert to the alternative version in the other file.
The FileMerge utility does this with a merged file pane at the bottom of the window. The merged file contains all of the common elements of both files and the selected blocks of text from either the right or left file pane. To create the merged version, select each difference and decide if you want to keep the version in the left file, the right file, neither, or both using the Actions pop-up menu. When you are finished, save the file as a new document, or replace one of the existing files with the merged version.
BBEdit works a little differently. In BBEdit there is no third file. It presents the two files in a separate editor windows (see Figure 18-18). A third window displays the list of differences between the two. Select a difference to highlight the corresponding regions in both files. From the differences window, you can replace the block in either file with the contents of the other using the Apply To New or Apply to Old button. When you are done, save the modified files back to their original locations, or use the File

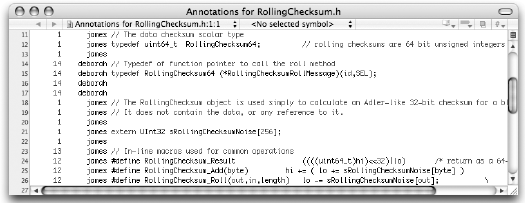
Another way of seeing how a file has evolved is to look at its annotation view. Select a file and choose a command from the SCM
The annotated listing of a file, shown in Figure 18-19, displays the revision number in which each line was added and the author of that line. In this example, you can see that the typedef for RollingChecksumRollMessage was added by deborah in revision 14 of the file. The in-line macros were added by james in revisions 12 and 13. The rest of the file was from the original when james first checked it in. Annotated listings do not show lines that have been removed, nor do they show the pervious versions of lines that have been altered.
When a newer revision of a file appears in the repository, and you have modified that same file locally, the SCM status of the file changes to C to indicate a conflict. Before committing your version of the file, you need to join it with the latest revision checked into the repository to add, combine, or discard the changes made by the other developer with yours—or not.
When a conflict occurs, you have two choices. You can abandon the changes that you've made, replacing them wholesale with the changes made in the latest revision of the file. To abandon your changes, select the conflicting file and choose SCM
The other choice is to manually merge your changes with the ones checked into source control. Select the file and choose the SCM
Edit the file, removing or combining the differences, until you have successfully integrated your changes with those of the other developer. If you are using Subversion, choose the SCM
You can now commit your combined changes, creating a new revision that contains the changes from both versions. When you commit your merged file, document your changes and the fact that these were combined with changes from the previous revision.
At some point, you may find yourself working on a project without access to the source control system or repository from which it was checked out. For example, you might have moved the project to another computer, or are using it on portable and are no longer in contact with your source control server.
You can temporarily disable SCM control of your project using the SCM
When you are back in touch with the source control repository, restore SCM functionality by choosing the SCM
The project document requires some special handing when a project is under the control of a source control system. The project document is a package containing several files. The project.pbxproj file contains the structure and common settings of the project document bundle. This includes source file references, target definitions, and build settings. If you change any of these values, the project.pbxproj file appears in the SCM smart group as a modified file (see Figure 18-21). The changes made to the project won't be stored in the repository until you commit this file.
Each user has a personalized settings file in the project document package. The name of the file is the user's UNIX account name with the extension .pbxuser. Settings such as the appearance of windows, breakpoint locations, debugger options, and many other personalized touches are stored individually for each user. Whether you store these files in source control or not is entirely up to you. If you do not, checking out the project on another system using the same account will forfeit these settings. This may, or may not, be desirable to you.
Here are some points to keep in mind:
Whenever you add, remove, or rename files in a project, commit the changes to the project document and all of the add and remove actions simultaneously. This will avoid the situation where the project has file references that are out of synchronization with the list of files in the repository.
Whenever you update the project document files from the repository, close the project and reopen it from the File
To make the most of personal settings in the
.pbxuserfiles, make sure all of the developers working on a project have distinct account names. If you work on a project from different systems, use the same account name on both or you will be treated as a different developer.
Source control management allows Xcode to become a member of a community. It also provides important tools for tracking, auditing, documenting, and protecting your hard work. Source trees let projects share common assets, maximizing their reuse, in a manner that won't break your projects when they're moved to another location or environment. Together, source control management and source trees allow you to benefit from the value of work that has already been done, and the work of your colleagues, in a portable and interactive manner.
The final chapter turns to what many consider to be an endless source of joy and entertainment: tweaking obscure options and settings in Xcode, customizing it to suite your every whim.