12
Organizing Your Code Projects with Git
Version control systems are tools that record all source code changes and make it easy to retrieve older versions of the code. Think of these tools as sophisticated undo features. For example, if you replace a function and then later decide you liked the old one better, you can restore your code to the original version. Or if you discover a new bug, you can go back to earlier versions to identify when it first appeared and which code change caused it.
A version control system manages files as you make changes to them. This is preferable to, say, making a copy of your myProject folder and naming it myProject-copy. If you keep making changes, you’ll eventually have to make another copy named myProject-copy2, then myProject-copy3, myProject-copy3b, myProject-copyAsOfWednesday, and so on. Copying folders might be simple, but the approach doesn’t scale. Learning to use a version control system saves you time and headaches in the long run.
Git, Mercurial, and Subversion are popular version control applications, although Git is by far the most popular. In this chapter, you’ll learn how to set up files for code projects and use Git to track their changes.
Git Commits and Repos
Git allows you to save the state of your project files, called snapshots or commits, as you make changes to them. That way, you can roll back to any previous snapshot if you ever need to. Commit is a noun and a verb; programmers commit (or save) their commits (or snapshots). Check-in is also a less popular term for commits.
Version control systems also make it easy for a software developer team to remain in sync with each other while they make changes to a project’s source code. As each programmer commits their changes, other programmers can pull these updates onto their computers. The version control system tracks what commits were made, who made them, and when they made them, along with the developers’ comments describing the changes.
Version control manages a project’s source code in a folder called a repository, or repo. In general, you should keep a separate Git repo for each project you’re working on. This chapter assumes you’re mostly working on your own and don’t need the advanced Git features, such as branching and merging, that help programmers collaborate. But even if you’re working alone, there is no programming project too small to benefit from version control.
Using Cookiecutter to Create New Python Projects
We call the folder that contains all the source code, documentation, tests, and other files related to a project the working directory or working tree in Git parlance, and project folder more generally. The files in the working directory are collectively called the working copy. Before we create our Git repo, let’s create the files for a Python project.
Every programmer has a preferred method for doing so. Even so, Python projects follow conventions for folder names and hierarchies. Your simpler programs might consist of a single .py file. But as you tackle more sophisticated projects, you’ll start to include additional .py files, data files, documentation, unit tests, and more. Typically, the root of the project folder contains a src folder for the .py source code files, a tests folder for unit tests, and a docs folder for any documentation (such as those generated by the Sphinx documentation tool). Other files contain project information and tool configuration: README.md for general information, .coveragerc for code coverage configuration, LICENSE.txt for the project’s software license, and so on. These tools and files are beyond the scope of this book, but they’re worth investigating. As you gain more coding experience, re-creating the same basic files for new programming projects becomes tedious. To speed up your coding tasks, you can use the cookiecutter Python module to create these files and folders automatically. You’ll find the full documentation for both the module and the Cookiecutter command line program at https://cookiecutter.readthedocs.io/.
To install Cookiecutter, run pip install --user cookiecutter (on Windows) or pip3 install --user cookiecutter (on macOS and Linux). This installation includes the Cookiecutter command line program and the cookiecutter Python module. The output might warn you that the command line program is installed to a folder not listed in the PATH environment variable:
Installing collected packages: cookiecutter
  WARNING: The script cookiecutter.exe is installed in 'C:UsersAlAppDataRoamingPythonPython38Scripts' which is not on PATH.
  Consider adding this directory to PATH or, if you prefer to suppress this warning, use --no-warn-script-location.
Consider adding the folder (C:UsersAlAppDataRoamingPythonPython38Scripts in this case) to the PATH environment variable by following the instructions in “Environment Variables and PATH” on page 35. Otherwise, you’ll have to run Cookiecutter as a Python module by entering python -m cookiecutter (on Windows) or python3 –m cookiecutter (on macOS and Linux) instead of simply cookiecutter.
In this chapter, we’ll create a repo for a module named wizcoin, which handles the galleon, sickle, and knut coins of a fictional wizarding currency. The cookiecutter module uses templates to create the starting files for several different kinds of projects. Often, the template is simply a GitHub.com link. For example, from a C:UsersAl folder, you could enter the following in a Terminal window to create a C:UsersAlwizcoin folder with the boilerplate files for a basic Python project. The cookiecutter module downloads the template from GitHub and asks you a series of questions about the project you want to create:
C:UsersAl>cookiecutter gh:asweigart/cookiecutter-basicpythonproject
project_name [Basic Python Project]: WizCoin
module_name [basicpythonproject]: wizcoin
author_name [Susie Softwaredeveloper]: Al Sweigart
author_email [[email protected]]: [email protected]
github_username [susieexample]: asweigart
project_version [0.1.0]:
project_short_description [A basic Python project.]: A Python module to represent the galleon, sickle, and knut coins of wizard currency.
If you get an error, you can also run python -m cookiecutter instead of cookiecutter. This command downloads a template I’ve created from https://github.com/asweigart/cookiecutter-basicpythonproject. You’ll find templates for many programming languages at https://github.com/cookiecutter/cookiecutter. Because Cookiecutter templates are often hosted on GitHub, you could also enter gh: as a shortcut for https://github.com/ in the command line argument.
As Cookiecutter asks you questions, you can either enter a response or simply press Enter to use the default response shown in between square brackets. For example, project_name [Basic Python Project]: asks you to name your project. If you enter nothing, Cookiecutter will use “Basic Python Project” as the project name. These defaults also hint at what sort of response is expected. The project_name [Basic Python Project]: prompt shows you a capitalized project name that includes spaces, whereas the module_name [basicpythonproject]: prompt shows you that the module name is lowercase and has no spaces. We didn’t enter a response for the project_version [0.1.0]: prompt, so the response defaults to “0.1.0.”
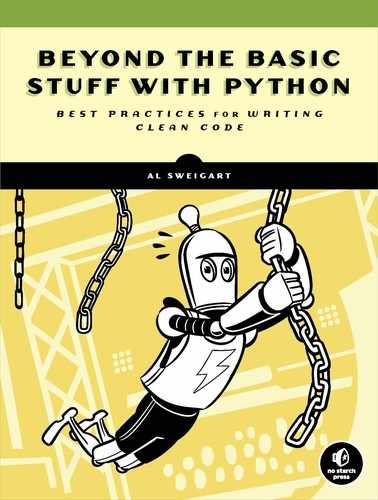
After answering the questions, Cookiecutter creates a wizcoin folder in the current working directory with the basic files you’ll need for a Python project, as shown in Figure 12-1.
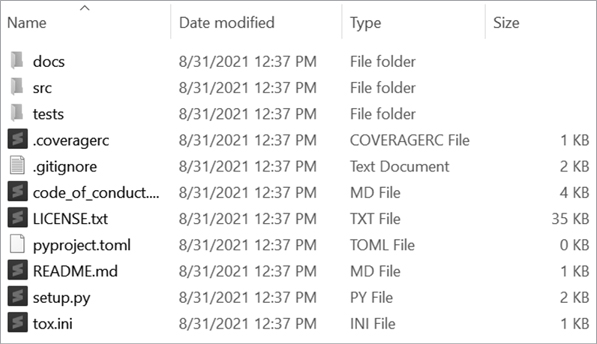
Figure 12-1: The files in the wizcoin folder created by Cookiecutter
It’s okay if you don’t understand the purpose of these files. A full explanation of each is beyond the scope of this book, but https://github.com/asweigart/cookiecutter-basicpythonproject has links and descriptions for further reading. Now that we have our starting files, let’s keep track of them using Git.
Installing Git
Git might already be installed on your computer. To find out, run git --version from the command line. If you see a message like git version 2.29.0.windows.1, you already have Git. If you see a “command not found” error message, you must install Git. On Windows, go to https://git-scm.com/download, and then download and run the Git installer. On macOS Mavericks (10.9) and later, simply run git --version from the terminal and you’ll be prompted to install Git, as shown in Figure 12-2.
On Ubuntu or Debian Linux, run sudo apt install git-all from the terminal. On Red Hat Linux, run sudo dnf install git-all from the terminal. Find instructions for other Linux distributions at https://git-scm.com/download/linux. Confirm that the install worked by running git --version.

Figure 12-2: The first time you run git --version on macOS 10.9 or later, you’ll be prompted to install Git.
Configuring Your Git Username and Email
After installing Git, you need to configure your name and email so your commits include your author information. From a terminal, run the following git config commands using your name and email information:
C:UsersAl>git config --global user.name "Al Sweigart"
C:UsersAl>git config --global user.email [email protected]
This configuration information is stored in a .gitconfig file in your home folder (such as C:UsersAl on my Windows laptop). You’ll never need to edit this text file directly. Instead, you can change it by running the git config command. You can list the current Git configuration settings using the git config --list command.
Installing GUI Git Tools
This chapter focuses on the Git command line tool, but installing software that adds a GUI for Git can help you with day-to-day tasks. Even professional software developers who know the CLI Git commands often use GUI Git tools. The web page at https://git-scm.com/downloads/guis suggests several of these tools, such as TortoiseGit for Windows, GitHub Desktop for macOS, and GitExtensions for Linux.
For example, Figure 12-3 shows how TortoiseGit on Windows adds overlays to File Explorer’s icons based on their status: green for unmodified repo files, red for modified repo files (or folders containing modified files), and no icon for untracked files. Checking these overlays is certainly more convenient than constantly entering commands into a terminal for this information. TortoiseGit also adds a context menu for running Git commands, as shown in Figure 12-3.
Using GUI Git tools is convenient, but it’s not a substitute for learning the command line commands featured in this chapter. Keep in mind that you might need to one day use Git on a computer that doesn’t have these GUI tools installed.
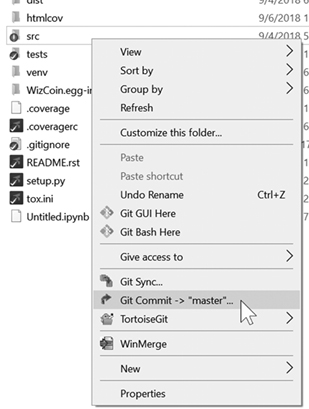
Figure 12-3: TortoiseGit for Windows adds a GUI to run Git commands from File Explorer.
The Git Workflow
Using a Git repo involves the following steps. First, you create the Git repo by running the git init or git clone command. Second, you add files with the git add <filename> command for the repo to track. Third, once you’ve added files, you can commit them with the git commit -am "<descriptive commit message>" command. At this point, you’re ready to make more changes to your code.
You can view the help file for each of these commands by running git help <command>, such as git help init or git help add. These help pages are handy for reference, although they’re too dry and technical to use as tutorials. You’ll learn more details about each of these commands later, but first, you need to understand a few Git concepts to make the rest of this chapter easier to digest.
How Git Keeps Track of File Status
All files in a working directory are either tracked or untracked by Git. Tracked files are the files that have been added and committed to the repo, whereas every other file is untracked. To the Git repo, untracked files in the working copy might as well not exist. On the other hand, the tracked files exist in one of three other states:
- The committed state is when a file in the working copy is identical to the repo’s most recent commit. (This is also sometimes called the unmodified state or clean state.)
- The modified state is when a file in the working copy is different than the repo’s most recent commit.
- The staged state is when a file has been modified and marked to be included in the next commit. We say that the file is staged or in the staging area. (The staging area is also known as the index or cache.)
Figure 12-4 contains a diagram of how a file moves between these four states. You can add an untracked file to the Git repo, in which case it becomes tracked and staged. You can then commit staged files to put them into the committed state. You don’t need any Git command to put a file into the modified state; once you make changes to a committed file, it’s automatically labeled as modified.
Figure 12-4: The possible states of a file in a Git repo and the transitions between them
At any step after you’ve created the repo, run git status to view the current status of the repo and its files’ states. You’ll frequently run this command as you work in Git. In the following example, I’ve set up files in different states. Notice how these four files appear in the output of git status:
C:UsersAlExampleRepo>git status
On branch master
Changes to be committed:
  (use "git restore --staged <file>..." to unstage)
       1 new file:   new_file.py
       2 modified:   staged_file.py

Changes not staged for commit:
  (use "git add <file>..." to update what will be committed)
  (use "git restore <file>..." to discard changes in working directory)
       3 modified:   modified_file.py

Untracked files:
  (use "git add <file>..." to include in what will be committed)
       4 untracked_file.py
In this working copy, there’s a new_file.py 1, which has recently been added to the repo and is therefore in the staged state. There are also two tracked files, staged_file.py 2 and modified_file.py 3, which are in the staged and modified states, respectively. Then there’s an untracked file named untracked_file.py 4. The output of git status also has reminders for the Git commands that move the files to other states.
Why Stage Files?
You might wonder what the point of the staged state is. Why not just go between modified and committed without staging files? Dealing with the staging area is full of thorny special cases and a large source of confusion for Git beginners. For instance, a file can be modified after it has been staged, leading to files existing in both the modified and staged states, as described in the previous section. Technically, the staging area doesn’t contain files so much as changes, because parts of a single modified file can be staged and other parts unstaged. Cases like these are why Git has a reputation for being complex, and many sources of information on how Git works are often imprecise at best and misleading at worst.
But we can avoid most of this complexity. In this chapter, I recommend avoiding it by using the git commit –am command to stage and commit modified files in a single step. This way they’ll move directly from the modified state to the clean state. Also, I recommend always immediately committing files after adding, renaming, or removing them in your repo. Additionally, using GUI Git tools (explained later) rather than the command line can help you avoid these tricky cases.
Creating a Git Repo on Your Computer
Git is a distributed version control system, which means it stores all of its snapshots and repo metadata locally on your computer in a folder named .git. Unlike a centralized version control system, Git doesn’t need to connect to a server over the internet to make commits. This makes Git fast and available to work with when you’re offline.
From a terminal, run the following commands to create the .git folder. (On macOS and Linux, you’ll need to run mkdir instead of md.)
C:UsersAl>md wizcoin
C:UsersAl>cd wizcoin
C:UsersAlwizcoin>git init
Initialized empty Git repository in C:/Users/Al/wizcoin/.git/
When you convert a folder into a Git repo by running git init, all the files in it start as untracked. For our wizcoin folder, the git init command creates the wizcoin/.git folder, which contains the Git repo metadata. The presence of this .git folder makes a folder a Git repository; without it, you simply have a collection of source code files in an ordinary folder. You’ll never have to directly modify the files in .git, so just ignore this folder. In fact, it’s named .git because most operating systems automatically hide folders and files whose names begin with a period.
Now you have a repo in your C:UsersAlwizcoin working directory. A repo on your computer is known as a local repo; a repo located on someone else’s computer is known as a remote repo. This distinction is important, because you’ll often have to share commits between local and remote repos so you can work with other developers on the same project.
You can now use the git command to add files and track changes within the working directory. If you run git status in your newly created repo, you’ll see the following:
C:UsersAlwizcoin>git status
On branch master

No commits yet

nothing to commit (create/copy files and use "git add" to track)
The output from this command informs you that you have no commits yet in this repo.
Adding Files for Git to Track
Only tracked files can be committed, rolled back, or otherwise interacted with through the git command. Run git status to see the status of the files in the project folder:
C:UsersAlwizcoin>git status
On branch master

No commits yet

1 Untracked files:
  (use "git add <file>..." to include in what will be committed)

        .coveragerc
        .gitignore
        LICENSE.txt
        README.md
--snip--
        tox.ini

nothing added to commit but untracked files present (use "git add" to track)
All the files in the wizcoin folder are currently untracked 1. We can track them by doing an initial commit of these files, which takes two steps: running git add for each file to be committed, and then running git commit to create a commit of all these files. Once you’ve committed a file, Git tracks it.
The git add command moves files from the untracked state or modified state to the staged state. We could run git add for every file we plan to stage (for example, git add .coveragerc, git add .gitignore, git add LICENSE.txt, and so on), but that’s tedious. Instead, let’s use the * wildcard to add several files at once. For example, git add *.py adds all .py files in the current working directory and its subdirectories. To add every untracked file, use a single period (.) to tell Git to match all files:
C:UsersAlwizcoin>git add .Run git status to see the files you’ve staged:
C:UsersAlwizcoin>git status
On branch master

No commits yet

1 Changes to be committed:
  (use "git rm --cached <file>..." to unstage)

     2 new file:   .coveragerc
        new file:   .gitignore
--snip--
        new file:   tox.ini
The output of git status tells you which files are staged to be committed the next time you run git commit 1. It also tells you that these are new files added to the repo 2 rather than existing files in the repo that have been modified.
After running git add to select the files to add to the repo, run git commit –m "Adding new files to the repo." (or a similar commit message) and git status again to view the repo status:
C:UsersAlwizcoin>git commit -m "Adding new files to the repo."
[master (root-commit) 65f3b4d] Adding new files to the repo.
 15 files changed, 597 insertions(+)
 create mode 100644 .coveragerc
 create mode 100644 .gitignore
--snip--
 create mode 100644 tox.ini

C:UsersAlwizcoin>git status
On branch master
nothing to commit, working tree clean
Note that any files listed in the .gitignore file won’t be added to staging, as I explain in the next section.
Ignoring Files in the Repo
Files not tracked by Git appear as untracked when you run git status. But in the course of writing your code, you might want to exclude certain files from version control completely so you don’t accidentally track them. These include:
- Temporary files in the project folder
- The .pyc, .pyo, and .pyd files that the Python interpreter generates when it runs .py programs
- The .tox, htmlcov, and other folders that various software development tools generate docs/_build
- Any other compiled or generated files that could be regenerated (because the repo is for source files, not the products created from source files)
- Source code files that contain database passwords, authentication tokens, credit card numbers, or other sensitive information
To avoid including these files, create a text file named .gitignore that lists the folders and files that Git should never track. Git will automatically exclude these from git add or git commit commands, and they won’t appear when you run git status.
The .gitignore file that the cookiecutter-basicpythonproject template creates looks like this:
# Byte-compiled / optimized / DLL files
__pycache__/
*.py[cod]
*$py.class
--snip--
The .gitignore file uses * for wildcards and # for comments. You can read more about it in the online documentation at https://git-scm.com/docs/gitignore.
You should add the actual .gitignore file to the Git repo so other programmers have it if they clone your repo. If you want to see which files in your working directory are being ignored based on the settings in .gitignore, run the git ls-files --other --ignored --exclude-standard command.
Committing Changes
After adding new files to the repo, you can continue writing code for your project. When you want to create another snapshot, you can run git add . to stage all modified files and git commit –m <commit message> to commit all staged files. But doing so is easier with the single git commit –am <commit message> command:
C:UsersAlwizcoin>git commit -am "Fixed the currency conversion bug."
[master (root-commit) e1ae3a3] Fixed the currency conversion bug.
 1 file changed, 12 insertions(+)
If you want to commit only certain modified files instead of every modified file, you can omit the –a option from –am and specify the files after the commit message, such as git commit –m <commit message> file1.py file2.py.
The commit message provides a hint for future use: it’s a reminder about what changes we made in this commit. It might be tempting to write a short, generic message, such as “Updated code,” or “Fixed a few bugs,” or even just “x” (because blank commit messages aren’t allowed). But three weeks from now, when you need to roll back to an earlier version of your code, detailed commit messages will save you a lot of grief in determining exactly how far back you need to go.
If you forget to add the -m "<message>" command line argument, Git will open the Vim text editor in the Terminal window. Vim is beyond the scope of this book, so press the Esc key and enter qa! to safely exit Vim and cancel the commit. Then enter the git commit command again, this time with the -m "<message>" command line argument.
For examples of what professional commit messages look like, check out the commit history for the Django web framework at https://github.com/django/django/commits/master. Because Django is a large, open source project, the commits occur frequently and are formal commit messages. Infrequent commits with vague commit messages might work well enough for your small, personal programming projects, but Django has more than 1,000 contributors. Poor commit messages from any of them becomes a problem for all of them.
The files are now safely committed to the Git repo. Run git status one more time to view their status:
C:UsersAlwizcoin>git status
On branch master
nothing to commit, working tree clean
By committing the staged files, you’ve moved them back to the committed state, and Git tells us that the working tree is clean; in other words, there are no modified or staged files. To recap, when we added files to the Git repo, the files went from untracked to staged and then to committed. The files are now ready for future modifications.
Note that you can’t commit folders to a Git repo. Git automatically includes folders in the repo when a file in them is committed, but you can’t commit an empty folder.
If you made a typo in the most recent commit message, you can rewrite it using the git commit --amend -m "<new commit message>" command.
Using git diff to View Changes Before Committing
Before you commit code, you should quickly review the changes you’ll commit when you run git commit. You can view the differences between the code currently in your working copy and the code in the latest commit using the git diff command.
Let’s walk through an example of using git diff. Open README.md in a text editor or IDE. (You should have created this file when you ran Cookiecutter. If it doesn’t exist, create a blank text file and save it as README.md.) This is a Markdown-formatted file, but like Python scripts, it’s written in plaintext. Change the TODO - fill this in later text in the Quickstart Guide section to the following (keep the xample typo in it for now; we’ll fix it later):
Quickstart Guide
----------------

Here's some xample code demonstrating how this module is used:

    >>> import wizcoin
    >>> coin = wizcoin.WizCoin(2, 5, 10)
    >>> str(coin)
    '2g, 5s, 10k'
    >>> coin.value()
    1141
Before we add and commit README.md, run the git diff command to see the changes we’ve made:
C:UsersAlwizcoin>git diff
diff --git a/README.md b/README.md
index 76b5814..3be49c3 100644
--- a/README.md
+++ b/README.md
@@ -13,7 +13,14 @@ To install with pip, run:
 Quickstart Guide
 ----------------

-TODO - fill this in later
+Here's some xample code demonstrating how this module is used:
+
+    >>> import wizcoin
+    >>> coin = wizcoin.WizCoin(2, 5, 10)
+    >>> str(coin)
+    '2g, 5s, 10k'
+    >>> coin.value()
+    1141

 Contribute
 ----------
The output shows that README.md in your working copy has changed from the README.md as it exists in the latest commit of the repo. The lines that begin with a minus sign – have been removed; the lines that begin with a plus sign + have been added.
While reviewing the changes, you’ll also notice that we made a typo by writing xample instead of example. We shouldn’t check in this typo. Let’s correct it. Then run git diff again to inspect the change and add and commit it to the repo:
C:UsersAlwizcoin>git diff
diff --git a/README.md b/README.md
index 76b5814..3be49c3 100644
--- a/README.md
+++ b/README.md
@@ -13,7 +13,14 @@ To install with pip, run:
 Quickstart Guide
 ----------------

-TODO - fill this in later
+Here's some example code demonstrating how this module is used:
--snip--
C:UsersAlwizcoin>git add README.md

C:UsersAlwizcoin>git commit -m "Added example code to README.md"
[master 2a4c5b8] Added example code to README.md
 1 file changed, 8 insertions(+), 1 deletion(-)
The correction is now safely committed to the repo.
Using git difftool to View Changes with a GUI Application
It’s easier to see changes with a diff program that uses a GUI. On Windows, you can download WinMerge (https://winmerge.org/), a free, open source diff program, and then install it. On Linux, you can install either Meld by using the sudo apt-get install meld command or Kompare by using the sudo apt-get install kompare command. On macOS, you can install tkdiff by using commands that first install and configure Homebrew (a package manager that installs software) and then using Homebrew to install tkdiff:
/bin/bash -c "$(curl -fsSL https://raw.githubusercontent.com/Homebrew/install/master/install.sh)"
brew install tkdiff
You can configure Git to use these tools by running git config diff.tool <tool_name>, where <tool_name> is winmerge, tkdiff, meld, or kompare. Then run git difftool <filename> to view the changes made to a file in the tool’s GUI, as shown in Figure 12-5.
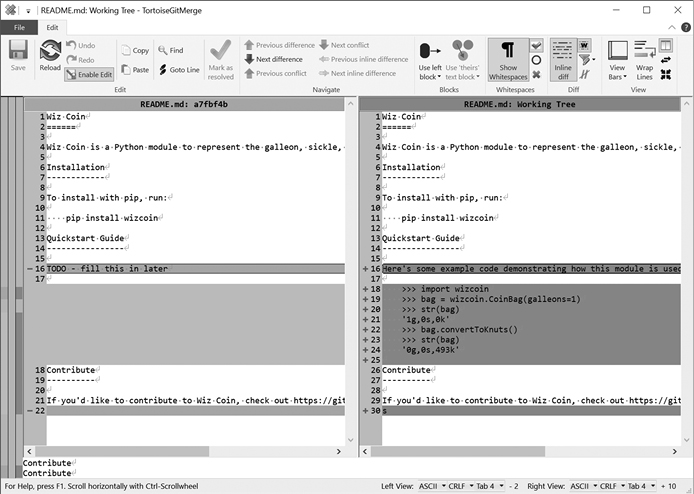
Figure 12-5: A GUI diff tool, in this case WinMerge, is more readable than the text output of git diff.
Additionally, run git config --global difftool.prompt false so Git doesn’t ask for confirmation each time you want to open the diff tool. If you installed a GUI Git client, you can also configure it to use these tools (or it might come with a visual diff tool of its own).
How Often Should I Commit Changes?
Even though version control allows you to roll back your files to an earlier commit, you might wonder how often you should make commits. If you commit too frequently, you’ll have trouble sorting through a large number of insignificant commits to find the version of the code you’re looking for. If you commit too infrequently, each commit will contain a large number of changes, and reverting to a particular commit will undo more changes than you want to. In general, programmers tend to commit less frequently than they should.
You should commit code when you’ve completed an entire piece of functionality, such as a feature, class, or bug fix. Don’t commit any code that contains syntax errors or is obviously broken. Commits can consist of a few lines of changed code or several hundred, but either way, you should be able to jump back to any earlier commit and still have a working program. You should always run any unit tests before committing. Ideally, all your tests should pass (and if they don’t pass, mention this in the commit message).
Deleting Files from the Repo
If you no longer need Git to track a file, you can’t simply delete the file from the filesystem. You must delete it through Git using the git rm command, which also tells Git to untrack the file. To practice doing so, run the echo "Test file" > deleteme.txt command to create a small file named deleteme.txt with the contents "Test file". Then commit it to the repo by running the following commands:
C:UsersAlwizcoin>echo "Test file" > deleteme.txt
C:UsersAlwizcoin>git add deleteme.txt
C:UsersAlwizcoin>git commit -m "Adding a file to test Git deletion."
[master 441556a] Adding a file to test Git deletion.
 1 file changed, 1 insertion(+)
 create mode 100644 deleteme.txt
C:UsersAlwizcoin>git status
On branch master
nothing to commit, working tree clean
Don’t delete the file using the del command on Windows or rm command on macOS and Linux. (If you do, you can run git restore <filename> to recover it or simply continue with the git rm command to remove it from the repo.) Instead, use the git rm command to delete and stage the deleteme.txt file such as in this example:
C:UsersAlwizcoin>git rm deleteme.txt
rm deleteme.txt'
The git rm command deletes the file from your working copy, but you’re not done yet. Like git add, the git rm command stages the file. You need to commit file deletion just like any other change:
C:UsersAlwizcoin>git status
On branch master
Changes to be committed:
 1 (use "git reset HEAD <file>..." to unstage)

        deleted:    deleteme.txt

C:UsersAlwizcoin>git commit -m "Deleting deleteme.txt from the repo to finish the deletion test."
[master 369de78] Deleting deleteme.txt from the repo to finish the deletion test.
 1 file changed, 1 deletion(-)
 delete mode 100644 deleteme.txt
C:UsersAlDesktopwizcoin>git status
On branch master
nothing to commit, working tree clean
Even though you’ve deleted deleteme.txt from your working copy, it still exists in the repo’s history. The “Recovering Old Changes” section later in this chapter describes how to recover a deleted file or undo a change.
The git rm command only works on files that are in the clean, committed state, without any modifications. Otherwise, Git asks you to commit the changes or revert them with the git reset HEAD <filename> command. (The output of git status reminds you of this command 1.) This procedure prevents you from accidentally deleting uncommitted changes.
Renaming and Moving Files in the Repo
Similar to deleting a file, you shouldn’t rename or move a file in a repo unless you use Git. If you try to do so without using Git, it will think you deleted a file and then created a new file that just happens to have the same content. Instead, use the git mv command, followed by git commit. Let’s rename the README.md file to README.txt by running the following commands:
C:UsersAlwizcoin>git mv README.md README.txt
C:UsersAlwizcoin>git status
On branch master
Changes to be committed:
  (use "git reset HEAD <file>..." to unstage)

        renamed:    README.md -> README.txt


C:UsersAlwizcoin>git commit -m "Testing the renaming of files in Git."
[master 3fee6a6] Testing the renaming of files in Git.
 1 file changed, 0 insertions(+), 0 deletions(-)
 rename README.md => README.txt (100%)
This way, the history of changes to README.txt also includes the history of README.md.
We can also use the git mv command to move a file to a new folder. Enter the following commands to create a new folder called movetest and move the README.txt into it:
C:UsersAlwizcoin>mkdir movetest
C:UsersAlwizcoin>git mv README.txt movetest/README.txt
C:UsersAlwizcoin>git status
On branch master
Changes to be committed:
  (use "git reset HEAD <file>..." to unstage)

        renamed:    README.txt -> movetest/README.txt

C:UsersAlwizcoin>git commit -m "Testing the moving of files in Git."
[master 3ed22ed] Testing the moving of files in Git.
 1 file changed, 0 insertions(+), 0 deletions(-)
 rename README.txt => movetest/README.txt (100%)
You can also rename and move a file at the same time by passing git mv a new name and location. Let’s move the README.txt back to its original place at the root of the working directory and give it its original name:
C:UsersAlwizcoin>git mv movetest/README.txt README.md
C:UsersAlwizcoin>git status
On branch master
Changes to be committed:
  (use "git reset HEAD <file>..." to unstage)

        renamed:    movetest/README.txt -> README.md

C:UsersAlwizcoin>git commit -m "Moving the README file back to its original place and name."
[master 962a8ba] Moving the README file back to its original place and name.
 1 file changed, 0 insertions(+), 0 deletions(-)
 rename movetest/README.txt => README.md (100%)
Note that even though the README.md file is back in its original folder and has its original name, the Git repo remembers the moves and name changes. You can see this history using the git log command, described in the next section.
Viewing the Commit Log
The git log command outputs a list of all commits:
C:UsersAlwizcoin>git log
commit 962a8baa29e452c74d40075d92b00897b02668fb (HEAD -> master)
Author: Al Sweigart <[email protected]>
Date:   Wed Sep 1 10:38:23 2021 -0700

    Moving the README file back to its original place and name.

commit 3ed22ed7ae26220bbd4c4f6bc52f4700dbb7c1f1
Author: Al Sweigart <[email protected]>
Date:   Wed Sep 1 10:36:29 2021 -0700

    Testing the moving of files in Git.

--snip—
This command can display a large amount of text. If the log won’t fit in your Terminal window, it’ll let you scroll up or down using the up and down arrow keys. To quit, press the q key.
If you want to set your files to a commit that’s earlier than the latest one, you need to first find the commit hash, a 40-character string of hexadecimal digits (composed of numbers and the letters A to F), which works as a unique identifier for a commit. For example, the full hash for the most recent commit in our repo is 962a8baa29e452c74d40075d92b00897b02668fb. But it’s common to use only the first seven digits: 962a8ba.
Over time, the log can get very lengthy. The --oneline option trims the output to abbreviated commit hashes and the first line of each commit message. Enter git log --oneline into the command line:
C:UsersAlwizcoin>git log --oneline
962a8ba (HEAD -> master) Moving the README file back to its original place and name.
3ed22ed Testing the moving of files in Git.
15734e5 Deleting deleteme.txt from the repo to finish the deletion test.
441556a Adding a file to test Git deletion.
2a4c5b8 Added example code to README.md
e1ae3a3 An initial add of the project files.
If this log is still too long, you can use -n to limit the output to the most recent commits. Try entering git log --oneline –n 3 to view only the last three commits:
C:UsersAlwizcoin>git log --oneline -n 3
962a8ba (HEAD -> master) Moving the README file back to its original place and name.
3ed22ed Testing the moving of files in Git.
15734e5 Deleting deleteme.txt from the repo to finish the deletion test.
To display the contents of a file as it was at a particular commit, you can run the git show <hash>:<filename> command. But GUI Git tools will provide a more convenient interface for examining the repo log than the command line Git tool provides.
Recovering Old Changes
Let’s say you want to work with an earlier version of your source code because you’ve introduced a bug, or perhaps you accidentally deleted a file. A version control system lets you undo, or roll back, your working copy to the content of an earlier commit. The exact command you’ll use depends on the state of the files in the working copy.
Keep in mind that version control systems only add information. Even when you delete a file from a repo, Git will remember it so you can restore it later. Rolling back a change actually adds a new change that sets a file’s content to its state in a previous commit. You’ll find detailed information on various kinds of rollbacks at https://github.blog/2015-06-08-how-to-undo-almost-anything-with-git/.
Undoing Uncommitted Local Changes
If you’ve made uncommitted changes to a file but want to revert it to the version in the latest commit, you can run git restore <filename>. In the following example, we modify the README.md file but don’t yet stage or commit it:
 C:UsersAlwizcoin>git status
On branch master

Changes not staged for commit:
  (use "git add <file>..." to update what will be committed)
  (use "git restore <file>..." to discard changes in working directory)
        modified:   README.md

no changes added to commit (use "git add" and/or "git commit -a")
C:UsersAlwizcoin>git restore README.md
C:UsersAlwizcoin>git status
On branch master
Your branch is up to date with 'origin/master'.

nothing to commit, working tree clean
After you’ve run the git restore README.md command, the content of README.md reverts to that of the last commit. This is effectively an undo for the changes you’ve made to the file (but haven’t yet staged or committed). But be careful: you can’t undo this “undo” to get those changes back.
You can also run git checkout . to revert all changes you’ve made to every file in your working copy.
Unstaging a Staged File
If you’ve staged a modified file by running the git add command on it but now want to remove it from staging so it won’t be included in the next commit, run git restore --staged <filename> to unstage it:
C:UsersAl>git restore --staged README.md
Unstaged changes after reset:
M	spam.txt
README.md remains modified as it was before git add staged the file, but the file is no longer in the staged state.
Rolling Back the Most Recent Commits
Suppose you’ve made several unhelpful commits and you want to start over from a previous commit. To undo a specific number of the most recent commits, say, three, use the git revert -n HEAD~3..HEAD command. You can replace the 3 with any number of commits. For example, let’s say you tracked the changes to a mystery novel you were writing and have the following Git log of all your commits and commit messages.
C:UsersAl
ovel>git log --oneline
de24642 (HEAD -> master) Changed the setting to outer space.
2be4163 Added a whacky sidekick.
97c655e Renamed the detective to 'Snuggles'.
8aa5222 Added an exciting plot twist.
2590860 Finished chapter 1.
2dece36 Started my novel.
Later you decide you want to start over again from the exciting plot twist at hash 8aa5222. This means you should undo the changes from the last three commits: de24642, 2be4163, and 97c655e. Run git revert -n HEAD~3..HEAD to undo these changes, and then run git add . and git commit -m "<commit message>" to commit this content, just as you would with any other change:
C:UsersAl
ovel>git revert -n HEAD~3..HEAD

C:UsersAl
ovel>git add .

C:UsersAl
ovel>git commit -m "Starting over from the plot twist."
[master faec20e] Starting over from the plot twist.
 1 file changed, 34 deletions(-)

C:UsersAl
ovel>git log --oneline
faec20e (HEAD -> master) Starting over from the plot twist.
de24642 Changed the setting to outer space.
2be4163 Added a whacky sidekick.
97c655e Renamed the detective to 'Snuggles'.
8aa5222 Added an exciting plot twist.
2590860 Finished chapter 1.
2dece36 Started my novel.
Git repos generally only add information, so undoing these commits still leaves them in the commit history. If you ever want to undo this “undo,” you can roll it back using git revert again.
Rolling Back to a Specific Commit for a Single File
Because commits capture the state of the entire repo instead of individual files, you’ll need a different command if you want to roll back changes for a single file. For example, let’s say I had a Git repo for a small software project. I’ve created an eggs.py file and added functions spam() and bacon(), and then renamed bacon() to cheese(). The log for this repo would look something like this:
C:UsersAlmyproject>git log --oneline
895d220 (HEAD -> master) Adding email support to cheese().
df617da Renaming bacon() to cheese().
ef1e4bb Refactoring bacon().
ac27c9e Adding bacon() function.
009b7c0 Adding better documentation to spam().
0657588 Creating spam() function.
d811971 Initial add.
But I’ve decided I want to revert the file back to before I added bacon() without changing any other files in the repo. I can use the git show <hash>:<filename> command to display this file as it was after a specific commit. The command would look something like this:
C:UsersAlmyproject>git show 009b7c0:eggs.py
<contents of eggs.py as it was at the 009b7c0 commit>
Using the git checkout <hash> -- <filename>, I could set the contents of eggs.py to this version and commit the changed file as normal. The git checkout command only changes the working copy. You’ll still need to stage and commit these changes like any other change:
C:UsersAlmyproject>git checkout 009b7c0 -- eggs.py

C:UsersAlmyproject>git add eggs.py

C:UsersAlmyproject>git commit -m "Rolled back eggs.py to 009b7c0"
[master d41e595] Rolled back eggs.py to 009b7c0
 1 file changed, 47 deletions(-)

C:UsersAlmyproject>git log --oneline
d41e595 (HEAD -> master) Rolled back eggs.py to 009b7c0
895d220 Adding email support to cheese().
df617da Renaming bacon() to cheese().
ef1e4bb Refactoring bacon().
ac27c9e Adding bacon() function.
009b7c0 Adding better documentation to spam().
0657588 Creating spam() function.
d811971 Initial add.
The eggs.py file has been rolled back, and the rest of the repo remains the same.
Rewriting the Commit History
If you’ve accidentally committed a file that contains sensitive information, such as passwords, API keys, or credit card numbers, it’s not enough to edit that information out and make a new commit. Anyone with access to the repo, either on your computer or cloned remotely, could roll back to the commit that includes this info.
Actually removing this information from your repo so it’s unrecoverable is tricky but possible. The exact steps are beyond the scope of this book, but you can use either the git filter-branch command or, preferably, the BFG Repo-Cleaner tool. You can read about both at https://help.github.com/en/articles/removing-sensitive-data-from-a-repository.
The easiest preventative measure for this problem is to have a secrets.txt, confidential.py, or similarly named file where you place sensitive, private information, and add it to .gitignore so you’ll never accidentally commit it to the repo. Your program can read this file for the sensitive info instead of having the sensitive info directly in its source code.
GitHub and the git push Command
Although Git repos can exist entirely on your computer, many free websites can host clones of your repo online, letting others easily download and contribute to your projects. The largest of these sites is GitHub. If you keep a clone of your project online, others can add to your code, even if the computer from which you develop is turned off. The clone also acts as an effective backup.
Go to https://github.com and sign up for a free account. From the GitHub home page or your profile page’s Repositories tab, click the New button to start a new project. Enter wizcoin for the repository name and the same project description that we gave Cookiecutter in “Using Cookiecutter to Create New Python Projects” on page 200, as shown in Figure 12-6. Mark the repo as Public and deselect the Initialize this repository with a README checkbox, because we’ll import an existing repository. Then click Create repository. These steps are effectively like running git init on the GitHub website.
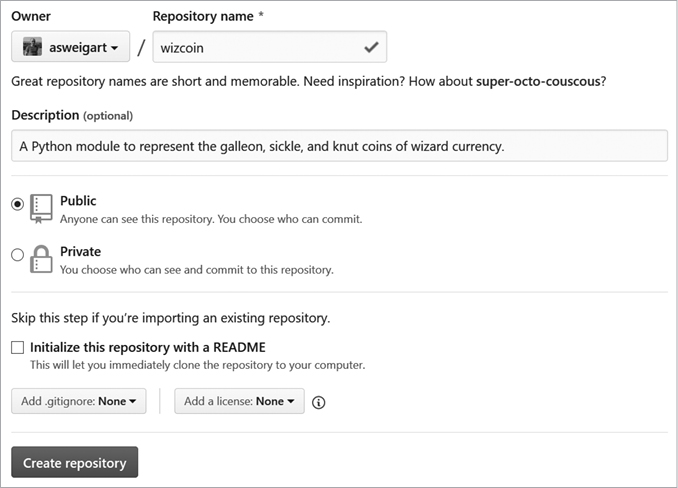
Figure 12-6: Creating a new repo on GitHub
You’ll find the web page for your repos at https://github.com/<username>/<repo_name>. In my case, my wizcoin repo is hosted at https://github.com/asweigart/wizcoin.
Pushing an Existing Repository to GitHub
To push an existing repository from the command line, enter the following:
C:UsersAlwizcoin>git remote add origin https://github.com/<github_username>/wizcoin.git
C:UsersAlwizcoin>git push -u origin master
Username for 'https://github.com': <github_username>
Password for 'https://<github_username>@github.com': <github_password>
Counting objects: 3, done.
Writing objects: 100% (3/3), 213 bytes | 106.00 KiB/s, done.
Total 3 (delta 0), reused 0 (delta 0)
To https://github.com/<your github>/wizcoin.git
 * [new branch]      master -> master
Branch 'master' set up to track remote branch 'master' from 'origin'.
The git remote add origin https://github.com/<github_username>/wizcoin.git command adds GitHub as a remote repo corresponding to your local repo. You then push any commits you’ve made on your local repo to the remote repo using the git push -u origin master command. After this first push, you can push all future commits from your local repo by simply running git push. Pushing your commits to GitHub after every commit is a good idea to ensure the remote repo on GitHub is up to date with your local repo, but it’s not strictly necessary.
When you reload the repo’s web page on GitHub, you should see the files and commits displayed on the site. There’s a lot more to learn about GitHub, including how you can accept other people’s contributions to your repos through pull requests. These, along with GitHub’s other advanced features, are beyond the scope of this book.
Cloning a Repo from an Existing GitHub Repo
It’s also possible to do the opposite: create a new repo on GitHub and clone it to your computer. Create a new repo on the GitHub website, but this time, select the Initialize this repository with a README checkbox.
To clone this repo to your local computer, go to the repo’s page on GitHub and click the Clone or download button to open a window whose URL should look something like https://github.com/<github_username>/wizcoin.git. Use your repo’s URL with the git clone command to download it to your computer:
C:UsersAl>git clone https://github.com/<github_username>/wizcoin.git
Cloning into 'wizcoin'...
remote: Enumerating objects: 5, done.
remote: Counting objects: 100% (5/5), done.
remote: Compressing objects: 100% (3/3), done.
remote: Total 5 (delta 0), reused 5 (delta 0), pack-reused 0
Unpacking objects: 100% (5/5), done.
You can now commit and push changes using this Git repo just as you would if you had run git init to create the repo.
The git clone command is also useful in case your local repo gets into a state that you don’t know how to undo. Although it’s less than ideal, you can always save a copy of the files in your working directory, delete the local repo, and use git clone to re-create the repo. This scenario happens so often, even to experienced software developers, that it’s the basis of the joke at https://xkcd.com/1597/.
Summary
Version control systems are lifesavers for programmers. Committing snapshots of your code makes it easy to review your progress and, in certain cases, roll back changes you don’t need. Learning the basics of a version control system like Git certainly saves you time in the long run.
Python projects typically have several standard files and folders, and the cookiecutter module helps you create the starting boilerplate for many of these files. These files make up the first files you commit to your local Git repo. We call the folder containing all of this content the working directory or project folder.
Git tracks the files in your working directory, all of which can exist in one of three states: committed (also called unmodified or clean), modified, or staged. The Git command line tool has several commands, such as git status or git log, that let you view this information, but you can also install several third-party GUI Git tools.
The git init command creates a new, empty repo on your local computer. The git clone command copies a repo from a remote server, such as the popular GitHub website. Either way, once you have a repo, you can use git add and git commit to commit changes to your repo, and use git push to push these commits to a remote GitHub repo. Several commands were also described in this chapter to undo the commits you’ve made. Performing an undo allows you to roll back to an earlier version of your files.
Git is a extensive tool with many features, and this chapter covers only the basics of the version control system. Many resources are available to you to learn more about Git’s advanced features. I recommend two free books that you can find online: Pro Git by Scott Charcon at https://git-scm.com/book/en/v2 and Version Control by Example by Eric Sink at https://ericsink.com/vcbe/index.html.