So, let's start with the Gidiosaurus skin.
But first, as usual, we must prepare the file:
- As the very first step, go to the
texture_makingfolder and move the texturesvcol.png,vcol2.png,norm.png, andnorm2.pngto thetexturesfolder. - Then start Blender and open the
Gidiosaurus_baking_normals.blendfile we saved in Chapter 11, Refining the Textures. - Switch the left UV/Image Editor window with a Node Editor window and press the N key to get rid of the Properties sidebar. Put the mouse pointer in the 3D viewport to the right and press the T key to get rid of the Tool Shelf panel, then press the Z key twice to go in Solid viewport shading mode.
- Enable the 3rd scene layer, select and delete the Armor_detailing object (press the X key, then left-click to confirm).
- Enable the 4th scene layer and select and delete the Gidiosaurus_for_baking object as well. Enable the 14th scene layer, and also select and delete the Gidiosaurus_detailing and the enamels objects.
- Enable the 11th scene layer and right-click on the Gidiosaurus_lowres object to select it.
- It's not mandatory but, in case it is not already disabled, it is best to go to the Object Modifiers window and disable the Armature modifier visibility in the viewport by clicking on the eye icon button.
- Go to the UV Maps subpanel under the Object Data window and select the UVMap coordinates layer (the first one); press Tab to enter Edit Mode, then click on the + icon button to the right side of the UV Maps subpanel to add a new coordinates layer; rename it UVMap2.
- Go to the left window and change it into a UV/Image Editor; one by one, select the UV islands of the talons (at the moment these are placed inside the other UDIM tile spaces), and move them to the default U0V0 tile, to overlap the location of the teeth islands. The reason for this will be clear later, when we will reuse the same color map both for the teeth and for all the talons.
- If necessary, remember to disable the Keep UV and edit mode mesh selection in sync button on the UV/Image Editor toolbar:

Moving the talon islands to overlap the teeth islands inside the default U0V0 tile space
- Go out of Edit Mode and switch the UV/Image Editor window back to a Node Editor window.
- Click on the Engine to use for rendering slot on the main top header to switch to the Cycles Render engine.
- Also, enable the 6th scene layer to show the Lamps. Go to the Outliner, unhide and delete the Lamp.001 object and select the Lamp object; in the Object Data window, change the type to Spot and then click on the Use Nodes button. Set the Strength to 10.000 and the Color to R 1.000, G 1.000, B 0.650, then set the Size to 0.500 and enable the Multiple Importance item (the Multiple Importance Sampling helps in reducing noise for big lamps and sharp glossy reflections, at the cost of the samples rendering a bit slower).
- Put the mouse pointer in the 3D viewport and press N to call the Properties sidepanel; in the top Transform subpanel, type: Location X = 6.059204, Y = -9.912249 and Z = 7.546275, and Rotation X = 55.788944°, Y = 0° and Z = 30.561825°.
- Go to the Render window and, under the Sampling subpanel, set the Samples to 400 for Render and 300 for Preview.
- Go down to the Light Paths subpanel and disable the Reflective Caustics item, then set Filter Glossy to 1.000.
- Re-select the Gidiosaurus_lowres object and go to the Material window:
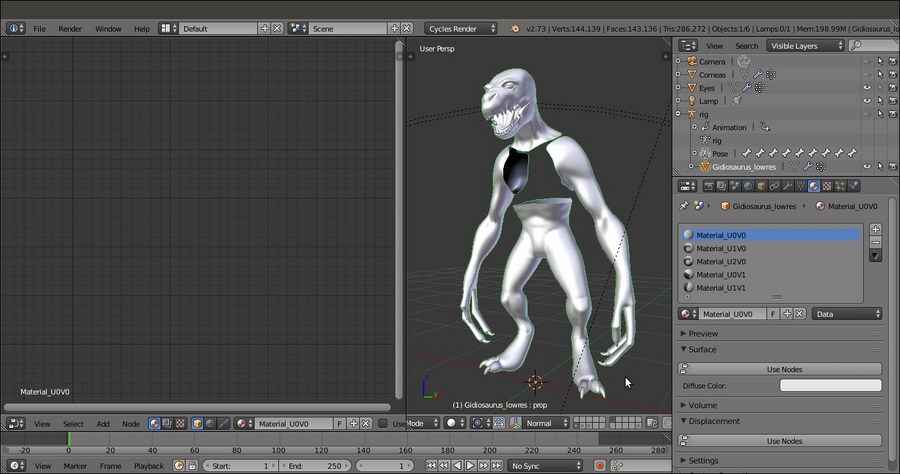
The 5 materials under the Cycles render engine
As you can see in the previous screenshot, the Gidiosaurus_lowres object has already assigned the 5 materials corresponding to the 5 UDIM tile spaces (see Chapter 5, Unwrapping the Low Resolution Mesh, and Chapter 10, Creating the Textures).
The materials have been created under Blender Internal so, switching to Cycles, they show but aren't initialized as node materials yet; besides this, just before starting the creation of the first Cycles material, we must add two more materials.
- Click the + icon button twice (Add a new material slot) to the right side of the Material window to add two new material slots.
- Select the penultimate slot and click on the New button; rename the new material as
Material_enamels. Select the last slot, click on the New button and rename it asMaterial_wet_U0V0. - Press Tab to enter Edit Mode and select all the vertices of the teeth and the talons; assign them to the
Material_enamelsslot. - Zoom on the Gidiosaurus head; select the vertices of the inner nostrils, of the inner edges of the eyelids and of the tongue, as shown in the following screenshot, and assign them to the
Material_wet_U0V0slot:
Selecting the vertices of the "wet" areas of the character's head to assign them to the "Material_wet_U0V0" slot
- Save the file as
Gidiosaurus_shaders_start.blendfile.
We know that the skin of our character is shared in 5 different materials; we are going to focus on the head (Material_U0V0), as the more representative one.
Once we are happy with the result, we will also copy (with all the due differences) the material to the other body parts.
Therefore, the steps are as follows:
- In the materials list inside the Material window, select the
Material_U0V0(the first top one) and press Ctrl + left-click on it to rename it asMaterial_skin_U0V0; then, move down and click on the Use Nodes button inside the Surface subpanel.Immediately, a Diffuse BSDF shader node (already connected to a Material Output node) appears inside the Node Editor window to the left of the screen and listed in the Surface slot inside the Surface subpanel to the right:

The Diffuse BSDF shader node connected to the Material Output node
- In the Surface subpanel, under the Material window, click on the Surface slot that now shows the Diffuse BSDF shader: in the pop-up menu that appears, select a Mix Shader node:

Switching the Diffuse BSDF shader node with a Mix Shader node through the Material window drop-down list
The Surface slot now shows the Mix Shader node item, and right below there are two new Shader slots that at the moment show the None item; in fact, looking at the nodes inside the Node Editor window, we see that the Diffuse BSDF shader node has been replaced by a Mix Shader node, and that the two (green) Shader input sockets are still empty:
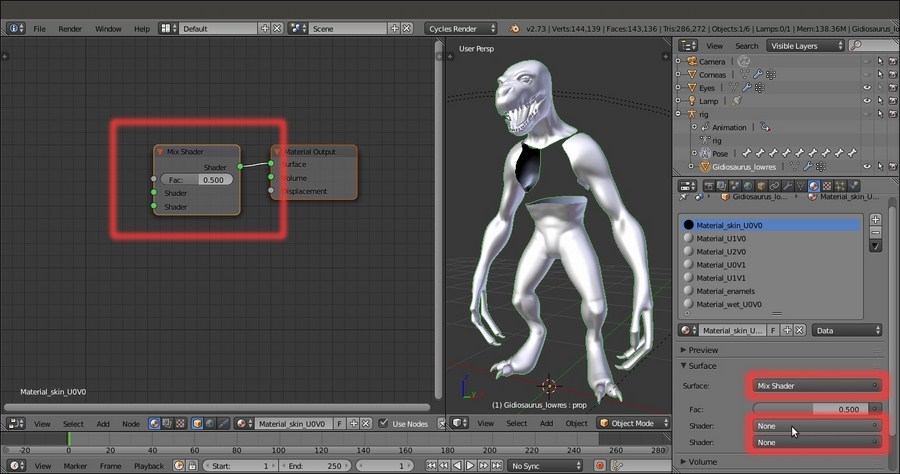
The Mix Shader node with its two shader input sockets in the UV/Image Editor window and in the Material window
- Click on the first Shader slot under the Surface subpanel to select, again from the pop-up menu, a Diffuse BSDF shader node; click on the second Shader slot and select a Mix Shader node; both the two new nodes are added and connected to the proper input socket, as we can see in the Node Editor window:

Two new nodes connected to the two shader input sockets of the Mix Shader node
At this point, to avoid confusion, it's already better to start to label the various nodes with meaningful names.
- Put the mouse pointer inside the Node Editor window and press the N key to call the Properties sidepanel.
- Select the last Mix Shader node we added to the material and then go to click on the Label slot inside the top Name subpanel of the side Properties panel: type Mix Shader1:

Labeling the nodes
- Select the other Mix Shader node (the old one) and repeat the procedure by labeling it as Mix Shader2:
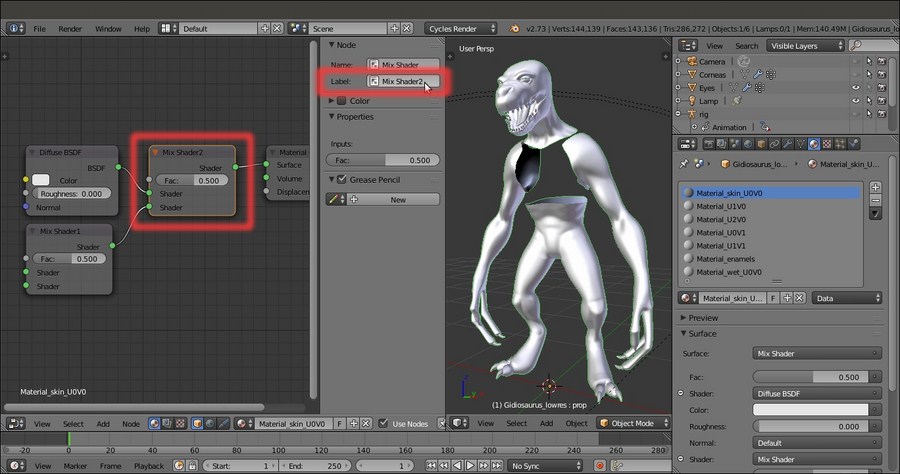
Labeling the nodes again
- Put the mouse pointer on the 3D viewport and press the 0 key on the numpad to enter the Camera view.
- Press Shift + B and by left-clicking draw a box around the head of the Gidiosaurus character to crop the area that can be rendered.
- Zoom to the red square by scrolling the mouse wheel and then press Shift + Z to switch the Viewport Shading mode to Rendered:

Cropping the renderable area and zooming to it
- Put the mouse pointer inside the Node Editor window and press Shift + A. In the pop-up panel that appears, navigate to Shader and then click on the Glossy BSDF item to add the node; as it appears, move the mouse to place it to the left side of the Mix Shader1 node.
- Label it as Glossy BSDF1, connect its output to the first top Shader input socket of the Mix Shader1 node, and set Distribution to Beckmann:

Adding a Glossy BSDF shader node and labeling it
- Add a second Glossy BSDF shader node (Shift + A | Shader | Glossy BSDF) and place it right under the previous one; label it as Glossy BSDF2, connect its output to the second Shader input socket of the Mix Shader1 node, and set Distribution to Beckmann as well and the Roughness to 0.400.
- Set the factor value (Fac) of the Mix Shader1 node to 0.350:

Adding a second Glossy shader node and blending it with the first one through the Fac value of the Mix Shader1 node
- Add a Fresnel node (Shift + A | Input | Fresnel) and connect its Fac output to the Fac input socket of the Mix Shader2 node; set the IOR value to 3.840. Set the Roughness value of the Diffuse BSDF shader node to 0.500:

Adding a Fresnel node to set the Index of Refraction value to blend the diffuse with the glossy components
- Add a Subsurface Scattering node (Shift + A | Shader | Subsurface Scattering) and an Add Shader node (Shift + A | Shader | Add Shader). Move this last one to the link that connects the Mix Shader2 node to the Material Output node in order to paste it automatically between the two nodes (automatically when the connection line becomes highlighted):

Automatically joining the Add Shader node
- Connect the output of the Subsurface Scattering node to the second Shader input socket of the Add Shader node. In the SSS node, change Fallof from Cubic to Gaussian, set the Scale to 0.001 and click on the Radius button to set the RGB to 9.436, 3.348 and 1.790:

Connecting and setting the SSS node
- Add a new Mix Shader node (Shift + A | Shader | Mix Shader) and label it as Mix Shader3. Connect the output of the Mix Shader2 node to the first Shader input socket of the Mix Shader3 node, and the output of the Add Shader node to its second Shader input socket. Set the Fac of the Mix Shader3 node to 0.250 and connect its output to the Surface input socket of the Material Output node:
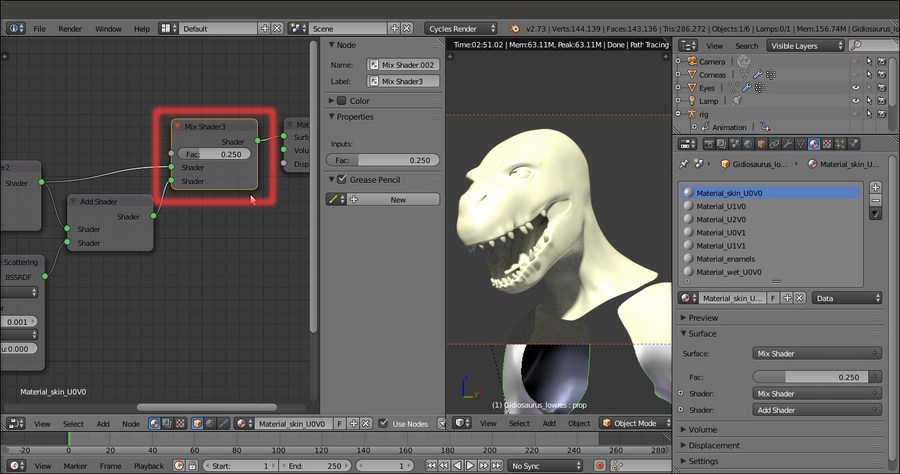
A little trick to tweak the influence of the Add shader node
- Add a Frame (Shift + A | Layout | Frame), box-select all the nodes (except the Material Output node) and then press Ctrl + P to parent them to the frame; label the frame as SHADERS.
- Select the SHADERS frame and go to the Properties sidepanel. Expand the Color subpanel (right under the Node subpanel) by clicking on the little horizontal black arrow, and enable the Color checkbox.
- Click on the color slot and set a light color of your choice (I set it to RGB 1.000, which is totally white). Then click on the + icon button to the side and in the Name slot of the Add Node Color Preset pop-up panel, write Frame, then click the big OK button.
- Select the Material Output node and then Shift-select the Frame again, then go to the Color subpanel and click on the big vertical arrow under the + and – icon buttons to the side. Click on the Copy Color item to copy the color of the Frame to the Material Output node:
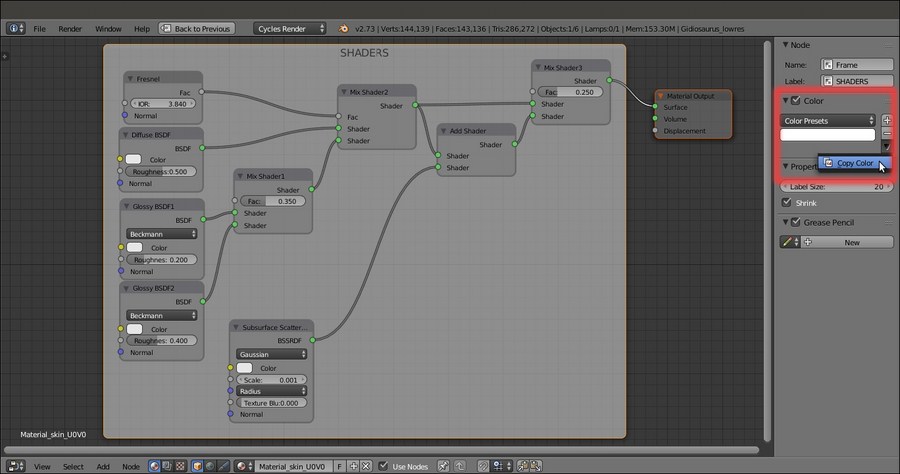
The SHADERS frame with the nodes and the Copy Color tool under the N sidepanel
- Select any one of the other nodes, for example the Fresnel node, enable the Color checkbox and set a new color of your choice (for these nodes, I set it to R 1.000, G 0.819, B 0.617, which is a light brown).
- Click on the + icon button to the side and in the Name slot of the Add Node Color Preset pop-up panel, write Shaders, then click the big OK button.
- Now box-select all the other nodes inside the frame and click on the Copy Color item to copy the color from the Fresnel node to all the other selected nodes at once:
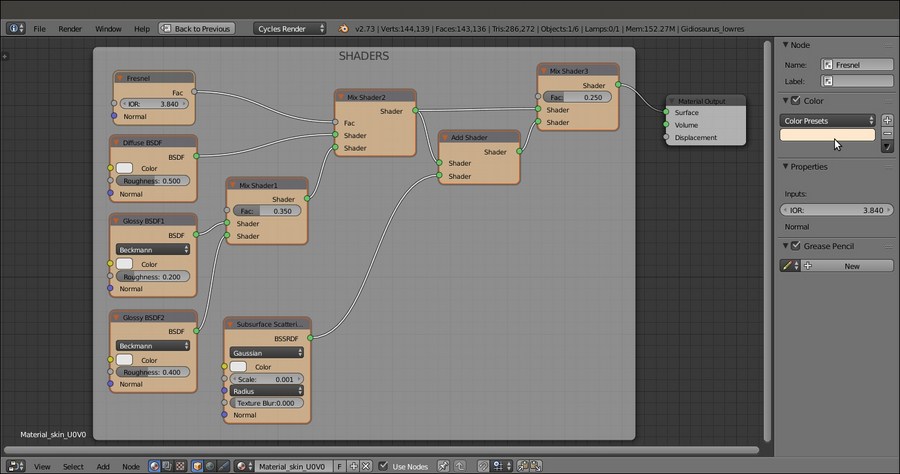
Copying the label color from one node to all the other selected nodes
At this point we have completed the basic shader for the skin; what we have to do now is to add the textures we painted in both Chapter 10, Creating the Textures, and Chapter 11, Refining the Textures.
So:
- Put the mouse pointer into the Node Editor window and add an Image Texture node (Shift + A | Texture | Image Texture); label it as COL and then use Shift + D to duplicate it; move the duplicated one down and change its label to SCALES.
As you label the newly added nodes, also assign colors to them to make them more easily readable inside the Node Editor window, and save these colors as presets as we did at step 20.
- Click on the Open button of the COL node and browse to the
texturesfolder. There, load the imageU0V0_col.png. - Click on the Open button of the SCALES node and browse to the
texturesfolder. There, load the imageU0V0_scales.png; set the Color Space to Non-Color Data. - Add a MixRGB node (Shift + A | Color | MixRGB) and label it as Scales_Col; connect the Color output of the COL node to the Color1 input socket of the Scales_Col node and the Color output of the SCALES node to its Color2 input socket. Set the Fac to 1.000 and the Blend Type to Divide.
- Connect the output of the Scales_Col node to the Color input socket of the Diffuse BSDF shader node inside the SHADERS frame.
The result so far is visible in the real-time rendered preview to the right:

The rendered result of the two combined image texture nodes
As you can see, the glossy component is strong in this one! We must lessen the effect, to obtain a more natural look.
- Add a new MixRGB node (Shift + A | Color | MixRGB) and label it as Col_Spec; set the Color2 to R 0.474, G 0.642, B 0.683, then also connect the output of the Scales_Col node to the Color1 input socket of the Col_Spec node.
- Set the Fac value to 0.150 and the Blend Type to Add, then connect its output to the Color input sockets of both the Glossy BSDF1 and Glossy BSDF2 nodes:

Varying the textures color output for the glossy component
- Press Shift + D to duplicate the Col_Spec node and label the duplicate as Col_SSS; set the Fac value to 1.000 and the Color2 to R 0.439, G 0.216, B 0.141. Connect the Color output of the Scales_Col node to the Color1 input socket of the Col_SSS node and the output of this latter node to the Color input socket of the Subsurface Scattering node; increase its Texture Blur to the maximum value.
- Shift-select the Col_Spec and the Col_SSS nodes and then also the SHADERS frame, and press Ctrl + P to parent them:

Varying the textures color output also for the SSS node
The new result looks a lot better:

A better result
- Add an Attribute node (Shift + A | Input | Attribute) and label it as Attribute_UV1. Connect its Vector output to the Vector input sockets of the COL and SCALES nodes and in the name field type UVMap:

Adding the Attribute node to establish the UV coordinates layer to be used
By the way, the glossy component is still a little unnatural.
- Add a new Image Texture node (Shift + A | Texture | Image Texture) and label it as VCOL. Click on the Open button, browse to the
texturefolder and load the imagevcol.png. - Press Shift + D to duplicate the Attribute node, change the label to Attribute_UV2, and change the Name field to UVMap_norm. Connect its Vector output to the Vector input of the VCOL node.
- Add a Math node (Shift + A | Converter | Math) and a MixRGB node (Shift + A | Color | MixRGB); connect the Color output of the VCOL node to the first Value input socket of the Math node; label this one as Spec_soften and set the second Value to 0.007. Connect its Value output to the Color1 input socket of the MixRGB node, which is now labeled as Mix_Spec.
- Connect the Color output of the Mix_Spec node to the Roughness input socket of the Glossy BSDF1 node:

Using the baked Vertex Color image to "soften" the character's skin specularity
The specularity is now a bit more realistic:

And the rendered result of this operation
Anyway, it's still missing the contribution of the bump effect.
- Add a Bump node (Shift + A | Vector | Bump); connect the output of the SCALES node to the Height input socket of the Bump node and the Normal output of this latter node to the Normal input socket of the Diffuse BSDF, Glossy BSDF1, Glossy BSDF2, and Subsurface Scattering nodes. Set the Strength of the Bump node to 0.500:

Adding the bump pattern to the shaders
Now we start to see something!

The bump effect in the rendered preview
By the way, the bump pattern is too even and, therefore, unrealistic; we must therefore break it in some way.
- Add a Noise Texture node (Shift + A | Texture | Noise Texture) and a Texture Coordinate node (Shift + A | Input | Texture Coordinate). Connect the Object output of the Texture Coordinate node to the Vector input socket of the Noise Texture node, then set the Scale of the texture to 50.000.
- Add a Math node (Shift + A | Converter | Math) and a MixRGB node (Shift + A | Color | MixRGB). Connect the Color output of the SCALES node to the Color1 input socket of the MixRGB node, and the Color output of the Noise Texture to the Color2 input socket.
- Set the MixRGB blend type to Add, the Fac value to 1.000 and label it as Scales_Noise. To see the effect, connect its Color output to the Height input socket of the Bump node (but this is going to change very soon, so it's not mandatory at this step):

Adding some noise to the bump pattern part 1
- Select the Math node and move it on the link connecting the Noise Texture node with the Scales_Noise node to paste it in between them: set the Operation to Multiply, the second Value to 1.000, and label it as Multiply_Noise.
- Press Shift + D to duplicate the Multiply_Noise node, change the label to Multiply_Scales and the second Value to 4.000; paste it between the SCALES node and the Scales_Noise node.
- Add an RGB to BW node (Shift + A | Converter | RGB to BW) and paste it between the Noise Texture node and the Multiply_Noise one:

Adding some noise to the bump pattern part 2
- Press Shift + D to duplicate the Multiply_Scales node and change the duplicate label to Multiply_Bump; connect the output of the Multiply_Scales to the first Value input socket of the Multiply_Bump node and the output of the Scales_Noise node to the second Value input socket. Connect the output of the Multiply_Bump node to the Height input socket of the Bump node:
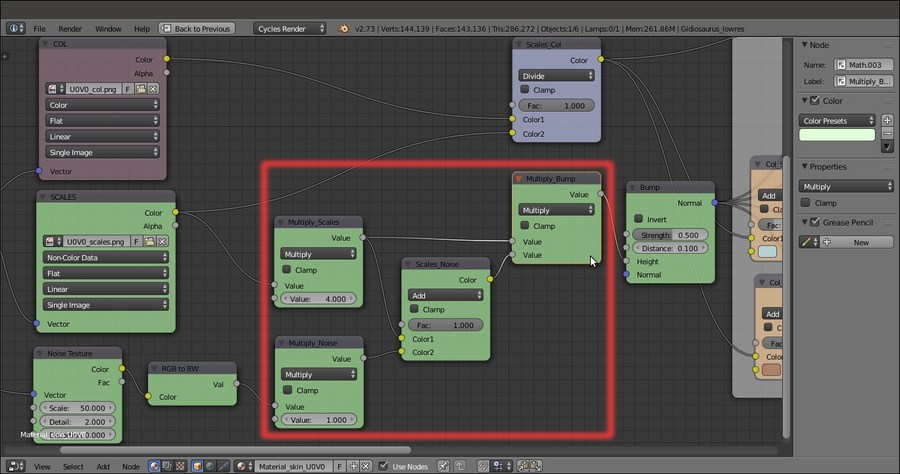
Adding some noise to the bump pattern part 3
- Add a MixRGB node (Shift + A | Color | MixRGB) and paste it between the VCOL node and the Spec_soften node; label it as Multiply_Spec, set the Blend Type to Multiply and the Fac value to 0.850; connect the output of the Multiply_Bump node to the Color2 input socket of the Multiply_Spec node:

Modulating the specularity with the aid of the bump pattern output
The overall bump effect is almost completed:

The new Rendered bump effect
What is still missing now is the normal map we obtained from the sculpted Gidiosaurus mesh in Chapter 11, Refining the Textures.
- Add a new Image Texture node (Shift + A | Texture | Image Texture) and a Normal Map node (Shift + A | Vector | Normal Map). Label the Image Texture node as NORMALS, then connect the Vector output of the Attribute_UV2 node to the Vector input socket of the NORMALS node.
- Connect the Color output of the NORMALS node to the Color input socket of the Normal Map node, then click on the Open button on the NORMALS node, browse to the
texturesfolder and load the imagenorm.png. Set the Color Space of the NORMALS node to Non-Color Data and click on the empty slot in the Normal Map node to select the UVMap_norm coordinates layer. - Add a Vector Math node (Shift + A | Converter | Vector Math), label it as Average_Normals and paste it right after the Bump node; connect the output of the Normal Map node to the second Value input socket of the Average_Normals node.
- Set the Operation of the Average_Normals node to Average and connect its Vector output to the Vector input sockets of the Diffuse BSDF, Glossy BSDF1, Glossy BSDF2, and Subsurface Scattering nodes.
- Set the Strength of the Normal Map to 2.000:

Adding the normal map output to the bump pattern
Finally we have completed the first skin material!

The completed Material_skin_U0V0
- Save the file as
Gidiosaurus_skin_Cycles.blend.
This material can at first glance appear a bit complex, but actually the design behind it is quite simple as you can see in the following screenshot, where each component has been visually grouped by colors and frames (open the provided Gidiosaurus_skin_Cycles_01.blend file to have a better look):

The total skin material network
- From step 1 to step 18 we built the SHADERS part of the material, that is, the combination of the diffuse with the glossy component and the addition of the subsurface scattering effect.
- Note that the glossy component (the specularity) is obtained by mixing two glossy shaders with different roughness values; by setting the factor value of the Mix Shader1 node to 0.350, we give prevalence to the Glossy BSDF1 node effect, which is to the node connected to the first top Shader input socket.
- Also, we added the subsurface scattering effect by the Add Shader node, and to further tweak the blending of the effect with the rest of the shader, we added the Mix Shader3 node, to give prevalence to the output of the Mix Shader2 node (that is the output of the diffuse plus the glossy components).
- From step 19 to step 24 we saw some not mandatory but useful tips for assigning colors to the nodes, in order to visually distinguish and/or group them and make the whole material network more easily readable.
- At step 25 we started to add the textures, first the diffuse color one and then the grayscale scales image that we used here to add details to the coloration (and later for the bump effect). By mixing the scales with the diffuse color through the MixRGB node set to a Divide blend type, we automatically obtained a scales pattern on the skin itself.
- From step 30 to step 33 we tweaked the diffuse color map to also affect the glossy and the subsurface scattering components, but with different hues.
- Note that at step 34 we used an Attribute node to set the UV coordinates layer to be used for the mapping of the textures. It would have been unnecessary in this case, with the UVMap coordinates layer being the first one and therefore the default one. Cycles, in fact, in the case of image textures, automatically uses any existing UV coordinates layer. But, because later we also used a different UV coordinates layer, it was better to specify it.
- From step 35 to step 38 we improved the glossiness effect of the skin, by using the output of the
vcol.pngimage we had previously baked and tweaked through the nodes inside the SPEC frame. - From step 39 to step 47 we built the BUMP effect, by using the output of the SCALES image texture added through a MixRGB node to the output of a procedural Noise Texture. The RGB to BW node simply converts the colored output of the procedural noise to a grayscale output (and if you think we could have used the Fac output instead, well, it's not the same thing), and the Multiply_Scales and Multiply_Noise nodes set the strength of the outputs before the adding process. Through the Multiply_Bump node we also added the grayscale output of the combined bump to the glossy component.
- From step 48 to step 52 we also added the effect of the normal map we baked from the sculpted high resolution Gidiosaurus mesh to the bump pattern. The normal map is averaged, through the Vector Math node, with the bump output. Because of this averaging, the strength value of the normal map had to be set to double (2.000) to have full effect.
Still focusing on the character's head, there is a material we can obtain from the skin material with some modification, the material for the wet parts of the character's skin (inner eyelids, tongue, inner nostrils).
Going on from the previously saved file:
- If you think this is the case, especially if your computer (like mine) isn't very powerful, temporarily disable the Rendered preview by moving the mouse cursor inside the 3D viewport and pressing Shift + Z.
- In the Material window, click on the
Material_wet_U0V0material to select it. - Put the mouse pointer inside the Node Editor window, select the default two nodes already assigned to the material and delete them by pressing the X key.
- Now, in the Material window, re-select the
Material_skin_U0V0; put the mouse in the Node Editor window, press A twice to select everything, and press Ctrl + C. - Re-select the
Material_wet_U0V0, put the mouse pointer inside the empty Node Editor window and press Ctrl + V to paste the copied material nodes.Now we have copied the nodes of the skin material to the material assigned to the parts that need to appear wet; it's enough now to tweak this material a bit to modify the bump pattern and the glossiness:
- In the Node Editor, zoom to the Noise Texture node inside the BUMP frame; left-click on it to select it and then press the X key to delete it.
- Press Shift + A and add a Voronoi Texture node (Shift + A | Texture | Voronoi Texture); left-click on the node and, by keeping the mouse button pressed, move the node a little bit on the frame, so it should automatically be parented to it.
- Connect the Object output of the Texture Coordinate node to the Vector input socket of the Voronoi Texture node and the Color output of this latter node to the RGB to BW node input socket; set the Voronoi Scale to 200.000.
- Add an Invert node (Shift + A | Color | Invert) and paste it between the Voronoi Texture and the RGB to BW nodes:

The different texture nodes of the "Material_wet_U0V0"
- Scroll the Node Editor window a bit to the right to find the Multiply_Noise node: change the label to Multiply_Voronoi and the second Value to 0.025.
- Find the Scales_Col node and change Blend Type from Divide to Multiply.
- Now go to the SHADERS frame; change the IOR value of the Fresnel node to 15.000 and connect its output to the Fac input socket of the Mix Shader1 node; change the Distribution of both the Glossy BSDF1 and Glossy BSDF2 nodes to Ashikhmin-Shirley and set the Roughness of the Glossy BSDF2 node to 0.600.
We substituted the Noise Texture node with a Voronoi Texture node to give a kind of organic look to the surface of the tongue of the creature.
In the following screenshot, we can see the result of the wet material; note that for the occasion I opened the mouth wide, to make the inside more visible:

The rendered wet material
One more material we are going to create in this section of the recipe is the Material_enamels for teeth and talons; in this case, we just need mostly the SHADERS frame's nodes with the single contribution of the color image texture
U0V0_col.png, here using the UVMap2 coordinates layer to avoid having to create 5 different materials for the talons alone (originally distributed in different tiles). By the way, nothing is stopping you from creating several talon materials, if you prefer. - Again, select, copy and paste the skin material to the enamels material slot through the Node Editor window, as we have already done in steps 3, 4 and 5.
- This time, just delete the unnecessary nodes, in short keeping only the Attribute node, the COL node and the SHADERS frame with its parented nodes.
- Change the UV coordinates layer in the Name slot of the Attribute node to UVMap2 (and the label to Attribute_UV3). Lower the Roughness value of the Diffuse BSDF node to 0.000.
- Go to the SHADERS frame; select and delete the Col_Spec and Col_SSS nodes, then connect the Color output of the COL node also to the Color input socket of the Subsurface Scattering node.
- Select and delete the Glossy BSDF1 and the Glossy BSDF2 nodes.
- Add 2 Anisotropic BSDF shader nodes (Shift + A | Shader | Anisotropic BSDF), a Tangent node (Shift + A | Input | Tangent) and detach the Add Shader node from the Mix Shader3 node.
- Label the two Anisotropic BSDF shader nodes as Anisotropic BSDF1 and Anisotropic BSDF2 and connect them to the two Shader input sockets of the Add Shader node. Connect the output of the Tangent node to the Tangent input sockets of the two Anisotropic shader nodes.
- Set the Tangent of the Tangent node to Z. Set the Anisotropy of both the Anisotropic nodes to 0.500, the Roughness of the Anisotropic BSDF1 node to 0.500 and the Roughness of the Anisotropic BSDF2 node to 0.200.
- Connect the Add Shader output to both the second Shader input sockets of the Mix Shader1 and Mix Shader2 nodes.
- Set the IOR value of the Fresnel node to 1.540 and connect the Fresnel output to the Fac input sockets of the Mix Shader1, Mix Shader2, and Mix Shader3 nodes.
- Connect the output of the Diffuse BSDF shader node to the first Shader input socket of the Mix Shader1 node, then connect the output of the Mix Shader1 node to the first Shader input socket of the Mix Shader2 node.
- Connect the output of the Subsurface Scattering node to the second Shader input socket of the Mix Shader3 node.
- In the Subsurface Scattering node, change the Scale to 0.020 and the Radius to R 1.000, G 0.400, B 0.100.

The "Material_enamels" network
- Save the file.
Thanks to the two Anisotropic shaders with their different roughness values, we obtained a nice specularity effect along the length of the teeth (and therefore also of the talons):

The rendered preview of the teeth (and talons) shader
- Shameless self-promotion—one other cookbook, published by Packt Publishing, explaining the logic behind Cycles materials and textures and with several material recipes (https://www.packtpub.com/hardware-and-creative/blender-cycles-materials-and-textures-cookbook-third-edition)
- The online documentation (http://wiki.blender.org/index.php/Doc:2.6/Manual/Render/Cycles/Nodes)
