
-
Establishing trust through verification, validation, and recording
-
Using finite state machine diagrams to characterize application phases
-
Incremental development of smart contracts using the Remix IDE
Trust and integrity are essential requirements for any system, but they are especially critical in a decentralized system where the peer participants operate beyond the traditional boundaries of trust. In this chapter, you’ll learn how to add elements that establish trust and integrity to your blockchain-based solution, to support robust decentralized operations.
Imagine that your neighbors want to borrow your food processor. You know and trust them because of your prior interactions, so you don’t hesitate to share your food processor with them. This action is a peer-to-peer transaction without an intermediary. What if you buy something online? You need a credit card and a bank account or some similar instrument whereby your credentials have been verified. The credit card company undertakes the responsibility of establishing trust in you for the online vendor. In this case, trust is quantified based on information like your credit rating and other credentials. Thus, building trust between the vendor and customer involves at least one intermediary and maybe more.
The cases I’ve described are just two of the many possibilities in the trust continuum, from simple peer-to-peer interactions between neighbors to complex financial systems. But how do you resolve the trust in a decentralized system in which no organizations or individuals act as intermediaries? Who or what fills this role in such systems? Blockchain can. It is ideally positioned to provide automated trust intermediation through its innovative infrastructure, unique protocol, and distributed ledger technology. It addresses trust and integrity by verification, validation, and protocol-level consensus, and through its distributed immutable recording.
In this chapter, you’ll learn about trust and integrity in the context of blockchain-based decentralized systems. You’ll learn to design smart contracts with additional techniques for improving trust in the system you developed in chapter 2. Often, the techniques for enabling trust, such as access control, encryption, and digital signatures, also address the integrity requirements of a system. We’ll focus on the access control aspect in this chapter, and explore cryptography and hashing techniques in chapter 5.
The chapter introduces a new decentralized application for balloting in a digital democracy (Ballot), as well as a new design diagram in finite state machines (FSM). This chapter also illustrates the use of Solidity features including modifiers and require() and assert() declarations to implement verification and validation.
3.1 Essentials of trust and integrity
The constituents of trust and integrity are represented by the two quad charts in figure 3.1, one showing the components of trust and the other showing the elements of integrity. Spend a few minutes reviewing figure 3.1, and identify the various components of trust and integrity before we explore these concepts further.
3.1.1 Trust
Trust means different things in different contexts. Trust is an essential criterion for the success of any system. So let’s first define trust in the context of blockchain-based decentralized systems.
Definition Trust is a measure of confidence in the credibility of a peer participant in a system. Trust in a blockchain-based system is established by verification and validation of relevant participant data and transactions, and by immutable recording of appropriate information done with the consensus of the stakeholders.

Figure 3.1 Essential components of trust and integrity
You establish trust by verification and validation; this aspect is shown in figure 3.2 as fundamental elements of trust (1a and 1b). Often, people use the terms verification and validation interchangeably. For smart contract development, we’ll differentiate between these two terms. This clarification will aid in better design and development of smart contracts.

To understand the difference between verification and validation, let’s consider these real-world examples:
-
Verification (1a) is similar to a Transportation Security Administration (TSA) agent checking your identification at an airport security checkpoint. Verification is about general rules.
-
Validation (1b) is similar to an airline’s gate agent making sure that you have a valid boarding pass. Validation is about application-specific rules.
-
The recording (1d) is similar to TSA’s and the airline’s centralized database updated with the traveler’s status. In the case of blockchain, the differences are that recording is on a distributed immutable ledger and the use of consensus protocol (1c).
You can think of verification as dealing with general or global requirements within a problem space and validation as being application- or data-specific. In the case of a blockchain application, the transactions are verified and validated according to general rules as well as application-specific rules and conditions.
The bottom two cells (1c and 1d) of the trust quad chart in figure 3.2, consensus and immutable distributed recording, are the responsibility of the blockchain protocol. The purpose of the consensus process is to make sure that a consistent set of transactions (a block) is recorded on the blockchain. As you’ll recall from chapter 1, nodes form the blockchain network. An exact copy of each block, chosen by the consensus process, is recorded on all the distributed nodes. The chain of blocks is deemed to be immutable because each of the nodes or stakeholders has a copy; no one node can make changes without its copy going out of sync with the others. The blockchain protocol and infrastructure determine the necessary rules and software for these two cells (consensus and recording) of the trust chart. You can focus on these two aspects of trust when you develop and contribute at the protocol level. As an application developer, you’ll design only the application-specific verification and validation (the top two cells, 1a and 1b).
3.1.2 Integrity
Integrity is about the truthfulness of the participants, the messages they send, the data, and the operations of the system under consideration.
Definition Integrity, in the context of blockchain, means ensuring the security and privacy of data and confidentiality of transactions.
Integrity, shown in the second quad of figure 3.1, begins with a method for uniquely identifying the peer participant on the node. In a decentralized system, no username and password identify who you are, as in a centralized system. Blockchain account address is a simple way to specify a unique identity for a participant. The elements of integrity--identity, security, privacy, and confidentiality (figure 3.1, 2a to 2d)--are based predominantly on the private-public key pair concept. You’ll learn in chapter 5 how to implement security and privacy aspects for participant data, using a combination of cryptography and hashing algorithms. Likewise, you’ll learn about confidentiality (figure 3.1, 2d) and its implementation in a micropayment channel application in chapter 7.
In this chapter, you’ll design a smart contract for application-specific trust and integrity. The ballot smart contract illustrates verification, validation, and identity and privacy aspects. Let’s explore applying these features to solve a well-known problem. Digital democracy has been a quest ever since the advent of the internet. Balloting is an exciting topic that garners the interest of a wide range of people. We’ll solve a balloting problem that allows for electronic voting by a set of decentralized participants.
3.2 Digital democracy problem
Digital democracy encompasses many things, from simple digital identity cards in India to e-residency in Estonia. In the context of this chapter, you’ll be concerned with systems that enable democracy by using digitization, such as internet-based communication and information systems--in particular, using internet-based electronic voting systems instead of paper ballots or mechanical machines. Let’s begin discussing the problem with a problem statement.
Problem Statement Consider an online ballot application. People vote to choose a proposal from a set of proposals. A chairperson registers the people who can vote, and only registered voters can vote (only once) on a proposal of their choice. The chairperson’s vote is weighted twice (x2) as heavily as regular people’s votes. The ballot process goes through four states (Init, Regs, Vote, Done), and the respective operations (initialize, register, vote, count votes) can be performed only in the corresponding states.
3.2.1 Designing a solution
We’ll apply the design principles you learned in chapter 2, which are available in appendix B. Please review these principles before starting the design process.
Here are the recommended steps for solving the ballot problem:
-
Apply design principles 1, 2, and 3 to design the use case diagram; use that diagram to discover the users, data assets, and transactions.
-
Use design principle 4, design the contract diagram that defines the data, modifiers, or rules for verification and validation, and functions.
-
Using the contract diagram, develop the smart contract in Solidity.
-
Compile and deploy the smart contract in the Remix IDE, and test it.
This ballot problem offers an opportunity to add one more UML design diagram: that of a finite state machine (FSM) model to represent the phases of the voting process.
3.2.2 Use case diagram
Let’s analyze the ballot problem using the UML diagram use case diagram. This diagram is the starting point for achieving the design principles of identifying the users, assets, and transactions. The use case diagram is shown in figure 3.3. The main actors and roles are as follows:
-
The chairperson can register voters and also self-register and vote.
-
Anybody can request the winner or results of the ballot process.

Figure 3.3 Ballot use case diagram
In this simple case, every call to the reqWinner() function will count the votes. Although this implementation is not efficient, you can leave it as such for now. In later versions, you can improve on this codebase. The diagram also captures one of the requirements of the problem: the fact that the chairperson is also a voter. The IS-A specialization relationship shows this: the chairperson is a voter, as shown in figure 3.3. The use cases are register, vote, and reqWinner; the function count votes is an internal function, as shown in the count votes use case of the diagram.
3.2.3 Incremental development of code
The code for the balloting problem will be developed in four incremental steps so that you can to learn the smart contract development process. Also, this process will allow you to learn Solidity language features by example. The four incremental steps in the development are as follows:
-
BallotV1 --Define the data structures for the smart contract, and test them.
-
BallotV2 --Add the constructor and the function to change the state of voting.
-
BallotV3 --Add the other functions of the smart contract and a modifier to illustrate the use of Solidity features for enabling trust.
-
BallotV4 --Add the trust elements
require(),revert(), andassert(), and the function access modifier.
Let’s now list the users of the system, data assets, and transactions based on the problem statement and the use case analysis.
3.2.4 Users, assets, and transactions
Now you’re ready to apply design principle 3. Recall from the problem statement that the goal is for users to choose one of the many available proposals by voting on them. Based on the use case analysis in figure 3.3, the following are the users of the ballot system: the chairperson, the voters (including the chairperson), and anybody who’s interested in the outcome of the balloting process.
The data assets, in this case, are the proposals on which the voters are voting. You also need to keep track of the voters, whether they have voted or not, and the weight of their votes. (Recall that the chairperson is also a voter and that the chairperson’s vote counts as double, weight=2.) Let’s use this analysis as a guideline and code the two data items identified: voters and proposals, as shown in listing 3.1. The phases of the voting specified in the problem statement are also coded into an enum or enumerated data type. enum is an internal data type provided by Solidity. A Voter type and Proposal type are defined using the struct construct, and a special voter, chairperson, is also defined. A mapping data structure maps the voter account address to the voter details, and an array defines the proposals (numbers) that are being voted on.
Listing 3.1 Data items (BallotV1.sol)
pragma solidity >=0.4.2 =<0.6.0;
contract BallotV1 {

    struct Voter {                          ❶
        uint weight;
        bool voted;
        uint vote;
    }
    struct Proposal {                       ❷
        uint voteCount;
    }

    address chairperson;
    mapping(address => Voter) voters;       ❸
    Proposal[] proposals;

    enum Phase {Init, Regs, Vote, Done}     ❹
    Phase public state = Phase.Init;
    }
❶ Type Voter contains the voter details.
❷ Type Proposal contains proposal details: for now, only voteCount.
❸ Mapping of voter address to voter details
❹ Various phases (0,1,2,3) of voting, state initialized to Init phase
You can enter this code in the Remix IDE. This step allows you to check the syntax of the data items as well as the values of any public variables. Create a BallotV1.sol smart contract, and copy in the contents of listing 3.1. If you have the just-in-time compiler enabled (in the left panel of the Remix IDE), you see a red X mark next to any code line with a syntax error. Correct any errors; then compile the code. You’ll see a check on the compile icon in the panel on the left, indicating that the compile process was successful. Make sure that the environment is set to the JavaScript VM, click the Deploy & Run Transactions icon, and then click the Deploy button (orange) in the middle of the left panel.
You should see the user interface with one button: state. Click that button, and you should see its value as 0 for the state value of Phase.Init. Now change the value of the state to Phase.Done in the code editor. Repeat the compile and deploy steps, and click the State button again. You should see the value of state as 3 for Phase.Done. Three test runs are shown in figure 3.4. Note that the variable state is available for user interaction (testing) because it was declared public in the code. If you remove the public visibility modifier from the state, you will not see the state button in the user interface.

Figure 3.4 Remix user interface for three runs (state = 0, state = 3, state is not public)
You’ve completed a simple exercise to make sure that all the data definitions are syntax error-free. In the process, you also learned about a few more Solidity language types--enums and arrays--and used structs, mappings, and the public visibility modifier again. Note that the Remix IDE helps with incremental development of your code by allowing you to check the syntax of the data elements before you add functions. This step is useful for testing the data structures before you get into coding the functions.
3.2.5 Finite state machine diagram
The use case diagram in figure 3.3 provides only static details; it has no way to depict the dynamic timing and state transitions that the ballot process requires. Moreover, the diagram doesn’t impose the order in which the operations should occur: registration period, voting period, and the determination of the winner. Do you now see the need for another design diagram that depicts the system dynamics?
To represent system dynamics, you’ll use a UML finite state machine, or FSM diagram. The FSM is well founded in formal computer science and mathematics, but it is also a versatile UML design diagram. It is an important diagram because it represents the various state changes a smart contract goes through that are dependent on time and other conditions. Often, the conditions and rules are based on various phases of a real-world contract or process, which brings us to design principle 5.
Design Principle 5 Use a finite state machine UML diagram to represent system dynamics such as state transitions within a smart contract.
In a voting process, voters are registered first, and there usually are deadlines for registration and voting. In some U.S. states, you have to be registered 30 days before the election day, and the voting takes place and is completed in a single day for in-person voters. If that is the case
-
Registration has to be completed before voting and before a specific deadline.
-
The functions for the ballot process proceed in a certain sequence.
Let’s apply this design principle and capture the dynamics with a state diagram, as shown in figure 3.5. This FSM is composed of
-
States, including a starting state and one or more ending states, indicated by double circles by convention
-
Inputs that bring about the transitions (T=0, T+10 days, T+11 days)
-
Zero or more outputs during transitions. Registration (
Regs), voting (Vote), and counting (Done), for example, happen in the states indicated.
Earlier, we defined four phases or states representing the ballot problem. These four phases are Init, Regs, Vote, and Done. The system begins its operation after initialization in the Init phase and then transitions into the Regs phase, where registration can take place. After ten days (in this case) for registration, the system moves to the Vote phase, in which voting goes on for a day, and then enters the (ballot) Done phase, at which point the winning proposal can be requested. Transitions in this case are temporal, or time-driven; you can see this in figure 3.5, with T=0, T+10, and T+11 limiting the duration of each phase. These dynamic rules for transitioning through the balloting process have to be captured when you code the smart contract to enable trust.

Figure 3.5 FSM design of the ballot state transitions
Now let’s translate these design representations into code, as shown in listing 3.2. This listing, BallotV2.sol, has all the contents of BallotV1.sol from listing 3.1, plus a constructor and an additional function: changeState(). The enumerated type Phase is used for setting the state variable state. Your goal is to effect and observe the state changes. Let’s assume that the ballot process’s chairperson is controlling when the transitions happen by calling the changeState() function with a parameter value of 0, 1, 2, or 3 (representing the four phases).
Listing 3.2 Solution with voting states (Ballotv2.sol)
// include the code from BallotV1.sol, not shown here

 enum Phase {Init, Regs, Vote, Done}                                     ❶
    // Phase can take only 0,1,2,3 values: Others invalid

 Phase public state = Phase.Init;

 constructor (uint numProposals) public  {                               ❷
        chairperson = msg.sender;                                        ❷
        voters[chairperson].weight = 2; // weight 2 for testing purposes
        for (uint prop = 0; prop < numProposals; prop ++)                ❸
            proposals.push(Proposal(0));                                 ❸

    }


    // function for changing Phase: can be done only by chairperson
    function changeState(Phase x) public {                               ❹
       if (msg.sender != chairperson) {revert();}                        ❺
       if (x < state) revert();                                          ❻
       state = x;
    }
    }
❷ Constructor makes contract deployer the chairperson
❸ Number of proposals is a parameter for the constructor
❺ Only chairperson can change state; otherwise, revert
❻ State has to progress in 0,1,2,3 order; otherwise, revert
In listing 3.2, only the constructor for BallotV2 and the changeState() functions are shown. When you copy this code into the Remix IDE, be sure to preface it with the contents of listing 3.1. The complete BallotV2.sol is available in the codebase of this chapter.
Let’s review the code. Initially, the state variable is set to Init by static initialization. The account (msg.sender) invoking the constructor is designated as the chairperson. More appropriately, we could say that the chairperson initiates the ballot process by deploying the smart contract. The number of proposals is initialized, and the chairperson’s vote is given a weight of 2 (arbitrarily). Voting-phase changes are affected by the function changeState(); you can enforce that only the chairperson can change from one phase to another and that Phase can take only the values {0,1,2,3} for {Init, Regs, Vote, Done}. You want the phases to progress from Init to Done via Regs and Vote. Let’s explore how all this works:
-
Enter the code for the BallotV2 smart contract into the Remix IDE, and check the state change functionality.
-
Compile and deploy the contract with
3as a parameter when you click the Deploy button, indicating that three proposals are available to vote on. Every time you click Deploy, the value in the box to the right of it has to be set to the number of proposals to be voted on. -
Click the
statebutton in the UI to show0as the value of thestate. -
Now click
changeState, using1as a parameter, and check the value ofstate, which will show1forRegs.
You can also see functions reverting if invalid values are given for their parameters. The Ethereum VM itself will throw an error if you give a negative value as a parameter to the changeState() function.
The code in listing 3.2 provides a general pattern for any smart contract that transitions through state changes in its design. In listing 3.2, the rules (for validation) for the state transitions are stated as they are in any other common code, using if statements. It is desirable to separate the definition of rules from the actual code of the functions to emphasize the role of the smart contract as a trust intermediator. That’s what we’ll do next.
3.2.6 Trust intermediation
Typically, verification, validation, and exceptions in problems are specified by rules to be enforced and conditions to be checked. Additionally, in a blockchain-based application, you should revert or abort any transactions that violate trust (represented by a rule) to prevent bad or unauthorized transactions from becoming part of the immutable ledger of the blockchain. This aspect is a key difference between blockchain programming and a traditional distributed application development. How do you implement these rules and requirements?
Solidity provides various language features and functions that address these trust requirements. These language features are as follows:
-
Modifiers specify access control rules to verify and manage who has control of data and functions to establish trust and privacy. (Perhaps only the chairperson can register members, for example.) These modifiers are also called access modifiers to distinguish them from the visibility modifiers (public and private) of functions and data.
-
The
require(condition)declaration validates the condition passed as a parameter and reverts the transaction if the check fails. This feature is commonly used for general validation of parameters (such asage > 21). -
The
revert()statement allows you to revert a transaction and also prevent it from being recorded on the blockchain. This feature is commonly used in modifier definitions. -
The
assert(condition)declaration validates the condition of the variable or data during the execution of a function and reverts the transaction if the check fails. This feature is used for exceptions when you don’t want the condition to fail, such as to validate the head count in the middle of the ocean during a cruise! Another example is to stop your bill payment if there is not enough money in your bank account.
3.2.7 Defining and using modifiers
As you learned in chapter 2, modifiers are a special programming language structure offered by Solidity for implementing verification and validation rules in a smart contract. Let’s first review how to define them and then dig into how to use them effectively.
Listing 3.3 shows the syntax of a modifier, which is somewhat like a function definition:
-
It has a body that specifies the conditions to be checked within a
requirestatement. -
This line is followed by
__;, which represents the code that follows the modifier at the actual location where it would be used. This symbol represents the code that the modifier guards.
The next listing also shows an example use of a modifier. Here, it is verifying that the state of the ballot process is in the correct phase, as specified by the parameter reqPhase.
Listing 3.3 Modifier definition syntax and example
modifier name_of_modifier (parameters)    ❶
{ require { conditions_to_be_checked};
    _;
}

modifier validPhase(Phase reqPhase)       ❷
{ require(state == reqPhase);
  _;
}
❷ Actual modifier definition for validPhase rule
Why separate the modifier definition from the function definition? The idea is to separate the verification, validation, and exceptions so that the code clearly articulates the rules that are being enforced by the smart contract for implementing trust and integrity. The special keyword modifier can be used by a smart contract auditor (manual or automatic) to make sure that all the rules are defined up front and used as expected. When a modifier representing a rule is defined, it can be used any number of times, like a function call. This pattern allows you to review the code locations where rules are applied easily.
Now let’s find out how a modifier is invoked within the code. Listing 3.4 shows an actual function, register(), using the modifier validPhase. The modifier is located in the header of the function. The traditional code for checking the condition is also shown in the listing’s second line, commented out. You can see the elegance of the modifier as opposed to this line (the if statement). A review of the function header demonstrates that the state of the voting process is checked (it must be Phase.Regs) before anything is done in the function.
function register(address voter) public validPhase(Phase.Regs) {         ❶
        //if (state != Phase.Regs) {revert();}                           ❷
        if (msg.sender != chairperson || voters[toVoter].voted) return;
        voters[voter].weight = 1;
        voters[voter].voted = false;
        ...
    }
❶ Modifier in the header of function; if the condition is not met, revert the transaction
The use of modifiers as trust implementers (intermediaries) results in design principle 6.
Design Principle 6 Implement the verification and validation needed for trust intermediation by using modifiers specifying the rules and conditions in a smart contract. Typically, verification covers general rules about participants, and validation covers conditions for checking application-specific data.
Let’s put all these concepts together in the next composite design representation: the contract diagram.
3.2.8 Contract diagram including modifiers
In this section, you’ll use the analysis and design completed so far to develop a contract diagram (design principle 4; see appendix B) listing the data structures and functions needed for coding the Ballot smart contract. In the contract diagram shown in figure 3.6, you can see the definition of one modifier, validPhase, in the modifier box after the data definition. In this case, only one example of a modifier is defined to help you understand the modifier feature.
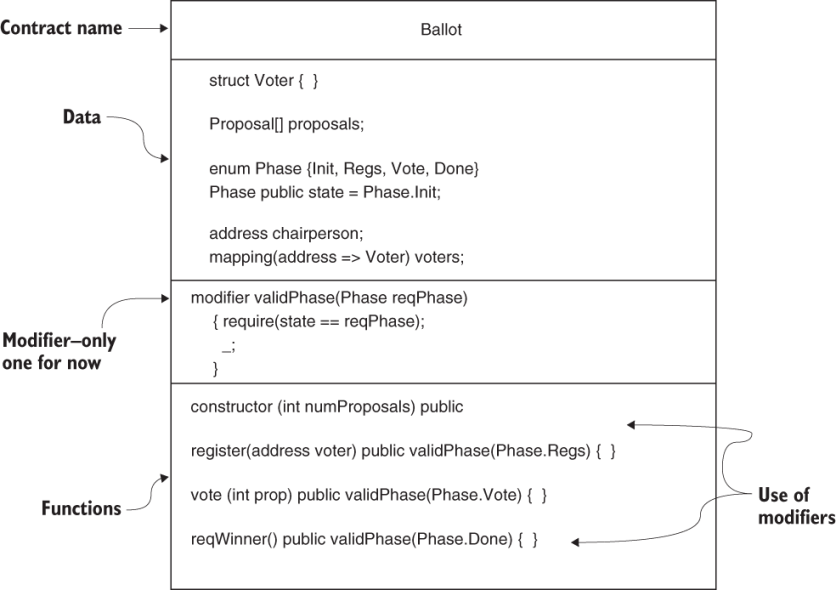
Figure 3.6 Ballot contract diagram
Note that the modifier validPhase has a parameter Phase reqPhase. In the functions box of the contract diagram, you see the repeated use of the validPhase modifier in the headers of three functions. Observe that the validPhase modifier is called with three different actual parameters--Regs, Vote, and Done--from the headers of the various functions, which illustrates the flexibility and reusability of the modifier. Before each function, the modifier is applied and executed with the actual parameter value. Inside the modifier, this actual parameter is compared with the current state of the voting process. If it does not match the state at the time the function is called, the function call is reverted, and it is not executed or recorded on the blockchain. This validation is the role of the modifier.
Now you can proceed to complete the Solidity code for the Ballot contract based on the details specified in the contract diagram.
3.2.9 Putting it all together
The complete code in Solidity is given in listing 3.5. Only the functions are shown because we already reviewed the data and modifier definitions in listings 3.1 through 3.4. Earlier, you saw only the templates of the functions; here, you see the completed code. Note that the Phase component is included in this code to illustrate the state transitions, the FSM-based design of dynamics, and the use of modifier-based validation.
Listing 3.5 Solution with modifier validPhase (BallotV3.sol)
// include listing 3.1 data here

   // modifiers
   modifier validPhase(Phase reqPhase)
    { require(state == reqPhase);
      _;
    }

    constructor (uint numProposals) public  {
        chairperson = msg.sender;
        voters[chairperson].weight = 2; // weight 2 for testing purposes
        for (uint prop = 0; prop < numProposals; prop ++)
            proposals.push(Proposal(0));
        state = Phase.Regs; // change Phase to Regs

    }

    function changeState(Phase x) public {                                ❶
        if (msg.sender != chairperson) {revert();}                        ❷
        if (x < state ) revert();
        state = x;
    }


    function register(address voter) public validPhase(Phase.Regs) {      ❸
        if (msg.sender != chairperson || voters[voter].voted) revert();   ❷
        voters[voter].weight = 1;
        voters[voter].voted = false;

    }


    function vote(uint toProposal) public validPhase(Phase.Vote)  {       ❸

        Voter memory sender = voters[msg.sender];
        if (sender.voted || toProposal >= proposals.length) revert();     ❷
        sender.voted = true;
        sender.vote = toProposal;
        proposals[toProposal].voteCount += sender.weight;


    }

    function reqWinner() public validPhase(Phase.Done) view returns (uint ❸
    ➥ winningProposal) {                                                 ❹

        uint winningVoteCount = 0;
        for (uint prop = 0; prop < proposals.length; prop++)
            if (proposals[prop].voteCount > winningVoteCount) {
                winningVoteCount = proposals[prop].voteCount;
                winningProposal = prop;
            }

    }
❶ Voting state change to be ordered by the chairperson
❷ Explicit validation using if statement
❸ validPhase modifier used in function headers
❹ View function, Tx not recorded on the chain
Storage vs. memory variables
In the vote function, you’ll find a local variable Voter struct. In Solidity, variables can be defined as storage (persistent and gets stored in the block) or memory (transient, does not get stored in the block). By default, simple variables are memory type, temporary, and do not get recorded in the block. The struct data structure is, by default, a storage variable, so you need to declare whether it is a memory or storage type when you use it. In the case of vote function, we’ve defined its local variable Voter struct as a memory type so that it does not waste storage in the block. When you define a struct inside a function as a local variable, you’ll have to declare explicitly whether it is a memory or storage type.
Function details
There are five functions, including the constructor:
-
constructor()--The constructor function is called when the smart contract is deployed. The account number that deploys the contract is that of the chairperson. The constructor takes the number of proposals to be voted on as a parameter. It initializes the data elements and the state of the voting phase (toRegsfromInit). -
changeState()--This function changes the state of the voting to the correct phase. It can be executed only by the chairperson, and the parameter value has to be in the correct order (1, 2, 3). Execute this function from the chairperson account’s address before transitioning toregister(),vote(), andreqWinner()for the first time. The statementif (x < state) revert();works only for simple state advancement. This basic version of state change is improved to a generic version in chapter 4. -
register()--This function should be executed only by the chairperson account; otherwise, it will revert and won’t be executed. It will also revert if thevotedBoolean variable istrueand if thestateis notPhase.Regs. -
vote()--This function can execute only during the voting phase (Phase.Vote). This rule is enforced by the modifier (rule)validPhase(Phase.Vote). You can observe the validation of the “one person-one vote” rule and the proposal number. (When the voting period ends, thestateis changed toPhase.Doneby the chairperson.) -
reqWinner()--This function counts the votes and identifies the winning proposal by its number. It executes the counting every time it’s called. During testing, this is okay because you might call the function once or twice, but for production, you may want to optimize it. (Also, in future designs, you’ll move this function off-chain or out of the smart contract code.) Note that this function is a “view” function, so it’s not recorded on the chain.
Review the roles of these functions before you move on to testing the complete Ballot in the Remix IDE.
3.3 Testing
Testing of smart contracts is a crucial step in the Dapp design process. Chapter 10 is fully dedicated to writing automated test scripts. In this chapter, you’ll start learning about the basics of testing to lay the foundation for test-driven development.
Load the code for the ballot problem into the Remix IDE in a file named BallotV3.sol, and compile it. Click the Deploy & Run Transactions icon, and within the JavaScript VM, choose an account address in the Account box in the panel at the top left. To the right of the Deploy button, you’ll see a box for the number of proposals. Enter the number of proposals (such as 3) in the text box next to it, and click Deploy. This action will invoke the constructor with number of proposals (in this case 3) as a parameter.
By now, you should be familiar with the various areas of the Remix IDE. Figure 3.7 shows a screenshot taken during the testing of the Ballot smart contract. During testing, you’ll be working with the user interface provided by Remix at the bottom of the left panel. You can see the results of execution in the output console at the bottom of the middle panel, below the code. After you deploy the Ballot smart contract with 3 as the parameter for the number of proposals, click the State button. It should show 1, representing Phase.Regs (mapped to 1 in the enum). In this phase, you can start registering accounts (voters). Note that you won’t use the Init state in this particular solution, even though it’s defined in the problem.

Figure 3.7 Remix user interface after the execution of BallotV3.sol
To make testing easier, copy the account numbers for the chairperson and the voters (as shown in table 3.1) from Remix, and save them somewhere convenient (such as a digital notepad). These accounts are the bottom 5 of the 15 test accounts available in the Remix IDE. Recall from the problem statement (section 3.2) and use case diagram (figure 3.3) that the chairperson is also a voter and that the chairperson’s vote is weighted twice as heavily as that of a regular voter.
Table 3.1 Accounts and their roles
Note The five accounts in Table 3.1 used to be the only five accounts in the previous version of Remix IDE (2019). The newer version of Remix IDE (2020) has ten additional test accounts that are random, which means that these accounts are different every time you reload. I’ve chosen to use the permanent five accounts at the bottom of the Account drop-down list of the Remix IDE. Be aware of such changes in the future, and be ready to adapt.
A robust testing process includes two different types of testing:
-
Positive tests --When given a valid set of data inputs, make sure that the smart contract performs correctly and as expected
-
Negative tests --When given invalid data inputs, make sure that the smart contract catches errors during verification and validation and that functions revert.
3.3.1 Positive tests
Let’s begin testing with the positive tests. In the Remix IDE, follow these steps:
-
Register three more voters (recall that the constructor already registers the chairperson). Copy and paste the second account number from the Account drop-down box (0x147 . . .) into the
register()function’s parameter box. You can copy it from your notepad or use the little copy button to the right of where the account number is displayed in the IDE. Make sure that the chairperson’s account (0xca3 . . .) is selected in the Account box, and click theregisterbutton in the user interface. (Recall that only the chairperson can register voters.) -
Use the
stateChange()function to change thestateto2orPhase.Vote. (Make sure that the chairperson’s account is selected in the Account box before you click thestateChangebutton.) Click thestatebutton representing the public variablestate. If you see the number 2, you are ready to vote. -
With the chairperson’s account selected in the Account box, enter
2in thevote()function’s parameter box--that is, the chair is voting for proposal number 2--and click thevotebutton. -
In the Account box, select the second account that was registered in step 1 of this test sequence. Enter
1for the proposal number in thevote()function’s parameter box, and click thevotebutton. -
Repeat step 5 for the other two voter account numbers. Now you are set to test the results.
-
Change the
state(from the chairperson’s account) by using thestateChange()function with parameter3.stateshould now bePhase.Done, or 3. Now you can call thereqWinner()function that does the counting. Click thereqWinnerbutton, and the winner should show up as proposal number 1.
This step is the end of the positive test. If you like, you can do an exhaustive positive test for all the accounts in the test chain provided by Remix.
Note Working with the user interface may take a little practice. Be patient. Account numbers may be different when you access the Remix IDE.
3.3.2 Negative tests
Now let’s move on to the negative tests. These tests might be an exhaustive list of tests covering every possible scenario or a minimal set of tests covering only the most likely conditions. You can use the following test scenarios and action plans as guidelines to develop the other tests needed for your applications. Three representative negative test scenarios and the steps for executing them in the Remix IDE are given here:
-
Account other than chairperson registers a voter. This transaction should be rejected in the
register()function’s regular code validation.From the Account drop-down list in the panel on the left, choose an account other than the chairperson’s (say, 0x147 . . .). Recall that the first account is the designated account for the chairperson. Now copy and paste any of the voter accounts from the first column of table 3.1 into the
register()function’s parameter box, and click theregisterbutton. The function call should error out, as you can see in the console at the bottom of the central panel. Figure 3.8 shows the error and revert messages.
Figure 3.8
register()function error and revert messages in the Remix console -
The smart contract is in the state
Phase.Done, and an account tries to vote. The modifiervalidPhaseshould reject this transaction.Make sure that you are in
Phase.Doneby clicking theStatebutton in the user interface. It should show3for this phase. Choose the chairperson’s account (0xca3 . . .) from the Account drop-down list in the left panel. Enter a number (0 to 2) in thevote()function’s parameter box, and click thevotebutton. This transaction should error out and be reverted due to the modifiervalidPhasein thevote()function validating the correct phase. You should observe this error in the console. -
An account tries to vote for a proposal number that doesn’t exist. This transaction is rejected by the condition in the
vote()function.This test again concerns the
vote()function. Close the current deployment by clicking the X button in the top-right corner of the user interface. Redeploy the contract by clicking the Deploy button and entering3as a parameter to the constructor. Register an account as a voter, and changestateto2orPhase.vote. Now enter a number (>= 3) in thevote()function’s parameter box, and clickvote. Because the valid proposal numbers are 0, 1, and 2, this should error out as validated by the condition in thevote()function:toProposal >= proposals.length.
These examples should give you an idea about testing the smart contract. In this case, you are testing it manually in the interface provided by the Remix IDE, and you can review the errors in the console. In chapter 10, after you’ve developed the entire application stack, you’ll learn to write test scripts, thus automating the manual test process.
3.4 Using modifiers, require(), and revert()
You’ve learned how to define a rule by using the modifier feature in Solidity. What if you have more than one rule for executing a function? You can apply a series of rules (access modifiers) to a function invocation. What if a condition is to be checked during or after the execution of the statements within a function? In this case, you can use a require() clause that reverts the function if the condition specified within it fails. The modifier validPhase specified in the Ballot smart contract uses a require() clause for checking the condition inside it and, if it fails, reverts the transaction. You also saw the use of revert() in the vote() function for validation that the voter has not already voted.
In the Ballot example, a single modifier was used in the function headers to validate the system parameters. Recall that the validPhase modifier enforces that all three functions--vote(), register(), and reqWinner()--are in the correct phase when they are invoked. Let’s now define one more modifier to reinforce your understanding of modifiers. You’ll do this for the validation within the register() function of the same smart contract. The modifier definition and use are shown in the next listing. Recall from the problem statement (section 3.2) that only the chairperson can register other voters. You can enforce this rule by using the onlyChair modifier.
Listing 3.6 Definition and use of onlyChair modifier
if (msg.sender != chairperson ..)                                          ❶


   modifier onlyChair ()                                                   ❷
   { require(msg.sender == chairperson);
  _;
}

function register(address voter) public validPhase(Phase.Regs) onlyChair   ❸
{
❶ Statement to be replaced by modifier onlyChair
❷ Modifier onlyChair definition
❸ Use of two modifiers in register() function’s header
You apply multiple modifiers to a function by specifying them in a whitespace-separated list. Modifiers are evaluated in the order in which they’re presented, so if the outcome of one modifier depends on that of another, make sure that you order the modifiers in the right sequence. In Ballotv3.sol, which uses the access modifiers validPhase and onlyChair, the validPhase modifier may take precedence and be applied first. In other words, if the phase is incorrect, you don’t have to check who is invoking the register() function. The header of the register() function, therefore, becomes
Function register(address voter) public validPhase(Phase.Regs)
                                            onlyChair
Here’s another example from an online buying use case:
function buy(..) payable enoughMoney itemAvail returns (..)
A function call to buy() verifies whether enough money is available (with the enoughMoney modifier) before checking the availability of the item. If enough money is not available, the function reverts without checking the item’s availability through the itemAvail modifier.
3.5 Assert() declarations
So far, our discussion of modifiers has involved two special built-in functions of Solidity: require() and revert(). In this section, you’ll learn about one more special function, assert(), which asserts that a condition is met during the computation process inside a function.
Suppose that you would like at least three votes (or majority votes) to be cast for the winning proposal in the ballot problem we’ve been discussing. You can enforce this rule by using an assert() clause at the end of the reqWinner() function. You can validate the parameters not only on entry to a smart contract function, but also at various stages of computation inside a function. Using assert(winningVoteCount>=3) will cause the function to revert if a vote count of 1 or 2 is the highest or number of voters is less than 3.
Note The value of 3 is used here for quick testing. In a more realistic case, you could use the value for majority in the assert() function or some other exceptional condition that should be checked.
Listing 3.7 shows the Ballot smart contract code with these incremental improvements: another modifier, onlyChair, and the assert() function. The combination of revert(), require(), and assert() along with modifiers and their proper use will help you address exceptions through verification and validation, resulting in robust trust intermediation by the smart contracts. require() used instead of an if statement means that a transaction will be reverted if a condition fails. If the function call reverts, no Tx is recorded on the blockchain for this function call. It is critical to understand that revert() stops the Tx from happening.
Listing 3.7 With all trust rules coded (BallotV4.sol)
   // modifiers
   modifier validPhase(Phase reqPhase)                             ❶
    { require(state == reqPhase);
      _;
    }
    modifier onlyChair()                                           ❶
     {require(msg.sender == chairperson);
      _;
     }

    constructor (uint numProposals) public  {
        chairperson = msg.sender;
        voters[chairperson].weight = 2; // weight 2 for testing purposes
        for (uint prop = 0; prop < numProposals; prop ++)
            proposals.push(Proposal(0));
        state = Phase.Regs;
    }

     function changeState(Phase x) onlyChair public {              ❷

        require (x > state );                                      ❸
        state = x;
     }

    function register(address voter) public validPhase(Phase.Regs)
                                                   onlyChair {     ❹

        require (! voters[voter].voted);                           ❸

        voters[voter].weight = 1;
       // voters[voter].voted = false;
    }


    function vote(uint toProposal) public validPhase(Phase.Vote)  {

        Voter memory sender = voters[msg.sender];                  ❺

        require (!sender.voted);                                   ❻
        require (toProposal < proposals.length);                   ❻

        sender.voted = true;
        sender.vote = toProposal;
        proposals[toProposal].voteCount += sender.weight;
    }

    function reqWinner() public validPhase(Phase.Done) view
                            returns (uint winningProposal)
    {

        uint winningVoteCount = 0;
        for (uint prop = 0; prop < proposals.length; prop++)
            if (proposals[prop].voteCount > winningVoteCount) {
                winningVoteCount = proposals[prop].voteCount;
                winningProposal = prop;
            }
       assert(winningVoteCount>=3);                                ❼
    }
}
❶ Two modifiers, including onlyChair
❸ require() instead of traditional if
❹ Use of two modifiers: validPhase and onlyChair
❺ Use of memory instead of storage type for local variables
❻ require() instead of traditional if
The functions assert() and require() are similar in that both check conditions and revert the transaction if the check fails. You use require() for common validations such as checking the limits of a variable’s value (such as age >= 18). You expect require() to fail sometimes; that is reasonable. assert() is meant for handling exceptions. You expect that this condition should not normally fail. To check the head count at a summer camp, for example, you might use assert(headcount == 44). You don’t want this check to fail in the middle of the night! On a more serious note, an assert() failure costs a lot more in wasted blockchain gas (execution cost) than require() reverting, so be selective about what to use when. Use assert() sparingly for managing exceptions. Use require() for validation of data, computations, and parameter values.
At this time, you can load listing 3.7, Ballotv4.sol, into the Remix IDE. Review the code to see all the incremental improvements (modifiers, require(), revert(), and assert()), and explore its workings.
3.6 Best practices
Now that you’ve learned about some significant additional features specific to blockchain application development, it’s an appropriate time to review some best practices:
-
Keep your smart contract code simple, coherent, and auditable. Let each state variable and function specified in a smart contract address a single problem. Do not include redundant data or unrelated functions. Make the smart contract functions auditable by using custom function modifiers instead of inline (
if/else) code for checking pre- and post-conditions of a function’s execution. -
Use the
memorytype as a qualifier for local variables that don’t need to be stored on the blockchain. Memory variables are transient and are not stored. (You saw an example in listing 3.7.) -
Develop the smart contract in incremental steps, debugging each step.
-
Be aware that the Solidity language updates frequently to improve performance and security. In this case, you have to adjust your code to meet the requirements of the latest version.
3.7 Retrospective
The design process you’ve learned in this chapter--creating a use case diagram; identifying users, data assets, and FSM state transitions; creating a contract diagram; and writing smart contract code--enables you to analyze a problem systematically and deliver a suitable smart contract solution. The smart contract syntax is similar to that of class in object-oriented programming, with the additional caveat that especially careful design is required for the trust and integrity elements.
You’ve also learned several special techniques for realizing these trust elements, including implementing trust intermediation through modifiers that enable validation and verification of conditions in a smart contract. Modifiers can also support privacy, security, confidentiality, and (thus) integrity by managing access to your data and functions.
3.8 Summary
-
Trust and integrity are critical needs in a decentralized system, in which the participants operate beyond traditional boundaries of trust. In a decentralized system, no humans are checking your credentials, such as a driver’s license, and no system is verifying your username/password combination for authentication.
-
Trust in blockchain-based application development is achieved by verification and validation through a trio of features: modifiers,
require(), andassert(). -
The
revert()declaration reverts a function call and prevents transactions from being recorded in the blockchain’s immutable ledger, thus preventing invalid information from accumulating in the ledger. -
FSM design provides another important design diagram, especially for the design of smart contracts with state transitions.
-
The Remix web IDE gives you a one-stop web platform for blockchain-based application development, including account numbers, transactions, and recording. In chapters 6-11, you’ll use this knowledge to develop Dapps in a desktop environment.
-
Armed with your knowledge of design principles, the design process, and the techniques for trust, you are ready to solve blockchain problems, represent your solutions by using a variety of design diagrams, and code smart contracts in the Solidity language. You’ll learn in chapters 5-7 about further strengthening trust in decentralized applications through algorithmic approaches using cryptography and secure hashing.