4
Managing Application Traffic
Microservices architecture creates a sprawl of loosely coupled applications deployed as containers on platforms such as Kubernetes. With the loose coupling of applications, inter-service traffic management becomes complex. If exposed insecurely to external systems, it can cause exposure of sensitive data, making your system vulnerable to external threats. Istio provides various mechanisms to secure and govern the following kinds of application traffic:
- Ingress traffic coming to your application from outside
- Inter-mesh traffic generated between various components of the application
- Egress traffic going out from your application to other applications outside the mesh
In this chapter, we will read about and practice managing application traffic by going through the following topics in detail.
- Managing Ingress traffic using the Kubernetes Ingress resource and an Istio Gateway
- Traffic routing and canary release
- Traffic mirroring
- Routing traffic to services outside the mesh
- Exposing Ingress over HTTPS
- Managing Egress
It will be a good idea to delete Istio and install it again to get a clean slate, as well as practice what you learned in Chapter 2. Istio releases a minor version at a 3-month cadence, as described at https://istio.io/latest/docs/releases/supported-releases/; therefore, it is recommended to keep your Istio version up to date using the documentation on the Istio website (https://istio.io/latest/docs/setup/getting-started/#download) and the concepts you learned about in Chapter 2.
Technical requirements
In this section, we will create an AWS cloud setup, which will be used to perform hands-on exercises in this and subsequent chapters. You can use any cloud provider of your choice, but to introduce some variety in this book, I have selected AWS for Part 2 and Google Cloud for Part 3. You can also use minikube for the exercises, but you will need at least a quad-core processor and 16 GB or more of RAM assigned to minikube for smooth, lag-free operations.
Setting up the environment
Let’s go!
- Create an AWS account. If you don’t already have an AWS account, then it’s time to sign up with AWS using https://portal.aws.amazon.com/billing/signup#/start/email.
- Set up the AWS CLI:
- Install the AWS CLI using the steps provided at https://docs.aws.amazon.com/cli/latest/userguide/getting-started-install.html.
- Configure the AWS CLI using the steps provided at https://docs.aws.amazon.com/cli/latest/userguide/cli-chap-configure.html.
- Install the AWS IAM authenticator using the steps provided at https://docs.aws.amazon.com/eks/latest/userguide/install-aws-iam-authenticator.html.
- Install Terraform, which is infrastructure-as-code software that automates the provisioning of infrastructure. This helps you to create an infrastructure that is consistent with the infrastructure used for the exercises in this book. I hope this provides a hassle-free experience where you can spend more time learning about Istio rather than troubleshooting infrastructure issues. Follow the steps provided at https://learn.hashicorp.com/tutorials/terraform/install-cli?in=terraform/aws-get-started.
Creating an EKS cluster
Next, you will need to create an EKS cluster. EKS stands for Elastic Kubernetes Service, which is a managed service offering from AWS. EKS provides a hassle-free and easy-to-use Kubernetes cluster where you don’t need to worry about the setup and operation of the Kubernetes control plane. We will make use of Terraform to set up an EKS cluster; the Terraform code and config are available at sockshop/devops/deploy/terraform in the source code repo of this book.
Perform the following steps from the sockshop/devops/deploy/terraform/src folder:
- Initialize Terraform. Prepare the working directory so that Terraform can run the configurations:
% terraform init
Initializing the backend...
Initializing provider plugins...
- Reusing previous version of hashicorp/aws from the dependency lock file
- Using previously-installed hashicorp/aws v4.26.0
Terraform has been successfully initialized!
You can read about init at https://developer.hashicorp.com/terraform/tutorials/cli/init.
- Configure Terraform variables by modifying sockshop/devops/deploy/terraform/src/variables.tf. Default values will work, but you can also modify them to suit your requirements.
- Plan the deployment. In this step, Terraform creates an execution plan that you can inspect to find any discrepancies and get a preview of the infrastructure, although it is not provisioned yet.
The output in the following code snippet is shortened to save space:
% terraform plan
………
~ cluster_endpoint       = "https://647937631DD1A55F1FDDAB99E08DEE0C.gr7.us-east-1.eks.amazonaws.com" -> (known after apply)
You can read more about plan at https://developer.hashicorp.com/terraform/tutorials/cli/plan.
- Provision the infrastructure. In this step, Terraform will create the infrastructure as per the execution plan created in previous steps:
% terraform apply
Once the infrastructure is provisioned, Terraform will also set a variable as defined in sockshop/devops/deploy/terraform/src/outputs.tf.
You can read more about apply at https://developer.hashicorp.com/terraform/tutorials/cli/apply.
Setting up kubeconfig and kubectl
Next, we will configure kubectl to be able to connect the newly created EKS cluster using Terraform. Use the following aws cli command to update kubeconfig with cluster details:
% aws eks --region $(terraform output -raw region) update-kubeconfig --name $(terraform output -raw cluster_name)
Next, check that kubectl is using the correct context:
% kubectl config current-context
If the value is not as expected, you can perform the following:
% kubectl config view -o json | jq '.contexts[].name'
"arn:aws:eks:us-east-1:803831378417:cluster/MultiClusterDemo-Cluster1-cluster"
"minikube"
Find the correct name of the cluster and then use the following command to set the kubectl context:
% kubectl config use-context "arn:aws:eks:us-east-1:803831378417:cluster/MultiClusterDemo-Cluster1-cluster"
Switched to context "arn:aws:eks:us-east-1:803831378417:cluster/MultiClusterDemo-Cluster1-cluster".
There will be instances where you will need to use minikube. In such a case, simply use the following command to switch context, and vice versa for switching back to EKS:
% kubectl config use-context minikube
Switched to context "minikube".
Deploying the Sockshop application
Finally, to add some variety to hands-on exercises, we will make use of a demo application called Sockshop available at https://github.com/microservices-demo/microservices-demo. You can find the deployment files in sockshop/devops/deploy/kubernetes/manifests:
% kubectl create -f sockshop/devops/deploy/kubernetes/manifests/00-sock-shop-ns.yaml
% kubectl create -f  sockshop/devops/deploy/kubernetes/manifests/* -n sock-shop
This will deploy the Sockshop application, and you are all set with the environment. The next step for you is to install the latest version of Istio using the instructions at https://istio.io/latest/docs/setup/install/istioctl/ and the concepts you learned about in Chapter 2.
In the rest of the chapter and the book, we will be making use of the Sockshop application to demonstrate various Service Mesh concepts. Feel free to use the sample BookInfo application that is provided with Istio, or any other application you may like for performing hands-on exercises. Let’s get started!
Managing Ingress traffic using the Kubernetes Ingress resource
When building applications that need to be consumed by other applications from outside the network boundary in which the application is deployed, you will need to build an Ingress point using which the consumers can reach the application. In Kubernetes, a Service is an abstraction through which a set of Pods are exposed as a network service. When these services need to be consumed by other applications, they need to be made externally accessible. Kubernetes supports ClusterIP for consuming services internally from within the cluster, NodePort for consuming the service outside the cluster but within the network, LoadBalancer for consuming the services externally via the cloud load balancer, and there are also options for exposing an internal-facing load balancer for internal traffic outside of the Kubernetes cluster. In this section, we will read about how we can configure Istio to expose a service using the Kubernetes Ingress resource.
In the previous chapter, we exposed the frontend service as a NodePort type and accessed it via minikube tunnel as well as AWS Loadbalancer. This approach takes away any control we might need on how the traffic to the frontend service should be managed.
So, instead of making use of Loadbalancer service types to expose the frontend service, let’s make the frontend service internal facing and rather make use of the Kubernetes Ingress resource. Update the frontend service Kubernetes configuration by removing NodePort (if using minikube) or LoadBalancer (if deploying on AWS) by removing the following lines from the YAML file:
type: NodePort
…..
    nodePort: 30001
The preceding changes make the service type take the default value of ClusterIp.
The updated file is also available in the Chapter4 folder under the name 10-1-front-end-svc.yaml.
Go ahead and change the frontend service type to ClusterIP using the following command:
$ kubectl apply -f Chapter4/ClusterIp-front-end-svc.yaml
After the changes, you will notice that the Sockshop website is not accessible from the browser due to obvious reasons.
Now, we will make use of the Kubernetes Ingress resource to provide access to the Sockshop frontend service. Kubernetes Ingress is a way to provide access to ClusterIP services in the cluster. Ingress defines the addressed host accepted by Ingress, along with a list of URIs and the services to which the request needs to be routed. The following is an illustration highlighting this concept:

Figure 4.1 – Kubernetes Ingress resource
Along with defining Ingress, we also need to define Ingress controllers, which are another Kubernetes resource that is responsible for handling the traffic as per the specification defined in the Ingress resource.
The following illustrates the relationship between Ingress, Ingress controllers, and Services. Please note that Ingress is a logical construct – that is, a set of rules enforced by the Ingress controller.

Figure 4.2 – Ingress controllers
Next, we will be making use of the Istio Gateway controller to handle the Ingress; we read about the Istio Gateway in Chapter 3.
We will need to provide the following configuration, also defined in Chapter4/1-istio-ingress.yaml, to make the changes:
apiVersion: networking.k8s.io/v1
kind: Ingress
metadata:
  annotations:
    kubernetes.io/ingress.class: istio
  name: sockshop-istio-ingress
  namespace: sock-shop
spec:
  rules:
  - host: "sockshop.com"
    http:
      paths:
      - path: /
        pathType: Prefix
        backend:
          service:
            name: front-end
            port:
              number: 80
In the preceding configuration, we are doing the following:
- Creating an Ingress resource with an annotation of kubernetes.io/ingress.class: istio, which, via admission controllers, as we discussed in Chapter 3, tells Istio that this Ingress is to be handled by the Istio Gateway.
- The Ingress resource is defined in the sock-shop namespace, as that’s where our Sockshop frontend service exists.
- A rule that says that any request specified by path of the / value and destined for the "sockshop.com" host (specified by host and the sockshop.com value) should be handled by this Ingress.
- Within the path configuration, we are configuring pathType of Prefix, which basically means that any request of the hostname/ format will be matched. Other values for pathType are as follows:
- Exact: the path is matching exactly as specified in path
- ImplementationSpecific: the matching of path is decided by the underlying implementation of the Ingress controller
Apply the rule using the following command:
$ kubectl create -f Chapter4/1-istio-ingress.yaml
If you are using minikube for this exercise, then run minikube tunnel in a separate terminal and get the external IP from the output. Find the port at which the service is exposed by the Istio Ingress gateway using the following command:
$ kubectl get svc istio-ingressgateway -n istio-system -o wide
NAME                   TYPE           CLUSTER-IP      EXTERNAL-IP     PORT(S)                                                                      AGE    SELECTOR
istio-ingressgateway   LoadBalancer   10.97.245.106   10.97.245.106   15021:32098/TCP,80:31120/TCP,443:30149/TCP,31400:30616/TCP,15443:32339/TCP   6h9m   app=istio-ingressgateway,istio=ingressgateway
In this instance, the Ingress gateway is exposing traffic from port 80 to Ingress port 31120, and 443 to 30149, but it may be different for your setup.
If you followed the instruction in Chapter 4 to use AWS EKS, then the IP and ports will be different; the following is an equivalent of minikube for AWS EKS:
$ kubectl get svc istio-ingressgateway -n istio-system
NAME                   TYPE           CLUSTER-IP       EXTERNAL-IP                                                               PORT(S)                                                                      AGE
istio-ingressgateway   LoadBalancer   172.20.143.136   a816bb2638a5e4a8c990ce790b47d429-1565783620.us-east-1.elb.amazonaws.com   15021:30695/TCP,80:30613/TCP,443:30166/TCP,31400:30402/TCP,15443:31548/TCP   29h
In this example, the Ingress gateway is exposed via an AWS classic load balancer at the following:
- http://a816bb2638a5e4a8c990ce790b47d429-1565783620.us-east-1.elb.amazonaws.com:80 for HTTP traffic
- https://a816bb2638a5e4a8c990ce790b47d429-1565783620.us-east-1.elb.amazonaws.com:443 for HTTPS traffic
Going forward, please use appropriate IPs and ports depending on your choice of environment. The examples in the rest of the chapters are deployed on the AWS EKS cluster, but they will also work for any other Kubernetes provider.
Go ahead and test the Ingress to frontend service via curl:
curl -HHost:sockshop.com http://a816bb2638a5e4a8c990ce790b47d429-1565783620.us-east-1.elb.amazonaws.com/
Or if using the Chrome browser, then use extensions such as ModHeader, available at http://modheader.com/. In either case, you will need to provide the host header with the value of sockshop.com.
So, we saw how the Istio Ingress gateway can be configured to handle Kubernetes Ingress.
Let’s add another Ingress rule to see how the Istio Ingress controller can handle multiple Ingress rules. We will be making use of the envoy configuration we did in Chapter 3, where we used a router filter to return a dummy string:
- In the following command, we are creating a chapter4 namespace so that we can be organized, and it will be easier to clean up:
$ kubectl create ns chapter4
- At this stage, we don’t need automatic sidecar injection, but from a visibility point of view and for getting meaningful information from Kiali, it will be a good idea to enable Istio sidecar injection using the following command we discussed in Chapter 2:
$ kubectl label namespace chapter4 istio-injection=enabled --overwrite
- We will then go ahead with the creation of configmap to load envoy config (also discussed in Chapter 3), which will be required by the Pods we will be creating in the next step:
$ kubectl create configmap envoy-dummy --from-file=Chapter3/envoy-config-1.yaml -n chapter4
- Next, we are creating the service and deployment to run envoy to return a dummy response for all HTTP requests:
$ kubectl apply -f Chapter4/01-envoy-proxy.yaml
- And finally, we create an Ingress rule to route all traffic destined for mockshop.com to the envoy service we created in the previous step:
$ kubectl apply -f Chapter4/2-istio-ingress.yaml
- Go ahead and test using the sockshop.com and mockshop.com hosts headers; the Istio Ingress controller will manage the routing to the appropriate destination as per defined Ingress rules.
The following illustration describes what we have configured so far. Note how the Ingress rules define the routing of traffic to Service A and B based on hostnames:

Figure 4.3 – Snapshot of Ingress configuration
In this section, we discussed how to expose services outside of the Kubernetes cluster using the Kubernetes Ingress resource and Istio Ingress controller. In this kind of Ingress configuration, although we are using Istio to manage the Ingress, we are limited by the spec of Kubernetes Ingress, which allows Ingress controllers to perform limited functions such as load balancing, SSL termination, and name-based virtual hosting. When using the Kubernetes Ingress resource type, we are not leveraging a wide range of functionality provided by Istio to manage Ingress. When using Istio, it is recommended to use the Istio Gateway CRD to manage Ingress; we will be discussing that in the next section.
Before moving on, let’s do some technical cleanup of your environment so that it doesn’t conflict with upcoming exercises:
$ kubectl delete -f Chapter4/2-istio-ingress.yaml
$ kubectl delete -f Chapter4/1-istio-ingress.yaml
Important note
Throughout this book, we will be leaving you reminders to reverse or clean up the configurations. You can use the preceding commands to execute the cleanup.
Managing Ingress using the Istio Gateway
When managing Ingress, it is recommended to make use of Istio Gateway over the Kubernetes Ingress resource. Istio Gateway is like a load balancer running at the edge of the mesh receiving incoming HTTP and TCP connections.
When configuring Ingress via Istio Gateway, you need to perform the following tasks.
Creating the gateway
The following code block creates an Istio Gateway resource:
apiVersion: networking.istio.io/v1alpha3
kind: Gateway
metadata:
  name: chapter4-gateway
  namespace: chapter4
spec:
  selector:
    istio: ingressgateway
  servers:
  - port:
      number: 80
      name: http
      protocol: HTTP
    hosts:
    - "sockshop.com"
    - "mockshop.com"
Here, we are declaring a Kubernetes resource named chapter4-gateway of the gateway.networking.istio.io type custom resource definition in the chapter4 namespace. This is also equivalent to defining a load balancer.
In the servers property, we are defining the following:
- hosts: These are one or more DNS names exposed by the gateway. In the preceding example, we are defining two hosts: sockshop.com and mockshop.com. Any other hosts apart from these two will be rejected by the Ingress gateway.
- port: In the port configuration, we define port numbers and the protocols, which can be either HTTP, HTTPS, gRPC, TCP, TLS, or Mongo. The name of the port can be anything you like to use. In this example, we are exposing port 80 over the HTTP protocol.
To summarize, the gateway will accept any HTTP request over port 80 with the host header of sockshop.com or mockshop.com.
Creating virtual services
A virtual service is another set of abstractions between the Ingress gateway and destination services. Using virtual services, you declare how the traffic for a single host (such as sockshop.com) or multiple hosts (such as mockshop.com and sockshop.com) should be routed to its destination. For example, you can define the following in a virtual service for all traffic addressed to sockshop.com:
- Request with the /path1 URI should go to service 1, and /path2 should go to service 2
- Route request based on the value of header or query parameters
- Weight-based routing or traffic splitting – for example, 60% of the traffic goes to version 1 of the service and 40% goes to another version of the traffic
- Define timeouts – that is, if a response is not received from the upstream service in X seconds, then the request should time out
- Retry – that is, how many times a request should be attempted if the upstream system is not responding or is too slow to respond
All these routing features are implemented via virtual services, and we will read more about them in this chapter as well as the next chapter.
In the following configuration, we are defining two virtual services that contain rules regarding traffic matching and to what destination it should be routed:
---
apiVersion: networking.istio.io/v1alpha3
kind: VirtualService
metadata:
  name: sockshop
  namespace: chapter4
spec:
  hosts:
  - "sockshop.com"
  gateways:
  - chapter4-gateway
  http:
  - match:
    - uri:
        prefix: /
    route:
    - destination:
        port:
          number: 80
        host: front-end.sock-shop.svc.cluster.local
In the preceding configuration, we have defined a virtual service named sockshop. In the spec property, we are defining the following:
- hosts: The rules in this virtual service will be applied to traffic destined for sockshop.com as defined under host.
- gateway: This virtual service is associated with chapter4-gateway we created in step 1 (Creating the gateway); this enforces that any other traffic not associated with the mentioned gateway will not be processed by this virtual service configuration.
- http: Here, we will define rules and routing information for HTTP traffic. There is also an option for defining tls and tcp routes; tls is used for passthrough TLS or HTTPS traffic, whereas tcp is used for opaque TCP traffic.
- match: These contain the matching criteria and can be based on path, headers, and so on. In this example, we are instructing that all traffic will be routed as per the instruction in this section.
- route: If the traffic is matched, the traffic is routed as per the information provided here. In this example, we are routing traffic to front-end.sock-shop.svc.cluster.local on port 80.
You can find the declaration of the corresponding virtual service for envoy-dummy-svc in Chapter4/3-istio-gateway.yaml. The file combines the declaration of the gateway and virtual services.
As a next step, if not already deleted as per the cleanup notes of the previous section, then please delete the Ingress resources you created in the previous section so that they do not conflict with the configuration we will be applying in this section.
Apply the new configuration:
$ kubectl apply -f chapter4/3-istio-gateway.yaml
Please test that you are able to access sockshop.com and mockshop.com using your preferred HTTP client, and do not forget to inject the correct host header.
If you are finding it difficult to visualize the end-to-end configuration, then take the help of the following illustrations:
- The following diagram summarizes the configuration in this section:

Figure 4.4 – Virtual services
- The following diagram summarizes the association between various Istio CRDs and Kubernetes resources:

Figure 4.5 – Association between virtual services and other Istio resources
In this section, we learned how to use Istio Gateway and virtual services for managing Ingress.
Reminder
Please clean up chapter4/3-istio-gateway.yaml to avoid conflict with the upcoming exercises.
Traffic routing and canary release
In the previous section, we went through some of the functionality of virtual services; in this section, let’s go through how you can distribute traffic to multiple destinations.
I’m assuming you have the envoy-dummy config map configured and the envoy Pod and service running as per the 01-envoy-proxy.yaml file. If not, follow the instructions in the previous section to get these configured.
In the following exercise, we will be creating another version of the envoydummy Pod called v2, which returns a different response than v1. We will deploy v2 alongside v1 and then configure traffic splitting between the two versions of the envoydummy Pods:
- Create another version of the envoy mock service but with a different message:
direct_response:
                  status: 200
                  body:
                    inline_string: "V2----------Bootstrap Service Mesh Implementation with Istio----------V2"
- The changes can be found in Chapter4/envoy-config-2.yaml; go ahead and create another config map:
$ kubectl create configmap envoy-dummy-2 --from-file=Chapter4/envoy-config-2.yaml -n chapter4
- Then, create another Deployment, but this time label the Pods as follows:
template:
    metadata:
      labels:
        name: envoyproxy
        version: v2
- Apply the changes:
$ kubectl apply -f Chapter4/02-envoy-proxy.yaml
- Next, we will be creating another virtual service, but with the following changes:
    route:
    - destination:
        port:
          number: 80
        subset: v1
        host: envoy-dummy-svc
      weight: 10
    - destination:
        port:
          number: 80
        subset: v2
        host: envoy-dummy-svc
      weight: 90
You must have noticed that we have two destinations under the same route. destination indicates the location of the service to which the requests are eventually routed. Under destination, we have the following three fields:
- host: This states the service name to which the request should be routed. The service names are resolved against the Kubernetes service registry or hosts registered by Istio service entry. We will read about service entry in the next section.
- subset: This is a subset of the service defined by the destination rule, as described next.
- port: This is the port on which the service is reachable.
We are also associating weights to the routing rules, specifying that 10% of traffic should be sent to subset: v1, whereas 90% should be sent to subset: v2.
Following the virtual service definition, we also need to define destination rules. Destination rules are a set of rules applied to the traffic after they have gone through the virtual service routing rules.
In the following configuration, we are defining a destination rule called envoy-destination, which will be applied to traffic destined for envoy-dummy-svc. It further defines two subsets – subset: v1 corresponds to the envoy-dummy-svc endpoints with the version = v1 label, while subset: v2 corresponds to endpoints with the version = v2 label:
apiVersion: networking.istio.io/v1alpha3
kind: DestinationRule
metadata:
  name: envoy-destination
  namespace: chapter4
spec:
  host: envoy-dummy-svc
  subsets:
  - name: v1
    labels:
      version: v1
  - name: v2
    labels:
      version: v2
Apply the changes:
kubectl apply -f Chapter4/4a-istio-gateway.yaml
You will notice that 10% of the request will be returning Bootstrap Service Mesh Implementation with Istio, and 90% of the request will be returning the V2----------Bootstrap Service Mesh Implementation with Istio----------V2 response.
If you are finding it difficult to visualize the end-to-end configuration, then take the help of the following illustration, which summarizes the configuration in this section:

Figure 4.6 – Destination rules
The following diagram summarizes the association between various Istio CRDs and Kubernetes resources:

Figure 4.7 – Association between destination rules and other Istio resources
You can also check in the Kiali dashboard that traffic is getting routed in a 1:9 ratio between the two services:

Figure 4.8 – Kiali dashboard showing traffic split
Reminder
Please clean up Chapter4/4a-istio-gateway.yaml to avoid conflicts in the upcoming exercises.
In this section, you learned how to route or split traffic between two versions of a service. This is fundamental to various operations related to traffic management, with the canary release being one of them. In the next section, we will read about traffic mirroring, which is also called traffic shadowing; it is another example of traffic routing.
Traffic mirroring
Traffic mirroring is another important feature that allows you to asynchronously copy traffic being sent to an upstream to another upstream service as well, also known as mirrored service. Traffic mirroring is on a fire-and-forget basis, where the sidecar/gateway will not wait for responses from the mirrored upstream.
The following is an illustration of traffic mirroring:
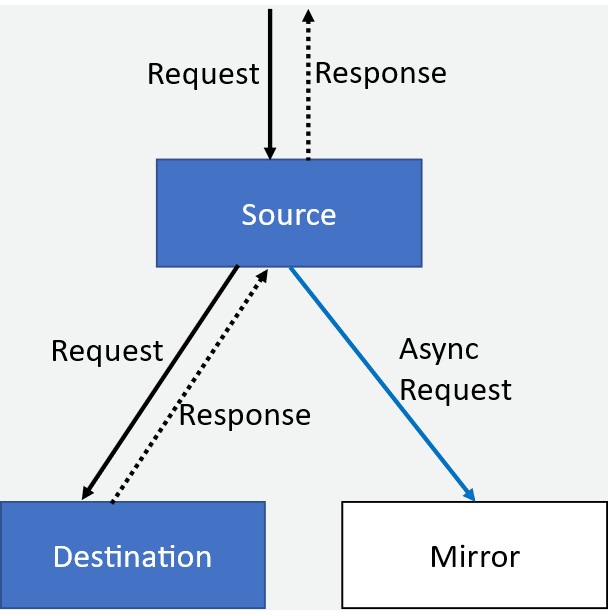
Figure 4.9 – Traffic mirroring
There are very interesting use cases for traffic mirroring, including the following:
- Traffic mirroring to pre-production systems for testing purposes
- Traffic mirroring to sink systems where traffic is recorded for out-of-band analysis
In the following example, in the virtual service definition under route configuration, we are mentioning that 100% of traffic should be mirrored to subset: v2:
  route:
    - destination:
        port:
          number: 80
        subset: v1
        host: envoydummy
      weight: 100
    mirror:
      host: nginxdummy
      subset: v2
    mirrorPercentage:
      value: 100.0
Before applying the preceding changes, first, create an nginx service using the following:
kubectl apply -f utilities/nginx.yaml
After that, deploy the virtual service:
kubectl apply -f chapter4/4b-istio-gateway.yaml
The following illustrates the configuration of virtual services and destination rules:

Figure 4.10 – Traffic mirroring via virtual services
When accessing the service using curl or the browser with the mockshop.com host header, you will notice that you are always receiving a Bootstrap Service Mesh Implementation with Istio response.
But if you check the nginx logs using the kubectl logs nginxdummy -c nginx -n chapter4 command, you will notice that nginx is also receiving the request, indicating that the traffic has been shadowed to nginx.
This completes a short section on traffic mirroring, a simple but powerful feature especially for event-driven architecture, testing, and training models when using machine learning and artificial intelligence.
Reminder
Please clean up Chapter4/4b-istio-gateway.yaml to avoid conflict in upcoming exercises.
Routing traffic to services outside of the cluster
In your IT environments, not all services will be deployed within the Kubernetes cluster; there will be services running on traditional VMs or bare metal environments, there will be services that will be provided by SaaS providers as well as your business partners, and there will be services running outside or on a different Kubernetes cluster. In those scenarios, there is a requirement to let services from the mesh reach out to such services. So, as the next steps, let’s try building routes to a service outside of the cluster. We will make use of the httpbin service, available at https://httpbin.org/.
Any request destined for mockshop.com/get should be routed to httpbin; the rest should be processed by envoy-dummy-svc, which we created in the previous section.
In the following virtual service definition, we have defined that any request with /get should be routed to httpbin.org:
- match:
    - uri:
        prefix: /get
    route:
    - destination:
        port:
          number: 80
        host: httpbin.org
Next, we will create ServiceEntry, which is a way of adding entries to Istio’s internal service registry. The Istio control plane manages a registry of all services within the mesh. The registry is populated from two kinds of data sources– one being the Kubernetes API server, which in turn uses etcd for maintaining a registry of all services in the cluster, and the second being a config store that is populated by ServiceEntry and WorkloadEntry. Now, ServiceEntry and WorkloadEntry are used to populate details about services that are unknown to the Kubernetes service registry. We will read about WorkloadEntry in Chapter 10.
The following is the ServiceEntry declaration for adding httpbin.org to the Istio service registry:
apiVersion: networking.istio.io/v1alpha3
kind: ServiceEntry
metadata:
  name: httpbin-svc
  namespace: chapter4
spec:
  hosts:
  - httpbin.org
  location: MESH_EXTERNAL
  ports:
  - number: 80
    name: httpbin
    protocol: http
  resolution: DNS
In the ServiceEntry declaration, the following configurations are defined:
- resolution: Here, we define how the hostname should be resolved; the following are the possible values:
- DNS: Makes use of available DNS to resolve the hostname
- DNS_ROUND_ROBBIN: In this case, the first resolved address is used
- NONE: No DNS resolution is required; the destination is specified in form of an IP address
- STATIC: Uses a static endpoint against the hostnames
- location: The service entry location is used to specify whether the requested service is part of the mesh or outside the mesh. Possible values are MESH_EXTERNAL and MESH_INTERNAL.
- hosts: This is the hostname associated with the service being requested; in this example, the host is httpbin.org. The host field in ServiceEntry is matched with host fields specified in virtual service and destination rules.
Go ahead and apply the changes:
$ kubectl apply -f Chapter4/5a-istio-gateway.yaml
When executing curl to /get, you will receive a response from httpbin.org, whereas /ping should route to the envoydummy service.

Figure 4.11 – Kiali dashboard showing connection to an external system via ServiceEntry
Reminder
Please clean up Chapter4/5a-istio-gateway.yaml to avoid conflict in upcoming exercises.
ServiceEntry provides various options to register external services to the Istio registry so that traffic within the mesh can be correctly routed to workloads outside the mesh.
Exposing Ingress over HTTPS
In this section, we will learn how to configure the Istio Gateway to expose the Sockshop frontend application over HTTPs.
Steps 1 and 3 are optional if you already have a Certificate Authority (CA); usually, for production systems, these steps will be performed by your organization’s CA:
- Create a CA. Here, we are creating a CA with CN (Common Name) as sockshop.inc:
$openssl req -x509 -sha256 -nodes -days 365 -newkey rsa:2048 -subj '/O=Sockshop Inc./CN=Sockshop.inc' -keyout Sockshop.inc.key -out Sockshop.inc.crt
- Generate a Certificate Signing Request (CSR) for the sockshop. Here, we are generating a CSR for sockshop.com, which also generates a private key:
$openssl req -out sockshop.com.csr -newkey rsa:2048 -nodes -keyout sockshop.com.key -subj "/CN=sockshop.com/O=sockshop.inc"
- Sign the CSR using the CA with the following command:
$openssl x509 -req -sha256 -days 365 -CA Sockshop.inc.crt -CAkey Sockshop.inc.key -set_serial 0 -in sockshop.com.csr -out sockshop.com.crt
- Load the certificate and private key as a Kubernetes Secret:
$kubectl create -n istio-system secret tls sockshop-credential --key=sockshop.com.key --cert=sockshop.com.crt
- Create a gateway and virtual service using the following command:
kubectl apply -f Chapter4/6-istio-gateway.yaml
This way, we have created a certificate and loaded that along with its private key as a Kubernetes Secret.
Finally, we are configuring Istio Gateway to use the Secret as a credential for TLS communications. In the Chapter4/6-istio-gateway.yaml file gateway, we are configuring IstioGateway as the Ingress, and listening on port 443 on the HTTPS server protocol:
  servers:
  - port:
      number: 443
      name: https
      protocol: HTTPS
    tls:
      mode: SIMPLE
      credentialName: sockshop-credential
    hosts:
    - "sockshop.com"
In the gateway configuration, we have changed the protocol version to HTTPS from HTTP, and we added the following configurations under servers>tls:
- Mode: Indicates whether this port should be secured using TLS. Possible values for this field are as follows:
- SIMPLE: This is the standard TLS setting that we have selected to expose Sockshop.
- MUTUAL: This is for mutual TLS between the gateway and any system calling the gateway.
- PASSTHROUGH: This is used when a connection needs to be routed to a virtual service with the host value as the Server Name Indication (SNI) presented during the call.
SNI
SNI is an extension of the TLS protocol, where the hostname or domain name of the destination service is shared at the TLS handshake process rather than Layer 7. SNI is useful where a server is hosting multiple domain names, with each represented by its own HTTPS certificate. By knowing the requested hostname at the Layer 5 handshake, the server is able to present the correct certificate as per the presented SNI during the handshake.
- AUTO_PASSTHROUGH: This is the same as PASSTHROUGH, except that there is no need for virtual services. The connection is forwarded to upstream services as per the details in the SNI.
- ISTIO_MUTUAL: This is the same as MUTUAL, except that the certificate used for mutual TLS is generated automatically by Istio.
- Credential name: This is the Secret that holds the private key and certificate to be used for the server-side connection during TLS. We created the Secret in step 4.
Go ahead and access sockshop.com; you will have to use --connect-to in curl to get around the name resolution issue caused by the difference in the replacement name and the actual name of the host:
$ curl -v -HHost:sockshop.com --connect-to "sockshop.com:443:a816bb2638a5e4a8c990ce790b47d429-1565783620.us-east-1.elb.amazonaws.com" --cacert Sockshop.inc.crt https://sockshop.com:443/
Please note, a816bb2638a5e4a8c990ce790b47d429-1565783620.us-east-1.elb.amazonaws.com is the fully qualified domain name (FQDN) of the load balancer provided by AWS. If you are using minikube, you can run the command against localhost by using --resolve in curl, similar to the following:
$ curl -v -HHost:sockshop.com --resolve "sockshop.com:56407:127.0.0.1" http://sockshop.com:56407/
In the preceding command, 56407 is the local port on which the Ingress gateway is listening.
During the connection, you will notice in the output that the gateway correctly presented the server-side certificates:
* SSL connection using TLSv1.3 / AEAD-CHACHA20-POLY1305-SHA256
* ALPN, server accepted to use h2
* Server certificate:
*  subject: CN=sockshop.com; O=sockshop.inc
*  start date: Aug 12 06:45:27 2022 GMT
*  expire date: Aug 12 06:45:27 2023 GMT
*  common name: sockshop.com (matched)
*  issuer: O=Sockshop Inc.; CN=Sockshop.inc
*  SSL certificate verify ok.
One special point to make here is that we exposed sockshop.com as an HTTPS service without making any changes to the frontend services that host the website.
Reminder
Please clean up Chapter4/6-istio-gateway.yaml to avoid conflict with upcoming exercises.
Enabling HTTP redirection to HTTPS
For downstream systems that are still sending requests to non-HTTPS ports, we can implement HTTP redirection by making the following changes in gateway configuration for non-HTTPS ports:
  servers:
  - port:
      number: 80
      name: http
      protocol: HTTP
    hosts:
    - "sockshop.com"
    tls:
      httpsRedirect: true
We have simply added httpsRedirect: true, which makes the gateway send a 301 redirect for all non-HTTPS connections. Apply the changes and test the connection:
$ kubectl apply -f Chapter4/7-istio-gateway.yaml
$ curl -v -HHost:sockshop.com --connect-to "sockshop.com:80:a816bb2638a5e4a8c990ce790b47d429-1565783620.us-east-1.elb.amazonaws.com" --cacert Sockshop.inc.crt  http://sockshop.com:80/
In the output, you will notice the redirection to sockshop.com:
* Mark bundle as not supporting multiuse
< HTTP/1.1 301 Moved Permanently
< location: https://sockshop.com/
Reminder
As usual, please clean up Chapter4/7-istio-gateway.yaml to avoid conflict with the next section exercises.
Enabling HTTPS for multiple hosts
In the previous section, we defined the settings for sockshop.com on the gateway. We can also apply similar settings for multiple hosts on the gateway. In this section, we will enable TLS on the gateway for mockshop.com along with sockshop.com:
- We will make use of the CA we created in the previous section. So, as the next steps, let’s generate a CSR for mockshop.com:
$openssl req -out mockshop.com.csr -newkey rsa:2048 -nodes -keyout mockshop.com.key -subj "/CN=mockshop.com/O=mockshop.inc"
- Sign the CSR using the CA:
$openssl x509 -req -sha256 -days 365 -CA Sockshop.inc.crt -CAkey Sockshop.inc.key -set_serial 0 -in mockshop.com.csr -out mockshop.com.crt
- Load the certificate and private key as a Kubernetes Secret:
$kubectl create -n istio-system secret tls mockshop-credential --key=mockshop.com.key --cert=mockshop.com.crt
- Add the following configuration for mockshop.com under server configuration in the gateway:
- port:
      number: 443
      name: https-mockshop
      protocol: HTTPS
    tls:
      mode: SIMPLE
      credentialName: mockshop-credential
    hosts:
    - "mockshop.com"
- Apply the changes:
kubectl apply -f Chapter4/8-istio-gateway.yaml
After the changes, the gateway will resolve the correct certificates based on the hostname.
- Let’s now access sockshop.com:
curl -v --head -HHost:sockshop.com --resolve "sockshop.com:56408:127.0.0.1" --cacert Sockshop.inc.crt https://sockshop.com:56408/
In the response, you can see that the correct certificates have been presented:
* SSL connection using TLSv1.3 / AEAD-CHACHA20-POLY1305-SHA256
* ALPN, server accepted to use h2
* Server certificate:
*  subject: CN=sockshop.com; O=sockshop.inc
*  start date: Aug 12 06:45:27 2022 GMT
*  expire date: Aug 12 06:45:27 2023 GMT
*  common name: sockshop.com (matched)
*  issuer: O=Sockshop Inc.; CN=Sockshop.inc
*  SSL certificate verify ok.
* Using HTTP2, server supports multiplexing
- Similarly, test mockshop.com:
curl -v -HHost:mockshop.com --connect-to "mockshop.com:443:a816bb2638a5e4a8c990ce790b47d429-1565783620.us-east-1.elb.amazonaws.com" --cacert Sockshop.inc.crt https://mockshop.com/
- Then, check whether the certificate presented by the gateway belongs to mockshop.com:
SSL connection using TLSv1.3 / AEAD-CHACHA20-POLY1305-SHA256
* ALPN, server accepted to use h2
* Server certificate:
*  subject: CN=mockshop.com; O=mockshop.inc
*  start date: Aug 12 23:47:27 2022 GMT
*  expire date: Aug 12 23:47:27 2023 GMT
*  common name: mockshop.com (matched)
*  issuer: O=Sockshop Inc.; CN=Sockshop.inc
*  SSL certificate verify ok.
* Using HTTP2, server supports multiplexing
In this way, we have configured the Istio Ingress gateway to serve multiple TLS certificates depending on hostnames; this is also called SNI. The Istio Ingress gateway can resolve SNI at the TLS Layer 4 level, allowing it to serve multiple domain names over TLS.
Enabling HTTPS for CNAME and wildcard records
The last topic on HTTPS is how to manage certificates for CNAME and wildcard records. Especially for traffic exposed internally, it is important to support wildcard. In this section, we will configure the gateway to support wildcard using SNI support. We will be using the CA we created in previous sections:
- Create a CSR for *.sockshop.com and sign it using the CA certificates, then create the Kubernetes Secret:
$openssl req -out sni.sockshop.com.csr -newkey rsa:2048 -nodes -keyout sni.sockshop.com.key -subj "/CN=*.sockshop.com/O=sockshop.inc"
$openssl x509 -req -sha256 -days 365 -CA Sockshop.inc.crt -CAkey Sockshop.inc.key -set_serial 0 -in sni.sockshop.com.csr -out sni.sockshop.com.crt
$kubectl create -n istio-system secret tls sni-sockshop-credential --key=sni.sockshop.com.key --cert=sni.sockshop.com.crt
- Then, add the *.sockshop.com hostname to the server configuration in the gateway:
servers:
  - port:
      number: 443
      name: https-sockshop
      protocol: HTTPS
    tls:
      mode: SIMPLE
      credentialName: sni-sockshop-credential
    hosts:
    - "*.sockshop.com"
- Also, modify the virtual service with *.sockshop.com:
kind: VirtualService
metadata:
  name: sockshop
  namespace: chapter4
spec:
  hosts:
  - "*.sockshop.com"
  - "sockshop.com"
- Apply the configuration:
$ kubectl apply -f Chapter4/9-istio-gateway.yaml
- You can test mockshop.com, sockshop.com, or any other CNAME records for sockshop.com. The following example is using my.sockshop.com:
$ curl -v -HHost:my.sockshop.com --connect-to "my.sockshop.com:443:a816bb2638a5e4a8c990ce790b47d429-1565783620.us-east-1.elb.amazonaws.com" --cacert Sockshop.inc.crt https://my.sockshop.com/
The following is the snippet from the output of step 5 showing that the correct certificate was presented during the handshake:
* SSL connection using TLSv1.3 / AEAD-CHACHA20-POLY1305-SHA256
* ALPN, server accepted to use h2
* Server certificate:
*  subject: CN=*.sockshop.com; O=sockshop.inc
*  start date: Aug 13 00:27:00 2022 GMT
*  expire date: Aug 13 00:27:00 2023 GMT
*  common name: *.sockshop.com (matched)
*  issuer: O=Sockshop Inc.; CN=Sockshop.inc
*  SSL certificate verify ok.
* Using HTTP2, server supports multiplexing
As you can see, Istio presented the correct wildcard certificate for CNAME. This example demonstrates how Istio gateways can be configured to handle multiple domains and subdomains.
In this and prior sections, we read about the various ways Ingress and the routing of traffic within and outside of the mesh are managed by Istio. It is important that you go through the concepts of gateways, virtual services, destination rules, and service entries and play with the example provided in this chapter, as well as think of other examples and try to implement them. In Chapter 6, we will discuss security in more depth and will cover topics such as mTLS, and so on. But for now, we will read about how Istio manages Egress traffic.
Reminder
Don’t forget to clean up Chapter4/8-istio-gateway.yaml and Chapter4/9-istio-gateway.yaml.
Managing Egress traffic using Istio
In the Routing traffic to services outside of the cluster section, we discovered how service entries can be used to update the Istio service registry about services external to the mesh and the cluster. Service entries are a way to add additional entries into Istio’s internal service registry for virtual services to be able to route to those entries. An Egress gateway, however, is used for controlling how the traffic for external service leaves the mesh.
To get familiar with Egress gateways, we will first deploy a Pod within the mesh from which we can call an external service:
$ kubectl apply -f utilities/curl.yaml
The command creates a Pod from which you can perform curl; this mimics a workload running inside the mesh:
$ kubectl exec -it curl sh -n chapter4
From the shell, access httpbin.org using curl:
$ curl -v https://httpbin.org/get
Now, we will stop all Egress traffic from the mesh using the following command:
$ istioctl install -y --set profile=demo --set meshConfig.outboundTrafficPolicy.mode=REGISTRY_ONLY
In the previous command, we are modifying the Istio installation to change the outbound traffic policy from ALLOW_ANY to REGISTRY_ONLY, which enforces that only hosts defined with ServiceEntry resources are part of the mesh service registry.
Go back and try curl again; you will see the following output:
$ curl -v https://httpbin.org/get
curl: (35) OpenSSL SSL_connect: SSL_ERROR_SYSCALL in connection to httpbin.org:443
Let’s now list httpbin.org in the Istio service registry by creating a service entry as follows:
apiVersion: networking.istio.io/v1alpha3
kind: ServiceEntry
metadata:
  name: httpbin-svc
  namespace: chapter4
spec:
  hosts:
  - httpbin.org
  location: MESH_EXTERNAL
  resolution: DNS
  ports:
  - number: 443
    name: https
    protocol: HTTPS
  - number: 80
    name: http
    protocol: HTTP
Now, you may go ahead and apply the configuration:
$ kubectl apply -f Chapter4/10-a-istio-egress-gateway.yaml
Access https://httpbin.org/get from the curl Pod; this time, you will succeed.
ServiceEntry added httpbin.org to the mesh service registry, and hence we were able to access httpbin.org from the curl Pod.
Though ServiceEntry is great for providing external access, it does not provide any control over how the external endpoints should be accessed. For example, you may want only certain workloads or namespaces to be able to send traffic to an external resource. What if there is a need to verify the authenticity of an external resource by verifying its certificates?
Reminder
Don’t forget to clean up Chapter4/10-a-istio-egress-gateway.yaml.
The Egress gateway, along with a combination of virtual services, destination rules, and service entries, provides flexible options to manage and control traffic egressing out of the mesh. So, let’s make configuration changes to route all traffic for httpbin.org to the Egress gateway:
- Configure the Egress gateway, which is very similar to the Ingress gateway configuration. Please note the Egress gateway is attached to httpbin.org; you can provide other hosts or * to match all hostnames:
apiVersion: networking.istio.io/v1alpha3
kind: Gateway
metadata:
  name: istio-egressgateway
  namespace: chapter4
spec:
  selector:
    istio: egressgateway
  servers:
  - port:
      number: 80
      name: http
      protocol: HTTP
    hosts:
    - httpbin.org
- Next, configure the virtual service. Here, we are configuring the virtual service to attach to the Egress gateway as well as to the mesh:
spec:
  hosts:
  - httpbin.org
  gateways:
  - istio-egressgateway
  - mesh
In the following part of the virtual service definition, we are configuring that all traffic originating from within the mesh for the httpbin.org host will be directed to the Egress gateway:
http:
  - match:
    - gateways:
      - mesh
      port: 80
    route:
    - destination:
        host: istio-egressgateway.istio-system.svc.cluster.local
        subset: httpbin
        port:
          number: 80
      weight: 100
We have configured subset: httpbin to apply destination rules; in this example, the destination rules are empty.
Finally, we will add another rule to route traffic from the Egress gateway to httpbin.org:
  - match:
    - gateways:
      - istio-egressgateway
      port: 80
    route:
    - destination:
        host: httpbin.org
        port:
          number: 80
      weight: 100
- Create a placeholder for any destination rules you might want to implement:
apiVersion: networking.istio.io/v1alpha3
kind: DestinationRule
metadata:
  name: rules-for-httpbin-egress
  namespace: chapter4
spec:
  host: istio-egressgateway.istio-system.svc.cluster.local
  subsets:
  - name: httpbin
- You also need to add ServiceEntry for httpbin.org, which we discussed in the previous section.
- Go ahead and apply the changes:
kubectl apply -f Chapter4/10-b-istio-egress-gateway.yaml
- Try accessing httpbin.org from the curl Pod; you will be able to access it now.
Examine the headers in the response, as well as the logs of istio-egressgateway pods. You will find information about the Egress gateway under X-Envoy-Peer-Metadata-Id. You can also see the request in the Egress gateway logs.
You will notice that you are not able to access https://httpbin.org/get, although we have defined https in the service entry. Try enabling https access to httpbin.org; you will find the solution in Chapter4/10-c-istio-egress-gateway.yaml.
Egress is important to control traffic leaving the mesh. In Chapter 6, we will focus on some of the other security aspects of Egress.
Reminder
Delete chapter4/10-b-istio-egress-gateway.yaml along with chapter4 namespace.
Revert the authorization policy to allow all outgoing traffic from the mesh without needing an Egress gateway using the following command:
$ istioctl install -y --set profile=demo --set meshConfig.outboundTrafficPolicy.mode=ALLOW_ANY
Summary
In this chapter, we read about how to manage external traffic coming inside the Service Mesh using the Istio Ingress gateway, as well as how to manage internal traffic leaving the mesh via Istio Egress gateways.
We learned about virtual services and destination rules: how virtual services are used to describe the rules to route traffic to various destinations in the mesh, how destination rules are used to define the end destination, and how the destination processes the traffic routed via rules defined by virtual services. Using virtual services, we can perform weight-based traffic routing, which is also used for canary releases and blue-green deployment.
Additionally, we learned about ServiceEntry and how it is used to make Istio aware of external services so that workloads in the mesh can send traffic to services outside the mesh. And finally, we learned how Egress gateways are used to control the Egress to endpoints defined by ServiceEntry so that we can access external services securely and reliably from the mesh. This chapter sets you up for the next chapter, where we will discuss how to implement application resiliency using the concepts from this chapter.