Appendix – Other Service Mesh Technologies
In this appendix, we will learn about the following Service Mesh implementations:
- Consul Connect
- Gloo Mesh
- Kuma
- Linkerd
These Service Mesh technologies are popular and are gaining recognition and adoption by organizations. The information provided in this Appendix about these Service Mesh technologies is not exhaustive; rather, the goal here is to make you familiar with and aware of the alternatives to Istio. I hope reading this Appendix will provide some basic awareness of these alternative technologies and help you understand how these technologies fare in comparison to Istio. Let’s dive in!
Consul Connect
Consul Connect is a Service Mesh solution offered by HashiCorp. It is also known as Consul Service Mesh. On the HashiCorp website, you will find that the terms Consul Connect and Consul Service Mesh are used interchangeably. It is built upon Consul, which is a service discovery solution and a key-value store. Consul is a very popular and long-established service discovery solution; it provides and manages service identities for every type of workload, which are then used by Service Mesh to manage traffic between Services in Kubernetes. It also supports using ACLs to implement zero-trust networking and provides granular control over traffic flow in the mesh.
Consul uses Envoy as its data plane and injects it into workload Pods as sidecars. The injection can be based on annotations as well as global configurations to automatically inject sidecar proxies into all workloads in specified namespaces. We will start by installing Consul Service Mesh on your workstation, followed by some exercises to practice the basics of using Consul Service Mesh.
Let’s begin by installing Consul:
- Clone the Consul repository:
% git clone https://github.com/hashicorp-education/learn-consul-get-started-kubernetes.git
…..
Resolving deltas: 100% (313/313), done.
- Install the Consul CLI:
- For MacOS, follow these steps:
- Install the HashiCorp tap:
% brew tap hashicorp/tap
- Install the Consul Kubernetes CLI:
% brew install hashicorp/tap/consul-k8s
Running `brew update --auto-update`...
==> Auto-updated Homebrew!
Updated 1 tap (homebrew/core).
You have 4 outdated formulae installed.
You can upgrade them with brew upgrade
or list them with brew outdated.
==> Fetching hashicorp/tap/consul-k8s
==> Downloading https://releases.hashicorp.com/consul-k8s/1.0.2/consul-k8s_1.0.2_darwin_arm64.zip
######################################################################## 100.0%
==> Installing consul-k8s from hashicorp/tap
/opt/homebrew/Cellar/consul-k8s/1.0.2: 3 files, 64MB, built in 2 seconds
- Check the version of consul-k8s on the Consul CLI:
% consul-k8s version
    consul-k8s v1.0.2
- Add the HashiCorp GPG key:
% curl -fsSL https://apt.releases.hashicorp.com/gpg | sudo apt-key add –
- Add the HashiCorp apt repository:
% sudo apt-add-repository "deb [arch=amd64] https://apt.releases.hashicorp.com $(lsb_release -cs) main"
- Run apt-get install to install the consul-k8s CLI:
% sudo apt-get update && sudo apt-get install consul-k8s
- For CentOS/RHEL, follow these steps:
- Install yum-config-manager to manage your repositories:
% sudo yum install -y yum-utils
- Use yum-config-manager to add the official HashiCorp Linux repository:
% sudo yum-config-manager --add-repo https://rpm.releases.hashicorp.com/RHEL/hashicorp.repo
- Install the consul-k8s CLI:
% sudo yum -y install consul-k8s
- For MacOS, follow these steps:
- Start minikube:
% minikube start --profile dc1 --memory 4096 --kubernetes-version=v1.24.0
- Install Consul on minikube using the Consul CLI.
Run the following in learn-consul-get-started-kubernetes/local:
% consul-k8s install -config-file=helm/values-v1.yaml -set global.image=hashicorp/consul:1.14.0
==> Checking if Consul can be installed
 ✓ No existing Consul installations found.
 ✓ No existing Consul persistent volume claims found
 ✓ No existing Consul secrets found.
==> Consul Installation Summary
    Name: consul
    Namespace: consul
….
--> Starting delete for "consul-server-acl-init-cleanup" Job
 ✓ Consul installed in namespace "consul".
- Check the Consul Pods in the namespace:
% kubectl get po -n consul
NAME                    READY   STATUS    RESTARTS    AGE
consul-connect-injector-57dcdd54b7-hhxl4       1/1     Running   1 (21h ago)   21h
consul-server-0       1/1     Running   0             21h
consul-webhook-cert-manager-76bbf7d768-2kfhx   1/1     Running   0             21h
- Configure the Consul CLI to be able to communicate with Consul.
We will set environment variables so that the Consul CLI can communicate with your Consul cluster.
Set CONSUL_HTTP_TOKEN from secrets/consul-bootstrap-acl-token and set it as an environment variable:
% export CONSUL_HTTP_TOKEN=$(kubectl get --namespace consul secrets/consul-bootstrap-acl-token --template={{.data.token}} | base64 -d)Set the Consul destination address. By default, Consul runs on port 8500 for HTTP and 8501 for HTTPS:
% export CONSUL_HTTP_ADDR=https://127.0.0.1:8501
Remove SSL verification checks to simplify communication with your Consul cluster:
% export CONSUL_HTTP_SSL_VERIFY=false
- Access the Consul dashboard using the following command:
% kubectl port-forward pods/consul-server-0 8501:8501 --namespace consul
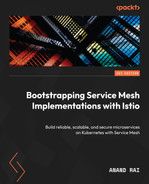
Open localhost:8501 in your browser to access the Consul dashboard, as shown in the following screenshot:
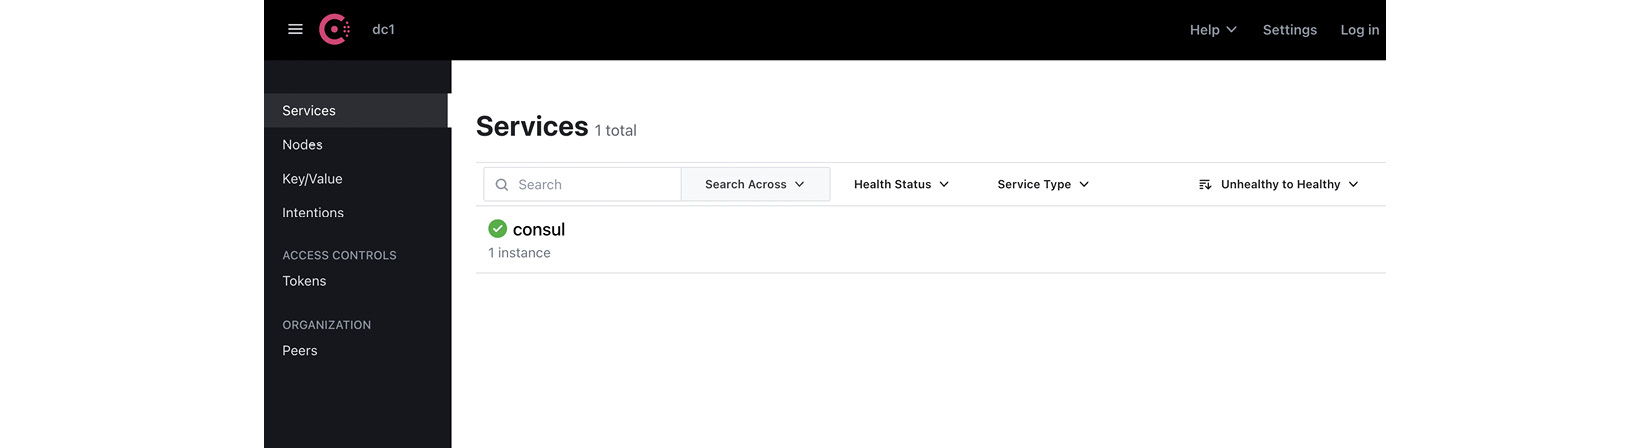
Figure A.1 – Consul Dashboard
Now that we have installed Consul Service Mesh on minikube, let’s deploy an example application and go through the fundamentals of Consul Service Mesh.
Deploying an example application
In this section, we will deploy envoydummy along with a curl application. The sampleconfiguration file is available in AppendixA/envoy-proxy-01.yaml.
In the configuration file, you will notice the following annotation:
      annotations:
        consul.hashicorp.com/connect-inject: "true"
This annotation allows Consul to automatically inject a proxy for each service. The proxies create a data plane to handle requests between services based on the configuration from Consul.
Apply the configuration to create envoydummy and the curl Pods:
% kubectl create -f AppendixA/Consul/envoy-proxy-01.yaml -n appendix-consul
configmap/envoy-dummy created
service/envoydummy created
deployment.apps/envoydummy created
servicedefaults.consul.hashicorp.com/envoydummy created
serviceaccount/envoydummy created
servicedefaults.consul.hashicorp.com/curl created
serviceaccount/curl created
pod/curl created
service/curl created
In a few seconds, you will notice that Consul automatically injects a sidecar into the Pods:
% % kubectl get po -n appendix-consul
NAME                          READY   STATUS    RESTARTS   AGE
curl                          2/2     Running   0          16s
envoydummy-77dfb5d494-2dx5w   2/2     Running   0          17s
To find out more about the sidecar, please inspect the envoydummy Pod using the following commands:
% kubectl get po/envoydummy-77dfb5d494-pcqs7 -n appendix-consul -o json | jq '.spec.containers[].image'
"envoyproxy/envoy:v1.22.2"
"hashicorp/consul-dataplane:1.0.0"
% kubectl get po/envoydummy-77dfb5d494-pcqs7 -n appendix-consul -o json | jq '.spec.containers[].name'
"envoyproxy"
"consul-dataplane"
In the output, you can see a container named consul-dataplane created from an image called hashicorp/consul-dataplane:1.0.0. You can inspect the image at https://hub.docker.com/layers/hashicorp/consul-dataplane/1.0.0-beta1/images/sha256-f933183f235d12cc526099ce90933cdf43c7281298b3cd34a4ab7d4ebeeabf84?context=explore and you will notice that it is made up of envoy proxy.
Let’s try to access envoydummy from the curl Pod:
% kubectl exec -it pod/curl -n appendix-consul -- curl http://envoydummy:80
curl: (52) Empty reply from server
command terminated with exit code 52
So far, we have successfully deployed the envoydummy Pod along with consul-dataplane as a sidecar. We have observed Consul Service Mesh security in action by seeing that the curl Pod, while deployed in the same namespace, is unable to access the envoydummy Pod. In the next section, we will understand this behavior and learn how to configure Consul to perform zero-trust networking.
Zero-trust networking
Consul manages inter-service authorization with Consul constructs called intentions. Using Consul CRDs, you need to define intentions that prescribe what services are allowed to communicate with each other. Intentions are the cornerstones of zero-trust networking in Consul.
Intentions are enforced by the sidecar proxy on inbound connections. The sidecar proxy identifies the inbound service using its TLS client certificate. After identifying the inbound service, the sidecar proxy then checks if an intention exists to allow the client to communicate with the destination service.
In the following code block, we are defining an intention to allow traffic from the curl service to the envoydummy service:
apiVersion: consul.hashicorp.com/v1alpha1
kind: ServiceIntentions
metadata:
  name: curl-to-envoydummy-api
  namespace: appendix-consul
spec:
  destination:
    name: envoydummy
  sources:
    - name: curl
      action: allow
In the configuration, we have specified the names of the destination service and the source service. In action, we have specified allow to allow traffic from source to destination. Another possible value of action is deny, which denies traffic from source to destination. If you do not want to specify the name of a service, you will need to use *. For example, if the service name in sources is * then it will allow traffic from all services to envoydummy.
Let’s apply intentions using the following command:
% kubectl create -f AppendixA/Consul/curl-to-envoy-dummy-intentions.yaml
serviceintentions.consul.hashicorp.com/curl-to-envoydummy-api created
You can verify the created intentions in the Consul dashboard:

Figure A.2 – Consul intentions
Considering that we have created the intention to allow traffic from the curl service to the envoydummy service, let’s test that the curl Pod is able to communicate with the envoydummy Pod using the following command:
% kubectl exec -it pod/curl -n appendix-consul -- curl http://envoydummy
V1----------Bootstrap Service Mesh Implementation with Istio----------V1%
Using intentions, we were able to define rules to control traffic between services without needing to configure a firewall or any changes in the cluster. Intentions are key building blocks of Consul for creating zero-trust networks.
Traffic management and routing
Consul provides a comprehensive set of service discovery and traffic management features. The service discovery comprises three stages: routing, splitting, and resolution. These three stages are also referred to as the service discovery chain, and it can be used to implement traffic controls based on HTTP headers, path, query strings, and workload version.
Let’s go through each stage of the service discovery chain.
Routing
This is the first stage of the service discovery chain, and it is used to intercept traffic using Layer 7 constructs such as HTTP header and path. This is achieved via service-router config entry through which you can control the traffic routing using various criteria. For example, for envoydummy, let’s say we want to enforce that any request send to envoydummy version v1 with /latest in the URI should be routed to envoydummy version v2 instead, and any request to version v2 of the envoydummy app but with /old in the path should be routed to version v1 of the envoydummy app. This can be achieved using the following ServiceRouter configuration:
apiVersion: consul.hashicorp.com/v1alpha1
kind: ServiceRouter
metadata:
  name: envoydummy
spec:
  routes:
    - match:
        http:
          pathPrefix: '/latest'
      destination:
        service: 'envoydummy2'
In the configuration, we are specifying that any request destined for the envoydummy service but with pathPrefix set to '/latest' will be routed to envoydummy2. And in the following configuration, we are specifying that any request destined for the envoydummy2 service but with pathPrefix set to '/old' will be routed to envoydummy:
apiVersion: consul.hashicorp.com/v1alpha1
kind: ServiceRouter
metadata:
  name: envoydummy2
spec:
  routes:
    - match:
        http:
          pathPrefix: '/old'
      destination:
        service: 'envoydummy'
Both ServiceRouter configurations are saved in AppendixA/Consul/routing-to-envoy-dummy.yaml. A deployment descriptor for envoydummy version v2 and the intentions that allow traffic from the curl Pod are also available in AppendixA/Consul/envoy-proxy-02.yaml on GitHub.
Go ahead and deploy version v2 of envoydummy along with the ServiceRouter configuration using the following commands:
% kubectl apply -f AppendixA/Consul/envoy-proxy-02.yaml
% kubectl apply -f AppendixA/Consul/routing-to-envoy-dummy.yaml -n appendix-consul
servicerouter.consul.hashicorp.com/envoydummy configured
servicerouter.consul.hashicorp.com/envoydummy2 configured
You can check the configuration using the Consul dashboard. The following two screenshots show the two ServiceRouter configurations we have applied:
- ServiceRouter configuration to send traffic with the prefix /latest to envoydummy2:
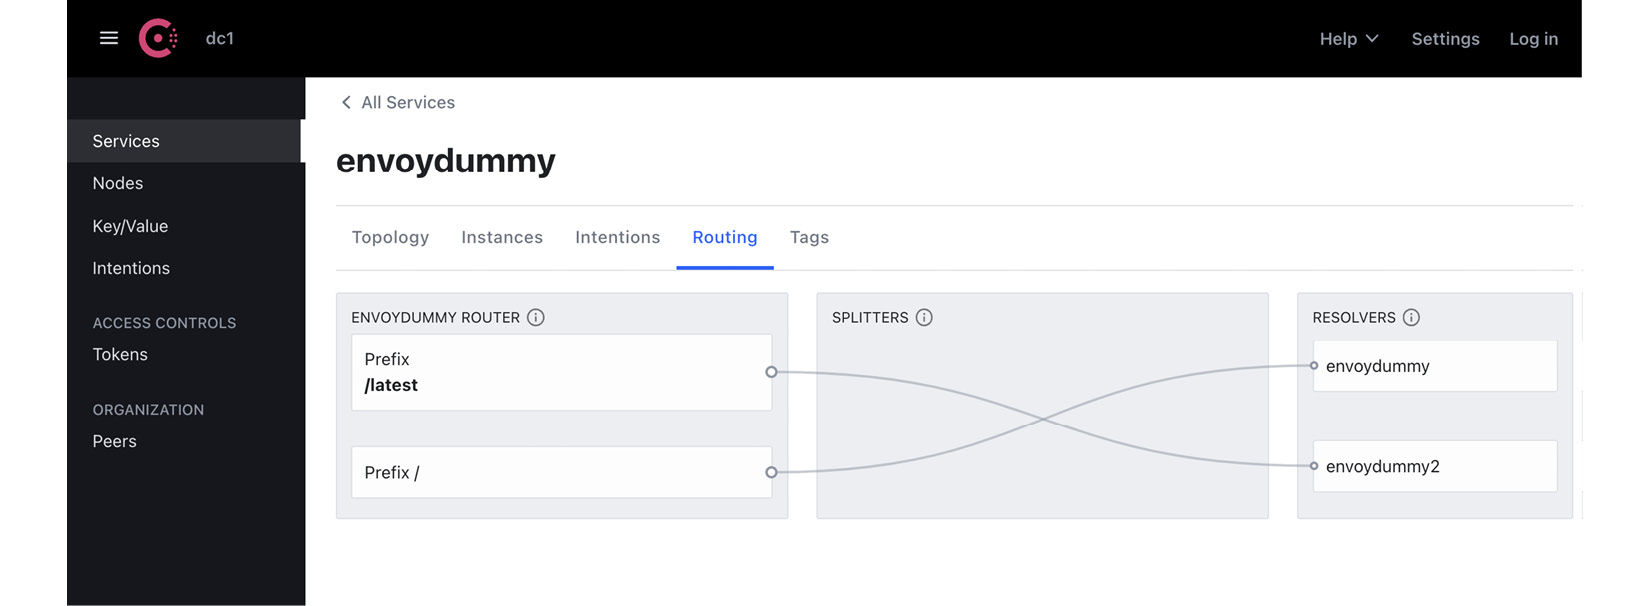
Figure A.3
- ServiceRouter configuration to send traffic with the prefix /old to envoydummy:
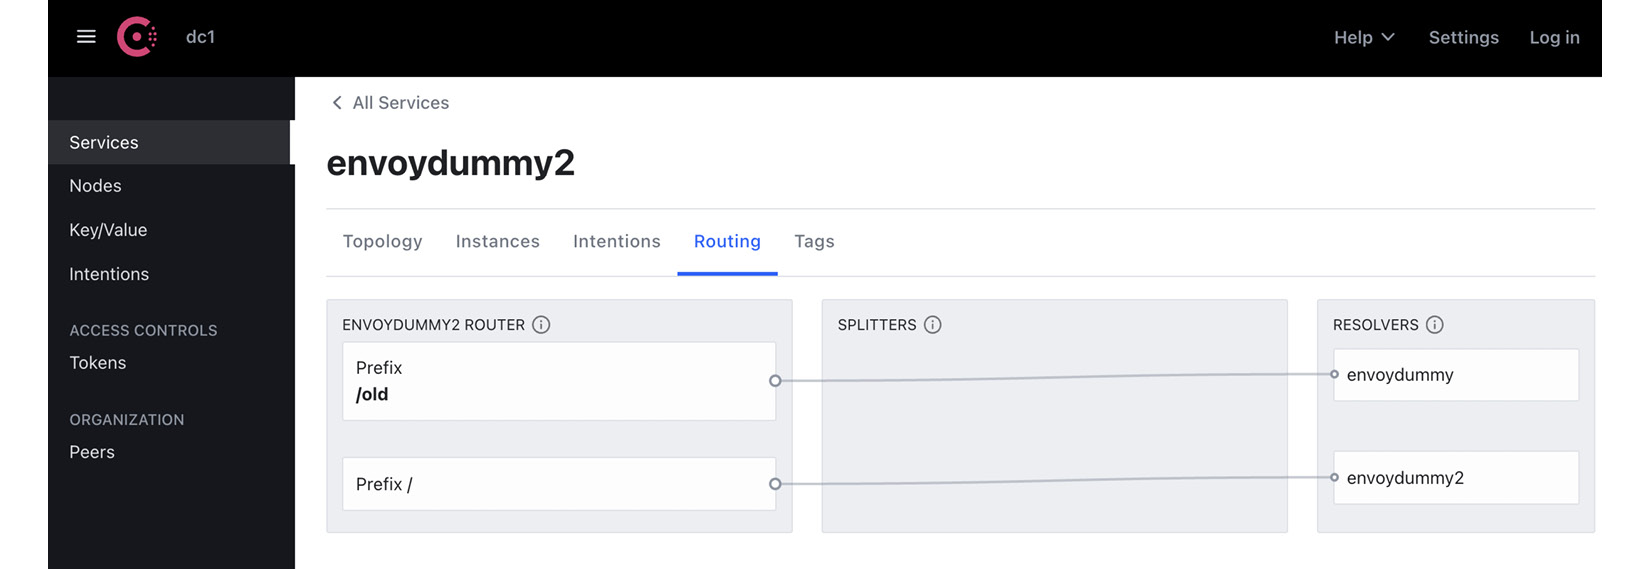
Figure A.4
Now that we have configured the service routes, let’s test the routing behavior:
- Make any request to version v1 of envoydummy with a URI that is not /latest:
% kubectl exec -it pod/curl -n appendix-consul -- curl http://envoydummy/new
V1----------Bootstrap Service Mesh Implementation with Istio----------V1%
The output is as expected: the request should be routed to version v1 of envoydummy.
- Make a request to version v1 of envoydummy with a URI that is /latest:
% kubectl exec -it pod/curl -n appendix-consul -- curl http://envoydummy/latest
V2----------Bootstrap Service Mesh Implementation with Istio----------V2%
The output is as expected: the request, although addressed to version v1 of envoydummy, is routed to version v2 of envoydummy.
- Make any request to version v2 of envoydummy with a URI that is not /old:
% kubectl exec -it pod/curl -n appendix-consul -- curl http://envoydummy2/new
V2----------Bootstrap Service Mesh Implementation with Istio----------V2%
The output is as expected: the request should be routed to version v2 of envoydummy.
- Make a request to version v2 of envoydummy with a URI that is /old:
% kubectl exec -it pod/curl -n appendix-consul -- curl http://envoydummy2/old
V1----------Bootstrap Service Mesh Implementation with Istio----------V1%
The output is as expected: the request although addressed to version v2 of envoydummy is routed to version v1 of envoydummy.
In these examples, we made use of path prefixes as criteria for routing. The other options are query parameters and HTTP headers. ServiceRouter also supports retry logic, which can be added to the destination configuration. Here is an example of retry logic added to the ServiceRouter config:
apiVersion: consul.hashicorp.com/v1alpha1
kind: ServiceRouter
metadata:
  name: envoydummy2
spec:
  routes:
    - match:
        http:
          pathPrefix: '/old'
      destination:
        service: 'envoydummy'
        requestTimeout = "20s"
        numRetries = 3
        retryOnConnectFailure = true
You can read more about ServiceRouter configuration on the HashiCorp website: https://developer.hashicorp.com/consul/docs/connect/config-entries/service-router.
Next in the service discovery chain is splitting, which we will learn about in the following section.
Splitting
Service splitting is the second stage in the Consul service discovery chain and is configured via the ServiceSplitter configuration. ServiceSplitter allows you to split a request to a service to multiple subset workloads. Using this configuration, you can also perform canary deployments. Here is an example where traffic for the envoydummy service is routed in a 20:80 ratio to version v1 and v2 of the envoydummy application:
apiVersion: consul.hashicorp.com/v1alpha1
kind: ServiceSplitter
metadata:
  name: envoydummy
spec:
  splits:
    - weight: 20
      service: envoydummy
    - weight: 80
      service: envoydummy2
In the ServiceSplitter configuration, we have configured 80% of the traffic to envoydummy to be routed to the envoydummy2 service and the remaining 20% of the traffic to be routed to the envoydummy service. The configuration is available in AppendixA/Consul/splitter.yaml. Apply the configuration using the following command:
% kubectl apply -f AppendixA/Consul/splitter.yaml -n appendix-consul
servicesplitter.consul.hashicorp.com/envoydummy created
After applying the configuration, you can check out the routing config on the Consul dashboard. In the following screenshot, we can see that all traffic to envoydummy is routed to envoydummy and envoydummy2. The following screenshot doesn’t show the percentage, but you can hover the mouse over the arrows connecting the splitters and resolvers and you should be able to see the percentage:
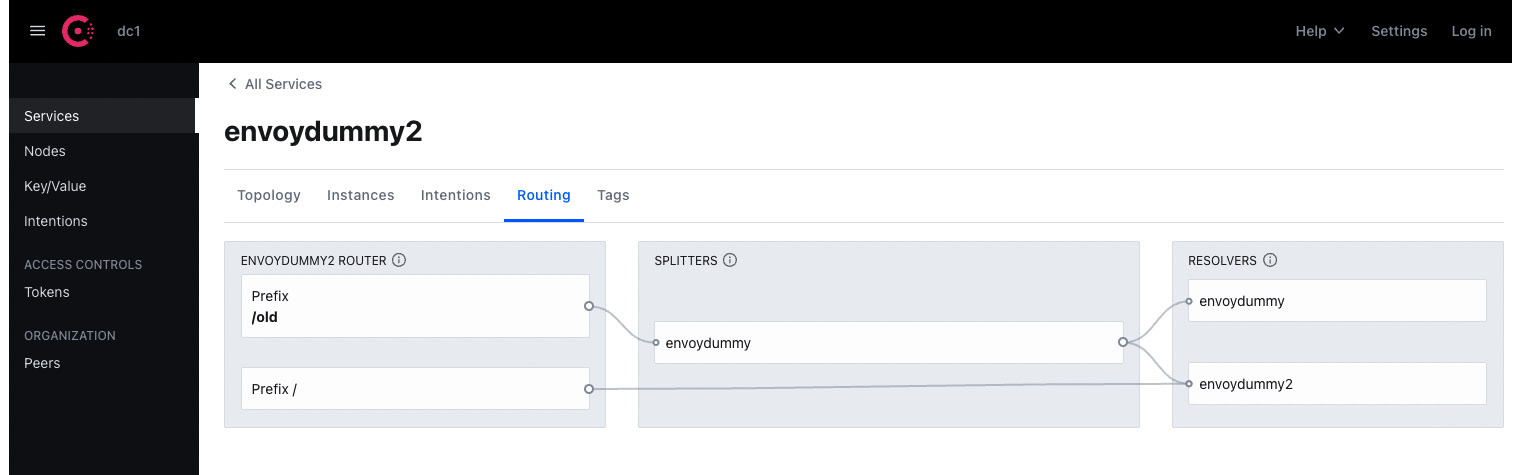
Figure A.5 – Split of traffic to envoydummy2
The following screenshot shows the split of traffic for envoydummy:
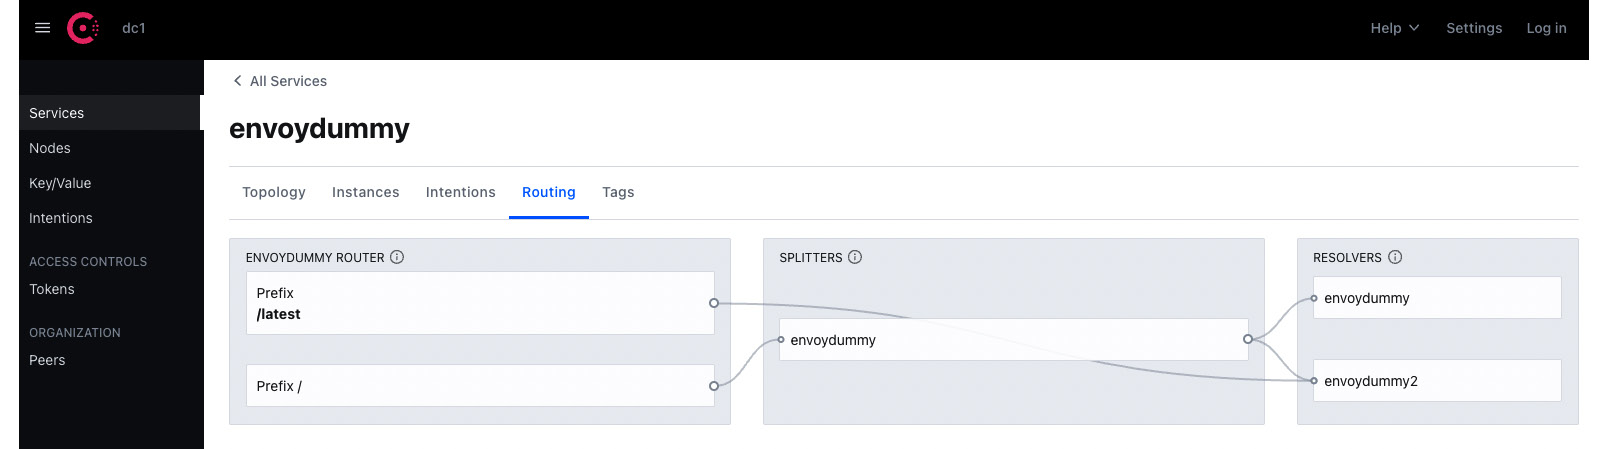
Figure A.6 – Split of traffic to envoydummy service
Now that the ServiceSplitter configuration is in place, test that traffic to our services is routed in the ratio specified in the config file:
% for ((i=0;i<10;i++)); do kubectl exec -it pod/curl -n appendix-consul -- curl http://envoydummy/new ;done
V2----------Bootstrap Service Mesh Implementation with Istio----------V2
V2----------Bootstrap Service Mesh Implementation with Istio----------V2
V2----------Bootstrap Service Mesh Implementation with Istio----------V2
V1----------Bootstrap Service Mesh Implementation with Istio----------V1
V2----------Bootstrap Service Mesh Implementation with Istio----------V2
V1----------Bootstrap Service Mesh Implementation with Istio----------V1
V2----------Bootstrap Service Mesh Implementation with Istio----------V2
V2----------Bootstrap Service Mesh Implementation with Istio----------V2
V2----------Bootstrap Service Mesh Implementation with Istio----------V2
V2----------Bootstrap Service Mesh Implementation with Istio----------V2
You will observe that the traffic is routed in a 20:80 ratio between the two services. ServiceSplitter is a powerful feature that can be used for A/B testing, as well as canary and blue/green deployments. Using ServiceSplitter, you can also perform weight-based routing between subsets of the same service. It also allows you to add HTTP headers while routing the service. You can read more about ServiceSplitter at https://developer.hashicorp.com/consul/docs/connect/config-entries/service-splitter.
We have looked at two of the three steps in Consul’s service discovery chain. The final stage is resolution, which we will cover in the next section.
Resolution
Consul has another config type called ServiceResolver, which is used to define which instances of a service map to the service name requested by the client. They control the service discovery and decide where the request is finally routed to. Using ServiceResolver, you can control the resilience of your system by routing the request to healthy upstreams. ServiceResolver distributes load to services when they are spread across more than one data center and provides failover when the services are suffering from outages. More details about ServiceResolver can be found at https://developer.hashicorp.com/consul/docs/connect/config-entries/service-resolver.
Consul Service Mesh also has provision for gateways to manage traffic from outside the mesh. It supports three kinds of gateway:
- Mesh gateways are used to enable and secure communication between data centers. It acts as a proxy providing Ingress to Service Mesh while at the same time securing the traffic using mTLS. Mesh gateways are used to communicate between Consul Service Mesh instances deployed in different data centers and/or Kubernetes clusters. A good hands-on exercise on mesh gateways is available at https://developer.hashicorp.com/consul/tutorials/kubernetes/kubernetes-mesh-gateways.
- Ingress gateways are used to provide access to services in the mesh to clients outside the mesh. The client can be outside the mesh but in the same Kubernetes cluster, or completely outside the cluster but within or beyond the network perimeter of the organization. You can read more about Ingress Gateway at https://developer.hashicorp.com/consul/docs/k8s/connect/ingress-gateways.
- Terminating gateways, like ServiceEntry in Istio, are used to allow workloads within the mesh to access services outside the mesh. To use a terminating gateway, users need to also use a configuration called ServiceDefault. This is where the details about the external service are defined, and it is referred to by the terminating gateway. You can read more about terminating gateways at https://developer.hashicorp.com/consul/docs/k8s/connect/terminating-gateways.
Finally, Consul Service Mesh also provides comprehensive observability of the mesh. The sidecar proxies collect and expose data about the traffic traversing the mesh. The metrics data exposed by the sidecar proxies are then scraped by Prometheus. The data includes Layer 7 metrics such as HTTP status code, request latency, and throughput. The Consul control plane also provides some metrics such as config synchronization status, exceptions, and errors, like the Istio control plane. The tech stack for observability is also like Istio; like Istio, Consul also supports integration with various other observability tools, such as Datadog, to get insight into Consul Service Mesh health and performance. You can read more about Consul Service Mesh observability at https://developer.hashicorp.com/consul/tutorials/kubernetes/kubernetes-layer7-observability.
I hope this section provided a brief but informative rundown of how Consul Service Mesh operates, what the various constructs in Consul Service Mesh are, and how they operate. I am sure you must have noticed the similarities between Consul Service Mesh and Istio: they both use Envoy as a sidecar proxy, and the Consul service discovery chain closely resembles Istio virtual services and destination rules; Consul Service Mesh gateways are very similar to Istio gateways. The main difference is how the control plane is implemented and the use of an agent on each node of the cluster. Consul Service Mesh can run on VMs to provide benefits of Service Mesh on legacy workloads. Consul Service Mesh is backed by HashiCorp and is tightly integrated with HashiCorp’s other products, including HashiCorp Vault. It is also offered as a freemium product. There is also an Enterprise version for organizations needing enterprise support and a SaaS offering called HCP Consul that provides a fully managed cloud service to customers who want one-click mesh deployments.
Uninstalling Consul Service Mesh
You can use consul-k8s to uninstall Consul Service Mesh using the following commands:
% consul-k8s uninstall -auto-approve=true -wipe-data=true
..
Deleting data for installation:
Name: consul
Namespace consul
✓ Deleted PVC => data-consul-consul-server-0
✓ PVCs deleted.
✓ Deleted Secret => consul-bootstrap-acl-token
✓ Consul secrets deleted.
✓ Deleted Service Account => consul-tls-init
✓ Consul service accounts deleted.
You can uninstall consul-k8s CLI using Brew on macOS:
% brew uninstall consul-k8s
Gloo Mesh
Gloo Mesh is a Service Mesh offering from Solo.io. There is an open source version called Gloo Mesh and an enterprise offering called Gloo Mesh Enterprise. Both are based on Istio Service Mesh and claim to have a better control plane and added functionality on top of open source Istio. Solo.io provides a feature comparison on its website outlining the differences between Gloo Mesh Enterprise, Gloo Mesh Open Source, and Istio, which you can access at https://www.solo.io/products/gloo-mesh/. Gloo Mesh is primarily focused on providing a Kubernetes-native management plane through which users can configure and operate multiple heterogeneous Service Mesh instances across multiple clusters. It comes with an API that abstracts the complexity of managing and operating multiple meshes without the user needing to know the complexity under the hood caused by multiple Service Meshes. You can find details about Gloo Mesh at https://docs.solo.io/gloo-mesh-open-source/latest/getting_started/. This is a comprehensive resource on how to install and try Gloo Mesh. Solo.io has another product called Gloo Edge, which acts as a Kubernetes Ingress controller as well as an API gateway. Gloo Mesh Enterprise is deployed along with Gloo Edge, which provides many comprehensive API management and Ingress capabilities. Gateway Gloo Mesh Enterprise adds support for external authentication using OIDC, OAuth, API key, LDAP, and OPA. These policies are implemented via a custom CRD called ExtAuthPolicy, which can apply these authentications when routes and destinations match certain criteria.
Gloo Mesh Enterprise provides WAF policies to monitor, filter, and block any harmful HTTP traffic. It also provides support for data loss prevention by doing a series of regex replacements on the response body and content that is logged by Envoy. This is a very important feature from a security point of view and stops sensitive data from being logged into the log files. DLP filters can be configured on listeners, virtual services, and routes. Gloo Mesh also provides support for connecting to legacy applications via the SOAP message format. There are options for building data transformation policies to apply XSLT transformation to modernize SOAP/XML endpoints. The data transformation policies can be applied to transform request or response payloads. It also supports special transformations such as via Inja templates. With Inja, you can write loops, conditional logic, and other functions to transform requests and responses.
There is also extensive support for WASM filters. Solo.io provides custom tooling that speeds up the development and deployment of web assemblies. To store WASM files, solo.io provides WebAssembly Hub, available at https://webassemblyhub.io/, and an open source CLI tool called wasme. You can read more about how to use Web Assembly Hub and the wasme CLI at https://docs.solo.io/web-assembly-hub/latest/tutorial_code/getting_started/.
As Gloo Mesh and other products from Solo.io are closely integrated with the Enterprise Service Mesh offering, you get a plethora of other features, and one such feature is a global API portal. The API portal is a self-discovery portal for publishing, sharing, and monitoring API usage for internal and external monetization. When using a multi-heterogeneous mesh, users don’t need to worry about managing observability tools for every mesh; instead, Gloo Mesh Enterprise provides aggregated metrics across every mesh, providing a seamless experience of managing and observing multiple meshes.
In enterprise environments, it is important that multiple teams and users can access and deploy services in the mesh without stepping on each others’ toes. Users need to know what services are available to consume and what services they have published. Users should be able to confidently perform mesh operations without impacting the services of other teams. Gloo Mesh uses the concept of workspaces, which are logical boundaries for a team, limiting team Service Mesh operations within the confines of the workspace so that multiple teams can concurrently use the mesh. Workspaces provide security isolation between configurations published by every team. Through workspaces, Gloo Mesh addresses the complexity of muti-tenancy in Enterprise environments, making it simpler for multiple teams to adopt Service Mesh with config isolation from each other and strict access control for safe muti-tenant usage of the mesh.
Gloo Mesh is also integrated with another Service Mesh based on a different architecture than Istio. The mesh is called Istio Ambient Mesh, which, rather than adding a sidecar proxy per workload, adds a proxy at the per-node level. Istio Ambient Mesh is integrated with Gloo Mesh, and users can run their sidecar proxy-based mesh along with their per-node proxy Istio Ambient Mesh.
Gloo Enterprise Mesh, with integration with Solo.io products such as Gloo Edge, makes it a strong contender among Service Mesh offerings. The ability to support multi-cluster and multi-mesh deployments, multi-tenancy via workspaces, strong support for authentication, zero-trust networking, and mature Ingress management via Gloo Edge makes it a comprehensive Service Mesh offering.
Kuma
Kuma is an open source CNCF sandbox project donated to CNCF by Kong Inc. Like Istio, Kuma also uses Envoy as the data plane. It supports multi-cluster and multi-mesh deployments, providing one global control plane to manage them all. At the time of writing this book, Kuma is one single executable written in GoLang. It can be deployed on Kubernetes as well as on VMs. When deployed in non-Kubernetes environments, it requires a PostgreSQL database to store its configurations.
Let’s start by downloading and installing Kuma, followed by hands-on exercises on this topic:
- Download Kuma for your operating system:
% curl -L https://kuma.io/installer.sh | VERSION=2.0.2 sh -
INFO Welcome to the Kuma automated download!
INFO Kuma version: 2.0.2
INFO Kuma architecture: arm64
INFO Operating system: Darwin
INFO Downloading Kuma from: https://download.konghq.com/mesh-alpine/kuma-2.0.2-darwin-arm64.tar.gz
- Install Kuma on minikube. Unzip the download file and, in the unzipped folder’s bin directory, run the following commands to install Kuma on Kubernetes:
% kumactl install control-plane | kubectl apply -f -
This will create a namespace called kuma-system and install the Kuma control plane in that namespace, along with configuring various CRDs and admission controllers.
- At this point, we can access Kuma’s GUI using the following command:
% kubectl port-forward svc/kuma-control-plane -n kuma-system 5681:5681
Open localhost:5681/gui in your browser and you will see the following dashboard:
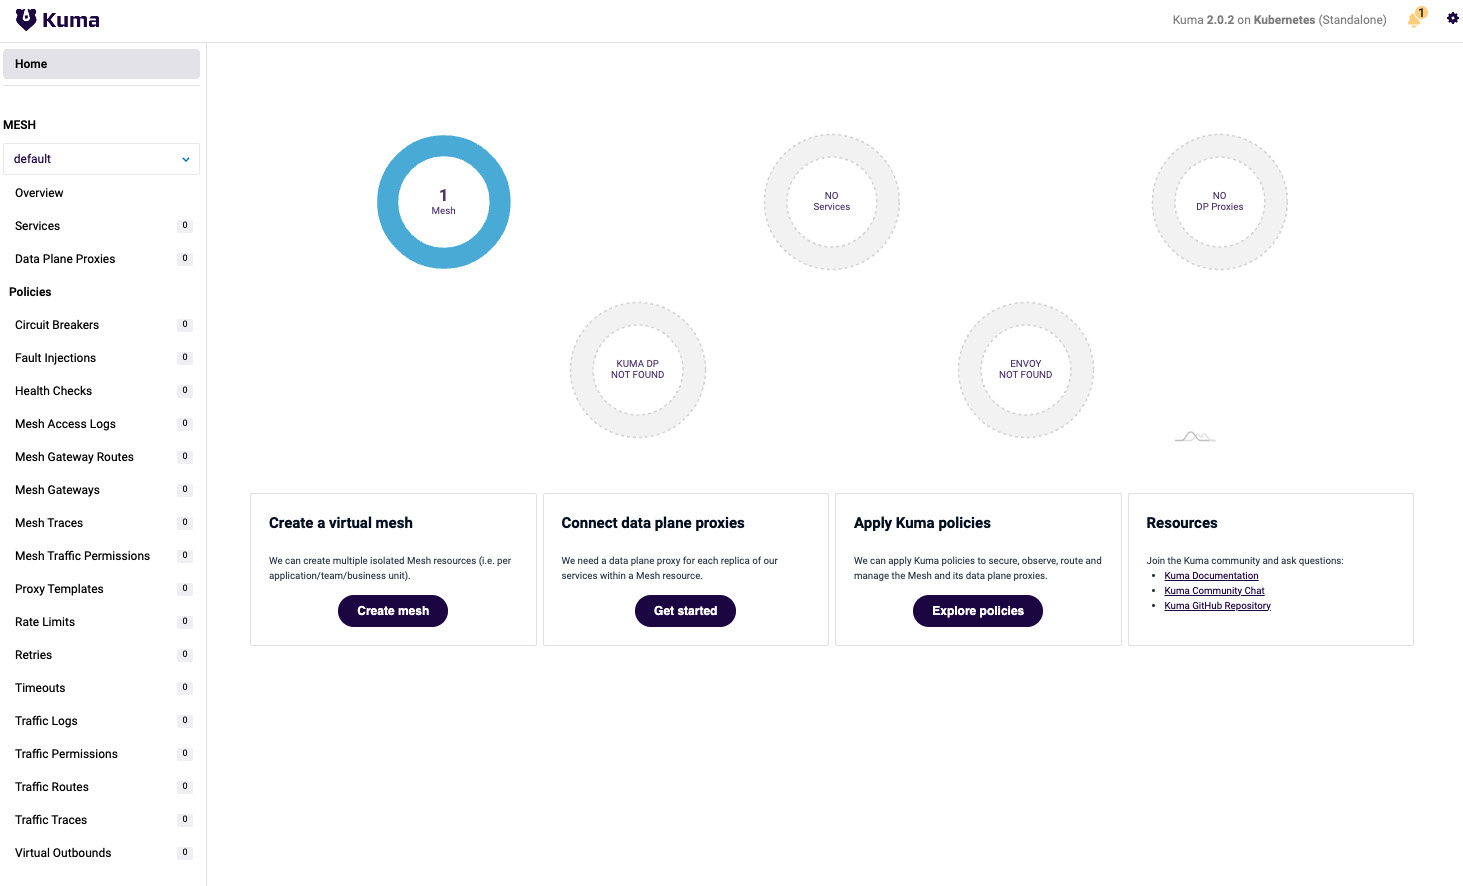
Figure A.7 – Kuma dashboard
The Kuma GUI provides comprehensive details about the mesh. We will use this to check the configuration as we build policies and add applications to the mesh. On the home page of the GUI, you will notice that it shows one mesh called default. A mesh in Kuma is a Service Mesh that is logically isolated from other Service Meshes in Kuma. You can have one Kuma installation in a Kubernetes cluster, which can then manage multiple Service Meshes perhaps for each team or department deploying their apps in that Kubernetes cluster. This is a very important concept and a key differentiator of Kuma from other Service Mesh technologies.
Deploying envoydemo and curl in Kuma mesh
The deployment file is available at AppendixA/Kuma/envoy-proxy-01.yaml. The noticeable difference compared to Istio in the deployment file is the addition of the following label, which instructs Kuma to inject its sidecar proxies into envoydummy:
kuma.io/sidecar-injection: enabled
The following commands will deploy the envoydummy and curl applications:
% kubectl create ns appendix-kuma
namespace/appendix-kuma created
% kubectl apply -f AppendixA/Kuma/envoy-proxy-01.yaml
configmap/envoy-dummy created
service/envoydummy created
deployment.apps/envoydummy created
serviceaccount/envoydummy created
After a few seconds, check whether the Pods have been deployed and the sidecars injected using the following commands:
% kubectl get po -n appendix-kuma
NAME                          READY   STATUS    RESTARTS   AGE
curl                          2/2     Running   0          71s
envoydummy-767dbd95fd-tp6hr   2/2     Running   0          71s
serviceaccount/curl created
pod/curl created
The sidecars are also called data plane proxies (DPPs), and they run along with every workload in the mesh. DPP comprises a data plane entity that defines the configuration of the DPP and a kuma-dp binary. During startup, kuma-dp retrieves the startup configuration for Envoy from the Kuma control plane (kuma-cp) and uses that to spawn the Envoy process. Once Envoy starts, it connects to kuma-cp using XDS. kuma-dp also spawns a core-dns process at startup.
It is worth noticing that installing Kuma and deploying an application has been a breeze. It is very simple, and the GUI is very intuitive, even for beginners.
Using the GUI, let’s check the overall status of the mesh.
From MESH | Overview, you can see newly added DPPs:
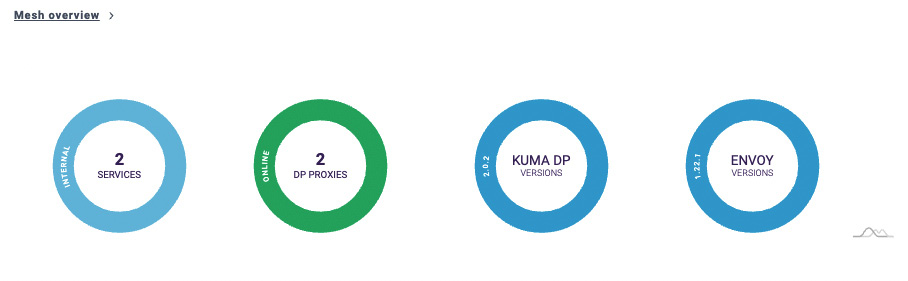
Figure A.8 – Mesh overview in the Kuma GUI
From MESH | Data Plane Proxies, you can find details about the workloads:

Figure A.9 – Data plane proxies
Now that we have installed apps, we will perform some hands-on exercises with Kuma policies to get experience with Kuma.
We will start by accessing the envoydummy service from the curl Pod:
% kubectl exec -it pod/curl -n appendix-kuma -- curl http://envoydummy:80
V1----------Bootstrap Service Mesh Implementation with Istio----------V1%
The output is as expected. By default, Kuma allows traffic in and out of the mesh. By default, all traffic is unencrypted in the mesh. We will enable mTLS and deny all traffic in the mesh to establish zero-trust networking. First, we will delete the policy that allows all traffic within the mesh using the following command:
% kubectl delete trafficpermissions/allow-all-traffic
allow-all-traffic is a traffic permission policy that allows all traffic within the mesh. The previous command deletes the policy, thereby restricting all traffic in the mesh.
Next, we will enable mTLS within the mesh to enable secure communication and let kong-dp correctly identify a service by comparing the service identity with the DPP certificate. Without enabling mTLS, Kuma cannot enforce traffic permissions. The following policy enables mTLS in the default mesh. It makes use of an inbuilt CA, but in case you want to use an external CA then there are also provisions to provide externally generated root CA and key. Kuma automatically generates certificates for every workload with SAN in SPIFEE format.
apiVersion: kuma.io/v1alpha1
kind: Mesh
metadata:
  name: default
spec:
  mtls:
    enabledBackend: ca-1
    backends:
    - name: ca-1
      type: builtin
In the config file, we have defined that this policy applies to the default mesh. We have declared a CA named ca-1 of the builtin type and have configured it to be used as the root CA for mTLS by defining enabledBackend. The configuration file is available at AppendixA/Kuma/enablemutualTLS.yaml. You can apply the configuration using the following commands:
% kubectl apply -f AppendixA/Kuma/enablemutualTLS.yaml
After enabling mTLS, let’s try to access envoydummy from curl:
% kubectl exec -it pod/curl -n appendix-kuma -- curl http://envoydummy:80
curl: (52) Empty reply from server
command terminated with exit code 52
The output is as expected because mTLS is enabled and there is no TrafficPermission policy allowing the traffic between curl and envoydummy.
To allow traffic, we need to create the following TrafficPermission policy:
apiVersion: kuma.io/v1alpha1
kind: TrafficPermission
mesh: default
metadata:
  name: allow-all-traffic-from-curl-to-envoyv1
spec:
  sources:
    - match:
        kuma.io/service: 'curl_appendix-kuma_svc'
  destinations:
    - match:
        kuma.io/service: 'envoydummy_appendix-kuma_svc_80'
Note that the kuma.io/service fields contain the values of the corresponding tags. Tags are sets of key-value pairs that contain details of the service that the DPP is part of and metadata about the exposed service. The following are tags applied to DPP for envoydummy:
% kubectl get dataplane/envoydummy-767dbd95fd-tp6hr -n appendix-kuma -o json | jq '.spec.networking.inbound[].tags'
{
  "k8s.kuma.io/namespace": "appendix-kuma",
  "k8s.kuma.io/service-name": "envoydummy",
  "k8s.kuma.io/service-port": "80",
  "kuma.io/protocol": "http",
  "kuma.io/service": "envoydummy_appendix-kuma_svc_80",
  "name": "envoydummy",
  "pod-template-hash": "767dbd95fd",
  "version": "v1"
}
Similarly, you can fetch the value of the curl DPP. The configuration file is available at AppendixA/Kuma/allow-traffic-curl-to-envoyv1.yaml. Apply the configuration using the following command:
% kubectl apply -f AppendixA/Kuma/allow-traffic-curl-to-envoyv1.yaml
trafficpermission.kuma.io/allow-all-traffic-from-curl-to-envoyv1 created
After applying the configuration, test that you can access envoydummy from curl:
% kubectl exec -it pod/curl -n appendix-kuma -- curl http://envoydummy:80
V1----------Bootstrap Service Mesh Implementation with Istio----------V1%
We have just experienced how you can control traffic between workloads in the mesh. You will find this very similar to ServiceIntentions in Consul Service Mesh.
Traffic management and routing
Now we will explore traffic routing in Kuma. We will deploy version v2 of the envoydummy service and route certain requests between version v1 and v2.
The first step is to deploy version v2 of envoydummy, followed by defining traffic permission to allow traffic between the curl Pod and the envoydummy v2 Pod. The files are at AppendixA/Kuma/envoy-proxy-02.yaml and AppendixA/Kuma/allow-traffic-curl-to-envoyv2.yaml. Apply the configuration, and once you have applied both files, test that curl is able to reach both v1 and v2 of the envoydummy Pod:
% for ((i=0;i<2;i++)); do kubectl exec -it pod/curl -n appendix-kuma -- curl http://envoydummy ;done
V2----------Bootstrap Service Mesh Implementation with Istio----------V2
V1----------Bootstrap Service Mesh Implementation with Istio----------V1
Next, we will configure the routing by using a Kuma policy called TrafficRoute. This policy allows us to configure rules for traffic routing in the mesh.
The policy can be split into four parts to make it easier to understand:
- In the first part, we are declaring the TrafficRoute policy. The basic usage of the policy is documented at https://kuma.io/docs/2.0.x/policies/traffic-route/. Here, we are declaring that the policy applies to the default mesh and to any request in the mesh originating from curl_appendix-kuma_svc with a destination of envoydummy_appendix-kuma_svc_80:
apiVersion: kuma.io/v1alpha1
kind: TrafficRoute
mesh: default
metadata:
  name: trafficroutingforlatest
spec:
  sources:
    - match:
        kuma.io/service: curl_appendix-kuma_svc
  destinations:
    - match:
        kuma.io/service: envoydummy_appendix-kuma_svc_80
- Next, we are configuring any request with a prefix of '/latest' to be routed to the DPP with the tags that are highlighted under destination:
 conf:
    http:
    - match:
        path:
          prefix: "/latest"
      destination:
        kuma.io/service: envoydummy_appendix-kuma_svc_80
        version: 'v2'
- Then, we are configuring request with a prefix of '/old' to be routed to the data plane with the tags that are highlighted under destination:
    - match:
        path:
          prefix: "/old"
      destination:
        kuma.io/service: envoydummy_appendix-kuma_svc_80
        version: 'v1'
- Finally, we are declaring the default destination for requests that do not match any of the paths defined in previous parts of the config. The default destination will be the DPP with the tags highlighted in the following code:
    destination:
      kuma.io/service: envoydummy_appendix-kuma_svc_80
The configuration file is available at AppendixA/Kuma/trafficRouting01.yaml. Apply the configuration and test the following scenarios:
- All requests with '/latest' should be routed to version v2:
% for ((i=0;i<4;i++)); do kubectl exec -it pod/curl -n appendix-kuma -- curl http://envoydummy/latest ;done
V2----------Bootstrap Service Mesh Implementation with Istio----------V2
V2----------Bootstrap Service Mesh Implementation with Istio----------V2
V2----------Bootstrap Service Mesh Implementation with Istio----------V2
V2----------Bootstrap Service Mesh Implementation with Istio----------V2
- All request with '/old' should be routed to version v1:
% for ((i=0;i<4;i++)); do kubectl exec -it pod/curl -n appendix-kuma -- curl http://envoydummy/old ;done
V1----------Bootstrap Service Mesh Implementation with Istio----------V1
V1----------Bootstrap Service Mesh Implementation with Istio----------V1
V1----------Bootstrap Service Mesh Implementation with Istio----------V1
V1----------Bootstrap Service Mesh Implementation with Istio----------V1
- All other requests should follow the default behavior:
% for ((i=0;i<4;i++)); do kubectl exec -it pod/curl -n appendix-kuma -- curl http://envoydummy/xyz ;done
V2----------Bootstrap Service Mesh Implementation with Istio----------V2
V2----------Bootstrap Service Mesh Implementation with Istio----------V2
V1----------Bootstrap Service Mesh Implementation with Istio----------V1
V1----------Bootstrap Service Mesh Implementation with Istio----------V1
The request routing works as expected, and it is similar to how you would configure the same behavior using Istio. Now, let’s look at the load balancing properties of Kuma Mesh. We will build another traffic routing policy to do weighted routing between version v1 and v2 of envoydummy. Here is a snippet of the configuration available at AppendixA/Kuma/trafficRouting02.yaml:
  conf:
    split:
      - weight: 10
        destination:
          kuma.io/service: envoydummy_appendix-kuma_svc_80
          version: 'v1'
      - weight: 90
        destination:
          kuma.io/service: envoydummy_appendix-kuma_svc_80
          version: 'v2'
After applying the configuration, you can test the traffic distribution using the following command:
% for ((i=0;i<10;i++)); do kubectl exec -it pod/curl -n appendix-kuma -- curl http://envoydummy/xyz ;done
The traffic should be distributed between the two versions in approximately a 1:9 ratio. You can perform traffic routing, traffic modification, traffic splitting, load balancing, canary deployments, and locality-aware load balancing using a TrafficRoute policy. To read more about TrafficRoute, please use the comprehensive documentation available here: https://kuma.io/docs/2.0.x/policies/traffic-route.
Kuma also provides policies for circuit breaking, fault injection, timeout, rate limiting, and many more things. A comprehensive list of Kuma policies is available here: https://kuma.io/docs/2.0.x/policies/introduction/. These out-of-the-box policies make Kuma very easy to use with a very shallow learning curve.
In the hands-on example so far, we have been deploying all workloads in the default mesh. We discussed earlier that Kuma allows you to create different isolated meshes, allowing teams to have isolated mesh environments within the same Kuma cluster. You can create a new mesh using the following configuration:
apiVersion: kuma.io/v1alpha1
kind: Mesh
metadata:
  name: team-digital
The configuration is available in AppendixA/Kuma/team-digital-mesh.yaml. Apply the configuration using the following command:
% kubectl apply -f AppendixA/Kuma/team-digital-mesh.yaml
mesh.kuma.io/team-digital created
Once you have created the mesh, you can create all the resources within the mesh by adding the following annotations to the workload deployment configurations:
kuma.io/mesh: team-digital
And add the following to the Kuma policies:
mesh: team-digital
The ability to create a mesh is a very useful feature for enterprise environments and a key differentiator of Kuma compared to Istio.
Kuma also provides built-in Ingress capabilities to handle north-south traffic as well as east-west traffic. The Ingress is managed as a Kuma resource called a gateway, which in turn is an instance of kuma-dp. You have the flexibility to deploy as many Kuma gateways as you want, but ideally, one gateway per mesh is recommended. Kuma also supports integration with non-Kuma gateways, also called delegated gateways. For now, we will talk about built-in Kuma gateways and, later, briefly discuss delegated gateways.
To create a built-in gateway, you first need to define MeshGatewayInstance along with a matching MeshGateway. MeshGatewayInstance provides the details of how a gateway instance should be instantiated. Here is an example configuration of MeshGatewayInstance, which is also available at AppendixA/Kuma/envoydummyGatewayInstance01.yaml:
apiVersion: kuma.io/v1alpha1
kind: MeshGatewayInstance
metadata:
  name: envoydummy-gateway-instance
  namespace: appendix-kuma
spec:
  replicas: 1
  serviceType: LoadBalancer
  tags:
    kuma.io/service: envoydummy-edge-gateway
In the config, we are setting that there will be 1 replica and a serviceType of LoadBalancer, and we have applied a tag, kuma.io/service: envoydummy-edge-gateway, which will be used to build the association with MeshGateway.
In the following configuration, we are creating a MeshGateway named envoydummy-edge-gateway. The configuration is available in AppendixA/Kuma/envoydummyGateway01.yaml:
apiVersion: kuma.io/v1alpha1
kind: MeshGateway
mesh: default
metadata:
  name: envoydummy-edge-gateway
  namespace: appendix-kuma
spec:
  selectors:
  - match:
      kuma.io/service: envoydummy-edge-gateway
  conf:
    listeners:
      - port: 80
        protocol: HTTP
        hostname: mockshop.com
        tags:
          port: http/80
The MeshGateway resource specifies the listeners, which are endpoints that accept network traffic. In the configuration, you specify ports, protocols, and an optional hostname. Under selectors, we are also specifying the MeshGatewayInstance tags with which the MeshGateway configuration is associated. Notice that we are specifying the same tags we defined in the MeshGatewayInstance configuration.
Next, we will define MeshGatewayRoute, which describes how a request is routed from MeshGatewayInstance to the workload service. An example configuration is available at AppendixA/Kuma/envoydummyGatewayRoute01.yaml. Here are some snippets from the file:
- Under selectors, we are specifying the details of the gateway and the listener to which this route should be attached. The details are specified by providing the tags of the corresponding gateway and listeners:
spec:
  selectors:
    - match:
        kuma.io/service: envoydummy-edge-gateway
        port: http/80
- In the conf part, we provide Layer 7 matching criteria for the request, such as the path and HTTP headers, and the destination details:
  conf:
    http:
      rules:
        - matches:
            - path:
                match: PREFIX
                value: /
          backends:
            - destination:
                kuma.io/service: envoydummy_appendix-kuma_svc_80
- And last but not least, we allow traffic between the edge gateway and the envoy dummy service by configuring TrafficPermission as described in following snippet. You can find the configuration at AppendixA/Kuma/allow-traffic-edgegateway-to-envoy.yaml:
kind: TrafficPermission
mesh: default
metadata:
  name: allow-all-traffic-from-curl-to-envoyv1
spec:
  sources:
    - match:
        kuma.io/service: 'envoydummy-edge-gateway'
  destinations:
    - match:
        kuma.io/service: 'envoydummy_appendix-kuma_svc_80'
With traffic permission in place, we are now ready to apply the configuration using the following set of commands:
- Create MeshGatewayInstance:
% kubectl apply -f AppendixA/Kuma/envoydummyGatewayInstance01.yaml
meshgatewayinstance.kuma.io/envoydummy-gateway-instance created
- Create MeshGateway:
% kubectl apply -f AppendixA/Kuma/envoydummyGateway01.yaml
meshgateway.kuma.io/envoydummy-edge-gateway created
- Create MeshGatewayRoute:
% kubectl apply -f AppendixA/Kuma/envoydummyGatewayRoute01.yaml
meshgatewayroute.kuma.io/envoydummy-edge-gateway-route created
- Create TrafficPermissions:
$ kubectl apply -f AppendixA/Kuma/allow-traffic-edgegateway-to-envoy.yaml
trafficpermission.kuma.io/allow-all-traffic-from-curl-to-envoyv1 configured
You can verify that Kuma has created a gateway instance using the following commands:
% kubectl get po -n appendix-kuma
NAME                         READY   STATUS    RESTARTS   AGE
curl                         2/2     Running   0          22h
envoydummy-767dbd95fd-br2m6                    2/2     Running   0          22h
envoydummy-gateway-instance-75f87bd9cc-z2rx6   1/1     Running   0          93m
envoydummy2-694cbc4f7d-hrvkd                   2/2     Running   0          22h
You can also check the corresponding service using the following command:
% kubectl get svc -n appendix-kuma
NAME                  TYPE   CLUSTER-IP      EXTERNAL-IP   PORT(S)        AGE
envoydummy       ClusterIP      10.102.50.112   <none>        80/TCP         22h
envoydummy-gateway-instance   LoadBalancer   10.101.49.118   <pending>     80:32664/TCP   96m
We are now all set to access envoydummy using the built-in Kuma gateway. But first, we need to find an IP address through which we can access the Ingress gateway service on minikube. Use the following command to find the IP address:
% minikube service envoydummy-gateway-instance --url -n appendix-kuma
http://127.0.0.1:52346
Now, using http://127.0.0.1:52346, you can access the envoydummy service by performing curl from your terminal:
% curl -H "host:mockshop.com" http://127.0.0.1:52346/latest
V1----------Bootstrap Service Mesh Implementation with Istio----------V1
You have learned how to create a MeshGatewayInstance, which is then associated with MeshGateway. After the association, kuma-cp created a gateway instance of the built-in Kuma gateway. We then created a MeshGatewayRoute that specifies how the request will be routed from the gateway to the workload service. Later, we created a TrafficPermission resource to allow traffic flow from MeshGateway to the EnvoyDummy workload.
Kuma also provides options for using an external gateway as Ingress, also called a delegated gateway. In a delegated gateway, Kuma supports integrations with various API gateways, but Kong Gateway is the preferred and most well-documented option. You can read more about delegated gateways at https://kuma.io/docs/2.0.x/explore/gateway/#delegated.
Like Istio, Kuma also provides native support for both Kubernetes and VM-based workloads. Kuma provides extensive support for running advanced configurations of Service Mesh spanning multiple Kubernetes clusters, data centers, and cloud providers. Kuma has a concept of zones, which are logical aggregations of DPPs that can communicate with each other. Kuma supports running Service Mesh in multiple zones and the separation of control planes in a multi-zone deployment. Each zone is allocated its own horizontally scalable control plane providing complete isolation between every zone. All zones are then also managed by a centralized global control plane, which manages the creation of and changes to policies that are applied to DPPs and the transmission of zone-specific policies and configurations to respective control planes of underlying zones. The global control plane is a single pane of glass providing an inventory of all DPPs across all zones.
As mentioned earlier, Kuma is an open source project that was donated by Kong to CNCF. Kong also provides Kong Mesh, which is an enterprise version of Kuma built on top of Kuma, extending it to include capabilities required for running critical functionality for enterprise workloads. Kong Mesh provides a turnkey Service Mesh solution with capabilities such as integration with OPA, FIPS 140-2 compliance, and role-based access control. Coupled with Kong Gateway as an Ingress gateway, a Service Mesh based on Kuma, additional enterprise-grade add-ons and reliable enterprise support makes Kong Mesh a turnkey Service Mesh technology.
Uninstalling Kuma
You can uninstall Kuma Mesh using the following command:
% kumactl install control-plane | kubectl delete -f -
Linkerd
Linkerd is a CNCF graduated project licensed under Apache v2. Buoyant (https://buoyant.io/) is the major contributor to Linkerd. Out of all Service Mesh technologies, Linkerd is probably one of the earliest, if not the oldest. It was initially made public in 2017 by Buoyant. It had initial success, but then it was criticized for being very resource hungry. The proxy used in Linkerd was written using the Scala and Java networking ecosystem, which uses the Java Virtual Machine (JVM) at runtime, causing significant resource consumption. In 2018, Buoyant released a new version of Linkerd called Conduit. Conduit was later renamed Linkerd v2. The Linkerd v2 data plane is made up of Linkerd2-proxy, which is written in Rust and has a small resource consumption footprint. Linkerd2- proxy is purpose built for proxying as a sidecar in Kubernetes Pods. While Linkerd2-proxy is written in Rust, the Linkerd control plane is developed in Golang.
Like other open source Service Mesh technologies discussed in this Appendix, we will discover Linkerd by playing around with it and observing how it is similar to or different to Istio. Let’s start by installing Linkerd on minikube:
- Install Linkerd on minikube using the following command:
% curl --proto '=https' --tlsv1.2 -sSfL https://run.linkerd.io/install | sh
Downloading linkerd2-cli-stable-2.12.3-darwin...
Linkerd stable-2.12.3 was successfully installed
Add the linkerd CLI to your path with:
  export PATH=$PATH:/Users/arai/.linkerd2/bin
- Follow the suggestion to include linkerd2 in your path:
export PATH=$PATH:/Users/arai/.linkerd2/bin
- Linkerd provides an option to check and validate that the Kubernetes cluster meets all the prerequisites required to install Linkerd:
% linkerd check --pre
- If the output contains the following, then you are good to go with the installation:
Status check results are √
If not, then you need to resolve the issues by going through suggestions at https://linkerd.io/2.12/tasks/troubleshooting/#pre-k8s-cluster-k8s%20for%20hints.
- Next, we will Install Linkerd in two steps:
- First, we install the CRDs:
% linkerd install --crds | kubectl apply -f -
- The, we install the Linkerd control plane in the linkerd namespace:
% linkerd install --set proxyInit.runAsRoot=true | kubectl apply -f -
- After installing the control plane, check that Linkerd is fully installed using the following commands:
% linkerd check
If Linkerd is successfully installed, then you should see the following message:
Status check results are √
That complete the setup of Linkerd! Let’s now analyze what has been installed:
% kubectl get pods,services -n linkerd
NAME                    READY   STATUS    RESTARTS   AGE
pod/linkerd-destination-86d68bb57-447j6       4/4     Running   0          49m
pod/linkerd-identity-5fbdcccbd5-lzfkj         2/2     Running   0          49m
pod/linkerd-proxy-injector-685cd5988b-5lmxq   2/2     Running   0          49m
NAME   TYPE        CLUSTER-IP       EXTERNAL-IP   PORT(S)    AGE
service/linkerd-dst           ClusterIP    10.102.201.182   <none>        8086/TCP   49m
service/linkerd-dst-headless        ClusterIP   None             <none>        8086/TCP   49m
service/linkerd-identity        ClusterIP   10.98.112.229    <none>       8080/TCP   49m
service/linkerd-identity-headless       ClusterIP   None             <none>        8090/TCP   49m
service/linkerd-policy           ClusterIP    None             <none>        8090/TCP   49m
service/linkerd-policy-validator    ClusterIP   10.102.142.68    <none>        443/TCP    49m
service/linkerd-proxy-injector      ClusterIP   10.101.176.198   <none>        443/TCP    49m
service/linkerd-sp-validator        ClusterIP    10.97.160.235    <none>        443/TCP    49m
It’s worth noticing here that the control plane comprises many Pods and Services. The linkerd-identity service is a CA for generating signed certificates for Linkerd proxies. linkerd-proxy-injector is the Kubernetes admission controller responsible for modifying Kubernetes Pod specifications to add linkerd-proxy and proxy-init containers. The destination service is the brains of the Linkerd control plane and maintains service discovery and identity information about the services, along with policies for securing and managing the traffic in the mesh.
Deploying envoydemo and curl in Linkerd
Now let’s deploy envoydummy and curl apps and check how Linkerd performs Service Mesh functions. Follow these steps to install the application:
- Like most Service Mesh solutions, we need to annotate the deployment descriptors with the following annotations:
      annotations:
        linkerd.io/inject: enabled
The configuration file for the envoydummy and curl apps along with annotations is available in AppendixA/Linkerd/envoy-proxy-01.yaml.
- After preparing the deployment descriptors, you can apply the configurations:
% kubectl create ns appendix-linkerd
% kubectl apply -f AppendixA/Linkerd/envoy-proxy-01.yaml
- That should deploy the Pod. Once the Pod is deployed, you can check what has been injected into the Pods via the following commands:
% kubectl get po/curl -n appendix-linkerd -o json | jq '.spec.initContainers[].image, .spec.initContainers[].name'
"cr.l5d.io/linkerd/proxy-init:v2.0.0"
"linkerd-init"
% kubectl get po/curl -n appendix-linkerd -o json | jq '.spec.containers[].image, .spec.containers[].name'
"cr.l5d.io/linkerd/proxy:stable-2.12.3"
"curlimages/curl"
"linkerd-proxy"
"curl"
From the preceding output, observe that Pod initialization was performed by a container named linkerd-init of the cr.l5d.io/linkerd/proxy-init:v2.0.0 type, and the Pod has two running containers, curl and linkerd-proxy, of the cr.l5d.io/linkerd/proxy:stable-2.12.3 type. The linkerd-init container runs during the initialization phase of the Pod and modifies iptables rules to route all network traffic from curl to linkerd-proxy. As you may recall, in Istio we have istio-init and istio-proxy containers, which are similar to Linkerd containers. linkerd-proxy is ultra-light and ultra-fast in comparison to Envoy. Being written in Rust makes its performance predictable and it doesn’t need garbage collection, which often causes high latency during garbage collection passes. Rust is arguably much more memory safe than C++ and C, which makes it less susceptible to memory safety bugs. You can read more about why linkerd-proxy is better than envoy at https://linkerd.io/2020/12/03/why-linkerd-doesnt-use-envoy/.
Verify that curl is able to communicate with the envoydummy Pod as follows:
% kubectl exec -it pod/curl -c curl -n appendix-linkerd -- curl http://envoydummy:80
V1----------Bootstrap Service Mesh Implementation with Istio----------V1%
Now that we have installed the curl and envoydummy Pods, let’s explore Linkerd Service Mesh functions. Let’s start by exploring how we can restrict traffic within the mesh using Linkerd.
Zero-trust networking
Linkerd provides comprehensive policies to restrict traffic in the mesh. Linkerd provides a set of CRDs through which policies can be defined to control the traffic in the mesh. Let’s explore these policies by implementing policies to control traffic to the envoydummy Pod:
- We will first lock down all traffic in the cluster using following:
% linkerd upgrade --default-inbound-policy deny --set proxyInit.runAsRoot=true | kubectl apply -f -
We used the linkerd upgrade command to apply a default-inbound-policy of deny, which prohibits all traffic to ports exposed by workloads in the mesh unless there is a server resource attached to the port.
After applying the policy, all access to the envoydummy service is denied:
% kubectl exec -it pod/curl -c curl -n appendix-linkerd -- curl --head http://envoydummy:80
HTTP/1.1 403 Forbidden
content-length: 0
l5d-proxy-error: unauthorized request on route
- Next, we create a server resource to describe the envoydummy port. A Server resource is a means of instructing Linkerd that only authorized clients can access the resource. We do that by declaring the following Linkerd policy:
apiVersion: policy.linkerd.io/v1beta1
kind: Server
metadata:
  namespace: appendix-linkerd
  name: envoydummy
  labels:
    name: envoydummy
spec:
  podSelector:
    matchLabels:
      name: envoydummy
  port: envoydummy-http
  proxyProtocol: HTTP/1
The configuration file is available at AppendixA/Linkerd/envoydummy-server.yaml. The server resource is defined in the same namespace as the workload. In the configuration file, we also define the following:
- podSelector: Criteria for selecting the workload
- port: Name or number of the port for which this server configuration is being declared
- proxyProtocol: Configures protocol discovery for inbound connections and must be one of the following: unknown, HTTP/1, HTTP/2, gRPC, opaque, or TLS
Apply the server resource using the following command:
% kubectl apply -f AppendixA/Linkerd/envoydummy-server.yaml
server.policy.linkerd.io/envoydummy created
Although we have applied the server resource, the curl Pod still can’t access the envoydummy service unless we authorize it.
- In this step, we will create an authorization policy that authorizes curl to access envoydummy. The authorization policy is configured by providing server details of the target destination and service account details being used to run the originating service. We created a server resource named envoydummy in the previous step and, as per AppendixA/Linkerd/envoy-proxy-01.yaml, we are using a service account named curl to run the curl Pod. The policy is defined as follows and is also available at AppendixA/Linkerd/authorize-curl-access-to-envoydummy.yaml:
apiVersion: policy.linkerd.io/v1alpha1
kind: AuthorizationPolicy
metadata:
  name: authorise-curl
  namespace: appendix-linkerd
spec:
  targetRef:
    group: policy.linkerd.io
    kind: Server
    name: envoydummy
  requiredAuthenticationRefs:
    - name: curl
      kind: ServiceAccount
- Apply the configuration as follows:
% kubectl apply -f AppendixA/Linkerd/authorize-curl-access-to-envoydummy.yaml
authorizationpolicy.policy.linkerd.io/authorise-curl created
Once the AuthorizationPolicy is in place, it will authorize all traffic to the Envoy server from any workload running using a curl service account.
- You can verify the access between the curl and envoydummy Pods using the following command:
% kubectl exec -it pod/curl -c curl -n appendix-linkerd – curl  http://envoydummy:80
V1----------Bootstrap Service Mesh Implementation with Istio----------V1
Using AuthorizationPolicy, we have controlled access to ports presented as servers from other clients in the mesh. Granular access control, such as controlling access to an HTTP resource, can be managed by another policy called s.
We can understand this concept better via an example, so let’s make a requirement that only requests whose URI start with /dummy can be accessible from curl; requests to any other URI must be denied. Let’s get started:
- We need to first define an HTTPRoute policy as described in the following code snippet:
apiVersion: policy.linkerd.io/v1beta1
kind: HTTPRoute
metadata:
  name: envoydummy-dummy-route
  namespace: appendix-linkerd
spec:
  parentRefs:
    - name: envoydummy
      kind: Server
      group: policy.linkerd.io
      namespace: appendix-linkerd
  rules:
    - matches:
      - path:
          value: "/dummy/"
          type: "PathPrefix"
        method: GET
The configuration is also available at AppendixA/Linkerd/HTTPRoute.yaml. This will create an HTTP route targeting the envoydummy server resource. In the rules section, we define the criteria for identifying requests that will be used to identify the HTTP request for this route. Here, we have defined to rule to match any request with the dummy prefix and the GET method. HTTPRoute also supports route matching using headers and query parameters. You can also apply other filters in HTTPRoute to specify how the request should be processed during the request or response cycle; you can modify inbound request headers, redirect requests, modify request paths, and so on.
- Once we have defined HTTPRoute, we can modify the AuthorizationPolicy to associate with HTTPRoute instead of the server, as listed in the following code snippet and also available at AppendixA/Linkerd/HttpRouteAuthorization.yaml:
apiVersion: policy.linkerd.io/v1alpha1
kind: AuthorizationPolicy
metadata:
  name: authorise-curl
  namespace: appendix-linkerd
spec:
  targetRef:
    group: policy.linkerd.io
    kind: HTTPRoute
    name: envoydummy-dummy-route
  requiredAuthenticationRefs:
    - name: curl
      kind: ServiceAccount
The configuration updates AuthorizationPolicy and, instead of referencing the server (envoydummy configured in AppendixA/Linkerd/authorize-curl-access-to-envoydummy.yaml) as the target, the policy is now referencing HTTPRoute (named envoydummy-dummy-route).
Apply both configurations and test that you are able to make requests with the /dummy prefix in the URI. Any other request will be denied by Linkerd.
So far in AuthorizationPolicy we have used ServiceAccount authentication. AuthorizationPolicy also supports MeshTLSAuthentication and NetworkAuthentication. Here is a brief overview of these authentication types:
- MeshTLSAuthentication is used to identify a client based on its mesh identity. For example, the curl Pod will be represented as curl.appendix-linkerd.serviceaccount.identity.linkerd.local.
- NetworkAuthentication is used to identify a client based on its network location using Classless Inter-Domain Routing (CIDR) blocks.
Linkerd also provides retries and timeouts to provide application resilience when systems are under stress or suffering partial failures. Apart from support for usual retry strategies, there is also a provision for specifying retry budgets so that retries do not end up amplifying resilience problems. Linkerd provides automated load balancing of requests to all destination endpoints using the exponentially weighted moving average (EWMA) algorithm. Linkerd supports weight-based traffic splitting, which is useful for performing canary and blue/green deployments. Traffic splitting in Linkerd uses the Service Mesh Interface (SMI) Traffic Split API, allowing users to incrementally shift traffic between blue and green services. You can read about the Traffic Split API at https://github.com/servicemeshinterface/smi-spec/blob/main/apis/traffic-split/v1alpha4/traffic-split.md and SMI at https://smi-spec.io. Linkerd provides a well-defined and documented integration with Flagger to perform automatic traffic shifting when performing canary and blue/green deployments.
There is a lot more to learn and digest about Linkerd. You can read about it at https://linkerd.io/2.12. Linkerd is ultra-performant because of its ultra-light service proxy build using Rust. It is carefully designed to solve application networking problems. The ultra-light proxy performs most Service Mesh functions but lacks in features such as circuit breaking and rate limiting. Let’s hope that the Linkerd creators bridge the gap with Envoy.
Hopefully, you are now familiar with the various alternatives to Istio and how they implement Service Mesh. Consul, Linkerd, Kuma, and Gloo Mesh have lots of similarities, and all of them are powerful, but Istio is the one that has the biggest community behind it and the support of various well-known organizations. Also, there are various organizations that provide enterprise support for Istio, which is a very important consideration when deploying Istio to production.