
This chapter contains powerful templates that will enable you to draft your first outline and build on it. You will identify when detail is required, as well as any need for creativity and flexibility. We look at the pitfalls and what you should have in place to give you the confidence to design effectively, including timings and up-front evaluation. The wants and needs of the audience are the most important, and this chapter consolidates the learning of that in the previous three. Pre-work pros and cons are also addressed in an easy-to-follow list.

Do not take planning and design for granted. It is just as important as the ‘doing it’ part.
There are many project management books on planning. The message is the same. To fail to plan is to plan to fail. When I meet ‘new’ facilitators, most of their effort and energy is spent focusing on the part where they have to stand up in front of an audience, as this is generally their biggest challenge. They tell me that the planning and design is the easy bit and the fear is the doing. (Many experienced facilitators also experience this.) They tend to focus their energy on what they will say when that moment comes, when they may get tongue-tied or feel anxious or appear nervous. When I get them to review their design and planning of the workshop, it generally tells them that if they had spent more time on this, it would increase their confidence when asked to ‘stand and deliver’. Alternatively, many facilitators get their buzz from the delivery, so the design part isn’t as exciting for them. We will focus on how the design can be exciting as well. Either way, this chapter will give you tools and templates to assist you in designing your workshops effectively.
Planning for success
When someone initially engages you to run a session or workshop, you must get your planning head on and be as positively challenging as you can. In Chapter 1, we said that many clients do not know what they need or require and your job is to ask as many questions as possible. Now that you have more of an idea, you have to put it into a deliverable product for your client.
Think about the type of presentation/facilitation/training that will be required. You will find some information in the tables below to assist you and to get you thinking. Focus on the type of delivery, the purpose, the audience and implications on preparation and delivery.
A briefing
| What is the purpose? | Who are the audience? | Implications on preparation and delivery |
|---|---|---|
| To give information. | May be either internal or external. | Do you already know your audience? |
| To motivate internal staff. | May be either a large or small audience. | Think about what they need to know. |
| To update the client team. | You may not need to use visual aids. | |
| To inform the client on latest state of play. | You may not need to use prompt cards/notes. | |
| To outline plans before an assignment starts. | You may not rehearse if the briefing is very informal. | |
| To report back after an assignment. | You need to be clear on the facts. |
A proposal
| What is the purpose? | Who are the audience? | Implications on preparation and delivery |
|---|---|---|
| To persuade or sell. | May be an existing client. | You must research your audience. |
| To give information. | May be an external client. | Who are the key decision-makers? |
| To prompt action. | May be a potential client. | What is their agenda? |
| To demonstate teamwork. | May be an internal team. | What are the criteria for the decision? |
| To follow the client’s agenda. | May be a small audience. | You must rehearse. |
| Appropriate use of visual aids. | ||
| Strong closing messages. |
A seminar
| What is the purpose? | Who are the audience? | Implications on preparation and delivery |
|---|---|---|
| To filter information. | May be either internal or external. | Audience research likely to be very generic (e.g. size, etc.). |
| To provide translation of technical subject matter. | Usually a large audience. | Think about what they are expecting to hear. |
| To prompt action. | Link with other speakers or theme. | |
| To promote awareness of your services. | Any underlying agenda (e.g. to sell)? | |
| To demonstrate expertise. | You must rehearse. | |
| To network. | Will be a more technical agenda. | |
| More formal approach. |
Workshop planning templates
Once you have agreed the type of approach required, you need to start to plan in more detail. There are many workshop planning templates that you can use and I would recommend that you get to know what your preference is, yet be open to adapting rather than sticking to the same one rigidly; flexibility is key.
Structuring your talk
Your structure must include a beginning, a middle and an end. Decide how conspicuous you want your structure to be. A clear structure is preferable, but it may be better to take a difficult audience along a chain of reasoning, showing them at the end where they have got to.
Try signposting. It can be blatant – ‘I have three points to make, 1. . ., 2. . ., 3. . .’; ‘In summary, my three points were. . .’ Or it can be subtle – ‘Now that we’ve dealt with. . . we can examine. . .’
Here are some areas to think about when planning your structure:
- Use the KISS technique – Keep It Short and Simple.
- Remember where the peaks of concentration occur:
– in the first few minutes;
– when they realise you are concluding and the end is near.
- Decide how to structure your ideas. If you have five points, of which number five is the strongest and number one is the weakest, start with number four (closest to five, which is your strongest point), then cover one, two and three, and then close with point number five (your strongest closing).
- Summarise at regular intervals.
If you are talking about a topic where there are two sides to the argument, you need to be aware of where you stand on the issue both professionally and personally, as well as where the audience stand.
Present one side of an argument when you know:
- most of the audience are in favour of your view;
- the audience are your subordinates who rely on you for guidance;
- the audience have to make an instant decision.
Present both sides of an argument when you know:
- most of the audience are opposed;
- the audience are your superiors who want the full picture;
- the counter-argument has or is going to be made known.
If you are presenting both sides, and you favour the ‘pro’ side, start with the ‘cons’ and answer them with the pros. This will help you to avoid destroying your own case. Put down the other side of the argument to put your point forward.
Always prepare the other side of the argument, even if you are not going to present it, so that you can answer any questions.
Always structure your talk. Plan it like a story (see Figure 3.1). Chunk it down into smaller sections – it can seem less daunting by focusing on smaller elements rather than the whole.

To break down your design into smaller parts can be useful in many ways. Design may not be as exciting as the delivery for some people, but you can make it what you want it to be. When I design, I visualise myself in front of the room and the positive atmosphere that will surround me. This enables me to write in an excited and motivated mood. You can focus on key points in the session and make sure that each part is as important as the next. I always find it invaluable to break down any session that I am planning into a beginning, middle and end. The reason that the order has been changed in the BEM model is that the beginning and end are where you will have the most impact. It really helps to focus on these two sessions: first, the impact at the beginning where you can grab their attention, get buy-in, set the scene, expectations, etc.; and the end, ensuring that the objectives have been met and you have delivered a ‘successful’ workshop. Once these are in place, the middle part is the ‘filling’. This should pull it all together. Just like making a sandwich, you cannot start with the filling; you need the bread on either side to make it!
The beginning
- The beginning must be used to grab the audience’s attention. They will be asking:
– Who are you and why are you doing this?
– What is the aim of the session/presentation?
– Will it be interesting?
– Will we be able to participate?
– What will we get out of it?
- Create acceptance, build bridges with your audience, don’t be offensive or unnecessarily outrageous, and get them on your side.
- Think about a general introduction:
– relating yourself and your subject to the place and the audience.
- Think about a specific introduction:
– make both your subject and your introductions clear.
- Your opening sentences might have one or more of these three aims:
– to get the audience’s attention and focus it on your presentation;
– to give them a taste of what is to come;
– to outline the content and structure of your presentation.
- You should learn your opening sentences. This reduces nervousness on the day.
- Having learnt your opening sentences your talk should start well. This will help establish your credibility and create a good rapport with your audience.
- Find out whether someone else will be introducing you. If this is so, it may be suitable to have ready a few words of thanks; if not, prepare a brief introduction for yourself. If you are presenting as part of a team, link your part with a previous talk: ‘As Mike said earlier. . .’
The end
- A clear conclusion is vital, linked to your original objective.
- Review what you have said with a summary of key points or an example which ties everything together.
- State or imply what you expect your audience to do, believe, know, etc., as a result of your session.
- Ensure you have met audience needs and have expressed any benefits in terms of benefits for them, not for you.
- Never introduce new points in your conclusion.
- Leave plenty of time for questions, if applicable.
The middle
- The middle is the ‘filling’ – a key part of the session. You should aim to keep audience attention.
- Get all your ideas on paper first – let them flow in any order. Then categorise:
– What are your audience needs?
– What do you know about your subject?
- Choose three or four points or main categories from the subject notes that are of major interest to the audience.
- Select a logical structure to cover each main point, supported with the relevant subheadings.

- Write down in one sentence the message of your talk or presentation.
- Refer to your brief. Read between the lines for a hidden agenda.
- Identify the purpose of your talk/presentation. Why am I making this presentation? Is it to motivate, inform, persuade?
- Note three key messages that you would like the audience to take away with them.
I always find that doing this exercise really gets me to focus on having a clear overview of what is required, and why.

Here is an example of delivering an appraisal workshop for a client.
- One sentence: I am informing an audience of managers about the changes in the appraisal process and the impact these changes will have on them.
- Hidden agenda: On searching through the supporting documentation, there was some small print about performance-related pay linked to attendance at work. This was never brought up in the planning discussions even though there would be a high impact on managers and staff.
- The purpose: To engage managers in the process, as without them supporting the changes, appraisal will not be effective. To inform and influence the managers to take ownership of the process and to manage people effectively.
- Three key messages: Managers own the appraisal process, not HR; appraisal is not optional, it is an integral part of being a manager. Support the changes – they have been agreed and no amount of time challenging them will have any effect on the outcome. Use your precious time sensibly elsewhere.
Designing your first draft
When designing your first draft, make a list of the key content or learning that must be covered. You will have discussed this with your client. Forget time limitations at this stage. If something is important you will always find the time for it. Do not worry about it now.
The following table can be useful to complete at the outset.

If the participants do not know each other, you may want to run a short session where they are all introduced to one another. Do not fall into the trap of running this session at every workshop as it can be tedious if everyone is already known to each other. Ask your client if it is needed and if it will add value.
A simple way of quick introductions is to use the four Ws – that is, the four ‘W’ questions that you need the answers to.
The four Ws
- Who are you? A name is all that is required.
- Where do you work? It is useful to know where people are working, either in an internal department or, if a public course, an external company.
- Why are you here? Get an insight into their motivations.
- What do you intend to learn? Find out their personal learning objectives. Get them to write these down. If you have planned correctly, the content should cover them already!
When you ask why someone is present, never accept ‘because my manager told me to be here’. It immediately tells you that the person probably does not want to be here – and you may need to be aware of this in case of disruption through lack of motivation. Pre-empt this response by always informing the group that when someone responds to this question in that way, you will be asking for an alternative answer.
The table below is based on an introductory session for a workshop. Remember, no timings at this stage. Just get your thoughts around what is required. Think of each key section individually. Do not worry about patterns or which session follows the next as this can get in the way of your focus for each session.

Complete this exercise for each separate session in your workshop. You can add rows and just complete for each session; or you can complete separate pages for each session, then put them together like a jigsaw puzzle when it comes to the next planning stage. Again, I cannot stress enough that you have to do what works for you.
You can find downloadable templates at www.brilliant-workshops.co.uk
Up-front evaluation

Evaluation
A systematic determination of merit, worth and significance of something or someone using criteria against a set of standards.
When working with the client during the design stage, it is important to have a column in your design template called ‘evaluation’ or ‘success criteria’, as mentioned in Chapter 1.
Generally, people talk about evaluation as something they will do only at the end of the workshop. While this can also be useful, don’t leave it solely until the end before you discuss it. You may have designed a fun, energetic session, but if you can’t measure its effectiveness then should you be doing it? How will you separate emotional evaluation from logical evaluation? What does the client want? Some people may feel that it went well but, as a facilitator, is that enough for you and your client? Is feeling good about a session part of the success criteria?
Evaluation begins at the design stage. Build it in to each session. Know what success looks like at each stage.
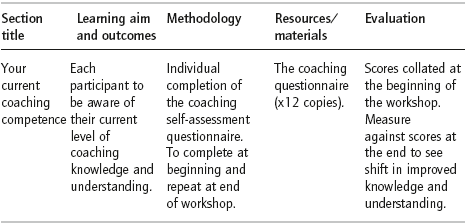
To build up your credibility as a facilitator, you need to make sure that each session can be measured by the client, in terms of success. We will be looking at evaluation in more depth in Chapter 11, but when at the design stage, have it at the forefront of your mind. This should be agreed with the client – and if they are paying or sponsoring the request, it is what is important to them that should be measured, not what is important to you. Add value and demonstrate your professionalism by adding your ideas to the process. See the table below taken from a coaching workshop as an example.
Some clients will not be interested in this amount of detail. However, you are ensuring that you are providing real value that can be measured. It enables you to feel more confident because you are working to specifics, rather than generalities. Get used to identifying the evaluation criteria up front with your client. They will thank you for it! So, always make sure that it’s not just what you do, but also how you do it.
The case for pre-work
Pre-work is something that needs careful thought. Do you set a group pre-work? Why do you feel you need to do so? How will it add to the value of the workshop? These are questions that need answering.
Listen to your client. They will inform you if participants will embrace it or ignore it. It can be a very bad experience if you have circulated pre-work only to find on the day that people didn’t know why they had to do it, or they just didn’t do it. You then need to manage the expectations of those individuals who did complete it.
Remember, when you get a group of people in a workshop, for whatever length of time, they are absent from their day job. In financial terms, that is costing the organisation money in terms of time away from the role as well as investment in the training itself. Therefore, it needs to be as effective as it can be.
Pre-work can really add value and save time on the day. Why get people into a room then hand out a process to read, when they could have done it in advance? The time away from their job needs to be used wisely. If it means that everyone will attain the same level of knowledge required for the session so you can move forward quickly, then it is also useful.
Any pre-work should be clearly communicated to the participants. They need to know expectations and consequences.
One of my clients sent the following out to their participants for a change management workshop. ‘Please read the following articles relating to change management. To ensure you get the most from this day you must read and understand them before the workshop. Failure to do so will mean that you will lack the knowledge of the other participants and you may be holding them back while you catch up. You will need to manage this.’
This is very clear and lets the participants decide. It leaves them in no doubt what needs to be done and the implications of not doing it.
Any pre-work that is given to participants should not be optional. It is there for a reason. The way you communicate it is the key.
Pre-work pros and cons
| Pros | Cons |
|---|---|
| Can help to make sure everyone begins with the same level of knowledge. | Only a few people may complete it – ‘too busy’, etc. |
| Makes participants feel at ease with the content of the workshop. | Participants may not see the relevance or benefit of completing it. |
| Can save time on the day checking existing knowledge and understanding. | Can be too complicated or simple. |
| Can create interest and a buzz about the workshop. | Participants did not receive it ‘in time’. |
Types of learning interventions
In the next chapter we will begin to think about our participants – who they are, what they do and how our design will meet their needs. In our design, we need to cater for all types of individuals. For the vast majority of your workshops, you will not know the learning preferences of each of the participants. You can ask your client about how people learn within the organisational culture, but they will only have a perception about individuals.
You will need to understand a range of learning approaches and aids and know their uses and the dangers of not getting it right. We will go through a few of them here.

