
C H A P T E R 2
![]()
Getting Started
In this chapter, we are going to jump right in the deep end and create our first site using Microsoft WebMatrix.
We will start by installing the WebMatrix toolbox on to your Windows PC using the Microsoft Web Platform Installer, a kind of all–in–one download manager and installer. Next, we’ll take a look at the major parts of the WebMatrix Integrated Development Environment (IDE) and the options we have for opening existing projects and creating new sites. Finally, we’ll create our first site and add some dynamic content with some simple server-side functionality.
![]() Note The purpose of this chapter is to serve as an introduction to the environment and concepts involved with developing web sites with Microsoft WebMatrix—the in-depth technical discussions will come at a later stage; therefore, to avoid confusion, we will pass over some technical details in this chapter. Wherever a feature is used without explanation, I will provide a reference to a later section of the book, where a more detailed explanation can be found.
Note The purpose of this chapter is to serve as an introduction to the environment and concepts involved with developing web sites with Microsoft WebMatrix—the in-depth technical discussions will come at a later stage; therefore, to avoid confusion, we will pass over some technical details in this chapter. Wherever a feature is used without explanation, I will provide a reference to a later section of the book, where a more detailed explanation can be found.
Installing WebMatrix
The easiest and best way to install WebMatrix is to use the Microsoft Web Platform Installer.
The Microsoft Web Platform Installer 3.0 is a free tool designed to greatly simplify the process of downloading and installing the components of the Microsoft Web Platform, including WebMatrix. Although separate installations of all the Web Platform components can still be downloaded individually from the Microsoft web site, the use of the Web Platform Installer is the preferred method and makes the whole procedure much more straightforward and reliable.
The actual process of installing WebMatrix will differ slightly depending whether or not you already have the Web Platform Installer available on your machine; we will look at both scenarios here.
Getting WebMatrix If You Don’t Already Have the Web Platform Installer
If you don’t already have the Web Platform Installer 3.0, you can easily download it and automatically set it and WebMatrix up in one process. To do this, go to
This will take you to the Microsoft Web Platform home page, as seen in Figure 2-1.
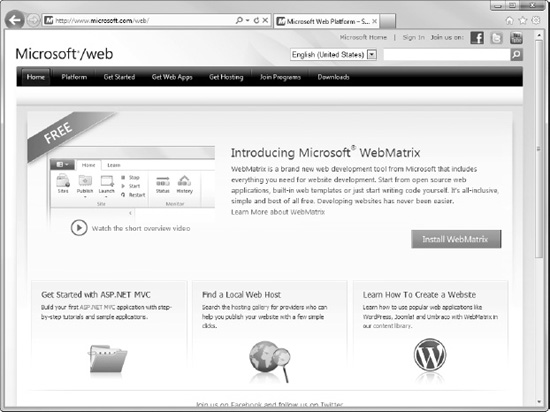
Figure 2-1. The Microsoft Web Platform home page
![]() Tip This site also has some great additional information about Microsoft WebMatrix and links to further tutorials, forums, and other resources on the ASP.NET web site.
Tip This site also has some great additional information about Microsoft WebMatrix and links to further tutorials, forums, and other resources on the ASP.NET web site.
Click the green Install WebMatrix button on this page and Install Now on the next and you will be directed to the Web Platform Installer 3.0 installation page. At this point, depending on your choice of browser and Windows settings, you may be prompted for permission to run the installer; or, as shown in Figure 2-2, you may receive a notification from Windows User Account Control, which you should accept.
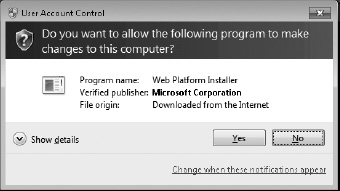
Figure 2-2. Choose ‘Yes’ if presented with the User Account Control dialog box.
Once the Web Platform Installer has launched, it will automatically prompt you to install Microsoft WebMatrix. Click Install and read and accept the terms of the license. Again, the installer may take 5–10 minutes to complete, depending on your PC hardware and Internet connection speed.
Getting WebMatrix via the Web Platform Installer
If you have previously installed the Web Platform Installer, you can open it via the Windows Start Menu from Start All Programs Microsoft Web Platform Installer, using the shortcut shown in Figure 2-3.
Figure 2-3. The Web Platform Installer shortcut in the Windows Start menu
Once the Web Platform Installer has fired up, you can find the option to install WebMatrix either by using the built-in search facility or choosing the Products menu at the top of the screen, selecting the Tools submenu on the left, and scrolling down to Microsoft WebMatrix. It’s then simply a matter of clicking the Add button (see Figure 2-4) and then Install.
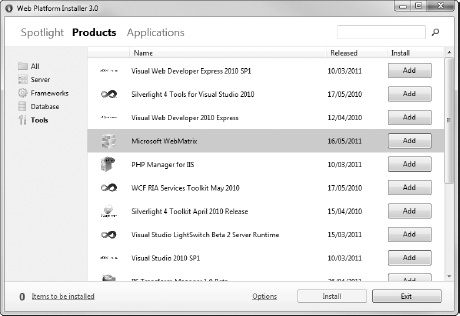
Figure 2-4. The Microsoft Web Platform Installer 3.0
After you click Install, you will be directed to the license screen, where you will need to read and accept the license terms of each of the products about to be installed (see Figure 2-5). Click I Accept and all the components of WebMatrix that you do not already have installed, or that you have installed but require updating, will be downloaded to your machine and set up.
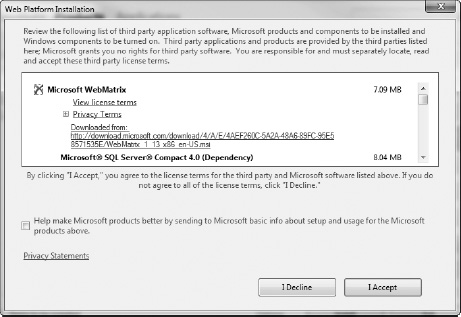
Figure 2-5. Accepting the license terms
The installer may take 5–10 minutes to complete, depending on your PC hardware and Internet connection speed. Once the install has successfully completed, you will be shown the congratulations message, seen here in Figure 2-6.
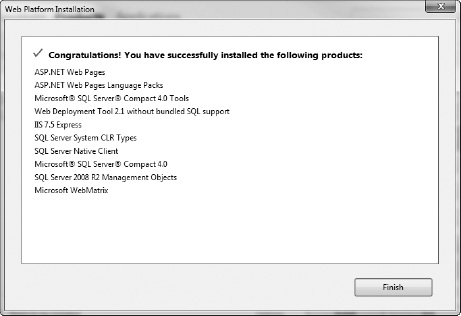
Figure 2-6. A successful install of WebMatrix
Once the installation is complete, click Finish to be taken directly to the WebMatrix QuickStart page, as shown in Figure 2-7.
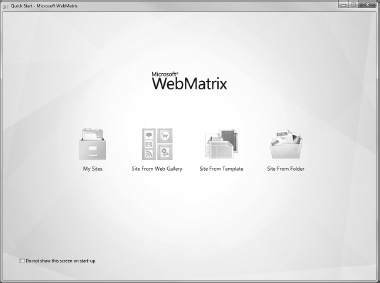
Figure 2-7. The Microsoft WebMatrix QuickStart page
What’s in the box?
WebMatrix can be described as a web development stack, or toolset, in that it is a collection of separate components that combine to create a single, integrated development experience. Rather than being a distinct application or programming framework, it combines a web server with a database and ASP.NET Web Pages, all of which are manipulated via a single Integrated Development Environment (IDE). Figure 2-8 shows this relationship.
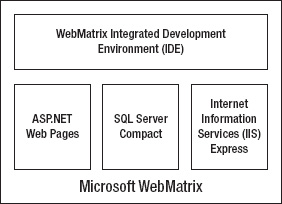
Figure 2-8. The WebMatrix toolset
The four major components of WebMatrix are the IDE, ASP.NET Web Pages, IIS 7.5 Express, and Microsoft SQL Server Compact 4.0. However, the Web Platform Installer actually installs 10 different components as part of the WebMatrix package. Let’s take a look at each of these 10 components to help us fully understand our toolbox.
ASP.NET Web Pages
ASP.NET Web Pages provide the programmable User Interface (UI) for your web application. Web Page output is created dynamically on the server for display in any Web browser or mobile device using a combination of client-side and server-side code and markup.
ASP.NET Web Pages are built on the Microsoft .NET Framework, a managed environment that provides important services, such as memory management, security, type safety, and access to the .NET Base Class Library, a standard library available to all .NET languages that encapsulates a large number of common programming functions. Although this book concentrates on writing this server-side code in C#, ASP.NET Web Pages are compatible with any language supported by the .NET Common Language Runtime (CLR), such as Visual Basic.
Over the course of this book, you will learn to design and create your own web sites using ASP.NET Web Pages to deliver dynamic content to the user’s web browser.
IIS 7.5 Express
IIS 7.5 Express is a lightweight, desktop version of Microsoft Internet Information Services that is optimized for use on a standalone machine during development. Internet Information Services is a web server application used to deliver ASP.NET and PHP pages to browsers. IIS Express is a scaled-down version: it does not require administrator user rights and is designed to run locally on the web developer’s machine for testing and debugging purposes. As IIS Express contains all the core capabilities of the full version of IIS, you can be confident that, barring configuration differences, a site that runs locally under IIS Express will also work on a web host running the full version.
IIS 7.5 Express is a seamlessly integrated part of the WebMatrix platform. As you develop web sites using WebMatrix, you will use IIS 7.5 Express for testing and debugging. It starts automatically when you first run your site from the IDE and very little (if any) configuration is usually required. Once the web site is complete, it can be moved to a production server with a full IIS installation or published to a web host using the Web Deployment Tool.
SQL Server Compact 4.0
Microsoft SQL Server Compact 4.0 is the default database for WebMatrix. It has been optimized and tuned for ASP.NET web applications and can scale up to a database size of 4 GB. The database is file-based (.sdf files) and does not require a separate database engine—SQL Server Compact automatically runs when your application runs and shuts down when your application shuts down. SQL Server Compact databases are created and administered directly from within the WebMatrix IDE.
The file-based database is entirely self-contained and runs in memory, so SQL Server Compact databases do not require any configuration on the server and can be uploaded as part of the site. SQL Server Compact is fit for use in a live web application and can be easily migrated to different versions of the SQL Server family of products, should the need arise.
You will use SQL Server Compact extensively throughout this book as you learn to create custom dynamic data-driven web sites with Microsoft WebMatrix.
Microsoft WebMatrix
The Microsoft WebMatrix installation refers to the WebMatrix Integrated Development Environment (IDE). The IDE provides a functional and seamless interface for creating ASP.NET Web Pages; administering IIS Express and SQL Server Compact; installing third-party open source web applications, such as WordPress, Joomla!, and Umbraco; deploying to web hosting providers; and much more.
By the end of this book, you will have become very well acquainted with the WebMatrix IDE and all of its functionality.
Other Components
ASP.NET Web Pages, IIS Express, SQL Server Compact, and the WebMatrix IDE are the four main components of the WebMatrix toolbox. The rest of the following components, which are installed by the Web Platform Installer, are there to support them and enable them to interact:
- The Microsoft SQL Server Compact 4.0 Tools component provides the tooling within the WebMatrix IDE for creating and administering SQL Server Compact 4.0 databases.
- The SQL Server System CLR Types package contains the components for implementing the geometry, geography, and hierarchyid types in SQL Server.
- The SQL Server Native Client is the component containing the database driver.
- The SQL Server Management Objects component is a collection of objects that automates the management of the SQL Server. WebMatrix uses this component to perform administrative tasks on the database.
- The ASP.NET Web Pages Language Packs contain translated text, such as error messages, for languages other than English. Without the Language Pack, these messages are displayed in English by default.
- The Web Deployment Tool manages the deployment and synchronization of WebMatrix web sites to IIS hosting providers from within the IDE.
Getting Started with WebMatrix Web Sites
In this section, we’ll get our hands dirty and build our first WebMatrix application. The application we create here will use three of the four major components of the WebMatrix toolbox: ASP.NET Web Pages, IIS 7.5 Express, and the WebMatrix IDE (Chapter 6: “Working with Data” contains detailed information on the use of the SQL Server Compact component).
Enter the Matrix: Creating Your First Site
When you run the WebMatrix application, you are presented with the WebMatrix QuickStart page (see Figure 2-7). Figure 2-9 shows the four options for working with a WebMatrix project from the QuickStart page.

Figure 2-9. The four options available on the QuickStart page
Each of these options presents a different way to either open an existing web site or create a new one. Generally, when creating a bespoke WebMatrix application, you will either create a Site from Template or open My Sites to view a list of previously created projects. However, in the interest of completeness, we will look at all four available options here, as each one offers unique features and benefits.
My Sites
This option opens a dialog box that allows you to browse through your existing sites to choose the one you wish to work on. WebMatrix stores web sites by default in the My Web Sites folder of the user’s documents library (C:Users[username]DocumentsMy Web Sites on Windows 7); however, the My Sites dialog box will list all the sites that you have ever opened in WebMatrix, regardless of their actual location(s).
As you learn WebMatrix, you will doubtless create tens (or even hundreds!) of web sites to test code and ideas. Your My Sites list can very quickly become cluttered, making it difficult to find the project you wish to open. To remove a site from the My Sites dialog box, you can right-click the relevant site and choose delete from the context menu. You will then be shown the Delete Site dialog box, as seen in Figure 2-10.
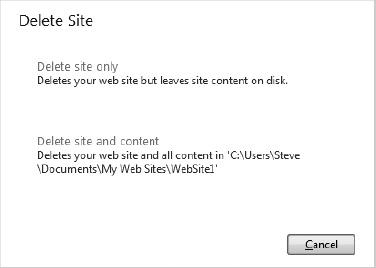
Figure 2-10. The Delete Site dialog box
The Delete Site dialog box gives you the opportunity to simply remove the site from the choices in the My Sites dialog, or delete the site and content completely, erasing both the entry in the My Sites dialog box and the physical files from disk.
![]() Tip The web sites that you create for testing code and ideas will seldom be more than a few hundred kilobytes each, often less. Unless you are particularly short of disk space, or are certain that you will never need to refer to your test code again, it is often worth choosing to delete the site only; this way, you will keep your
Tip The web sites that you create for testing code and ideas will seldom be more than a few hundred kilobytes each, often less. Unless you are particularly short of disk space, or are certain that you will never need to refer to your test code again, it is often worth choosing to delete the site only; this way, you will keep your My Sites list free of clutter, but you will always be able to open your site in the future using the Site from Folder option on the QuickStart page.
Site from Web Gallery
WebMatrix contains a built-in Web Gallery that allows you to choose one of many free, open-source web applications that can be automatically downloaded and installed locally. The open-source applications offered in the Web Gallery include a wide variety of the most popular PHP- and ASP.NET-based open-source projects, such as WordPress, Umbraco, Moodle, Joomla!, Dot Net Nuke, ScrewTurn, Wiki, and Orchard. At the time of writing, over 50 free, open-source web applications are available to download, install, and configure via WebMatrix. The Web Gallery can be seen in Figure 2-11 and offers a great way to kick-start a project by customizing or extending an already-developed application.
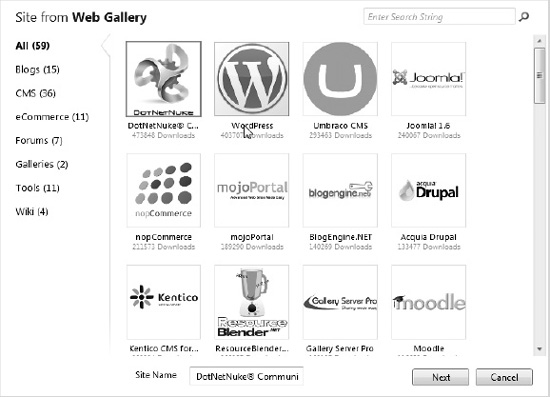
Figure 2-11. The WebMatrix Web Gallery
Once the open-source web application of choice has been downloaded and installed, WebMatrix provides tools to configure the site to your specifications.
As an example, we will install and configure a web site using the popular, PHP-based blogging engine, WordPress. Select WordPress from the Site from the Web Gallery screen, enter a site name, and click Next. The following screen, shown here in Figure 2-12, is used to choose a database instance.
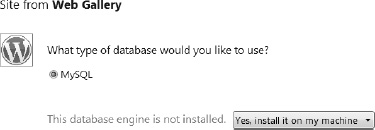
Figure 2-12. Choosing the database for a WordPress installation
Select install MySQL on your machine and click Next. Specify a password for the root user on the following screen, then click Next and accept the license agreement. WebMatrix will now automatically download and install all of the components necessary for the WordPress installation; this may take several minutes, depending on your PC and internet connection speed.
Figure 2-13 shows the configuration screen presented by WebMatrix for the configuration of a new WordPress installation. Enter the necessary information and click Next to complete the installation.
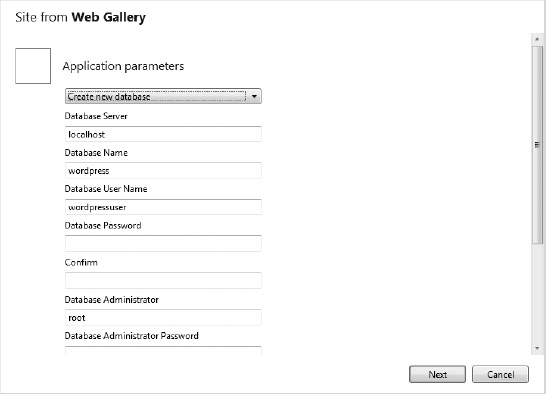
Figure 2-13. Configuring a site from the Web Gallery
Once WebMatrix has finished installing and configuring the application, it will present the confirmation screen, shown here in Figure 2-14.
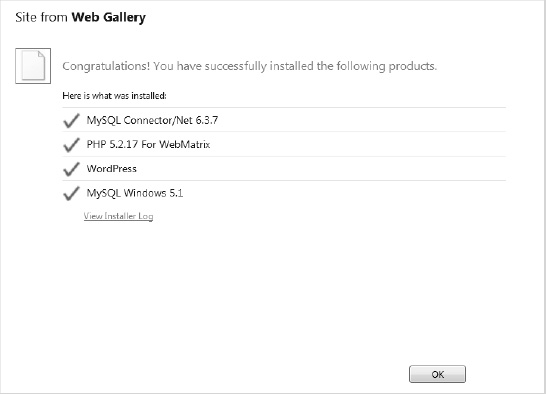
Figure 2-14. Confirmation of a successful WordPress installation
Finally, click the OK button to open the site in WebMatrix, where it can be run in the browser by clicking the Run button on the Ribbon Control located in the top-left of the screen. Figure 2-15 shows the WordPress application running for the first time in the browser.

Figure 2-15. WordPress running in the browser for the first time
Sites downloaded from the Web Gallery can be run directly on the local machine from the WebMatrix IDE, because IIS Express inherits the ability to serve PHP as well as ASP.NET sites from the full version of Internet Information Services (IIS). This means that WebMatrix can be used to construct both PHP and ASP.NET web sites—a powerful feature!
This process is very simple and requires little (if any) further explanation, so we will not go into it in any more detail. The rest of this book is focused exclusively on teaching you how to create bespoke web sites by creating your own ASP.NET Web Pages.
![]() Tip The Windows Web App Gallery can be browsed at
Tip The Windows Web App Gallery can be browsed at http://www.microsoft.com/web/gallery/. The online gallery allows you to see much more information about the applications than you have access to through the Web Gallery built into WebMatrix. The material in the online gallery includes ratings, reviews, screenshots, and links to further resources, such as forums and tutorials. The online gallery is well worth checking out before you make an irreversible decision on the open-source platform you are going to use for your project.
Site from Folder
The Site from Folder option allows you to create a WebMatrix site from any specified folder on disk. This option is particularly useful when a WebMatrix site already physically exists, but has not yet been opened using WebMatrix on the current machine; for example, suppose that a site has been created by another developer and passed on to you for further development, or you wish to use WebMatrix to add some dynamic content to an existing static HTML site.
Another common use for this option involves forcing WebMatrix to create a new site in a location other than the default (C:Users[username]DocumentsMy Web Sites); for example, on a network drive. If you often find yourself wishing to create a site in a location other than the My Web Sites folder, the default site location can be changed in the Options menu in the WebMatrix IDE.
Site from Template
To create a new WebMatrix site in the default location, choose the Site from Template option. This will open the Site from Template dialog box, shown in Figure 2-16.
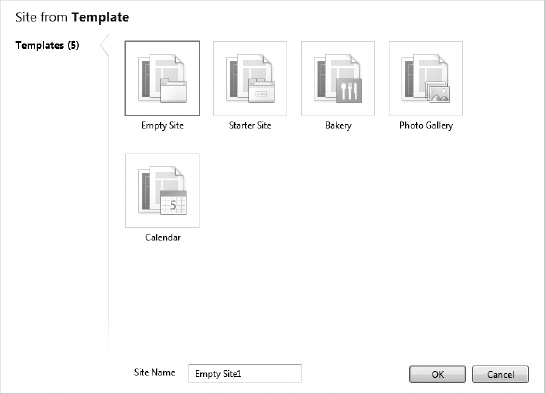
Figure 2-16. The Site From Template dialog box
Templates are, as the name suggests, pre-built starting points for developing new ASP.NET Web Page applications. As we will see, a template can contain any number of files, folders, and features. A template can be anything from a bare-bones set of folders to a functional web application. The important thing to remember is that they are intended only as starting points for developing custom applications, not as ready–to–deploy applications in their own right. We will now explore WebMatrix’s five default templates.
Empty Site
The Empty Site template sets up a folder with the name you specify in the Site from Template dialog box in the default site location. The new folder contains only one file, robots.txt. This template is ideal if you do not wish to implement any of the functionality provided by the other templates, or you just want to test some code without the overhead or distraction of one of the larger templates. We will use this template throughout the course of this book, as it will help you gain a more complete knowledge of building web applications in WebMatrix.
Robots.txt
Starter Site
Back in the Site Template window, click the Starter Site icon and then click OK. This will create a small example web site, based on the Starter Site template, which you can use as a starting point for your own applications. Clicking the Run button in the Ribbon Control at the top left-hand side of the screen (see Figure 2-17) will open the site in your default web browser, shown in Figure 2-18. The template produces a web site that has a pre-built membership and authentication system alongside a professionally designed layout and navigation structure.
Figure 2-17. Click the Run button in WebMatrix to open the site in your default browser.
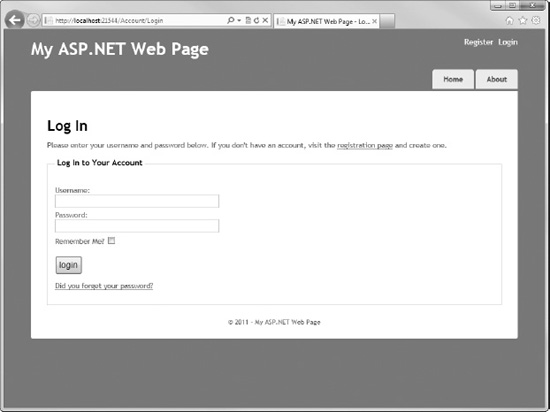
Figure 2-18. The Starter Site template
To previous users of ASP.NET Web Forms or ASP.NET MVC, the Starter Site template will probably look very familiar. The template contains Home and About pages, as well as nine pages in a folder named Account, which provide sample code related to membership, registration, and authentication. The Starter Site template also includes an SQL Server Compact database used to store membership, role, and profile information (see Chapter 7: “Security and Membership”). The site layout is controlled using layout pages (see Chapter 4: “Working with Razor and ASP.NET Web Pages”), which can be customized easily using Cascading Style Sheets (CSS).
Bakery, Photo Gallery, and Calendar Templates
The remaining three templates found in the Site From Template screen (see Figure 2-16)—Bakery, Photo Gallery, and Calendar—create sample web sites that include code to perform various common tasks. They serve as valuable learning aids to assist developers who wish to implement similar ideas and features.
As with the Starter Site template, WebMatrix makes creating sites based on these templates a very simple process. In each case, you simply need to select the required template from the Site From Template screen, name the site, and click Next. Once WebMatrix has created the site, it can be run in the browser by clicking the Run button in the Ribbon Control, located in the top left-hand side of the screen.
The Bakery template (shown in Figure 2-19) creates a sample e-commerce web site that includes a database of products the user can “purchase” through an order processing system. The order processing system also features some basic forms of validation code and code to send emails to customers for order confirmation. The web site also includes some social networking integration via Twitter.
The Photo Gallery template (see Figure 2-20) creates a site that allows users to upload and display images in galleries. The site also makes extensive use of the membership system and includes an SQL Server Compact database to store user details, comments, and galleries. Some more advanced code is included to perform various image manipulations, such as rotation and thumbnail generation.
The Calendar template (see Figure 2-21) generates a site that allows registered users to create and share calendars online. Site users can create calendars and events, choose other users to share their calendars with, and even download their entire calendars or individual events in iCalendar format for import into other scheduling applications, such as Microsoft Outlook, Google Calendar, or Apple iCal. The Calendar template also demonstrates the use of themes to style an application.
![]() Tip Generate sites based on the Bakery, Photo Gallery, and Calendar templates and study them in detail. This way, you’ll know instantly where to go to grab some sample code to help you implement similar features in a future project of your own.
Tip Generate sites based on the Bakery, Photo Gallery, and Calendar templates and study them in detail. This way, you’ll know instantly where to go to grab some sample code to help you implement similar features in a future project of your own.
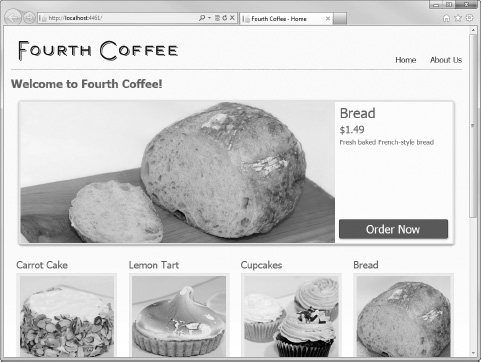
Figure 2-19. The Bakery Template—an example e-commerce site
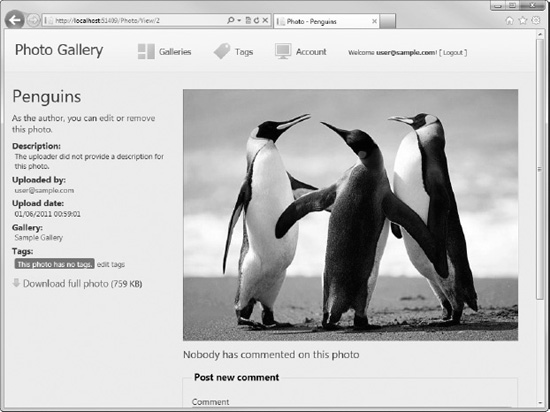
Figure 2-20. The Photo Gallery Template
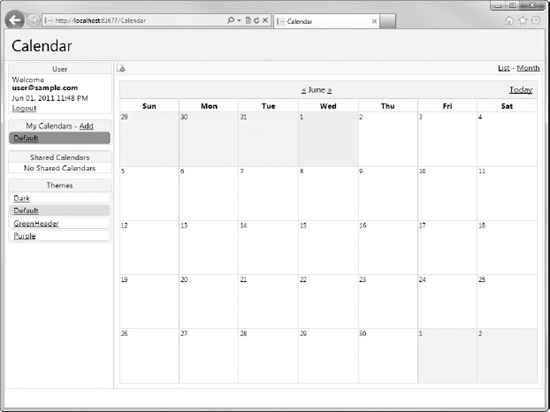
Figure 2-21. The Calendar Template
Our First WebMatrix Application
We are going to create our first web site using the Empty Site template to avoid any of the distractions of the other templates. Choose the Empty Site template, enter the name of your site as “Hello World” in the Site Name textbox, and click the OK button.
![]() Note When naming a project, it is important to use a name that describes the contents and functionality of the site. In six-month’s time, you will not remember what “Empty Site27” does, but you will remember the purpose of “Hello World” or “BlogEngine.” The same rule applies when naming pages within your site and elements within the pages themselves. A good naming convention can make a site much more maintainable in the future.
Note When naming a project, it is important to use a name that describes the contents and functionality of the site. In six-month’s time, you will not remember what “Empty Site27” does, but you will remember the purpose of “Hello World” or “BlogEngine.” The same rule applies when naming pages within your site and elements within the pages themselves. A good naming convention can make a site much more maintainable in the future.
The WebMatrix IDE: A Quick Tour
Once you have created your “Hello World” site, the WebMatrix IDE will open. Before we move on with the development of our first application, let’s take a few minutes to familiarize ourselves with the WebMatrix IDE.
The WebMatrix Integrated Development Environment (IDE) is, as the name suggests, a software application that allows the developer to interact with all of the different components of WebMatrix from a single user interface. The concept of an IDE has been around since the 1970s on many different platforms, and is a well-developed and proven way to increase developer productivity and efficiency. The WebMatrix IDE is quite basic compared to some (see the “Alternatives to the WebMatrix IDE” section later in this chapter); however, this is not necessarily a bad thing—it is fully functional and contains everything you need to develop and deploy WebMatrix applications. The following screenshot in Figure 2-22 shows the WebMatrix IDE, as you will see it upon the creation of a new empty site:
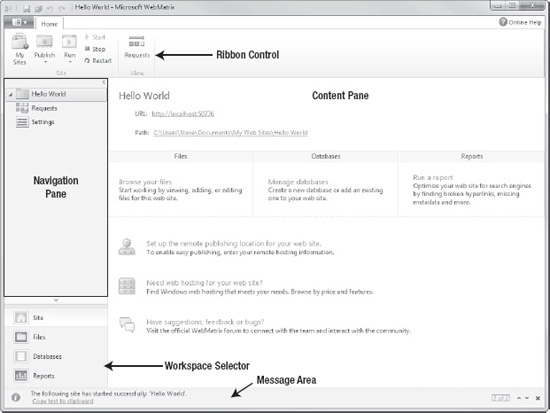
Figure 2-22. The WebMatrix IDE
![]() Tip There is a well-known phrase among experienced developers: “Know Your IDE.” Everything you need to create a web application can be accomplished through the WebMatrix IDE; you are going to spend a lot of time using it. Therefore, if you know how to use it efficiently and effectively, you can really increase your productivity. Taking the time to learn keyboard shortcuts, where to go to perform specific common tasks, and how to customize the IDE according to your preferences will pay dividends.
Tip There is a well-known phrase among experienced developers: “Know Your IDE.” Everything you need to create a web application can be accomplished through the WebMatrix IDE; you are going to spend a lot of time using it. Therefore, if you know how to use it efficiently and effectively, you can really increase your productivity. Taking the time to learn keyboard shortcuts, where to go to perform specific common tasks, and how to customize the IDE according to your preferences will pay dividends.
The IDE contains five distinct areas. Let’s look at them in more detail.
The Workspace Selector
The Workspace Selector (see Figure 2-23) is located in the lower left-hand side of the IDE by default. It allows you to choose one of the four workspaces available within the IDE: Site, Files, Databases, or Reports. Workspaces are used to group the tasks involved in creating WebMatrix sites into areas of common functionality within the IDE. Each workspace contains a set of tools specifically designed for each task. Almost every task that you can conduct within the WebMatrix IDE will be found inside one of these workspaces.
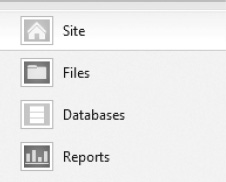
Figure 2-23. The Workspace Selector
The contents of the other elements in the IDE will change according to your workspace selection. Therefore, it is important to know which workspace you require to perform a particular task.
- Site: When you open a new or existing site in WebMatrix, the IDE will always start in the Site workspace. The Site workspace lets you perform site-wide tasks, such as managing server settings and monitoring HTTP requests.
- Files: The Files workspace is where you will spend the majority of your time in WebMatrix. The Files workspace displays the site’s file and folder structure in the Navigation Pane (located in the top left-hand side of the IDE by default). Double-clicking an individual file in the Navigation Pane opens the file for editing in the Content Pane (the main area in the center of the IDE).
- Databases: All activity regarding database management is carried out within the Databases workspace; here, you can connect to existing databases, create and view databases and tables, and edit their contents directly.
- Reports: The final workspace is the Reports workspace. The Reports workspace enables you to create and view site analysis reports to provide you with useful information about the performance of your site and Search Engine Optimization (SEO).
The Ribbon Control
Across the full width of the window at the top of the page is the Ribbon control (see Figure 2-24), which gives quick access to common tasks and will be familiar to users of other Microsoft products, particularly Microsoft Office. The content of the Ribbon control changes contextually, based on the current selection in the Workspace Selector and Navigation Pane (see the following), with the exception of the Site panel on the far left of the Ribbon Control, which remains constant.
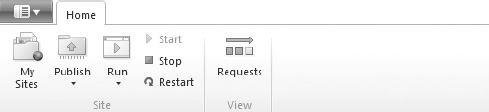
Figure 2-24. The content of the Ribbon Control changes contextually.
On the far right-hand side of the Ribbon Control is a small button labeled “Online Help.” This button will open the online help documentation on the Microsoft web site.
The Navigation and Content Panes
Below the Ribbon control are the Navigation and Content Panes (see Figure 2-25).
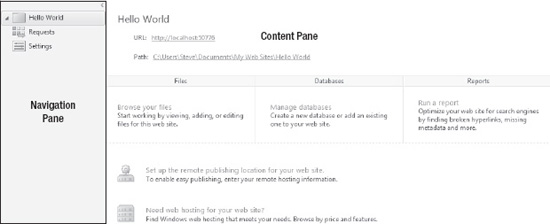
Figure 2-25. The Navigation Pane (left) and Content Pane (right)
The contents of the Navigation Pane change automatically, according to the current selection in the Workspace Selector. For instance, in the Files workspace, the Navigation Pane lists all the files within the current site, whereas in the Database workspace, the Navigation Pane allows you to navigate through database connections and tables.
The Content Pane takes up the majority of the screen real-estate. The contents of the Content Pane are determined by the selection in the Workspace Selector, Ribbon Control, and Navigation Pane. The Content Pane is where you will actually carry out the tasks involved in developing your web sites; for instance, the Content Pane can display a code editor for editing code and markup, a database table designer, or a performance report, depending on the current activity.
The Notifications Area
The final area of the IDE worth noting is the Notifications Area, which appears from time to time as a yellow bar across the bottom of the screen with any system messages, as shown in Figure 2-26. The Notifications Area is not a permanent fixture and disappears after a short delay once messages have been displayed.
Figure 2-26. The Notifications Area
Alternatives to the WebMatrix IDE
Adding a Page to Your Site
To view your web site in a browser, you can click the Run button in the Ribbon Control. This will open your default browser and display the web site. Clicking the down arrow underneath the word “Run” will drop down a list of all the browsers you have installed on your development machine (see Figure 2-27). You will also have the option to open the site in all installed browsers. This is an incredibly useful feature for ensuring that your site is compatible with all the major web browsers.
![]() Note Cross-browser compatibility issues can be a real headache, even for experienced web developers. Historically, different browsers have implemented web “standards” in HTML, JavaScript, and CSS in slightly different ways, leading to situations where a single page could look dramatically different from browser to browser, or even not work at all. The situation has improved a great deal in recent years and many strategies have been developed to minimize its impact, but some differences do remain. Therefore, it is essential that you fully test your sites in all popular browsers before deployment; otherwise, you could find yourself in a situation where your site simply doesn’t work for a large percentage of your intended audience.
Note Cross-browser compatibility issues can be a real headache, even for experienced web developers. Historically, different browsers have implemented web “standards” in HTML, JavaScript, and CSS in slightly different ways, leading to situations where a single page could look dramatically different from browser to browser, or even not work at all. The situation has improved a great deal in recent years and many strategies have been developed to minimize its impact, but some differences do remain. Therefore, it is essential that you fully test your sites in all popular browsers before deployment; otherwise, you could find yourself in a situation where your site simply doesn’t work for a large percentage of your intended audience.
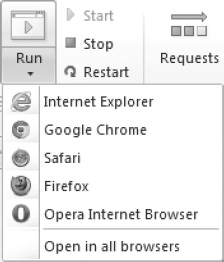
Figure 2-27. WebMatrix makes it easy to run your web site in any browser.
If you click the Run button now, you will see that IIS Express generates a 404 Not Found error (similar to the one shown in Figure 2-28), which is displayed by the browser.
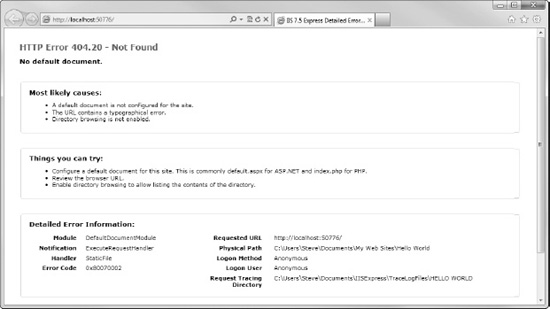
Figure 2-28. The browser displays a 404 Not Found error, as no default page currently exists in our site.
The browser is displaying this error because we don’t have any pages to display in our web site. By default, if no specific page is requested from a URL, IIS will attempt to find and display a page named something like Default.cshtml or Index.htm. Let’s create our default page. Back in the WebMatrix IDE, select the Files workspace in the Workspace Selector and choose New from the Ribbon Control or click the Create a new file button in the centre of the Content Pane. This will open the Choose a File Type dialog box (see Figure 2-29).

Figure 2-29. The Choose a File Type dialog box is displayed when adding a new file to the web site.
There are 25 different types of files that WebMatrix can add to your site; although, there are only seven that you will commonly add to your site through this dialog.
- HTML: A simple, static HyperText Markup Language (HTML) page
- CSHTML: A C# based ASP.NET Web Page page (more on this in Chapter 4: “Working with Razor and ASP.NET Web Pages”)
- VBHTML: A VB.NET based ASP.NET Web Page
- CSS: A Cascading Style Sheet (CSS) file
- Jscript: A JavaScript file
- TXT: A blank text file
- XML: An eXtensible Markup Language file
Choose to add a CSHTML file and name it Default.cshtml and click OK. The page will be created and displayed in the text editor in the Content Pane.
![]() Note You may have noticed the options for creating ASP.NET Web Forms (.aspx) and Classic ASP (.asp) files in the screenshot in Figure 2-29. These are included for compatibility reasons. All dynamic ASP.NET Web Pages’ files have a .cshtml or .vbhtml file extension.
Note You may have noticed the options for creating ASP.NET Web Forms (.aspx) and Classic ASP (.asp) files in the screenshot in Figure 2-29. These are included for compatibility reasons. All dynamic ASP.NET Web Pages’ files have a .cshtml or .vbhtml file extension.
Working with the HTML
You will notice that the page created for you contains just the usual HTML elements that you would expect to see in any static HTML page—<html>, <head>, <title>, <body>, etc.
<!DOCTYPE html>


<html lang="en">

    <head>

        <meta charset="utf-8" />

        <title></title>

    </head>

    <body>


    </body>

</html>
What about the .cshtml file extension? Well, the .cshtml file extension tells the web server that this page contains Razor code. Razor code is simply C# (or VB) code, placed inline within standard HTML markup. The code is inserted using a special Razor syntax (more in Chapter 4: “Working with Razor and ASP.NET Web Pages”), wherever we want the server to perform a dynamic action, such as displaying a table of data from a database or calculating values based on user input. Put simply, you can layout an HTML page the same way you always have and just insert some Razor code wherever you want the server to produce some dynamic content. This will become clearer as we move through this example. In the meantime, just to prove that we still use plain old HTML for presentation, let’s add a title to the <head> and some markup to the page.
<!DOCTYPE html>


<html lang="en">

    <head>

        <meta charset="utf-8" />

        <title>Hello World</title>

    </head>

    <body>

       <h1>Hello World!</h1>

        <ul>

            <li>

                Bonjour tout le monde

            </li>

            <li>

                Hallo Welt

            </li>

            <li>

                Ciao mondo

            </li>

            <li>

                Hola mundo

            </li>

        </ul>

    </body>

</html>
You will notice that as you type the opening tag of an HTML element, a small popup menu, like the one shown in Figure 2-30, appears next to the cursor.

Figure 2-30. Hint menus are designed to aid developer productivity.
This menu, also known as hinting, displays a list of all the valid HTML tags that can be displayed at the current cursor position. For instance, if you are inside a pair of <ul>…</ul> tags, the only option in the hint menu when you type an opening angle bracket will be <li>, as this is the only legal tag within an un-ordered list according to World Wide Web Consortium (W3C) HTML specifications.
This list will narrow as you continue typing; or, you can scroll through the list using the scrollbar or the up/down arrows on your keyboard. Once you have found the element you want to use, it can be inserted into the page by pressing return, tab, the spacebar, or double-clicking with the mouse.
If you enter a space directly after a tag name, a second hint menu will be displayed, like the one in Figure 2-31. This menu displays all the possible attributes for the tag you have just entered, which can be chosen in the same way as the previous hint menu.
![]() Tip If you move the selection cursor over an item in the hint menu, or single-click an item with the mouse, a tooltip will be displayed; it provides more information about the item, including the name of the element, a brief description, and the URL of the HTML namespace.
Tip If you move the selection cursor over an item in the hint menu, or single-click an item with the mouse, a tooltip will be displayed; it provides more information about the item, including the name of the element, a brief description, and the URL of the HTML namespace.
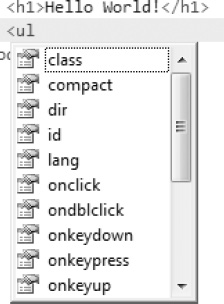
Figure 2-31. The HTML attribute hint menu
Notice also that closing tags are automatically created when you close the opening tag, and that the markup in the Content Pane’s code editor is colored. This colorization of the markup in the code editor is known as syntax highlighting. Syntax highlighting is a useful aid that helps you quickly navigate the code and spot mistakes in the markup, such as malformed or incorrectly nested tags. All of these added features in the WebMatrix IDE’s code editor make it much more fun to use and contribute to a marked increase in developer productivity over a plain text editor.
Now, let’s run the page again by clicking the Run button on the Ribbon Control (or by pressing F12 or Alt + H, then R; see the following Keyboard Shortcuts). You will see the page displayed, as seen in Figure 2-32.
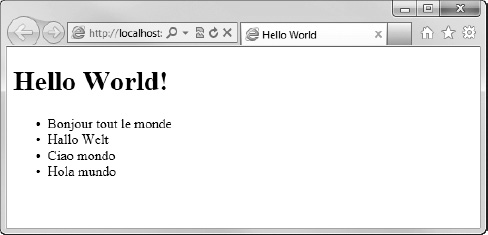
Figure 2-32. Hello World!
Well, this is hardly ground-breaking stuff, but it does prove that the presentation markup within a Razor-based page is simply HTML.
Keyboard Shortcuts
Many developers like to use keyboard shortcuts in their IDE to perform common tasks. It makes total sense—your hands are likely already on it—so you can save quite a bit of time and effort: instead of hunting through the user interface (UI) with the mouse, all you need to do is memorize the keyboard shortcuts. The following is a list of the keyboard shortcuts available in the WebMatrix IDE.
Alternatively, you can press the Alt key to display top-level key tips on the Ribbon Control, which can then be activated using the indicated keys. This will be familiar to users of Microsoft Office, where the same functionality exists in the Ribbon Control.
Adding Some Razor Code
Now that we have a static page working and displaying correctly, let’s add some dynamic content by inserting some in-line C# Razor code. Add this markup in Default.cshtml between the </h1> end tag and the <ul> start tag:
<p>The date and time here is @DateTime.Now</p>
When you run the site, you will see something similar to the output shown in Figure 2-33, but with the current date and time set to wherever you are in the world.
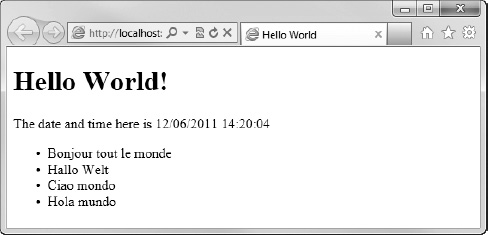
Figure 2-33. The output of your first line of Razor code
![]() Note Razor code can be written using C# or Visual Basic .NET. In this book, all the code samples will be written exclusively in C#.
Note Razor code can be written using C# or Visual Basic .NET. In this book, all the code samples will be written exclusively in C#.
To display dynamic content, Razor code is inserted in-line with the HTML using the @ character to denote the start of a block of code. One of the things that makes Razor really stand out from other in-line code models, such as Classic ASP or PHP, is the lack of a closing tag. Razor has semantic knowledge of C# and VB.NET code and is able to use that knowledge to identify where the code finishes and the markup begins.
You will learn much more about Razor in Chapter 4; for now, you just need to know that the use of the @ symbol in a .cshtml or .vbhtml file tells the Razor parser that this is the start of a code block.
So what does the line we added to our Default.cshtml actually do? Well, the majority of it is just a simple HTML paragraph; the interesting bit is shown here in bold:
<p>The date and time here is @DateTime.Now</p>
As we know, the @ symbol tells the Razor parser that this is the start of a code statement. Since this is a .cshtml file, the parser knows that any code following an @ character will be in C# (although in this simple case, the code is actually identical in VB.NET), so the parser reads in the next set of characters: DateTime.Now. When the parser looks at the next character, which in this case is an angle bracket from the closing paragraph tag, it identifies that this is not valid C#, so it outputs the current date and time to the browser and switches back to HTML mode. The parser will continue outputting HTML until it parses the next @ symbol.
This code is run every time the page is requested from the server. If you refresh the page in the browser by pressing F5, you will notice that the time updates, and it will do so every time the page is served.
It is also worth noting that the web server’s date and time is output to the response stream, as this code is running on the server as opposed to the client machine. This is important to take into account, since it is possible that the user may be in a time zone different from the web server.
Let’s add some more C# Razor code to our page to provide a little more interaction. First, let’s add a simple HTML form to accept our user’s name.
<!DOCTYPE html>


<html lang="en">

    <head>

        <meta charset="utf-8" />

        <title>Hello World</title>

    </head>

    <body>

        <h1>Hello World!</h1>

        <p>The date and time here is @DateTime.Now</p>

       <form method="post" action="">

            <div>

                <label for="Username">Please enter your name:</label>

                <input type="text" name="Username" />

                <input type="submit" value="Go" />

            </div>

        </form>

        <ul>

            <li>

                Bonjour tout le monde

            </li>

            <li>

                Hallo Welt

            </li>

            <li>

                Ciao mondo

            </li>

            <li>

                Hola mundo

            </li>

        </ul>

    </body>

</html>
The page now uses a standard HTML form to gather the username. The form tag has its method attribute set to post and its action left as an empty string, which tells WebMatrix to post the user input back to the same page (Default.cshtml) for processing when the user clicks the form’s submit button.
Now we’ll declare and initialize some variables to hold our greetings. Insert the following code at the very top of the page, above the <!DOCTYPE html> tag:
@{

    var english = "World";

    var french = "tout le monde";

    var german = "Welt";

    var italian = "mondo";

    var spanish = "mundo";

}
This code simply declares and initializes five variables, one for each of the languages in our list of greetings, using the var keyword. We will use these variables to hold the second part of the greeting for each language for output into our page.
![]() Note If you have no previous programming experience and the last sentence has left you puzzled, do not panic! The next chapter is a C# Primer where all will be explained—for now, you’ll just have to trust me and follow along. Don’t worry, I’ll keep it simple.
Note If you have no previous programming experience and the last sentence has left you puzzled, do not panic! The next chapter is a C# Primer where all will be explained—for now, you’ll just have to trust me and follow along. Don’t worry, I’ll keep it simple.
You will notice that the code is enclosed in a pair of braces {...} immediately following the @ symbol, which denotes the start of some Razor code. This is known as a multi-statement block and is used to tell the Razor parser that everything inside the braces should be processed as C# code, not as output to the browser.
The variables declared within the multi-statement block are available for use in every subsequent line in that page, so we can display the value held within those variables by calling them from within our un-ordered list.
@{

    var english = "World";

    var french = "tout le monde";

    var german = "Welt";

    var italian = "mondo";

    var spanish = "mundo";

}


<!DOCTYPE html>


<html lang="en">

    <head>

        <meta charset="utf-8" />

        <title>Hello World</title>

    </head>

    <body>

        <h1>Hello @english</h1>

        <p>The date and time here is @DateTime.Now</p>

        <form method="post" action="">

            <div>

                <label for="Username">Please enter your name:</label>

                <input type="text" name="Username" />

                <input type="submit" value="Go" />

            </div>

        </form>

        <ul>

            <li>

                Bonjour @french

            </li>

            <li>

                Hallo @german

            </li>

            <li>

                Ciao @italian

            </li>

            <li>

                Hola @spanish

            </li>

        </ul>

    </body>

</html>
If you refresh your browser now, you will see that the output hasn’t changed (our variables are being output), but they hold the same values as the static text they replaced. Let’s add our final piece of Razor code to accept the user input and personalize the greeting.
We’ll use the IsPost() method to determine if the page has been posted back to the server; i.e., if the user pressed the submit button on the form. The IsPost() method is built into ASP.NET Web Pages and returns true if the page is a postback (an HTTP POST request) or false for any other type of HTTP request (usually HTTP GET).
On postback, our page will change the values of the greetings variables we set up earlier by requesting the value held within the Username text box, adding an appropriate greeting, and assigning the result to the relevant variable. We get the value of the Username text box by interrogating the ASP.NET Request object and specifying the name of the form field we wish to read.
![]() Note We’ll be covering the
Note We’ll be covering the IsPost method and the Request object in greater detail in Chapter 5: “Forms and Validation.”
Edit the code within the multi-statement block at the top of the page to look like this:
{

    var english = "World";

    var french = "tout le monde";

    var german = "Welt";

    var italian = "mondo";

    var spanish = "mundo";


   if (IsPost)

    {

        english = Request["Username"] + ". Welcome to WebMatrix!";

        french = Request["Username"] + ". Bienvenue a WebMatrix!";

        german = Request["Username"] + ". Willkommen auf WebMatrix!";

        italian = Request["Username"] + ". Benvenuti a WebMatrix!" ;

        spanish = Request["Username"] + ". Bienvenido a WebMatrix!";

    }

}


<!DOCTYPE html>


<html lang="en">

    <head>

        <meta charset="utf-8" />

        <title>Hello World</title>

    </head>

    <body>

        <h1>Hello @english</h1>

        <p>The date and time here is @DateTime.Now</p>

        <form method="post" action="">

            <div>

                <label for="Username">Please enter your name:</label>

                <input type="text" name="Username" />

                <input type="submit" value="Go" />

            </div>

        </form>

        <ul>

            <li>

                Bonjour @french

            </li>

            <li>

                Hallo @german

            </li>

            <li>

                Ciao @italian

            </li>

            <li>

                Hola @spanish

            </li>

        </ul>

    </body>

</html>
Now, when you run the page, enter your name in the textbox and click Go. You will see something similar to Figure 2-34.
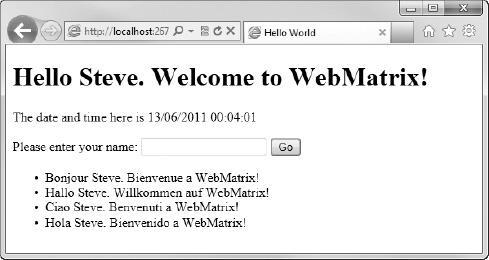
Figure 2-34. Our personalized international greetings!
On the initial load, our page displays the default greetings, but when a name is entered into the Username textbox and the form is posted back to the server, personalized greetings are constructed and output to the browser.
Summary
We have covered a lot of new information in this chapter. We have seen that WebMatrix is not a single product or application; rather, it is made up of many different components, the four most important of these being the WebMatrix IDE, ASP.NET Web Pages, SQL Server Compact 4.0, and IIS 7.5 Express.
You have also installed WebMatrix on your machine using the Microsoft Web Platform Installer and had a brief introduction to the WebMatrix IDE. We will cover the IDE in a lot more detail throughout the course of this book, as we look at all of its various features.
Finally, you have created your first site using WebMatrix to get an introductory look at how a site built using ASP.NET Web Pages actually works. We have barely scratched the surface of ASP.NET Web Pages and we will be spending a considerable amount of time looking more in-depth at its features and implementation details in the following chapters.
In the next two chapters, we will be looking at C# and Razor in more detail. This foundational knowledge will assist you greatly as you plan out and build custom WebMatrix sites.