
C H A P T E R 3
![]()
C# Primer
Before we look any further into ASP.NET Web Pages and WebMatrix, it is important that you have a basic familiarity with the C# programming language and that you understand a few elementary programming concepts. In this chapter, we are going to discuss:
- C# types and variables
- Operators
- Collections
- Conditions and loops
- An introduction to Object Oriented Programming
- Dynamics
The Razor code that we will use in this book to create and display dynamic data within ASP.NET Web Pages will all be built upon C#, so it is essential that you have a solid foundation in the language before we move on any further.
If you already have experience of any of the topics covered in this chapter, you might want to skip ahead. For some readers, this chapter will be totally new material; for others, who perhaps have some programming experience in another language, it will just be a matter of converting to the C# syntax. All readers should bear in mind that, due to size limitations, this chapter is only intended as a C# primer and it is by no means proposed as an exhaustive reference. I provide merely enough content to allow you to progress through the rest of the examples in the book and to prompt further research. I will also point you in the direction of useful references at appropriate points in the text.
![]() Note The Razor syntax used when developing ASP.NET Web Pages is based on C# and that is the language that we will use throughout this book. The vast majority of online materials are also based on C#. However, although Razor was originally written for C#, since its initial release it has gained support for the Visual Basic language. The Visual Basic language and the resulting Razor syntax are much more verbose than C# but are popular with developers coming from a Visual Basic or VBScript (Classic ASP) background. Both languages work equally well and the use of one or the other makes little or no difference to the user experience achieved in the end result.
Note The Razor syntax used when developing ASP.NET Web Pages is based on C# and that is the language that we will use throughout this book. The vast majority of online materials are also based on C#. However, although Razor was originally written for C#, since its initial release it has gained support for the Visual Basic language. The Visual Basic language and the resulting Razor syntax are much more verbose than C# but are popular with developers coming from a Visual Basic or VBScript (Classic ASP) background. Both languages work equally well and the use of one or the other makes little or no difference to the user experience achieved in the end result.
So let's dive straight into some code by looking at variables and the various types available for the programmer to use in C#.
Types and Variables
When we want to keep a piece of data in the memory of the computer to work with later, we store it in a variable. You can think of the computer's memory as a huge set of shelves that can store anything you like, as long as it's in a box. The only proviso to being able to store anything you like is that the computer needs to know what sort of thing you want to store beforehand—so that it can give you the right box and allocate enough space on the shelf. This essentially explains variables and types: the variable is the actual item you want to store and the type describes the kind of box you are going to put it in (which in turn determines the space required).
As a program executes, the variables are defined and changed as necessary to support the running of the program and any algorithms that may be defined. A variable can only be used within the scope it is declared. For example, if a variable is declared at the class level, it can be used anywhere within that class. However, if a variable is declared within a block of code, such as within a method or an if statement structure, it can only be used within that code block. This is known as a local variable.
![]() Note Classes, methods and code blocks will be explained fully later in the chapter. Do not worry if you did not fully understand the last paragraph; it will become much clearer as we progress.
Note Classes, methods and code blocks will be explained fully later in the chapter. Do not worry if you did not fully understand the last paragraph; it will become much clearer as we progress.
To define a variable, we use the following pattern to tell the compiler what type of variable we want to use and by what name we are going to refer to it:
Type Identifier;
For example to declare an integer (a whole number) for storing the total number of employees at a company, we might say:
int totalEmployees;
Here int is the type of the variable and totalEmployees is the identifier. We will discuss the built-in variable types that C# provides later in this chapter. Declared in this way, the local variable totalEmployees has not been assigned a value. An uninitialized local variable will throw an error if accessed later in code (see Figure 3-1).
![]() Note All .NET built-in types have a default value that is automatically given to an uninitialized variable declared at the class level. In the case of an
Note All .NET built-in types have a default value that is automatically given to an uninitialized variable declared at the class level. In the case of an int, for example, the default value is 0. However, it is good practice to always explicitly initialize your variables because it's important to be certain exactly what is being stored.
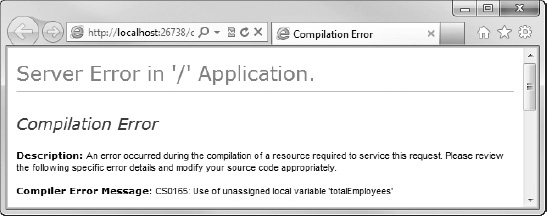
Figure 3-1. Use of an unassigned local variable will cause an error.
We can initialize a variable at the point of declaration by doing the following:
int totalEmployees = 100;
This code initializes our totalEmployees integer with a value of 100. We can change the value of that variable by using an assignment. In this example, we will double the number of employees:
totalEmployees = 200;
![]() Caution As you follow along with these code examples, remember that C# is a case-sensitive language. Therefore, two variables called
Caution As you follow along with these code examples, remember that C# is a case-sensitive language. Therefore, two variables called totalEmployees and TotalEmployees would be treated as entirely separate entities by the compiler. This same case-sensitivity applies to all C#'s keywords and identifiers.
Naming Identifiers
C# has some strict rules to follow regarding the naming of identifiers (variable names, method names, class names, etc.). When naming an identifier, you must adhere to the following rules:
- Identifiers must start with a letter or an underscore
- It must contain only non-formatting Unicode characters (i.e., letters, numbers, and symbols)
- The identifier must not contain any spaces
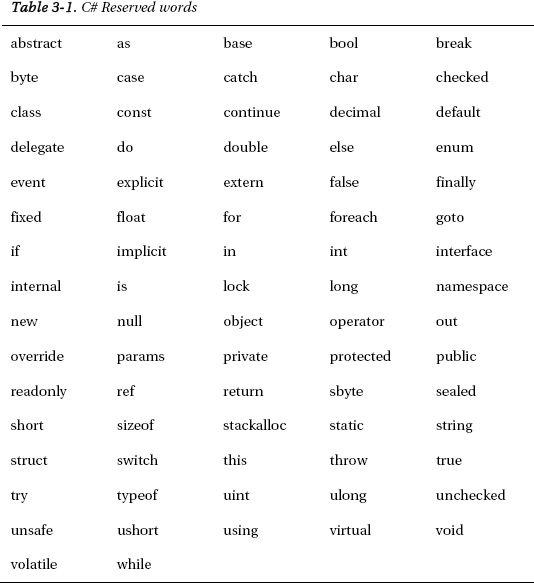
- It must not be a C# reserved word (i.e., not a word used as part of the C# language)
In general, as long as you name your variables using only letters and underscores (and numbers after the first character) and avoid reserved words (see Table 3-1), you will be OK.
Choosing good names for your identifiers, more than anything else, will improve the readability of your code. You should always strive to use a name that describes the exact purpose of the identifier in a clear and concise manner.
Always strive to create your programs in such a way that another developer could pick up your code and easily understand it—that programmer may well be you in two or three years, when you come to implement new functionality on your site. The purpose of a variable will be much easier to remember (or work out) if the variable is called totalPrice or shippingAddress1 than if it is named t, x, or sa1.
![]() Tip A set of guidelines for C# Coding Conventions, including naming conventions, can be found on the Microsoft Developer Network Site at http://msdn.microsoft.com/en-us/library/ff926074.aspx. Defining a set of coding conventions helps to create a consistent look and feel to your code, which will greatly aid readability to help in future development and debugging. This is particularly important if you are working as part of a development team.
Tip A set of guidelines for C# Coding Conventions, including naming conventions, can be found on the Microsoft Developer Network Site at http://msdn.microsoft.com/en-us/library/ff926074.aspx. Defining a set of coding conventions helps to create a consistent look and feel to your code, which will greatly aid readability to help in future development and debugging. This is particularly important if you are working as part of a development team.
In the next few sections we will look at some of the different types built into C# and see some examples of their use.
Booleans
Booleans are the simplest of all the C# .NET types in that they are able to hold only one of two values: true or false. They are declared using the keyword bool:
bool isAuthorized = true;

bool messageRead = false;


...


messageRead = true;
![]() Note Unlike languages such as C and C++, the C#
Note Unlike languages such as C and C++, the C# bool type will not allow an integer expression such as 0, 1 or –1 for setting a true or false value. The true and false keywords are built into the C# language and they are the only values accepted by the compiler for assignment to a Boolean variable.
Numbers
The numeric types in C# are split into two different categories—integral and floating-point. The integral types can hold only integer values (i.e., whole numbers without a decimal part), whereas the floating-point types hold real numbers represented to a specified number of significant digits.
Integral Types
C# has eight individual integral types available for use when working with and storing integers. The reason for the requirement for so many different integral types has primarily to do with the amount of memory required to store and manipulate each variable. Table 3-2 shows this in some detail.
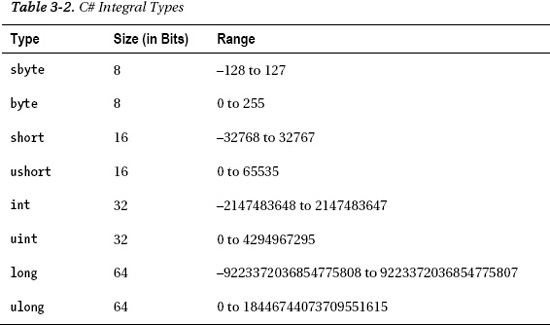
You can see from Table 3.2 that the web server requires eight times more space to hold a long or ulong over a byte or sbyte. Therefore, you should always try to ensure that you use an appropriately sized type wherever possible (i.e., choose one with the minimum size required to hold any likely values), in the same way that you would choose the smallest usable field type when designing a database.
![]() Note This will become increasingly important as your web site gathers users and as performance becomes an issue when thousands (or even tens of thousands) of browsers are requesting pages from your server. Compared to only a couple of years ago, computer memory and disk space is cheap, but there is no point wasting it!
Note This will become increasingly important as your web site gathers users and as performance becomes an issue when thousands (or even tens of thousands) of browsers are requesting pages from your server. Compared to only a couple of years ago, computer memory and disk space is cheap, but there is no point wasting it!
For more information on optimizing your web site's performance, take a look at the ‘Improving Performance using Caching’ section in Chapter 12.
As with any other C# type, integral variables are declared by use of the relevant keyword and assignment of a valid identifier. As mentioned previously, all class level numeric types default to 0 (zero), but always specifying an initial value (called initialization) is considered good practice. All local variables must be initialized before use.
int variance = -1000;

byte studentCount = 20;

long numberOfBacteria = 0;
Floating-Point Types
C# provides three types specifically designed for use when working with floating-point numbers; float, double and decimal (see Table 3-3).
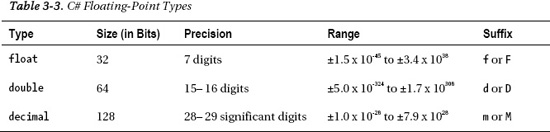
The major factor when deciding between the use of a decimal or double is the priority of precision or range. A double has the greatest range, whereas the decimal type is much more precise, making it a good choice, in particular, for financial calculations where rounding errors can be problematic.
Each floating-point type has a literal suffix that is used to ensure that the compiler uses the intended type when evaluating expressions. To avoid the associated—and often very hard to find—bugs and errors, you should always use the appropriate suffix. This has the added benefit of self-documenting your code for future reference. Floating-point variables are declared and initialized as follows:
float totalVolume = 46524.23f;

double calculationsPerSecond = 6984725.389277d;

decimal jackpot = 145678289.42m;
Floating-point values can also be specified using exponential notation. This allows the programmer to describe extremely large or small numbers more easily than using a lot of zeros in the number, albeit with a trade-off against precision:
float averagePopulation = 6.43e35f;

double mass = 3.42e-108d;

decimal annualSales = 93883992e11m;
Numeric Conversions
The C# compiler places constraints on the conversion of numeric types in any situation where data loss may occur. All integral types may be implicitly converted to any other integral type, where the type to be converted to has a range larger than the type to be converted from. For example, conversion from a byte to a short is implicit as a variable of type short can contain every possible value of a variable of type byte:
byte hoursWorked = 105;

short totalHours = hoursWorked;
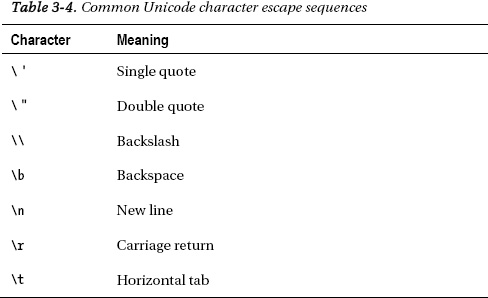
However, in the reverse direction (i.e. from a short to a byte) an explicit conversion is required. This is achieved by the placing the type name in brackets before the value on assignment; an action known as casting:
short hoursWorked = 105;

byte totalHours = (byte)hoursWorked;
This tells the compiler that it is OK to force the value of the hoursWorked variable into totalHours even though the range of the variable type is smaller in the case of totalHours. Without this cast, the compiler will display the error seen here in Figure 3-2:
Figure 3-2. Implicit conversion between non-compatible types will generate a compilation error
![]() Caution You need to take care when performing casting operations in order to ensure that the type you are casting to can fully hold the intended value. If there is any possibility that the original value may fall outside the permitted range of the intended type, you should implement code to check the value before casting in order to avoid out of range errors or unexpected values (which can be an absolute nightmare to debug).
Caution You need to take care when performing casting operations in order to ensure that the type you are casting to can fully hold the intended value. If there is any possibility that the original value may fall outside the permitted range of the intended type, you should implement code to check the value before casting in order to avoid out of range errors or unexpected values (which can be an absolute nightmare to debug).
An implicit conversion from a float to a double is permitted as no information may be lost. However, conversions from double to float and to/from a decimal type must be performed using explicit casts:
//float to double - implicit conversion permitted

float deviation = 9378239.2872f;

double totalDeviation = deviation;
//double to float requires explicit cast

double xPosition = 1.4e37d;

float totalXMovement = (float)xPosition;


//float or double to/from decimal requires explicit cast

decimal departmentalProfit = 2993899.28m;

double totalProfit = (double)departmentalProfit;
Integral types can be converted to floating-point types implicitly as long as the range of the two types is compatible. However, conversions from floating-point types to integers must always be cast explicitly.
![]() Tip For more information on casting in C#, visit the Casting and Type Conversions section of the C# Programming Guide on the Microsoft Developer Network site at: http://msdn.microsoft.com/en-us/library/ms173105.aspx
Tip For more information on casting in C#, visit the Casting and Type Conversions section of the C# Programming Guide on the Microsoft Developer Network site at: http://msdn.microsoft.com/en-us/library/ms173105.aspx
Strings
Two built-in types exist in C# that are designed to hold exclusively textual, or string, values; char and string. The string type holds a series of Unicode characters, whereas the char type can hold only one.
The value to be stored in a char type must be enclosed by single quotes:
char department = 'B';
Values assigned to variables of type string must be enclosed in double quotes:
string firstName = "Steve";
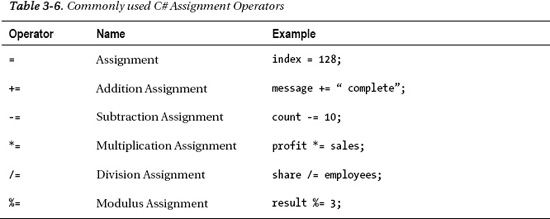
Strings and chars can also contain Unicode escape sequences to represent other useful formatting instructions; these are preceded with a backslash. A list of the more common escape sequences can be seen in Table 3-4:
Therefore, to represent the following file path as a string:
C:UsersSteveDocumentsMy Web SitesHello Worlddefault.cshtml
you must escape all the backslash characters, giving you this:
string filePath = "C:\Users\Steve\Documents\My Web Sites\Hello World\default.cshtml";
Alternatively you can also create a verbatim string literal using the @ symbol. By placing the @ symbol before the string literal you instruct the compiler to ignore Unicode escape sequences:
string filePath = @"C:UsersSteveDocumentsMy Web SitesHello Worlddefault.cshtml";
ToString()
All data types in C#, including the C# built-in types such as int and float, derive from a base class called Object, which enables them to share some common functionality. One such function is the ToString() method, which returns a string representation of the value on which the method is called. For example:
int numberOfUsers = 1253;

string userCount = numberOfUsers.ToString();
This method is particularly useful when creating a string literal to be output to a screen that contains some calculated numeric or Boolean value.
String.()Format()
The String.Format() method is used to insert values into string literals. Any number of values can be inserted into the original string using numbered placeholders contained in curly braces:
int numberOfUsers = 1253;

string userCountMessage = String.Format("There are currently {0} users logged

into the system", numberOfUsers);
Notice that use of the String.Format() method does not require calling the ToString() method on the values to be inserted.
String Length
Ascertaining the length of a string is often useful while programming web sites. For example, you may want to check that a specified username contains more than a set number of characters. This can be achieved by accessing the string's Length property, which returns an int:
string username = "stevelydford";

int usernameLength = username.Length;  // usernameLength = 12
Changing Case
Two methods are available to change the case of letters in a string; ToUpper() and ToLower(). The following example takes a first name, “Steve” and a last name, “Lydford” and creates a new variable called fullName which contains the formatted text, “LYDFORD, Steve”.
string firstName = "Steve";

string lastName = "Lydford";

string fullName = String.Format("{0}, {1}", lastName.ToUpper(), firstName);
Other Useful String Methods
Strings have many other methods. We will take quick look at some of the most useful ones here.
![]() Note As mentioned previously, this chapter is only intended as a “getting started guide,” not as an exhaustive manual. For more information on C#, I recommend visiting the Microsoft Developer Network (MSDN) C# Programming Guide at http://msdn.microsoft.com/en-us/library/67ef8sbd.aspx
Note As mentioned previously, this chapter is only intended as a “getting started guide,” not as an exhaustive manual. For more information on C#, I recommend visiting the Microsoft Developer Network (MSDN) C# Programming Guide at http://msdn.microsoft.com/en-us/library/67ef8sbd.aspx
The Replace() method allows easy substitution of all or part of a string:
string welcome = "Welcome to my world!";

string newWelcome = welcome.Replace("my", "your");      // Becomes "Welcome to your world!"
The Trim() method removes all whitespace from the beginning and end of a string :
string noPadding = " My Web Site ".Trim(); // noPadding contains "My Web Site"
Methods also exist to remove whitespace at each end of a string literal individually; TrimStart() and TrimEnd().
To access specific portions of a string you can use the Substring() method. You need to tell the method which character to start at (where 0 (zero) is the first character) and how many characters you require.
string title = "Microsoft WebMatrix";

string shortTitle = title.Substring(10, 9);             // shortTitle contains "WebMatrix"
The final string methods we are going to consider in this section are concerned with searching within strings - StartsWith(), EndsWith(), Contains() and IndexOf(). The following code example shows how these are used and the outcome of the methods:
string movieTitle = "Star Wars Episode V: The Empire Strikes Back";


bool startsWithStar = movieTitle.StartsWith("Star");    // Returns true

bool endsWithBack = movieTitle.EndsWith("back");        // Returns false (case-sensitive)

bool containsEmpire = movieTitle.Contains("Empire");    // Returns true

int indexOfEpisode = movieTitle.IndexOf("Episode");     // Returns 10
The endsWithBack variable contains a false, as all of the methods described in this example are case-sensitive by default. The IndexOf() method reports the zero-based index of the first occurrence of a string of one or more characters, within the specified variable. If the string is not found within the specified variable, –1 is returned.
Concatenation and StringBuilder
Strings can be concatenated, or joined, using the string concatenation operator, + as seen here:
string firstString = "abcdefg";

string secondString = "hijklmn";

string thirdString = firstString + secondString;      // thirdString contains "abcdefghijklmn"
In the following code, the += operator is used to append text onto the end of the original string, which saves the overhead of creating variables to hold the second and third values, if that is appropriate to the program (the original value of the name variable will no longer be available after this operation):
string name = "Steve";

name += " Lydford";         // name contains the value "Steve Lydford"
C# strings are immutable, meaning that the content of the object cannot be changed once it has been created and initialized. The methods that we have seen that perform operations on strings actually create new string objects in memory. When we are performing one action, such as a Replace() or single concatenation, this is not generally a problem. However, imagine that you are in looping through 500,000 records and concatenating a string from the value of each record; performance may well become an issue here as hundreds of thousands of redundant string objects are created in memory. In scenarios involving anything more than one or two concatenations, the StringBuilder class should be used to ensure that no performance hit occurs on your web site.
StringBuilder is very easy to use. You simply create a new StringBuilder instance, which can optionally contain the first part of your string, and then call the Append() method as necessary to concatenate. The following example demonstrates the correct use of the StringBuilder class:
StringBuilder sb = new StringBuilder("The quick");

sb.Append(" brown");

sb.Append(" fox jumps");

sb.Append(" over the");

sb.Append(" lazy");

sb.Append(" dog");

sb.Append('.'),
The StringBuilder object sb now contains the text, “The quick brown fox jumps over the lazy dog.” and no redundant string objects have been created.
When we are done appending to our StringBuilder object, we can convert it back to a String using the ToString() method:
string message = sb.ToString();
Dates and Times
Dates and times are represented in C# by the DateTime type. Dates and times are very complex and can present a number of issues in everyday development, particularly around time zones and Daylight Savings Time (DST). The .NET Framework provides excellent facilities to cope with these complexities, although they are beyond the scope of this chapter (see the following Note).
![]() Note The MSDN coverage of this topic is excellent and can be found at http://msdn.microsoft.com/en-us/library/system.datetime(v=VS.100).aspx
Note The MSDN coverage of this topic is excellent and can be found at http://msdn.microsoft.com/en-us/library/system.datetime(v=VS.100).aspx
I would highly recommend reading the information available here before attempting any complex DateTime code.
The usual way to instantiate a DateTime is as followings:
DateTime appointment = new DateTime(2012, 9, 3, 10, 30, 00);
This creates a DateTime object and sets its initial value to 10:30:00 (ten thirty and zero seconds on 3rd September 2012). An alternative way to assign a date and time to a DateTime object is via its Parse() method, using a standard format date and time:
DateTime start = DateTime.Parse("31/08/2011 14:25:00");
![]() Note My PC is set up to use the United Kingdom default date formats (dd/MM/yyyy HH:mm:ss). Your PC may give a different result, depending on your Windows settings.
Note My PC is set up to use the United Kingdom default date formats (dd/MM/yyyy HH:mm:ss). Your PC may give a different result, depending on your Windows settings.
This method can be extremely useful when populating DateTime objects from values stored in input controls (textboxes, drop-down lists, etc.) on web pages and from external data sources, as we will see later in the book.
Let's quickly look at a few common DateTime methods and properties, starting with the Now property, which we used in Chapter 2 to give us the current date and time for our Hello World application.
DateTime currentDateTime = DateTime.Now;
As well as the usual ToString() method, the DateTime object has a number of methods that output strings in various formats:
DateTime start = DateTime.Parse("31/08/2011 14:25:00");


string dateTime1 = start.ToString();                    // 31/08/2011 14:25:00

string dateTime2 = start.ToLongDateString();            // 31 August 2011

string dateTime3 = start.ToLongTimeString();            // 14:25:00

string dateTime4 = start.ToShortDateString();           // 31/08/2011

string dateTime5 = start.ToShortTimeString();           // 14:25
We can also inspect individual parts of a DateTime by accessing the following properties:
DateTime dateJoined = DateTime.Parse("22/11/2009 18:02:24");


string dateElements = String.Format("Year: {0} Month: {1} Day: {2} " +

                                    "Hours: {3} Mins: {4} Secs: {5} " +

                                    "Milliseconds {6} Day of Week: {7} Day of Year: {8}",

                                    dateJoined.Year,

                                    dateJoined.Month,

                                    dateJoined.Day,

                                    dateJoined.Hour,

                                    dateJoined.Minute,

                                    dateJoined.Second,

                                    dateJoined.Millisecond,

                                    dateJoined.DayOfWeek,

                                    dateJoined.DayOfYear           // Days since 1st Jan

   );
Output:
Year: 2009 Month: 11 Day: 22 Hours: 18 Mins: 2 Secs: 24 Milliseconds 0 Day of Week: Sunday Day of Year: 326
Finally, we can perform basic addition operations on DateTime objects using the various Add() methods. Subtractions can be achieved by passing a negative integer:
DateTime arrival = new DateTime(2011, 02, 24, 09, 30, 42);   // 24/02/2011 09:30:42


DateTime newArrivalYear = arrival.AddYears(1);               // 24/02/2012 09:30:42

DateTime newArrivalMonth = arrival.AddMonths(4);             // 24/06/2011 09:30:42

DateTime newArrivalDay = arrival.AddDays(-20);               // 04/02/2011 09:30:42

DateTime newArrivalHour = arrival.AddHours(2);               // 24/02/2011 11:30:42

DateTime newArrivalMinute = arrival.AddMinutes(-30);         // 24/02/2011 09:00:42

DateTime newArrivalSecond = arrival.AddSeconds(-2);          // 24/02/2011 09:30:40
Operators
C# provides a series of built-in operators that allow us to perform a number of operations on literals and variables. We will look at the common, more useful, operators in this chapter, broken down into a few sections.
Arithmetic Operators
As the name would suggest, the arithmetic operators allow us to perform mathematical operations on numeric variables and literals (see Table 3-5).

All operators can be used to operate on variables as well as literals. Therefore, the two result variables in the following example contain the same value, 25.
int result1 = 100 / 4;


int operand1 = 100;

int operand2 = 4;

int result2 = operand1 / operand2;
The addition, subtraction, division, and multiplication operators are self-explanatory, except perhaps to say that they are subject to operator precedence. Operator precedence states that multiplicative operators (* and /) will be evaluated before any additive operators (+ and -) in the same expression— this may give some surprising results if not accounted for. Evaluation order can be forced by the use of parentheses, with expressions inside parentheses being evaluated before other expressions.
int result1 = 3 + 2 * 4;      // Result = 11

int result2 = (3 + 2) * 4;    // Result = 20
The modulus operator returns the remainder of the result of the division of the first operand by the second.
int result1 = 32 % 20;           // Result = 12

int result2 = 15 % 2;            // Result = 1
The increment and decrement operators simply increase or decrease a numeric value by one. The timing of the operator depends on which side of the operand it appears. If it appears after the operand, known as a post-increment/decrement operator, the value is evaluated then incremented/decremented. If the operator appears before the operand, known as a pre-increment/decrement operator, the value is incremented or decremented before it is evaluated. The following code example shows this in operation:
// Post-increment operator

int operand1 = 10;

int result1 = operand1++;        // result1 = 10; operand1 = 11


// Pre-increment operator

int operand2 = 20;

int result2 = ++operand2;        // result2 = 21; operand2 = 21


// Post-decrement operator

int operand3 = 30;

int result3 = operand3--;        // result3 = 30; operand3 = 29


// Pre-increment operator

int operand4 = 40;

int result4 = --operand4;        // result4 = 39; operand4 = 39
Assignment Operators
C# supports a number of assignment operators which are used to assign a value to a variable. Table 3-6 details the most commonly used of these:
Let's take a quick look at an example of each of these operators to better understand their behavior.
The assignment operator simply assigns a value to a variable, as we have seen in previous examples in this chapter. The value to be assigned can be either a literal or the value of another variable:
int score1 = 10;

int score2 = score1;
The addition assignment operator adds the specified value to the original:
decimal totalProfit = 100.00m;

decimal sales = 40.50m;

totalProfit += sales;            // totalProfit is now 140.50
This code is equivalent to:
decimal totalProfit = 100.00m;

decimal sales = 40.50m;

totalProfit = totalProfit + sales;           // totalProfit is also 140.50 here
As we have seen previously, the addition assignment operator can also be used with string variables to concatenate them:
string user = "stevelydford";

user += "@example.com";             // user contains text [email protected]
The subtraction, multiplication, division and modulus assignment operators work in similar ways as you would expect.
int result = 100;


result -= 50;                          // result = 50

                                       // Equivalent to: result = result - 50;


result *= 10;                          // result = 500;

                                       // Equivalent to: result = result * 10;


result /= 20;                          // result = 25;

                                       // Equivalent to: result = result / 20;


result %= 3;                           // result = 1;

                                       // Equivalent to: result = result % 3;
These operators will not work with string variables.
Equality Operators
The two C# equality operators simply compare two values for equality or inequality and return a Boolean true or false value depending on the outcome. As you will see later in the chapter, these operators are used extensively when testing variables for conditions and loops. Table 3-7 describes the two equality operators:

In the following code sample we can see the equality and inequality operators in action:
int first = 10;

int second = 20;

int third = 30;


bool result1 = first == second;                // false

bool result2 = first + second == third;        // true


bool result3 = first != second;                // true

bool result4 = first + second != third;        // false
Relational Operators
The relational operators allow us to compare one value in relation to another. Table 3-8 shows the commonly used relational operators:
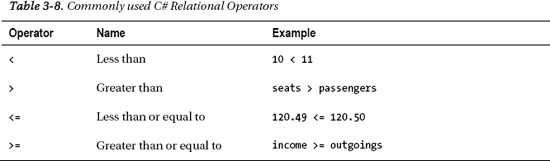
Again, the result of a relational operator is always a Boolean:
int first = 10;

int second = 20;

int third = 20;


bool result1 = first > second;                // false

bool result2 = first < second;                // true


bool result3 = second > third;                // false

bool result4 = second >= third;               // true


bool result5 = (first + second) > third;      // true
Conditional Operators
The final trio of operators we are going to cover in this chapter are known as conditional operators (see Table 3-9).
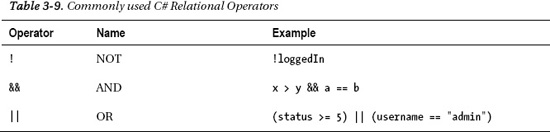
The NOT operator is used to negate its operand. In other words, it will return a Boolean true only if its operand is false.
bool isLoggedIn = false;

bool showLoginScreen = !isLoggedIn;             //true
For a conditional AND to evaluate as true, both sides of the argument must be true. A conditional OR will return true if either side, or both sides, of the argument evaluate to a Boolean true.
int first = 10;

int second = 20;

int third = 20;


bool result1 = first < second && second == third;             // true

bool result2 = first > second && second == third;             // false


bool result3 = first < second || second == third;             // true

bool result4 = first > second || second == third;             // true

bool result5 = first > second || second != third;             // false
Note that the second part of a conditional AND will never be evaluated if the first part returns a false value. Likewise the second part of a conditional OR will not be evaluated if the first part returns true.
Collections
In C#, a collection is a data structure that holds data in an indexed way for ease of storage and retrieval. It can be thought of as a related group of variables that can be accessed individually; examples may include a collection of exam results or a list surnames for a class register. A collection removes the requirement for a separate variable to store each value and most collections provide greatly simplified methods for performing common operations across the collection as a whole, such as sorting, iteration, etc.
Many different types of collection are available to the C# programmer. As I have mentioned before, this chapter has been designed to give you a working knowledge of the language, sufficient only to allow you to progress through the rest of the book, so we will cover just the most commonly used collection types here.
Arrays
An array is a simple collection that contains several values of the same type. The collection is indexed (a zero-based integer index) and each element of the array can be accessed individually by specifying the index of the required element.
A single-dimensional array containing five elements can be declared as follows:
string[] names = new string[5];
To assign a value to each element, we can refer to them using the index (notice the zero-based index):
names[0] = "John";

names[1] = "Bob";

names[2] = "Tom";

names[3] = "Bill";

names[4] = "Jack";
If we want to initialize our array at the same time we declare it, we can use one of the shorter alternative syntaxes. The following two lines demonstrate the two types of concise syntax and are equivalent:
string[] names = new string[] {"John", "Bob", "Tom", "Bill", "Jack"};


string[] names = {"John", "Bob", "Tom", "Bill", "Jack"};
The value of each element can be retrieved in a similar fashion, specifying the required element by referring to its index, as shown in this example:
bool isBob = names[1] == "Bob"; // isBob is true
Arrays can also be multi-dimensional, in that they can hold several sets of elements. Imagine you wanted to hold the following table of measurements in an array:

A two-dimensional array to hold this data, with 5 rows and 3 columns, would be defined as follows:
float[,] measurements = new float[5,3];
To then refer to each cell in the table, you would use the index of the row, followed by the index of the column. For example:
measurements[0, 0] = 1.44f;

measurements[0, 1] = 2.81f;

measurements[0, 2] = 0.76f;

measurements[1, 0] = 4.23f;

measurements[1, 1] = 5.94f;

measurements[1, 2] = 2.32f;

measurements[2, 0] = 2.45f;

measurements[2, 1] = 4.4f;

measurements[2, 2] = 1.95f;

measurements[3, 0] = 3.0f;

measurements[3, 1] = 4.91f;

measurements[3, 2] = 4.39f;

measurements[4, 0] = 2.98f;

measurements[4, 1] = 3.02f;

measurements[4, 2] = 3.15f;
Alternatively you could use either of the following shortcut syntaxes:
float[,] measurements = { { 1.44f, 2.81f, 0.76f },

                          { 4.23f, 5.94f, 2.32f },

                          { 2.45f, 4.4f, 1.95f },

                          { 3.0f, 4.91f, 4.39f },

                          { 2.98f, 3.02f, 3.15f }

                        };


float[,] measurements = new float[5,3] { { 1.44f, 2.81f, 0.76f },

                                         { 4.23f, 5.94f, 2.32f },

                                         { 2.45f, 4.4f, 1.95f },

                                         { 3.0f, 4.91f, 4.39f },

                                         { 2.98f, 3.02f, 3.15f }

                                       };
C# also supports jagged arrays. A jagged array is similar to a multi-dimensional array, but each row can contain a different number of columns; they are often referred to as an array of arrays. For more information on arrays, visit the MSDN web site at http://msdn.microsoft.com/en-us/library/9b9dty7d.aspx.
To get the size of an of array dimension, you can access the array's Length property. This property holds the number of columns in the specified dimension. For instance, in the measurements array we declared earlier we have three columns.
int columnCount = measurements.Length; // columnCount = 3
An array can be sorted using the Sort() method of the Array object. To order our names array from earlier, we would use the following code:
Array.Sort(names);
This arranges the elements of our array into alpha-numeric sequence, in this case: Bill, Bob, Jack, John, Tom. It is worth noting here that, unlike the String methods described earlier, the Array methods actually change the original array and do not make a copy.
We can reverse the elements of an array by calling the Array.Reverse() method:
Array.Reverse(names);
Our array is now ordered in reverse: Tom, John, Jack, Bob, Bill.
Two methods are useful in finding elements within an array; IndexOf() and LastIndexOf(). IndexOf() returns an integer containing the index of the first element in the array matching the specified search object; LastIndexOf() returns the index of the last matching element.
int jacksIndex = Array.IndexOf(names, "Jack"); // jacksIndex = 2
The final thing I want to talk about with regard to arrays is the IndexOutOfRange exception. This exception will be generated if you ever try to access an array element that is outside the bounds of the array. For example, the following line:
float boxSize = measurements[1, 6];
will cause WebMatrix to display the following error page (Figure 3-3):
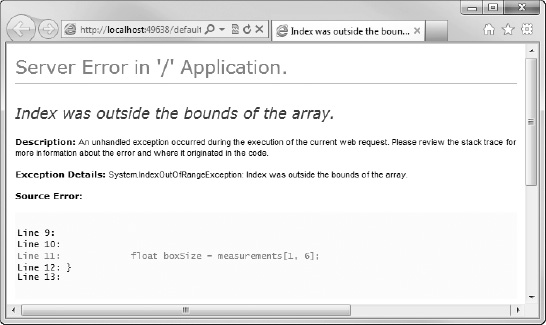
Figure 3-3. An IndexOutOfRangeException error page
![]() Note The search and order functions of Arrays have been largely superseded by LINQ (Language Integrated Query). We will look at LINQ later in Chapter 6—Working with Data.
Note The search and order functions of Arrays have been largely superseded by LINQ (Language Integrated Query). We will look at LINQ later in Chapter 6—Working with Data.
Generic Collections-
Generics were introduced into C# in version 2.0, which came along in 2005 as part of Visual Studio 2005. They are a way of defining type-safe data structures without committing to data types until runtime. Generics in C# is a vast subject that could easily fill a chapter of its own, but here we are just interested in the basics. We will look at two commonly used built-in generic collections—List and Dictionary—which will cope well with most situations, and the var keyword. Finally, we will talk briefly about the IEnumerable interface and how it helps us to interact with our generic collections.
![]() Note We will also be discussing generics in the Object Oriented Programming section later in this chapter.
Note We will also be discussing generics in the Object Oriented Programming section later in this chapter.
List<T>
A generic list is very similar in functionality to an array (in fact, it is backed by an array behind-the-scenes), but with a number of useful additional features that make it much more programmer friendly.
The best way to see a generic list in action is to take a look at some code, so let's declare our list. When we refer to List<T>, the T stands for Type. We simply need to tell List<T> what type we wish to create a list of, as it is a generic list remember, which we do inside the angle brackets:
List<string> cars = new List<String>();
We can also initialize the list with items at the point of declaration by passing the values within curly braces, as we did with arrays.
List<string> cars = new List<String>() { "Ferrari", "Aston Martin" };
So now the compiler knows that I have a list of strings that I have called cars. I can add items to the end of my list by calling the Add() method and passing it the string I wish to add. Remember that the list is now strongly typed as a list of strings, so if I pass in a value that cannot be implicitly cast to a string, I will receive an error.
cars.Add("Lamborghini");

cars.Add("Porsche");
This code demonstrates one of the major advantages that List<T> has over an Array. At no point have we told the compiler what size the list should be— it simply does not matter. Unlike an array, which has its size set at the time of declaration, a List<T> can be resized at any time—in fact this process is virtually invisible to the programmer; items can be added and removed at will.
To get the current number of elements, use the Count() method. This is the number of elements, not the index of the last element (which would be Count() -1):
int carsCount = cars.Count(); // carsCount = 4
To remove an item, call the Remove() method:
cars.Remove("Lamborghini");
Items can also be accessed using the index, as with an array:
string myCar = cars[0]; // myCar = "Ferrari"
or, as is more often the case, using a Language Integrated Query(LINQ). We will be taking an introductory look at LINQ in Chapter 6—Working with Data.
Dictionary<TKey, TValue>
The generic dictionary stores key/value pairs. When we declare it, we need to tell the compiler the type of the key and type of the value:
Dictionary<string, decimal> prices = new Dictionary<string, decimal>();
Again, we can use shortcut syntax to initialize the dictionary at the point of declaration:
Dictionary<string, decimal> prices = new Dictionary<string, decimal>()

                                                     {

                                                         { "Bread", 1.20m },

                                                         { "Soup", 1.50m },

                                                         { "Butter", 0.95m },

                                                         { "Milk", 1.90m }

                                                     };
We can also add items to our dictionary using the Add() method:
prices.Add("Orange Juice", 2.60m );
Now, to retrieve items, we can simply refer to them by their key:
decimal priceOfMilk = prices["Milk"]; // priceOfMilk = 1.90
As with List<T>, we can find out the number of elements in our dictionary by using the Count() method and we can delete items from the dictionary using the Remove() method:
prices.Remove("Butter");

int numberOfPrices = prices.Count;          // numberOfPrices = 4
The var keyword
The syntax for declaring C# generics can get pretty long-winded. Take a realistic dictionary declaration:
Dictionary<string, List<float>> measurements = new Dictionary<string, List<float>>();
We can see here that the majority of the declaration is merely a repetition of the type. The var keyword allows us to shorten this considerably by instructing the compiler to infer the type:
var measurements = new Dictionary<string, List<float>>();
This makes the code much more concise and readable. As long as the compiler can infer the type from the right-hand side of the equals sign, then the var keyword can be used.
Although originally implemented to deal with the incredibly long declarations required by the introduction of generics to the language, the var keyword can be used during any type declaration. The following are all equally valid:
var surname = "Lydford";

var pricePerHour = 25.99m;

var count = 3;

var myArray = new string[12];
Notice that the variable must be initialized at the time of declaration when using var, as its type is not explicitly specified on the right hand side. It is the type of this initial value that the compiler uses to infer the actual type of the variable at compile time.
IEnumerable<T>
IEnumerable<T> is not a type of generic collection; rather, it is an interface that defines a number of actions useful for interacting with collections, most importantly the ability to iterate over then. The IEnumerable<T> interface requires that any generic collection that implements it provides a core set of functionality. List<T> and Dictionary<TKey, TValue> both implement IEnumerable<T> which means that, along with several other useful functions, we have the ability to iterate over the collection using the C# foreach loop (which we will see later in the chapter).
This ability to be iterated over will become very important later in the book, when we move on to displaying dynamic data on our web pages (see Chapter 6 - Working with Data).
Conditions
Conditions are sometimes referred to as Control or Selection statements. They are the part of a program that allows us to branch into separate logical sequences according to decisions based on specific values at runtime.
C# has three major conditional statements—if…else, switch, and try…catch—each of which we will look at now.
if…else
The if statement selects a branch for execution based on the evaluation of a Boolean expression. Although not mandatory, it is often used in conjunction with the else statement to provide an alternative program flow should the if statement evaluate to false.
The code to be executed must be placed in a code block (i.e., within a pair of braces). This tells the compiler where the code to be executed starts and ends.
var loggedIn = false;

var message = "";


if (loggedIn)

{

    message = "User logged in successfully.";

}

else

{

    message = "User login failed.";

}
It is common practice to use conditional operators here to evaluate more than one expression:
var loggedIn = true;

var membershipValid = true;

var message = "";


if (loggedIn && membershipValid)

{

    message = "User logged in successfully.";

}

else

{

    message = "User login failed.";

}
Multiple if statements can be nested within each other as necessary, although care should be taken to ensure readability is not compromised.
var count = 15;

var message = "";


if (count > 10)

{
    if (count < 20)

    {

        message = "Count is more than 10 but less than 20";

    }

    else

    {

        message = "Count is 20 or more";

    }

}

else

{

    message = "Count is 10 or less";

}
else if can be used to handle multiple conditions if necessary, although in many cases this is better dealt with through use of the switch statement, which we will look at in the next section.
int role =2;

string username = "Steve";

string securityLevel = "";


if ((role == 4) && (username == "Steve"))

{

    securityLevel = "Developer";

}

else if (role == 3)

{

    securityLevel = "Administrator";

}

else if (role == 2)

{

    securityLevel = "Moderator";

}

else if (role == 1)

{

    securityLevel = "Member";

}

else

{

    securityLevel = "Guest";

}
switch
The switch statement is used to evaluate an expression against a number of possible values and pass program control to one of the case statements within it if required. The following code evaluates the value of the primaryColor string variable and executes code accordingly:
var primaryColor = "red";

var hexValue = "";


switch (primaryColor)

{

    case "blue":

        hexValue = "#0000FF";

        break;

    case "red":

        hexValue = "#FF0000";

        break;

    case "green":

        hexValue = "#00FF00";

        break;

    case "yellow":

        hexValue = "#FFFF00";

        break;

    default:

        hexValue = "#FFFFFF";

        break;

}
In this example, the hexValue variable will be set to “#FF0000”.
The break keyword halts execution of the switch statement and transfers program flow to the next statement. Any value of primaryColor that is not met by one of the case statements is handled by the default code block.
The switch statement can handle any number of cases, but no two cases can have the same value. In addition to this, each case instance can only have a single value. However, by using multiple case statements without a break between them, you can achieve the same result:
var animal = "lizard";

var animalType = "";


switch (animal)

{

    case "dog":

    case "cat":

    case "cow":

        animalType = "Mammal";

        break;

    case "eagle":

    case "hawk":

    case "sparrow":

        animalType = "Bird";

        break;

    case "lizard":

    case "snake":

        animalType = "Reptile";

        break;

    default:

        animalType = "Unknown";

        break;

}
At the end of execution, the variable animalType holds the string “Reptile”.
![]() Note You must have a break statement at the end of each non-empty case branch; otherwise, a compilation error will occur.
Note You must have a break statement at the end of each non-empty case branch; otherwise, a compilation error will occur.
try…catch
The try..catch block basically says to the compiler, “Try and execute this code and if it fails, catch the exception here and execute this code instead.” In C# that looks like this:
var sports = new List<string> {"Football", "Cricket", "Rugby", "Golf"};

var output = "";


try

{

    output = sports[7];
}

catch(Exception e)

{

    output = "Try block failed - " + e.Message;

}
When this example is executed, the try block fails so the catch block is executed. This takes the exception raised and concatenates the exception message to the output, which in this case reads as: “Try block failed – Index was out of range. Must be non-negative and less than the size of the collection. Parameter name: index”
It is worth noting that this is a superficial example designed to explain the use of the try...catch block. In reality, we would write code to check that the index was valid before trying to access the element in the array.
![]() Note We will look at error handling and
Note We will look at error handling and try..catch in much more depth in Chapter 12—Advanced WebMatrix.
The try..catch block has one other code construct, called finally. The finally block is placed after the catch block and is always run, whether the try block fails or not. This is a useful place to put code that is used to release resources—for example, a database connection or file stream.
var output = "";


try

{

    output += "Executing try statement. ";

}

catch (Exception e)

{

    output += "Executing catch. ";

}

finally

{

    output += "Executing finally.";

}
The value of output after execution of this example would be, “Executing try statement. Executing finally.” However, if for some reason the try block had failed and the catch block was run, the code inside finally would still be executed.
Loops
A loop is a code construct designed to allow a statement, or sequence of statements, to be performed multiple times. The C# language specifies four different types of loop— while, do, for, and foreach—which we will look at in turn here.
The while loop
A while loop is a condition controlled loop that tests the condition at the start of the loop and continues to iterate while the condition is true. As seen earlier with the if and try…catch statements, the code to be executed is placed with a pair of braces.
int count = 1;

string message = "";


while (count <= 10)

{

    message += count + " ";

    count++;

}
After the loop has completed all its cycles, the string value of message will be, "1 2 3 4 5 6 7 8 9 10 ".
![]() Caution In the above example, note that the
Caution In the above example, note that the count integer is incremented each time the body of the loop is executed, using the statement count++;
If we had failed to increment the count integer on each iteration, the condition of the loop would always be evaluated to true and the loop would continue to run. In other words, we would have an infinite loop.
If the initial condition is not met, the code inside the body of the loop will never run, as in this example:
int studentIndex = 0;


while (studentIndex > 10)

{

    // This will never be run

    studentIndex++;

}
The do loop
The do loop is also a conditional loop and works in a way similar to while, except that the condition is evaluated at the end of the loop. This means that, unlike the while loop, the code in the body of a do loop will always execute at least once.
var recordCount = 0;

var output = "";


do

{

    output += recordCount + " ";

    recordCount++;

} while ( recordCount < 10 );
In this example, following the successful completion of the loop, the value of the output string is set to “0 1 2 3 4 5 6 7 8 9”.
The for loop
The for loop iterates over a series of statements until the specified expression evaluates to a Boolean false value. The for loop is commonly used for iterating over arrays (i.e., visiting every element in an array dimension) or performing sequential processing.
The following example iterates over an array of integers, adding ten to every value:
int[] values = {1, 2, 3, 4, 5, 6, 7, 8, 9, 10};


for (int i = 0; i < values.Length; i++)

{

    values[i] += 10;

}
Let's take a look at this in a little more detail. First, the for loop declares a loop counter variable, i, and initializes it to 0:
for (int i = 0; i <= values.GetUpperBound(0); i++)
Then, while the value of i is less than or equal to the number of the last index in our array (in this case 9), the code inside the curly braces executes:
for (int i = 0; i <= values.GetUpperBound(0); i++)
Each time the loop iterates the value of i is altered as specified. In this case (and in most common scenarios), we simply add one to it using the increment operator:
for (int i = 0; i <= values.GetUpperBound(0); i++)
When the test evaluates as false, i.e. the index i is no longer less than or equal to the upper bound of the array, execution stops and program control is transferred to the next statement outside the loop.
![]() Note Whereas the value of the index is altered (in our case incremented) immediately after each iteration of the loop, the condition is evaluated immediately before. Therefore, the statements inside a for loop code block may not execute at all if the condition is initially evaluated as
Note Whereas the value of the index is altered (in our case incremented) immediately after each iteration of the loop, the condition is evaluated immediately before. Therefore, the statements inside a for loop code block may not execute at all if the condition is initially evaluated as true.
For example, in the following code the contents of the loop will never be executed:
int minimum = 5;

int maximum = 5;


for (int i = minimum; i < maximum; i++)

{

    // Code in here will never be executed...

}
The foreach loop
The foreach loop can be used to easily iterate over any collection that implements the IEnumerable or IEnumerable<T> interface. This means that it can be used to iterate over both arrays and the generic collections we looked at previously; List and Dictionary.
In fact, the ability to iterate over collections is why we will use the foreach loop most often as we continue with our coverage of WebMatrix. It is a natural fit for iterating over the results of a database query for display on an ASP.NET Web Page using Razor.
The following example shows how to iterate over a generic List using a foreach loop:
var cities = new List<string>() {"London", "Paris", "New York", "Seattle", "Sydney"};

var output = "";


foreach (var city in cities)

{

    output += city + " ";

}
The value of the string variable output, once the foreach loop has completed its iterations, is "London Paris New York Seattle Sydney".
![]() Tip Items cannot be added to or removed from the collection being iterated over using a
Tip Items cannot be added to or removed from the collection being iterated over using a foreach loop. If you need to perform that function, it must be achieved using a for loop.
Object Oriented Programming
This section will provide only a very basic introduction to Object Oriented Programming (OOP), as a full in-depth investigation into OOP is well beyond the scope of this book (and could easily fill it). I will give a very brief overview of the guiding principles behind OOP and how they can be implemented using C#, but space allows only just that—a very brief overview.
Should you wish to gain a greater knowledge of OOP, and C# in general, than I can impart here, you should consider taking a look at Adam Freeman's book, “Introducing C#” available from Apress.com.
Principles and Terminology
The three core principles behind OOP support in the .NET framework are encapsulation, abstraction, inheritance, and polymorphism.
Encapsulation is the inclusion of all related properties, methods, and data about a program entity into a single unit or class. The encapsulated class hides its internal implementation and instead exposes a series of methods and properties to the outside world to provide its functionality. This process of exposing external methods and properties while hiding the inner workings of the object is called abstraction. By following the principles of abstraction and encapsulation, the internal implementation of a class can change without affecting the way it is used by other objects.
The principle of inheritance describes the ability to create new classes based on existing ones. The newly created class would automatically inherit all the members of the base class (except constructors), and can also define additional members. Where allowed, inherited classes can override the members of the base class and specify additional ones.
Polymorphism is the ability to create a class or method that has more than one form. The objects created based on these classes and their member methods can then be used interchangeably, even though they may have wildly different implementations. Polymorphism in C# is commonly implemented through the use of interfaces. For example, a number of classes implementing a single interface must all implement the set of methods and properties specified by the interface, but each can do so in their own way. This means that we can safely use any of the classes which implement the interface interchangeably in our program.
.NET languages, such as C# and VB.NET, fully support these three OO principles.
Classes and Objects
Classes are all about encapsulation—they are a bunch of related data and functionality that describes an object. A class can be described as a blueprint or specification for a type of object, whereas an object created from that specification is referred to as being an instance of that class. When we create an object in C# it is called instantiation.
A class is defined using the class keyword and in WebMatrix is defined within a separate class file with a .cs file extension, which can be selected from the ‘New File’ dialog .
class Person

{

}
Objects based on that class can then be instantiated using the new keyword:
var employee = new Person();

var customer = new Person();
These objects are independent instances of the Person class and changes made to one instance will not affect any other instances of the same class.
Fields and Properties
The fields and properties of a class describe the data held and used by it. A field is defined simply by declaring a variable at the top level within the class:
class Person

{

    public DateTime DateOfBirth;

}
Notice that before the field declaration there is the keyword public. This is known as an access modifier and is used to determine who and what has access to this field. In this case the access modifier public means that any other code can read or set the value of the DateOfBirth field directly. Table 3-10 lists the different access modifiers available in C#:
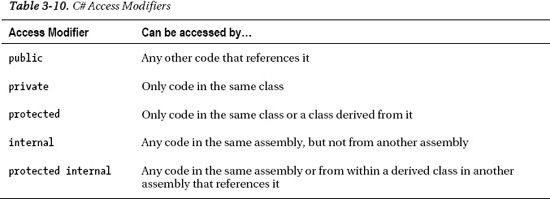
These access modifiers can be attached to classes and all their member fields, properties and methods.
Properties have get and set methods which provide access to the underlying data field. These methods allow you to determine how values are set or returned, and validate those values if necessary. This is good programming practice as the underlying data fields are not directly accessible outside the class. For this reason they are much the preferred way of exposing data outside the class. It is usual to have a private field within the class that is used internally, with a property controlling access to it from the outside world:
class Person

{

    public DateTime DateOfBirth;

    private string _surname;


    public string Surname

    {

        get { return _surname; }

        set { _surname = value; }

    }

}
The set method accesses the data to be written by using a hidden parameter called value.
By omitting the get or set statement, a property can be made read-only or write-only. As the implementation of properties is so common a more concise syntax is available for creating properties which deals with the creation of a private field and the basic logic behind the scenes.
class Person

{

    public DateTime DateOfBirth;


    public string Surname { get; set; }

}
The Surname property can now be accessed in code once a new object of type Person has been instantiated:
var student = new Person();

student.Surname = "Smith";

string surnameInitial = student.Surname.Substring(0, 1);       //surnameInitial = "S"
Alternatively, the values of an object's fields and properties can be set during instantiation using object initializers:
var student = new Person { Surname = "Smith" };

var employee = new Person { DateOfBirth = new DateTime(1976, 5, 20), Surname = "Williams"};
Methods
A method is an action that can be performed by an object. Methods are defined using the following format:
[access modifier] [return type] MethodName ([parameters]) { }
The access modifier must be one of the values detailed in Table 3-10. The return type describes the type returned as a result of the method. If the method does not return a result the return type should be specified as void.
A comma-separated list of parameters can be specified in parentheses after the method name. If the method does not require any parameters to be passed to it the parentheses should be left empty. A method also has access to all the members in the class, such as fields, properties and other methods.
The following code example declares two methods. The method called GetFullName() takes no parameters and returns a string. The AgeAtDate() method accepts a single DateTime parameter and returns a double.
class Person

{

    public DateTime DateOfBirth;


    public string Surname { get; set; }

    public string Forenames { get; set; }


    public string GetFullName()

    {

        var fullName = String.Format("{0} {1}", Forenames, Surname);

        return fullName;

    }


    public double AgeAtDate(DateTime calculationDate)

    {

        double ageInDays = (calculationDate - DateOfBirth).TotalDays;

        return ageInDays / 365.25;

    }

}
These methods can be called from code as follows:
var student = new Person();

student.Surname = "Smith";

student.Forenames = "Joe";

student.DateOfBirth = new DateTime(1990, 1, 1);


string fullName = student.GetFullName();        // Returns “Joe Smith”

double age = student.AgeAtDate(DateTime.Now);   // Returns age at current date
Two methods with the same name may be declared as long as they have different parameter types or number of parameters—this is known as overloading.
Definition of optional parameters is also possible. Optional parameters must be defined at the end of the parameter list and they need to set a default value, which must be a constant. If the parameter is not passed to the method specifically, then the default value is used.
public void exampleMethod (int requiredInteger, string optionalString = “default”)
Constructors
A constructor is a special type of method that is called every time an object is instantiated. Constructors are commonly used to initialize the object's member fields and properties. The code in the constructor is guaranteed to run before any other code in a class and, as with any other method, they can optionally receive parameters and be overloaded. Constructors cannot be declared with a return type, not even void.
To define a method as a constructor, simply name the method the same as the class it is contained within. Constructor definitions can also contain parameters. The following code example shows an example of both a parameterless and parameterized constructor:
public class Vehicle

{

    public Vehicle()    // Parameterless Constructor

    {

        // Add initialization code here...

    }


    Public Vehicle(string color)    //Parameterized Constructor

    {

        // Add initialization code here...

    }

}
Events and Delegates
An event is a class member that is used to notify other classes or objects of a particular occurrence. Although an event is a valid C# class member, ASP.NET Web Pages does not make use of them so their inclusion here is merely in the interest of completeness. Much more information about handling and raising events can be found at http://msdn.microsoft.com/en-us/library/edzehd2t.aspx.
Delegates are declared using the delegate keyword and most commonly used with events in event-driven programming, although they do have some use on their own. A delegate is essentially a type that defines only a method signature that can then provide a reference to any other method with a compatible signature. This is useful for passing methods as arguments to other methods. As with events, delegates are rarely used in ASP.NET Web Pages but further information can be found via MSDN at http://msdn.microsoft.com/en-us/library/ms173171.aspx.
Static Classes and Members
A static member is a member that is shared across all instances of a class. For example, a property marked as static represents a single value that applies across the whole class, rather than a separate value per object.
The following code sample declares the field BookingCount as static and uses a constructor method to increment its value every time an object is instantiated from the class:
public class Booking

{

    public static int BookingCount { get; private set; }


    public Booking()

    {

        BookingCount++;

    }

}
Now, each time a new object of type Booking is created, the BookingCount field is incremented. We can inspect the value of BookingCount by referring to its class name.
var booking1 = new Booking();

var booking2 = new Booking();

var booking3 = new Booking();


int totalBookings = Booking.BookingCount;     // Returns 3
Entire classes can also be marked as static. Static classes can only have static members and cannot be instantiated.
public static class Conversions

{

    public static double kilogramsToPounds(double kg)

    {

        return (kg * 2.2d);

    }


    public static double poundsToKilograms(double pounds)

    {

        return (pounds / 2.2d);

    }

}
To call a static methodfrom code, we simply refer to the name of the class followed by the name of the method using standard .NET dot notation:
double weightInPounds = Conversions.kilogramsToPounds(100d);

double weightInKilos = Conversions.poundsToKilograms(100d);
Inheritance
In OOP, inheritance describes the principle of defining a new class type based on an existing one and having the ability to modify and extend its behavior. The class that the new type inherits from is called the base class and the class that inherits from the base class is called the derived class.
In the following example, the Circle class derives from the Shape class and extends its functionality with the addition of a Circumference property. We use a colon (:) followed by the base class name to let the compiler know which base class we are deriving from:
public class Shape

{

    public double Width { get; set; }

    public double Height { get; set; }

    public string FillColor { get; set; }

}


public class Circle : Shape

{

    public double Circumference { get; set; }

}
Objects instantiated from the Circle class have access to all members of the Circle and Shape classes, according to the access modifiers of the members of the base classes. To specify that a class cannot be used as a base class, you must use the sealed keyword in the class definition:
public sealed class Shape { }
To specify that a class can only be used as a base class and cannot be instantiated, you can use the abstract keyword:
public abstract class Shape { }
Namespaces
Namespaces are simply a way of organizing classes—they are used extensively in C#, in part due to the enormous size of the .NET Framework Base Class Library. The use of namespaces allows developers to organize their classes into a logical structure and helps to prevent duplication of class names.
In this example:
WebMatrix.Data.Database.Open("myDB");
WebMatrix.Data is a namespace, and Database is a class within that namespace. The Database class has a static Open() method that takes a string parameter.
When creating classes within your own projects, you can organize them within your own namespaces by using the namespace keyword:
namespace Geometry

{

    public class Shape

    {

        public double Width { get; set; }

        public double Height { get; set; }

        public string FillColor { get; set; }

    }

}
The Height property of the shape class can now be accessed like this:
Geometry.Shape.Height = 22.9d;
If we want to use classes from within the Geometry namespace throughout our code, without specifying it every time, we can use the using keyword. We will then be able to access the classes within that namespace directly:
@using Geometry;


var hexagon = new Shape();
Interfaces
An interface is a contract to which other classes must comply. Interfaces are separate entities that define properties, methods and events, but do not provide an implementation and cannot be instantiated. A class that implements an interface must implement every one of these properties, methods and events. The purpose of an interface is to ensure that all classes that implement it expose the same set of public members, although their specific implementation may differ.
We briefly mentioned interfaces earlier in this chapter when we discussed IEnumerable<T>. IEnumerable<T> is an interface (by convention all interface names are prefixed with a capital I) that defines the set of members necessary for other code constructs to be able to enumerate, and hence iterate over, a set of data. The foreach loop then, for example, will only accept a type that implements this interface (or its non-generic equivalent IEnumerable).
You define an interface with the keyword interface. All members are then declared without implementations:
interface IVehicle

{

    // Properties

    string manufacturer { get; set; }

    string model { get; set; }


    // Methods

    void Move(int x, int y);

}
A class can declare that it implements an interface by using the same colon notation we used to signify inheritance. The implementing class must contain at least an implementation of every member specified in the interface, although additional members may be added:
public class SportsCar : IVehicle

{

    private string _manufacturer;

    private string _model;

    private int _currentXPosition;

    private int _currentYPosition;


    public string manufacturer

    {

        get { return _manufacturer; }

        set {_manufacturer = value; }
    }


    public string model

    {

        get { return _model; }

        set { _model = value; }

    }


    public void Move(int x, int y)

    {

        _currentXPosition += x;

        _currentYPosition += y;

    }

}
Anonymous Types
Anonymous types in C# provide a way to quickly create objects which encapsulate a set of read-only properties without the need to write an explicit class definition. The compiler automatically generates a class which contains only the properties you define in the initializer. As the type of object is not pre-defined, anonymous types must be declared using the var keyword:
var motorcycle = new { Manufacturer = "Honda", Year = 2010, Mileage = 1569.3d };
Generics
We have already looked at generic collections earlier in the chapter, which is by far their most common use, but generics can also be applied to methods and types. This is useful when we want to declare a class but defer the specification of the type until runtime, when the class or method is instantiated. We can achieve this by the use of a generic type parameter <T>. Consider the following class definition:
public class GenericClass<T>

{

    public T GenericField;

}
Use of the generic type parameter T allows us to specify the exact type at runtime. The following two lines of code are equally valid and declare and instantiate objects based on the same generic class:
var generic1 = new GenericClass<string>();

var generic2 = new GenericClass<int>();
The chosen type is substituted everywhere that the type parameter appears in the class definition:
generic1.GenericField = "Indiana Jones";

generic2.GenericField = 1024;
OOP Conclusion
Well, that concludes our whistle-stop tour of Object Oriented Programming in C#. Please remember that this is only a very brief introduction and was designed only to help you understand the code samples in the rest of the book. I would highly recommend further reading on the subject of OOP as it forms the basis for everything in C#.
Dynamics
The C# dynamic type allows the developer to bypass compile-time type checking, instead passing the responsibility of type resolution to the Dynamic Language Runtime (DLR). Dynamics are used extensively within ASP.NET Web Pages, and are at the heart of the standard data access strategy.
A dynamic variable can essentially store any value and will not be checked by the compiler during the build process; the DLR will deal with the resolution of types at runtime. The following code may look a bit strange to anyone used to programming in a strongly-typed, type-safe environment such as C#, but it is valid code and will compile and run successfully:
dynamic myDynamic = "hello";

myDynamic = 2.94e-56d;

myDynamic = DateTime.Today.Year;
This ability to store any type makes them really convenient for use in collections where you don't necessarily want to store the same data type in each index. The following code will demonstrate this further:
var myList = new List<dynamic>();


myList.Add(DateTime.Now);

myList.Add("This is a string");

myList.Add(29.45f);

myList.Add(new Dictionary<string, double>());
Here we have a generic list of dynamics where we are able to store any valid .NET data type. This concept is in widespread use in ASP.NET Web Pages and we will re-visit it several times in later chapters.
ExpandoObject()
The last item I want to touch on with regards dynamics in C# is the very coolly named ExpandoObject() class. ExpandoObject() lives in the System.Dynamic namespace and allows you to create an object that can have its members dynamically added and removed at runtime. The following code creates an ExpandoObject called product and adds four members at runtime:
dynamic product = new System.Dynamic.ExpandoObject();


product.Name = "Widget";

product.Description = "The best widget money can buy!";

product.Price = 2.99m;

product.StockID = 92102;
ExpandoObjects can even contain other ExpandoObjects as members:
using System.Dynamic;


dynamic product = new ExpandoObject();

product.Name = "Widget";

product.Description = "The best widget money can buy!";

product.Price = 2.99m;

product.StockID = 92102;


product.Dimensions = new ExpandoObject();

product.Dimensions.Height = 42;

product.Dimensions.Width = 96;
The same overall effect could be achieved using a generic dictionary inside a generic dictionary, but the code would soon become very ugly and hard to read. ExpandoObject() provides an elegant and efficient solution.
Summary
In this chapter we have had a very quick introduction to the C# programming language. A good understanding of the concepts outlined in this chapter will arm you with enough knowledge to be able to follow all the code in the rest of this book.
Please bear in mind that this chapter has barely scratched the surface of the C# language and the .NET Framework. As you grow in experience with ASP.NET Web Pages, your knowledge and understanding of C# will also grow. An in-depth working knowledge of C# is essential if you are to consider yourself a competent WebMatrix developer