
C H A P T E R 7
![]()
Security and Membership
It is a common requirement in the design of web applications that parts of a web site are available only to certain privileged users. In practice, this is most commonly implemented by having users log into the site to determine their identity; this process is known as authentication.
Once a user's identity has been established, they are then given access to the parts of the site that their user account allows; this is known as membership.
In this chapter, we will see how the WebMatrix WebSecurity helper can be used to implement authentication and membership functions in a web site. We will learn how to restrict areas of a site to individual and groups of authenticated users, how to allow new users to register for an account, and how to allow existing users to login and change and reset passwords.
The membership system stores its data within a set of database tables. We will see how WebMatrix can generate these tables for us in an existing database and how to plug existing user data from another source into the system. We will also see an example of how we can provide pages to carry out user administration and how to store the user information securely in a database.
Setting Up the WebSecurity Helper
In order to use the WebSecurity helper, it must first be initialized in code. To do this, we need to call the WebSecurity.InitializeDatabaseConnection() method, passing in some initialization values. The call to the InitializeDatabaseConnection() method can be made at any time before the first interaction with the helper. In most cases, it is best to do this during the initial startup of the application by placing it within the site's _AppStart.cshtml file.
The InitializeDatabaseConnection() method has a signature containing five parameters and an overload containing six parameters:
public static void InitializeDatabaseConnection(

        string connectionStringName,

        string userTableName,

        string userIdColumn,

        string userNameColumn,

        bool autoCreateTables

)


public static void InitializeDatabaseConnection(

        string connectionStringName,

        string providerName,
        string userTableName,

        string userIdColumn,

        string userNameColumn,

        bool autoCreateTables

)
Table 7-1 explains each of these parameters in detail.
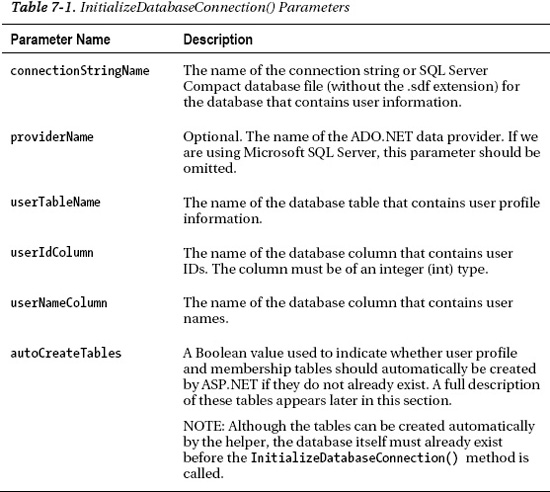
The flexibility of the WebSecurity helper is one of its main features and benefits. The helper can work with either its own proprietary database tables or can be easily configured to integrate with any existing data.
Many companies, for example, will already hold employee information that could be used as the basis for a membership system. By pointing the helper at the existing database, along with the relevant columns for user IDs and user names, duplication of data can be minimized.
![]() Tip ASP.NET provides an
Tip ASP.NET provides an ActiveDirectoryMembershipProvider class that, although well beyond the scope of this chapter, could be used with ASP.NET Web Pages to authenticate users against a Windows Active Directory system. We can find more information about this on the MSDN web site at http://msdn.microsoft.com/en-us/library/system.web.security.activedirectorymembershipprovider.aspx
The WebSecurity helper distinguishes between profile and membership data. The user profile data is the user name and ID, along with whatever other personal information we wish to store about our user (email addresses, contact numbers, date of birth, etc.). Membership data is the security information required by the membership system to authenticate and administer users of this particular system (passwords, last password change dates, application roles, etc.). This split between profile and membership data makes it possible for the helper to work with our present user data—our existing data providing the profile part of the system.
Let's create a new site to demonstrate the WebMatrix membership system. Create a new site using the empty site template and add a blank database called MembershipExample.sdf. Add a file called _AppStart.cshtml to the root of the site and replace the default markup with the following:
@{

  WebSecurity.InitializeDatabaseConnection("MembershipExample",

     "UserProfile", "UserId", "UserName", true);

}
Next, add a C# ASP.NET Web Page called default.cshtml to the root of the site, which will be our home page, and alter the generated markup to look like the following:
<!DOCTYPE html>


<html lang="en">

    <head>

        <meta charset="utf-8" />

        <title>Home Page</title>

    </head>

    <body>

        <h1>Home Page</h1>

        <p>

            Welcome to the Home Page of the Membership Example site.

        </p>

    </body>

</html>
When we run the site for the first time, we will see that the InitializeDatabaseConnection() method call in the _AppStart.cshtml file has created four tables in the MembershipExample.sdf database, as in Figure 7-1.
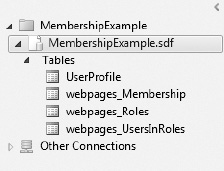
Figure 7-1. The database tables added by the InitializeDatabaseConnection() method
The UserProfile table contains only the two columns specified in the method call: UserID and UserName. We can customize this table to include additional personal information about the user as long as we don't alter the definitions of these two columns.
The webpages_Membership table contains all the detailed membership and security information required by the helper.
The webpages_Roles table is used by the helper to define roles that can be used to create groups of users. This table is used in conjunction with the webpages_UsersInRoles table, which links users to roles. Roles will be discussed in depth later in the chapter.
![]() Caution Changes to the existing schema of the four database tables used by the membership system can have severe consequences, possibly resulting in the complete failure of the membership functionality of our site. The only table that is commonly changed is the UserProfile table, which can have extra columns added to it to store additional user info. This process is described in detail in the section titled “Storing Additional User Information,” later in this chapter.
Caution Changes to the existing schema of the four database tables used by the membership system can have severe consequences, possibly resulting in the complete failure of the membership functionality of our site. The only table that is commonly changed is the UserProfile table, which can have extra columns added to it to store additional user info. This process is described in detail in the section titled “Storing Additional User Information,” later in this chapter.
Now that the membership system has been initialized, we can move on and implement a registration page, which will allow new users to create accounts in our membership database.
Creating a New User Registration Page
On our user registration page, we will provide a form containing a user name textbox and two password textboxes—a standard design for this type of page. When the user submits the form, we will check that an account does not already exist with this user name and that the values of the two password textboxes match. If both these conditions are met, we will log out any current user, create the new account, log the new user in, and display a success message.
Create a new page called register.cshtml in the root of our site and add the following markup, which displays a registration form:
@{

    var username = "";

    var password1 = "";

    var password2 = "";

}

<!DOCTYPE html>


<html lang="en">

    <head>

        <meta charset="utf-8" />

        <title>Register</title>

    </head>

    <body>

        <h1>Register</h1>

        <form action="register" method="post">

            <div>

                @Html.Label("Username: ", "username")<br />

                @Html.TextBox("username", username)

            </div>

            <div>

                @Html.Label("Password: ", "password1")<br />

                @Html.Password("password1", password1)

            </div>

            <div>

                @Html.Label("Confirm Password: ", "password2")<br />

                @Html.Password("password2", password2)

            </div>

            <div>

                 <input type="submit" value="Register" />

            </div>

        </form>

    </body>

</html>
Next, add code to the block at the top of the page to be run on postback. This code will do the following:
- Log out any current user (via the
WebSecurity.Logout()method). - Check that the username submitted in the form does not already exist (via the
WebSecurity.UserExists()method). - Compare the values of the two password textboxes to ensure they match.
Finally, if all the validation has passed, we'll call the WebSecurity.CreateUserAndAccount() method to insert the new account in the database, log the user in, and return them to the default page.
@{

    var username = "";

    var password1 = "";

    var password2 = "";


    if(IsPost)

    {

        WebSecurity.Logout();


        username = Request["username"];

        password1 = Request["password1"];

        password2 = Request["password2"];


        // Validation

        if (username.IsEmpty()) {

            ModelState.AddError("username", "Username is required.");

        }


        if (password1.IsEmpty()) {

            ModelState.AddError("password1", "Password is required.");

        }


        if(WebSecurity.UserExists(username))

        {

            ModelState.AddError("username", "An account with this name already exists.");

        }


        if(password1 != password2)

        {

            ModelState.AddError("password1", "The passwords do not match.");

        }


        // Create Account

        if(ModelState.IsValid)

        {

            WebSecurity.CreateUserAndAccount(username, password1, null, false);

            WebSecurity.Login(username, password1);

            Response.Redirect("default");

        }

    }

}
We make four method calls to the WebSecurity helper in this piece of code: Logout(), UserExists(), CreateUserAndAccount(), and Login().
The Logout() method accepts no parameters and simply logs out any current user. No error message will be shown if we call the Logout() method when there are no logged in users, so there is no need to check for this before calling it.
The UserExists() method queries the profile and membership database to see if a record can be found that has a username matching the passed in parameter. If a matching record is found, the method returns true, otherwise it returns false.
Once we are sure that the account does not already exist, we pass the CreateUserAndAccount() method the username and password of the account to be created and then call the Login() method, again passing in the username and password.
![]() Tip The
Tip The CreateUserAndAccount() method can also be used to store additional information about the user. This is explained in the “Storing Additional User Information” section, later in this chapter.
Finally, we will need to add some code and markup to the page to display the results of any validation errors.
<!DOCTYPE html>


<html lang="en">

    <head>

        <meta charset="utf-8" />

        <title>Register</title>

        <style>

            .validation-summary-errors,

            span.field-validation-error { color: #FF0000; }

            input.field-validation-error { border: 1px solid #FF0000;

                                           background-color: #FFCCCC; }

        </style>

    </head>

    <body>

        <h1>Register</h1>

        @Html.ValidationSummary("Unable to create account. Please correct the following:")

        <form action="register" method="post">

            <div>

                @Html.Label("Username: ", "username")<br />

                @Html.TextBox("username", username)

                @Html.ValidationMessage("username")

            </div>

            <div>

                @Html.Label("Password: ", "password1")<br />

                @Html.Password("password1", password1)

                @Html.ValidationMessage("password1")

            </div>

            <div>

                @Html.Label("Confirm Password: ", "password2")<br />

                @Html.Password("password2", password2)

            </div>

            <div>

                 <input type="submit" value="Register" />

            </div>

        </form>

    </body>

</html>
When the register.cshtml page is run, the user will be presented with the form shown here in Figure 7-2:
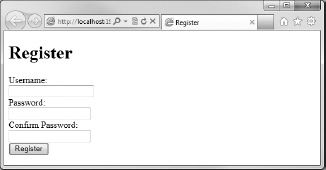
Figure 7-2. The new account registration page
When an account is successfully registered, the user will be directed back to the default page and the rows containing the relevant account information will be inserted into the UserProfile and webpages_Membership tables of our database. Take a look at these tables in the Databases workspace and we will notice that the password is stored in the webpages_Membership table as a secure hash, rather than plain text, as an aid to security.
![]() Note By default, ASP.NET Web Pages passes data between the server and the client browser insecurely using plain text. When sending sensitive data across the internet, it is desirable to do so securely using a Secure Sockets Layer (SSL) certificate and the HTTPS protocol.
Note By default, ASP.NET Web Pages passes data between the server and the client browser insecurely using plain text. When sending sensitive data across the internet, it is desirable to do so securely using a Secure Sockets Layer (SSL) certificate and the HTTPS protocol.
The setup for this is a server configuration process and is beyond the scope of this book. However, we can find more information on secure web communications at http://www.microsoft.com/web/post/securing-web-communications-certificates-ssl-and-https
Adding an Account Summary Helper
Next, we'll create a helper named AccountSummary, which we can use to display login information to the user on the pages in our site. If no user is currently logged in to the site, it will display links to the login and register pages (see Figure 7-3):

Figure 7-3. The content displayed by the AccountSummary helper when no user is logged in
If a user is currently logged into the site, the helper will display the current user name, which will itself be a link to a page allowing the user to change their password, and a link to log out (see Figure 7-4).

Figure 7-4. The content displayed by the AccountSummary helper when a user has already logged in
To create the AccountSummary helper, make an App_Code folder in the root of the site if one does not already exist. Inside the App_Code folder, add a file called MembershipHelpers.cshtml and replace the default markup generated by WebMatrix with the following:
@helper AccountSummary()

{

    <div id="accountSummary">

        @if(WebSecurity.IsAuthenticated) {

            <p>

                Welcome <a href="@Href("~/changePassword")">@WebSecurity.CurrentUserName</a> |

                <a href="@Href("~/logout")">Logout</a>

            </p>

        } else {

            <p>

                <a href="@Href("~/login")">Login</a> |

                <a href="@Href("~/register")">Register</a>

            </p>

        }

    </div>

}
![]() Note The AccountSummary helper is an excellent example of how helpers can be used in ASP.NET Web Pages to dramatically improve readability, quality, and maintenance through code re-use. By encapsulating this functionality in a helper, we can code it once and use it in any page within our site.
Note The AccountSummary helper is an excellent example of how helpers can be used in ASP.NET Web Pages to dramatically improve readability, quality, and maintenance through code re-use. By encapsulating this functionality in a helper, we can code it once and use it in any page within our site.
For more information on the use of helpers within WebMatrix, see the Helpers section in Chapter 4.
The code inside this helper is relatively straightforward. We examine the WebSecurity.IsAuthenticated property to get the authentication status of the current user. If the current user is authenticated, we display the value of the WebSecurity.CurrentUserName property, which contains the username of the authenticated user. We display the username as a link to the changePassword page.
Next to the username, we provide a link to a page that will allow the user to log out of the site; this is an important security feature for users who may be on a shared or public computer.
If the current user is not authenticated, that is, if they are an anonymous user, we display links to the login and register pages.
Currently only the register page exists; we will add the login, logout, and changePassword pages as we progress through the rest of the chapter.
Finally, to display the AccountSummary helper on the home page, we need to add a call to MembershipHelpers.AccountSummary() in default.cshtml:
<body>

    @MembershipHelpers.AccountSummary()

    <h1>Home Page</h1>

    <p>

        Welcome to the Home Page of the Membership Example site.

    </p>

</body>
To test the functionality of the helper, close all instances of our web browser to ensure we are not still logged in, run the default page, and click the Register link. On the register page, enter a new user name and password and submit the form. The register page will then create the user, log us in, and redirect us to the home page. When we return to the home page, we will notice that the AccountSummary helper displays content similar to that shown here in Figure 7-5.
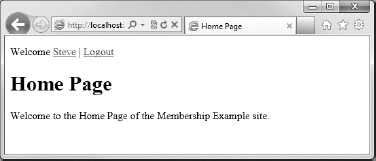
Figure 7-5. The AccountSummary helper displayed on the home page
Providing a Login Page
Once a user has registered with the site, they need to be able to log in on their next visit. We will achieve this by providing them with a login page, which can be accessed via the Login link displayed by the AccountSummary helper for non-authenticated users.
Add a new file to the root of the site, called login.cshtml. When login.cshtml is loaded for the first time, a simple login form will be displayed containing two textboxes, one for the username and another for the password, and a “Remember me on this computer” checkbox.
When the form is submitted, we will carry out some basic validation to ensure that the textboxes are not empty. If the validation is passed, we will attempt to log the user in using the WebSecurity.Login() method. If the user has checked the rememberMe checkbox, the Login() method will set the authentication token in the cookie to be persisted beyond the current session. That way, when they return to the site at a later date, they will be automatically logged in as the authentication token in the cookie will still be valid.
If the Login() method is successful, the user will be redirected to the home page; otherwise, a form error will be added to the ModelStateDictionary and a relevant error message will be shown by the ValidationSummary helper at the top of the page (see Figure 7-6).
Amend the default markup, generated by WebMatrix, in login.cshtml to the following:
@{

    var username = "";

    var password = "";


    if(IsPost)

    {

        username = Request["username"];

        password = Request["password"];

        var rememberMe = Request["rememberMe"].AsBool();


        // Validation

        if (username.IsEmpty()) {

            ModelState.AddError("username", "Username cannot be blank.");

        }


        if (password.IsEmpty()) {

            ModelState.AddError("password", "Password cannot be blank.");

        }


        // Attempt login

        if(ModelState.IsValid)

        {

            if(WebSecurity.Login(username, password, rememberMe))

            {

                Response.Redirect("~/default");

            }

            else

            {

                ModelState.AddFormError("Unable to log in.");

            }

        }

    }

}

<!DOCTYPE html>


<html lang="en">

    <head>

        <meta charset="utf-8" />

        <title>Login</title>

        <style>

            .validation-summary-errors,

            span.field-validation-error { color: #FF0000; }

            input.field-validation-error { border: 1px solid #FF0000;

                                           background-color: #FFCCCC; }

        </style>

    </head>
    <body>

        <h1>Login</h1>

        @Html.ValidationSummary(true)

        <form action="login" method="post">

            <div>

                @Html.Label("Username: ", "username")<br />

                @Html.TextBox("username", username)

                @Html.ValidationMessage("username")

            </div>

            <div>

                @Html.Label("Password: ", "password")<br />

                @Html.Password("password")

                @Html.ValidationMessage("password")

            </div>

            <div>

                @Html.CheckBox("rememberMe", new { value = "true" })

                @Html.Label("Remember me on this computer?", "rememberMe")

            </div>


            <div>

                 <input type="submit" value="Login" />

            </div>

        </form>

    </body>

</html>
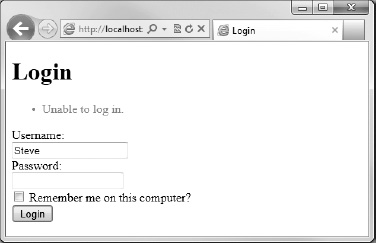
Figure 7-6. The login page showing the failure message
![]() Tip Later in the chapter, we will see how we can use the WebSecurity helper to deal with users who have forgotten their password.
Tip Later in the chapter, we will see how we can use the WebSecurity helper to deal with users who have forgotten their password.
The Logout Page
For users who are accessing the site from a shared or public computer, it is important that we provide the ability to log out of the site when they are finished.
Add a new file called logout.cshtml to the root of the site and replace the generated markup with that shown below:
@{

  WebSecurity.Logout();

}

<!DOCTYPE html>


<html lang="en">

    <head>

        <title>Log Out</title>

    </head>

    <body>

        <h1>Log Out</h1>

        <p>We have been logged out from the site.</p>

        <p><a href="@Href("~/default")">Return to home page</a></p>

    </body>

</html>
This is a very simple page that calls the WebSecurity.Logout() method and displays a message to the user along with a link back to the home page (see Figure 7-7).
To test the page, log in to the site and click the Log Out link in the AccountSummary helper, which will direct we to the Log Out page. When we click the link back to the home page, we will see that we have been logged out.

Figure 7-7. The Log Out page
Changing Passwords
The Change Password page will be accessed via the username hyperlink displayed in the AccountSummary helper. It is an essential security feature of any site that users are able to change their own passwords.
To change the password of an account, we call the WebSecurity.ChangePassword() method. The method requires three parameters—userName, currentPassword, and newPassword— and returns a Boolean value indicating whether the password change operation was successful.
Create a file called changePassword.cshtml in the root folder of our web site. Replace the default generated markup in our page with the following:
@{

    if (!WebSecurity.IsAuthenticated)

    {

        Response.Redirect("default");

    }


    var currentPassword = "";

    var newPassword1 = "";

    var newPassword2 = "";


    if(IsPost)

    {

        currentPassword = Request["currentPassword"];

        newPassword1 = Request["newPassword1"];

        newPassword2 = Request["newPassword2"];


        // Validation

        if (currentPassword.IsEmpty()) {

            ModelState.AddError("currentPassword", "Current Password required.");

        }


        if (newPassword1.IsEmpty()) {

            ModelState.AddError("newPassword1", "Required.");

        }


        if (newPassword2.IsEmpty()) {

            ModelState.AddError("newPassword2", "Required.");

        }


        if(newPassword1 != newPassword2)

        {

            ModelState.AddError("newPassword1", "The passwords do not match.");

        }


        // Attempt password change

        if(ModelState.IsValid)

        {

            var currentUser = WebSecurity.CurrentUserName;
            if(WebSecurity.ChangePassword(currentUser, currentPassword, newPassword1))

            {

                Response.Redirect("~/default");

            }

            else

            {

                ModelState.AddFormError("Unable to change password.");

            }

        }

    }

}

<!DOCTYPE html>


<html lang="en">

    <head>

        <meta charset="utf-8" />

        <title>Change Password</title>

        <style>

            .validation-summary-errors,

            span.field-validation-error { color: #FF0000; }

            input.field-validation-error { border: 1px solid #FF0000;

                                           background-color: #FFCCCC; }

        </style>

    </head>

    <body>

        <h1>Change Password</h1>

        @Html.ValidationSummary(true)

        <form action="changePassword" method="post">

            <div>

                @Html.Label("Current Password: ", "currentPassword")<br />

                @Html.Password("currentPassword")

                @Html.ValidationMessage("currentPassword")

            </div>

            <div>

                @Html.Label("New Password: ", "newPassword1")<br />

                @Html.Password("newPassword1")

                @Html.ValidationMessage("newPassword1")

            </div>

            <div>

                @Html.Label("Confirm New Password: ", "newPassword2")<br />

                @Html.Password("newPassword2")

                @Html.ValidationMessage("newPassword2")

            </div>

            <div>

                 <input type="submit" value="Change Password" />

            </div>

        </form>

    </body>

</html>
Let's quickly describe how this page works.
The first thing that happens when a user lands on the page is a check to see if they are an authenticated user, that is, that they are currently logged in to the site. If they are not, they are immediately redirected to the default page. This is necessary as they may have arrived to the page via a bookmark or other link, but may not actually be currently authenticated; it makes no sense for an anonymous user to use the Change Password page. Calling the ChangePassword() method without a current, authenticated user to operate on displays an error, as we would expect.
If the page is not being displayed as a part of a post back, a form like that shown in Figure 7-8 is displayed in the user's browser. To test this page, we will first need to log in to the site, so run the default page, log in from there, and click on the user name hyperlink in the AccountSummary helper.

Figure 7-8. The Change Password form
When the form is submitted, we carry out some simple validation to ensure that all the necessary fields have been completed and that the two New Password fields have matching values.
Next, if the form data is valid, we get the current user name by accessing the WebSecurity.CurrentUserName property. Finally, call the WebSecurity.ChangePassword() method, passing in the required parameters.
If the password change operation is successful, the user is redirected to the default page. If the operation fails, a message is added to the form's ModelStateDictionary and the form is re-displayed.
And that is it. The basic membership functionality is complete. In the rest of the chapter, we will learn some of the other features of the ASP.NET Web Pages membership system and see how they can be integrated into our Membership Example site.
Protecting Content
As well as providing a means to register, authenticate, and administer individual user accounts, the WebMatrix membership system also provides ways to restrict access to areas of the site. In this section, we will see the various ways of achieving this at different levels, both for individual authenticated users and groups.
Restricting to Authenticated Users
The most basic form of content protection is achieved by restricting pages and folders to allow access only to authenticated users. By protecting content in this way, we are not concerned with which account a user is logged in with, only that they are logged in at all.
Page Level Access Restriction
We have already seen an example of page level access restriction in the Changing Passwords section. In the code block at the top of the page are the following lines of code:
if (!WebSecurity.IsAuthenticated)

{

    Response.Redirect("default");

}
This code simply interrogates the IsAuthenticated property of the WebSecurity class and redirects the user to the default page if it contains the value false. This is all the code that is necessary to restrict an individual page to only authenticated users.
Folder Level Access Restriction
By planning our site carefully, we can place all the pages we wish to restrict to only authenticated users within a specific folder or set of folders. We can then control access to that folder as a whole.
To see an example of how this works, create a new folder in the root of our site called Members. The name of this folder is not special in any way; the same technique can be applied to a folder of any name, at any level within the site structure. In the Members folder, create two new Razor files: _PageStart.cshtml and MembersPage.cshtml. The _PageStart.cshtml file is a special file that is executed when any page within that folder is requested. By placing the authentication check within the _PageStart.cshtml file, we can control access to the whole folder.
Figure 7-9 shows how the file and folder structure should now look.
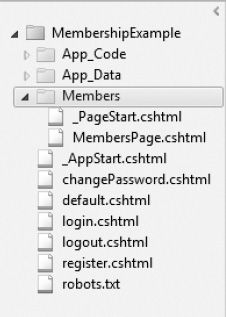
Figure 7-9. Any page in wer Members folder will be protected by the code in the _PageStart file.
In _PageStart.cshtml, replace the default markup with the following code:
@{

    if (!WebSecurity.IsAuthenticated)

    {

        Response.Redirect("~/default");

    }

}
Whenever a page is accessed within the Members folder, this code is executed first. The code uses the ASP.NET tilde (~) symbol to access the root folder of the site.
To prove this works, replace the existing markup in the MembersPage.cshtml file we just created with the following:
<!DOCTYPE html>


<html lang="en">

    <head>

        <meta charset="utf-8" />

        <title> Members Only</title>

    </head>

    <body>

        <h1>Members Only Page</h1>

    </body>

</html>
Notice that we do not need any authentication code within this page, as it is all handled for we by _PageStart.cshtml.
Run the site and browse to Members/MembersPage.cshtml without logging in. We will be redirected back to the home page. Now log in and browse again to Members/MembersPage.cshtml and we will see the page as expected. Any new page added to the Members folder will automatically be restricted to allow only authenticated users by _PageStart.
Providing a Better User Experience
When an anonymous user lands on one of our protected pages, they are redirected immediately to the home page by means of the code we have placed into _PageStart.cshtml. This is functional and certainly restricts our pages to only authenticated users, but it does leave some room for improvement with regard to the user experience.
The very best possible scenario for an unauthenticated user who tries to access a restricted page is that they land on the site at the home page, navigate through to the restricted page, and are returned back to the home page where they can click the Login link. Once they have logged in, they will be redirected again to the home page from where they can navigate their way back to the page they were originally trying to access. And that is the best scenario!
I'm sure we will agree that this provides a less than ideal experience for the user. However, the scenario gets even worse if the user browses directly to the protected page, possibly via a browser bookmark or by clicking through a hyperlink in an email. In this situation, it is quite possible that the user doesn't even know how to navigate their way to the page they wished to see in the first place.
Fortunately, this is relatively simple to fix. By making some slight alterations to the existing code in _PageStart.cshtml and login.cshtml, we can send an unauthenticated user directly to the login page and have the login page redirect them back to the page they were originally trying to visit after they have successfully logged in.
This solution will provide a vastly improved experience for the user. It is this kind of attention to detail in the user experience that is the mark of a quality web site—one that has been well designed and implemented.
Change the code in _PageStart.cshtml to the following:
@{

    if (!WebSecurity.IsAuthenticated)

    {

        string currentUrl = Request.Url.ToString();

        Response.Redirect("~/login?sender=" + currentUrl);

    }

}
This code now sends unauthenticated users directly to the login page. By interrogating the Url property of the Request object, we can get the full URL of the page the user was originally trying to visit. When we perform the redirect, we send the URL in the QueryString with a key of sender. The URL that we will redirect to will look something like the following:
http://localhost:1956/login?sender=http://localhost:1956/Members/MembersPage
Next, we need to make the necessary amendments to login.cshtml to redirect the user back to their initial page upon successful login. The changes necessary to the code block at the top of the page are highlighted here:
@{

    var username = "";

    var password = "";


    if(IsPost)

    {

        username = Request["username"];

        password = Request["password"];

        var rememberMe = Request["rememberMe"].AsBool();


        // Validation

        if (username.IsEmpty()) {

            ModelState.AddError("username", "Username cannot be blank.");

        }


        if (password.IsEmpty()) {

            ModelState.AddError("password", "Password cannot be blank.");

        }


        // Attempt login

        if(ModelState.IsValid)

        {

            if(WebSecurity.Login(username, password, rememberMe))

            {

                if (Request.QueryString["sender"] != null)

                {

                    Response.Redirect(Request.QueryString["sender"]);

                }

                else

                {

                    Response.Redirect("~/default");

                }

            }

            else

            {

                ModelState.AddFormError("Unable to log in.");

            }

        }

    }

}
The amended part of this code is quite straightforward and simply checks to see if a value has been passed in the QueryString with a key of sender. If it has, the user is redirected to the value passed; if not, they are redirected back to the home page.
To make this work, we need to make one final alteration to the <form> tag in login.cshtml. This alteration will pass the whole QueryString back to the page on post back, allowing us to gain access to the sender URL in the post request handler:
<form action="login[email protected]" method="post">
Now we have a much more satisfactory login system that presents a greatly improved experience to our users.
Roles
Roles are a convenient way to create groups of related users. They are the next step in granular control over access to pages and features. Whereas the examples seen up to now in this section have simply been about authenticated or anonymous users, roles allow for further break down of authenticated users into distinct groups.
For example, we may have areas of our site that are open to all users (authenticated and anonymous), areas that are open to just authenticated users, and other areas that should only be accessible by site administrators. This is where roles come in. We could create a role called “Admins” and assign that role only to the site administrators' membership accounts. Once we have done this, it is simply a matter of restricting the relevant areas of the site to only allow access to the members of the “Admins” role.
Roles and role members are stored in the webpages_Roles and webpages_UsersInRoles tables of the membership database, respectively. The schema for the database is extremely straightforward. Roles are defined in the webpages_Roles table, which contains two columns: RoleId and RoleName. Roles can be named using any valid string, but must be unique within the webpages_Roles table. The webpages_UsersInRoles table links users to roles through the use of two columns: UserId and RoleId. Each row within this table associates one user with one role. If a user has many roles, there will be a separate row for each role mapping.
Obviously, we could use the tools within the WebMatrix IDE to administer the roles and their membership by adding, deleting, and creating rows directly in the database tables. However, a much better solution is to provide this functionality within our site, so in the next four sections, we will create pages designed to carry out role administration.
The role administration section of our site will consist of two main pages. The first will list all the current roles and give the ability to add new ones. By clicking on a role name within this page the user will be taken to the second main page, which will list all users currently associated to that role and provide ways to add new users to the role and remove existing from it. We will also require two secondary pages to delete users and roles.
Listing and Adding Roles
As mentioned previously, our site will contain a page that lists all the roles in our membership database and give users the ability to add new roles. The ASP.NET Web Pages membership system provides role management functionality through the Roles class.
We'll keep all of our role administration pages in a separate folder called “Admin,” which we should create in the root of the site. Within the Admin folder, create a new page called roles.cshtml and populate it with the following code:
@{

    if(IsPost)

    {

        var newRole = Request["roleName"];


        // Add new role

        if(!newRole.IsEmpty()) && (!Roles.RoleExists(newRole))

        {

            Roles.CreateRole(newRole);

        }

    }


    var currentRoles = Roles.GetAllRoles();

}

<!DOCTYPE html>


<html lang="en">

    <head>

        <meta charset="utf-8" />

        <title>Roles</title>

    </head>

    <body>

        <h1>Roles</h1>

        <div>

            <h2>Current Roles</h2>

            @if(currentRoles.Length > 0)

            {

                @* List all current roles *@

                <ul>

                    @foreach(var role in currentRoles)

                    {

                        <li><a href="roleDetails?roleName=@role">@role</a></li>

                    }

                </ul>

            }

            else

            {

                <p>No roles currently defined.</p>

            }

        </div>

        <div>

            @* Form to add new roles to the membership database *@

            <h2>Add New Role</h2>

            <form action="roles" method="post">

                @Html.Label("Role Name: ", "roleName")

                @Html.TextBox("roleName")

                <input type="submit" value="Add Role" name="addRole" />

            </form>

        </div>

    </body>

</html>
On the initial load this page gets a list of all the currently defined roles, using the Roles.GetAllRoles() method, and assigns it to a variable. The Roles.GetAllRoles() method returns an array of strings, with each element of the array holding a role name.
var currentRoles = Roles.GetAllRoles();
If the array is not empty, that is, there is one or more current role, we use a foreach loop to iterate across the array and display each name in a bulleted list on the web page, with a hyperlink to the roleDetails page, which we will create later. The hyperlink also passes the name of the role in a QueryString key called roleName. If the array is empty, we simply display a message to the user to say there are no roles to display.
@if(currentRoles.Length > 0)

{

    @* List all current roles *@

    <ul>

        @foreach(var role in currentRoles)

        {

            <li><a href="roleDetails?roleName=@role">@role</a></li>

        }

    </ul>

}

else

{

    <p>No roles currently defined.</p>

}
At the bottom of the page, underneath the list of current roles, we display a simple form that will allow the user to add a new role. When the user clicks the submit button of this form, the code at the top of the page checks that the textbox is not empty and that the role name entered by the user does not already exist. If both these checks are passed, the role is added to the database by passing the new role name into the Roles.CreateRole() method.
if(IsPost)

{

    var newRole = Request["roleName"];


    // Add new role

    if((!newRole.IsEmpty()) && (!Roles.RoleExists(newRole)))

    {

        Roles.CreateRole(newRole);

    }

}
An example of the page displayed to the user can be seen here in Figure 7-10:
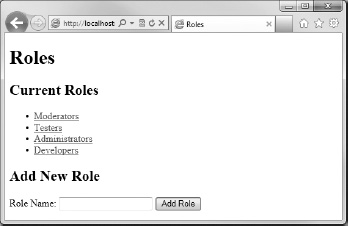
Figure 7-10. The role administration page, showing additional roles created through the Add New Role form
Listing Role Members and Adding Users to Roles
When the user clicks on a role in roles.cshtml, they will be directed to a page that lists all the users currently assigned to that role. It will also be here that existing users can be assigned to the role.
Create a new file in the Admin folder called roleDetails.cshtml. Add the following code and markup to the page:
@{

    var roleName = Request["roleName"];


    if(IsPost)

    {

        // Assign user to role

        var userName = Request["newUser"];


        if (!Roles.IsUserInRole(userName, roleName))

        {

            Roles.AddUsersToRoles(

                new [] { userName }.ToArray(),

                new [] { roleName }.ToArray()

            );

        }

    }


    // Get all current role members

    var usersInRole = Roles.GetUsersInRole(roleName);


    // Get all users from database and create a list of SelectListItems

    var db = Database.Open("MembershipExample");
    var sqlCommand = "SELECT UserName FROM UserProfile ORDER BY UserName";


    List<SelectListItem> allUsers = new List<SelectListItem>();

    foreach(var item in db.Query(sqlCommand))

    {

        allUsers.Add(new SelectListItem { Text = item.UserName });

    }

}


<!DOCTYPE html>


<html lang="en">

    <head>

        <meta charset="utf-8" />

        <title>Role Details</title>

    </head>

    <body>

        <h1>Role Details - @roleName</h1>

        <div>

            @if(usersInRole.Length > 0)

            {

                @* List all current role members *@

                <ul>

                    @foreach(var user in usersInRole)

                    {

                        <li>@user

                            <a href="removeUserFromRole?roleName=@roleName&userName=@user">

                                [Remove]

                            </a>

                        </li>

                    }

                </ul>

            }

            else

            {

                <p>No users currently attached to this role.</p>

                <p><a href="deleteRole?roleName=@roleName">Delete this role</a></p>

            }

        </div>

        <div>

        @* Form to assign users to the current role *@

            <h2>Add User</h2>

            <form action="roleDetails" method="post">

                @Html.Hidden("roleName", roleName)

                @Html.Label("User: ", "newUser")

                @Html.DropDownList("newUser", allUsers)

                <input type="submit" value="Add User" name="addUser" />

            </form>

        </div>

    </body>

</html>
Let's go through the code to fully understand exactly what is happening.
When the page is requested, we get the name of the relevant role by accessing the roleName key in the Request object, which has been passed through in the URL.
var roleName = Request["roleName"];
Let's skip over the if(IsPost) post request handler code for now, we'll come back to that later. Once we have the role name, we are then able to call the GetUsersInRole() method, which returns an array of strings containing the usernames of all the members of the role passed into the method as a parameter.
// Get all current role members

var usersInRole = Roles.GetUsersInRole(roleName);
The last section of the code block at the top of the page queries the UserProfile table of the database to return a list of all users, the result of which we use to create a collection of SelectListItems to be used with a drop down list.
// Get all users from database and create a list of SelectListItems

var db = Database.Open("MembershipExample");

var sqlCommand = "SELECT UserName FROM UserProfile ORDER BY UserName";


List<SelectListItem> allUsers = new List<SelectListItem>();

foreach(var item in db.Query(sqlCommand))

{

    allUsers.Add(new SelectListItem { Text = item.UserName });

}
In the page itself we check to see if there are currently any users assigned to this role, by checking the length of the array returned by the Roles.GetUsersInRoles() method call. If there are one or more members, we iterate over the array using a foreach loop and output their names in a bulleted list. The user name in each list item is presented as a hyperlink used to facilitate the removal of users from the role. The “Remove” hyperlink directs the browser to removeUserFromRole.cshtml, which we will create later, and passes the role name and user name in the URL as a QueryString.
@if(usersInRole.Length > 0)

{

    @* List all current role members *@

    <ul>

        @foreach(var user in usersInRole)

        {

            <li>@user

                <a href="removeUserFromRole?roleName=@roleName&userName=@user">

                    [Remove]

                </a>

            </li>

        }

    </ul>

}
If there are currently no users assigned to the role, we present a message to that effect, along with a link to delete the role; a role can only be deleted when there are no related records in the webpages_UsersInRoles table, that is, the role has no members. The “Delete this role” hyperlink points to deleteRole.cshtml, which we have yet to create, passing the role name in URL.
else

{

    <p>No users currently attached to this role.</p>

    <p><a href="deleteRole?roleName=@roleName">Delete this role</a></p>

}
Finally, we display a form to the user that allows them to add a user to the role. In this form, we display a drop down list, populated using the collection of SelectListItems we created earlier from the membership database, and a button to submit the form. The form also includes a hidden field containing the role name that was earlier extracted from the URL to be passed through to the post request handler.
<form action="roleDetails" method="post">

    @Html.Hidden("roleName", roleName)

    @Html.Label("User: ", "newUser")

    @Html.DropDownList("newUser", allUsers)

    <input type="submit" value="Add User" name="addUser" />

</form>
To test this page, log in as an Admin user, click the “Roles Administration” link in the AccountSummary helper, and select a role with at least one associated user. The final page presented to the user looks like this (see Figure 7-11):
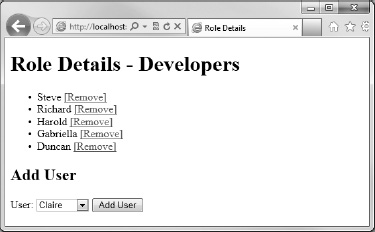
Figure 7-11. The role details page
When the “Add User” button is clicked, the post request handler checks that the user we are trying to add isn't already assigned to the role, using the Roles.IsUserInRole() method. It then uses the Roles.AddUsersToRoles() method to assign the user to the role. As the method accepts string arrays as parameters, we use the String.ToArray() method to convert our form values.
var roleName = Request["roleName"];


if(IsPost)

{

    // Assign user to role

    var userName = Request["newUser"];


    if (!Roles.IsUserInRole(userName, roleName))

    {

        Roles.AddUsersToRoles(

            new [] { userName }.ToArray(),

            new [] { roleName }.ToArray()

        );

    }

}
The final two pages in our roles administration system are concerned with the deletion of roles and role members.
Removing Users from Roles
We “Role Details” page lists all the current members of a particular role and provides the user with a “Remove” hyperlink. The hyperlink passes the name of the role and the name of the user to removeUserFromRole.cshtml, which we will create now.
The code for removeUserFromRole.cshtml is as follows:
@{

    var userName = Request["userName"];

    var roleName = Request["roleName"];


    if(IsPost)

    {

        // Remove user from role

        if (Roles.IsUserInRole(userName, roleName))

        {

            Roles.RemoveUsersFromRoles(

                new [] { userName }.ToArray(),

                new [] { roleName }.ToArray()

            );

        }


        Response.Redirect("roleDetails?roleName=" + roleName);

    }

}

<!DOCTYPE html>


<html lang="en">

    <head>
        <meta charset="utf-8" />

        <title>Remove User From Role</title>

    </head>

    <body>

        <h1>Remove User from Role</h1>

        <p>Are we sure we wish to remove user @userName from the @roleName role?</p>

        <p>

            <form action="" method="post">

                @Html.Hidden("roleName", roleName)

                @Html.Hidden("userName", userName)

                <input type="button"

                    onclick="window.location.href='roleDetails.cshtml?roleName=@roleName';"

                    value="Cancel" />

                <input type="submit" value="Remove" />

            </form>

        </p>

    </body>

</html>
When this page is first requested, we display a confirmation message to the user. This helps to ensure that the right user is going to be removed from the role and also enables we to perform the remove operation on a POST request, rather than a GET (i.e., when the user clicks the submit button on the page).
Along with a button to confirm the removal, the form also contains a simple HTML “Cancel” button with a JavaScript onclick event to send the user back to the Role Details page without submitting the form. Two HTML hidden input controls are used to pass the role name and user name from the initial URL to the POST request handler.
An example of the Remove User from Role page is seen here in Figure 7-12:
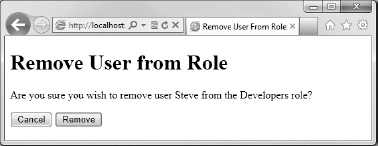
Figure 7-12. The Remove User from Role confirmation page
When the form is submitted, we get the user name and role name from the hidden fields, check that the user is in the role, and if so, remove them. To remove the user from the role, we use the Roles.RemoveUsersFromRoles() method, passing in the user name and role name. As with the AddUsersToRoles() method seen earlier, the RemoveUsersFromRoles() method accepts string arrays as parameters, so we use the String.ToArray() method to convert the form values to an array.
Once the user has been removed from the role, the browser is redirected to the Role Details page, passing the role name in the QueryString.
Deleting Roles
Lastly, we will implement the “Delete Role” page. The page is relatively simple and works in a similar way to the “Remove Users from Roles” page. The page is accessed via a hyperlink on the “Role Details” page.
Add a new file to the Admin folder called deleteRole.cshtml and replace the default markup with the following:
@{

    var roleName = Request["roleName"];


    if(IsPost)

    {

        // Delete role

        if(Roles.GetUsersInRole(roleName).Length == 0 && !roleName.IsEmpty())

        {

            Roles.DeleteRole(roleName, true);

        }


        Response.Redirect("roles");

    }

}

<!DOCTYPE html>


<html lang="en">

    <head>

        <meta charset="utf-8" />

        <title>Delete Role</title>

    </head>

    <body>

        <h1>Delete Role</h1>

        <p>Are we sure we wish to delete the @roleName role?</p>

        <p>

            <form action="" method="post">

                @Html.Hidden("roleName", roleName)

                <input type="button"

                    onclick="window.location.href='roleDetails.cshtml?roleName=@roleName';"

                    value="Cancel" />

                <input type="submit" value="Delete" />

            </form>

        </p>

    </body>

</html>
Again, when the user first requests the page, a confirmation message is presented. A form at the bottom of the page contains a submit button, a cancel button, and an HTML hidden field containing the role name, retrieved from the URL QueryString.
Figure 7-13 shows an example of the Delete Role page.
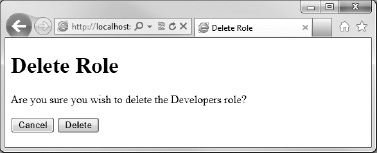
Figure 7-13. The Delete Role confirmation page
When the Delete submit button is clicked, the POST request handler checks that the role name is not empty and has no assigned members. This step is important as a role cannot be deleted when it has related users in the webpages_UsersInRoles table. Due to the nature of web applications, it is possible that another user (in another browser) has added a user to the role in the time between us requesting the Role Details page and clicking the Delete submit button on the Delete Role page. In this circumstance, we would not want to call the Roles.DeleteRole() method.
If the role has no member users, it is deleted using the Roles.DeleteRole() method and the browser is redirected to the Roles page.
Restricting Access Using Roles
Now that the role administration pages are complete, we can use them to create a role, assign users to it, and restrict pages within our site to allow access only to members of that role.
If we do not already have a role called “Administrators,” create one using the Roles page or by adding it directly to the webpages_Roles table; be sure to add a user to the role. To create a role using the Roles page, open Admin/Roles.cshtml in the browser and use the UI to add a role named “Administrators.” The page will display the new role, which we should then click on to go to the RoleDetails page. This will allow us to add users to that role.
We will restrict the access of pages within the Admin folder to users in this role. To do this, add a _PageStart.cshtml file to the Admin folder with the following code:
@{

    if (!Roles.IsUserInRole(WebSecurity.CurrentUserName, "Administrators"))

    {

        string currentUrl = Request.Url.ToString();

        Response.Redirect("~/login?sender=" + currentUrl);

    }

}
This code is run immediately before the execution of any page requested within the Admin folder. The code uses the Roles.IsUserInRole() method to check that the current user is in the “Administrators” role. We get the name of the current user to pass to the Roles.IsUserInRole() method via a call to WebSecurity.CurrentUserName(), which returns a string containing the user name of the currently authenticated user. If the current user is not in the “Administrators” role, they are redirected to the login page in the root folder. The URL of the requested page is appended to the URL in the QueryString, as discussed in the “Providing a Better User Experience” section.
Updating the AccountSummary Helper
Although the site administrators could browse directly to the Roles page by typing the URL into the address bar of their web browser, it would be much better if we could provide them with a link. The ideal place to do this is the AccountSummary helper, which already displays account information specific to the authenticated user. We will modify the AccountSummary helper to use the Roles.IsUserInRole() method to display a link to the Roles for authenticated users who are members of the “Administrators” role.
Open the MembershipHelpers.cshtml file in the App_Code folder and amend the AccountSummary helper to look like the following:
@helper AccountSummary()

{

    <div id="accountSummary">

        @if(WebSecurity.IsAuthenticated) {

            <p>

                Welcome <a href="@Href("~/changePassword")">@WebSecurity.CurrentUserName</a> |

                <a href="@Href("~/logout")">Logout</a>

                @if (Roles.IsUserInRole(WebSecurity.CurrentUserName, "Administrators"))

                {

                    <text>

                         | <a href="@Href("~/Admin/roles")">Roles Administration</a>

                    </text>

                }

            </p>

        } else {

            <p>

                <a href="@Href("~/login")">Login</a> |

                <a href="@Href("~/register")">Register</a>

            </p>

        }

    </div>

}
Now when a member of the Administrators role logs into the site, they will receive a link to the Role Administration page in the AccountSummary helper (see Figure 7-14):
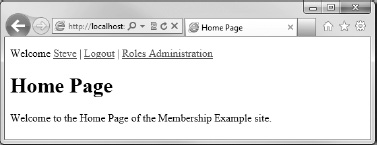
Figure 7-14. The amended AccountSummary helper showing the Roles Administration hyperlink
Advanced Membership Features
The final part of this chapter will investigate some of the more advanced features of the ASP.NET Web Pages membership system, looking at the following:
- How to use the
WebSecurityhelper to store additional information about the user gathered at registration. - Implementing a more advanced registration system where an email is sent to the user, requiring confirmation before an account is activated.
- Adding a password reset feature for registered users who have forgotten their passwords.
Storing Additional User Information
When creating a new user account, it is often desirable to store more information than simply a user name and password. Fortunately, the WebSecurity helper makes this easy with an optional parameter in the CreateUserAndAccount() method.
To demonstrate this, we will amend our registration page and database to gather and store a user's email address. First, we will need to add an additional field to the registration form in register.cshtml:
<form action="register" method="post">

    <div>

        @Html.Label("Username: ", "username")<br />

        @Html.TextBox("username", username)

        @Html.ValidationMessage("username")

    </div>

    <div>

        @Html.Label("Email Address: ", "email")<br />

        @Html.TextBox("email", email)

        @Html.ValidationMessage("email")

    </div>

    <div>

        @Html.Label("Password: ", "password1")<br />

        @Html.Password("password1", password1)

        @Html.ValidationMessage("password1")

    </div>

    <div>

        @Html.Label("Confirm Password: ", "password2")<br />

        @Html.Password("password2", password2)

    </div>

    <div>

         <input type="submit" value="Register" />

    </div>

</form>
Next, open the Databases workspace in the WebMatrix IDE, select the UserProfile table in the site database, and click the “Definition” button in the Ribbon Control at the top of the screen. Now click the “New Column” button in the Ribbon Control and add a column called EmailAddress. This column should be a nullable nvarchar with a length of 100 characters (see Figure 7-15):
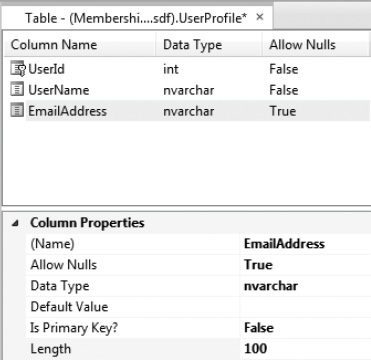
Figure 7-15. Add an emailAddress column to the UserProfile table
Save the amended UserProfile table and navigate back to the register.cshtml page in the Files workspace.
When the user submits the form, we will check that they have entered an email address and then pass the value of the field into the optional propertyValues parameter of the CreateUserAndAccount() method.
![]() Caution This code example checks only that the user has entered a value into the emailAddress field on the form; it does not check that the email address supplied is valid. To see how WebMatrix can be used to validate email addresses, see the “Building a validation library” section of Chapter 5.
Caution This code example checks only that the user has entered a value into the emailAddress field on the form; it does not check that the email address supplied is valid. To see how WebMatrix can be used to validate email addresses, see the “Building a validation library” section of Chapter 5.
Amend the code block at the top of register.cshtml to include the following highlighted changes:
@{

    var username = "";

    var email = "";

    var password1 = "";

    var password2 = "";


    if(IsPost)

    {

        WebSecurity.Logout();
        username = Request["username"];

        email = Request["email"];

        password1 = Request["password1"];

        password2 = Request["password2"];


        // Validation

        if (username.IsEmpty()) {

            ModelState.AddError("username", "Username is required.");

        }


        if (email.IsEmpty()) {

            ModelState.AddError("email", "Email Address is required.");

        }


        if (password1.IsEmpty()) {

            ModelState.AddError("password1", "Password is required.");

        }


        if(WebSecurity.UserExists(username))

        {

            ModelState.AddError("username", "An account with this name already exists.");

        }


        if(password1 != password2)

        {

            ModelState.AddError("password1", "The passwords do not match.");

        }


        // Create Account

        if(ModelState.IsValid)

        {

            WebSecurity.CreateUserAndAccount(userName:username,

                                            Password: password1,

                                            propertyValues: new { emailAddress = email } );

            WebSecurity.Login(username, password1);

            Response.Redirect("default");

        }

    }

}
The propertyValues parameter accepts an object that contains additional user attributes. We simply need to create a new object and assign the value of the email variable to an entity named the same as the database column we created. When the method is called, the WebSecurity helper will attempt to match any entities in the propertyValues object to database columns and store the values held within them.
Confirming Registration by Email
In order to help prevent fraudulent registrations by humans and bots, it is a common practice to send an email to the user containing a link to a registration confirmation page following registration. Only after the user has clicked the link in the email and successfully validated their registration are they able to login to the site.
All the necessary components to accomplish this design are available within ASP.NET Web Pages. To demonstrate this technique, we will further amend our registration page from the last section using the WebSecurity and WebMail helpers.
![]() Tip Another useful method for the prevention of fraudulent form submission is the use of the Re-Captcha helper, which we will learn more about in Chapter 8.
Tip Another useful method for the prevention of fraudulent form submission is the use of the Re-Captcha helper, which we will learn more about in Chapter 8.
The WebMail Helper
The WebMail helper takes some initial setting up, but once complete, provides a very easy way to send emails from within Razor code.
As we would expect, the WebMail helper needs some initial information about our mail server. The best place to provide this information is in the _AppStart.cshtml file, in order to make it available to the whole application.
The specific information we require here can be sought from our web hosting provider or system administrator. For the purposes of development and testing, it is often possible to use a standard web mail service. This code sample shows the _AppStart.cshtml file with WebMail helper settings for use with Google's Gmail service.
@{

    WebSecurity.InitializeDatabaseConnection("MembershipExample",

        "UserProfile", "UserId", "UserName", true);


    WebMail.SmtpServer = "smtp.gmail.com";

    WebMail.SmtpPort = 587;

    WebMail.EnableSsl = true;

    WebMail.UserName = "[email protected]";

    WebMail.From = "[email protected]";

    WebMail.Password = "wer_password_here";

}
Table 7-2 explains these settings in more detail.
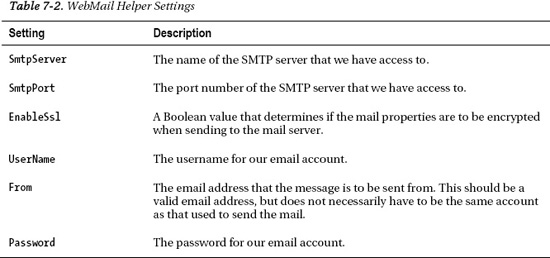
Once the initial setup is complete, sending an email is simply a matter of calling the WebMail.Send() method, passing in the email address to send to, the subject line of the email, and the body text:
WebMail.Send(to: "[email protected]",

             subject: "Subject line goes here”,

             body: “Message text goes here” );
![]() Note For more information on the WebMail helper, visit the MSDN page at http://msdn.microsoft.com/en-us/library/system.web.helpers.webmail.aspx
Note For more information on the WebMail helper, visit the MSDN page at http://msdn.microsoft.com/en-us/library/system.web.helpers.webmail.aspx
Generating and Sending the Confirmation Email
Now that we have initialized the WebMail helper, we need to generate an email to send to the user asking them to confirm their newly created account. We can use the CreateUserAndAccount() method to return a unique token, which we will send in an email to the user as part of a link to a confirmation page. The user must visit the link URL in the email in order to confirm their account.
By setting the requireConfirmationToken parameter of the WebSecurity.CreateUserAndAccount() method to true, we can generate a unique confirmation token that will look something like hYQSzXhwp6Se6mmPJ0KFoQ==. This token is also stored against the user record in the database. The user and account is created, but in an unconfirmed state (i.e., the IsConfirmed column in the webpages_Membership table is set to false) and cannot be used to log in to the site until confirmed.
This example builds on the example in the “Storing Additional User Information” section, presented earlier in this chapter, where we amended the registration page to accept and store a user's email address in addition to the standard username and password. So, open register.cshtml and amend the post request event handler as shown here:
if(ModelState.IsValid)

{

    var token = WebSecurity.CreateUserAndAccount(userName: username,

                    password: password1,

                    propertyValues: new { emailAddress = email },

                    requireConfirmationToken: true);


    // Generate confirmation link URL

    var hostUrl = Request.Url.GetComponents(UriComponents.SchemeAndServer,

                                        UriFormat.Unescaped);

    var confirmAccountUrl = hostUrl +

                    "/confirmAccount?confirmationToken=" +

                    HttpUtility.UrlEncode(token);


    // Send confirmation email

    WebMail.Send(to: email,

        subject: "Thank we for registering - " + username,

        body: "Please visit <a href='" + confirmAccountUrl + "'>" + confirmAccountUrl +

            "</a> to activate wer account."

    );


    Response.Redirect("confirmSent");

}
In this code, we call WebSecurity.CreateUserAndAccount() and set the requireConfirmationParameter to true. We store the resulting confirmation token in a variable called token.
Next, we construct the URL of the link that the user will need to visit to confirm their account. We do this by getting the scheme, host, and port data from the Request object, which will return something like http://localhost:16458 on a local development machine using IIS Express. To that, we then append the name of the confirmation page and a QueryString containing the token. The token is URL encoded to ensure that none of the characters that form the token are misinterpreted as reserved characters in the URL.
// Generate confirmation link URL

var hostUrl = Request.Url.GetComponents(UriComponents.SchemeAndServer,

                                    UriFormat.Unescaped);

var confirmAccountUrl = hostUrl +

                "/confirmAccount?confirmationToken=" +

                HttpUtility.UrlEncode(token);
Finally, we use the WebMail helper to send an email containing a short message and the confirmation URL to the email address supplied in the form and redirect the user to confirmSent.cshtml.
The confirmSent.cshtml file merely contains a message to the user, thanking them for registering and prompting them to check their email account for further instructions. Create confirmSent.cshtml in the root of the site with the following markup:
<!DOCTYPE html>


<html lang="en">

    <head>

        <meta charset="utf-8" />

        <title>Confirmation Sent</title>

    </head>

    <body>

        <h1>Thanks For Registering</h1>

        <p>We have sent an email with instructions on how to activate wer account

        to the email address we supplied.</p>

    </body>

</html>
The Account Confirmation Page
When the user receives their confirmation email, they will be instructed to visit a URL at our site to validate their account; that URL on our site will be confirmAccount.cshtml with the unique confirmation token being passed in the QueryString with a key of confirmationToken.
When confirmAccount.cshtml is requested, we will log out any authenticated users (as there may be a user other than the one we are trying to confirm already logged in), get the confirmation token from the URL, and attempt to confirm the account by passing the token to the WebSecurity.ConfirmAccount() method. The ConfirmAccount() method returns a Boolean value that indicates whether the confirmation was successful. We will use this Boolean value to display a relevant message to the user.
Add a new file to the root of the site, called confirmAccount.cshtml, and replace the default markup with the following:
@{


    bool confirmed = false;

    var confirmationToken = Request["confirmationToken"];


    WebSecurity.Logout();


    // Attempt account confirmation

    if (!confirmationToken.IsEmpty()) {

        if (WebSecurity.ConfirmAccount(confirmationToken)) {

            confirmed = true;

        }

    }

}

<!DOCTYPE html>


<html lang="en">

    <head>

        <meta charset="utf-8" />
        <title>Registration Confirmation</title>

    </head>

    <body>

        <h1>Registration Confirmation</h1>


        @if (confirmed)

        {

            <p>

                Wer registration is confirmed.

                We can now <a href="login">login</a>.

            </p>

        }

        else

        {

            <p>Unable to confirm the registration.</p>

        }

    </body>

</html>
If the confirmation is successful, the user will see the page shown here in Figure 7-16:

Figure 7-16. The Registration Confirmation page
Dealing with Forgotten Passwords
The WebMatrix WebSecurity helper has a built-in scheme for dealing with forgotten passwords. In many ways, it is similar to the email registration confirmation process discussed in the last section. When a user forgets their password, an email will be sent containing a link to a URL with a unique password reset token. When they visit the URL, the code checks the token, and if valid, presents them the opportunity to reset their password.
The whole process requires two pages: one to gather the username, generate the reset token, and send the email and another to verify the token and allow the user to set a new password.
The first page will be called forgotPassword.cshtml, which we should add to the root of the example site. The code and markup for this page is listed below:
@{

    var username = "";

    var message = "";


    if(IsPost)

    {

        username = Request["username"];
        // Validation

        if (username.IsEmpty()) {

            ModelState.AddError("username", "Username is required.");

        }


        // Generate and send password reset email

        if(ModelState.IsValid)

        {

            // Generate confirmation link URL

            var resetToken = WebSecurity.GeneratePasswordResetToken(username);

            var hostUrl = Request.Url.GetComponents(UriComponents.SchemeAndServer,

                                                    UriFormat.Unescaped);

            var passwordResetUrl = hostUrl +

                                "/passwordReset?resetToken=" +

                                HttpUtility.UrlEncode(resetToken);


            // Get email address for user

            var db = Database.Open("MembershipExample");

            var sqlCommand = "SELECT emailAddress FROM UserProfile WHERE UserName = @0";

            var userDetails = db.QuerySingle(sqlCommand, username);


            // Send email

            WebMail.Send(to: userDetails.emailAddress,

                subject: "Password Reset for " + username,

                body: "Please visit <a href='" + passwordResetUrl + "'>" + passwordResetUrl +

                    "</a> to reset wer password."

            );


            message = "An email has been sent to wer registered email address " +

                "with a password reset link.";

        }

    }

}


<!DOCTYPE html>


<html lang="en">

    <head>

        <meta charset="utf-8" />

        <title>Forgot Password</title>

        <style>

            span.field-validation-error { color: #FF0000; }

            input.field-validation-error { border: 1px solid #FF0000;

                                           background-color: #FFCCCC; }

        </style>

    </head>

    <body>

        <h1>Forgotten Password</h1>

        @if (!message.IsEmpty()) {

            <p>@message</p>
        }

        else

        {

            <form action="forgotPassword" method="post">

                <div>

                    @Html.Label("Username: ", "username")<br />

                    @Html.TextBox("username", username)

                    @Html.ValidationMessage("username")

                </div>

                <div>

                    <input type="submit" value="Reset Password" />

                </div>

            </form>

        }

    </body>

</html>
On the initial request, this page displays a very simple form to the user, asking only for their username. When the form is submitted, the post request handler validates the form, and if valid, generates the URL of the password reset page, which is sent as a link in an email to the user. The password reset URL consists of the scheme and server details, the page name (passwordReset.cshtml), and a QueryString containing the unique reset token.
The reset token is a cryptographically secure string, similar to the account confirmation token we saw earlier. We generate the token by calling the WebSecurity.GeneratePasswordResetToken() method, passing in the username as a parameter.
Once we have generated the URL, we query the UserProfile table of the membership database to ascertain the email address registered against the user. We then use the WebMail helper to send an email to the user containing a short message and a link to the password reset page. Finally, we display a message to the user to let them know to look at their email account for further instructions.
When the user receives their password reset email, they will be asked to visit a particular URL to reset their password. In this case, the page they need to visit will be called passwordReset.cshtml, which we should create in the root folder of the site.
Replace the content of passwordReset.cshtml with the following:
@{

    var resetToken = Request["resetToken"];

    var message = "";

    var newPassword1 = "";

    var newPassword2 = "";


    if(IsPost) {

        newPassword1 = Request["newPassword1"];

        newPassword2 = Request["newPassword2"];


        // Validation

        if (newPassword1.IsEmpty()) {

            ModelState.AddError("newPassword1", "Required.");
        }


        if (newPassword2.IsEmpty()) {

            ModelState.AddError("newPassword2", "Required.");

        }


        if(newPassword1 != newPassword2)

        {

            ModelState.AddError("newPassword1", "The passwords do not match.");

        }


        // Attempt password reset

        if(ModelState.IsValid)

        {

            if (WebSecurity.ResetPassword(resetToken, newPassword1))

            {

                message = "Password changed successfully.";

            }

            else

            {

                message = "Unable to change password.";

            }

        }

  }

}


<!DOCTYPE html>


<html lang="en">

    <head>

        <meta charset="utf-8" />

        <title>Reset Password</title>

    </head>

    <body>

        <h1>Reset Password</h1>

        @if (!message.IsEmpty()) {

            <p>@message</p>

        }

        else

        {

            <form action="passwordReset" method="post">

                @Html.Hidden("resetToken", resetToken)

                <div>

                    @Html.Label("New Password: ", "newPassword1")<br />

                    @Html.Password("newPassword1")

                    @Html.ValidationMessage("newPassword1")

                </div>

                <div>

                    @Html.Label("Confirm New Password: ", "newPassword2")<br />

                    @Html.Password("newPassword2")

                    @Html.ValidationMessage("newPassword2")

                </div>

                <div>

                    <input type="submit" value="Reset Password" />

                </div>

            </form>

        }

    </body>

</html>
When the user clicks the link in the email sent to them by forgotPassword.cshtml, they will be taken directly to passwordReset.chtml. This page displays the form seen in Figure 7-17. The password reset token is passed in the URL as a QueryString with the key resetToken.
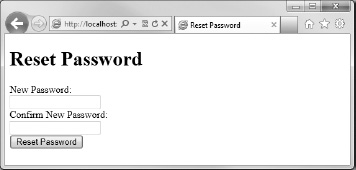
Figure 7-17. The Reset Password form
The user then enters the new password twice to ensure it is entered correctly and submits the form. If the form validation passes, the POST request handler attempts to reset the form by calling the WebSecurity.ResetPassword() method. If the method returns a Boolean value of true, a success message is displayed, otherwise the user receives a failure message.
All that remains is to place a link on the login page to forgotPassword.cshtml. Add the following HTML to a suitable place in login.cshtml (see Figure 7-18):
<div>

    </p><a href="forgotPassword">Forgotten password?</a></p>

</div>
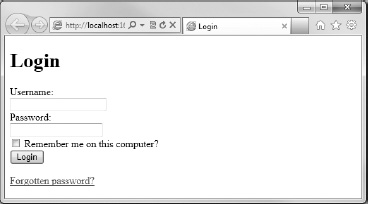
Figure 7-18. The “Forgotten password?” link added to the Login page
Summary
WebMatrix ships with a set of helpers designed to assist the developer in providing a comprehensive security and membership process.
In this chapter, we have learned how to initialize the membership system to work with a SQL Server Compact database and how to take advantage of user information that may already exist in a database. We also saw how to provide functionality for users to register on a site, log in, log out, and change their passwords. We created a helper to display relevant account information in any page with our site and added code to restrict individual pages and entire folders to authenticated users.
Next, we learned how roles could be used to manage groups of users and created pages to aid in their administration. We then saw how roles can be used to restrict access to specific areas of a site.
Finally, we reviewed some of the more advanced features of the ASP.NET Web Pages membership and security system, including storage of additional personal user information, registration validation by email, and dealing with users who have forgotten their password.
In the next chapter, we will get an in-depth look at the WebMatrix Package Manager and how it can be used to implement third-party helpers to integrate social networking and other features into our site.