
6. Smart Contracts
The most important feature of the Ethereum blockchain is its ability to execute software code known as smart contracts. Now, we already have many distributed computing networks. Why do we need a blockchain to act as a distributed computer? The answer is decentralized and trusted autonomous execution. With the Ethereum blockchain, you do not need to trust anyone to correctly execute your code. Instead, a community of network participants (Ethereum miners) will all execute your smart contract code and reach a consensus that the results are correct.
In this chapter, I will first revisit the “Hello, World!” smart contract to illustrate how an Ethereum smart contract works under the hood. I will then provide a high-level overview of the design features of smart contract languages like Solidity to help you get a head start on Solidity programming. I will also cover how to build and deploy smart contracts using the open source framework and tools. While I will continue to cover graphical user interface (GUI) tools, I will focus on command-line power tools that are more suitable for professional developers in this chapter.
“Hello, World!” Again
The idea behind smart contracts is software code that is, once written, guaranteed to get executed correctly. In this section, let’s review a simple smart contract. It works as follows:
Anyone can submit the smart contract code to the Ethereum blockchain. Ethereum miners validate the code, and if most of them agree (i.e., reach consensus), the code will be saved on the blockchain. The smart contract now has an address on the blockchain, as if it is an account.
Anyone can then call any public method on the smart contract at that blockchain address. The blockchain nodes will all execute the code. If most of them agree on the results of the code execution, the changes made by the code will be saved on the blockchain.
In this chapter, I will again use the “Hello, World!” example to further illustrate how smart contracts work and how to interact with them using different tools. The contract is written in the Solidity programming language. The filename is HelloWorld.sol. The most important requirement of a smart contract is that it must produce the same result when executed on different node computers. That means it cannot contain any random functions or even floating-point math as floating-point numbers are represented differently on different computer architectures. The Solidity language is designed to be completely unambiguous in the programs it expresses.
pragma solidity ^0.4.17;
contract HelloWorld  {

    string helloMessage;
    address public owner;

    function HelloWorld () public {
        helloMessage = "Hello, World!";
        owner = msg.sender;
    }

    function updateMessage (string _new_msg) public {
        helloMessage = _new_msg;
    }

    function sayHello () public view returns (string) {
        return helloMessage;
    }

    function kill() public {
        if (msg.sender == owner) selfdestruct(owner);
    }
}
The “Hello, World!” smart contract has two key functions.
The
sayHello()function returns a greeting to its caller. The greeting is initially set to “Hello, World!” when the smart contract is deployed. It is a view method indicating that it does not change the state of the smart contract and hence can be executed locally on any Ethereum node without gas fees.The
updateMessage()function allows the method caller to change the greeting from “Hello, World!” to another message.
The “Hello, World!” smart contract maintains an internal state (helloMessage) that can be modified by the public function updateMessage(). The key feature of blockchain technology is that each function call is executed by all nodes on the network, and any change to the helloMessage state must be agreed upon by at least the majority of validators or miners on the network before it can be recorded on the blockchain. In turn, every change of the helloMessage state is recorded in the blockchain. Any interested party can review the blocks and find out all recorded change histories for helloMessage. That level of transparency ensures that the smart contract cannot be tampered with.
It is important to note that the sayHello() function can be executed on any Ethereum node the caller has access to. It looks up information from the blockchain and does not change the blockchain state. It affects no other nodes in the network. Hence, the Ethereum blockchain does not require a gas fee for view function calls like sayHello().
On the other hand, the updateMessage() function causes state changes across all nodes in the Ethereum network. It can take effect only when nodes on the blockchain all execute it and reach consensus on the results. Hence, the updateMessage() function call requires a gas fee. The results of the updateMessage() function call also takes a rather long time (up to ten minutes on Ethereum) to take effect since the blocks containing the results need to be confirmed and added to the blockchain by miner nodes.
Learning Smart Contract Programming
This book does not intend to be a Solidity tutorial. Solidity is a JavaScript-like language. It is also unique and different from JavaScript in many important ways. Details of the Solidity syntax are ever-evolving and outside the scope of this book. I encourage you to learn the Solidity language from its official documentation at https://solidity.readthedocs.io/.
However, it is important to understand the high-level design features of Solidity as they are generally applicable to all smart contract languages. Understanding the design will give you a head start on learning Solidity as its quirkiness will now make sense.
Consensus vs. Nonconsensus Code
As you have seen from the “Hello, World!” smart contract’s sayHello() and updateMessage() functions, there are clearly two types of code in a smart contract.
One type of code, like the
updateMessage()function, requires consensus. These functions must be precise and produce deterministic behaviors (i.e., no random numbers or floating-point numbers) since all nodes must produce the same results. They are also slow, require long confirmation time, and are expensive to execute both in terms of computing resources (all nodes must run them) and in gas fees.The other type of code, like the
sayHello()function, does not require consensus. These functions can be executed by a local node and hence do not require gas. It is not a problem even if different nodes return different results from the same function (i.e., precision loss for floating-point numbers).
In Solidity variables have the reference types memory and storage to indicate whether the values should be saved on the blockchain. Functions that do not modify the blockchain state (nonconsensus) should be labeled as view functions. Functions that do not even read the blockchain state (purely computational) should be labeled as pure functions.
It is clear that the virtual machine can provide many more functionalities and performance optimizations for nonconsensus code. However, the current design of the Solidity language is dominated by the need of consensus code. As a result, it lacks many basic features that could be easily provided for the nonconsensus part of the system, such as a string library, JSON parser, complex data structure support, and so on.
I view this as a flaw of Solidity. In the future Ethereum 2.0, the WebAssembly-based new virtual machines (including the Second State Virtual Machine) could solve this problem by supporting multiple commonly used programming languages for nonconsensus code. That would make the blockchain truly a computing platform rather than just a decentralized state machine.
Data Structures
Besides the primitive types, such as int, uint, and address, the Solidity language supports the array data type. In fact, the string data type is internally implemented as an array. However, the array type is also difficult to work with. For example, the computational cost for iterating over an array depends on the size of the array. It could be expensive and is difficult to estimate before the function execution. That is why Solidity supports only limited string operations out of the box.
For structured data, I recommend using the struct data type to group multiple related data fields. For collections, I recommend using the mapping data type to build key/value stores. The mapping structure has the advantage of fixed computational cost for adding, removing, or looking up elements from the collection.
Function Parameters and Return Values
While struct and mapping are widely used inside smart contracts, you can pass only primitive types into and out of contract functions. The contract function’s input and return values are both tuples of limited length. Ethereum extension (as well as EVM 2.0) projects are working on different ways to relax such constraints, especially for nonconsensus view functions.
For now, to pass complex data objects to a function, you could encode the data into a string format (e.g., a CSV) and then parse the string inside the contract. However, because of the lack of high-performance string libraries in Solidity, this is also difficult and gas expensive.
Payable Functions
One of the unique features of a smart contract language is functions that can receive payments. In Solidity, you can label any contract function as payable. A payable function automatically requires consensus. It can be invoked only via a transaction that gets recorded in the blockchain. The caller can attach an ETH value to the transaction. The ETHs will be transferred from the caller’s address to the contract address upon execution of this function.
The contract can also have a default payable function. It is called when an address makes a regular ETH transfer to the contract address without making an explicit function call.
The contract can access its own fund through the this.balance() function and transfer funds to other addresses through the <address>.transfer(amount) function.
Calling Other Contracts
A contract function can call functions in another contract deployed at a different address. The caller contract needs to know the callee contract’s ABI and address.
This feature allows us to build proxy contracts, where function implementations can be changed or upgraded because we can update the proxy to point to different implementing contracts. Some well-known smart contracts, such as the GUSD contract, are written this way.
In this section, I discussed some unique design features of the Solidity language, compared with traditional programming languages. It should get you started on learning Solidity. As a first-generation smart contract programming language, Solidity has many shortcomings, especially with regard to nonconsensus functions and programs. Ethereum extensions such as the Lity project are working on better solutions (see Chapter 14).
Building and Deploying the Smart Contract
In this section, I will use the “Hello, World!” contract as an example to show how to build and deploy an Ethereum smart contract. Let’s start with the standard Solidity tools.
Solidity Tools
While you can install and use a JavaScript version of the Solidity compiler, I recommend you install the fully featured C++ version. You can do it easily with Linux distributions’ package managers. Here is how to do it using the apt-get package manager on Ubuntu:
$ sudo add-apt-repository ppa:ethereum/ethereum
$ sudo apt-get update
$ sudo apt-get install solc
The solc command takes a Solidity source file as input and outputs the compiled bytecode as well as the ABI definition as a JSON string.
$ solc HelloWorld.sol
The output from the command is a large JSON structure that gives information about compiler errors and results. You can find the following under the HelloWorld contract:
The compiled EVM bytecode as a hex string in the evm/bytecode/object field
The associated ABI definition in the
abifieldThe recommended gas costs in the
gasEstimatesfield
Next, you can deploy this contract from GETH and obtain an address on the blockchain for the deployed contract instance. You can run the following command in the GETH console attached to an Ethereum blockchain network or the TestRPC:
> var owner = "0xMYADDR"
> var abi = ...
> var bytecode = ...
> var gas = ...
> personal.unlockAccount(owner)
... ...
> var helloContract = eth.contract(abi)
> var hello = helloContract.new(owner, {from:owner, data:bytecode, gas:gas})
Once the contract is mined and recorded on the blockchain, you should be able to query for its address.
> hello.address
"0xabcdCONTRACTADDRESS"
You need to record and save the ABI and contract address. As you have seen, those two pieces of information are needed when you retrieve this contract instance later in another program.
The BUIDL Integrated Development Environment (IDE)
While the command-line compiler tool is fundamental to Solidity smart contract development, many developers prefer to use graphical user interface (GUI) tools for a more visual development experience. The BUIDL IDE is by far the easiest GUI tool to compile and deploy Solidity smart contracts.
First, you need to configure BUIDL to work with Ethereum blockchains via the Providers tab (see Figure 6.1). Then, send a small amount of ETH (e.g., 0.1 ETH) to the default address on the Accounts tab so that BUIDL can pay gas fees to Ethereum on your behalf. See more details in Chapter 4.

Figure 6.1 Configuring BUIDL to work with Ethereum
Next, type your Solidity code into the editor in the contract section, and hit the Compile button. You will be able to see the compiled ABI and bytecode in the side panel (see Figure 6.2).

Figure 6.2 Compiled artifacts from BUIDL
Of course, you can also copy the ABI and bytecode and paste them into your other tools to use.
The Remix IDE
Remix is a web-based IDE for Solidity smart contracts from the Ethereum Foundation. You can access it in your web browser: http://remix.ethereum.org/.
You can simply enter Solidity source code into the text box, and the IDE will compile it for you. The compiler output is shown by clicking the Details button next to the contract name (Figure 6.3).
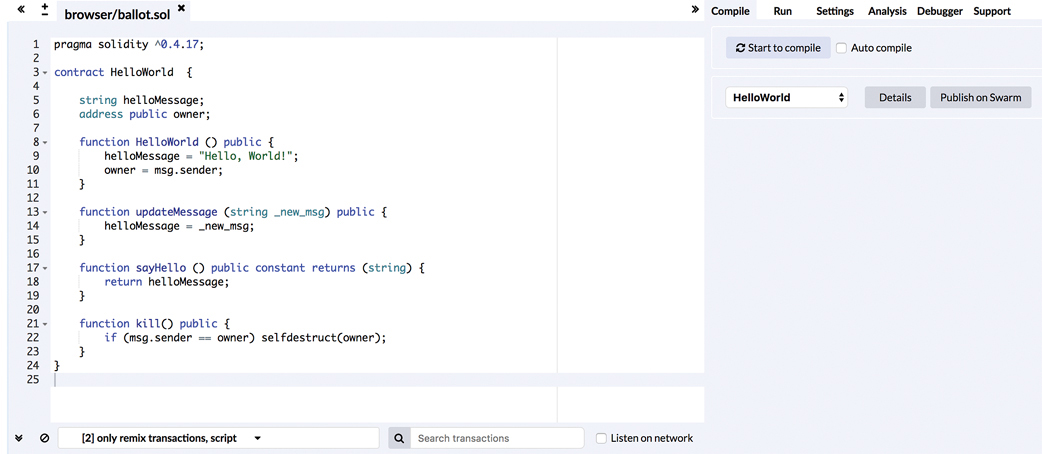
Figure 6.3 The Remix IDE compiles a Solidity smart contract.
As you can see in Figure 6.4, the IDE provides the ABI and bytecode results from the compiler, as well as a GETH script to deploy the contract for your convenience.
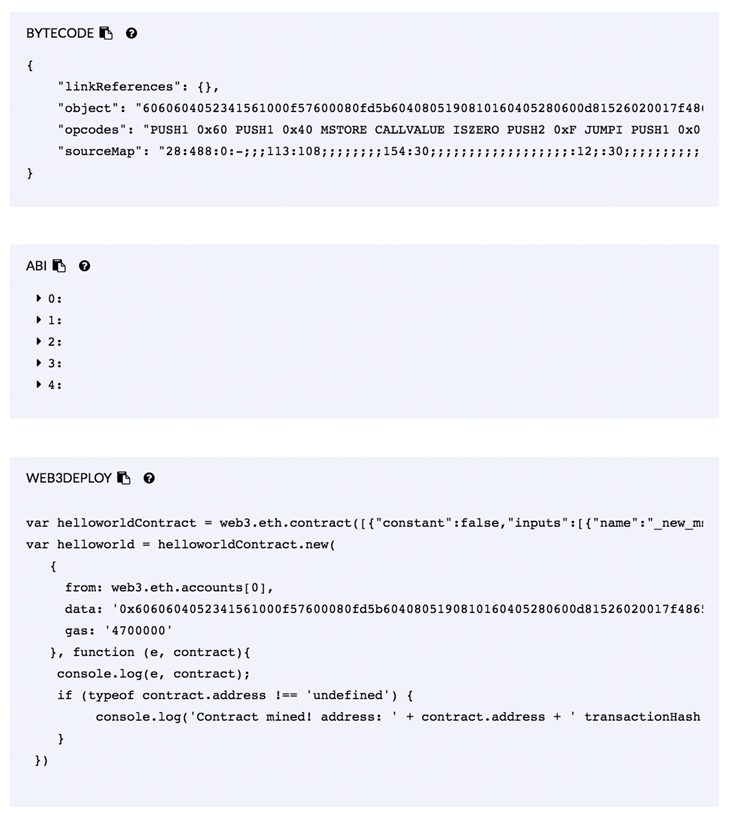
Figure 6.4 Clicking the Details button shows the ABI, bytecode, and a deployment script for the smart contract.
Truffle Framework
The Truffle Framework significantly streamlines and simplifies the process of building and deploying smart contracts. We recommend it for complex smart contracts as well as for automated building and testing in professional software development settings.
The Truffle framework builds on the node.js framework. So, you should first make sure that node.js and its package manager, npm, are installed on your machine. You can install them at https://www.npmjs.com/get-npm. On most Linux distributions, you can use the system package manager to install them as well. For example, the following command installs node.js and npm on a CentOS/RedHat/Fedora Linux system:
$ sudo yum install epel-release
$ sudo yum install nodejs npm
Next, let’s install the Truffle framework using the npm package manager.
$ sudo npm install -g truffle
Next, you can create a basic project structure using the truffle command.
$ mkdir HelloWorld
$ cd HelloWorld
$ truffle init
$ ls
contracts        test            truffle.js
migrations        truffle-config.js
Now you can create a HelloWorld.sol file in the HelloWorld/contracts directory. The file content was listed earlier in this chapter, and you can also get it from the sample project on GitHub. In addition, create a migrations/2_deploy_contracts.js file to indicate that the HelloWorld contract needs to be deployed by Truffle. The content of the 2_deploy_contracts.js file is as follows:
var HelloWorld = artifacts.require("./HelloWorld.sol");

module.exports = function(deployer) {
  deployer.deploy(HelloWorld);
};
You will also need to update the truffle.js file, which configures the deployment targets. The following truffle.js example has two targets: one for the TestRPC on the localhost, and one for an Ethereum testnet node on the local network.
module.exports = {

  networks: {
    development: {
      host: "localhost",
      port: 8545,
      network_id: "*" // Match any network id
    },
    testnet: {
      host: "node.ip.addr",
      port: 8545,
      network_id: 3, // Ropsten,
      from: "0x3d113a96a3c88dd48d6c34b3c805309cdd77b543",
      gas: 4000000,
      gasPrice: 20000000000
    }
  }
};
To compile and build the smart contract, you can use the following command:
$ truffle compile
Compiling ./contracts/HelloWorld.sol...
Compiling ./contracts/Migrations.sol...
Writing artifacts to ./build/contracts
The previously mentioned contract ABI, when constructing a contract object from the blockchain address, is a JSON object in the build/contracts/HelloWorld.json file.
{
  "contractName": "HelloWorld",
  "abi": [
    ... ...
  ],
  ... ...
}
Finally, you have two deployment options. The first option is to deploy to the TestRPC. You must have the TestRPC running on the same machine. Run the following command to deploy the HelloWorld contract to the TestRPC:
$ truffle migrate --network development
Using network 'development'.

Running migration: 1_initial_migration.js
  Deploying Migrations...
  ... 0x22cbcdd77c162a7d72624ddc52fd83aea7bc091548f30fcc13d745c65eab0a74
  Migrations: 0x321a5a4ee365a778082815b6048f8a35d4f44d7b
Saving successful migration to network...
  ... 0xcb2b363e308a22732bd35c328c36d2fbf36e025a06ca6e055790c80efae8df13
Saving artifacts...
Running migration: 2_deploy_contracts.js
  Deploying HelloWorld...
  ... 0xb332aee5093195519fa3871276cb6079b50e51308ce0d63b58e73fb5331016fc
  HelloWorld: 0x4788fdecd41530f5e2932ac622e8cffe3247caa9
Saving successful migration to network...
  ... 0x8297d06a8112a1fd64b2401f7009d923caa553516a376cd4bf818c1414faf9f9
Saving artifacts...
The second option is to deploy to a live Ethereum blockchain network. However, since this costs gas, you will need to unlock an account with an ETH balance first. You can use GETH attached to the testnet node to do this. The unlocked address is the one specified in the testnet/from field in the truffle.js file. Please see Chapter 5 to review GETH account unlocking commands.
$ ./geth attach http://node.ip.addr:8545 (http://172.33.0.218:8545/)
Welcome to the Geth JavaScript console!
modules: eth:1.0 miner:1.0 net:1.0 personal:1.0 rpc:1.0
> personal.unlockAccount("0x3d113a96a3c88dd48d6c34b3c805309cdd77b543", "pass");
true
Then deploy to the testnet using truffle.
$ truffle migrate --network testnet

Using network 'testnet'.

Running migration: 1_initial_migration.js
  Deploying Migrations...
  ... 0x958a7303711fbae57594959458333b4c6fb536c66ff392686ca8b70039df7570
  Migrations: 0x7dab4531f0d12291f8941f84ef9946fbae0a487b
Saving successful migration to network...
  ... 0x0f26814aa69b42e2d72731651cc2cdd72fca32c19f82073a76461b76265e564a
Saving artifacts...
Running migration: 2_deploy_contracts.js
  Deploying HelloWorld...
  ... 0xc97646bcd00f7a3d1745c4256b334cdca8ff965095f11645144fcf1ec002afc6
  HelloWorld: 0x8bc27c8129eea739362d786ca0754b5062857e9c
Saving successful migration to network...
  ... 0xf077c1158a8cc1530af98b960d90ebb3888aa6674e0bcb62d0c7d4487707c841
Saving artifacts...
Finally, you can verify the contract deployed on the live network at this address: https://ropsten.etherscan.io/address/0x8bc27c8129eea739362d786ca0754b5062857e9c
Calling Smart Contract Functions
Now that you have deployed the “Hello, World!” smart contract on the blockchain, you should be able to interact with it and call its public functions.
The BUIDL IDE
Once you have configured the BUIDL IDE to work with the Ethereum blockchain and have hit the Compile button to compile your Solidity smart contract, you are ready to deploy it.
Hit the Deploy to the chain button (see Figure 6.5) to deploy the smart contract onto the Ethereum blockchain. The deployed contracts are available on the Deployed tab. You can click to open any of them and interact with the public functions directly from inside BUIDL.
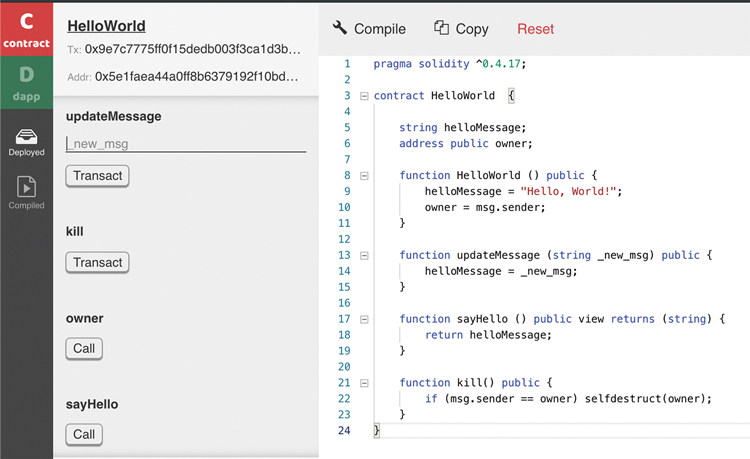
Figure 6.5 Calling functions on a deployed Ethereum smart contract
The Remix IDE
As I showed in Chapter 4, the Remix IDE can build a UI for a smart contract given the ABI and contract address. All public functions of the contract are listed in the UI. Functions that result in blockchain state changes (e.g., require gas to operate) are labeled as red buttons (Figure 6.6). Functions that do not result in state changes (i.e., view methods) are labeled as blue buttons. You can pass call parameters to functions in the input boxes next to each button.
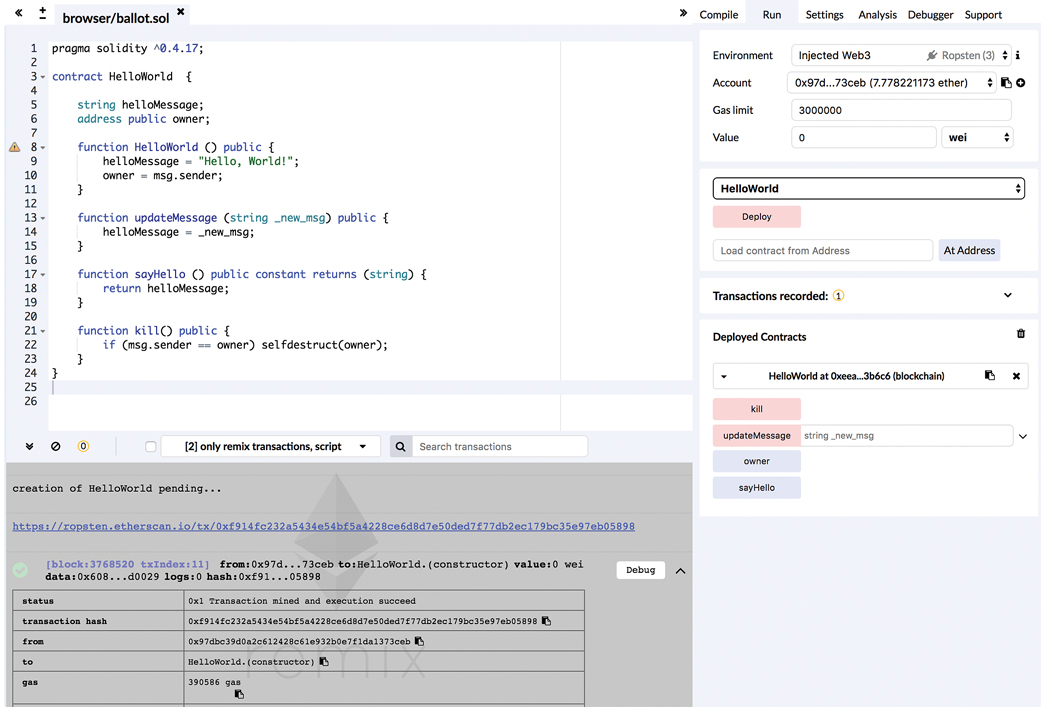
Figure 6.6 A smart contract UI built by Remix
The Remix UI is convenient, but it cannot be automated and hides details of the transactions. To fully understand how smart contracts are executed on the blockchain, I recommend you interact with the functions directly on a blockchain node. In the case of Ethereum, it is a node running GETH connected to the mainnet or testnet.
GETH Console
GETH is a GO language-based client for Ethereum. You can run GETH in a mode that attaches itself to an Ethereum node (or the TestRPC for local testing). See Chapter 5 for how to run an Ethereum node yourself using GETH.
$ geth attach http://node.ip.addr:8545
In the console, you can now create an instance of the contract via the eth.contract().at() method. You need two pieces of information. Both of them come from the tool you use to build and deploy your smart contract to the blockchain, which I will cover in the next section.
The JSON parameter to the
contract()method is known as the ABI. When you build the smart contract, the compiler outputs the ABI. In the case of the Truffle framework, the ABI is located in thebuild/contracts/HelloWorld.jsonfile’s abi JSON field, with all line breaks removed.The
at()method parameter is the address to this specific instance of the smart contract. That is, you can deploy the same smart contract class multiple times, and each time the Ethereum blockchain will create a unique address for it.
> var abi = [ { "constant": false, "inputs": [ { "name": "_new_msg",
"type": "string" } ], "name": "updateMessage", "outputs": [], "payable":
false, "stateMutability": "nonpayable", "type": "function" },
{ "constant": false, "inputs": [], "name": "kill", "outputs": [],
"payable": false, "stateMutability": "nonpayable", "type": "function" },
{ "constant": true, "inputs": [], "name": "owner", "outputs": [ { "name":
"", "type": "address" } ], "payable": false, "stateMutability": "view",
"type": "function" }, { "constant": true, "inputs": [], "name":
"sayHello", "outputs": [ { "name": "", "type": "string" } ], "payable":
false, "stateMutability": "view", "type": "function" }, { "inputs": [],
"payable": false, "stateMutability": "nonpayable", "type":
"constructor" } ]
> var helloContract = eth.contract(abi)
> var hello = helloContract.at("0x59a173...10c");
The sayHello() method on the contract instance does not change the blockchain state. So, it is “free” and immediately executed by the node connected to our GETH console.
> hello.sayHello()
"Hello, World!"
The updateMessage() method, on the other hand, changes the contract’s internal state on the blockchain. It must be executed by all the miners and gets recorded on the blockchain once most miners reach consensus. Because of that, it’s execution requires gas (in ETH) to pay the miners for their effort. The gas is provided by an account specified on the method call.
If your GETH console is connected to the TestRPC, you should already have unlocked accounts. But if you are connected to a real Ethereum node, you can use the following command in the GETH console to create a new Ethereum account and then send ETH to this account from one of your wallets:
> personal.newAccount("passphrase")
Next, the account must be unlocked so that we can “spend” its ETH as gas.
> personal.unlockAccount("0xd5cb83f0f83af60268e927e1dbb3aeaddc86f886")

Unlock account 0xd5cb83f0f83af60268e927e1dbb3aeaddc86f886
Passphrase:true
... ...

> hello.updateMessage("Welcome to Blockchain", {from:
"0xd5cb83f0f83af60268e927e1dbb3aeaddc86f886"})
"0x32761c528f426993ba980fdd212f929857a8bd392c98896a4e4a898077223c07"
> hello.sayHello()
"Welcome to Blockchain"
>
While the gas fee is small, it is necessary. If your account specified in the method call has zero balance and cannot pay gas, the function call will fail. The changed state of the contract will be finalized across all blockchain nodes when the transaction is confirmed by the miners. The confirmation could take several minutes on the Ethereum blockchain, degrading the user experience. On Ethereum-compatible blockchains like CyberMiles, the confirmation time could be as fast as seconds. That is a compelling reason to develop and deploy Ethereum applications on alternative compatible blockchains (learn more in Appendix A).
A New Language
While the Solidity language is currently the most widely used programming language for Ethereum smart contract development, it is also hard to use and has many design flaws. Specifically, it lacks safeguards and logical separations commonly available in modern programming languages. It is easy to make human errors in Solidity.
In fact, a large-scale code audit has revealed about 100 obvious bugs for every 1,000 lines of Solidity code. That is astonishingly high as most Solidity code is for smart contracts that actually manage financial assets. In contrast, nonfinancial business software typically contains 10 bugs per 1,000 lines of code.
To address Solidity’s problems, the Ethereum community is developing a new experimental language for smart contract programming called Vyper. It is designed for human readability and auditability. It removes some confusing features from Solidity and should produce safer smart contracts with fewer bugs.
While Vyper is in early beta and the design is still changing, it is possibly the future of Ethereum development. In this section, I will show how to rewrite the Solidity “Hello, World!” example in Vyper and how to deploy it. The following is the Vyper code for the smart contract. You will notice that the Vyper smart contract is similar to the Python language. The filename is HelloWorld.v.py. The filename suffix is .py to allow development tools to highlight its syntax using Python rules. If that is a concern, you can also use the .vy suffix.
#State variables
helloMessage: public(bytes32)
owner: public(address)

@public
def __init__(_message: bytes32):
    self.helloMessage = _message
    self.owner = msg.sender

@public
def updateMessage(newMsg: bytes32):
    self.helloMessage = newMsg

@public
@constant
def sayHello() -> bytes32:
    return self.helloMessage

@public
def kill():
    if msg.sender == self.owner:
        selfdestruct(self.owner)
To install the Vyper compiler, you will need Python 3.6 or newer. Since Vyper is still an evolving technology, the official documentation suggests building from the source. You can find the latest instructions at https://vyper.readthedocs.io/en/latest/installing-vyper.html.
Once you have the Vyper application installed, you can run it as any other compiler. The following command will output the hex string of the compiled bytecode of the contract:
$ vyper HelloWorld.v.py
The following command will output the JSON string of the ABI for the contract:
$ vyper -f json HelloWorld.v.py
With both the bytecode and ABI, you can use GETH to deploy the smart contract to Ethereum or the TestRPC.
> var owner = "0xMYADDR"
> var abi = ...
> var bytecode = ...
> var gas = ...
> personal.unlockAccount(owner)
... ...
> var helloContract = eth.contract(abi)
> var hello = helloContract.new(owner, {from:owner, data:bytecode, gas:gas})
Now, similar to Remix, there is also an online compiler for Vyper contracts: https://vyper.online/ (Figure 6.7). You can type in your Vyper source code and let the web application compile it into bytecode (Figure 6.8) and ABI (Figure 6.9).
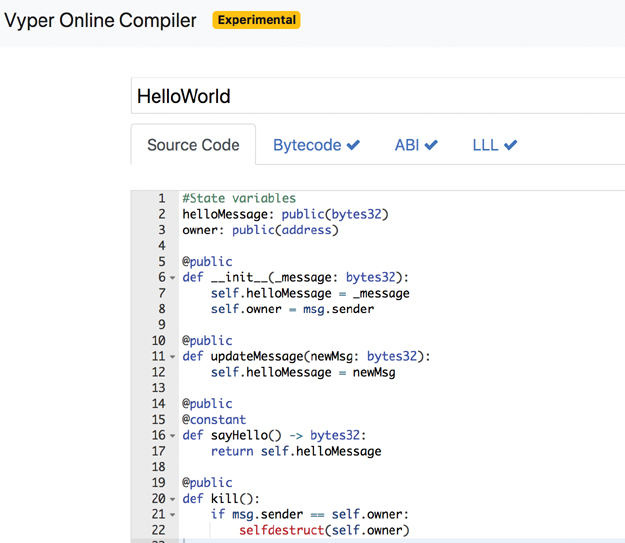
Figure 6.7 A web-based Vyper compiler, vyper.online
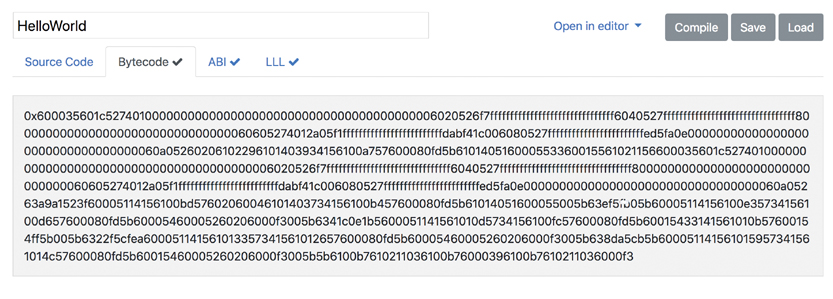
Figure 6.8 The compiled bytecode from vyper.online

Figure 6.9 The ABI interface generated by vyper.online
More Smart Contract Languages
While the Vyper language is similar to Python, it cannot be called Python since it removes some important features from the Python language to make its programs deterministic. All blockchain node computers must produce the same result when executing the smart contract code in order to reach consensus. Therefore, no general-purpose computer programming language can be used directly for smart contract programming. The language must be modified to produce entirely deterministic behavior.
The new generations of blockchain virtual machines are leveraging state-of-the-art virtual machine technologies such as the WebAssembly (Wasm) virtual machine. For example, the next Ethereum Virtual Machine will be based on WebAssembly and called Ethereum Flavored WebAssembly (eWASM). Another large public blockchain, EOS, already has a WebAssembly-based virtual machine.
Those new-generation virtual machines are commonly based on the LLVM technology that supports optimization across the entire application lifecycle from compile time to link time to runtime. LLVM uses an intermediate representation (IR) code format between the application source code and machine bytecode to support a “language-agnostic” compiler infrastructure. The IR allows the virtual machine to support multiple source code programming languages on the front end. Indeed, LLVM already supports 20+ programming languages. Solidity and Vyper are also evolving to become compatible with the LLVM IR. For example, the open source SOLL project is developing an LLVM-based Solidity compiler for the next generation of blockchain virtual machines. See https://github.com/second-state/soll.
However, because of the unique constraints of smart contract programming, it is impossible to expect mainstream programming languages to be fully supported on blockchain virtual machines. When EOS says that its smart contract programming language is C++, it means a modified version of C++ that produces deterministic programs. It will be a major effort to modify and reform mainstream programming languages to support smart contract programming. So, in the near future, I think Solidity will continue to be the dominant smart contract programming language.
Conclusion
In this chapter, I explained what a smart contract is, how to program it, and how to interact with it. I covered both the Solidity language and the upcoming Vyper language for smart contract programming. Using open source tools, we explored different options to test and deploy the smart contract onto Ethereum blockchain networks. Of course, Solidity and Vyper still have their limitations. I will cover an alternative programming language called Lity, which is fully backward compatible with Solidity but attempts to address some of the most glaring problems, in Chapter 14.