
Chapter 6: Game-Changing Workflows and Automations
This chapter will provide you with powerful insight and knowledge of workflow automation, which is arguably the most valuable feature of Zoho CRM.
Used well and often, the workflows in Zoho will deliver huge efficiency time and again. They will take your Customer Relationship Management (CRM) system to the next level and get you and your and team excited about how it can help you become more efficient and successful.
In this chapter, we will work through practical examples that you may use straight away and also act as a stimulus for other ideas. These workflows will save you countless hours and help your team proactively manage opportunities and clients much more effectively.
Topics covered within this chapter include the following:
- Introducing workflow rules
- How to trigger a workflow with single and multiple conditions
- Using instant single, multiple, and scheduled actions
- Use cases and examples
By the end of this chapter, you will have learned how, why, and when to trigger workflows, set up some examples, and be inspired to create many more.
Introducing workflow rules
Workflow rules are a set of actions that are executed when specific conditions are met. Upon these conditions being met, the rules automate the process of sending emails, assigning tasks, and updating fields.
Workflow rules consist of the following elements:
- Basic Details: To specify the module, rule name, and description.
- Rule Trigger: To specify when the rule should be triggered. Examples of such triggers are outlined as follows:
Execute based on a record's action: Rules will be triggered when a record is created, edited, deleted, or if certain fields have been updated.
Execute based on date field's value: Rules will be triggered either before, on, or after any date field in the record.
Execute based on the record's score: Rules will be triggered when the score of a record is increased, decreased, or updated.
- Workflow Condition: It is possible to specify single or multiple conditions in a workflow rule. We may apply the rule to all records or only to certain records based on a condition(s) being met.
- Actions: Specify the actions to be automated for records that meet the criteria. The different types of actions are outlined as follows:
Instant Actions: This includes sending an email, assigning a task, updating a field, pushing data to another system (webhook), customizing functions (script), converting a record, or creating a record.
Scheduled Actions: All the same possible actions as with Instant actions, but this time they are scheduled to be actioned at a later date/time.
While this may sound alien at first, it is important to familiarize yourself with these elements as they apply to each and every rule that we set up in Zoho. As with most new skills, with practice comes experience and with experience comes more confidence, and in time they become simple to understand and execute.
Let's now consider each of these elements individually within an end-to-end process, starting with how to trigger a workflow.
How to trigger a workflow with single and multiple conditions
With some knowledge of the basics, it is only by creating your first few workflows that you will start to master them. So, let's start with a simple example. We will create a workflow rule that will create a task, with a reminder and an email notification for a user to follow up when a new lead is created via the website. Proceed as follows:
- From the Home page in CRM, access the setup by clicking on the following icon:

Figure 6.1 – Setup icon
- Within the Automation menu, click on Workflow Rules.
- Click on the + Create Rule button.
- Now, select a Module, then add a Rule Name and Description, as shown in the following screenshot. Then, click Next:

Figure 6.2 – Defining a new workflow rule
- In this example, we will select the On a record action trigger and then select the Create option, as illustrated in the following screenshot:

Figure 6.3 – Triggering a workflow when a new record is created
Once we have selected when to trigger the rule, we must now add a condition to specify which records to apply the rule to.
Adding a single condition
Once we have specified the trigger as shown in Figure 6.3, we may add a single condition by selecting the Leads matching certain conditions option then Lead Source is Website, as follows:
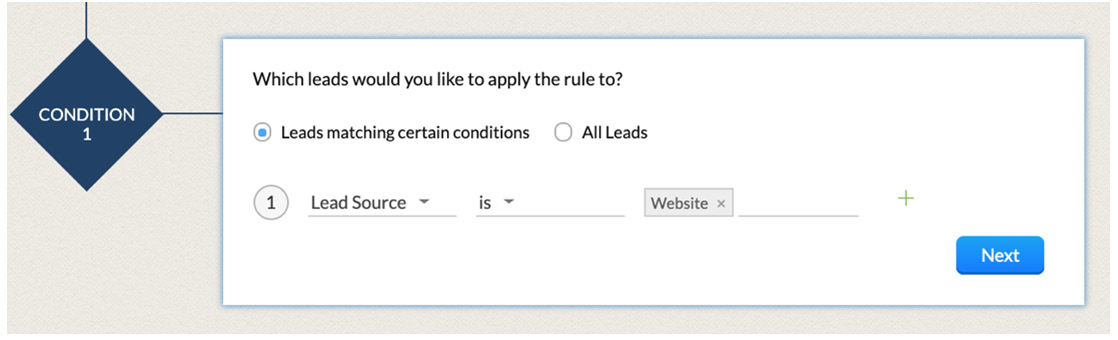
Figure 6.4 – Adding a single condition
Summarizing what we have achieved so far, when a new record is created (Figure 6.3) where the lead source is Website (Figure 6.4), this will trigger this particular workflow rule.
Once we have created our trigger with a condition, we now need to specify what we wish to happen to a record when it triggers our rule.
Using instant single, multiple, and scheduled actions
Your mind is possibly boggling already at the possibilities the workflows may present us with. It gets even better! We can also perform single and multiple actions immediately or schedule them to happen in the future.
Let's consider initially a single action—creating a follow-up task.
Instant single action
To automate the creation of a single action, you must firstly click on the Instant Action button to reveal the options, as shown in the following screenshot:

Figure 6.5 – List of instant actions
You can create a follow-up task by following these steps:
- Click on Task.
- Click on the + New Task button in the top-right corner, upon which you will be presented with the following Assign Task screen:
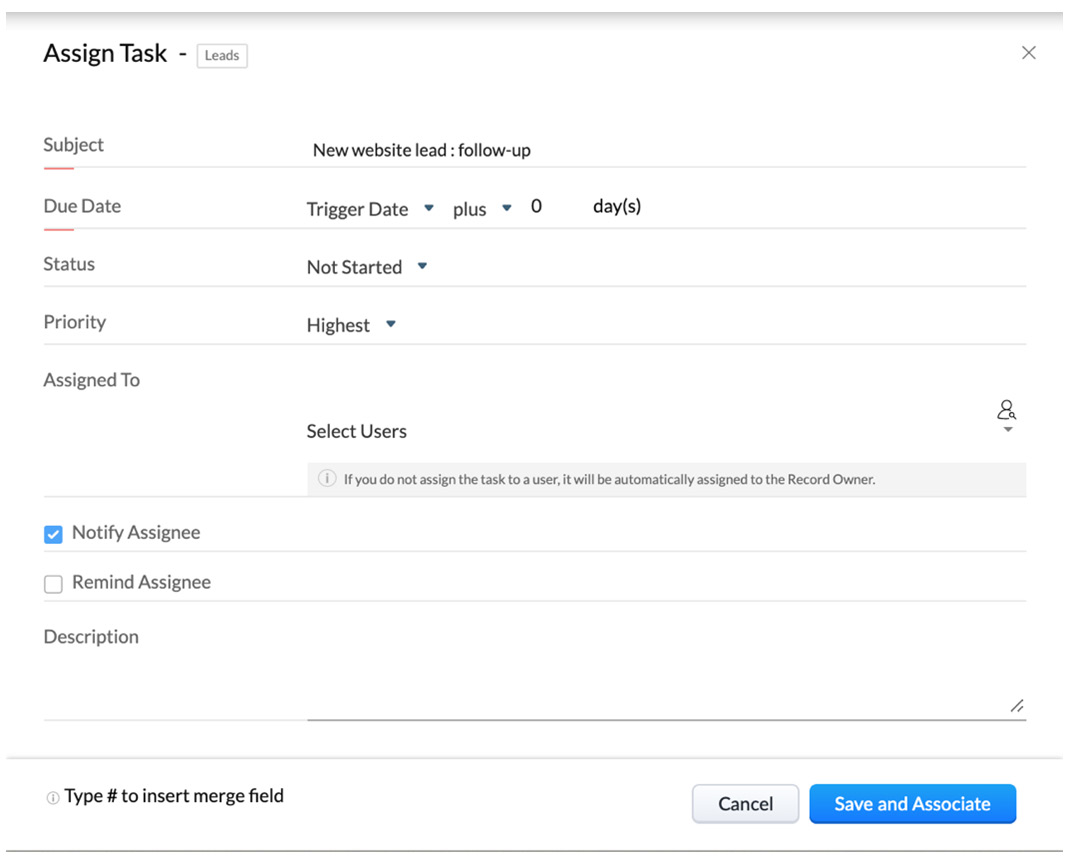
Figure 6.6 – Assigning a task
- Give your task a concise description of what the user needs to do in the Subject field—ideally with some context. In this example, we have used New website lead: follow-up.
- Now, fill in the Due Date options, which in this case will be on the same day that the rule was triggered—defined as Trigger Date plus 0 day(s).
- Set the Status dropdown to Not Started.
- Now, select a user to whom you wish to assign the task by clicking on the icon to the right of Select Users. Most of the time, however, it is desirable for the task to be assigned to the owner of the record (in this case, the Lead). In such cases, simply do not select a user, and the rule will automatically be assigned to the owner of the record. If you are a single user, then this will always be assigned to you.
- Now, select the Notify Assignee and/or Remind Assignee checkboxes, as required.
-Notify Assignee: This will send an email notification to the assignee as soon as the workflow action is triggered. It is recommended to check this box as it will alert the user that a new lead from the website has just been received.
-Remind Assignee: This will remind the assignee by email or at a time of your choosing. It is recommended to check this box in this scenario too, as it is important that we follow up on new leads as promptly and as quickly as possible.
- It is possible to add a description that can also contain merge tags (in other words, include any of the fields within the Lead). However, if the subject is succinct and clear, then this may not be necessary. The task will be linked to the Lead record, so the user will have visibility of everything they need.
- Finally, click on Save and Associate.
So, having illustrated how we can assign a single action—a task—let's consider how we could add more than one action to our workflow rule.
Instant multiple actions
In our example, we may also need to send an instant thank-you message to our prospective customers who submitted their inquiry using the web-form. To assign this, we can follow these steps:
- Once we have followed Steps 1-9 (from the previous section) to add creating a task to our workflow, it is possible to add further actions by clicking on + Action, as shown in the following screenshot:
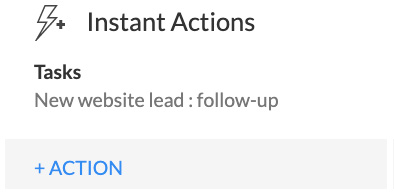
Figure 6.7 – Adding multiple actions
- Now, click on Email Notification followed by the blue button on the right, titled Create Email Notification.
You will now be presented with the following Edit Email Notification screen:
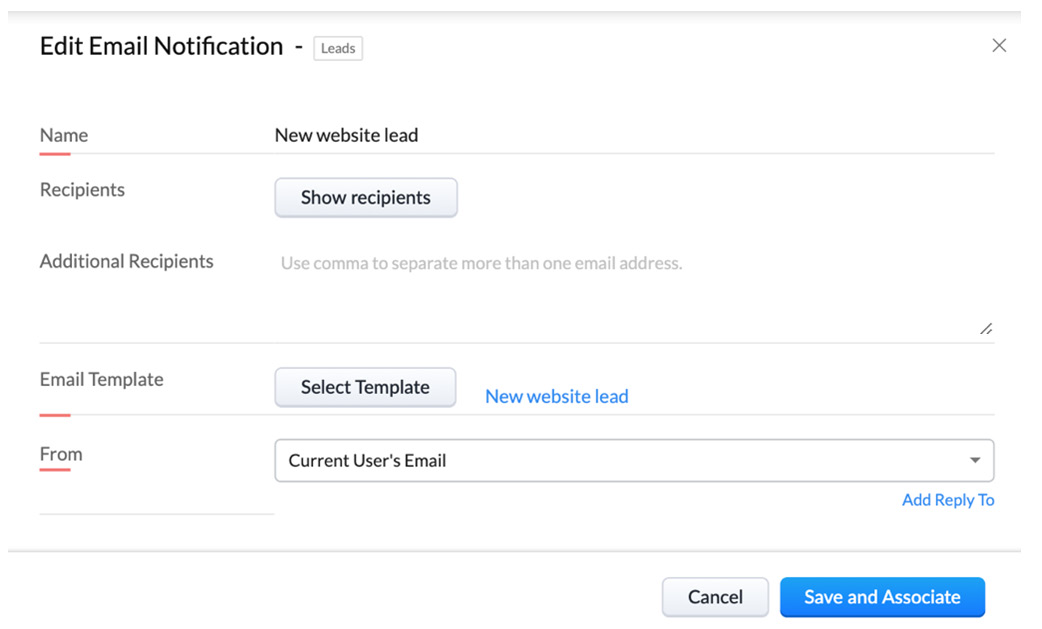
Figure 6.8 – Creating an email notification
- Give your notification a name, such as New website lead.
- Click on the Choose recipients button and add the email associated with the lead.
- Click on Select Template, and then select or create your email template. (See Chapter 7, Essential Systems Administration for information on email templates.)
- Now, a From picklist will appear that will allow you to specify the email address from which the email needs to be sent. Options here include Record Owner, Current User's Email, Any User, or Any Organization Email (see Chapter 7, Essential Systems Administration for further details).
- Click on Save and Associate.
Having considered how to add instant actions (single and multiple), let's now take a look at how we can also schedule actions to take place at some point in the future.
Scheduled actions
Staying with our new website lead example, following on from step 7 in the Instant multiple actions section, in addition to the instant task and email, we may also want to send a couple of lead-nurturing content emails to help keep the prospect warm and engaged. Let's see how to do this, as follows:
- Firstly, click on the words Scheduled Actions to reveal the following pop-up box:
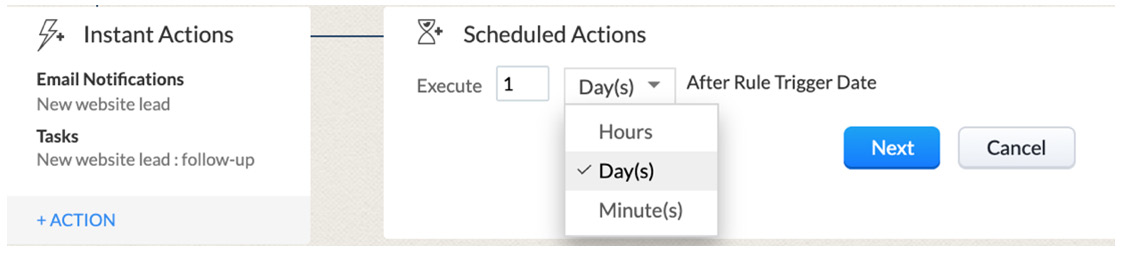
Figure 6.9 – Creating scheduled actions
- Now, specify a trigger, selecting from Hours, Day(s), or Minute(s). In this example, we will set this at 1 Day After Rule Trigger Date before clicking Next.
- You will be presented with the same list of actions as earlier, so in this case, select Email Notification.
- Following the same process as in the Instant multiple actions section (Steps 1-7), you may now create your first scheduled email notification.
- Once the first email notification is associated, you may now add a second scheduled action by clicking + ACTION, as illustrated in the following screenshot:

Figure 6.10 – Adding multiple scheduled actions
- To add a second email notification after 3 days, click Add New Scheduled Action, as illustrated in the following screenshot:
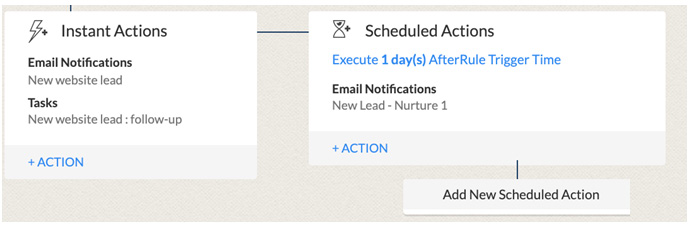
Figure 6.11 – Adding a second scheduled action
- Finally, repeat Steps 5-6 but executing 2 (or 3) days After Rule Trigger Time and using a different Email Template.
While sometimes a single condition is enough, we often need to specify more than one so that we can define more precise actions for each. Let's consider how to add multiple conditions.
Multiple conditions
In many cases, we may need to perform a different set of actions based on different conditions being met.
For example, if we also had an additional field on our web-form where our prospect selected from a picklist which product they were interested in (Training or Consultancy), then we could click on the + to the right of our first criteria before adding Product Is Training. This would be like adding an and to our criteria, so our amended condition would effectively be this:
Apply the rule to Leads where the Lead Source Is Website AND the Product is Training
The benefit of having multiple conditions, in this case, is that we could assign the task to different owners based on the product selected. This would help to ensure that the right person is allocated to the query based on your team's skills and experience. This is automating processes that we would normally require a person to do and thus we are saving time, and also our team is being prompted automatically.
Once we have saved our workflow containing a single condition with actions, a + Add another condition link will appear on the left, as shown in the following screenshot. Clicking this link will allow you to select another set of conditions:
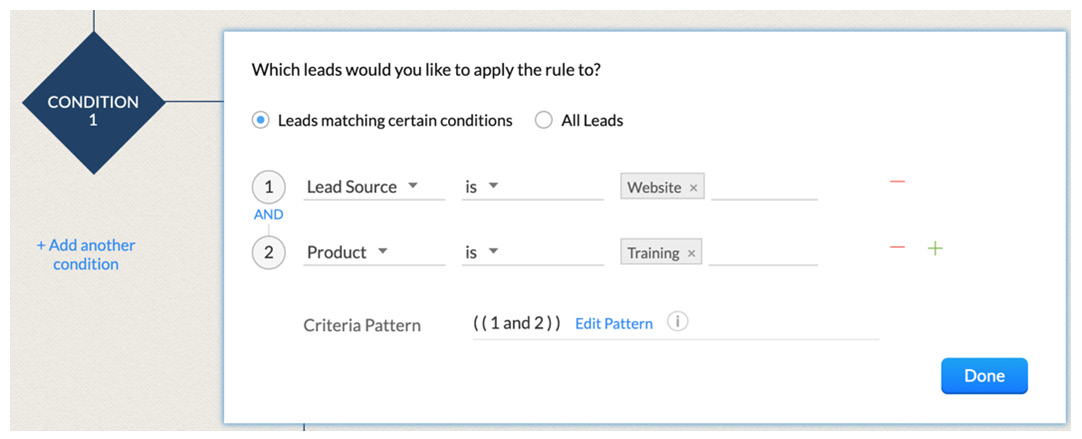
Figure 6.12 – Adding multiple criteria and conditions
Once we have defined which records we wish the workflow to be applied to, it's time to specify which action(s) we wish to perform. Refer back to the earlier sections on how to add single instant/multiple and scheduled actions, and repeat the steps as required.
Once you have set up this example on your CRM system and tweaked it for your business, it is useful to reflect on what we have learned in this chapter so far. By creating automated tasks, we are adding value every time the workflow is triggered. The system is prompting the users what needs to be done and when. By sending emails automatically, we are automating what would have been a manual process, one that may have been forgotten about or missed if the user were busy. Finally, by adding scheduled actions, we are automating other manual processes of nurturing the lead, which again would have been vulnerable to a user forgetting to do this or being unable to fulfill the task if they were busy elsewhere.
This is the value added by just one single workflow that will perform these tasks all day, every day. Imagine how much value we could add to our CRM system if we created 10, 20, or 30 workflow rules. This is game-changing!
So, now we are on board with the benefits workflow automation can bring, it's time to consider various additional examples that have all been proven to add significant value to Zoho users.
Use cases and examples
In this section, we look at some examples for you to try using the skills and techniques achieved from this chapter. Compare these to your processes and relate these examples to those, adjusting them accordingly.
Example 1 – Update Deal stage when a quote is sent
In the first example, the standard functionality does not update the stage of a Deal when a related Quote is sent, which forces the user to make a manual change. This is inefficient and, if overlooked, will lead to incorrect pipeline reporting.
Detailed next is the name of the module to which the workflow applies, the outcomes you will achieve, and the suitability of the workflow:
Module: Quotes.
Outcomes: Multiple actions and a task that will help the sales team follow up and facilitate additional workflows later (based on expiry) while also updating the stage of the associated deal.
Suitability: Every business that uses the Quotes module.
A summary of the trigger, conditions, and actions is illustrated here, as follows:

Figure 6.13 – Workflow rule with multiple actions when a Quote is created
In summary, this workflow automates two updates that would otherwise have been manual processes (or possibly overlooked) and also creates an automatic follow-up task for the salesperson to try to close the deal.
Example 2 – Update Quote when Quote expires
In this example, we resolve a common issue of a quote expiring without a final prompt to our client or an alert to the user, which can lead to a missed sales opportunity.
Detailed next is the name of the module to which the workflow applies, the outcomes you will achieve, and the suitability of the workflow:
Module: Quotes.
Outcomes: Automatically update Quote to Expired, send a final reminder email to the client, and add a task for the salesperson to follow up on.
Suitability: Every business that uses the Quotes module.
A summary of the trigger, conditions, and actions is illustrated here, as follows:

Figure 6.14 – Workflow with multiple actions on date of Quote expiry
This workflow combines a field update, email notification, and task creation all in one, which will help ensure that the sales team is proactively following up quotes and prompting our clients to action.
Example 3 – Rollover due date of open tasks to today
A common challenge many busy micro-business owners face is not enough time. Some days, despite best efforts, not all the day's tasks get completed, so this workflow was inspired by a Zoho user experiencing this scenario. This workflow literally solved the issue overnight.
Detailed next is the name of the module to which the workflow applies, the outcomes you will achieve, and the suitability of the workflow.
Module: Tasks.
Outcomes: Automatically updates the due date of the task once it has become overdue. Also marks the task as overdue for reporting, if needed.
Suitability: Micro-business owners "spinning a lot of plates".
A summary of the trigger, conditions, and actions is illustrated here, as follows:
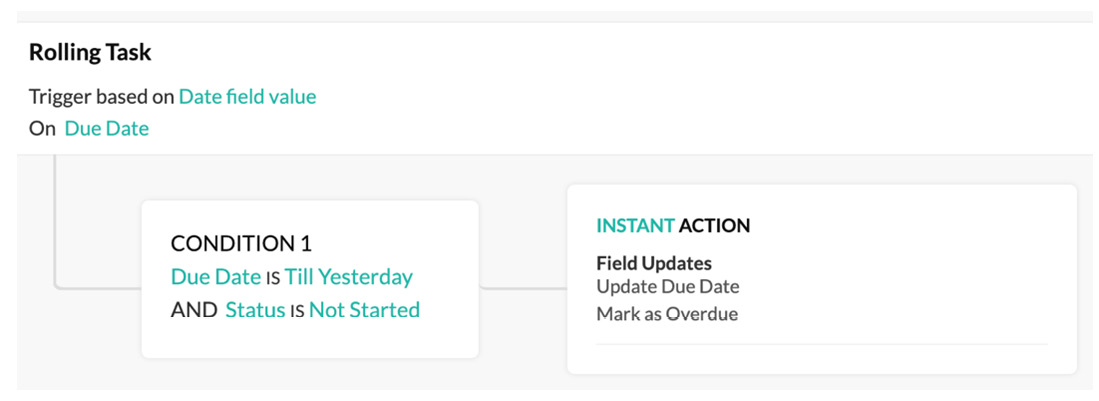
Figure 6.15 – Workflow to change due date of open tasks to today
So, this solution is triggered 1 day after the due date, on records that were due yesterday and not completed. Notice that we have added two field updates—one to change the Due Date to Today and another (optional) to mark as overdue so that we can still report on how many tasks were completed on time or were overdue.
Example 4 – Various tasks based on the Deal stage being updated
This is an example of workflow with a single trigger—updating the Stage field, with multiple conditions, each with its own outcome. This type of workflow will add great value to many stages of the Deal life cycle and help the users become more efficient, and ultimately close more deals.
Detailed next is the name of the module to which the workflow applies, the outcomes you will achieve, and the suitability of the workflow:
Module: Deals.
Outcomes: Multiple actions based on stages being updated by the user.
Suitability: All Zoho users.
A summary of the trigger, conditions, and actions is illustrated here, as follows:

Figure 6.16 – Multiple conditions and workflows based on Deal stage
In the preceding example, you will notice that there are multiple conditions, each matching a different stage.
As a benchmark, you should be aiming for each stage of your Deals module triggering a workflow(s). Use the preceding example directly or tweak it for your business process.
Ask yourself the following questions:
- What needs to happen in order to move this Deal on to the next stage?
- Who needs to action this and when?
Answering these questions will give you the information you need to understand which workflows to create.
While the earlier examples contain instructions to help you get started, there are almost endless possibilities for how a business can benefit from workflow automation. Here are some additional examples of generic workflows that are helping Zoho users around the world gain value from their CRM system every day:
- Sending an email containing a link to a feedback survey—triggered x days after Closing Date (or another appropriate date field such as delivery/installation date).
- Creating tasks for the salesperson to give a follow-up courtesy call—triggered x days after Closing Date.
- Prompting a user to re-engage with a former prospect—triggered by the Stage field being updated to Lost with a Due Date set to Closing Date plus x days.
- Updating the status of a Lead record when the Lead Score increases beyond a threshold score—triggered based on the score.
- Updating the status of a Lead record when the Lead Score decreases below a threshold score—triggered based on the score.
- Adding tags to records based on the number of days since the last activity date—used to notify marketing to add to a mailing list (which can also be automated). This will be triggered x days after the Last Activity Date.
This list is not exhaustive, and many more examples will be specific to your business. So, it is often beneficial to include other team members in any brainstorming sessions.
Tip
Aim for around five workflows initially before seeking feedback from users or review yourself how effective these are if you are a single user. Once you have refined these based on feedback and are getting value from them, it's time to brainstorm ideas for the next batch before repeating the Build > Measure > Evolve process.
Summary
In this chapter, you have gained an understanding of the value and importance of workflow automation in Zoho CRM.
You have learned about the different types of triggers and how to add single/multiple conditions. You also have developed your knowledge of the different types of instant and scheduled actions that can be automated.
Most importantly, you realize that the possibilities are endless and probably bound by your imagination only. Successfully adopted workflow automation can in many cases give you a return on your license investment every month, meaning that the software literally pays for itself.
In the next chapter, you will learn about some of the essentials of systems administration.