
9. MVVM and Testing
Mvvm is the abbreviation for a user interface design pattern called Model-View-View Model. This is a pattern (a reusable solution to a commonly occurring problem) that was introduced many years ago for Windows Presentation Foundation (WPF) development and was later adopted by Silverlight, web-based applications like knockout.js, Windows Phone, Xbox, and Windows 8 apps. The central idea behind MVVM is a separation of UI implementation from presentation and business logic that uses data-binding to connect the layers. This results in a number of benefits including making it easier to work on the design (look and feel) aspects of applications and to apply testing. You can use the Portable Class Library (PCL) with the MVVM pattern to write components and tests that are shared between WPF, Silverlight, and Windows 8 apps. You learn about the PCL later in this chapter.
You may have already noticed that the Visual Studio 2012 C# with XAML templates provide MVVM out of the box. The LayoutAwarePage contains a DefaultViewModel dictionary property. Data, including classes that implement property change notification, is bound to the dictionary and then referenced from code. MVVM is preferred for Windows 8 applications because it takes advantage of the data-binding features in XAML you learned about in Chapter 3, Extensible Application Markup Language (XAML). Another advantage of the MVVM pattern is that it helps facilitate testing.
Testing is one of those topics that many developers seem to have a love/hate relationship with. In this chapter, I hope to show you that unit tests done correctly can save significant time during the development process and increase the maintainability and extensibility of the application. MVVM provides a good foundation to work from for tests because well-defined, decoupled code is also code that is easy to write tests for.
The proper use of MVVM with testing makes it easier to build applications, especially when you have larger teams or separate teams of designers and developers. The ability to incorporate unit tests also helps reduce the rate of customer-initiated incidents because bugs are caught earlier in the process. Unit tests make it easier to extend and refactor applications, and the MVVM pattern itself allows for what I call refactoring isolation or the ability to make modifications to areas of the application without having to visit and update every module as a side effect of changes.
UI Design Patterns
User interface (UI) design patterns are reusable solutions that have evolved to solve the problem of maintaining the presentation layer of your application independently of the underlying business logic, services, and data. Some of the problems being solved include the following:
• Fluidity of the user interface—Often there can be significant changes to look, feel, and interaction over time. A well-defined and properly implemented UI design pattern can help insulate those changes to minimize impact on the core business logic and data concerns. This is evident in the existing templates that can expose data in various views (snapped, landscape, and portrait) without having to change the underlying classes that provide the data.
• Parallel development and design—Often the design team is separate from the development team, with different skillsets and involving multiple designers. UI design patterns can maximize the efficiency of this workflow by providing the separation necessary to allow the developers and designers to work in parallel with minimal conflicts. Design-time data allows designers to work directly with the XAML to create the desired look and feel without having to understand or interact directly with the underlying logic.
• Decoupling of presentation logic—There are common patterns in the presentation layer, such as providing a list of items and allowing the user to select a single item, that can be solved in multiple ways (combo box, grid, list box, and so on). UI design patterns help decouple data elements from the presentation implementation so the core functionality can remain the same regardless of how the pattern is presented.
• View-logic testing—Complex view logic is often the domain of developers. Testing the logic is made easier by not requiring a full-blown UI. An example is dependent or cascading lists: Selecting an item in the first list determines the content of the second list. Ideally, you should be able to implement this behavior and test it without having to draw a corresponding combo box control and process click events.
In 2005, a developer named John Gossman working on WPF—which at the time was code-named Avalon—published a blog post that would ultimately introduce the MVVM pattern to the world (http://blogs.msdn.com/b/johngossman/archive/2005/10/08/478683.aspx). In his post, he described “a variation of Model/View/Controller (MVC) that is tailored for modern UI development platforms where the View is the responsibility of a designer rather than a classic developer.”
The introduction to his post provides valuable insight into one of the original motivations for the pattern: the designer/developer workflow. His post further explains that the view is defined declaratively (a reference to XAML) and is responsible for inputs, keyboard shortcuts, visual elements, and more. The view model is responsible for tasks that are too specific for the general model to handle (such as complex UI operations), for maintaining the view state, and for projecting the model to the view, especially when the model contains data types that won’t map directly to controls.
MVVM uses data-binding and the Visual State Manager (VSM) to communicate between the UI implementation and your business and presentation logic. Instead of raising events, the view drives the view model through data-binding—whether it is by updating a value that in turn synchronizes to a property on the view model or by mapping an event to a command that fires on the view model. Presentation logic exists in the view model as code and takes the form of behaviors, triggers, visual states, and value converters in the view.
In applications based on the built-in Visual Studio 2012 templates, the LayoutAwarePage automatically detects changes to the view state (for example, going into snapped view or changing the orientation from portrait to landscape). The InvalidateVisualState method uses the VSM to set the new visual state:
string visualState = DetermineVisualState(ApplicationView.Value);
foreach (var layoutAwareControl in this._layoutAwareControls)
{
VisualStateManager.GoToState(layoutAwareControl,
visualState, false);
}
In XAML, the VSM enables you to define the appropriate templates for the various states. You’ve learned how to provide a snapped view or how to switch from using the GridView control to a ListView control when the orientation changes. The design is defined in the XAML independently of the underlying code, creating a clean separation of concerns.
You can see what this looks like for the Wintellog project in Figure 9.1. Note the LayoutAwarePage facilitates the view model dictionary, handles changes with the VSM, and is the base class that the XAML for the view is derived from. The BlogDataSource class coordinates with the application to gather data and then exposes this via the view model dictionary, starting with the GroupList property.
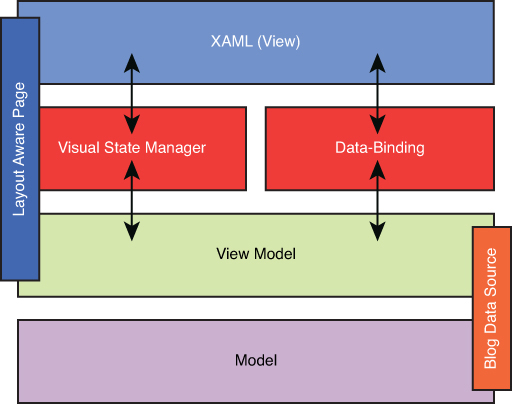
Figure 9.1. The MVVM pattern used by the Wintellog application
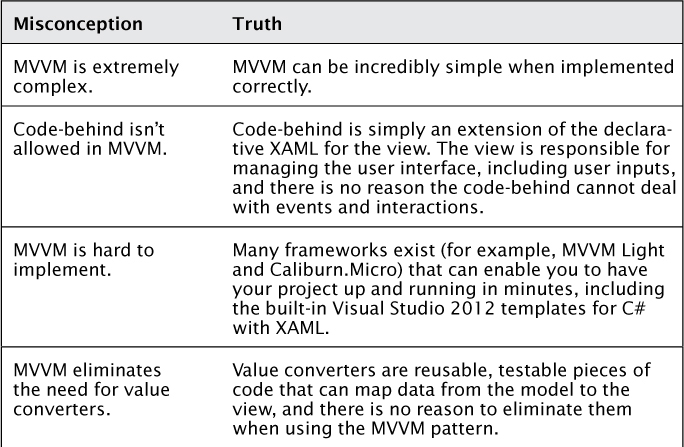
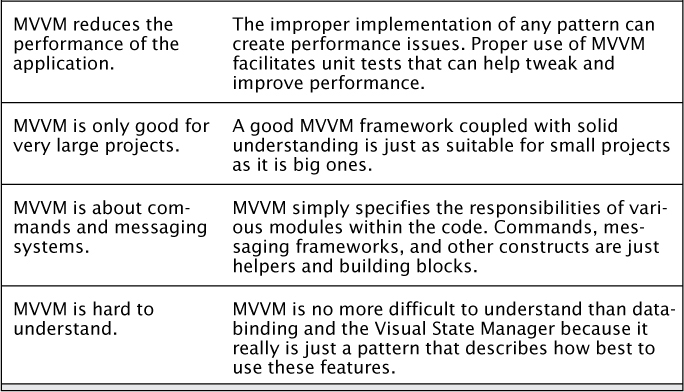
Like other patterns, MVVM is a solution to common problems. When implemented correctly, it should make the job of building your Windows 8 application easier. Unfortunately, the pattern can be abused and end up slowing down projects and making them more complex than necessary. I’ve built dozens of large enterprise applications using the MVVM pattern and am glad that Microsoft decided to make the pattern a part of their built-in templates for Windows 8 apps. The first use of MVVM in Visual Studio dates even earlier to the Panorama templates used for Windows Phone development. Although the pattern has been used for years, there are many lingering misconceptions. Table 9.1 lists some of these misconceptions and the truth that addresses them.
Table 9.1. Common MVVM Misconceptions
In the rest of this chapter, you learn about the various parts of MVVM and how to apply it with a special focus on testing. If you’ve read the previous chapters in this book and followed the examples, you already have an understanding of MVVM because you’ve created specific classes that implement property-change notification to facilitate data-binding. Those classes can actually be thought of as your view models. You also learn more about view models later in this chapter.
Contrary to the misconceptions about MVVM, there are many advantages the pattern provides above and beyond the separation of design from development. In my experience, these are the top ten benefits you may receive by using MVVM in your applications:
1. A clean separation of concerns (decoupling)—MVVM follows best practices for software architecture.
2. Designer/developer workflow—MVVM enables parallel development and design by multiple team members working on the same project through its support of design-time data.
3. Unit testing—You learn more about testing later in this chapter.
4. Use of data-binding—MVVM takes direct advantage of the rich and powerful data-binding system in XAML for Windows 8 apps, which also allows for design-time data.
5. Improved code reuse—View models can be used to power multiple views, and various helpers and scaffolding can be reused throughout your project and across various products in your organization, even in different technologies including WPF and Silverlight.
6. Modularity—MVVM encourages a modular design that makes it easy to modify parts of the application independently of each other.
7. Refactoring containment—Through the clean separation of concerns, MVVM minimizes the impact to other areas of the application from refactoring.
8. Extensibility—A well-designed MVVM framework makes it easy to extend the application by adding new screens and modules.
9. Tools support—Various tools, such as Expression Blend and the designer, are built into Visual Studio that can take direct advantage of MVVM.
10. Pattern vocabulary.
The final item, pattern vocabulary, requires some additional explanation. When you are learning how to read, there is a strong correlation between the size of your vocabulary and your ability to comprehend what you are reading. This should not be surprising because vocabulary provides the building blocks for the text you are trying to comprehend, and not understanding those blocks can lead to confusing conclusions and misinterpretations of the text. Although there is a strong correlation, vocabulary certainly doesn’t guarantee comprehension because you must be able to piece the words together and derive their meaning as a whole.
Developing software is an exercise that also involves a vocabulary. You start with the vocabulary of the language you are developing in. Programs have their own syntax and grammar, and comprehension relies on your ability to interpret the keywords correctly and understand them in context. Patterns provide a higher-level vocabulary that can describe entire subroutines and components within the system. As with vocabulary, knowing a pattern isn’t the same thing as comprehending how it best fits into a software application (or whether it belongs at all).
The more you are able to understand and integrate patterns, the more you will be able to build your vocabulary and better comprehend complex software systems. I’ve found the developers who are involved in the most successful projects and who have tackled the most complex systems also tend to have a strong pattern vocabulary. They are not only aware of many patterns that exist in software development, but also understand when and where they make sense.
I believe MVVM is popular because it has been so successful at providing the benefits listed earlier when implemented correctly. MVVM is an important pattern to learn and understand for Windows 8 applications especially because it is the default pattern provided by the built-in C# with XAML templates. Like all patterns, it is a tool and must be used for the right job. In the next few sections, I cover MVVM in more detail to help you learn the pattern and determine how to take advantage of it in your applications. Let’s start by examining the components that make up MVVM.
The Model
The model is often confused with a “data model,” which is far too specific. A better definition is the application’s model of the world. It is the model that encompasses everything that must happen to solve the business problem without defining a specific user interface or presentation of data. Some like to call this the domain model, but a domain model is a conceptual representation, whereas the model in MVVM is an actual implementation.
To provide a simple example, a banking system might contain customers and accounts. The representations of customers and accounts are part of the model. The model describes how they are related: A customer has one or many accounts. It describes state (an account is open or closed) and provides behaviors (an account accrues interest). Making the model work requires implementations of classes with properties; a database to store the information; and loads of APIs to fetch data, transfer it, and apply various algorithms.
When built correctly, the model should expose only the parts needed by the application. For example, the presentation layer shouldn’t have to worry about how the data is stored (is it in a database or in an XML file?) or how the data is retrieved (was it parsed and passed as a binary object over a TCP/IP socket or sent over a REST service?). A model that is too open will create unnecessary dependencies and overcomplicate the code.
The model for the Wintellog application encompasses the blogs and blog posts as well as the network and syndication APIs used to retrieve them. It includes the WinRT APIs used to send tiles and notifications. The code used to store the items in cache and retrieve them is also part of the model. All of these components work together to deliver the end user experience, without interacting directly with the user. When a blog item is displayed within the application, it’s not the physical page on the Web that is shown, but a data bound representation of the BlogItem entity.
Your main goals should be to write flexible, extensible, testable, and maintainable code. When the model of your application follows these principles, the MVVM pattern can easily connect to the interfaces and classes that are needed without creating dependencies on parts of the system that have nothing to do with presentation logic. The model is the “application model” of the real world, but at some point that model must be presented to the end user. This is done through output, which in the case of Windows 8 applications is a rich and powerful user interface (UI). The screen that the user is presented with is referred to as the view.
The View
The view in Windows 8 apps is what interacts with the user. The view itself is the user interface. The user interface is almost always represented using the declarative XAML markup. The XAML participates in the dependency property system, and the view is able to present information to the user as well as respond to user inputs. Table 9.2 shows common parts of the views and their function.
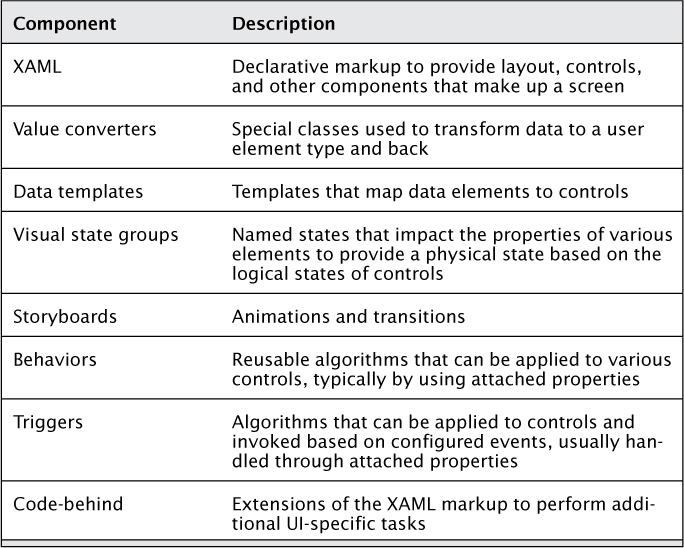
It should be obvious from Table 9.2 that the view is not completely ignorant of presentation logic. Commands map controls to actions on the view model, and data-binding declarations require knowledge of the structure of the underlying data to bind to. Animations, visual states, templates, behaviors, and triggers all represent various components of business logic that relate to the view.
What may not be as obvious is that all of these components are stateless with regard to the model of the application. Storyboards maintain a state (started, stopped, playing, and so on), and visual state groups maintain a state, but all of these states are related to the UI. Behaviors and triggers also operate based on events or act on generic controls and should not be designed with dependencies on the underlying data and business logic. Even code-behind is typically written to facilitate certain aspects of the UI. More complex code should go somewhere else—not because there is a rule that code-behind is not allowed, but because more complicated algorithms need to be tested, and having a separate and decoupled class makes it easier to test without having to wire up a full UI.
So where does the bulk of presentation logic go, and what is responsible for maintaining the business state of the application? This state includes the data that is being presented as well as the status of various commands and processes that both drive the UI and respond to user inputs. The answer is the essence of the MVVM pattern and the one element that makes it unique: the view model.
The View Model
The view model is what makes MVVM unique. It is simply a class that holds the responsibility of coordinating the interaction between the view and the model. The view model is where the bulk of the presentation logic should reside. In my opinion, a well-written view model can be tested without creating any views and has three main methods for communication with the view:
• Data-binding
• Visual states
• Commands and/or method calls
With this definition in mind, you’ve already created several view models. The BlogDataSource class exposes the GroupList, which in turn contains instances of BlogGroup and BlogItem. View models typically implement the property-change notification interface. They often include references to APIs that enable the exchange of data and communication with the model. The use of interfaces makes it easier to write portable code that can be reused across your organization.
Those are all of the components of MVVM. The key to MVVM is the view model, or a class that supports property change notification so that it can participate in data-binding. A view model might be a simple domain object like an instance of a BlogItem, or it may be a class that exposes collections, commands, and interacts with other interfaces more like the BlogDataSource. Decoupling the view model from the UI enables not only testing, but also code reuse. Combined with the Portable Class Library (PCL), you can effectively write business logic that is shared between various platforms.
The Portable Class Library
The Portable Class Library (PCL) is a special project type in Visual Studio 2012 that enables you to write assemblies that work on multiple .NET platforms. It is the ideal way to create shared components with business logic that you can reuse in your desktop and Windows 8 applications. An assembly built with the PCL project template can run on those platforms without being recompiled.
The PCL works by providing a targeted subset of APIs that are common to all platforms. When you create a PCL project, you are prompted to choose the frameworks you would like your code to run on, as shown in Figure 9.2.
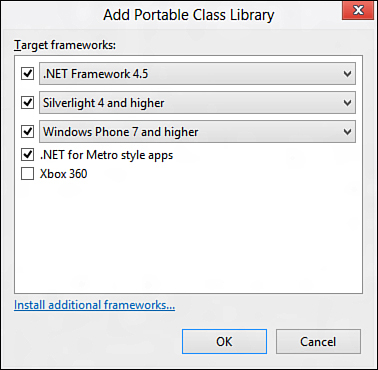
Figure 9.2. Choosing target frameworks for the Portable Class Library
The amount of portable code available will depend on how old the frameworks are that you target, the number of frameworks you target, and type of the target frameworks. For example, a project that targets Xbox will have far fewer APIs available than a project that targets Silverlight. Likewise, the .NET Framework 4.0 will impose more limitations than a project that targets the .NET Framework 4.5. To see what APIs are available when you make a selection, expand the References for your project in the Solution Explorer. Right-click and choose Properties, and you will see a Path property. Copy the path and open it in Windows Explorer.
Figure 9.3 shows the folder available when you accept all of the defaults. Each combination of frameworks results in a new profile that contains the set of APIs that will work across those platforms. The reference actually uses a new feature known as Extension SDKs that allow references to include multiple files and configuration as opposed to a single project or assembly. You can read more about Extension SDKs online at http://msdn.microsoft.com/en-us/library/hh768146(v=vs.110).aspx.

Figure 9.3. A Portable Class Library profile
As you can see, the example profile supports several libraries. In addition to core services, there is support for networking, serialization, and web services, as well as XML including LINQ. For any of the referenced assemblies, you can use the ILDASM.exe tool to inspect the APIs that are available. The assemblies are simply copies of the .NET Framework assemblies that are supported by the particular profile.
The WintellogMvvm project for Chapter 9 has been refactored to take advantage of the Portable Class Library. The PortableWintellog project was created to support both the .NET Framework 4.5 and Windows 8 applications. The project provides a number of classes and interfaces that can be shared without modification between Windows 8 and desktop apps.
The Contracts folder contains interfaces that are shared across the platforms. PCL projects are the perfect place to define interfaces and contracts that don’t take strong dependencies on non-portable APIs. These interfaces can help you separate logic that is platform-specific from other logic through a concept called Inversion of Control or IoC for short. IoC helps you build classes that are easier to test and are more likely to be shared across multiple platform targets.
In the previous versions of the application, the StorageUtility class was a static class used to write and read from the local cache for the application. The BlogDataSource class controlled access to the StorageUtility. In a sense, it took on an additional responsibility to interface with the static methods exposed by the class. Although this was a straightforward way to access storage, it also created a strong dependency or coupling between the data source and the implementation of the storage logic. This prevented the BlogDataSource class from being shared by any environment other than the Windows 8 platform. It also made it tough to test the class because any test would require that appropriate storage exists.
In the PortableWintellog project, the control has been inverted. This simply means the BlogDataSource class no longer has the responsibility of determining how storage works. Instead, it works with the IStorageUtility interface. The interface provides the method signatures to save and restore items but does not impose any type of implementation. This makes the BlogDataSource more loosely coupled because it no longer has a direct dependency on the storage implementation.
There are numerous advantages to this approach. First, it is possible (and easy) to test the storage logic in the BlogDataSource class without relying on the presence of storage. You can easily create a helper class (as you see later in this chapter) to emulate storage for the purpose of testing. Second, you can implement the appropriate storage based on the target environment. The WintellogMvvm project contains an implementation for Windows 8 apps. The WintellogWpf project, a desktop app based on WPF, contains an implementation for desktop applications. Even though the implementations are different, the interface allows the same BlogDataSource class to be shared between both versions of the application.
Take a look at the WintellogWpf project. It references the portable class library and reuses all of the logic contained within the BlogDataSource class. This includes the logic to fetch individual blogs and items from the list, the interaction with the cache, and even some online functions. The HttpClient is shared between both desktop and Windows 8 applications, so it is used consistently to load the page for a post to parse related images.
The StorageUtility implementation uses the local file system to store the cache instead of isolated storage. An internal helper method computes a path to the application folder on the system:
private static string GetRootPath()
{
return Path.Combine(
Environment.GetFolderPath(
Environment.SpecialFolder.LocalApplicationData),
"Wintellog");
}
Here is the code to list files. It checks to see if the directory exists before querying for the file list. The code is wrapped in a Task to execute asynchronously:
var directory = Path.Combine(GetRootPath(), folderName);
return
Directory.Exists(directory)
? Directory.GetFiles(directory)
: new string[0];
Remember the earlier discussion about Inversion of Control? The application controls dependencies by injecting them at the start. In the App.xaml.cs file, you’ll find the following snippets that map the portable contracts to WPF-specific implementations:
Ioc = new TinyIoc();
Ioc.Register<IStorageUtility>(ioc => new StorageUtility());
Ioc.Register<IApplicationContext>(ioc => new ApplicationContext());
Ioc.Register<IDialog>(ioc => new WpfDialog());
Ioc.Register<ISyndicationHelper>(ioc => new SyndicationHelper());
After the dependencies are resolved, the IoC utility is used to inject them into the BlogDataSource class through its constructor:
Ioc.Register(ioc => new BlogDataSource(
ioc.Resolve<IStorageUtility>(),
ioc.Resolve<IApplicationContext>(),
ioc.Resolve<IDialog>(),
ioc.Resolve<ISyndicationHelper>()));
The technique of having an external helper inject the dependencies is referred to as Dependency Injection (DI) and is a common method for handling IoC. The small class for IoC included with the sample application only scratches the surface of scenarios available for IoC. There are many mature frameworks available, including one that I’ve used for several years, the Managed Extensibility Framework (MEF), that is available for use in Windows 8 through a NuGet package:
http://nuget.org/packages/Microsoft.Composition/
With all of the logic encapsulated in the various shared and local classes, it was straightforward to create some XAML in the MainPage.xaml for the blog. The functionality is far more basic than in the Windows 8 application, but it completely reuses the existing class. In fact, it demonstrates how you can have a significantly different look and feel while using the same business logic in your core classes, as evidenced by the screenshot in Figure 9.4.
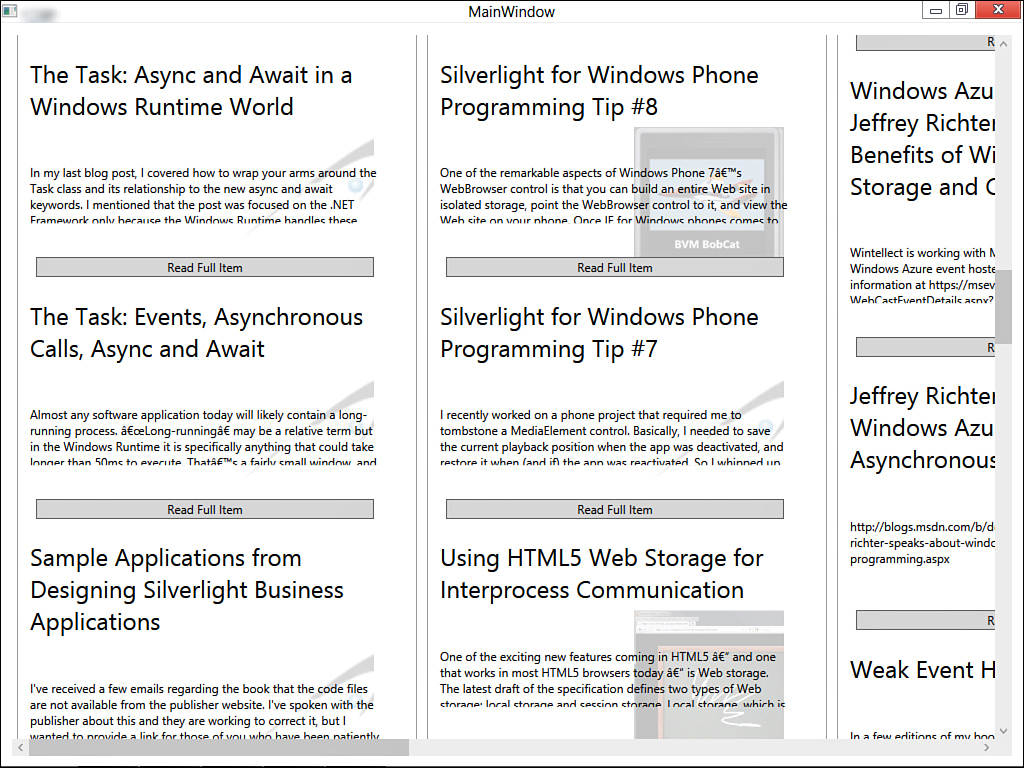
Figure 9.4. The WPF version of the application
Sharing the code between platforms and applications is powerful, but there is an even bigger benefit to using the Portable Class Library for common code: testing. With this approach, you’ll only have to test the core components once even though they might be used by multiple applications. You might be asking, “What is the point of software testing?”
Why Test?
The first question I’m often asked when I speak about testing is, “Why test?”
I’ve been writing enterprise software for well over a decade, so I tend to take testing for granted. In reality, however, it is a very valid question and one that is often asked when companies are allocating resources and building their teams. “If the product is well-written, does it really require tests?” “I understand we need to test it, but isn’t that the responsibility of the developer?” “Unit tests just slow down the process—can’t we just have a sales person review the builds when they are pushed out?”
There are dozens of valid reasons to perform testing—I’ll share a few of the benefits I’ve encountered during my career. These are benefits I’ve seen regardless of the vertical, size of the project, or composition of the team doing it.
Testing Eliminates Assumptions
Developers are biased. There is no escaping the fact that when you set out to build an application, you have a notion of how it should work. When that notion is correct, it is easy to build the software the customer is looking for. That is usually not the case because most developers build for what they expect. You can test the “happy path” through an application all day long and not find a single bug. Turn it over to users, however, and things get ugly fast. They don’t know they’re not supposed to enter the text into the number field, that the date has to be in a special format, or that it’s not fine to close the browser or undock the laptop halfway through a multi-step form.
Invariably the users will find a way to interact with the application that was completely unexpected and that results in errors. As developers, it is our duty to address those scenarios. It’s not only about trapping and logging errors in code, but also working with the design team to provide a user interface that makes it clear what the intent is and how to use the software. There is a fine art to pulling this off, and as a visionary chairman liked to tell me, “It takes a lot of technology to create the illusion of simplicity.”
The specification for a particular unit or module is often focused on what should happen and some simple data validations. Every step of the process introduces assumptions about layout, appropriate validation, business logic, and validation. Testing, especially testing by a team that is not technical and represents a valid user of the system, helps eliminate those assumptions early in the process so you can produce a higher–quality product.
Testing Kills Bugs at the Source
If someone asked you to help them find a watch he lost five years ago, how would you start? Imagine how many people might have crossed the same spot over time. Storms could have shifted its position. New construction could have paved over the very place it was resting for months, buried under a layer of mud. If that same person asked you to help only five minutes after losing the watch, you’d probably feel a lot more confident about your odds of success.
Bugs are easier to fix when they are found closer to the source. When you isolate a bug inside a specific component, you have a view of the component that makes it easier to comprehend the context the bug was discovered in and take steps to resolve the issue. Bugs that happen as the result of complex modules interacting across third-party boundaries are far more difficult to track down. Bugs that are found in the field are often the most frustrating because it can be difficult if not impossible to obtain the forensic evidence you need to properly troubleshoot the problem in the production environment.
Tests can contribute to finding bugs early in the software development lifecycle. The earlier you find the bug in the process of developing the application, the easier it is to fix. Unit tests ensure components behave as expected at a local level. Integration tests ensure that modules interact appropriately in spite of ongoing changes to underlying code and APIs. Coded UI tests validate the function of the user interface and help flag breaking changes to the application flow that are often side effects of changes to business and validation logic.
Testing Helps Document Code
My favorite open source projects are ones that ship with thousands of lines of well-written unit tests. For me, this is the easiest and fastest way to learn how to interface with a third-party API. The manual may be fine, but it’s the tests that provide sample code, multiple examples of ways to call the API, and more importantly, expected conditions that will make things break. There have been a number of projects that I discovered a way of using the component that just wasn’t obvious from the documentation but was addressed with a test.
Well-written unit tests with adequate code coverage help document the code and make it easier for developers to consume, maintain, and extend the code base. The unit tests give insight in the breadth and depth of the project. They demonstrate various ways to call the APIs. They show what some expected exception conditions are and how to handle them. They provide a baseline to work from when you are extending a code and serve as a template for additional tests as the code base evolves.
Integration tests and coded UI tests also require a specific script. That script involves knowledge of the system and how it is expected to behave. It is not uncommon for the test cases to be written at the start of the project as part of the specification process. As a developer, I always prefer having explicit and well-thought out test cases because it gives me a standard to measure my deliverables against. A story is fine, and I can write code to a story, but a set of explicit tests is a validation checklist I can use to verify that I wrote the code correctly and understood the story in the business context it was intended.
Testing Makes Extending and Maintaining Applications Easier
This point falls in line with the previous one. I still remember the project early in my career for which I was forced to start writing unit tests when I didn’t fully appreciate their value. I gritted my teeth and wrote unit test after unit test while complaining that it was nothing but “busy work” and slowed down my progress. Fortunately, although some of the tests may have been poorly written, our architect provided great guidance, and the majority of the tests served their functions well.
I learned just how well when I was asked to perform a major change to one of the interfaces that would require significant refactoring. In the past, exercises like this would have been like writing code in the dark—I would have slammed in the changes and held my breath, hoping the code would compile, and then stepped through the final product with fingers crossed. I’d have held my breath again when it was pushed to production because that was always when the problem we didn’t think of happened and resulted in those fun early morning support calls.
With unit tests in place, things were different. I was able to tweak parts of the interface and then run the unit tests to determine what areas were impacted. Instead of looking at the application as a whole and trying to figure out what broke, I could focus on the unit tests and determine what was required to make each one pass. This resulted in concise, precise, iterative changes that not only cut the time it took to refactor by half, but also left the product far more stable when it was pushed to production after.
Testing Improves Architecture and Design
One side effect of writing tests is that it forces you to think about how components are built and interact. This has the direct and positive side effect of improving both the architecture of the application as well as the approach to design. I witnessed this change personally when we took a large team and shifted from the haphazard “napkin specifications” to a process that included writing solid unit tests. It’s not uncommon for developers to throw together classes and APIs only to discover they aren’t appropriate and have to be rewritten. Tests help bring to the surface issues with the APIs early in the process so they are mature and tested by the time it is necessary to integrate with other components.
I ran into this early on in my own career. When building complex systems, I would often dive headfirst into a coding marathon and emerge on the other end with thousands of lines of code. The only problem was that I would flip the switch and find some small defect that would take time to discover and even longer to fix. When I started using tests, I began to approach those complex systems as smaller, simpler units. I’d focus entirely on the design, construction, and thorough testing of the component and then move to then next. It took a little more time to create the building blocks for the system, but they would quickly and easily integrate and save time overall due to a lower defect rate when complete.
Testing Makes Better Developers
The same effect tests have on the quality of the code base I believe positively impacts developers. This is another observation from personal experience. The same developers who grumbled at the notion of writing tests at the beginning of the project are often excited to share their modules and show the tests that validate them. The act of spending additional time thinking about components and authoring tests changes the entire approach to software design. Common patterns are quickly and easily discovered and readily applied in other areas where the solution makes sense, and approaches to error handling, API definition and organization of algorithms within code evolves based on the positive feedback of the tests themselves.
Conclusion: Write Those Unit Tests!
Hopefully you’ve come to the conclusion now that tests are important. Some developers reading this may be surprised it’s even a topic of discussion, as there are many shops that include testing as a de facto part of the development lifecycle and many that follow full Test-Driven Development. My suggestion if you are new to testing is to take it one step at a time. A great place to start is by adding unit tests to your projects.
Unit Tests
Unit tests are a category of tests known as white box tests. The entire software system can be looked at in two ways. The end user sees a “black box” because she is not exposed to the source code, database definitions, and other processes that drive the application. Instead, she is aware of interactions (most often directly through the user interface) that go into a black box and results that come out of that black box. This is the realm of QA and automated UI tests.
White box tests would be better referred to as “clear box” tests because they imply exposure to the inner workings of the system. Unit tests require a fundamental knowledge of what’s happening at the source code and stored procedure level. Integration tests require knowledge of the APIs and boundaries between systems. White box tests ensure the internal system is working and is the set of “checks and balances” that keeps the black box functioning correctly.
I’ve seen many tests that were called unit tests but really weren’t. If you loathe running the tests for your project because they require an Internet connection, a specially configured directory, and they take hours to run, you are most likely running some form of integration tests and not a true unit test. Unit tests have common characteristics that are important to understand:
• Unit tests should focus on a specific function of a class. Classes should only have a single responsibility, so if you find you are spending hours writing the unit tests for a class, it’s probably a sign that the class should be refactored.
• Unit tests should be completely isolated so they run “no matter what.” You shouldn’t have to create a special environment for them to run, and they should not have dependencies on classes outside of the one you are testing.
• Unit tests should be short and simple. They should not take too long to execute even when you have many in a project, and it should be extremely clear what the test is doing and what the success or failure conditions are.
• Unit tests should be easy to write. The simplest and most efficient way I’ve found to write unit tests is while I’m defining the target class. Test-Driven Development (TDD) takes this a step further by having you write the test first and then define the class and API to make the test succeed.
You can learn more about test-driven development online at http://www.agiledata.org/essays/tdd.html.
To help you understand unit tests, I’ve created a few for the Wintellog application. Had this been developed using a full Test-Driven Development cycle, there would literally be hundreds of tests. For the purposes of this chapter, however, I wanted to provide a few specific examples. All of the tests included in the Chapter 9 sample application can be run using the Windows Store Unit Testing Framework.
Windows Store Unit Testing Framework
Visual Studio 2012 has built-in support for writing unit tests. The default test system is known as the MSTest framework. Although Visual Studio 2012 does support plugging in other test frameworks including the popular NUnit (http://nunit.org/), I focus on the features that are available “out of the box” for the Professional-level SKU (unfortunately, unit tests are not available for the free Express version of Visual Studio 2012). This includes a test template for Windows 8 unit tests.
When you add a new Windows 8 style project to your solution, one of the options is to create a Unit Test Library for Windows Store apps. This template will create a project that references the assemblies and SDKs used for testing including MSTestFramework and TestPlatform. The project is similar to a full-blown Windows 8 app and even has its own application manifest. You can see an example of a project created using this technique in the Chapter 9 sample application. The project is named WintellogTest.
To run the tests, navigate to Test![]() Run...
Run...![]() All Tests or hold down Ctrl+R and then press A. The package will be compiled and executed. You should see results similar to what is shown in Figure 9.5.
All Tests or hold down Ctrl+R and then press A. The package will be compiled and executed. You should see results similar to what is shown in Figure 9.5.

Figure 9.5. Unit test results in Visual Studio 2012
The individual tests are listed along with an indicator of whether or not they succeeded and how long they took to run. You can also filter this list by clicking the little drop-down icon next to the search icon. In addition to filtering by result, you can filter by test file name and fully qualified name. Figure 9.6 shows the filter applied for only those tests in the TinyIocTests.cs file.
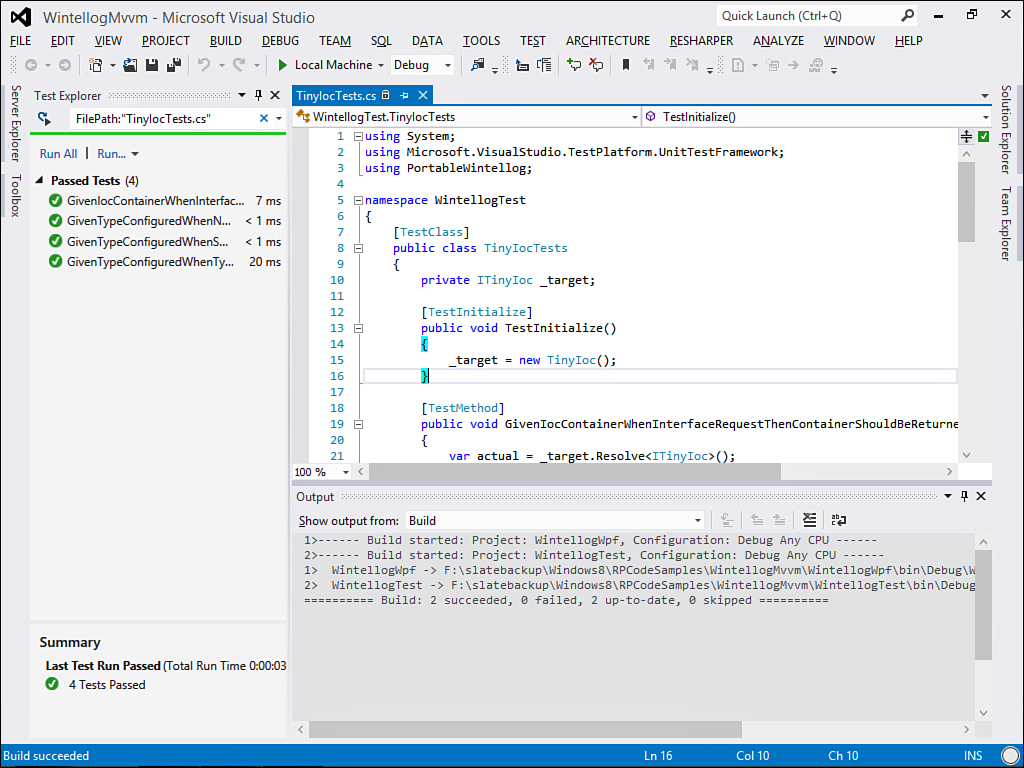
Figure 9.6. Filtering by test file
Setting up tests is relatively straightforward. You declare a class and tag it with the TestClass attribute, like this:
[TestClass]
public class TinyIocTests
There are a number of popular conventions for declaring tests. I prefer to have a file per target class type and create a test class with the target class name followed by “Tests.” There is usually a specific target for the test that I track:
private ITinyIoc _target;
For any setup that must run before each individual test, you can declare a method and tag it with the TestInitialize attribute. This example simply spins up a new instance of the IoC helper:
[TestInitialize]
public void TestInitialize()
{
_target = new TinyIoc();
}
Finally, tests are declared as methods that are decorated with the TestMethod attribute. There are many different methods for both naming and scoping tests. I try to have targeted tests that focus on one aspect or code block in the target method, but sometimes those will involve supporting tests as well. I like to name tests following the given... when... then pattern:
Given a certain set of pre-conditions, when an action is taken, then what should the result be? Although this helps name the test, within the test you’ll almost always follow three prescriptive steps: arrange, act, and assert. You arrange the test to prepare it for running (that is, set up the given), act by calling something on the target class (set up the when), and then assert that you have the results you need (validate the then).
Let’s take a look at a simple test to start with. The IoC container configures itself, so if you request the ITinyIoC interface, it should resolve to the instance of the IoC container you’ve created. This reads as:
“Given the IoC helper has been created, when the interface for the IoC helper is requested then the helper should return the instance of itself.”
The test looks like this:
[TestMethod]
public void GivenIocContainerWhenInterfaceRequestThen ContainerShouldBeReturned()
{
var actual = _target.Resolve<ITinyIoc>();
Assert.AreSame(_target, actual, "Test failed: instance was not returned.");
}
The arrange happens in the TestInitialize method when the target is created. The act happens with the call to resolve the interface. The assert validates that what was expected (the instance itself) is what was actually returned from the class. If there is a mismatch, the test fails, and a specific message is provided. From this example, we can move to a slightly more complex one:
“Given a type is configured with the IoC helper, when the type is requested then an instance of the appropriate type should be returned.”
This is really the true heart of what the IoC should do. The lightweight container that I wrote for this application allows you to pass in the type you are satisfying (usually an interface or abstract class, but it can be a regular class as well) and a function that returns a new instance of the type. By default, the IoC helper will hold onto the first type created. This is known as a shared instance. You can, however, request a new instance be returned, and this will execute the function again to generate a new, non-shared instance.
Here is the test that the mapping works—the base type is simply System.Object, and the mapped type is dynamic:
_target.Register<object>(tinyIoc => new {id = Guid.NewGuid()});
dynamic expected = _target.Resolve<object>();
Assert.IsInstanceOfType(expected.id, typeof (Guid),
"Test failed: dynamic type was not returned.");
The arrange sets up the IoC helper to return a dynamic type when object is requested. The act calls the container to resolve the instance. Finally, the assert verifies that a dynamic type with a property called id of type Guid was indeed returned.
You can browse the remaining tests to see the check for subsequent calls returning the same instance (shared) while calls that request a new instance work the way they were expected to. These were fairly simple examples and tested a fairly self-contained component. What happens when you have components like BlogDataSource that rely on other components to work? This is where some good mocks and stubs can come into play.
Mocks and Stubs
In unit tests, you focus on one piece of code. The idea is to test the main responsibility for that code and not concern yourself with external components that may include other parts of the current application. In the case of the BlogDataSource class, you care about the logic it uses to read blogs, inspect the cache, and assemble a list of groups and items to expose to your application. It is not the responsibility of the class to understand how storage works or know how to create a dialog on the target platform. Those responsibilities are delegated to other components.
There is plenty of debate over the precise definition of what a mock or stub is, but I tend to follow the general guideline that a stub is simply a fake implementation of a class used as a placeholder so that another class that depends on it can run. A mock is slightly more. A mock is also a fake implementation (meaning it is created specifically for testing and is not part of the production system), but in addition to allowing another class to run, a mock may track some sort of state so it can be inspected as part of the assert portion of a test. This allows you to check that certain methods were called the right way to ensure the logic in the target component is behaving correctly.
There are several ways to create stubs and mocks. The first is by creating your own helper classes. You can see these in the TestHelpers folder of the WintellogTest project. The DialogTest class is an example of a mock because it emulates an asynchronous dialog but also records the message passed for later inspection. The full class is shown in Listing 9.1.
Listing 9.1. Mocking the IDialog Interface
public class DialogTest : IDialog
{
public string Message { get; set; }
public Task ShowDialogAsync(string dialog)
{
return Task.Run(() =>
{
Message = dialog;
});
}
}
The mock does not involve any type of UI, so it can be easily run from within the test system. It stores the message passed so you can test that your dependent component used the dialog appropriately. The other classes provide similar functionality by either standing up fake data sources for the dependent classes to use or recording properties that can be inspected later on.
You can see the mocks being used in the BlogDataSourceTests class. There is one large test:
“Given new items exist, when the blog group is populated then the total and new items should reflect the correct totals.”
The test will emulate existing items in cache and a new item from the Web. It also exposes a flaw in the current design of the BlogDataSource class. The class itself still tries to use the HttpClient to fetch a page from the test data, which will fail because the URL does not exist. Although the component handles this fine and the test checks that the dialog was called with an error message, ultimately the web call should be abstracted behind an interface as well. This will allow you to mock the call and control whether or not you want it to be successful and what it should return.
The first step defines a sample cached item, a sample blog, and provides the storage mock with a fake hash code to process:
var cached = new BlogItem {Id = Guid.NewGuid().ToString()};
var blog = new BlogGroup { Id = Guid.NewGuid().ToString() };
_storageUtilityTest.Items = new[] {"123"};
The mock for storage is then passed a function that will return the blog or cached item depending on what is requested:
_storageUtilityTest.Restore = (type, folder, hashCode) =>
{
if (type == typeof (BlogGroup))
{
return blog;
}
return cached;
};
Finally, the simulated “new item” is added along with the blog to the mock for the syndication helper class that processes feeds:
var newItem = new BlogItem {Id = Guid.NewGuid().ToString()};
_syndicationHelperTest.BlogItems.Add(newItem);
_syndicationHelperTest.BlogGroups.Add(blog);
The first step is to load the groups. This is called, and the list is checked to ensure the appropriate number of blogs were processed:
await _target.LoadGroups();
Assert.AreEqual(1, _target.GroupList.Count,
"Task failed: should have generated one group.");
Next, the groups are iterated to load individual posts. Note this step could easily just have involved a single call based on the single group because that is how the test was set up, but I preferred to write it this way to more closely match how it is implemented in the target applications:
foreach (var group in _target.GroupList)
{
await _target.LoadAllItems(group);
}
Now the test has been arranged and acted, so it is time to assert the results. The item counts are checked, the lists are compared, and finally the dialog mock queried to see if it was called to show the error encountered when trying to download an empty URL. Just writing this exercise proved the value of testing—it turns out the previous versions of the application had a bug, and the total count wasn’t being properly updated. The test found this out quickly, and I was able to apply the necessary fix. Listing 9.2 shows the final asserts.
Listing 9.2. Asserts for the BlogDataSource Test
Assert.AreEqual(2, _target.GroupList[0].ItemCount,
"Test failed: item count should have been 2.");
Assert.AreEqual(1, _target.GroupList[0].NewItemCount,
"Test failed: new item count should have been 1.");
CollectionAssert.AreEquivalent(new[] {cached, newItem},
_target.GroupList[0].Items,
"Test failed: lists do not match.");
Assert.IsTrue(!string.IsNullOrEmpty(_dialogTest.Message),
"Test failed: dialog was not called with error message.");
There are a number of available frameworks that make it easier to create stubs and mocks. Microsoft Fakes and MOQ are a few examples that allow you to dynamically configure a mock or stub to use in your unit tests. This keeps you from having to create complex mocks or stubs of your own, and you can tailor the behavior to fit the specific test you are writing. The examples in this chapter used the Windows Store unit test project. If you are using the PCL to share code for your project, you can just as easily create a traditional desktop unit test project and build your tests there as well using the testing and mocking frameworks of your choice.
Summary
In this chapter, you learned about the MVVM pattern and how it can benefit the applications you build. I showed you how to use the Portable Class Library (PCL) to create code that is shared between various platforms and built a WPF application using the same core classes that the Windows 8 apps use. You also learned some of the benefits of testing and several methods to write unit tests in Visual Studio 2012. For classes with dependencies, you learned how to mock the dependencies manually.
In the next chapter, you will learn how to prepare your application for the Windows Store. You will learn how to set pricing for your application and enable in-application purchases to activate features (referred to as “products”) and how to test them. I’ll show you how to use the Windows App Cert Kit to test your application for potential issues prior to submitting them to the store and show you a convenient way to create a distributable package for sharing code outside of the store.