
5. Application Lifecycle
In the traditional Windows environment, the user manages the lifetime of his applications. He launches the application, and it continues to run until he decides to close it. The problem with this model is that applications continue to drain system resources, including memory and CPU, even when they are not in the foreground. This impacts the performance of the application the user is using as well as drains the battery faster when the device is not plugged in.
It is easy to demonstrate this traditional behavior in the desktop mode of Windows 8. If you don’t have a video file to use, browse to the following website that contains all of the video sessions from the Microsoft //BUILD event that launched Windows 8:
http://channel9.msdn.com/Events/BUILD/BUILD2011
(You may be reading this after the 2012 event; if so, then you should be able to reach the updated site and pull videos from there, too.)
Navigate to a video of your choice and use the download links to save a copy of either the mid-quality or high-quality video to your hard disk. This can take several minutes to hours depending on the size of the video. While you are waiting, launch the Task Manager. This is an application that provides a view of the applications running on your system. There are several ways to launch the Task Manager:
• From the Windows 8 Start menu, type task mager and select the program from the search results when it appears.
• On the desktop, right-click the taskbar and select the Task Manager option.
• From anywhere, hold down Ctrl+Shift+Esc at the same time
When you first launch the Task Manager, it will have a simple view, as shown in Figure 5.1.

Figure 5.1. The simple Task Manager view
The default view provides a simple list of running applications. To see a more advanced view, click the More details prompt in the lower left. This will provide the advanced view you see in Figure 5.2. It not only shows the running applications with specific information about their resource utilization, but also includes background processes that are running, such as drivers that your system uses to interface with various devices.
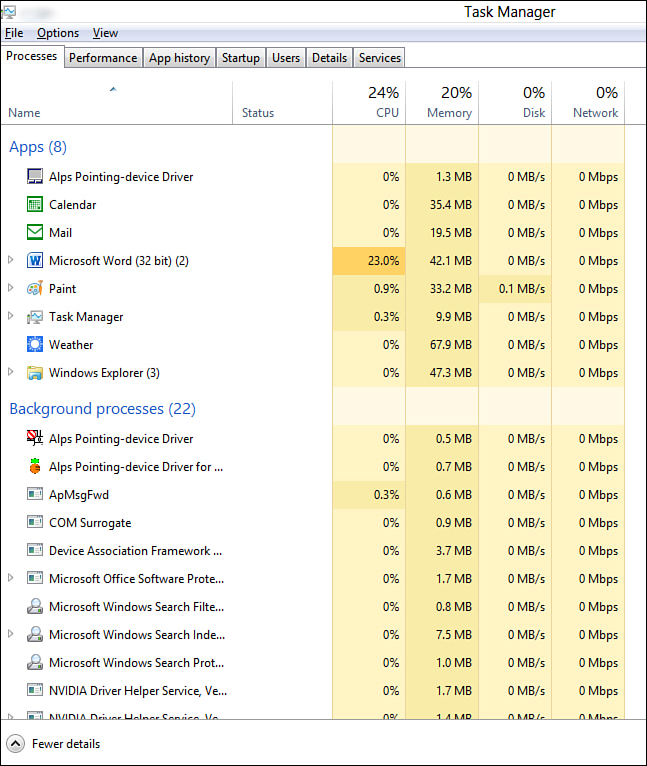
Figure 5.2. The advanced Task Manager view
Make sure the Task Manager is running in the advanced view and is visible for you to watch. Now, launch the video you downloaded and start watching it by right-clicking the file in Windows Explorer and choosing Play with Windows Media Player to launch it. You should notice the CPU and memory for that application start to spike. The amount will vary depending on your system configuration. Now open an instance of Notepad and stretch it so it completely covers the video. What you’ll find is that the CPU usage will remain consistent even though you are no longer watching the video. The application actually goes through the task of processing the video when you’ve indicated you are no longer interested in that piece by bringing the Notepad application to the foreground.
This scenario changes in Windows 8 applications. The user decides which applications will run in the foreground, and only one application can run in the foreground at a time (with the exception of the snapped view, which allows two applications with one taking up a small strip of space). The system will then determine what happens to the other background applications. If you don’t build your application correctly, you will create negative side effects that cause a bad user experience. The management of applications in the Windows Runtime is called Process Lifetime Management (PLM).
Process Lifetime Management
Windows 8 applications only run when they are in the foreground. This allows the user to focus on the primary application she wishes to interact with. Applications in the background go into a suspended state in which the threads for the application are literally frozen in place. The application will no longer take up system resources or impact battery life. Most of the time, the application will remain in memory. This allows fast application switching, so when the user swipes back to a different application, it resumes immediately as if it were already running.
There is a case where the suspended application may be terminated by the system. This is based on system resources. For example, if the foreground application requires a large chunk of memory that will potentially result in a low memory state, the system may terminate one or more applications that are in the suspended state. It will target background applications based on their memory consumption and terminate the ones taking up the most resources first.
To see this process in action, launch the Windows 8 Start menu by pressing the Windows Key. Open the Task Manager and overlay it on the Windows 8 display. Be sure to go under Options and ensure that Always on Top is checked. Now launch an application and then return to the Start menu and launch another application. Repeat this process several times. You should notice after a few seconds that the applications will show a Suspended status. If the status is not showing, go into View![]() Status values and select Show suspended status. Figure 5.3 shows the result of launching several applications with the Weather application in the foreground. Notice that the other Windows 8 applications are in a Suspended status.
Status values and select Show suspended status. Figure 5.3 shows the result of launching several applications with the Weather application in the foreground. Notice that the other Windows 8 applications are in a Suspended status.
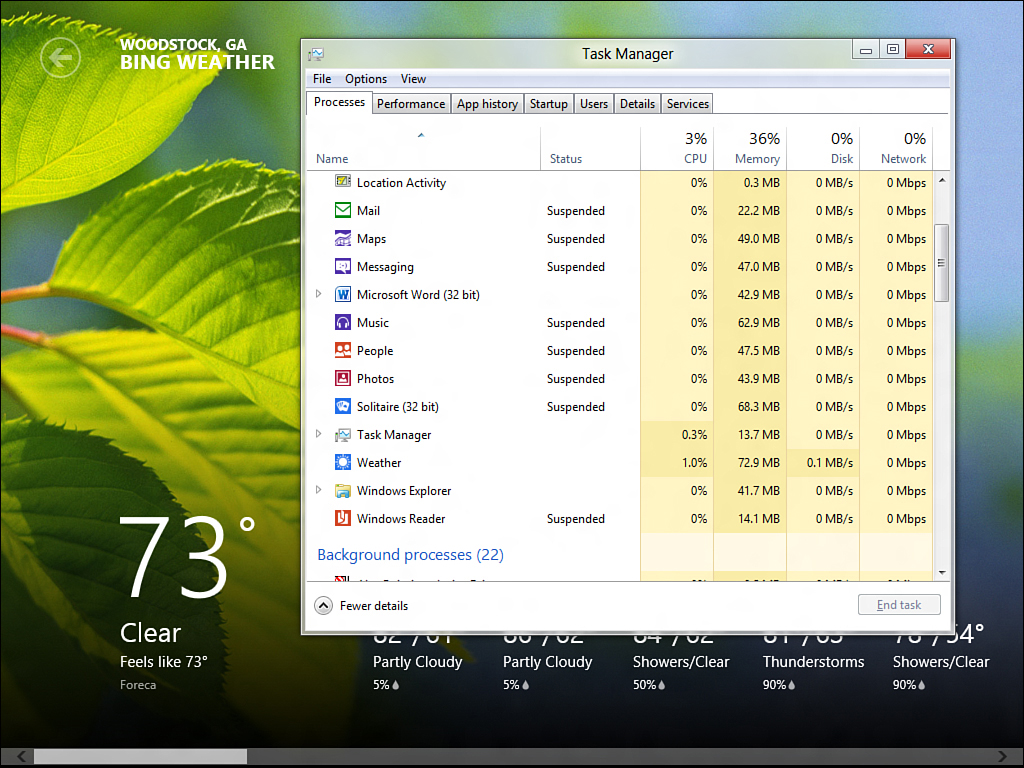
Figure 5.3. Windows 8 applications in the Suspended status
If the system experiences low resources, many of the applications in Suspended status might be terminated and will be removed from the Task Manager list. You can also emulate a suspension from Visual Studio 2012 in debug mode. You learn how later in this chapter, but first, it’s important to understand the full PLM lifecycle. The life of an application begins with activation.
Activation
Activation is the first step in an application lifecycle. In previous versions of Windows, activation typically happened as the result of the user launching the application, either through the Start menu or by typing the name of the program at a command prompt. In Windows 8, an application is always activated through a contract. You learned about the mechanics of activation in Chapter 2, Getting Started.
The most common contract is the Launch contract. This is the contract that is invoked when you tap a tile from the Start menu. The Launch contract activates the application and calls the OnLaunched method. Another contract that may activate your application is the Share contract if your application is a share target like ImageHelper from Chapter 2. There are several other contracts that can activate the application. The Windows8Application2 is based on the application from Chapter 4, Windows 8 Applications, and has been updated to support the Search contract. You can download it from this book’s website at http://windows8applications.codeplex.com/.
Adding this contract to a Windows 8 application is straightforward. This has already been done in the sample application, but if you were starting with a new application, you would right-click the project node in the Solution Explorer and choose Add![]() New Item or hold down Ctrl+Shift+A. Choose the Search Contract option and name the search results page, as shown in Figure 5.4.
New Item or hold down Ctrl+Shift+A. Choose the Search Contract option and name the search results page, as shown in Figure 5.4.
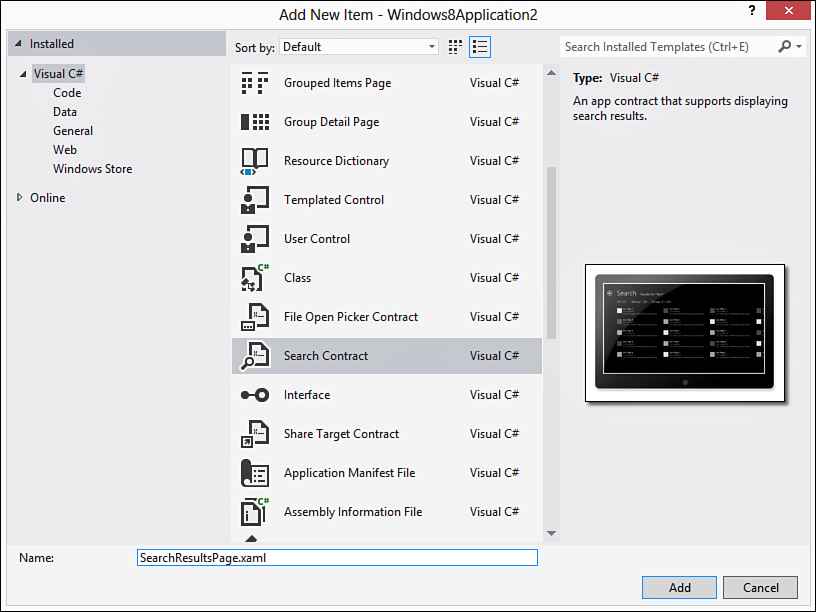
Figure 5.4. Adding the Search contract to a project
When you add the new item, several things happen behind the scenes. In addition to a new Page, a method called OnSearchActivated is added to the App.xaml.cs file to handle incoming search requests. It provides a code snippet to move into the OnLaunched event to handle queries from within the running application. The Declarations section of the package for the application is also updated to include the Search declaration.
When the plumbing is in place, the templates can be used to provide search capabilities. In the example, the search results show on the page with a set of filters by group. This will enable the user to specify a search across all items or restrict the search to items within a particular group. The search is also set up to handle incoming requests regardless of whether or not the application is currently running.
When the application is activated by any contract, it will display a splash screen. The initial splash screen is composed of the background color and a static image (you learned how to specify these in Chapter 4 and will learn how to specify a custom one later in this chapter). The application is notified of activation when the appropriate method in App.xaml.cs is called based on the contract (OnLaunching for the Launch contract, OnSearchActivated for the Search contract, and so on).
The application is given about 15 seconds to show the first page. Failure to show the first page within this timeframe will result in the application being terminated, and it will appear as a crash to the end user. This is important to know because applications that require large amounts of data to be downloaded or initialized prior to showing the first page must handle the delay appropriately. It is possible to do this by providing an extended splash screen. You learn about extended splash screens later in this chapter.
When the application is activated, it becomes the foreground application and will run until the user switches to a different application, including the desktop. When the user switches, the application will be notified via the Suspending event. This notifies the application that it is about to be suspended and allows the developer to insert any code that is necessary to preserve state prior to termination.
Suspension
In the normal course of operation, your application will become suspended as soon as it is no longer in the foreground. It is not easy to force a suspension of the application during testing, so Visual Studio 2012 provides a way to manually suspend your program for debugging purposes. To understand suspension, load the Windows8Application2 project.
Open the App.xaml.cs file and place a breakpoint next to the highlighted line of code in the OnSuspending method:
private static async void OnSuspending(object sender,
SuspendingEventArgs e)
{
var deferral = e.SuspendingOperation.GetDeferral();
Debug.WriteLine(string.Format("{0} remaining",
e.SuspendingOperation.Deadline - DateTime.Now));
await SuspensionManager.SaveAsync();
deferral.Complete();
}
Launch the application in debug mode. In the toolbar, you should see an icon that looks like a pause button with an application behind it (don’t confuse this with the Pause button for debug that forces a “Break All”). The tooltip is shown in Figure 5.5. Use that icon to emulate a suspension of your application. When you click it, you’ll notice the line of code is highlighted as the OnSuspending method in the application object is called. Note the value that is written to the Output window (if you can’t see it, hold down Ctrl+Alt+O for “Output”) and then press Continue.
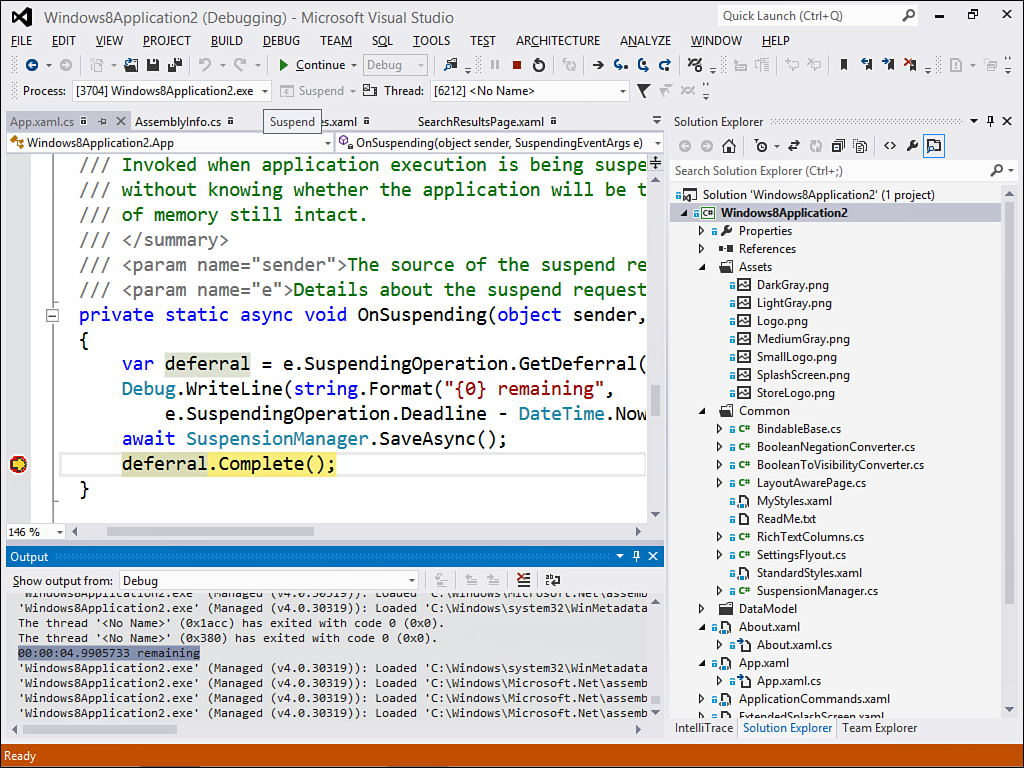
Figure 5.5. Suspending an application from debug mode
The Deadline is an offset that provides the time remaining for the suspension to complete. If your application does not complete any necessary tasks within that timeframe, it will be terminated. When performing asynchronous tasks, you must ask for a deferral. With the arguments passed to the event, you can request a deferral and then perform a list of asynchronous operations such as saving your application state to disk. The sample application saves state as events happen, so it has no extra work to perform when the application is being suspended. When the application is ready for suspension, it will call the Complete method to finish suspension.
So far you’ve learned how to use the debugger in Visual Studio 2012 to debug applications run locally or within the simulator. There is another option to debug to a remote machine. This is particularly useful when you have a slate device to test touch operations on but prefer to develop from a laptop or desktop. To debug remotely, you must first launch a special application on the remote device that configures the debug environment. You can then specify the remote machine from the Remote Machine option. You may have to authenticate before the debugging session begins. Full instructions to set up this feature are available online at http://msdn.microsoft.com/en-us/library/bt727f1t(v=vs.110).aspx.
At this stage the application is still in memory, but it is not consuming any resources. If you launch the Task Manager, you’ll see the CPU utilization at 0%. The application is no longer impacting battery life and is simply waiting. If you then resume operation (either by bringing the application back to the foreground or by pressing the Resume option located in the same drop-down as Suspend in Visual Studio 2012), the application will be “fast-switched” and resumed with no perceptible delay.
The kernel provides one additional service for suspended applications. There are times when the application may be in a critical section of code, such as releasing locks on files. The kernel will not suspend the application while it is in a critical code section (usually when control has passed to a WinRT component) and instead will wait until the application exits that section to avoid system-wide deadlocks.
You may have noticed another option next to Suspend and Resume that has the text Suspend and shutdown. This icon is used to terminate your application. This will simulate what happens when the application is in a suspended state and system resources force the runtime to shut down your application to free up memory.
Termination
When the system needs memory, the active user is switched, the system is shut down, or your application crashes, the Windows Runtime will terminate the application. There is no event to notify you when it is terminating. This is why it is important to save state either while the application is running or when the OnSuspending event handler is called.
Typical application behavior is to start at the first screen whenever it is launched for the first time or after the user has closed it. You should only launch the application into saved state when you are resuming from a termination event. Fortunately, the previous state of the application is always passed to the OnLaunched event. This allows you to check the previous state and take action based on whether the user is swapping back to a terminated application or re-launching it after closing it.
Resume
The application can register for the Resuming event. This event is only fired if the application was still in memory when the user returned it to the foreground. There is no need to restore any state because all of the application threads, stack, and storage were maintained. So why is this event even available?
The main reason is for applications that provide timely data to refresh their information. Imagine a weather application that is suspended when you swap to a game that you play for several hours. The application remains in memory with all of its threads frozen in place. You then return to the application. What do you expect to see? Without the Resuming event, you would simply see the stale information the application displayed earlier in the day. This event will allow the weather application to fetch the latest forecast and show you the current weather status, including any alerts that may have been issued.
If an application is terminated, then it is relaunched when the user comes back to it. The Resuming event is not fired. Instead, the application can check the previous state to determine what logic to apply when it is launched. Take a look at the ExtendedSplashScreen_Loaded method in ExtendedSplashScreen.xaml.cs, and you will see the following check:
if (_activationArgs.PreviousExecutionState ==
ApplicationExecutionState.Terminated)
If the application was terminated, the previous state is queried and the user is returned to the place he left off. You learn how the state is saved and restored later in this chapter. Otherwise, the application initializes and places the user in the Start screen. The other valid states you can check for include ClosedByUser, NotRunning, Running, and Suspended.
Figure 5.6 provides a general overview of the application lifecycle.
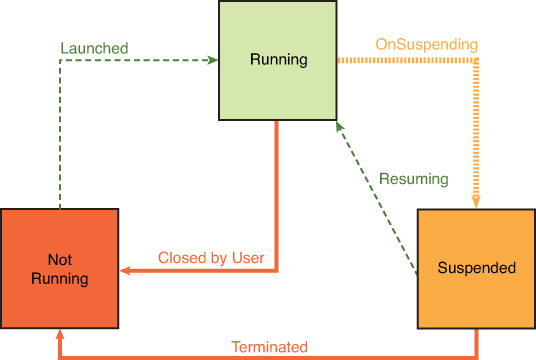
Figure 5.6. Overview of the application lifecycle
The following list of guidelines will help you build your application to provide the best user experience possible while managing PLM:
• Incrementally save user data—This keeps you from having to save everything at once when the application is suspended and risk timing out.
• Save and restore application state—This is important to ensure the user has a consistent experience when she returns to the application.
• Only save/restore session metadata (where the user is/navigation)—Any other data should be handled elsewhere by your application.
Now that you are familiar with the lifecycle, you can use the code in the templates to manage the application state. It will help to understand how navigation in Windows 8 applications works. When a previously suspended application is launched from the Start screen, it will resume the application rather than treating the launch as a “fresh start.”
Navigation
There are two primary types of navigation in Windows 8 applications: hierarchical and flat. In hierarchical applications, you start with a high level view and drill down to a specific area. In the example applications, you’ve dealt with groups of collections and drilled into collections and then specific items. A flat navigation is like the traditional wizard and guides you through various steps of the process.
When you launch a mail application for the first time, you likely start with a flat navigation scenario. A wizard will guide you through the process of entering the information about your mail server and your credentials, testing the connection, and adding it to the accounts list. When you begin using the mail application, your view is hierarchical. You start with a view of accounts and messages and then drill down into individual messages.
For Windows 8 applications built using XAML and C#, the default container for your application is the Frame. Take a look at the Windows8Application2 example in the ExtendedSplashScreen.xaml.cs file. The code for the ExtendedSplashScreen_Loaded method creates the Frame, hooks into an event, and then navigates to a page. The splash screen performs some work before wiring up the main application navigation (you will learn more about the custom splash screen later in this chapter):
var rootFrame = new Frame();
rootFrame.Navigating += rootFrame_Navigating;
// additional code here
rootFrame.Navigate(target, parameter);
The Frame object is a visual container that supports navigation. The unit of navigation within the Frame is a Page. The Page is a special control that is designed to work with navigation. Think of it as a container for the visual elements you wish to present for a specific area of the application. The Frame object allows you to navigate by passing in the type of Page you wish to display, as well as an optional parameter. In the example for the sample application, the target defaults to the type of the main page that shows the various groups and passes in the name for the collection of groups from the data source:
if (!rootFrame.Navigate(typeof(GroupedItemsPage), "ItemGroups"))
Calling the Navigate method on the Frame will create an instance of the target page. When the target Page is loaded, the OnNavigatedTo method is called. This allows you to set up your UI. The sample application uses this method to wire the data to the underlying view model (you’ll learn more about view models in Chapter 9, MVVM and Testing) as well as set the source for items on the control.
The Frame keeps a journal of Page objects that you navigate to. This allows it to function similar to a web browser because you can choose to go back to previous Page instances or move forward when you’ve navigated backwards. These actions are supported by the GoBack and GoForward methods, and you can check to see if the actions are possible by interrogating the CanGoBack and CanGoForward properties on the Frame object.
Open GroupDetailPage.xaml. The XAML for the back button looks like this:
<Button x:Name="backButton" Click="GoBack"
IsEnabled="{Binding Frame.CanGoBack,
ElementName=pageRoot}"
Style="{StaticResource BackButtonStyle}"/>
The button is enabled only when a previous page exists in the journal. If it is enabled and the user clicks the button, it invokes the GoBack method. This method is defined in the base LayoutAwarePage class that in turn derives from Page:
protected virtual void GoBack(object sender, RoutedEventArgs e)
{
if (this.Frame != null && this.Frame.CanGoBack)
this.Frame.GoBack();
}
Figure 5.7 shows the typical flow when a navigation event occurs. The Frame is instructed to Navigate to a new Page called Page 2. The Navigating event is fired for the Frame. The Page 1 object is informed of the navigation through the OnNavigatingFrom event. If there is a reason to prevent the navigation from taking place (for example, the user has entered data on a form and not yet saved it), Page 1 can cancel the navigation by setting the Cancel flag on the event.
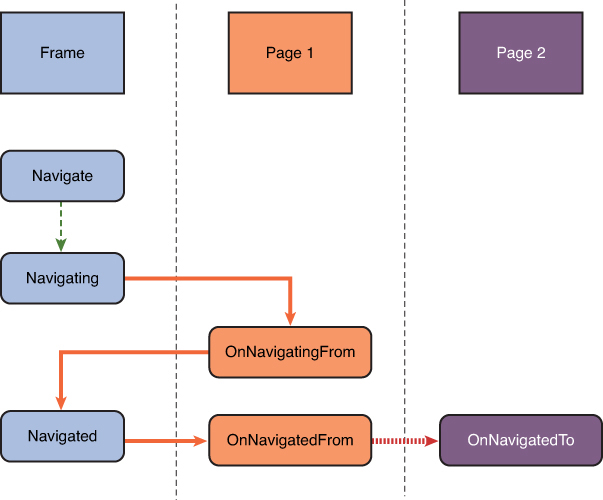
Figure 5.7. An overview of navigation events
When Page 1 declines to cancel the navigation, the Frame unloads Page 1 and fires the Navigated event. It informs Page 1 that it has been unloaded through the OnNavigatedFrom method. It then places an instance of Page 2 onto the visible frame and notifies Page 2 via the OnNavigatedTo event. The Frame may create a new instance of Page 2 or reuse an existing instance. Page 1 is now part of the journal, so CanGoBack is enabled, and a call to GoBack on the Frame will result in Page 1 being shown again.
You can control how the Frame manages instances of pages through the CacheSize property. This represents a number of pages that will be stored in the cache. Any pages in cache are simply reused instead of having new instances created. For a Page to participate in the cache, you must set the NavigationCacheMode on the Page object to either Enabled or Required. When it is set to Required, it will be cached regardless of the CacheSize setting on the Frame object and will not count against the CacheSize total.
Understanding how navigation works makes it easy to manage the location of the user. The built-in templates in Visual Studio 2012 provide a special helper class called the SuspensionManager that assists with saving and restoring state. When the application is loaded, the root Frame object is registered with the SuspensionManager in App.xaml.cs:
SuspensionManager.RegisterFrame(rootFrame, "AppFrame");
This sets up the SessionManager to observe the frame as the user navigates. It then saves the navigation stack as well as parameters that are passed to pages so that it can restore both the user location and the navigation history when the application is resumed. The state is saved to a local cache using the Application Data API.
Application Data API
The Application Data API provides a way to manage data specific to a particular application. You can use it to store state, preferences, local cache, and other settings. The Windows Runtime manages application-specific storage and isolates it per user and per application from other users and applications on the system. The data persists through application updates and is removed when the application is uninstalled.
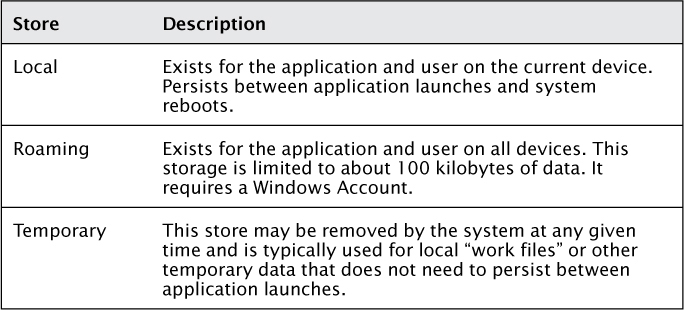
There are three types of local data that are available to your application. Table 5.1 lists these types and describes what they are used for.
Table 5.1. Application Data Storage Types
Each store provides two types of access. The first type, application settings, allows for any WinRT data type to be stored. You can store data as single values, composite values, or in containers to segregate sets of data from each other. This storage is intended for small sets of data. According to the documentation, the settings are actually stored in the registry. Read the documentation for application data online here at http://msdn.microsoft.com/en-us/library/windows/apps/hh464917.aspx.
The second type is application files. These are files in the traditional sense that you can read and write to. Each store has a space allocated for storage per application and user. You are able to create directories up to 32 levels deep and read or write as many files as you like. The files written to the temporary store can be removed at any time. The files written to the roaming store when the user is logged in with a Windows account (such as Live) are synchronized across devices but must fit within the quota that you can query using ApplicationData.RoamingStorageQuota.
The application is in control of local data, so it typically will not change except as a result of application code. Roaming data is different because the user may change data on one device while running an instance of the application on another device. When application data is synchronized, these changes will raise the DataChanged event. Your application can use this event to react to changes and refresh the data on the local device. You can also explicitly signal a data change by calling SignalDataChanged.
The Windows8Application2 example uses the local settings to store the navigation location for the application and this is the default for the SuspensionManager. The reason it uses the local settings instead of the roaming settings is because when the user adds a new item, it is only stored locally. The items list can potentially become quite large, so it doesn’t make sense to store it in the roaming settings. You will learn more about data in Chapter 6, Data, and how to manage large collections across devices.
The application storage settings are extremely easy to use. If you were not concerned about the navigation history and parameters passed to various pages, you could easily save the current page by updating the NavigatedPage property in App.xaml.cs like this:
set
{
_navigatedPage = value;
ApplicationData.Current.LocalSettings.Values["NavigatedPage"]
= value.ToString();
}
That’s really how simple it is—you simply choose a key for the property and set the value. It is also possible to store groups of values together. If you need an atomic operation that ensures either all of a group of values is stored or none are, use the ApplicationDataCompositeValue. This simply prepares an atomic group of values for storage with a single setting. In the App.xaml.cs file the current group, and item could be stored like this:
private void PersistCurrentSettings()
{
var value = new ApplicationDataCompositeValue();
value.Add("Group", _currentGroup == null ? string.Empty :
_currentGroup.UniqueId);
value.Add("Item", _item == null ? string.Empty : _item.UniqueId);
ApplicationData.Current.LocalSettings.Values["Current"] = value;
}
Reading back values is straightforward as well. To restore the current page, the application would simply read in the value of the type as a string and then convert it to an actual type for navigation:
target = Type.GetType(ApplicationData.Current.LocalSettings
.Values["NavigatedPage"].ToString(), true);
The navigation would be combined with the value of the current item or group. Composite values are retrieved like this:
var value = ApplicationData.Current.LocalSettings.Values["Current"]
as ApplicationDataCompositeValue;
The value could then be restored and queried against the internal collections to retrieve the full object:
var currentItemId = value["Item"];
CurrentItem = (from g in DataSource.ItemGroups
from i in g.Items
where i.UniqueId.Equals(currentItemId)
select i).FirstOrDefault();
The query uses Language-Integrated Query syntax, or LINQ. You can learn more about LINQ online at http://msdn.microsoft.com/en-us/library/bb397926(v=vs.110).aspx.
It is also possible to separate settings in different containers. You can use the ApplicationDataContainer class for this. The store provides a CreateContainer method as well as a list of current Containers. When you reference a specific container, you can access the Values dictionary to set and retrieve settings specific to that container.
Storage is not limited to simple key-value pairs. You can also create folders and files. Instead of saving individual pages and parameters as suggested here, it is possible to use the generic SuspensionManager helper to handle most of your navigation scenarios. The SuspensionManager declares a simple file name to store all of the state for the application:
private const string sessionStateFilename = "_sessionState.xml";
It then uses the DataContractSerializer to create an image of the stored navigation state. This class can inspect all of the properties and values in a class instance and turn them into an XML representation. Here is the code that does this by transforming the instance into an in-memory XML document:
MemoryStream sessionData = new MemoryStream();
DataContractSerializer serializer =
new DataContractSerializer(typeof(Dictionary<string, object>),
_knownTypes);
serializer.WriteObject(sessionData, _sessionState);
Next, the code is written to storage. The Application Data API is used to create an instance of the file, and then the stream that was serialized is written to disk:
StorageFile file = await ApplicationData.Current.LocalFolder
.CreateFileAsync(sessionStateFilename,
CreationCollisionOption.ReplaceExisting);
using (Stream fileStream = await file.OpenStreamForWriteAsync())
{
sessionData.Seek(0, SeekOrigin.Begin);
await sessionData.CopyToAsync(fileStream);
await fileStream.FlushAsync();
}
To restore state when the user returns to the application, the reverse operation is performed:
StorageFile file = await ApplicationData.Current.LocalFolder
.GetFileAsync(sessionStateFilename);
using (IInputStream inStream = await file.OpenSequentialReadAsync())
{
DataContractSerializer serializer = new DataContractSerializer(
typeof(Dictionary<string, object>), _knownTypes);
_sessionState = (Dictionary<string, object>)serializer
.ReadObject(inStream.AsStreamForRead());
}
Compile and run the application and then navigate into a group and an item. Terminate the application by either dragging it off the bottom edge of the display or by pressing Alt+F4. Now open the File Explorer and navigate to the following:
C:users{username}AppDataLocalPackages{packagename}
Replace {username} with your user name and {packagename} with the name of the package from the Package name value on the Packaging tab of the application manifest. On my machine, the path resolves to this:
C:UsersJeremyAppDataLocalPackages34F9460F-0BA2-4952-8627-439D8DC45427_req6rhny9ggkj
Open the LocalState folder and you should see the _sessionState.xml file. There you can see the stored contents for the state of the application. An example XML element that holds the navigation history looks like this:
<KeyValueOfstringanyType>
<Key>Navigation</Key>
<Value i:type="a:string" xmlns:a="http://www.w3.org/2001/XMLSchema"> 1,3,2,33,Windows8Application2.GroupedItemsPage,12,10,ItemGroups,32, Windows8Application2.GroupDetailPage,12,7,Group-2,31, Windows8Application2.ItemDetailPage,12,14,Group-2-Item-2
</Value>
</KeyValueOfstringanyType>
You will learn more about storing and retrieving data in Chapter 6, Data.
Connected and Alive
Just because applications are suspended and potentially terminated when they are in the background doesn’t mean they can’t remain connected or provide the appearance of running. One effective way to keep applications current and provide real-time feedback to the user is through the use of tiles and notifications. You will learn more about these in Chapter 7, Tiles and Toasts.
There are also other ways that applications may remain running. The following list shows just a few that are available:
• Audio—Certain applications such as podcasts and music players can register to play audio in the background with a basic set of audio controls even when the application is not running.
• Download—The Background Transfer API can be used to download large amounts of data in a power-friendly manner.
• Lock Screen—Special lock screen applications can provide basic information to a user even when her tablet is locked (for example, the mail application can show the number of unread mail messages).
• Sockets—The ControlChannelTrigger class can be used to register for network events that will notify the application even when it is suspended.
It is a misconception that Windows 8 applications stop when they are swapped to the background. The combination of services provided through the platform enable them to remain connected and current regardless of whether they are running in the foreground. The use of these APIs enables your application to preserve system resources and battery lifetime by responding to events in a smart way.
Custom Splash Screen
Earlier in this chapter, you learned that the application must display the first page on launch within a given timeframe, or the application will be terminated. When you require more time to set up the application, you can show a custom splash screen while you are initializing the application. In this section, you learn how to configure a custom splash screen.
The Windows8Application2 simulates a long startup operation by waiting for a loop to complete. This loop runs slowly in debug mode because it writes each value to the debugger:
await Task.Run(() =>
{
for (var x = 0; x < 2000; x++)
{
Debug.WriteLine(x);
}
});
This loop is intended to simulate common operations an application may perform at startup. These include connecting to web services to download content and reading items that are serialized from cache. If the application takes too long to perform these tasks, the application will be terminated by Windows 8 after 15 seconds.
To fix these issues, a custom splash screen is used to load the data first before rendering the initial grid. In App.xaml.cs, the OnLaunched method sets an instance of ExtendedSplashScreen as the main visual when the application is launched and passes in the current splash screen:
var splashScreen = args.SplashScreen;
var eSplash = new ExtendedSplashScreen(splashScreen, false, args);
splashScreen.Dismissed += eSplash.DismissedEventHandler;
Window.Current.Content = eSplash;
Window.Current.Activate();
The ExtendedSplashScreen control keeps a reference to the original splash screen. It contains a copy of the same image that is displayed and uses the position from the system-provided splash screen to align the image. The image will appear in the exact same place to create a seamless transition from the splash screen image to the extended splash screen that displays.
When the control is loaded, it simply calls the Initialize method on the data source and waits asynchronously for the items to load. When all items are loaded, the control replaces the visual with a Frame object for navigation and navigates to the first page. All of this logic would normally exist in the App.xaml.cs code-behind file but was moved to the ExtendedSplashScreen control so it can be deferred until the data is completely loaded.
A ProgressRing control is positioned just below the splash screen image to indicate to the user that work is being performed. To see the progress indicator, run the application in debug mode. You will see the splash screen image with a spinning progress ring. It will continue to animate even though the program is paused because the operation is handled asynchronously so it does not block the UI thread. This example showed a very simple feedback mechanism, but applications with more complex initialization can show a progress bar and display textual feedback to the user as components are loaded. You will see more detailed examples of this in later chapters; here, the splash screen simply executes the delay and then launches into the main page.
Summary
In this chapter, you learned about the application lifecycle and the role that Process Lifetime Management (PLM) plays. Applications can be suspended and terminated but have mechanisms to save and restore state that can synchronize between multiple devices. You learned about the frame-based navigation that Windows 8 applications use and how to take advantage of local storage to preserve the user’s location in the application. Local storage allowed you to save and restore data specific to the user and application.
You also learned how to create a custom splash screen to allow applications to initialize without being terminated if it takes longer than about five seconds to display the first page. This chapter touched briefly on application data by demonstrating the local file system. There are many ways Windows 8 applications can create and consume data, from web-based services to local files. The next chapter, Data, will cover these approaches to data.