
2. Getting Started
“Hello, world” is a popular application because it is usually the first program developers write to learn a new language or platform. You learned how to write “Hello, World” using three different approaches in the previous chapter. In this chapter, you learn how to set up your environment to develop Windows 8 applications. There are many options, and it is important to choose the one that makes the most sense for you.
When the environment is set up, I cover the various templates that are provided out of the box in Visual Studio 2012. These templates are designed to help you get up and running with your Windows 8 applications as quickly as possible. They have built-in code and mark-up to handle things like orientation switching or scaling (resizing) the application. You learn how to decide which template to start with based on the goals of your application.
In this chapter, I walk through a simple example of building a Windows 8 application. This example integrates a few advanced features so you can see how easy they are to integrate in the new platform. Finally, we look at the result of building the application. You learn how it was deployed with the system and the structure it takes. I think you’ll be surprised to learn just where some of the information about your new application is stored in Windows 8.
Setting Up Your Environment
There are a number of options available to set up your environment for authoring Windows 8 applications. You must be running Windows 8 to develop and test Windows 8 applications. If you don’t already have a machine running Windows 8, there are a few different options for setting it up in your development environment. When Windows 8 is installed, you can then install and configure Visual Studio 2012, the primary tool for building Windows 8 applications, and Blend, a tool for designing the user interface by manipulating the Extensible Markup Language (XAML) in your application.
Windows 8
The first step to developing Windows 8 applications is to set up the operating system. This may seem obvious, but you cannot develop Windows 8 Windows Store applications on other machines—you must be using Visual Studio 2012 from a Windows 8 machine. You can obtain the installation media several different ways, including an Internet download from the main website at http://dev.windows.com/.
You will also need to prepare your media for installation. Most OS downloads are distributed as ISO images (ISO stands for International Organization for Standardization) that can be used to create installation CDs and/or DVDs. When you have the image, you can mount it using a tool such as Virtual CloneDrive (http://www.slysoft.com/en/virtual-clonedrive.html). Another option when considering an upgrade is to use the Windows 7 USB/DVD Download (compatible with Windows 8) tool to prepare a DVD or external USB drive (http://wudt.codeplex.com/).
After you have your media ready to install the Windows 8 image, you need to decide which configuration to use for your install. There are three common options available:
• Full Install—Choose this option to overwrite your existing operating system and replace it with Windows 8. Be sure to back up any important data on the existing system because it might be overwritten by the upgrade.
• Dual Boot—Use this option to allow Windows 7 and Windows 8 to boot side-by-side. When you turn on your computer, you will be prompted to choose which operating system you would like to boot. You have the option of installing the dual-boot either using a partition on your disk drive or by creating a Virtual Hard Disk (VHD) image.
• Virtual Machine—Use this option to create a virtual hard drive and load the operating system in a virtual machine. There are many virtual machine products available. I demonstrate this option using Oracle’s VirtualBox because it is a free virtual machine host.
The option that you choose will depend on the environment you have. For writing this book, I chose to dedicate a machine to Windows 8 and used the full installation option. The virtual machine option is not the best choice because Windows 8 is a new operating system, and therefore not all of the tools and features have been implemented in the virtual machines yet. For example, I found the mouse support to be very sporadic, and there was no option to use touch even though I have a fully functional touch monitor.
To begin your installation, skip ahead to the section that covers the choice you made for your configuration. Already set up and ready to go? Skip ahead to the “Hello, Windows 8” section of this chapter.
Full Install
The Windows 8 installation is fast and easy. Simply insert the installation media and follow the prompts. When it’s installed, you will be directed through several steps to configure your Windows 8 installation. You can personalize the machine name, choose settings for online updates, and specify a user login. Be sure to explore the option to use a Windows Account (also known as Windows Live) for your login. This provides additional features such as synchronization to the cloud and seamless integration to SkyDrive.
When you’ve completed the personalization steps—that’s it! You’re done. Windows 8 is ready to go.
Dual Boot
A dual boot installation will allow you to install Windows 8 and retain your existing OS installation. These instructions will assume you are starting from Windows 7. The first step is to create space on your hard disk.
The following steps require advanced knowledge of your Windows system. They will involve re-partitioning and formatting sections of your hard drive. You should create a full backup prior to continuing. If you are not familiar with or comfortable working with Windows Disk Management, I strongly recommend you choose a different option or work with someone more knowledgeable. You’ve been warned!
If do not have an available partition or hard drive to install Windows 8 to, you can shrink your existing hard drive to make room. From the Start Menu, right-click Computer and choose Manage. This will launch the Computer Management application. In the left navigation, select Storage![]() Disk Management. This will open Windows Disk Management. You will see something similar to Figure 2.1. Right-click the partition you wish to shrink and choose the option Shrink Volume.
Disk Management. This will open Windows Disk Management. You will see something similar to Figure 2.1. Right-click the partition you wish to shrink and choose the option Shrink Volume.
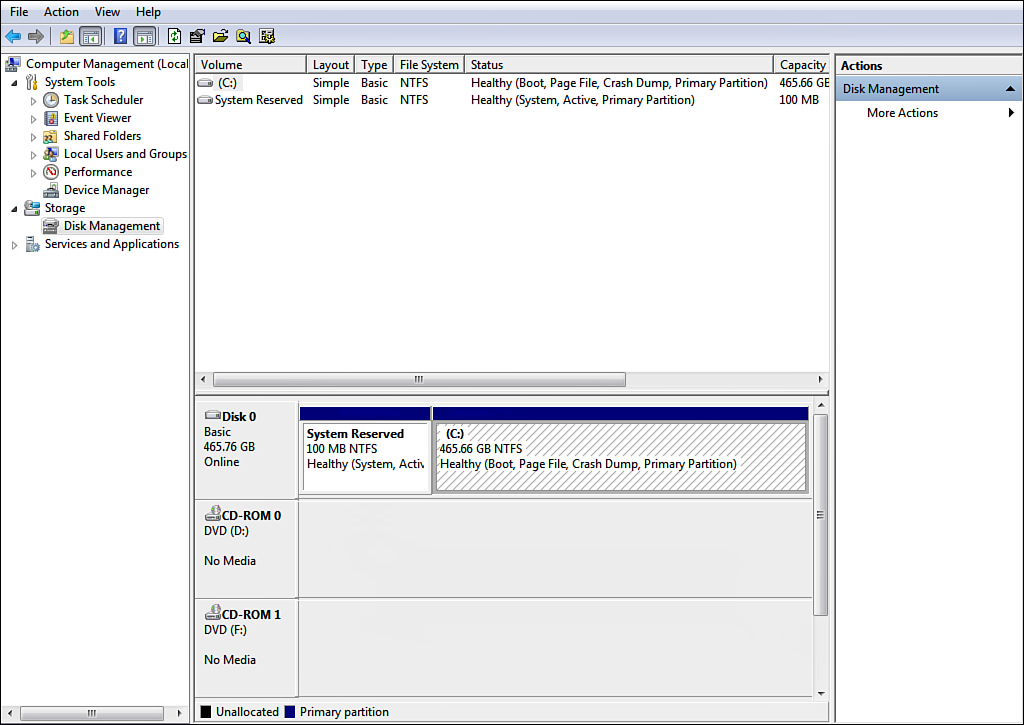
Figure 2.1. The Windows Disk Management application
The disk manager will scan the volume to find available space. This may take several minutes depending on the size of your hard drive and amount of fragmentation it has. When it is finished, you can specify a size for the new volume. The minimum recommended space for Windows 8 is 20GB. Figure 2.2 shows the dialog with the minimum amount entered in megabytes.
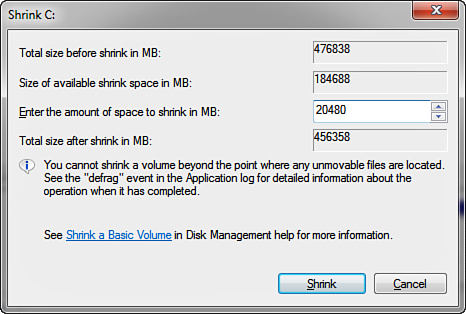
Figure 2.2. Specifying the amount of space to free for a new partition
You’ll see your favorite spinning icon for several minutes. When completed, a new section called Unallocated will appear that should be the size you specified. Right-click the new section and choose New Simple Volume. The New Simple Volume Wizard will appear. Click the Next button. Leave the default space for the new volume and click the Next button. Again, keep the defaults (unless you wish to assign a different drive letter). On the last dialog, select the option to format the volume as NTFS and give it a meaningful label. Your dialog should look like what’s shown in Figure 2.3.
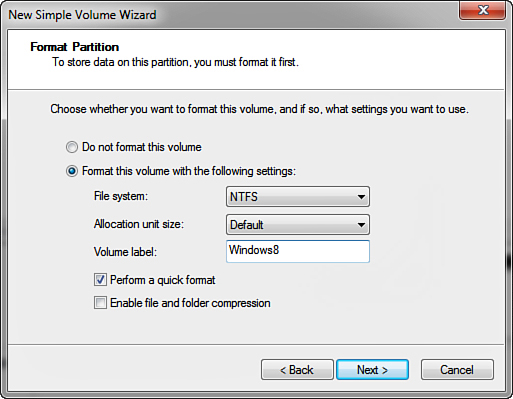
Figure 2.3. Formatting the partition for dual boot
Click the Next button. The final dialog will show you the various settings you’ve selected. When you’ve confirmed they are correct, click Finish, and the new volume will be formatted, mounted, and ready for a Windows 8 installation.
Insert your Windows 8 DVD or USB drive and reboot (the instructions to do this are in the “Full Install” section). Choose the Custom option for installation. When prompted, select the volume you created. You will recognize the volume because it should show the size you specified and be flagged as a Primary partition. Be sure to select the correct volume; a mistake here could result in overwriting your existing system.
Walk through the install process as specified in the “Full Install” section. When the system reboots, you will be presented with a new menu. Unlike the text-based menu you might be used to in Windows 7, the boot menu for Windows 8 is graphical; has a Windows 8 user interface; and is mouse, keyboard, and touch-friendly. You will be presented with the option to boot into either the old Windows 7 operating system or your new Windows 8 one. Obviously you’ll pick the new OS—Windows 8—and after experiencing the incredibly fast boot, you’ll be ready to set up your development and jump into your first application.
Virtual Machine Install
You may also wish to install Windows 8 on a virtual machine. The steps you will use vary depending on the virtual machine you decide to use. There are several options available. One popular, open source solution that is free is called VirtualBox. You can download VirtualBox from the website at http://www.virtualbox.org/. You will need the installation media available to install on the virtual machine. Some solutions are able to mount ISO images directly to make the process easier.
Visual Studio 2012
Visual Studio is Microsoft’s development environment for building software and is the tool you will use to design Windows 8 applications. It is possible to develop Windows 8 applications for free by downloading the Express version of Visual Studio that comes packaged with the Express version of Blend. Other versions provide additional features ranging from testing modules to architecture design tools. This book will focus mostly on the features that are available with the free edition. Some features covered may require a paid edition. The following is a brief list of differences between the various levels:
• Test Professional—This version is designed for business analysts and testers and contains team collaboration features, a number of test features, and lab management.
• Professional—This is the entry-level version for developers and includes debugging, code analysis, unit testing, development platform support, and integrated development tools.
• Premium—The premium level combines the features of the Test Professional and Professional versions and then adds code metrics, code coverage, coded UI testing, UML diagrams, sprint planning and backlog management, code review, and storyboarding.
• Ultimate—This is the most comprehensive version and includes all of the features of the other versions and adds IntelliTrace (historical debugging), load testing, Microsoft Fakes (a framework for stubbing and mocking unit tests), advanced architecture tools, and feature packs.
Blend
Expression Blend is a design tool that was previously available for Silverlight, WPF, and Windows Phone applications. It has been extended to support Windows 8 applications that are based on both XAML and HTML. Blend is a powerful tool that provides sophisticated previews for content, supports design-time data to visualize pages without running the application, and a drag-and-drop approach to placing both controls and UI behaviors on the design surface.
Many features of Blend have been integrated into the designer for Visual Studio 2012. The previous version of Visual Studio 2010 used a different XAML design tool codenamed “Cider” that did not provide the same rich features found in Blend. The Blend engine provides much more functionality and developers familiar with the previous versions will feel at home within the designer. This book will focus mostly on the features of Blend that are integrated into the XAML designer for Visual Studio 2012.
Hello, Windows 8
In this section, you build your first Windows Store application. The goal for this application is to show you how easy it is to build some fairly advanced features with minimal code. The application supports using your webcam to take a picture and then save it to your picture library, a social networking site, or cloud storage. It also supports receiving images from other applications to preview and save.
After you build and run the application, you explore what happened in the Windows 8 operating system to support the application. You learn about the three phases for a Windows 8 application that include installing or deploying, tapping to launch, and running the application. Finally, I demonstrate using a tool called ILDASM (a code disassembler) to show how WinRT uses the same metadata standards as .NET to expose information about your application.
Creating Your First Windows 8 Application
The process all starts in Visual Studio 2012. There you can choose what language you will be working with (in our case, Visual C#) as well as the type of application. Depending on the version of Visual Studio you have installed, you may have access to develop Windows desktop applications, Web-based applications, reporting solutions, SharePoint integration, or an application that targets the tailored Windows 8 platform. You can see an example of the available templates in Figure 2.4.

Figure 2.4. The available project templates for C# Windows 8 applications
To open a new project, simply select File![]() New
New![]() Project. Choose the option Windows Store, and you will be presented with several template options.
Project. Choose the option Windows Store, and you will be presented with several template options.
Templates
The project templates in Visual Studio provide different starting points for your application based on common patterns for development. Depending on your needs, you may want to start with a project template that supports interacting with groups of collections and individual items. The advantage of using these project templates is that the code they generate automatically provides support for drilling between the category and detail level, responding to orientation switches between portrait and landscape modes, and resizing when the application is snapped in a split screen. Following is a breakdown of specific features by template.
Blank Application
The blank application provides a single page project. There are no pre-defined controls or layout. This is the simplest starting point and wires up some basic infrastructure so that you can hit the ground running.
Grid Application
The grid application provides you with a multi-page project. The application supports data that is grouped into categories. For example, a feed-reader application could implement a group for each feed and each group could contain a collection of items or individual posts for the feed. The template provides a way to navigate across groups or drill into specific group and item details. The default page for an application generated from this template is shown in Figure 2.5.
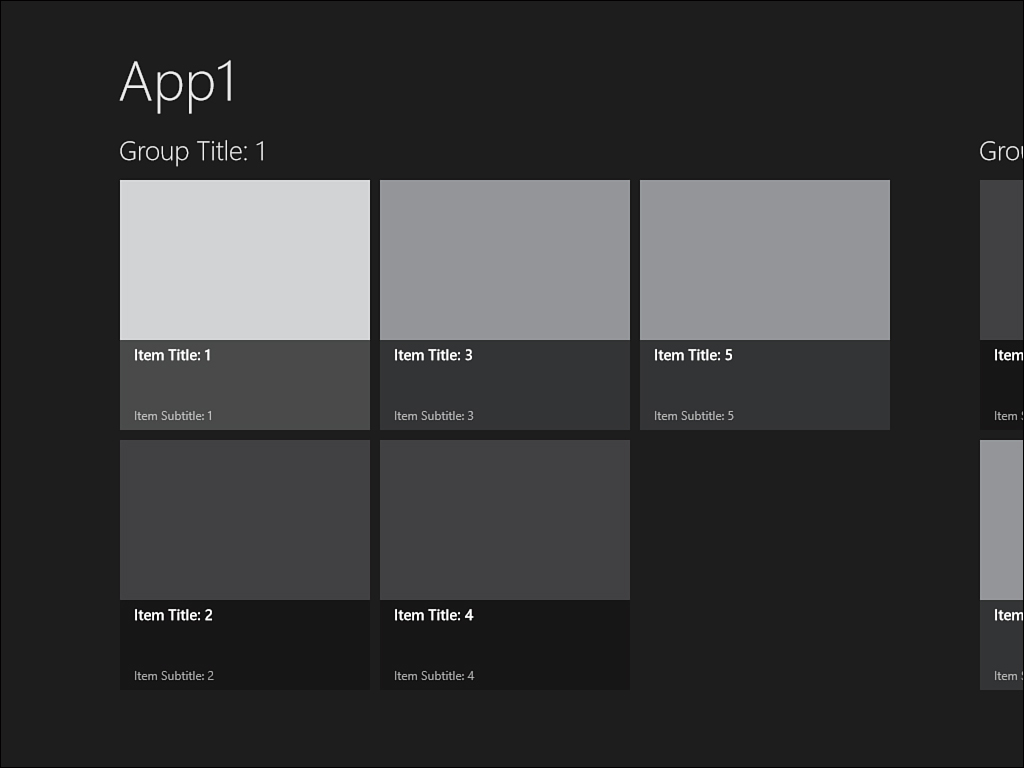
Figure 2.5. The grid application template
The project template provides you with several helper classes that will come in handy as you build more complex applications, including
• BindableBase—The base class for view models that follow the MVVM pattern. It makes it easier to provide objects that participate in the data-binding system. You will learn more about data-binding in Chapter 3, Extensible Application Markup Language (XAML).
• BooleanNegationConverter—Provides an easy way to invert the value of a Boolean data element.
• BooleanToVisibilityConverter—Allows you to easily set the appearance of a UI element based on the value of a Boolean data element.
• LayoutAwarePage—A base class for a Page that tracks both the orientation of the page and the view mode (that is, whether it is full-screen or snapped next to another application).
• RichTextColumns—Specifies a custom panel that allows you to bind any number of data elements and have them automatically align into uniform columns.
• StandardStyles—A useful dictionary of styles that help define the look and feel of your application. You will learn more about styles in Chapter 3.
• SuspensionManager—A helper class for saving values, especially useful for restoring state (you will learn more about application state in Chapter 5, Application Lifecycle).
In later chapters, you will learn more about the various elements that make up an application. You will also discover some useful ways to share code between applications. This will allow you to create classes and share them without having to depend on the template to provide them for you.
Split Application
The split application is similar to the grid application but is optimized for navigating the individual items in the group list. It starts with a display that provides an overview of the available groups. When you drill down into a specific group, it provides a split view with the list of available items on one side and the details for a particular selected item on the other side. The split view for an application generated with this template is shown in Figure 2.6.
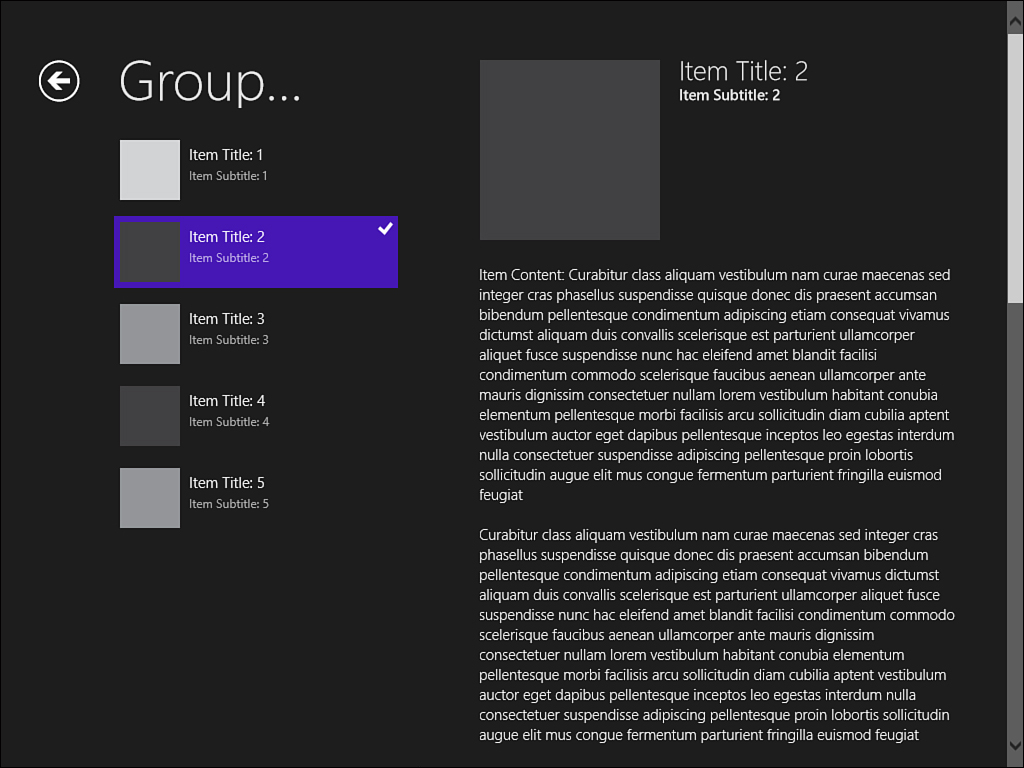
Figure 2.6. The split view
This template also contains the helper classes and dictionaries listed for the grid application.
Class Library
A class library is used when you want to create libraries that can be shared within applications. The project template provides the minimum profile you need to generate an assembly that can be linked to one of the application templates to provide services such as utilities, reusable code, data models, and other code that is important for your application.
Windows Runtime Component
You use the Windows Runtime Component template to create reusable WinRT components. These are specialized class libraries that can be accessed from Windows 8 applications built using any of the supported Windows 8 languages. You will learn more about how to create WinRT components in Chapter 4, Windows 8 Applications.
Unit Test Library
The unit test library contains special classes that define unit tests for your system. These classes contain methods that are called by the test system. Testing is an important part of building applications. You will learn all about testing in Chapter 9, MVVM and Testing.
The ImageHelper Application
Now you are ready to build your first Windows 8 application. For this application, I started with the Blank Application template. You can choose to build the application yourself by following along or download the final product from the book website at http://windows8applications.codeplex.com/. The name of the project and solution is ImageHelper.
The first step is to create a meaningful user interface (UI). This is done using a special technology called XAML. You will learn all about XAML in Chapter 3. XAML is a declarative language that supports the creation of various objects and allows you to define their attributes and child elements using Extensible Markup Language (XML). The most common use of XAML is to define the UI elements that make up your application.
The template already generated a default Grid element in the MainPage.xaml file. The next step is to define two rows in the grid by placing the following code in between the start and end Grid tags:
<Grid.RowDefinitions>
<RowDefinition Height="*"/>
<RowDefinition Height="Auto"/>
</Grid.RowDefinitions>
The definitions instruct the display engine to create a bottom row that automatically provides enough space for its child elements and give all of the remaining space to the top row. This is because Auto refers to automatic sizing based on the contents, and * indicates “take all of the remaining space.”
Next, insert a place holder to show an image after the closing </Grid.RowDefinition> tag but before the closing </Grid> tag. It should be centered in the top row. If it has to be resized or stretched, it should maintain its aspect ratio. The image is centered using the alignment properties. The Stretch property indicates how the runtime should handle resizing the image when needed to fit the available space. The Uniform value specifies that the aspect ratio should be maintained:
<Image x:Name="ImageTarget" Grid.Row="0"
HorizontalAlignment="Center" VerticalAlignment="Center"
Stretch="Uniform"/>
Finally, include a StackPanel to show two buttons right after the Image you just inserted. The element works as its name implies: It stacks the elements next to each other. In this case, the first button will be used to capture a new image and the second button to save it. The margin attribute simply specifies some padding so the buttons are not next to each other:
<StackPanel Grid.Row="1" Margin="10"
HorizontalAlignment="Center" Orientation="Horizontal">
<Button x:Name="CaptureButton" Content="Capture New Image"
Click="CaptureButton_Click_1"/>
<Button x:Name="SaveButton" Content="Save Image"
Click="SaveButton_Click_1" Margin="20 0 0 0"/>
</StackPanel>
If you are writing the application instead of following along with the existing sample, you should notice a drop-down menu appears after you specify the Click attribute (thanks to IntelliSense). Choose the option for <New Event Handler> to have the event handler code automatically generated for you. If you pasted the code, delete the value after the click attribute and start over to see the drop-down.
Before you test this new UI, you should set some parameters for your application. These will give it a friendly name to display on the Start screen as well as provide some behaviors and capabilities you will need in order to complete the application. First, double-click the file called Package.appxmanifest in your Solution Explorer. You should see a dialog similar to the one shown in Figure 2.7.
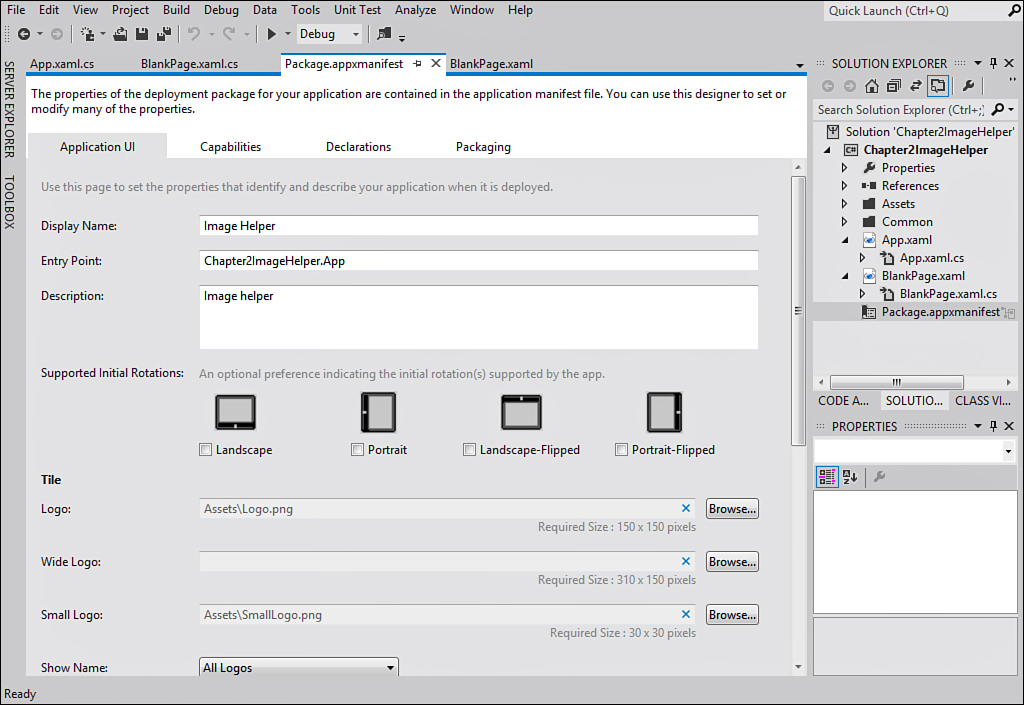
Figure 2.7. The dialog for your application manifest
The application manifest is important and contains four sections. The dialog allows you to modify the sections and saves it to the underlying XML format. You can few the source XML file by right-clicking the manifest file and selecting View Code. The sections are as follows:
• Application UI—Information about how the application appears to the end user. This is where you can specify a friendly name like Image Helper and give the application a short description. You can restrict your orientations and manage tiles and notifications (you will learn more about those in Chapter 7, Tiles and Toasts).
• Capabilities—The Windows 8 platform restricts the features and devices that your application can use by default. If you wish to interact with those items, you must declare the capability—otherwise, the user will receive an error when attempting to use the capabilities while running the application. Even when you specify a capability, the user may be prompted to “opt-in” to using it. The following capabilities should be selected for this application: Internet (Client), Pictures Library Access, and Webcam. You can click any capability to read a description about it and get help.
• Declarations—Windows 8 applications can integrate with each other using a powerful new platform that includes charms and contracts. You will learn more about declarations in Chapter 8, Giving Your Application Charm. For this application, choose the Share Target declaration and click the Add button. Next, click the Add New button under Data formats and type Bitmap. The dialog should appear similar to what’s shown in Figure 2.8.
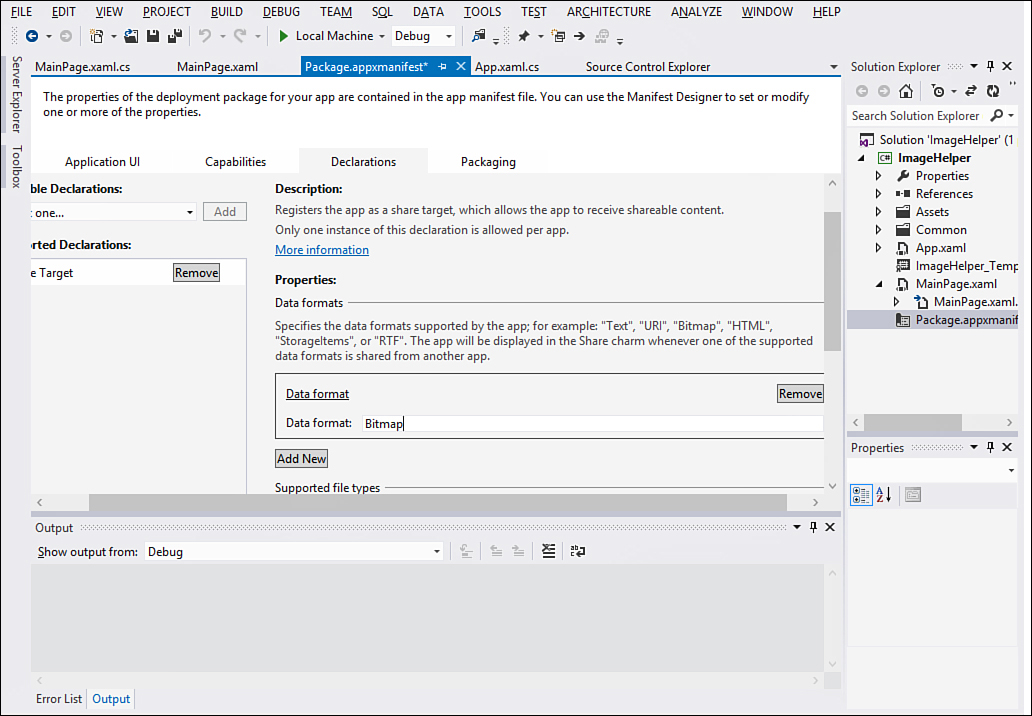
Figure 2.8. Declaring the application as a share target that can accept bitmaps
• Packaging—Allows you to edit all of the unique attributes that describe a package when it is deployed. You can provide a unique name to refer to the package as, a display name to show when enumerating packages on the system, and information about the publisher. I left the package name as is and gave it the display name Image Helper.
Be sure to save the package manifest after you are done editing the various properties.
Now you can write some code for the application. Don’t worry if this is confusing at first—you will start by implementing some specific features and then learn more about what those features do in subsequent chapters. First, because the application was declared as a Share Target, you need to implement the right event to handle sharing. In the App. xaml.cs file (the code-behind file for the application), add an override to the App class with the following code (note that it copies the code generated by the template for launching the application—the only difference is that the page is passed a parameter):
protected override void
OnShareTargetActivated(ShareTargetActivatedEventArgs args)
{
var rootFrame = new Frame();
rootFrame.Navigate(typeof(MainPage), args);
Window.Current.Content = rootFrame;
Window.Current.Activate();
}
When a user uses the Share charm, a list of applications that declared themselves as a Share Target is provided. To see this in action, open an application that shares images (such as the Photos application) and hold down the Windows Key and press C (or swipe your finger from the right side of the display). In Figure 2.9, you can see the result of my selecting a share from the image of the book cover and the option to choose the ImageHelper application.
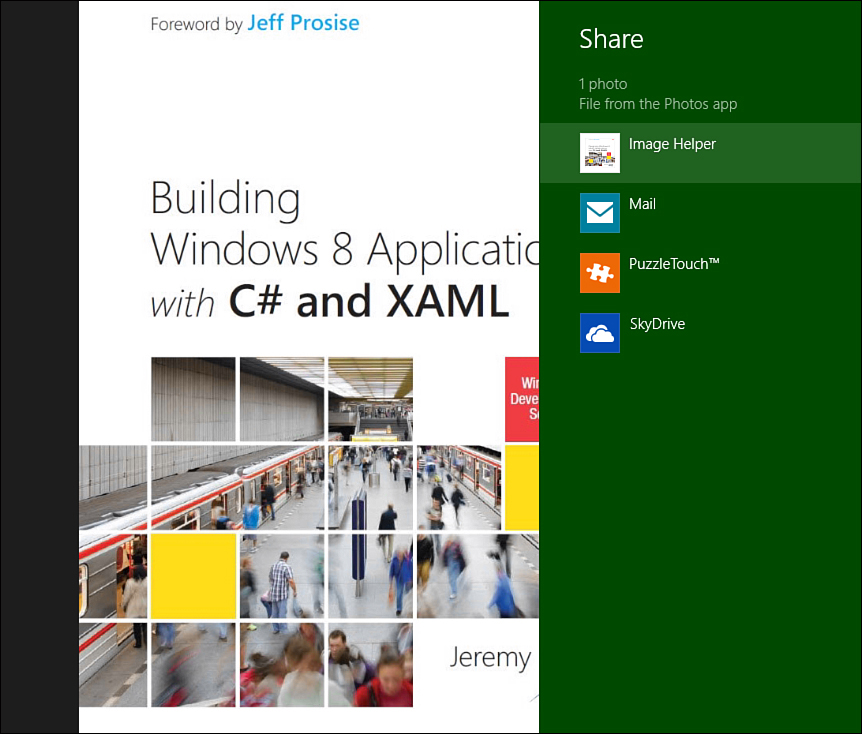
Figure 2.9. The Share charm from the Photos application
If the user selects your application, the OnShareTargetActivated event will be called with the information being shared. The code follows the launch code that creates a frame for navigation, adds a page to the frame (this is your start page), and then activates the windows and navigates to the first page.
In the MainPage.xaml.cs, you have some more work to do. First, add a private field to hold a WriteableBitmap object (you will need to add a using statement for Windows.UI.Xaml.Media.Imaging to the top of the file). This will be used to keep track of the camera capture or the shared item that the application is working with:
private WriteableBitmap _writeableBitmap;
Next, add code to capture an image from the camera. You might be surprised at how easy this is. Add two more using statements:
using Windows.Media.Capture;
using Windows.Storage.Streams;
The code to capture an image from your computer’s web camera is shown in Listing 2.1. This will replace the empty method that was generated for the click event from XAML. Enter the code if you are building the application from scratch and then compile, deploy, and run the application by pressing F5. You will be prompted for permission to use your webcam the first time it is run, as shown in Figure 2.10.
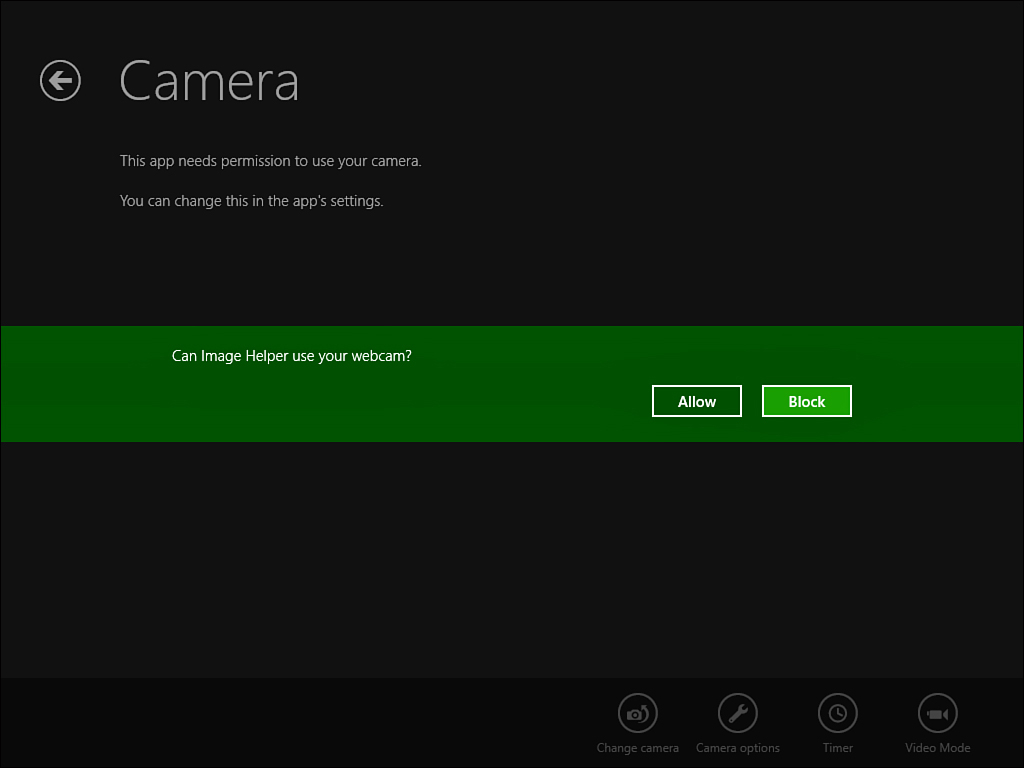
Figure 2.10. Obtaining permission to use the camera
In just a few lines of code, you were able to activate the user’s webcam, allow him to capture a picture, and bring it into the application. If a webcam does not exist, you’ll get a page that indicates you should connect a camera. Otherwise, simply tap the image you see to take a photo.
Listing 2.1. Code to Capture an Image from the Built-in Web Camera
private async Task LoadBitmap(IRandomAccessStream stream)
{
_writeableBitmap = new WriteableBitmap(1, 1);
_writeableBitmap.SetSource(stream);
_writeableBitmap.Invalidate();
await Dispatcher.RunAsync(
Windows.UI.Core.CoreDispatcherPriority.Normal,
() => ImageTarget.Source = _writeableBitmap);
}
public async void CaptureButton_Click_1(object sender,
RoutedEventArgs e)
{
var camera = new CameraCaptureUI();
var result = await camera.CaptureFileAsync(
CameraCaptureUIMode.Photo);
if (result != null)
{
await LoadBitmap(await result.OpenAsync(
Windows.Storage.FileAccessMode.Read));
}
}
To stop the application, you can either swipe from the top edge of the application to the bottom, or you can press Alt+F4. This will terminate the application but will not stop the debugger. To do that, click the Stop icon in Visual Studio 2012 or press Shift+F5.
Most gestures in Windows 8 have keyboard and mouse equivalents. For example, if you swipe from the right edge of the screen, you will see the Charm Bar. You can move your mouse pointer over the right edge of the Task Bar to accomplish the same thing. With the keyboard, hold down the Windows Key and press the letter C at the same time. When you are debugging the application and want to return to the desktop, hold down the Windows Key and press D. If you are using more than one monitor and wish to switch which monitor the start menu appears on, hold down the Windows Key and press Page Up or Page Down.
The code starts by referencing the system-supplied object to manage camera captures. The async and await keywords are used together to asynchronously send a request for the user to grab a photograph (you will gain a much better understanding of asynchronous programming in Chapter 6, Data). Control will be passed back when the user selects a photo or cancels from the UI. If the user selected a photo, the remaining code reads in the bits and stores them in a special WriteableBitmap object so that the pixels can be referenced later (when the user saves them to disk) while also being referenced onscreen to show the image. The bitmap logic is in its own method called LoadBitmap so that it can be used with various sources.
The code that will save the image is in Listing 2.2 to replace the other click method. It will require the following using statements to be added:
using Windows.Storage;
using Windows.Storage.Pickers;
using Windows.Graphics.Imaging;
using System.Runtime.InteropServices.WindowsRuntime;
This code is a bit more involved but still far easier than what you may be used to. The user is prompted for a location to save the file and even given a specific file format to save to—this is all done through the WinRT Picker component. When the user selects their destination for the file, the image is encoded using the Portable Network Graphics (PNG) format and saved to the destination that the user specified. You can run the application, save the image, and preview it by using the file explorer to navigate to the folder you saved it in. You can learn more about the graphics and imaging libraries in Windows 8 here at http://msdn.microsoft.com/en-us/library/windows/apps/br226400.aspx.
Listing 2.2. Code to Save the Image
public async void SaveButton_Click_1(object sender,
RoutedEventArgs e)
{
if (_writeableBitmap != null)
{
var picker = new FileSavePicker();
picker.SuggestedStartLocation =
PickerLocationId.PicturesLibrary;
picker.FileTypeChoices.Add("Image", new List<string>()
{ ".png" });
picker.DefaultFileExtension = ".png";
picker.SuggestedFileName = "photo";
var savedFile = await picker.PickSaveFileAsync();
try
{
if (savedFile != null)
{
IRandomAccessStream output = await
savedFile.OpenAsync(FileAccessMode.ReadWrite);
BitmapEncoder encoder =
await BitmapEncoder.CreateAsync(
BitmapEncoder.PngEncoderId, output);
encoder.SetPixelData(BitmapPixelFormat.Rgba8,
BitmapAlphaMode.Straight,
(uint)_writeableBitmap.PixelWidth,
(uint)_writeableBitmap.PixelHeight,
96.0, 96.0,
_writeableBitmap.PixelBuffer.ToArray());
await encoder.FlushAsync();
await output.GetOutputStreamAt(0).FlushAsync();
}
}
catch (Exception ex)
{
var s = ex.ToString();
}
}
}
The error handling is there just to allow you to set a breakpoint if there is an issue. I purposefully kept this example simple for the first program so you can focus on some of the fast and easy features. In the next few sections, you learn how Windows 8 stores information about your application and enables integration between applications in the Windows 8 platform. First, there is one last step to perform.
When you created the application, you declared a capability for sharing and wrote some code to pass the sharing information to the main page of the application. To receive that information, implement the code in Listing 2.3. This code simply grabs the bitmap data that was shared, loads it to the WriteableBitmap, and displays it the same way as if it had been captured from the web camera. The code goes into MainPage.xaml.cs and replaces the empty OnNavigatedTo method that was generated from the template. You will need to add using statements for both Windows.ApplicationModel.Activation and Windows.ApplicationModel.DataTransfer as well as add a declaration for the _shareOperation field.
Listing 2.3. The Code to Receive a Shared Bitmap
protected async override void OnNavigatedTo(NavigationEventArgs e)
{
var args = e.Parameter as ShareTargetActivatedEventArgs;
if (args != null)
{
_shareOperation = args.ShareOperation;
if (_shareOperation.Data.Contains(
StandardDataFormats.Bitmap))
{
_bitmap = await _shareOperation.Data.GetBitmapAsync();
await ProcessBitmap();
}
else if (_shareOperation.Data.Contains(
StandardDataFormats.StorageItems))
{
_items = await _shareOperation.Data
.GetStorageItemsAsync();
await ProcessStorageItems();
}
else _shareOperation.ReportError(
"Image Helper was unable to find a valid bitmap.");
}
}
Notice there are two formats that the application supports. One is a raw bitmap format. When a bitmap is passed in, a stream reference to the contents of the bitmap is saved, and then the bitmap is loaded like this:
private async Task ProcessBitmap()
{
if (_bitmap != null)
{
await LoadBitmap(await _bitmap.OpenReadAsync());
}
}
Some applications may reference photos stored on the local device. Instead of packing the contents of the photo in a stream to send over to the share target, the applications will create a list of storage items instead. The storage items refer to files in storage, and some of those files could be images. The code in Listing 2.4 iterates each storage item and loads the first one it finds that is an image format.
Listing 2.4. Iterating Storage Items
private async Task ProcessStorageItems()
{
foreach (var item in _items)
{
if (item.IsOfType(StorageItemTypes.File))
{
var file = item as StorageFile;
if (file.ContentType.StartsWith(
"image",
StringComparison.CurrentCultureIgnoreCase))
{
await LoadBitmap(await file.OpenReadAsync());
break;
}
}
}
}
Compile and then run the application the same way you did before (by pressing Ctrl+F5). It should behave the same way it did the last time you ran it. Now exit the application (Alt+F4 or swipe from top to bottom).
Navigate to an application with images (the easiest is probably the Photos application) and show the Charm Bar. This is done one of two ways. With your thumb, you can simply swipe from the right side of the touch screen to show the bar. If you are using a mouse, simply hover in the bottom right corner of the screen. You should be presented with a list that includes the image application.
Select the ImageHelper application. The application will slide in from the side. This effect is known as a fly-out because it comes in from the side to overlay the existing application. This application reuses the main page to keep it simple; in most cases, you will design a special page for the fly-out that accommodates a narrower screen width. The resulting view will contain a thumbnail of the desktop, with the same buttons to either capture a new image or save the snapshot to disk as you did with the web camera capture.
This example is simplified to show the results of the sharing. When you click the buttons, the application are dismissed. You will not be able to save the file because the file picker tries to overlay the application, which is not allowed in the fly-out. This is part of the share behavior. You will learn more about sharing and how to handle these scenarios appropriately in Chapter 8.
Under the Covers
This first application did quite a lot! Not only were you able to capture an image from the web camera and save it, you were also able to take images shared from other applications and view those from within the application. If your login is connected to a SkyDrive account, you can save your images to the cloud (it will appear as an option in the save file dialog) without changing any code in the application. How does Windows 8 manage these interactions between applications? The answer lies in the details of WinRT.
Applications Are WinRT Components
You learned about the WinRT architecture in the previous chapter. You also used some WinRT components in your first application. The CameraCaptureUI is an example of one component, and the FileSavePicker was another. What you may be surprised to learn is that the ImageHelper application you created is also a WinRT component! Applications are special WinRT components that can be launched either from the start menu or through contracts.
The lifecycle of a Windows 8 application can be summarized in three simple steps: install, tap, and run. The installation step involves the deployment of your component to the operating system. It is registered with the system (including any capabilities and declarations). When the user taps the icon on the Start menu, Windows 8 locates your component and launches it. That is when the application is actually run.
Extensions and Classes
It might surprise you to learn about the way Windows 8 keeps track of your applications. It uses the Windows Registry. The Registry is a hierarchical database that Windows uses to store configuration settings and preferences. The Registry was introduced with Windows 3.1, which makes it over 20 years old! It is this same database that drives the Windows 8 experience, including the contracts that integrate applications with each other.
When you deploy your application, the entry into it is stored as a class in the registry. Classes are the unique identifiers for WinRT components, including applications. Extensions represent contracts. There are numerous contracts in the system, and they all contain a collection of classes that can interface with the contract.
To see how this works, open a command line (the easiest way is to press the Windows Button to access the Start screen, and then type cmd and click the resulting Command Prompt icon). Type regedit and press Enter. When prompted for security, click Yes. This will open the classic registry editor that has existed for several versions of Windows. You can also launch it from the application search by pressing the Windows Key and typing regedit.
Expand HKEY_CURRENT_USER![]() Software
Software![]() Classes
Classes![]() Activatable Classes
Activatable Classes![]() Package. Under package, you will see an entry that starts with the package name (this is the long string that appears by Package name on the Packing tab of the manifest). This is the registry entry for the application you just built and deployed. You can see the entry is a combination of the package name, the version, the culture, and a generated code. This entry provides information to Windows 8 about how your application should be launched (for example, HTML-based applications must be launched using a host that contains the web browser engine) and what class and method to call to kick things off.
Package. Under package, you will see an entry that starts with the package name (this is the long string that appears by Package name on the Packing tab of the manifest). This is the registry entry for the application you just built and deployed. You can see the entry is a combination of the package name, the version, the culture, and a generated code. This entry provides information to Windows 8 about how your application should be launched (for example, HTML-based applications must be launched using a host that contains the web browser engine) and what class and method to call to kick things off.
Now expand HKEY_CURRENT_USER![]() Software
Software![]() Classes
Classes![]() Extensions
Extensions![]() ContractId. Extensions represent the system contracts. You may recognize some of the contracts such as Windows.ShareTarget and Windows.File. There is another contract called Windows.Launch that represents the contract for WinRT components that can be launched from the start menu. If you expand that node, you will see several items listed, including the ImageHelper application. The same application is also listed under the Windows.ShareTarget node.
ContractId. Extensions represent the system contracts. You may recognize some of the contracts such as Windows.ShareTarget and Windows.File. There is another contract called Windows.Launch that represents the contract for WinRT components that can be launched from the start menu. If you expand that node, you will see several items listed, including the ImageHelper application. The same application is also listed under the Windows.ShareTarget node.
The application you created was a special WinRT component that Windows 8 stored in the registry. When a user chooses the Share charm, Windows 8 will open the registry to find applications listed as a share target and display them as options to the user. When the user taps an option, the class is referenced in the registry where Windows 8 can determine what components to create and what methods to call. The same thing happens when the user launches your application. The application tile is really a special type of Launch charm that uses the same technique to look up the class and launch the component.
Using ILDASM
In addition to registering information about your application to the operating system, Windows 8 applications also publish metadata. This metadata details the interfaces, classes, methods, and properties exposed by the WinRT components and applications. Whether your application is written in HTML5, C++, or C#, the same type of metadata information is published. This makes it easy for other programs to inspect your component to determine how to use it. It also makes the features of the component available for projection so they can be mapped as local objects in your preferred language.
You can use the ILDASM tool to inspect the metadata for components. To see this in action, open a developer command prompt. Start by bringing up the charm overlay; this is shown in Figure 2.11.
Figure 2.11. Bringing up the charm overlay from the Desktop
When the overlay appears, click the Search icon and type Command. This should provide a list of options. To make it easier to use the command prompt, right-click the Developer Command Prompt icon to show the application bar; then click the icon with the text Pin to taskbar. Finally, left-click or tap the Developer Command Prompt menu item to open the command prompt. Type the following and press Enter:
ildasm.exe
This will launch the .NET Framework IL Disassembler. It is typically used to inspect .NET assemblies and view the associated IL. For Windows 8, it can also inspect WinRT applications and components. This is because the metadata for Windows 8 applications follows the ECMA-335 standard. This is the open standard Microsoft published for the Common Language Infrastructure. You can read the standard online at http://www.ecma-international.org/publications/standards/Ecma-335.htm.
From within Visual Studio 2012, right-click the project name ImageHelper in the Solution Explorer to open the solution context menu. Choose the option Open Folder in Windows Explorer. This will open the folder that the application resides in. Drill down into the bin![]() Debug folder to see the output from compiling the application. The contents of the folder should look similar to what you see in Figure 2.12.
Debug folder to see the output from compiling the application. The contents of the folder should look similar to what you see in Figure 2.12.
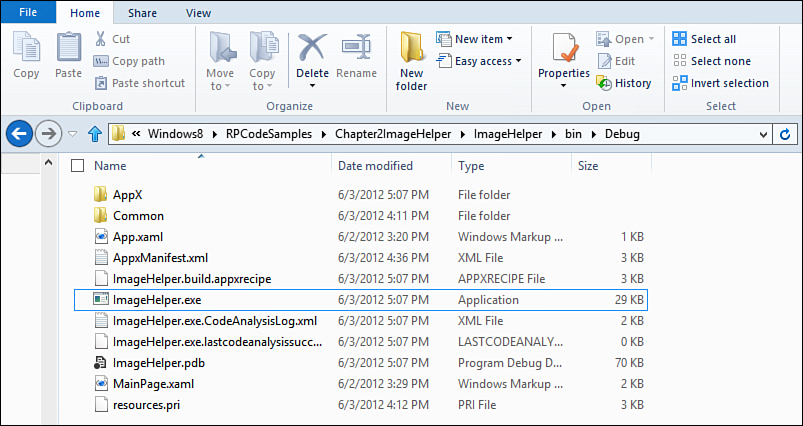
Figure 2.12. The output files for the Windows 8 application
Click the ImageHelper file (in the example figure, file extensions are shown—this is a preference setting; they might not display on your system, so choose the file with the type Application) and drag it onto the ILDASM dialog. You should see a tree appear as the program parses the metadata for the executable. You can expand the nodes on the tree to see the classes, methods, properties, and events that were generated for the application. This is shown in Figure 2.13. As you can see, the C# application actually generated IL code and runs with the .NET Framework. The WinRT components for the operating system are projected to the application and appear like native classes.
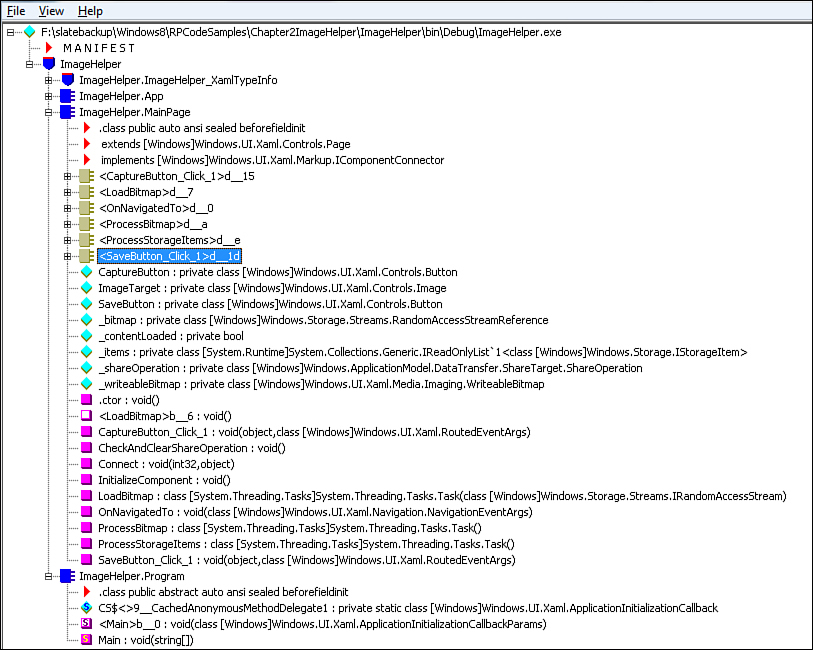
Figure 2.13. The internal metadata and code for the ImageHelper application
The application uses several core WinRT components. Even when the components are part of the operating system, it is possible to inspect their signature using the ILDASM tool. For example, to capture an image from the web camera, you included a reference to Windows.Media.Capture and used the component CameraCaptureUI. You can inspect this component if you know where to look.
From the ILDASM tool, either navigate to File![]() Open or press Ctrl+O. In the file picker dialog, navigate to the Windows 8 metadata folder:
Open or press Ctrl+O. In the file picker dialog, navigate to the Windows 8 metadata folder:
C:windowssystem32WinMetadata
There you will see a list of files that end with the .winmd extension. These files contain the metadata information about the WinRT components they are named for regardless of what language they were built with. Scroll down and select the Windows.Media.winmd file (the extension will not appear if you do not have Explorer configured to show file extensions, but the dialog should display the type as WINMD File). Click or tap the Open button. Figure 2.14 shows the result of expanding several nodes for the component. You can clearly see the class definition and method you used to capture the image.
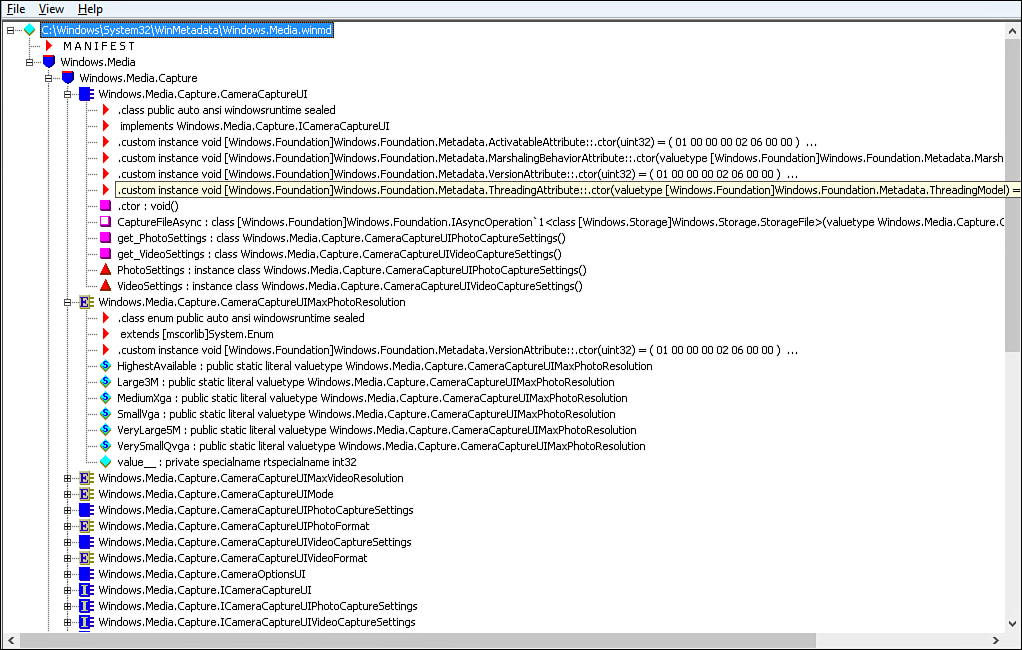
Figure 2.14. Metadata for a WinRT component
You can get a good idea of how comprehensive the Windows 8 platform is by inspecting the number of files available in the metadata folder. Those are just the built-in WinRT components; many more are available through your own code and other applications that are installed on the system. As you can clearly see, the Windows 8 platform is built on decades of legacy technology that many developers are familiar with. It is how it stitches the best parts together that make it so powerful and easy to use.
Summary
In this chapter, you learned several ways to set up an environment to begin developing Windows 8 applications. You learned about the various tools available to create applications and the various templates provided by Visual Studio 2012. You built a sample application that was able to capture images from the camera, receive images shared from other applications, and save the images to your local file system or the cloud with only a few dozen lines of code.
After building and deploying the application, you learned how Windows 8 uses the registry to store information about the application and the contracts it implements. You also learned about the open standards Windows 8 applications used to provide metadata about components and how to inspect the metadata using the ILDASM tool. In the next chapter, you will learn more about XAML technology and how it will help you build the UI for your Windows 8 applications.