
3. Overview of Commercial Drones and Kits
The easiest way to get a drone, as usual, is to buy one. There’s nothing wrong with buying a pre-made product because it gets you flying faster. However, you don’t really learn anything about electronics or robot building. A kit, by contrast, gives you the opportunity to plug in the various components. In doing so, you learn a little about the parts and how they fit together. It’s a nice middle ground between doing everything yourself and just buying a finished bird.
Parallax ELEV-8 Quadcopter
The ELEV-8 (P/N MKPX23) is the second version of Parallax’s entry into the world of quadcopters. Parallax makes microcontrollers, most noticeably the Propeller, which features the PBX32A chip. Not coincidentally, the flight controller for the ELEV-8 also features the same chip. The quadcopter, therefore, is something of a plug for Parallax’s hardware.
The ELEV-8 is cleanly designed (you can see this in Figure 3.1), and it conceals the usual ugly wires and zip ties by hiding them inside the hollow booms, while the ESCs are tucked between the two central mounting plates (see Figure 3.2).

FIGURE 3.1 The ELEV-8 stands out with its clean looks, with far fewer visible wires than is average (credit: Parallax).

Be aware that Parallax doesn’t include a battery pack, an RC transmitter, or an RC receiver. Obviously you’ll need to buy your own in order to fly. The company suggests a specific lithium polymer (LiPo) battery, mentioned later, and claims that nearly any RC transmitter and receiver combo will work with the hardware.
Finally, Parallax describes the quadcopter as requiring advanced-level skills to fly it, and it’s suggested for experienced RC airplane operators.
The ELEV-8 has the following features. Feel free to check out the parts that make up the kit in Figure 3.3.
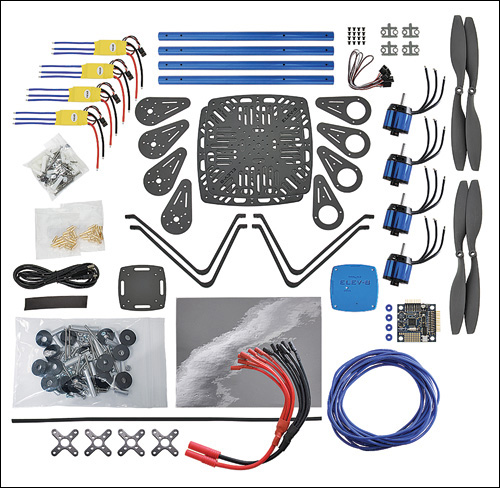
![]() Frame: Aluminum tubes with plastic plates and connectors.
Frame: Aluminum tubes with plastic plates and connectors.
![]() Landing struts: Plastic.
Landing struts: Plastic.
![]() Motors: Four 1000kV.
Motors: Four 1000kV.
![]() ESCs: GemFan 30A.
ESCs: GemFan 30A.
![]() Flight control: The kit comes with a Hoverfly Open flight control board.
Flight control: The kit comes with a Hoverfly Open flight control board.
![]() Power: No batteries come with the kit, although a 3300 mAh, three-cell lithium polymer (LiPo) battery is recommended.
Power: No batteries come with the kit, although a 3300 mAh, three-cell lithium polymer (LiPo) battery is recommended.
![]() Cost: $400–$550
Cost: $400–$550
![]() URL: http://www.parallax.com/product/elev-8
URL: http://www.parallax.com/product/elev-8
DJI Phantom 2 Vision+
The DJI Phantom is a pre-built, high-end quadcopter with a variety of configurations, ranging from $580 to $1,300. The top of the line is the Vision+ (pictured in Figure 3.4), which features a motorized gimbal (shown in Figure 3.5) so you can aim a camera wherever you want.


FIGURE 3.5 The Vision+, true to its name, has a gimbal-mounted camera that comes with it (credit: DJI).
The Phantom has far more control options than most quadcopters. The Vision+ comes with a 5.8GHz controller. This unit also has a smartphone holder so you can use a phone application to control the Phantom, or you can use the joysticks on the hand unit.
Finally, the Vision+ is very attractive, with a beautiful shell and LED strips on the booms, as shown in Figure 3.6.

FIGURE 3.6 The Phantom’s distinctive LEDs not only illuminate the quadcopter, but also tell the operator which way is forward (credit: DJI).
DJI’s Phantom 2 Vision+ has the following specs:
![]() Frame: Metal and plastic
Frame: Metal and plastic
![]() Motors: Four T-Motor MN2214 920kV brushless outrunners
Motors: Four T-Motor MN2214 920kV brushless outrunners
![]() ESCs: Custom DGI controllers
ESCs: Custom DGI controllers
![]() Flight control: DJI NAZA Autopilot
Flight control: DJI NAZA Autopilot
![]() Power: 5200 mAh LiPo battery
Power: 5200 mAh LiPo battery
![]() Cost: $579–$1,229
Cost: $579–$1,229
![]() URL: http://www.firstpersonview.co.uk/quadcopters/dji-phantom-2-vision-plus
URL: http://www.firstpersonview.co.uk/quadcopters/dji-phantom-2-vision-plus
OpenROV
I’ve mentioned a category of drone called the remotely operating vehicle, or ROV. The best example of a DIY unmanned submersible is OpenROV, an open-source semipro ROV that has been tested in lakes and oceans around the world (see Figure 3.7). It has been used to explore caves, shipwrecks, and Antarctic glaciers. Less romantically, it has been used to inspect underwater features such as ship hulls that might otherwise require a professional diver.

FIGURE 3.7 An OpenROV is a small submersible that explores underwater while the operator remains on the surface (credit: OpenROV).
OpenROV consists of three motors, with the control electronics sealed against the moisture. Because of the poor transmission of radio waves through water, operators must connect a laptop to the ROV with long wires (visible in Figure 3.8), which trail behind the craft as it explores underwater.

The operator looks through the attached webcam and moves the craft by interacting with a browser application. Additionally, because underwater tends to be dark, the ROV has a pair of LED matrices that it uses as headlights.
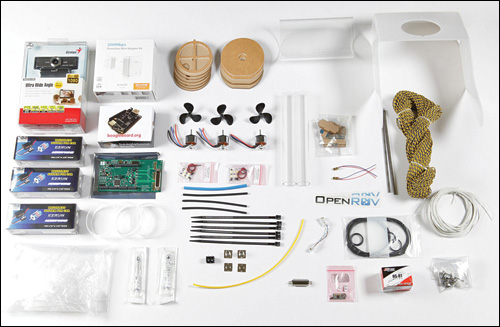
The OpenROV kit (shown in Figure 3.9) comes with the following parts:
![]() Frame: Laser-cut acrylic.
Frame: Laser-cut acrylic.
![]() Motors: Three brushless DC motors with Graupner high-efficiency marine propellers.
Motors: Three brushless DC motors with Graupner high-efficiency marine propellers.
![]() ESCs: Three FalconSEKIDO brushless motor controllers.
ESCs: Three FalconSEKIDO brushless motor controllers.
![]() Control: OpenROV uses a BeagleBone Black that plugs into a custom Arduino Mega; an Ethernet add-on board handles communication with the surface.
Control: OpenROV uses a BeagleBone Black that plugs into a custom Arduino Mega; an Ethernet add-on board handles communication with the surface.
![]() Power: Batteries not included, but it takes six “C” lithium cells.
Power: Batteries not included, but it takes six “C” lithium cells.
![]() Cost: $899 kit, $1,450 assembled.
Cost: $899 kit, $1,450 assembled.
![]() URL: openrov.com.
URL: openrov.com.
Actobotics Nomad
Actobotics is a cool building set whose trademark element is the hole-studded beams you can see in Figure 3.10. Their newest robot offering is the Nomad, a rover just dying to be decked out in sensors and control systems. I mean this in the sense that you don’t get a full kit with a microcontroller or control system—it’s strictly DIY after you have the chassis built and add the motors and wheels.
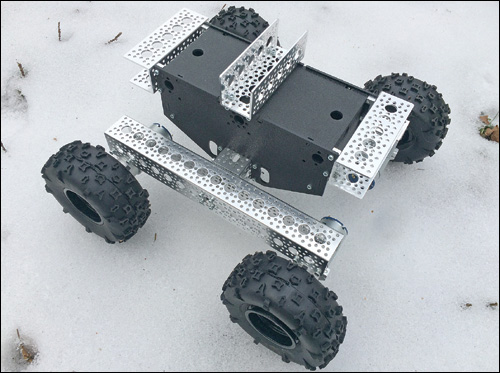
The wheels are robust for a small robot. The largest chassis elements are a foot long. Each wheel is 5” in diameter and over 2” thick—just the ticket for clearing those obstacles. Check them out in Figure 3.11.

That said, you will have to source your own battery packs, motor controllers, and so on. Do not buy the Nomad expecting it to roll right out of the kit, unless you have those extra parts! It’s a great start for a rover, however, and the construction promises to be durable enough (see Figure 3.12) to explore any terrain your backyard has to offer.

The Nomad offers the following specs:
![]() Frame: Extruded aluminum frame with an ABS enclosure
Frame: Extruded aluminum frame with an ABS enclosure
![]() Motor: Four 12V, 313-RPM DC motors
Motor: Four 12V, 313-RPM DC motors
![]() Wheels: All-terrain tires
Wheels: All-terrain tires
![]() ESCs: None included
ESCs: None included
![]() Control systems: None
Control systems: None
![]() Cost: $280
Cost: $280
![]() URL: https://www.sparkfun.com/actobotics or https://www.servocity.com/html/actoboticstm.html
URL: https://www.sparkfun.com/actobotics or https://www.servocity.com/html/actoboticstm.html
Brooklyn Aerodrome Flack
Brooklyn Aerodrome (brooklynaero.com) is a group in New York making RC airplanes out of household insulation, the kind that looks like brightly colored foam—you can see an example in Figure 3.13. Equipped with an electric motor for propulsion and servos for manipulating the control surfaces, the Flack (which stands for Flying Hack) is extremely maneuverable. Because the airplane is made out of foam, rebuilding it is a cinch—if the plane crashes and the foam breaks, simply remove the electronics deck and put it on a new wing.

The Flack started off as a $100 kit, but now it’s about twice that, with somewhat better electronics as well as a great book in which the group details what they’ve learned. If you’re just getting into making inexpensive RC projects, this book will definitely help you along.
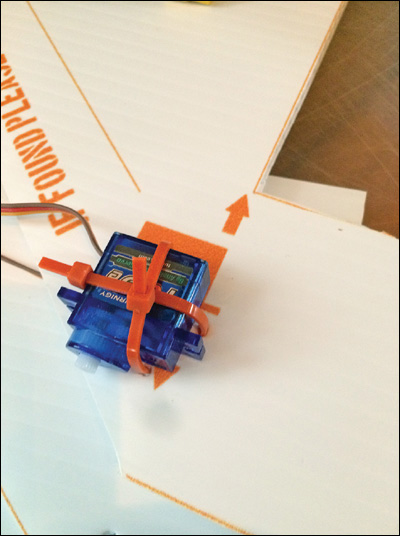
The kit (a partially-built Flack may be seen in Figure 3.14) provides everything you need to fly, including batteries, a base-model controller and receiver, motors, and enough insulation to rebuild the plane if it is wrecked. It makes adept use of lightweight materials like zip-ties (shown in Figure 3.15) but is sturdy enough to take a hit.

The Flack features the following specs:
![]() Frame: Coroplast flight deck and foam insulation wings. You get a bunch of extra wings in the kit, or you can source your own.
Frame: Coroplast flight deck and foam insulation wings. You get a bunch of extra wings in the kit, or you can source your own.
![]() Motors: One 1800kV HiModel brushless outrunner; two TG9E micro-servos.
Motors: One 1800kV HiModel brushless outrunner; two TG9E micro-servos.
![]() ESC: No-name 18A ESC.
ESC: No-name 18A ESC.
![]() Props: 9×9 slow flyer propeller.
Props: 9×9 slow flyer propeller.
![]() Flight control: Hobby King HK-T6A controller and receiver.
Flight control: Hobby King HK-T6A controller and receiver.
![]() Power: Turnigy 1800 mAh LiPo battery.
Power: Turnigy 1800 mAh LiPo battery.
![]() Cost: $199 from brooklynaero.com or $249 from makershed.com.
Cost: $199 from brooklynaero.com or $249 from makershed.com.
![]() URL: http://www.brooklynaerodrome.com/.
URL: http://www.brooklynaerodrome.com/.
Summary
In this chapter, we got in depth with five excellent drone products. Some are kits and others ship pre-assembled, but all offer their own unique challenges and learning opportunities. Now, having looked through a wide range of projects and kits, you’re ready to tackle our own creation! In the next chapter, you’ll begin working on your quadcopter, beginning with selecting an airframe.