
Prerequisites for Installing SharePoint
At this point, you’ve patched your servers with the most recent updates, joined the servers to the domain, modified your hosts file on your host machine, tested logging into your servers with your service accounts using Microsoft Terminal Services Connection (mstsc.exe), and set up group policies that control admin accounts for your SharePoint servers. You’ve also downloaded the SharePoint image from Microsoft. You are ready to begin installing SharePoint!
Purpose of SharePoint
SharePoint is many things to many different people and businesses. The main purpose of SharePoint is to create a shared location or point where business members can come together to perform business-related activities. It’s a strong platform to host applications. Some businesses use it for their external web site engine. It has many other uses, too!
Using a Client Alias
It’s a best practice to configure the farm servers to use an alias for the SQL server vs. the actual name of the SQL server, for database portability reasons. If you use the alias and you later need to completely relocate your SharePoint farm, you’ll be able to do so once it is in a powered-off state. The use of aliases allows the SQL databases to be moved from one SQL database server to another without much manipulation. We are not going to perform a SQL Server migration, but we will configure our farm to use an alias, in case you want to practice migrating to a new SQL server at a later date.
Use SQL Alias
Configuring Client Aliases
Log in to each of your front-end servers (e.g., SP2016APP, SP2016WFE, SP2016Search, and SP2016Cache) with the install account (e.g., svc_install).
Open a Run bar, type cliconfgand, and click OK, as shown in Figure 10-1.

Figure 10-1. The client configuration tool is a very important step
When the SQL Server Client Network Utility opens, click TCP/IP, click Enable, and then click the Alias tab. Figure 10-2 shows this step after it has been completed.

Figure 10-2. Use TCP/IP protocol
Once on the Alias tab, select TCP/IP, enter the SPAlias in the “Server alias” text box, and enter the FQDN to your SQL Server in the “Server name” text box, as shown in Figure 10-3.

Figure 10-3. Use whatever alias you want—just remember it—and use FQDN to SQL Server
Click OK. You’ll return to the screen shown in Figure 10-4. Click Apply and then Click OK (see Figure 10-4).
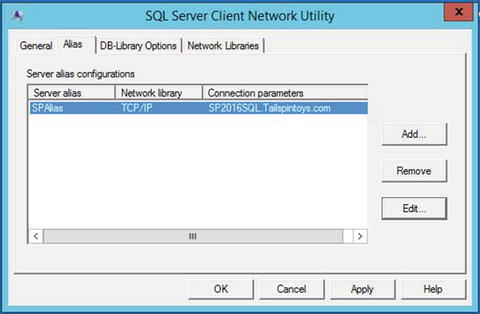
Figure 10-4. Server alias is ready
You’ve just enabled this machine to use the alias of SPAlias when it looks for future SQL Server connections. Make sure that the alias is the same in all your scripts later on in this chapter.
Overview of the Install and Configuration Process
The install process consists of installing the SharePoint bits or binaries (folders and files) onto all the machines that will be part of the farm. You must ensure that all the farm servers have the same operating system (OS) and that the OS is updated to the same levels with the same security patches. You should check the update status as much as you can during the install, making sure that all servers are as updated as possible.
Before running the PowerShell to create the farm, you’ll create the client configuration alias to each farm server, except for the SQL server. After the servers are updated, the binaries are installed, and you have an alias for SQL, you’re almost ready to install SharePoint. The SQL server needs a couple more modifications and the farm account needs to log in to the farm servers and then log off. This log in and log off burns in the admin rights to the farm account profile on the VMs.
The install account is used to install SharePoint. The farm account is used for some of the configuration after the farm is up and online. It is used to join the member servers into the farm.
After the “Maximum degree of parallelism” is set to 1 on the SQL server, you’re ready to prep your farm creation and install scripts. But before you install the farm, you’ll make one more check for any OS-level updates. The install PowerShell script to install central admin is run on the first server that joins and creates the farm. This server is the application (app) server, and then, after the app server is created, the service applications are installed and configured, some with PowerShell and some manually a little bit later. Central admin is configured to run on SSL. And then the other servers are joined into the farm.
At this point, you’ll manually create a few of the other service applications from within central administration.
After the farm is configured, we’ll create a couple of host-named site collections, and then install Visual Studio on our host computer and configure the host computer to deploy to the SharePoint farm. The other alternative is to install Visual Studio right on the app server or web front-end server. At this point, we’re ready to make sure that SharePoint Designer can access the farm, as well.
Installing the Prerequisites
There are two ways to install the binaries. The first method, and the preferred method, is using the GUI and a machine that has access to the Internet. The second method is an option if you don’t have access to the Internet from your server for whatever reason. For example, maybe you can’t connect to the Internet from your Hyper-V network when at work due to a setting on the guest network, which is out of your realm of control. Or maybe you are not working in a home lab and you are doing this in a live-fire exercise where the servers do not have Internet access. The second method, installing from a network share, is outside the scope of this book, but there is a link in the “Do You Want to Know more?” section that lists the official TechNet instructions. Be careful when going that route. Make sure that you get just the files you need, because some downloads (e.g., SQL Server) include much more than the required files.
Installing the Prerequisites
Download the SharePoint Server 2016 install file from the Microsoft download site.
Note For Beta 2 and the Release Candidate, this file was in the ISO format and required mounting to the VM from within the settings of the VM, as you did when you installed the operating system (see Figure 10-5). However, the Release to Market (RTM) has been released as an image file, so you must copy it to your Windows Server 2012 R2 machine and then double-click the file to automatically mount it. Or, you can create an ISO file. If you decide not to make an ISO, you also need to remember to mount the .img file after each restart. These instructions assume that you opted to forego making the ISO file.

Figure 10-5. Browse to the ISO file if you created one
If you didn’t create an ISO, you’ll need to get the .img file into your VMs. If you did create the ISO file and mounted it within the VM settings, go ahead to step 6 of this section. One way you can do this is to modify your mstsc connection so that it includes the disks and drives from your host computer by opening Microsoft terminal services connection (mstsc.exe) from the Run bar and then modifying the connection properties and saving them.
Open the Microsoft Terminal Services Connection utility (mstsc.exe), enter the app server name, and then click the Local Resources tab (see Figure 10-6).

Figure 10-6. Make sure that you’re logging into the correct VM
On the Local Resources tab, click the More… button, and then click Drives. Select C:, D:, and “Drives that I plug in later”. Click OK (see Figure 10-7).

Figure 10-7. Include drives from your host machine
Switch back to the General tab and click the Save button. Click OK (see Figure 10-8).

Figure 10-8. Save your settings, but don’t use LUCY for the sign on, use install account
Copy the file that you downloaded from Microsoft to the E: drive of your VM. Figure 10-9 shows the file being copied.

Figure 10-9. Copy operation in progress
Before you mount your .img file as a drive, your PC window should look like Figure 10-10.

Figure 10-10. Before mounting the file
After the file is copied to your E: drive, double-click the file. This creates a new mounted drive on your VM. Make a note of this drive. In Figure 10-11, the new drive is F. If you get a message about can’t mount the drive, double-click it again, because this sometimes happens if you had previously mounted an ISO file via settings.

Figure 10-11. DVD drive F: is the mounted drive
Caution The home-lab instructions do not use splash.hta when installing in order to avoid any additional memory overhead. If you have enough resources, you can increase your memory and use splash.hta, as opposed to using prerequisiteinstaller.exe and setup.exe. Reference the high-level steps at https://www.microsoft.com/en-us/download/details.aspx?id=51493 . One more word of caution: these high-level steps will leave you with GUIDs in your database names.
Make sure that you’re logged in with the install account. After the drive is mounted, open the drive and right-click the file named prerequisiteinstaller.exe. Choose “Run as administrator” (see the menu option in Figure 10-12).

Figure 10-12. Run as administrator; make sure you’re logged in with svc_install
If you didn’t turn off the user account control, click Yes, as shown in Figure 10-13; otherwise, you can skip this step.
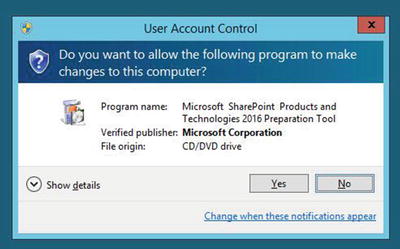
Figure 10-13. UAC prompt
Take a look at what all the installer plans to install on your server, and then click Next (see Figure 10-14).

Figure 10-14. Keep checking this window when it is displayed for status
Click “I accept the terms of the License Agreement(s)” and then click Next (see Figure 10-15).

Figure 10-15. Sign away your rights to everything you own—just kidding
The installation of the binaries begins, as shown in Figure 10-16. The install requires at least one restart, or depending on which iteration of SharePoint you’re installing, it might restart a few times, and after each restart, you have to remount the drive and initialize the prerequisiteinstaller.exe file administratively, if you’re using the .img file. (Repeat steps 6 and 7). Figure 10-17 shows the auto restart failing. Remount the .img file.

Figure 10-16. Binaries are loaded by prerequisite installer

Figure 10-17. Restart the prerequisiteinstaller.exe
When prompted, click Finish, taking special note of whether a restart is required in order to continue (see Figure 10-18).

Figure 10-18. A restart is required to continue
Scroll down to read all the statuses. Note the error shown in Figure 10-19 regarding “Update for Microsoft .NET Framework to disable RC4 in Transport Layer Security”. Click Finish to restart. Also, this image is from the Beta 2; the RTM install was different. You may not encounter any errors. Just read the screen and then follow the instructions on a restart until you get a screen that indicates everything was installed successfully or no action is required.

Figure 10-19. this image is from the Beta 2, the RTM install was different
Remount the drive after the restart and reinitialize the prerequisite installer administratively.
Previously, the binaries had been in the form of an ISO file that was mounted to the VM, in which case SharePoint is smart enough to relaunch the prerequisite installer, as shown in Figure 10-20.

Figure 10-20. Auto relaunch is possible when the install files are in a mounted ISO
The server restarts a couple more times. Each time, you have to mount the .img file. This is why I recommend creating an ISO from this file so that you can mount the ISO to the DVD drive. If it seems like the server is taking a long time, look inside Hyper-V Manager’s server console. You’ll be able to determine the status. For example, Figure 10-21 shows the server is still restarting.

Figure 10-21. Server restarting
If you get to the end of the prerequisite installer and receive a message that there was an error during installation, you need to rerun it administratively (see Figure 10-22).

Figure 10-22. If you get an error, restart the server and follow instructions
Once you’ve run the installer and received an Installation Complete message, you are ready to click Finish and move on to the next server (see Figure 10-23). Note how the installer states that, “All prerequisites have been installed or enabled.”

Figure 10-23. Installation complete for the prerequisites
Repeat these steps on each front-end server. After each server gets the binaries, run Windows Update.
Running Setup
Before running setup, make sure to check Windows Update for any required updates. Chapter 3 has instructions on running Windows Update.
When you run setup, you’ll do so administratively by right-clicking the file and then choosing “Run as administrator”. During this step, you’ll need the key that you downloaded with the .img file. At the end of the setup installation, you uncheck the box to autorun the post-setup configuration wizard for SharePoint products and technologies.
Caution
Don’t forget to uncheck the box that calls for running the SharePoint products and technologies wizard. This step is critical!
Running Setup
Make sure that you have logged in to the server with the install account and the farm account at least one time before starting these steps. Once that is complete, log in with the install account.
Mount the .img file if it isn’t already mounted from the previous exercise for some reason.
Right-click the setup.exe application file and click “Run as administrator” (see Figure 10-24).

Figure 10-24. Run setup
If prompted to restart the server, as shown in Figure 10-25, go ahead and restart; then, remember to remount the .img file if you’re not using an ISO.

Figure 10-25. You might have to restart, just depends
When the server starts backup, go back to the mounted drive, start setup.exe administratively (Shift+right-click and Run as administrator) and if prompted for UAC, click Yes. Figure 10-26 displays the UAC prompt. You won’t see it if you turned them off.

Figure 10-26. Turn this off if you want
Tip The download page for SharePoint 2016 lists the keys for Standard and Enterprise SharePoint 2016, as well as Project Server 2016 180-day trials. See https://www.microsoft.com/en-us/download/details.aspx?id=51493 .
Provide the license key (see Figure 10-27).

Figure 10-27. See the download link for the actual keys
Note Sometimes the setup.exe goes into a non-responsive state at this point. This is usually because an operating system (OS) restart is required. Make sure that the restart is graceful (i.e., not initiated from Hyper-V Manager via Turn Off) or initiated from within the OS. This can also occur if the VM does not have enough memory or if the paging file is too small. Therefore, if you run into a situation where the setup.exe is non-responsive, then restart the machine. if that does not work, increase the RAM.
Accept the terms and click Continue (see Figure 10-28).

Figure 10-28. Please read the terms if you’re unsure what they say
Accept the default file locations and click Install Now, as shown in Figure 10-29.

Figure 10-29. Leave the files on C for the home lab
The installation begins. When it ends, uncheck the box. Figure 10-30 shows the installation process beginning.

Figure 10-30. Install is underway now, baby!
Keep watching the wizard; eventually it will get to the finalizing portion. Get ready to uncheck the box. When the process is almost finished, it states that it is finalizing installation, as shown in Figure 10-31.

Figure 10-31. When you see this screen, you’re almost done with setup.exe
Make sure to uncheck the box on the Run Configuration Wizard screen before clicking Close (see Figure 10-32).

Figure 10-32. Uncheck the box
Repeat the preceding steps on each server. Except for the back-end (SQL) server, you can perform these steps asynchronously. In other words, there’s no need to wait and do each server one by one; do them all at once and remember to uncheck the box.
Configure SQL for the Install
At this point, you have all the binaries installed on all of the farm servers, with the exception of the SQL server. And it’s almost time to create the farm. But first, we need to set up permissions for the install account and make sure that SQL Server is configured to run each request in a separate process (MAXDOP = 1).
Configure SQL
Server Login for Install Account
In order for SharePoint to properly install, the install account (svc_install) needs to have elevated rights within the SQL server. It doesn’t need sysadmin (SA), as that would over-privilege the account. All that is needed is db_creator and SecurityAdmin, which is still a lot, but at least it’s not the all-powerful SA.
Log in to the SQL server with the svc_sqldba account.
Open SSMS (open the Run bar, enter ssms, and click OK) (see Figure 10-33).
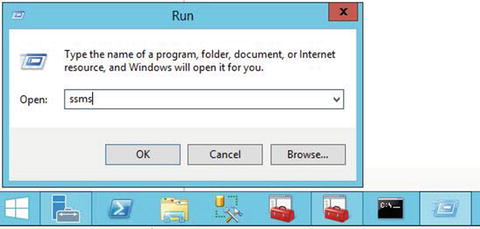
Figure 10-33. SSMS
SQL Server Management Studio opens and the splash screen appears, as shown in Figure 10-34.
Figure 10-34. This beats the hour glass
On the Connect to Server window, make sure that the name of your SQL database and Windows Authentication are still selected, and then click Connect (see Figure 10-35).
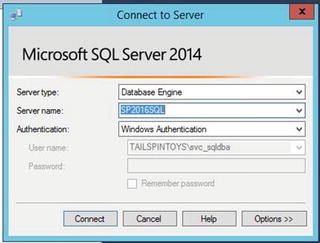
Figure 10-35. Enter your server name and select Database Engine
Once the database opens, right-click Security, and click New ➤ Login…, as shown in Figure 10-36.

Figure 10-36. New login for svc_install account
When the Login - New window opens, click the Search… button (see top right of Figure 10-37).

Figure 10-37. Sorta reminds me of Hyper-V, but it’s SQL
When the Select User or Group window opens, click the Locations… button (see second button from top right in Figure 10-38).

Figure 10-38. Don’t forget the domain location
When the Locations window opens, click Entire Directory and click OK (see Figure 10-39).
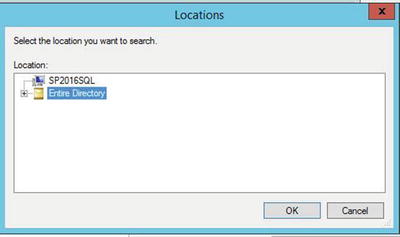
Figure 10-39. Search the entire directory, or you could expand it and select the domain
When you’re back on the Select User or Group window, enter the name of your install account in the “Enter the object name to select (examples)” text box (e.g., svc_install) and then click Check Names, as shown in Figure 10-40.

Figure 10-40. Tailspintoyssvc_install
After clicking Check Names, the account should underline and enumerate to show an email address. If you assigned one in Active Directory, click OK (see Figure 10-41).

Figure 10-41. Click OK
After clicking OK, you’re returned to the Login Properties - TAILSPINTOYSsvc_install general screen that shows the general properties for the login of the install account. Click Server Roles, as shown in Figure 10-42.
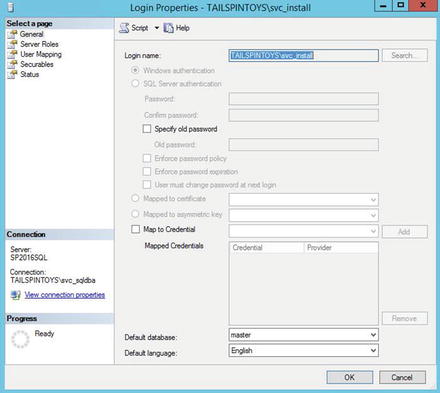
Figure 10-42. Almost done, server roles are next
On the Server Roles screen, select SecurityAdmin and dbcreator. Leave public selected, and then click OK (see Figure 10-43).

Figure 10-43. Login properties
OK, now you’ve got the install account ready to create a farm. There is only one more thing to do: change the maximum degree of parallelism (MAXDOP) to 1.
Maximum Degree of Parallelism
Setting the MAXDOP to 1 is a fairly quick procedure.
Right-click the server name in Object Explorer inside the SSMS (see Figure 10-44).

Figure 10-44. Right-click the instance
Select Properties, as shown in Figure 10-45.

Figure 10-45. Click properties
Select Advanced from the “Select a page” menu (see Figure 10-46).

Figure 10-46. Scroll down
In the Parallelism section, scroll down to Max Degree of Parallelism and change the default 0 to a 1, and then click OK, as shown in Figure 10-47.
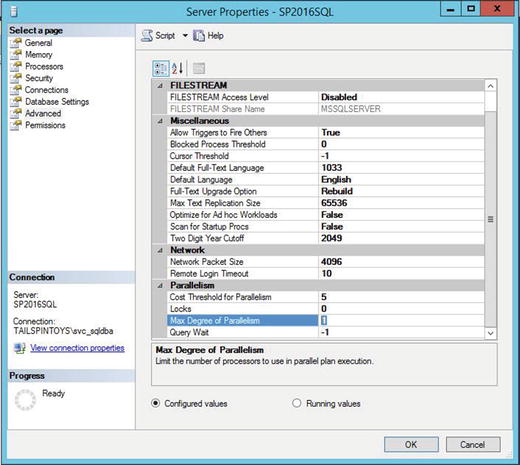
Figure 10-47. MAXDOP
That’s it. SQL Server is ready to accept SharePoint now. You might be wondering why these SQL exercises were not in Chapter 9. The reason they are included in this chapter on SharePoint installation is that they are paramount to the install of SharePoint succeeding. I wanted everyone who already had SQL Server configured and just wanted to install SharePoint to be able to do so in this chapter alone.
At this point, you’ve turned off the firewalls (wf.msc) and the install account has admin rights on all of the farm servers (non-SQL servers). For that matter, the farm account has admin rights on the farm servers and it is an administrator, too. You’ve created the SQL alias on all the front ends and installed all of the binaries by first running through the prerequisite installer, and then running through the setup installer to a point. I say, “to a point” because you stopped at the screen that asked you to run the post-setup configuration wizard GUI (psconfigui.exe) so that, you can use PowerShell to create cleanly named databases.
In the next exercise, we’ll get the PowerShell scripts ready for your environment, and then in the exercise that follows, we’ll install SharePoint and begin configuring the farm.
Recap of the Needed Service Accounts
Recall in Chapter 1 that we planned the needed service accounts. At this time, you really need to make sure that they are all created in Active Directory. To save the future forests of the world, we won’t revisit creating Active Directory accounts, but I do provide the account information one more time, as shown in Table 10-1.
Table 10-1. SharePoint Service Accounts
Account Name | Purpose |
|---|---|
svc_Install | Installation account |
svc_Farm | FarmSystem account |
svc_svcacct | SharePoint service application account |
svc_content | SharePoint web application content access account |
svc_search | SharePoint search crawler account used to access content |
svc_sync | SharePoint account used to synchronize user profiles with Active Directory |
svc_superuser | SharePoint publishing infrastructure super user account |
svc_superreader | SharePoint publishing infrastructure super reader account |
svc_unattended | SharePoint unattended access account for secure store, performance point, and Visio Graphics Services |
Prep Powershell Scripts
Central Admin Script
In this part of the script preparation exercise, you’ll modify the script that creates the central administration database, the SharePoint configuration database, and then the farm passphrase. You’ll need to ensure that the database names adhere to your naming conventions, that the passphrase is acceptable, and that the alias in the script matches what you have already configured on your front-end servers when you used cliconfg.exe.
Download the artifacts for Chapter 10 from the Apress.com site.
Create a folder on your E: drive named scripts.
Open the E: drive of your VM and copy the central administration script (2016-CentralAdmin.ps1) and the service application installer script (2016Install.ps1) to the scripts folder on your E: drive.
Right-click the central administration script and click Edit (see Figure 10-48).

Figure 10-48. Edit some PowerShell scripts
Make sure that line 9 of the script has the correct information for the Database Server parameter (a.k.a. property). The database server property should match, verbatim with what you used in the SQL Server Client Network Utility (cliconfg.exe) (see Figure 10-49).

Figure 10-49. Verify that the SQL alias matches what’s configured in cliconfg
Make sure that the properties for the configuration database name (-DatabaseName SharePoint_Config) and the administration database name (-AdministrationContentDatabaseName SharePoint_CentralAdmin_Content) have the proper naming convention.
Check that the “Minimum role technology property” is set to Application by looking at the -localserverrole property (see Figure 10-50).

Figure 10-50. -localserverrole application for central admin server
If the passphrase of 1Qaz2Wsx3Edc4Rfv is unacceptable, you can change it (see Figure 10-52, where it shows the passphrase). If we were joining in a web front-end (WFE) server, the local server role to use is webfrontend.
There’s nothing else to see here folks, please move along.
—Anonymous police officer at crime scene
Farm Server Join Scripts
In this section of the exercise, you’ll verify that the scripts for each of the other farm servers (search, web server, and distributed cache server) are ready.
Log in to your search server and create a folder on the E: drive named scripts.
Copy the Join-Search.ps1 file to this folder.
Open the Join-Search.ps1 script in the integrated scripting editor by right-clicking it and selecting Edit (similar to previous step 7, except a different script file).
Make sure that the database name property (-DatabaseName SharePoint_Config) and the database server property (-DatabaseServer SPALias) are correct for your environment. Also, check that the passphrase is correct (see Figure 10-52).
Check that the minimum role technology role is set correctly for a server running search by looking at the property -localserverrole (-localserverrole search) (see Figure 10-51 localserverrole parameter).

Figure 10-51. -localserverrole search
Repeat steps 1–5 and when you get to step 5 for the distributed cache server, make sure that the local server role is set correctly for a server performing the distributed cache role. (e.g., -localserverrole distributedcache) (see Figure 10-52).

Figure 10-52. -localserverrole distributedcache
Repeat steps 1–5 and when you get to step 5 for the web server, make sure that the local server role is set correctly for a server performing the web front-end server role. (e.g., -localserverrole WebFrontEnd) (see Figure 10-53).

Figure 10-53. -localserverrole webfrontend
Service Application Install Script
You may notice in one of the crime scene photos (named Figure 10-55) that there is a folder named logs. Inside of that folder is a folder named ULS. Let’s create that folder structure now.
Log in to one of your servers. If you’re on the web server, you can start there.
Open the E: drive and create a folder named logs and then inside of the logs folder, create a folder named ULS, as shown in Figure 10-54.

Figure 10-54. Create a folder named logs and then one named ULS (E:LogsULS)
Now copy this folder structure to the other farm servers by using a universal naming convention (UNC) mapping in the My Computer window. Right-click the logs folder and select Copy. Then, type \ServerNamedriveLetterFollowedbyDollarSign, (e.g., \sp2016appe$) in Windows Explorer and click Enter. When the window opens, you can paste the folder structure for the logs folder (see Figure 10-55).

Figure 10-55. Logs folder and scripts folder
Repeat step 2 for the search and distributed cache servers.
Note Make sure all farm servers have this folder structure for logsuls and for scripts. Figure 10-55 already had the logs folder copied; but it illustrates how you would type in the UNC mapping.
Let’s edit the install script.
Right-click the service application installer script (2016Install.ps1) that you copied to the scripts folder on your E: drive, and then select Edit.
Check line 8 and line 16 to make sure that the account property and AppPoolUserName variable both show the domain ame of your service application account (e.g., Tailspintoyssvc_svcaccount) (see Figure 10-56).

Figure 10-56. Install script, check the variables, make sure they’re OK for your environment
Note This script is based on scripts that Spencer Harbar and Todd Klindt published on their blogs. The original scripts are at www.harbar.net/articles/sp2013mt.aspx and www.toddklindt.com/blog/Lists/Posts/Post.aspx?ID=378 . The modified versions are located in the Apress “Downloads” section.
Check line 12 and make sure that the DatabaseServerName variable shows the correct alias name. It should be the same alias that you used in your SQL Server Client Network Utility (cliconfg.exe). (.e.g., SPAlias). See line 12 in Figure 10-56.
Scroll down to line 55 and verify that the entry for the log location matches the path that you used (e.g., $usageLogLocationOnDisk = E:logsULS).
Now we’re ready to make a series of preflight checks. Then we’ll install SharePoint 2016 using PowerShell.
Things don’t always go the way that you planned them. You don’t get to be a fireman or a ballerina, for example. That astronaut career never materializes. Becoming a neurosurgeon just slips through your grasp. The same thing is true in regards to SharePoint. It’s easy to forget stuff, so that’s why we’re going to do what I like to call a “preflight check.”
SharePoint Install and Central Administration Scripts
At this point, you’ve installed all the binaries on the application, search, web front-end, and distributed cache servers, and you’re ready to start the process to create the configuration database and the central administration database. You’ll be doing this via PowerShell to create databases that follow your company’s naming convention and that do not have GUIDs as part of their names.
By using PowerShell, your farm will have logs that reference clearly named databases. This will make the overall size of your logs smaller, and more importantly, easier to read. If you don’t use PowerShell to create your farm and instead use the SharePoint Products and Technologies Wizard, SharePoint will create your databases with exceptionally long names—all of them with GUIDs at the end.
After you run the script that creates the central admin database, you’ll create a DNS zone for SharePoint apps, add a registry entry on each of your SharePoint servers, run a script that creates some of the SharePoint Service Applications (SSAs), and then change central admin to run on SSL.
Config Database, Central Admin, and Some SSAs
Configuration Database and Central Admin
Log in to the application server (e.g., SP2016APP) with the install account, as shown in Figure 10-57.

Figure 10-57. svc_install or equivalent
Navigate to Control Panel ➤ System and Security ➤ Windows Update and install any updates. Hopefully, you’ll be able to skip this step, but if not, don’t worry about it. If prompted to restart, or if a restart is required, please do so. Figure 10-58 shows Windows Update installing 9 of 203 updates.

Figure 10-58. My server had 203 updates
After the updates are completed, open the SharePoint Management Shell by navigating to the desktop and then typing SharePoint. Various SharePoint-related results appear in your search. Pin the SharePoint Management Shell to the taskbar and/or the Start menu. If you recall, there’s a section in the introduction area that covers this step. If the search results are null when you type SharePoint on the desktop, then you still need to run setup.
Once you open the shell, the farm will be unreachable. In this case, it is because you haven’t created the farm. With the other servers, it is because they haven’t joined the farm.
Right-click Management Shell and choose “Run as administrator” or click it from your taskbar (if you recall the introduction section advice about making the shell and central admin open administratively), as shown in Figure 10-59.
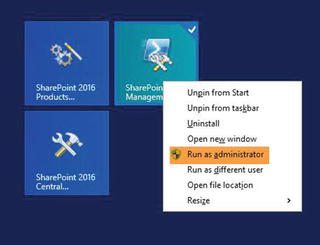
Figure 10-59. Pin all the SharePoint shortcuts to your Start menu
Note The Management Shell natively only runs PowerShell scripts that are remotely signed. We need to remove this to run our scripts, because they are not signed. This is probably what you’ll do in the real world, as well. The shell natively runs in non-admin mode. You need to change this or you need to remember to Shift, right-click, and click “Run as administrator”. Again, the instructions to changing the shell and other components to open administratively are in this book’s introduction.
When the shell opens administratively, type Get-ExecutionPolicy and press Enter. Notice that it returns RemoteSigned, as shown in Figure 10-60.

Figure 10-60. SharePoint Management Shell is not connected to farm, RemoteSigned
Type Set-ExecutionPolicy unrestricted, type Y, and press Enter. Note that the execution policy for PowerShell scripts is now unrestricted if you run Get-ExecutionPolicy (see Figure 10-61).
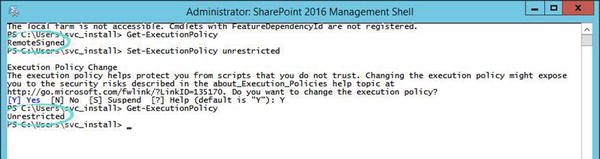
Figure 10-61. Execution policy changed to unrestricted
Change the directory to the E:scripts folder by typing CD e:scripts and then pressing Enter (see Figure 10-62).

Figure 10-62. E:scripts
Check that the files are visible within the shell by typing Dir and pressing Enter (see Figure 10-63).
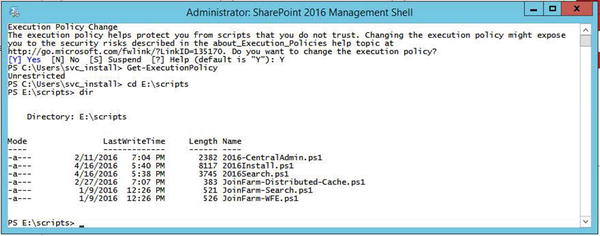
Figure 10-63. All of these files appear to have their archive bit set
Make sure that you’re logged in with the install account by looking at the shell. It should read, ....install, not farm. As you can see in Figure 10-64, I need to log off the farm account and log back in with the install account.

Figure 10-64. Look, mom, I’m logged in with the farm account. Oops!
If you’re not logged in with the install account, log off and log back on with the install account. Next, open it and then open the Management Shell. No need to run set-executionpolicy. That is a one-time thing (e.g., once you run it, it is set until you change it, even after restarts).
After you’re logged in with the install account and at the E:scripts folder, call the central admin script using the dot-source method. Type .2016-c and then press the Tab key. PowerShell will autocomplete the line via the PowerShell tab expansion feature (see Figure 10-65).
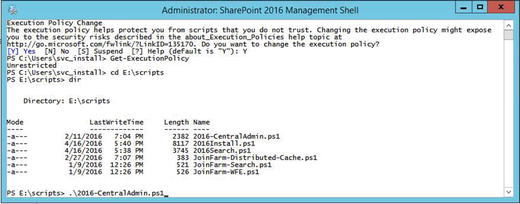
Figure 10-65. Ready to run the script, logged in with install account
Press Enter. The script will begin to execute and it will prompt you for an account. Enter the farm account name in the form of DomainAccountName (e.g., Tailspintoyssvc_farm). Enter the password and click OK. Figure 10-66 shows inputting the farm account credentials.

Figure 10-66. Give it the farm account and password
If things are going well after the credential window disappears, the screen will remain as shown in Figure 10-66, minus the credential prompt window. When the script nears its end, it sets a registry entry and prompts you to allow updating sa service connection point in Active Directory. Allow it by entering Y for yes (see Figure 10-67).

Figure 10-67. Let the SCP happen
Note Management Shell gives you a “red badge of courage” for the registry key creation portion of the script if you’ve already run the script to create the registry key or if you’re running the central admin script for a second time for some reason.
Now if you open the SQL server and navigate to the SSMS, you’ll see that two databases have been created. Figure 10-68 shows the two databases.

Figure 10-68. Two nicely named databases
Installing SharePoint Service Applications
Now that central administration is created, we’re going to install some of the SharePoint Service Applications (SSAs). This is something that you would never get to do if you were a site collection administrator in the real world. The reason that this would never happen is because the site collection administrator does not administer the farm; it is a farm administrator task that is hopefully only needed once in a farm’s life.
Before you can run the script that creates some of the service applications, you need to create some managed accounts. SharePoint has the ability to manage Active Directory accounts, and when you make an account a managed account in SharePoint, you can opt to control when the password changes. In our home lab, and probably in a live-fire exercise, you’ll control when passwords are changed.
Installing Service Applications
Create Managed Accounts
Close the SharePoint Management Shell and reopen it. Note that there is no message about the farm not being available (see Figure 10-69).

Figure 10-69. Reopen the shell with the install account, this time the farm is there
Type New-SPManagedAccount and press Enter (see Figure 10-70).

Figure 10-70. Make your service accounts managed by SharePoint
At the prompt, type tailspintoyssvc_content and the correct password, and then click OK (see Figure 10-71).

Figure 10-71. Too easy, repeat it a few more times for each account
Repeat steps 1–3 for all of your service accounts (svc_search, svc_svcacct, svc_pubsuperreader, etc.)
When you’re done, you should have something like what’s shown in Figure 10-72 when you run Get-SPManagedAccount.

Figure 10-72. All svc_accounts are managed
SharePoint Apps Zone in DNS
Log in to the domain controller and open DNS (Windows key + R, dnsmgmt.msc). Right-click Forward Lookup Zones and create a new zone, as shown in Figure 10-73.

Figure 10-73. New Zone…
Click Next on the New Zone Wizard (see Figure 10-74).

Figure 10-74. New Zone Wizard
Accept the default setting for a new zone so that the zone is created as a primary Active Directory-integrated zone, and then click Next (see Figure 10-75).

Figure 10-75. Active Directory-integrated zone
Accept the “To all DNS servers running on domain controllers in this domain: Tailspintoys.com” default zone replication scope, and then click Next (see Figure 10-76).
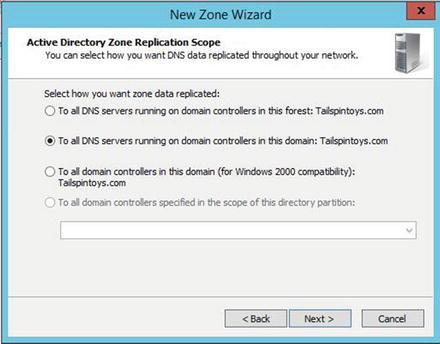
Figure 10-76. To all Domain controllers in the domain
Enter apps as the name of your zone, and then click Next (see Figure 10-77).
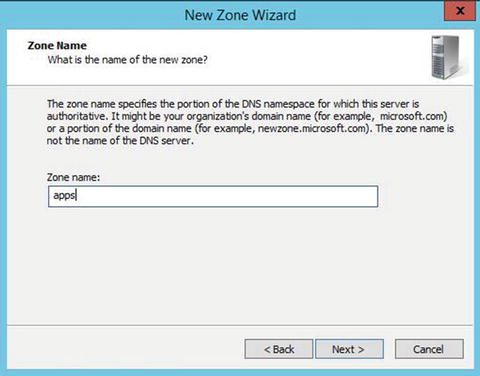
Figure 10-77. Give your zone a name
Accept the “Allow only secure dynamic updates (recommended for Active Directory)…” default zone update setting, and click then Next, as shown in Figure 10-78.

Figure 10-78. Keep things secure (only domain members can change stuff)
Click Finish to create your new Active Directory-integrated zone (see Figure 10-79).

Figure 10-79. Click Finish when you’re done
Right-click the New Apps Zone and click New Alias (CNAME)…. Enter an asterisk (*) for the alias name. Enter the host name of your app server for the FQDN that you’re aliasing (e.g., sp2016app.tailspintoys.com.). Don’t forget to add a period after the FQDN (see Figure 10-80).

Figure 10-80. Wildcard CNAME for apps
SharePoint Service Applications
Make sure that you are still logged in with the install account and not the farm account.
Proceed with installing the service applications by changing the shell directory to e:scripts and then calling the install script (e.g., 2016Install.ps1). Type cd e:scripts, and press Enter. Type .2016install.ps1 and press Enter (see Figure 10-81).

Figure 10-81. Installing the SSAs
Don’t worry about any messages regarding services that are already started (e.g., “Managed metadata is already started on server SP2016APP” or “App management Service is already started on server SP2016APP”) (see Figure 10-82).

Figure 10-82. Script completes, but there’s still more configuration and installation.
After the script completes, it returns to E:scripts>. Then it is time to join the other servers to the farm and create more service applications.
After the script finishes, there is still additional work to be done in regards to SSAs, since the script was modified from its original content and not all the service applications were created. That said, your SharePoint farm now has a few service applications and their nicely named databases created, but the SSAs are not completely configured. You’ll configure them later in this chapter.
Join the Servers to the Farm Running Central Admin on SSL
After you’ve installed the good majority of the SSAs, you’ll need to join the other servers to the farm. This is so that you can simulate an environment where the solutions you write replicate to the various members of the farm. There has been talk about farm solutions being deprecated in future releases of SharePoint. And that will probably happen; but until it does, let’s develop code in a place where we can test deployment across a multiserver farm.
Join Members Servers to Farm with SSL
Create Registry Entry to Disable Loopback Check
There are two ways to create the registry entry: manually and via PowerShell. If you create the entry manually and then try to create it with PowerShell, you’ll receive a “red badge of courage,” as mentioned. If you want to see that happen, you can watch it happen at the 30-second point of a YouTube video I made and posted at https://www.youtube.com/watch?v=C3eKI6Bz-wM .
Open the Run bar (Windows key + R) or right-click the Windows icon, and then click Run (see Figure 10-83).

Figure 10-83. Run bar another way than Windows Key + R
Type RegEdit and press Enter or click OK. If prompted by the UAC, allow by clicking Yes.
Navigate to HKLM ➤ SYSTEM ➤ CurrentControlSet ➤ Control ➤ Lsa (see Figure 10-84).

Figure 10-84. HKEY_Local_Machine (aka HKLM)…
Figure 10-84 was taken from the SP2016APP server. You can see that the REG-DWORD for DisableLoopbackCheck is already created. When you navigate to the same location in one of the other farm servers, you’ll notice that the DisableLoopbackCheck does not exist, as shown in Figure 10-85.

Figure 10-85. DisableLoopbackCheck value not in registry by default
Right-click the registry key named Lsa. Click New ➤ Key ➤ DWORD (32-bit) Value (see Figure 10-86).

Figure 10-86. Manually create the new registry value; be careful
When the new key appears, change its name to DisableLoopbackCheck and change its value to 1. Right-click the new value and click Rename (see Figure 10-87).

Figure 10-87. Rename it from New Value #1 to DisableLoopbackCheck
Double-click the DisableLoopbackCheck value and enter 1 to replace the default value of 0, and then click OK (see Figure 10-88).

Figure 10-88. Change its value to 1 to turn it on
The other, much quicker way to change this is to use PowerShell. The script to create a new value in registry is New-ItemProperty followed by the PowerShell drive for the registry key, followed by the name of the item, the value to set for the item, and the type of value to create:
New-ItemProperty HKLM:SystemCurrentControlSetControlLsa -Name "DisableLoopbackCheck" -value "1" -PropertyType dwordAs an optional way to create the key, you can call the disableLoopback script from within either an administrative SharePoint Management Shell session or from within an administrative PowerShell session, as shown in Figure 10-89.

Figure 10-89. PowerShell is so much faster
Note Without this entry, you’ll receive error 401.1 when you browse a web site that uses integrated authentication and is hosted on IIS 5.1, or a later version, when browsing to that site directly on the server. This is bad when it comes to search working correctly (see https://support.microsoft.com/en-us/kb/896861 ). You can and should avoid using DisableLoopbackCheck in a production environment and instead use BackConnectionHostNames.
Request and Export a Certificate for SSL
At this point, you’ve got the app server created and central admin is still running on a non-secure HTTP. You have created a few service applications with PowerShell and you have installed the SharePoint binaries (files and folders) on the other servers, with the exception of SharePoint’s back-end server, the SQL Server.
Let’s make central admin accessible from a vanity URL over SSL: something like SPCA, SPCentral, admincenter, or anything you want to easily remember it by. The default name is server: port (e.g., SP2016APP:11111), which may seem like an easy name to remember, but that is because this is a home lab. In a live-fire exercise, the server name would be something like mdcpappshr01wv, jxnw2k8sp13idx, or dc101d1sp13app, followed by a port number. Let’s get started!
Log in to the app server with the domain admin account (e.g., tailspintoysLucy, or if you didn’t change it, tailspintoysadministrator) (see Figures 10-90 and 10-91).

Figure 10-90. Log in with domain admin not svc_install or svc_farm

Figure 10-91. If you didn’t change the default domain admin
Make sure that the certificate authority is turned onstarted. Start it if it is off (see Figure 10-92).

Figure 10-92. Starting CA
Once the CA is online, you’re ready to request the certificate using the Internet Information Services (IIS) Manager on the application server.
Open a Run bar on the App server. Type Inetmgr and click OK or press Enter (see Figure 10-93).

Figure 10-93. inetmgr
When IIS manager opens, click the Server node. When prompted to get started with Microsoft Web Platform to stay connected with the latest web platform components, click the “Do not show this message” radio box, and then click No (see Figure 10-94).

Figure 10-94. IIS web platform declination
Note The only reason you opted to decline the web platform components installer was to save trees. You can learn more about it in the “Do You Want to Know More?” section at the end of this chapter.
After the pop-up for the web platform goes away, select Server Certificates and then click Open Feature. Or just double-click Server Certificates (see Figure 10-95).

Figure 10-95. Server certificates, open feature
Click Create Domain Certificate (see Figure 10-96).
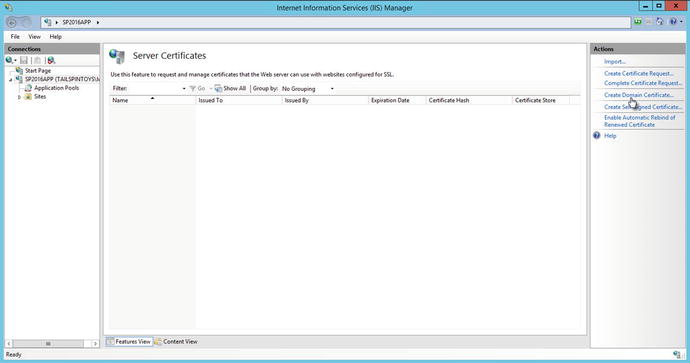
Figure 10-96. Create domain certificate…
Complete the form for the domain certificate, as shown in Figure 10-97, adjusting for your domain name, location, OU, as you see fit, and then click Next.

Figure 10-97. Use your own state, country, planet, etcetera
Complete the form for the certificate authority in the same fashion as you did for the certificate request, adjusting for any name changes that you may have made for your environment, and then click Finish (see Figure 10-98).

Figure 10-98. The friendly name can be anything: you could enter *, wildcard, or MycertName
If you can’t remember what you named your CA, but you are sure you followed the advice from Chapter 8, then you should be good to go with entering what you see in Figure 10-98. And after you click Finish, you should see the new certificate named CA added into IIS, as shown in Figure 10-99.
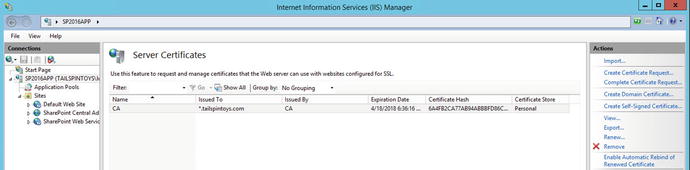
Figure 10-99. Certificate requested and in place on app server
Now you need to export the certificate to a .pfx file so that it can be imported into the other three servers that will be members of your farm.
Right-click the certificate from the Server Certificates screen and click Export (see Figure 10-100).
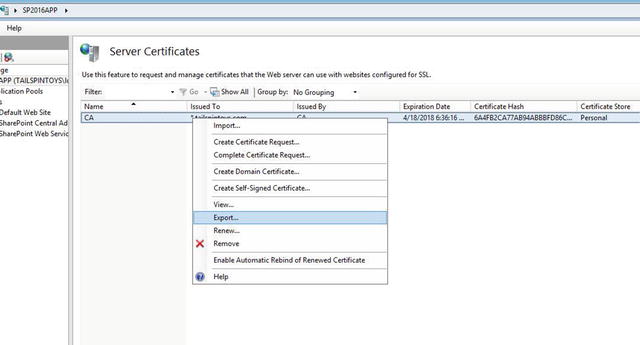
Figure 10-100. Export it so that you can use it on other servers
Create a name for the certificate .pfx file and a password by navigating to a location to export the file and entering a password. Make the password something easy to remember yet hard to guess; phrases work best (e.g., Krista Simpkins is the best wife ever) (see Figure 10-101).

Figure 10-101. Krista Simpkins is the best wife ever.
Click the ellipsis for the “Export to” field, shown in Figure 10-101. Then navigate to your desktop and enter a file name in the field, and then click OK. Enter your password. (Feel free to use the suggested phrase from the Figure 10-101 caption as your password when you enter it.) Click OK after you’ve created a good file name, as shown in Figure 10-102.
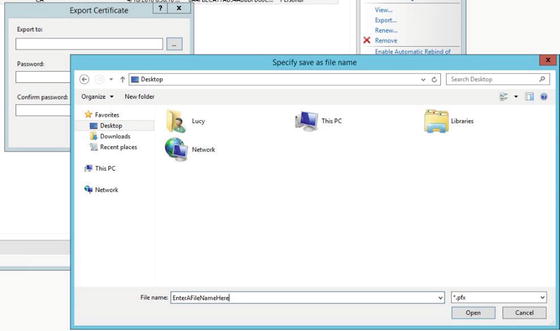
Figure 10-102. Make a good file name
Enter the password or passphrase, and click OK. Now the .pfx file is on your desktop and ready for use in making central admin run on a vanity URL.
Copy the file to your other SharePoint servers and then log in to each server and double-click the file. Choose Local Machine, and then click Next. If prompted by a UAC prompt, allow the program to run, and then click Next on the “File to import” page. Provide the password or passphrase when requested. Select the “Mark this key as exportable…” box, and then click Next.
Click Next to automatically select where the certificate stores.
Click Finish. You should see that the import was successful. Repeat this on all of your servers, except for SQL.
If you can’t remember how to copy the file, you can refer to the introduction where it refers to mapping a drive. Then you can map a drive, and copy and paste the file. There is a section in the Introduction on importing a certificate.
Set Central Admin to Run on SSL with Vanity URL
At this point, you’ve got the app server created with central admin installed. You’ve requested a certificate, exported that certificate, and you are ready to get central admin running on SSL.
Log in to your domain controller with the domain admin. Open DNS Manager and navigate to Forward Lookup Zones, as shown in Figure 10-103.

Figure 10-103. DNS Management
If you didn’t create all the records in Chapter 5, please refer back to Figure 5-17. We need the CNAME record for central admin (e.g., SPCA) created. Assuming you didn’t get to create it, and don’t see it as shown in Figure 10-103, you can create it now by right-clicking Tailspintoys.com forward lookup zone and then click New Alias (CNAME)…. Then when the New Resource Record screen opens enter in the information, as shown. Don’t forget to use the make believe load balancer host name of sp16lb.tailspintoys.com and to include the trailing period (.) after the host name. Also, make sure that you create(d) the host (A) record for the make-believe load balancer (see Figure 10-104).

Figure 10-104. These URLs are so vain!
Log back in to your app server with the install account and open IIS Manager (inetmgr.exe).
Once IIS Manager opens, select the SharePoint Central Administration v4 site and then click Bindings… (see Figure 10-105).
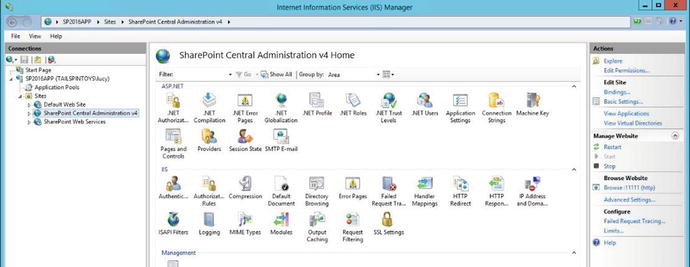
Figure 10-105. Even bindings can be used in vain
After the Site Bindings window opens, click the Add… button.
At the Add Site Binding screen, select https from the Type drop-down menu. Leave the IP address at the default All Unassigned setting. Note how after you select the https protocol (HyperText Transfer Protocol over Secure Socket Layer) the Port box changes to 443 (see Figure 10-106).

Figure 10-106. Security is of utmost importance
Enter spca.tailspintoys.com in the “Host name” box , then select the CA certificate from the “SSL certificate” drop-down menu, and then click OK (see Figure 10-107).

Figure 10-107. Don’t forget your driver’s license
Navigate back to the server’s Start menu and then search for SharePoint by typing SharePoint (see Figure 10-108).
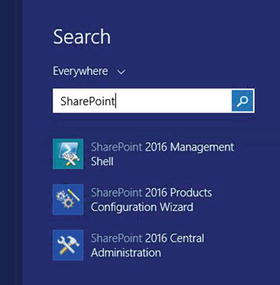
Figure 10-108. Getting SharePoint-y
Once the search results come back, right-click the three results, as shown in Figure 10-108, and pin them to the Start menu. Pin SharePoint 2016 Management Shell and SharePoint 2016 Central Administration to the task menu.
Return to the desktop. Shift+right-click both of the new desktop icons and set them to open administratively by navigating to Properties ➤ Advanced… ➤ Run as administrator ➤ OK ➤ Apply ➤ OK, as shown in Figure 10-109.

Figure 10-109. Run it administratively
Open central administration, make your Internet Explorer 11 choice, and then click OK (see Figure 10-110).

Figure 10-110. Use the recommended
Click Application Management (either link is fine) (see Figure 10-111).

Figure 10-111. starting to administer SharePoint
In the Web Applications section, click “Configure alternate access mappings” (see Figure 10-112).

Figure 10-112. Configure those AAMs, and then update your résumé!
Take note of the internal URL shown for the default zone for central administration web site. Click the Internal URL so that you can edit it. Leave the zone at the default, enter https://spca.tailspintoys.com to replace http://sp2016app:11111, and click OK (see Figure 10-113).

Figure 10-113. The default AAMs has a grayed out Delete key, thank God!
Back on the Alternate Access Mappings screen, click Add Internal URLs, and add a new Internal URL for each of the following internal URLs listed in Table 10-2. When you’ve finished, the AAM screen should look like Figure 10-114.
Table 10-2. Central Administration Alternate Access Mappings (AAMs)
Internal URL
Zone
Public URL for Zone
http://sp2016app:11111 /
Default
https://sp2016app:11111/
Default
Default
Default

Figure 10-114. AAMs
If you’re getting prompted to authenticate when making selections in central admin, you can add the central admin URL to your local intranet security zone. Refer to Chapter 13 for the exact steps. Figure 10-115 depicts the steps after clicking Tools ➤ Internet Options ➤ Local intranet.

Figure 10-115. Local intranet does not prompt you
Open the registry editor (regedit.exe) and navigate to HKLM ➤ Software ➤ Microsoft ➤ Shared Tools ➤ Web Server Extensions ➤ 16.0 ➤ WSS. Take note that the Central Administration URL REG_SZ value (CentralAdministrationURL) has the new vanity URL. The registry location, shown in Figure 10-116, is important to remember because it is what controls the central administration icon URL and other settings. After running an update, you may have to correct this setting and the bindings in central admin.

Figure 10-116. Be careful in registry
Open the SharePoint Management Shell administratively. Type the following line of code (also shown in Figure 10-117) and then press A when prompted:

Figure 10-117. Central admin on secure socket layer
Set-SPCentralAdministration -SecureSocketsLayer -Port 443Close central administration and then reopen it. Notice that the URL has changed from http://sp2016app:11111 to https://SPCA.Tailspintoys.com. This is a very important distinction to note. Now central administration is running securely.
OK, let’s join the rest of the servers to the farm.
Join Servers to Farm
At this point, you’ve got the app server created, central admin is still running securely on HTTPS, and a few service applications were created. Now you’ll join the other servers to your farm.
Log in to the distributed cache server (SP2016CACHE or your equivalent) using the farm account, svc_farm (see Figure 10-118).

Figure 10-118. The farm account (a.k.a. system account)
Open the hosts file (C:WindowsSystem32driversetchosts) and add an entry that points to the app server (192.168.1.189 spca.tailspintoys.com). You can ping the app server to make sure that you have the correct IP, if you used a different IP scheme than the one provided in an earlier chapter (see Figure 10-119).

Figure 10-119. Hosts file and ping
Open an administrative SharePoint Management Shell and navigate to E:scripts. Call the join script for the cache server by typing .JoinFarm-Distributed-Cache and pressing Enter (see Figure 10-120).

Figure 10-120. PowerShell to connect servers to the SharePoint configuration database
Log in to the search server (SP2016SEARCH or your equivalent) using the farm account, svc_farm.
Open the hosts file (C:WindowsSystem32driversetchosts) and add an entry that points to the app server (192.168.1.189 spca.tailspintoys.com). You can ping the app server to make sure that you have the correct IP if you used a different IP scheme than the one provided in an earlier chapter (see Figure 10-121).

Figure 10-121. Ping spca.tailspintoys.com
Open an administrative SharePoint Management Shell and navigate to E:scripts. Set the execution policy to unrestricted, and then call the join script for the cache server by typing .JoinFarm-Search and pressing Enter.
After the script runs, PowerShell returns to the E:scripts> directory (see Figure 10-122).

Figure 10-122. The script is finished. Move on to the next crime scene.
Log in to the web front-end server (SP2016WFE or your equivalent) using the farm account, svc_farm.
Open the hosts file (C:WindowsSystem32driversetchosts) and add an entry that points to the app server (192.168.1.189 spca.tailspintoys.com). You can ping the app server to make sure that you have the correct IP if you used a different IP scheme than the one provided in an earlier chapter.
Open an administrative SharePoint Management Shell, navigate to E:scripts, and then call the join script for the cache server by typing .JoinFarm-WFE and pressing Enter.
Congratulations! You’ve created a SharePoint farm, joined the member servers, and stood up central admin on SSL. Don’t stop now, though! There’s still more to do before we’re ready to start coding. So, let’s move forward with further configuration.
Do You Want to Know More?
Table 10-3 provides additional information.
Table 10-3. Not Required Reading, but Here If You Want to Dive Deeper (Seeing How We’re Only in About 10 Feet of Water). These Are All Great Reads!
Topic | URL |
|---|---|
Using Tab Expansion | |
Install prerequisites for SharePoint Server 2016 from a network share | https://technet.microsoft.com/en-us/library/ff686793(v=office.16).aspx |
SharePoint Server 2016 Download | https://www.microsoft.com/en-us/download/details.aspx?id=51493 |
Core Solutions of Microsoft SharePoint Server 2013 - Exam Topics Advanced Solutions of Microsoft SharePoint Server 2013 - Exam Topics | https://www.microsoft.com/en-us/learning/exam-70-331.aspx#question-types https://www.microsoft.com/en-us/learning/exam-70-332.aspx#question-types |
You receive error 401.1 when you browse a web site that uses integrated authentication and is hosted on IIS 5.1 or a later version |
Summary
At this point, you’ve created a domain controller, a certificate authority, and a partially configured, four-server SharePoint 2016 farm running the Minimum Role technology (in a home lab setting). That is a lot!
There is still a lot more to do in this farm. You really should check out the resources listed in the “Do You Want to Know More?” section to learn more or to prepare yourself for certification. You’ll get some great ideas there. In the upcoming chapters, we’ll configure additional service applications, create some host-named site collections, spin up an app catalog, install Visual Studio, and explore some troubleshooting tips.