
5. adding records via Ajax
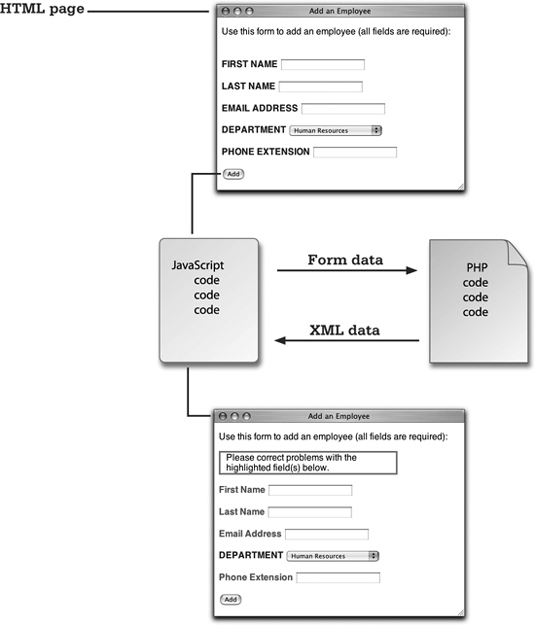
In the previous chapter, we created a way to add employees to the database. That process required one HTML form and one PHP script that handled the form. It all works fine but in the old-fashioned, client-server kind of way.
In this chapter, let’s set an Ajax layer on top of those scripts so that, for the browsers that support it, our form for adding employees can behave more like a desktop application. To do so, we’ll need to slightly modify the HTML page. Then we’ll create one JavaScript file that has the page-specific Ajax functionality. Finally, a new PHP script will be written that handles the Ajax request.
This example will also introduce two new techniques: sending an Ajax request using the POST method and working with XML data. This Ajax example is a little more complicated than the previous one, but it should all make sense by the end of the chapter.
what we’ll do
![]() First, on pages 62, we’ll modify the HTML page to include the necessary Ajax pieces.
First, on pages 62, we’ll modify the HTML page to include the necessary Ajax pieces.
![]() On Ajax-enabled browers, when the user clicks Add, the page-specific JavaScript will read in all the form data and submit it to a new PHP script. On pages 63-66, we’ll begin the JavaScript file that starts this process.
On Ajax-enabled browers, when the user clicks Add, the page-specific JavaScript will read in all the form data and submit it to a new PHP script. On pages 63-66, we’ll begin the JavaScript file that starts this process.
![]() The PHP script, written on pages 67-74, will validate all the data and report on the results. Its response will be returned as XML.
The PHP script, written on pages 67-74, will validate all the data and report on the results. Its response will be returned as XML.
![]() The JavaScript will take the XML returned by the PHP script and use it to update the HTML page. We’ll complete this file on pages 75-79.
The JavaScript will take the XML returned by the PHP script and use it to update the HTML page. We’ll complete this file on pages 75-79.
![]() Naturally, we’ll test what we’ve built to make sure it all works.
Naturally, we’ll test what we’ve built to make sure it all works.
![]() At the end of this chapter, in the extra bits section, you’ll find more information, tips, and recommendations regarding all of these steps.
At the end of this chapter, in the extra bits section, you’ll find more information, tips, and recommendations regarding all of these steps.
add the Ajax elements

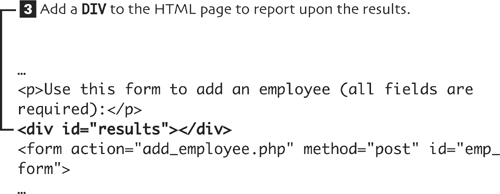
![]() Save the file (it will continue to use the name
Save the file (it will continue to use the name add_employee.html).
apply the Ajax layer
Create a new JavaScript file that starts with the following code (see extra bits on page 82):
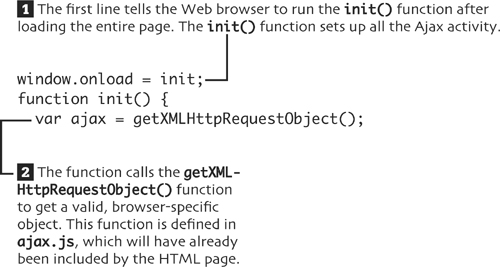

set up the Ajax

prepare the form data
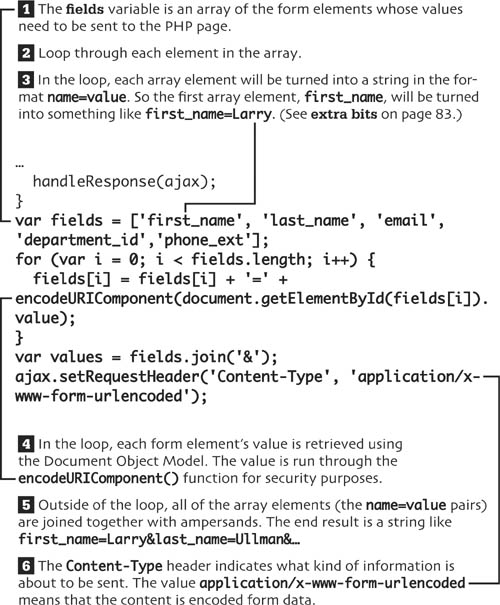
complete the function
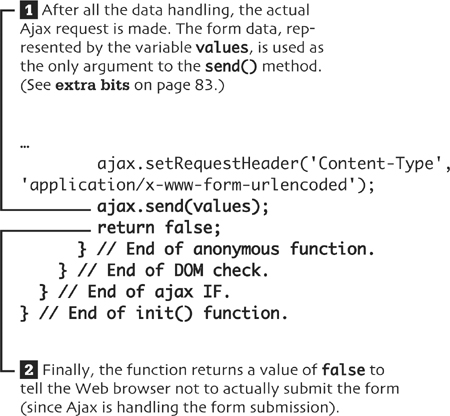
Save this file as add_employee.js and place it in the same directory on your Web server as every other file.
prepare for XML
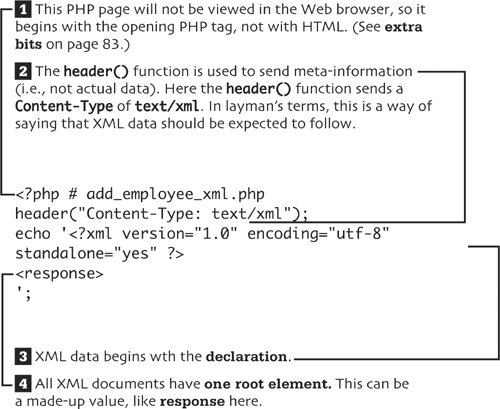
A new PHP script will do the same thing as add_employee.php, only it will return all of its results as XML data. This data will be handled by the JavaScript in the Web browser. Start a new PHP script in your text-editing application.
validate the form data
The form data must be validated prior to using it in a query. Add this code to the PHP page.

![]() To make sure the data is safe to use in a query, text inputs are run through the
To make sure the data is safe to use in a query, text inputs are run through the mysql_real_escape_string() function.


update the database
Assuming that the form data passed all the validation routines, an INSERT query should be run.

complete the XML

handle the response
The PHP page sends back XML data, which must be handled by the JavaScript. Add this new function to the add_employee.js JavaScript file. (See extra bits on page 85.)
prepare the page
handle the XML
display the results
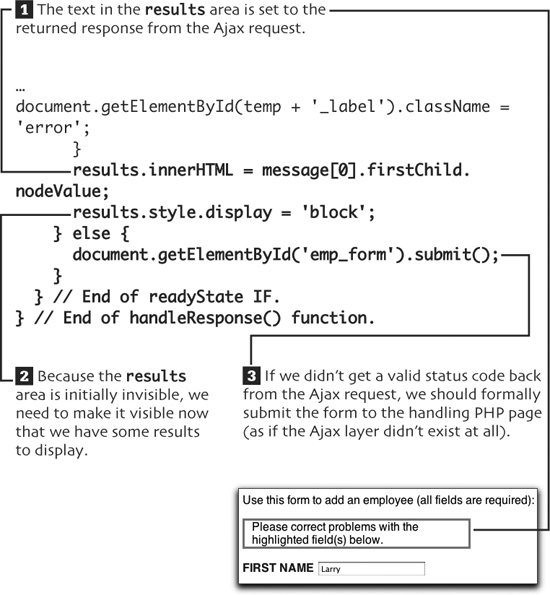
The final step in the Ajax process is to display the results message by placing that message on the HTML page. This code completes the handleResponse() function. (See extra bits on page 86.)
test the Ajax layer
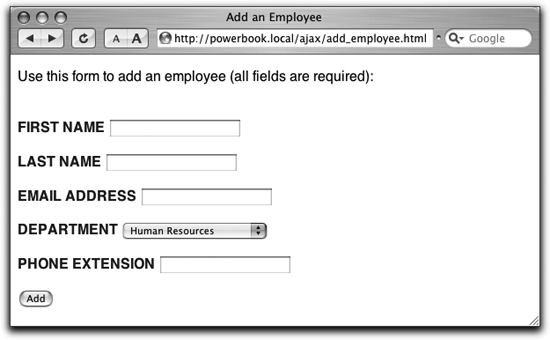
![]() Load the HTML page in your Web browser.
Load the HTML page in your Web browser.
The address must begin with http:// for this to work.
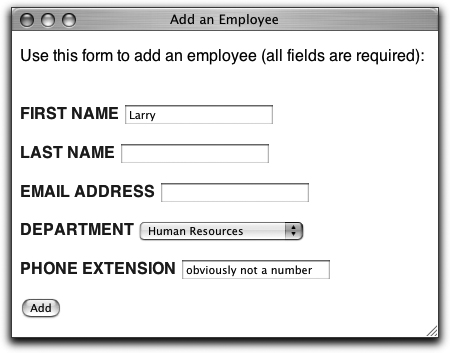
![]() Fill out the form incompletely or improperly and click Add.
Fill out the form incompletely or improperly and click Add.
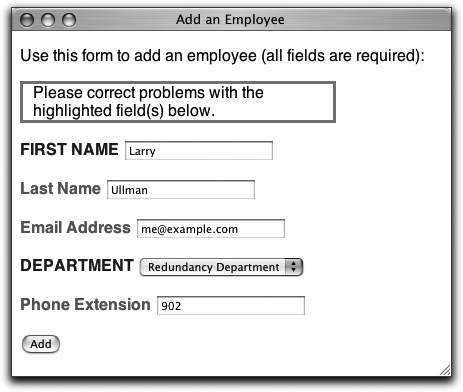
![]() The HTML page should show the results without reloading the page or going to a new page.
The HTML page should show the results without reloading the page or going to a new page.

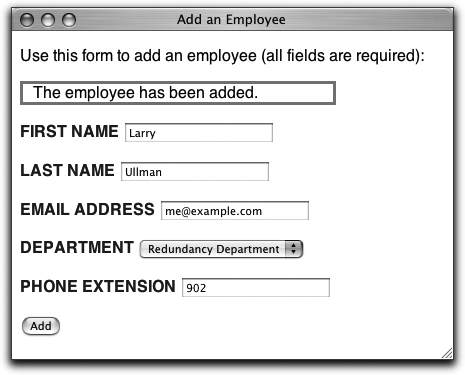
![]() Fill out the form completely and click Add.
Fill out the form completely and click Add.
![]() Again, the HTML page shows the results.
Again, the HTML page shows the results.
extra bits
add the Ajax elements p. 62
• The ajax.js file, written in Chapter 3, “browsing using Ajax,” defines a function that returns a browser-specific XMLHttpRequest object. This file is needed by any page that performs any Ajax operations.
• Because the DIV, where the results will be reported, has an id value of results, it will be formatted according to the rules dictated in style.css. This is the same as the results DIV in dept_form.html. For starters, the DIV will be hidden when the page is first viewed.
apply the Ajax layer p. 63
• Most of this code is exactly like that in dept.js. You’ll find that to be the case with a good Ajax base, like the one we’ve developed in this book. The only change in this first bit of code is the reference to emp_form. It’s in the rest of the code—what should be done when the form is submitted—that the big differences can be found.
set up the Ajax p. 64
• The POST method should generally be used when the form’s submission should have an effect on the site. For example, using the add-an-employee form adds another record to the database.
• The GET method should generally be used when requesting information—for example, when requesting the employees in a specific department.
prepare the form data p. 65
• When a form is submitted using the GET method, you’ll see the form data in the URL, with a syntax of page.php?this_item=this_value&that_item=that_value. This is the same syntax used by POST, but the data isn’t sent in the URL and you don’t need the question mark.
• All of the form data needs to be run through the encodeURIComponent() function to make it safe to send to the PHP page. Rather than apply that function to each value separately, using a for loop on an array of form elements lets us accomplish the same thing with less code.
• The plus sign in JavaScript is used to perform concatenation: appending one string onto another. In PHP, the period does the same thing.
• If you wanted to send XML data to the PHP script, you would set the Content-Type to text/xml.
complete the function p. 66
• When using the GET method, use the value null as the only argument when calling send(). Any data sent over GET is appended to the URL itself. When using POST, you need to provide the data when you call send(), as it’s not sent in the URL.
prepare for XML p. 67
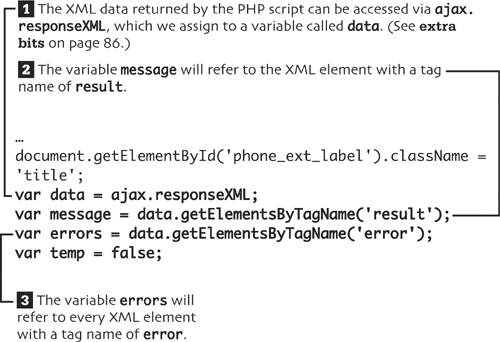
• The PHP script sends its response as XML data, not as a normal Web page. Everything PHP will print will be part of this XML.
• The XML data being created is really like the data in an HTML page, where there’s one root element and any number of nested subelements. For this example, the root element will be called response and there will be two subelements. There can be zero or more elements called error and there will always be exactly one element called result. In comparison, an HTML page has a root element called html, two subelements named head and body, and more subelements within those.
• If the PHP page does not use the header() function to set the Content-Type, the JavaScript that receives this response will not recognize it as XML.
• You don’t have to fully understand XML to do this example or to use XML in general. But should you want to better understand the subject, search the Web for more information.
validate the form data p. 68
• For more information on the form validation routines, see the extra bits section for Chapter 4, “adding records.”
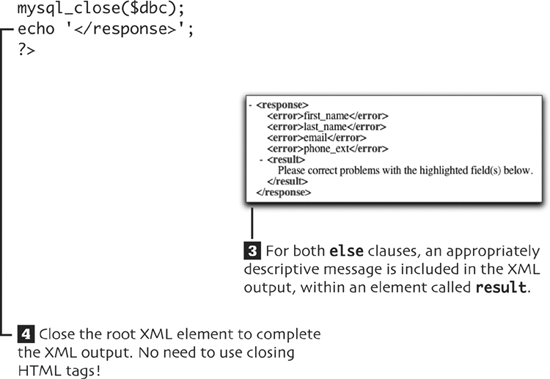
• The XML data will have zero or more elements called error. Any failed validation will result in another error element, whose value will match the name of the corresponding form field. The point of this XML data is to indicate which form fields weren’t properly filled out. If all of the validation tests were passed, there will be none of these elements.
complete the XML p. 73
• To debug any PHP-MySQL problems, you’ll need to print out the query to inspect its syntax. You should also invoke the mysql_error() function to see what problems the database reports.
• A useful debugging technique when working with XML data is to verify that your PHP script is returning valid XML. To see the result of the PHP page, either use JavaScript to access ajax.responseText (in the handle-Response() function) or submit your form to the PHP page directly (without using JavaScript).
• For directly viewing XML in your Web browser, you’ll want to use a browser that supports the format. At the time of this writing, this includes recent versions of Internet Explorer and Firefox, but not Safari.
handle the response p. 75
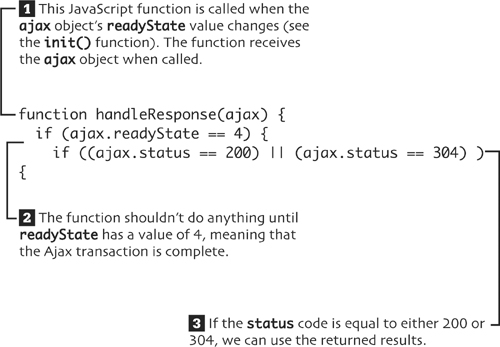
• In the init() function, we tell the JavaScript to call a function called handleResponse() whenever the readyState value changes. This value will change multiple times during an Ajax request, so this function will be called multiple times.
• The XMLHttpRequest status attribute stores the HTTP status code returned by the server-side page. There are dozens of status codes—from 200, meaning that everything was OK, to values over 500, which are normally server errors. A status code of 304 indicates that the page was found but had not been modified since a certain date and time.
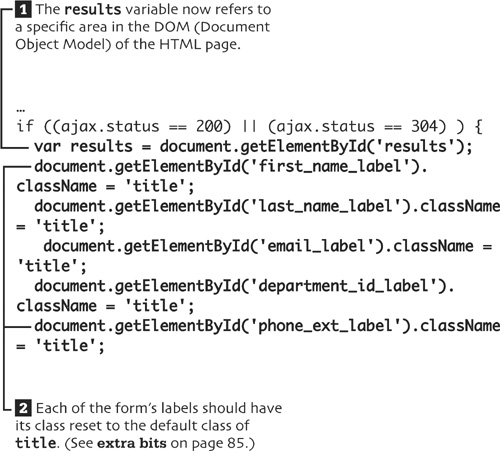
prepare the page p. 76
• One of the new tricks in this chapter’s example is that the form elements’ labels will be changed to indicate errors. Specifically, any problematic field will have its label class switched from the default title to error. Upon a resubmission of the form, the labels should have their class values reset so that they can reflect the new results.
handle the XML p. 77
• The server’s response is available in two attributes of the XMLHttpRequest object. It can be found as plain text in responseText or as XML data in responseXML.
• The XML data can be accessed just like an HTML page, using the Document Object Model. So data.getElementsByTagName ('error') refers to every item in the XML data with a name of error.
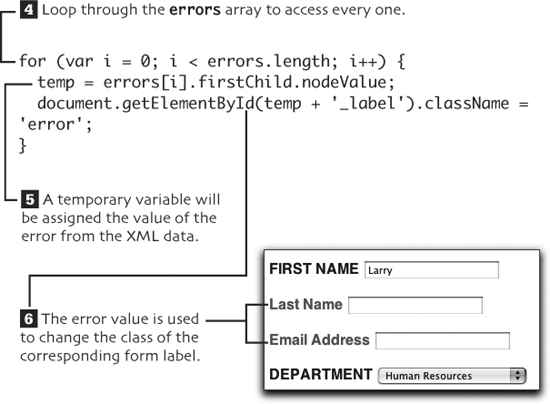
• The syntax of the for loop is a common way to access every item found in an array. Within the loop, the specific array item is accessed via arrayname[i].
• The error elements in the XML data have the names of the problematic form elements as their values. To access these values, refer to the error element, which is errors[i] within the loop, followed by .firstChild.nodeValue. It’s a rather complex syntax but it works. More information on a child and a node can be found in Chapter 7, “enabling an Ajax search.”
• To indicate a problem with a form element, its corresponding label will have its class changed from title to error. Using the Document Object Model, document.getElement-ById(temp + '_label') will refer to the label (where temp stores the name of the form element). Then .className lets you change its class.
display the results p. 79
• The message variable refers to every XML element with a name of result (see the code earlier in the function). Even though the XML data will only ever have one such element, an array is still returned. So the text itself is accessed via the unwieldy message[0].firstChild.nodeValue.
• As with the previous Ajax example, the innerHTML property is used to put a message within the results DIV.