
Chapter 7. Implementing web Things
- Exploring the three possible patterns to implement web Things
- Giving access to sensors and actuators via web protocols
- Building REST and WebSockets APIs on your Pi with Node.js and Express
- Building CoAP devices and connecting them to the web
- Using MQTT on your Pi to connect to the EVRYTHNG API
In the previous chapter, we focused on how to design a clean web API for physical Things. This chapter builds on the principles you learned and describes how to actually implement those APIs for real Things.
The next sections detail the three different ways to implement a web Thing API so it deals with the implementation strategy. Here, we focus on the integration patterns of Things to the web, answering the question, “Where do we actually implement the API of the Thing to integrate it to the web?” This question is important because not all Things are equal! As you saw in chapter 5, some Things can have internet access and implement web protocols natively. But for other Things that are more computationally or power-constrained, web protocols might be challenging.
7.1. Connecting devices to the web
The most straightforward integration pattern is the direct integration pattern. It can be used for devices that support HTTP and TCP/IP and can therefore expose a web API directly. This pattern is particularly useful when a device can directly connect to the internet; for example, it uses Wi-Fi or Ethernet. Second, we explore the gateway integration pattern, where resource-constrained devices can use non-web protocols to talk to a more powerful device (the gateway), which then exposes a REST API for those non-web devices. This pattern is particularly useful for devices that can’t connect directly to the internet; for example, they support only Bluetooth or ZigBee or they have limited resources and can’t serve HTTP requests directly. Third, the cloud integration pattern allows a powerful and scalable web platform to act as a gateway. This is useful for any device that can connect to a cloud server over the internet, regardless of whether it uses HTTP or not, and that needs more capability than it would be able to offer alone.
Choosing one of these patterns is the first step in the web Things design process presented in chapter 6. After that, we can apply steps 2–4 of the design process. Step 5 will be covered in greater detail in chapter 8:
1. Integration strategy—Choose a pattern to integrate Things to the internet and the web. The patterns are presented in this chapter.
2. Resource design—Identify the functionality or services of a Thing, and organize the hierarchy of these services.
3. Representation design—Decide which representations will be served for each resource.
4. Interface design—Decide which commands are possible for each service, along with which error codes.
5. Resource linking design—Decide how the different resources are linked to each other.
Over the next few chapters, you’ll learn how to implement a full-featured Web of Things server that allows connecting any device to the web based on the WoT architecture and concepts presented throughout this book. Each chapter will extend the code written in the previous one, so you’ll get the most out of this book by reading the next chapters in order. By doing so, at the end of the book you will have built from scratch a complete, extensible, and secure framework to implement web Things.
If you can’t wait, you could also download the latest version of the reference implementation of the Web of Things: webofthings.js. You can find it on our GitHub[a] or directly on npm[b] and use it in your own projects, applications, or devices. And please, do send us your feedback and pull requests—we’d love for this framework to evolve way beyond this book.
7.2. Direct integration pattern—REST on devices
The first and easiest way to implement a web Thing API is directly on a Thing, as shown in figure 7.1. This requires the Thing to be accessible via internet protocols (TCP/IP) and be able to host an HTTP server directly. Crazy idea, we hear you say? Well, web servers aren’t that big and can easily fit on the smallest devices out there. Some of the smallest HTTP servers can work with less than 50 bytes of RAM,[1] TCP/IP stack included, which makes it possible for even tiny and cheap 8-bit devices to speak HTTP. This also means that your Pi—or any other Linux device you use—can definitely implement a web server to provide access to its resources through a REST API.
MiniWeb is an example of an extremely small web server; see http://miniweb.sourceforge.net/.
Figure 7.1. Direct integration pattern. In this pattern the web Things are Wi-Fi–connected lamps that run an embedded HTTP server and therefore offer a Web of Things API directly. This allows web Thing clients, such as mobile applications or other web Things, to communicate with the lamps directly over HTTP. Image used with permission from http://model.webofthings.io.

Although it’s possible to implement web protocols on the vast majority of embedded devices, the direct integration pattern is the perfect choice when the device isn’t battery powered and when direct access from clients such as mobile web apps is required. A good example is home automation, where power is usually available and low-latency local interactions are important—for instance, turning lights on/off. In the rest of this section, we’ll show how to implement a WoT server directly on your Pi so that it can directly speak web protocols and join the Web of Things club.
7.2.1. Creating a WoT server
Let’s begin by setting up a web server on your Pi. Node.js is primarily meant for building web applications, so you could easily build one from scratch just as you did in chapter 3. But because we’re switching gears and want to implement a full-blown REST API, a large number of Node.js frameworks can help us.[2] For simplicity’s sake, we’ll use the most popular: Express.[3]
A number of the most popular web/REST frameworks for Node.js are listed here: http://nodeframework.com/.
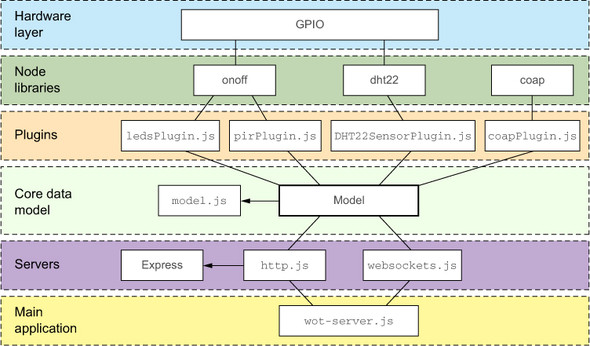
The architecture of the server you’ll build is shown in figure 7.2. It revolves around a central model that plugins can update and observe. Furthermore, all the sensors and actuators are available as web resources thanks to the use of the Express framework.
Figure 7.2. The components architecture of our WoT server: The servers use the Express framework. The rest of the system is built around a model that plugins can observe and change. The plugins are built on other Node libraries, providing access to physical resources via GPIOs.
We’ll deploy this code on the Pi, but if you don’t yet own a Pi, don’t worry; with a few exceptions, you’ll be able to run all the examples in this chapter on your computer. But it’ll be more fun on a Pi. Just saying![4]
Check out the special deals offered by our partners: http://book.webofthings.io.
Express: a Node.js web framework
Express is much more than a web server; it’s a complete framework that handles pretty much everything modern web applications need, from RESTful APIs to HTML and CSS templating engines, database connectors, cookie management, and even social network integration. Express also has a large developer community and a variety of plugins.
Although Express will run smoothly on the Pi and most other Linux devices, it’s worth pointing out that Express isn’t the lightest way to implement web APIs for IoT devices. But as you’ll see on numerous occasions, such a flexible framework allows us to quickly extend our web Thing APIs and implement the various patterns we’ll encounter.
We’ll now show how to create a WoT server based on Express.[5] The project’s structure is shown in the following listing. You could reproduce this structure and install Express via NPM. Alternatively, you could clone the project from the book’s GitHub repository,[6] which is available in the folder chapter7-implementation/part1-2-direct-gateway/.
Although you can certainly run these commands directly on the Pi, it’s easier and more practical to develop applications on your laptop or desktop computer and then pull the code via Git on the Pi, as explained in chapter 4.
Listing 7.1. WoT server for Pi project directory structure
wot-pi
—— middleware
   —— converter.js
—— plugins
   —— external
      —— coapPlugin.js
   —— internal
       —— DHT22SensorPlugin.js
       —— ledsPlugin.js
       —— pirPlugin.js
—— public
   —— websocketsClient.html
—— resources
   —— model.js
   —— resources.json
—— routes
   —— actuators.js
   —— sensors.js
   —— things.js
—— servers
   —— coap.js
   —— http.js
   —— websockets.js
—— utils
   —— utils.js
—— package.json
—— wot-server.js
7.2.2. Resource design
You now have all the elements in place to implement your API, so let’s start with the first step of our process: the resource design. You first need to consider the physical resources on your device and map them into REST resources. Starting from the Pi you configured in chapter 4, your device should have at least an LED, a passive infrared (PIR) sensor and possibly a temperature sensor, and a humidity sensor. If you don’t have all these sensors, don’t worry. We’ll show you how to simulate them as well! These sensors and actuators can be mapped into the resource tree shown in figure 7.3.
Figure 7.3. The resource tree of your Pi with a number of sensors and actuators and their hierarchy. Each resource gets a URL formed by following the path to this resource. As an example, the URL of the passive infrared sensor would be http://localhost:8484/pi/sensors/pir.

Step 1: Create the resource model
You can now map this tree into a JSON file that your application will use to expose your desired URL structure. Create or open the resources/resources.json file that contains the object shown in the next listing.
Listing 7.2. /resources/resources.json: JSON model of the Pi resources
{
  "pi": {
    "name": "WoT Pi",
    "description": "A simple WoT-connected Raspberry PI for the WoT book.",
    "port": 8484,
    "sensors": {
      "temperature": {
        "name": "Temperature Sensor",
        "description": "An ambient temperature sensor.",
        "unit": "celsius",
        "value": 0,
        "gpio": 12
      },

      "humidity": {
        "name": "Humidity Sensor",
        "description": "An ambient humidity sensor.",
        "unit": "%",
        "value": 0,
        "gpio": 12
      },
      "pir": {
        "name": "Passive Infrared",
        "description": "A passive infrared sensor.
            When 'true' someone is present.",
        "value": true,
        "gpio": 17
      }
    },
    "actuators": {
      "leds": {
        "1": {
          "name": "LED 1",
          "value": false,
          "gpio": 4
        },
        "2": {
          "name": "LED 2",
          "value": false,
          "gpio": 9
        }
      }
    }
  }
}
Next, you create the resources/model.js file, which imports our JSON model as follows:
var resources = require('./resources.json');
module.exports = resources;
This file loads the JSON model of our Pi from the resources.json file, and exports will make this object available as a node module that you can use in your application.
Step 2: Create the Express routes
You can now bind these resources to URLs that your web server will reply to. In Express and many other web frameworks, the URL of a resource is defined by a route. You define those routes in two files available in the routes/ folder (actuators.js and sensors.js), which are shown in the next two listings.
Listing 7.3. /routes/sensors.js: routes for sensors

Step 3: Create an Express application
Now that the routes are ready, you need to load them inside an HTTP server, which is done in the servers/http.js file. The content of this file is shown in the following listing and is in essence an HTTP server wrapped inside the Express framework.
Listing 7.4. /servers/http.js: Express application

You need one more file before you can test your implementation: wot-server.js, shown in the next listing. This is the entry point of your WoT Pi server and is in charge of starting the servers with the right configuration.
Listing 7.5. /wot-server.js: application entry point

You can now test your server from your PC by starting the app via your terminal as usual.[7] Once it’s started, you’ll be able to access the resources with your browser—for example, the temperature sensor at http://localhost:8484/pi/sensors/temperature or the list of actuators at http://localhost:8484/pi/actuators. In both cases, you’ll get the JSON payload corresponding to your request. Obviously, if you run the code on your Pi, replace localhost with the IP address or name (raspberrypi.local) of your Pi.
After you run an npm install in the wot-pi/ folder, run node wot-server.js or nodemon wot-server.js, as shown in chapter 3.
Step 4: Bind the sensors to the server
This is all nice, but currently all we return are bits of the JSON model in listing 7.2, and the real-world data—the actual temperature—is missing! You need to put some sensor data from your Pi into the server. You’ll do this by creating a number of plugins, one per sensor or actuator. Each sensor plugin should update the model each time new data is read from the sensor. A sensor plugin should at least have the functions shown in the following listing. All plugins are inside the plugins/ directory. The implementation of the PIR sensor plugin is shown in the next listing and is essentially an extension of the pir.js code you wrote in chapter 4.
Listing 7.6. /plugins/internal/pirPlugin.js: PIR sensor plugin


The code for the temperature and humidity sensor is shown in the next listing, except for one new function: connectHardware(), which uses the node-dht-sensor library introduced in chapter 4.
Listing 7.7. /plugins/internal/DHT22SensorPlugin.js: temperature and humidity sensor plugin

The code for the two plugins clearly shares a number of common functions, so as an exercise you might want to extract the common features into a JavaScript prototype. If you don’t know how to do that, don’t worry; we’ll illustrate this when we improve the code in chapter 8.
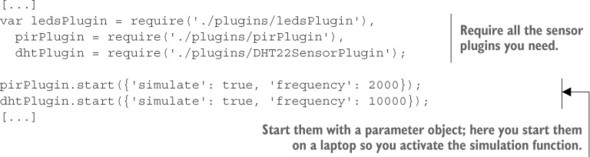
You can now install your plugins on your server by requiring them from the wot-server.js file and starting each plugin with the right parameters, as shown in the following listing.
Listing 7.8. Integrating the plugins to wot-server.js
Run your server again and open the humidity sensor page at http://localhost:8484/pi/sensors/humidity. Refresh the page several times; this should give you different values each time.
Test it with real hardware on your Pi
Simulating sensors is nice, but using real ones is way nicer! To use real sensors on your Pi, you first need to install the libraries that connect the sensors. The problem is that these libraries aren’t supported on non-IoT platforms like your laptop, so if you add the dependencies via npm install --save, you won’t be able to install your code on your PC anymore. Don’t worry: there’s a way out! NPM allows you to set an optionalDependencies object for the package.json file. The idea is that npm install won’t fail if a dependency in optionalDependencies can’t be installed. Go ahead and add the following code in your package.json file; the first dependency supports the PIR sensor and LEDs, and the second one supports the temperature and humidity sensor (if you have one):
"optionalDependencies": {
  "onoff": "^1.0.4",
  "node-dht-sensor": "^0.0.8"
}
Finally, run npm install on your Pi to install these dependencies. Now modify the parameters of the plugins you want to enable with {'simulate': false} and run your application on the Pi;[8] this will connect to physical drivers. Your Pi is now exposing its real sensor data and actuators to the world via a web API. You can access them via REST using the address of your Pi, for example, http://raspberrypi.local:8484/pi/sensors/pir.
If you did set up the temperature and humidity sensor, you’ll need to run the code with sudo: sudo node wot-server.js.
7.2.3. Representation design
The next step of the design process is the representation design. REST is agnostic of a particular format or representation of the data. We mentioned that JSON is a must to guarantee interoperability, but it isn’t the only interesting data representation available. In this section you’ll add support for two more. You’ll add HTML support because this allows you to browse your Pi and discover its resources in a human-friendly way. For this first step, you’ll use a simple JSON-to-HTML library called json2html.
While you’re at it, let’s also add support for MessagePack, a more compressed and binary alternative to JSON that was briefly introduced in chapter 6. MessagePack can easily be mapped to JSON but is more compact than JSON, which makes it interesting for resource-constrained Things that communicate over low-bandwidth networks. There are libraries for encoding and decoding MessagePack in most popular programming languages, so adding support for it in your server is merely a matter of installing the msgpack5 module for Node.
Implementing a representation converter middleware
There are several ways of supporting other representations in Express, but we propose a modular way based on the middleware pattern. Many Node libraries, including Express, support the idea of chaining functions that have access to the request (req) response (res) objects in a request-response cycle. This pattern allows for extensibility while keeping the code clean and modular. In essence, a middleware can execute code that changes the request or response objects and can then decide to respond to the client or call the next middleware in the stack using the next() function. The chain of middleware we’ll implement here is shown in figure 7.4.
Figure 7.4. The middleware chain implemented for the WoT server: each middleware is added to the Express application with the app.use() function. Then, each middleware gets a reference to the request object, the response object, and the next middleware in the chain.

The stub of a typical middleware looks like this:
function myMiddleware(req, res, next) {
  // do something with the request
  // AND/OR add something to the response
  res.send("something");
  next();
}
We use this pattern to implement a representation converter supporting MessagePack and HTML representations. First, install the two libraries via NPM (npm install node-json2html msgpack5). The middleware code is located in middleware/converter.js, as shown in listing 7.9. Essentially, our representation converter middleware will implement the content negotiation pattern described in chapter 6, where it looks for the Accept header in a request and tries to deliver a representation in the format the client asked for. If it doesn’t recognize the format, it will return JSON by default.
Listing 7.9. /middleware/converter.js: implementing representation middleware


Now that the middleware is ready, you need to modify the routes of your server so they call the next middleware in the chain, the representation converter, rather than answering the request directly. You can easily implement this inside the two route files, sensors.js and actuators.js, by replacing every res.send(resource) with req.result = resource and next(). The following listing shows the changes for the sensor’s routes, so make sure you apply those changes to the actuator’s routes as well.
Listing 7.10. Calling the next middleware in sensors.js

Finally, you need to add the middleware to the Express application so that it gets called in the middleware chain. In http.js, first require the middleware with converter = require('./../middleware/converter') and add it to the chain by calling app.use(converter()). Because your converter middleware responds to the client, make sure you add it last, after app.get('pi'), or it will bypass any other middleware. Test your new server on your Pi (or PC) from your browser: http://raspberrypi.local:8484/pi/sensors/pir. You should now see a minimalist HTML representation of the PIR sensor. Now use cURL to request other types of representations by setting the Accept header to the desired MIME type (application/json for JSON and application/x-msgpack for MessagePack) as shown here:
curl -i -H "Accept: application/json"
-X GET 'http://raspberrypi.local:8484/pi/sensors/pir'

curl -i -H "Accept: application/x-msgpack"
-X GET 'http://raspberrypi.local:8484/pi/sensors/pir'
Your server is now capable of serving three different representations—JSON, HTML, and MessagePack—for all the resources it offers. All this thanks to a middleware that’s 20 lines long! How’s that for an illustration of the power of open web standards and Node.js?
7.2.4. Interface design
So far so good, but you’re only able to GET resources from your Pi over HTTP. What about the other verbs like PUT and POST? What about HTTP status codes? What about using WebSockets to subscribe to sensor data? This is the goal of the interface design step.
Adding a body parser
The GET verb is enough for sensors because you only read them, but what if you want to change the actuators—for example, turning on/off an LED or changing its color? The first step is to inform Express that you’re happy to receive JSON payloads from clients. Adding an HTTP body parser to the middleware chain does just this. In http.js require the body-parser module: bodyParser = require('body-parser'). Also add the middleware at the beginning of the chain. Why the beginning? You want to parse the body of the HTTP message first to make it available to all other middleware: app.use(bodyParser.json()).
Supporting other HTTP verbs
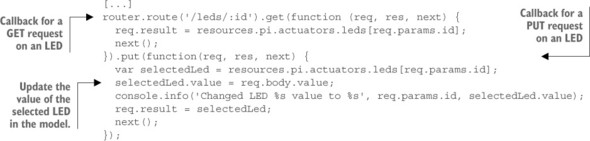
Your server can now handle incoming JSON messages as well, so let’s add support to update the state of the Pi LED using a PUT request. To add support for PUT, you need to extend again the routes in actuators.js. Transform the route for /leds/:id as shown in the next listing.
Listing 7.11. Adding PUT support for LEDs in /routes/actuators.js
You can now update the state of the LED by running a PUT request on the LED resource with the appropriate JSON payload. In cURL this looks like the following:
curl -i -H "Content-Type: application/json"
  -H "Accept: application/json"
  -X PUT 'http://localhost:8484/pi/actuators/leds/1'
  -d '{"value":true}'
If you’re successful, you’ll see the following in the Node console: Changed LED 1 value to true.
Binding actuators to the server
This is all nice but it actually only updates your model; it doesn’t actuate the real world! To change this behavior you need to write an LED plugin that has a similar structure to the sensor plugins but with a notable exception: it has an observe() function. observe() is needed for actuator plugins, and its goal is to observe changes in the model and report them to the physical world.
The core of this implementation is using the Object.observe() function.[9] This allows you to asynchronously observe the changes happening to an object by registering a callback to be invoked whenever a change in the observed object is detected:
Note that this function has been supported by Node since version 0.11.13 and is available in the current Node LTS v4.X we use for this book, but it could be removed in the future LTS, so make sure you use node 4.X LTS for this to work. See http://www.infoq.com/news/2015/11/object-observe-withdrawn.
Object.observe(obj, function(changes) {
  console.log(changes);
});
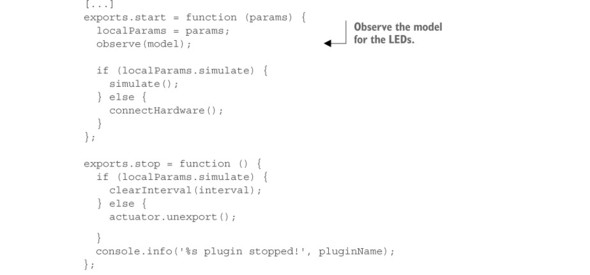
Let’s use this feature to implement your LED plugin. It uses the on/off library to change the state of the GPIO the LED is connected to. Note that to keep things simple, this code supports only one LED (LED #1), but feel free to extend it to support more as an exercise. Inside observe you register a callback to be triggered whenever the model of your LEDs changes. It is inside this callback that you actually change the state of the GPIO, as shown in the next listing.
Listing 7.12. /plugins/internal/ledsPlugin.js: LED plugin

Add this plugin to the list of initialized plugins in wot-server.js and set the simulation to false: ledsPlugin.start({'simulate': false}). Run it on your Pi and try the last cURL request again against the URL of your Pi; this time the LED should turn on! Yeah, we know. It’s just an LED, but, oh my, this feels so good. Welcome to the IoT!
7.2.5. Pub/sub interface via WebSockets
The last part in our interface design step is to support publish/subscribe via WebSockets. Our goal is to offer the ability to subscribe via WebSockets on all our resources by a simple protocol upgrade to WebSockets.
There are several implementations of WebSockets for Node. The most complete and best-known one is probably Socket.io, which is more than a WebSocket server. It also supports fallbacks for clients that don’t support WebSockets; for example, long polling as shown in chapter 6. We suggest you have a closer look at Socket.io, but for the server of our Pi we’ll choose a pure and high-performing WebSockets implementation called WS.
The implementation of the WS integration is illustrated in figure 7.5. You create a WebSocket server and attach a listener to the main HTTP server of Express to listen for protocol upgrade requests to WebSockets; see chapter 5. You then take these upgrade requests and use the URL of the request to observe the corresponding resource in the model. Whenever a change is detected, you propagate the change to the client via the open WebSockets connection.
Figure 7.5. Sequence diagram of the WebSockets implementation of the WoT server: the WebSocket server is reacting to clients opening a WebSocket connection via an HTTP upgrade request by observing the corresponding resource;, for example, /temp. Whenever a new value for the resource is available, the WebSocket server sends it over the TCP connection it maintains open with the client.

To integrate this into your WoT server on the Pi, first install the WS module (npm install --save ws). Then implement the WebSocket server as shown in the next listing.
Listing 7.13. /server/websockets.js: WebSockets server


The last step to enable the support for WebSockets is to initialize the WebSockets server after starting the HTTP server in wot-server.js. Modify the call to listen() to include a callback that starts the WebSockets server, as shown in the following listing.
Listing 7.14. Enabling the WebSockets server in wot-server.js
var httpServer = require('./servers/http'),
  wsServer = require('./servers/websockets'),
  resources = require('./resources/model');
[...]
var server = httpServer.listen(resources.pi.port, function () {
  console.log('HTTP server started...');
  wsServer.listen(server);
  console.info('Your WoT Pi is up and running on port %s', resources.pi.port);
})
That’s it! You can now subscribe to all the resources on the web Thing with WebSockets and be informed whenever the state of a resource changes. You can use any WebSockets client—for example, a web page, such as the example you saw in chapter 2. Try adapting it to subscribe to your WoT Pi, or you can use the /public/websocketsClient.html file in any recent browser. When you open this file in your browser, you’ll see the WebSockets messages in the JavaScript console of your developer tools, as shown in figure 7.6.
Figure 7.6. Subscribing to temperature updates via WebSockets using a simple WebSockets client in Firefox. The upper part shows the protocol upgrade process and the lower part the incoming messages pushed from the Thing (a Pi here) directly to the browser-based client.

The WoT server we built in this section was kept extremely simple in terms of the code to ensure everyone could follow along. The code could be made a lot cleaner and more reusable by applying a number of JavaScript good practices and patterns. If you know JavaScript, a good exercise is to modularize the code; for instance, by starting with prototypes to factorize a large chunk of plugin code. In chapter 8 you’ll see an improved version of the framework we presented here, but don’t hesitate to build your own right now!
7.2.6. Summary—direct integration pattern
In this section, we showed how to rapidly build a complete Web of Things API that not only can run on actual devices and talk to actual sensors and actuators, but also can support many advanced capabilities, such as content negotiation and push support via WebSockets. But there’s a whole range of devices where you won’t have the luxury of running Node natively. A solution for these cases is described in the next section, where we provide another pattern for non-HTTP/WebSockets devices: the gateway integration pattern.
7.3. Gateway integration pattern—CoAP example
In the previous section, you transformed your Pi into a web Thing by creating an HTTP and WebSockets API for its sensors. This worked well because your Pi was not battery powered, had access to a decent bandwidth (Wi-Fi/Ethernet), and had more than enough RAM and storage for Node. But not all devices are so lucky. Native support for HTTP/WS or even TCP/IP isn’t always possible or even desirable. For battery-powered devices, Wi-Fi or Ethernet is often too much of a power drag, so they need to rely on low-power protocols such as ZigBee or Bluetooth instead. Does it mean those devices can’t be part of the Web of Things? Certainly not, as illustrated in figure 7.7.
Figure 7.7. Gateway integration pattern. In this case, the web Thing can’t directly offer a web API because the device might not support HTTP directly. An application gateway is working as a proxy for the Thing by offering a web API in the Thing’s name. This API could be hosted on the router in the case of Bluetooth or on another device that exposes the web Thing API; for example, via CoAP.

Such devices can also be part of the Web of Things as long as there’s an intermediary somewhere that can expose the device’s functionality through a WoT API like the one we described previously. These intermediaries are called application gateways (we’ll call them WoT gateways hereafter), and they can talk to Things using any non-web application protocols and then translate those into a clean REST WoT API that any HTTP client can use. Some gateways can also do more than simply translate across protocols. They can add a layer of security or authentication, aggregate and store data temporarily, expose semantic descriptions for Things that don’t have any, and so on.
To better understand what a WoT gateway is and what it can do for non-web devices, let’s look at a concrete example where we expose a CoAP device using an HTTP and WebSockets API. As you’ve seen before, CoAP is an interesting protocol based on REST, but because it isn’t HTTP and uses UDP instead of TCP, a gateway that translates CoAP messages from/to HTTP is needed. It’s therefore ideal for device-to-device communication over low-power radio communication, but you can’t talk to a CoAP device from a JavaScript application in your browser without installing a special plugin or browser extension. Let’s fix this by using your Pi as a WoT gateway to CoAP devices.
7.3.1. Running a CoAP server
Start by creating a simple CoAP resource. For the sake of simplicity—and to keep your budget in check—you’ll simulate a CoAP device on your computer. Of course, you could also buy a resource-constrained device such as an Arduino Uno and install CoAP on it.[10]
For instance, using the microcoap implementation available here: https://github.com/1248/microcoap.
There are a number of libraries for CoAP on Node but our favorite is coap (run npm install coap to install it). An implementation of a minimal CoAP server is provided in /servers/coap.js, shown in the following listing.
Listing 7.15. coap.js: a simple CoAP server
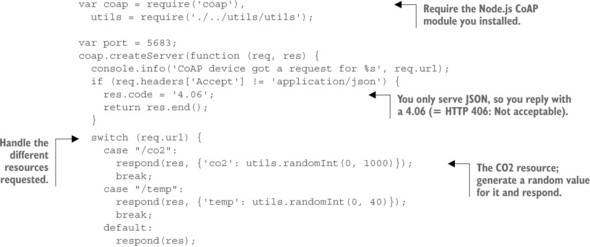

You’ll likely realize that this code isn’t very different from what you’ve learned in the last two chapters. That’s because CoAP is heavily inspired by HTTP and REST but adapted for the requirements of low-power embedded systems. Because CoAP is using UDP and not HTTP/TCP, you can’t access these resources directly from your browser via a CoAP URI: coap://localhost:5683/co2.
But you can use an excellent plugin for Firefox called Copper.[11] Once the plugin is installed, start the CoAP server (node coap.js in the servers directory) and you’ll be able to access the resources you just created by typing the CoAP URI; for example, coap://localhost:5683/co2, in Firefox’s address bar.
7.3.2. Proxying CoAP via a gateway
The next step is to proxy CoAP requests to HTTP so that you can access CoAP devices from web browsers. Here you’ll extend your WoT gateway to provide access to CoAP devices via your Pi.
Transforming your Pi into a WoT gateway requires two simple steps. First, you create a CoAP plugin, which is essentially a CoAP client creating a new device in our model. Second, you create routes for the resources the CoAP device has to offer. The code for the CoAP plugin is shown in the next listing. Because most of the code is just like the other temperature/humidity sensor plugins, we focus on what’s different.
Listing 7.16. /plugins/external/coapPlugin.js: a simple CoAP plugin


Then you need to add the routes for the resources for your CoAP device. To keep it simple, you connect only a CO2 sensor, but feel free to extend this to support any other resources you want. You need to add these routes in /routes/things.js:
router.route('/coapDevice/sensors/co2').get(function (req, res, next) {
  req.result = resources.things.coapDevice.sensors.co2
  next();
});
You load the router as a middleware in /servers/http.js, binding it to /things. This means the CoAP device will be accessible on /things/coapDevice/sensors/co2, which makes sense because it’s a Thing managed by the Pi, which acts as a proxy, not the Pi itself. Finally, you require and start the CoAP plugin in wot-server.js:
var coapPlugin = require('./plugins/external/coapPlugin');
coapPlugin.start({'simulate': false, 'frequency': 10000});
If everything works, you should be able to access the simulated CoAP device through the Pi gateway using HTTP. First, start the CoAP server on your PC (node coap.js) and then the gateway on your Pi (node wot-server.js), and finally, try to run the following cURL:
curl -i -H "Accept: application/x-msgpack"
  -X GET 'http://raspberrypi.local:8484/things/coapDevice/sensors/co2'
You should get the sensor readings as a MessagePack representation. You can also try to use a snippet of JavaScript that connects to the CoAP CO2 sensor via WebSockets (for example, use the file /public/websocketsClient.html) or even point your browser at http://raspberrypi.local:8484/things/coapDevice/sensors/co2. All of these will work, even if the CoAP device can’t serve MessagePack or HTML representations and can’t speak WebSockets. This is the gateway pattern in action: it seamlessly integrates the CoAP device to the web of browsers!
This was a very short introduction to CoAP. If you want to learn more about this young and growing web-inspired protocol, start by exploring the CoAP technology portal.[12]
Even though CoAP isn’t supported by the web of browsers, it offers an interesting tradeoff for resource- or battery-constrained devices, especially when considering device-to-device communication. It’s similar to HTTP, so the translation is easier because we don’t need to map between different data models and could use the same JSON model over both HTTP and CoAP. The translation we illustrated here was simple but not generic: we needed to manually map a CoAP resource to HTTP routes. Building a generic HTTP proxy for CoAP devices is possible and not overly complex. Should you want to try, you’ll find a number of examples on the web.[a]
For instance, here: https://github.com/morkai/h5.coap/blob/master/example/http-proxy.js.
7.3.3. Summary—gateway integration pattern
For some devices, it might not make sense to support HTTP or WebSockets directly, or it might not even be possible, such as when they have very limited resources like memory or processing, when they can’t connect to the internet directly (such as your Bluetooth activity tracker), or when they’re battery-powered. Those devices will use more optimized communication or application protocols and thus will need to rely on a more powerful gateway that connects them to the Web of Things, such as your mobile phone to upload the data from your Bluetooth bracelet, by bridging/translating various protocols. Here we implemented a simple gateway from scratch using Express, but you could also use other open source alternatives such as OpenHab[13] or The Thing System.[14]
7.4. Cloud integration pattern—MQTT over EVRYTHNG
As you saw in the previous sections, it’s possible to implement WoT servers directly on devices or via gateways. This is sufficient in many situations, but as soon as you need to manage large quantities of devices and data, you’ll need to have a much more powerful and scalable platform to store and process the data. The cloud integration pattern, shown in figure 7.8, is an extension of the gateway pattern where the gateway is a remote server that devices and applications access via the internet.
Figure 7.8. Cloud integration pattern. In this pattern, the Thing can’t directly offer a Web API. But a cloud service acts as a powerful application gateway, offering many more features in the name of the Thing. In this particular example, the web Thing connects via MQTT to a cloud service, which exposes the web Thing API via HTTP and the WebSockets API. Cloud services can also offer many additional features such as unlimited data storage, user management, data visualization, stream processing, support for many concurrent requests, and more.

Using a cloud server has several advantages. First, because it doesn’t have the physical constraints of devices and gateways, it’s much more scalable and can process and store a virtually unlimited amount of data. This also allows a cloud platform to support many protocols at the same time, handle protocol translation efficiently, and act as a scalable intermediary that can support many more concurrent clients than an IoT device could. Second, those platforms can have many features that might take considerable time to build from scratch, from industry-grade security, to specialized analytics capabilities, to flexible data visualization tools and user and access management. This means you can get started building complex applications in a fraction of time. Third, because those platforms are natively connected to the web, data and services from your devices can be easily integrated into third-party systems to extend your devices.
Over the years, many cloud platforms have appeared, and they usually share similar characteristics: creating virtual devices in the cloud that can permanently talk to their physical counterparts, storing all the data generated by the devices, and visualizing that data in multiple ways. Xively[15] (ex-Cosm, ex-Pachube) was one of the earliest ones; its simple API allowed developers throughout the world to quickly connect devices to the cloud. There are many other ones you can use for your projects, such as ThingWorx,[16] ThingSpeak,[17] Carriots,[18] and thethings.io.[19]
In this section, we’ll teach you how to connect to our favorite IoT platform ever: EVRYTHNG. Okay, we might be biased because we built it! But at least it will help you learn quickly about the advantages of the cloud integration pattern. Started in 2011, EVRYTHNG was also the first IoT platform to apply the Web of Things principles, so it should feel familiar! In this section, you’ll learn how to implement a basic web-connected power plug, as shown in figure 7.9. The plug monitors the energy consumption of the device attached to it and permanently sends this data to the cloud. These readings will be permanently stored in the cloud. In addition, the plug is permanently connected to the cloud using MQTT (which we described in chapter 5), which means that the cloud can send commands to it at any time with minimal latency.
Figure 7.9. A physical device connects to a cloud platform using MQTT over TCP/IP and talks to its proxy on the web—called Thng. An external application can then talk to the Thng using a simple HTTP client.

Afterward, we’ll implement a simple web application using HTML and JavaScript that subscribes to the plug using WebSockets, displays the current consumption in real time, and also allows you to turn the plug on and off. You’ll find all the source code you need in the folder chapter7-implementation/part3-cloud of the book’s GitHub repository.
7.4.1. Set up your EVRYTHNG account
The first thing you need to do is create an EVRYTHNG account and log into it.[20] Don’t worry; it’s quick and it won’t cost you a dime to implement this exercise. EVRYTHNG services are completely free for non-commercial projects! To get you up to speed, you can check out our quick tutorial for how to use it.[21]
You can do it here: https://dashboard.evrythng.com/signup.
Quick introduction to EVRYTHNG: https://developers.evrythng.com
Once you’ve created your account, you’ll need your account API key (called operator API key[22]). This key will allow you to create and manage the digital identities for your device in the cloud and interact with them. It’s critical that you don’t share it with anyone because this API key is so powerful that it can delete every Thng—this is not a typo; EVRYTHNG likes to drop vowels—in your account. Don’t even share it with your girlfriend/boyfriend or best buddy! Unless he’s really a great guy, in which case it might be okay—or not!
Find it here: https://dashboard.evrythng.com/account.
In this section you set up your account so that you can connect your devices and applications to the engine. You could also do all the following steps from the EVRYTHNG dashboard or via POSTman. In this section, we’ll show you how to use cURL so that you can easily run those requests from your terminal and also see the details of the various HTTP requests. You can append the --verbose flag to the request to see more details about your request.
You’ll have to manually create a few entities in your EVRYTHNG account by running various HTTP requests against our cloud, as described in steps 1–4. If you run into any problems or you don’t want to do this all manually, we’ve prepared a cool script for you that does steps 1–4 automatically, which is described at the end of this section. The script is called setup.sh and you can run it from the terminal of your Pi with
$ sh setup.sh XXX
where XXX is your operator API key. You’ll see a matrix-like effect that not only runs all the commands you’ve seen to create those entities for you but also saves them into a config.json file that you’ll need in the next section. You’re now ready to experience the full power of the cloud implementation pattern.
Step 1—Create a project and an application
Before we start, you must copy and paste these two lines in your terminal, which will define two shell environment variables that the cURL requests in this section will use:
SERVER="https://api.evrythng.com"
EVRYTHNG_API_KEY="YOUR-API-KEY"
Obviously, replace YOUR-API-KEY with your own operator API key before you run it. You’ll have to define quite a few other environment variables in the same way in this section.
The first thing you’ll do is to create a project inside your account. A project is a placeholder (a scope) that allows you to separate the various elements you’ll generate (Thngs and data). Also, you’ll need a project to create applications that can access some of your data because you don’t want to use your operator API key in client applications. Paste the following request into your terminal:
curl -X POST "$SERVER/projects"
     -H "Authorization: $EVRYTHNG_API_KEY"
     -H "Content-Type: application/json"
     -d '{ "name": "Web of Things Book", "description": "My First WoT
     Project" }' --verbose
If this request wasn’t successful make sure the SERVER and EVRYTHNG_API_KEY environment variables are correct, which you can test by running echo $SERVER in your terminal. If it was successful, you should receive a 201 Created response that looks like this:
HTTP/1.1 201 Created
Access-Control-Allow-Origin: *
Access-Control-Expose-Headers: Link, X-Result-Count
Content-type: application/json
Date: Sun, 14 Jun 2015 18:41:52 GMT
location: https://api.evrythng.com/projects/UCkWEEKnPe5wWhgbdhSfwnGc
Content-Length: 150
Connection: keep-alive
{
  "id":"UCkWEEKnPe5wWhgbdhSfwnGc",
  "createdAt":1434810298365,
  "updatedAt":1434810298365,
  "name":"Web of Things Book",
  "description":"My First WoT Project"
}
Note that there’s now an id field in the object, which contains the EVRYTHNG ID of the project you created. Go ahead and save this value into the environment variable $PROJECT_ID as you did when you pasted the EVRYTHNG_API_KEY="XXX" earlier, by pasting PROJECT_ID=YYY into your terminal, where YYY is the ID of the project you just created—PROJECT_ID=UCkWEEKnPe5wWhgbdhSfwnGc, in this example.
Once you’ve created your first project, you can create an application in it. An application will give you another API key (an App API key) that you can use in the client application we’ll build later. This one isn’t so dangerous, because what it can do is very limited; basically it only allows you to create users. To create an application, send the following cURL request in your terminal:
curl -X POST "$SERVER/projects/$PROJECT_ID/applications"
     -H "Authorization: $EVRYTHNG_API_KEY"
     -H "Content-Type: application/json"
     -d '{ "name": "My Awesome WoT App", "description": "My First WoT Client
     Application","tags":["WoT","device","plug","energy"], "socialNetworks":
     {} }'
Again, just like you did for projects, store the ID returned in the response inside the $APP_ID environment variable. Also, note the API key in the response; you’ll use it to build your web application later on. Now you’re ready to create a web Thing in our cloud.
Step 2—Create your first products and Thngs
A product is a class of physical objects (think TV model or car type) but not a unique instance (think serial number). You shouldn’t use products to store data about physical objects. They’re a conceptual entity, a model of a physical object, and should only contain information that many physical objects of this class share—attributes such as size, image, weight, and color—but no real-time information such as location, sensor readings, or current state. Create a product using the following request:
curl -X POST "$SERVER/products?project=$PROJECT_ID"
     -H "Authorization: $EVRYTHNG_API_KEY"
     -H "Content-Type: application/json"
     -d '{ "fn": "WoT Smart Plug", "description": "A Web-connected Smart
     Plug","tags":["WoT","device","energy"],"photos":["https://
     webofthings.github.io/files/plug.jpg"] }'
Note the ?project=$PROJECT_ID query parameter, which tells EVRYTHNG to store this product inside the project we created earlier. Store the product ID in the $PRODUCT_ID variable.
Thngs, on the other hand, are the digital representation of unique instances of physical objects: the Thing you hold in your hands! For each unique device or object you want to web-enable, you’ll need to create a unique Thng. You can do it like this:
curl -X POST "$SERVER/thngs?project=$PROJECT_ID"
     -H "Authorization: $EVRYTHNG_API_KEY"
     -H "Content-Type: application/json"
     -d '{ "name": "My WoT Plug", "product":"'$PRODUCT_ID'", "description":
     "My own Smart Plug","tags":["WoT","device","plug","energy"] }'
You can see that we’re also sending the product ID in this request. Keep track of the ID of the Thng returned in the payload in the $THNG_ID variable.
Step 3—Create a device API key
Technically, you could use your operator API key to update the property of your Thng, but it’s unwise to use this on a production device for various security reasons. Instead, you can easily generate a Thng API key that allows your device to see and edit only itself. Send a POST (using your operator API key) to the end point https://api.evrythng.com/auth/evrythng/thngs with the ID of your Thng, as follows:
curl -X POST "$SERVER/auth/evrythng/thngs"
     -H "Authorization: $EVRYTHNG_API_KEY"
     -H "Content-Type: application/json"
     -d '{ "thngId": "'$THNG_ID'" }'
You’ll get this in return:
{
  "thngId": "UCE7qfbK8VKwdt8kAfqtbwmd",
  "thngApiKey": "M1ST3RP0TAT0H3ADROCKS"
}
The thngApiKey field contains an API key that allows the device to see and update itself. Store its value in the $THNG_API_KEY environment variable.
Step 4—Change properties
If you’ve successfully completed the previous lines, you’ll now have a project, an application, a product, and an instance of this product in your account. You can see them in your dashboard. Now you’re going to update the properties of your smart plug. A property is an array of data that you can update any time and that’s stored permanently inside the engine. You can continuously update each property individually and retrieve it anytime.
To update one or more properties, use the device API key and send a POST request to the thngs/$THNG_ID/properties endpoint, using this request:
curl -X POST "$SERVER/thngs/$THNG_ID/properties"
     -H "Authorization: $THNG_API_KEY"
     -H "Content-Type: application/json"
     -d '[{"key": "status","value": true},
          {"key": "energyConsumption","value": 71}]'
Now you can navigate to the page of your Thng in the EVRYTHNG dashboard, which is shown in figure 7.10. There you’ll see the information about this plug and its properties changing in real time as you run this request several times with different values.
Figure 7.10. See the smart plug directly from the dashboard and the properties being updated in real time.

7.4.2. Create your MQTT client application
In the previous section, you learned how to set up your EVRYTHNG account to create web Things for any physical object you want to connect to the web. You did this using cURL commands to learn about the endpoints and how they work, but obviously this is not how your device will talk to the engine.
For this project, you’ll write a simple Node application that simulates a smart plug and that you can run from your Pi or on your PC. The application uses the Thng API key (created in step 3 of the previous exercise) to open a permanent connection to the EVRYTHNG engine over MQTT and update its properties every five seconds.
Open the file simple-plug.js and look at the code. Before you can execute it, you’ll need a config.json file with the IDs and API keys of your EVRYTHNG account. If you ran the setup.sh bash script instead of going through the four manual steps, it will have generated this file for you. Otherwise, create a copy of the file config-sample.json named config.json and put the Thng ID (step 2 of previous section) and the Thng API key (step 3) in it, as shown in the following listing.
Listing 7.17. simple-plug.js: simulated power plug that connects to EVRYTHNG via MQTT


You can see that this example connects to EVRYTHNG via secure MQTT (MQTTS) and subscribes to all property updates. It then calls the function updateProperties() every five seconds, which simulates typical current and voltage readings a real plug might measure, and finally sends the readings to the cloud by updating the properties of the Thng, as you did in the step 4 of the previous section.
You can then go back to the Thngs page in the dashboard and start the simulated device by running the Node code: npm install and node simple-plug.js. You can now go back to the Dashboard tab to see the properties of the plug being updated in real time, as shown in figure 7.10.
7.4.3. Use actions to control the power plug
You’ve built a device that’s permanently connected to the internet and that pushes its updates to a service via MQTT. This illustrates how using a cloud engine can allow you to rapidly build web-connected devices without implementing a local gateway.
At this point, you’re probably thinking, “Okay, great, but how do I send commands to the plug to turn it on or off?” Fair enough! The simplest answer is this: because the device has subscribed to all properties using MQTT, it will receive a message each time any property in the EVRYTHNG cloud changes. Indeed, the text you see in the terminal is displayed by the console.log() statement in that callback function. With the Node application running, go to the dashboard, click the property status of the Thng, and set it to false. You’ll see this change immediately in your terminal:
[{"timestamp":1434823136116,"key":"voltage","value":220.259}]
[{"timestamp":1434823136116,"key":"current","value":0.839}]
[{"timestamp":1434823136898,"key":"status","value":false}]
[{"timestamp":1434823137065,"key":"voltage","value":219.919}]
[{"timestamp":1434823138184,"key":"power","value":913.355}]
You could then modify that callback handler to trigger something else in your code when this happens, and this will work fine.
But this isn’t the best option because you must carefully keep track of which properties the device should set and which ones should only be changed by applications. Besides, a property is only a single value; therefore, you’d have to use several properties if you wanted to send commands to your device that have multiple input parameters; for example, setting the RGB value of several LEDs.
For this reason, you’ll use actions to send more complex commands with several input parameters. For this, you can look at the more advanced plug-with-control.js. If you’ve run the bash script in section 7.4.1, it will have created an action type called _setStatus for you. If not, you’ll have to create it yourself using this command:
curl -X POST "$SERVER/actions?project=$PROJECT_ID"
     -H "Authorization: $EVRYTHNG_API_KEY"
     -H "Content-Type: application/json"
     -d '{ "name": "_setStatus", "description": "Changes the Status of the
     Thng","tags":["WoT","device"] }'
Before you create actions, you need to change your device application so that it also subscribes to the actions/ resource and does something each time it receives a specific action. You can open the file plug-with-control.js where the callback functions have been modified, as shown in the next listing.
Listing 7.18. plug-with-control.js: subscribe and handle actions pushed from the server


You can now run this second code, and you’ll still see when properties are updated. But for now, open a second terminal and send a _setStatus command to the Thng in your engine, using the following request:
curl -X POST "$SERVER/actions/_setStatus?project=$PROJECT_ID"
     -H "Authorization: $EVRYTHNG_API_KEY"
     -H "Content-Type: application/json"
     -d '{ "type": "_setStatus", "thng":"'$THNG_ID'", "customFields":
     {"status":"false"} }'
Study carefully the content of the response payload because it contains much more information that you’ve sent. Our cloud uses your IP address to determine the location of the action. If you refresh the page, you’ll see this action appear on your Thng page in the dashboard, along with a map of it.
7.4.4. Create a simple web control application
So far, you’ve written a Node application that allows a Pi to connect to a cloud service and receive push notifications instantly, even if your device is behind firewalls or NAT boxes. The benefit of using a cloud service is that it allows you to use a uniform interface such as a REST API, properties, or actions to talk to any device connected to the cloud, regardless of whether the device talks to EVRYTHNG using the REST API, MQTT, or another protocol. This means you can build a generic client application and it will work with any Thng in the platform. It also makes access to your Things much more scalable because clients don’t talk to your Things directly, but rather through a cloud intermediary representing the state of the Thing, like a mirror or a shadow.
A simple web application using the cloud
The next step is to build a simple web application that can interact with the device via its Thng, subscribe to its properties using WebSockets, and display them as soon as the device sends them. This application should also be able to push commands to the device via the REST API of the cloud platform.
We built such an application for you, so go ahead and open the file part3-cloud/client/plug.html in your editor—or, of course, feel free to build your own! Provide the Thng ID and your operator API key here as query parameters in the URL:
file:///.../plug.html?key=XXX&thngId=YYY
You can now start the plug-with-control.js Node application we used in the previous section and open plug.html in your browser. Within a few seconds, you should see the properties changing and a graph being updated in real time. This application connects to your Thng in EVRYTHNG, subscribes to its properties using WebSockets, and updates the page as soon as property updates are received from the engine. Because the code is long and uses quite a few excellent libraries to do the heavy work, we’ll show only the most interesting bits here. First, you create a toggle button that sends a _setStatus action each time it’s used, as shown in the following listing.
Listing 7.19. client/plug.html: attach a handler to the toggle button
<input type="checkbox" id="toggle-status"/>
<script>
  $(function() {
    $('#toggle-status').bootstrapToggle({
      on: 'On',
      off: 'Off'
    });
  });

  $(function() {
    $('#toggle-status').change(function() {
      sendAction("_setStatus",{"status": $(this).prop('checked')});
    });
  });
</script>
You create a button and use the Bootstrap Toggle[23] library to make it look pretty. Each time this button is triggered, the sendAction() function will be called, which looks like the code shown in the next listing.
Listing 7.20. client/plugs.html: the sendAction() function

Each time this function is called, it will POST an action in the engine that will be received by your device—exactly as you saw in the previous section.
Oh, and don’t forget to turn on the plug with the button you just created; otherwise you won’t see anything on the graph!
Subscribing via WebSockets
Second, you need to subscribe your client application to all property updates using WebSockets. In principle, this is similar to what you did with MQTT in the previous section. The idea is that you create a few HTML placeholders to display the current property values. For each property you want to display, you create a list item that looks like this:
<li class="list-group-item">
  <span id="value-status" class="badge">false</span>
  status
</li>
Note that the id must be set to value-status and the same property name as in the engine. Let’s now see how to connect and process WebSockets messages, as the following listing shows.
Listing 7.21. Connecting to WebSockets and handling property updates

This is similar to MQTT but entirely web-based and running in your web browser with no dependencies to install. Each time any property is updated you’ll receive a corresponding JSON message over the WebSocket channel because you subscribed to the properties topic.
Using QR codes to identify Things
Before we finish this section, let’s do a final trick. For this, you’ll need to deploy plug.html and the ui/ folder file somewhere in the cloud—for instance, on GitHub pages.[24] If you want to take the short route, we’ve deployed this file for you as well, and you can access it here (after replacing XXX with your operator API key and YYY with your Thng ID): https://webofthings.github.io/wot-book/plug.html?key=XXX&thngId=YYY. If you ran the script earlier in the previous section, it will have created a redirection for your Thng automatically; scan the QR code or click the short URL and you’ll land on that link automatically. Otherwise, you can create it using the Setup Redirector button as shown in figure 7.11.
Figure 7.11. How to create a short URL redirecting to the user interface of your device

Put the full path to the file in the redirect expression—the previous URL with your own credentials—and click Create Redirection. You now have a short URL and a corresponding QR code that you can update anytime and that allows you to see and control your device by scanning it with your phone. QR codes or NFC tags are a great way to serialize the URLs of Things and make them physically discoverable by mobile phones.
Note that you should not share this QR code or URL with anyone: it contains your operator API key! This was only to make a point, but you should never expose your API keys in this manner.
7.4.5. Summary—cloud integration pattern
Let’s take some time to reflect on all you’ve done in this section. How did it feel to be able to do so much in so little time? Thanks to the open and flexible APIs of a Web of Things cloud platform such as EVRYTHNG, you’ve written a simple Node application that can talk to its digital identity in the cloud using MQTT. You’ve also built a basic HTML/JavaScript application that displays data from your device in real time and can send commands to it even if it doesn’t have a REST API.
This is where the cloud integration pattern shines. Because most of the complexity of this system lives inside the cloud platform, you have less need to worry about scalability, reliability, or security. A cloud platform allows you, a digital product developer, to drastically reduce the time it takes to build web-connected devices and provides various powerful features, such as visualization, data storage, and access control. Because the front-end application uses only HTML/JS/CSS, you have a uniform interface to control any device regardless of whether it speaks HTTP or not, because the cloud system can seamlessly handle the translation across protocols.
Why would you ever use the direct connectivity pattern? There are several good reasons for still natively providing APIs on Things. Think, for instance, about latency: a local call is almost always faster than a call through the cloud. Or think about monitoring and control when the internet is down. Because of this, the best compromise for real-world WoT products is quite often to offer both local and cloud access.
7.5. Summary
- There are three main integration patterns for connecting Things to the web: direct, gateway, and cloud.
- Regardless of the pattern you choose, you’ll have to work through the following steps: resource design, representation design, and interface design.
- Direct integration allows local access to the web API of a Thing. You tried this by building an API for your Pi using the Express Node framework.
- The resource design step in Express was implemented using routes, each route representing the path to the resources of your Pi.
- We used the idea of middleware to implement support for different representations—for example, JSON, MessagePack, and HTML—in the representation design step.
- The interface design step was implemented using HTTP verbs on routes as well as by integrating a WebSockets server using the ws Node module.
- Gateway integration allows integrating Things without web APIs (or not supporting web or even internet protocols) to the WoT by providing an API for them. You tried this by integrating a CoAP device via a gateway on your cloud.
- Cloud integration uses servers on the web to act as shadows or proxies for Things. They augment the API of Things with such features as scalability, analytics, and security. You tried this by using the EVRYTHNG cloud.
Now that we’ve created web APIs for Things, the next few chapters will be about making these APIs even more powerful and interesting. In the next chapter, we’ll explore the resource-linking design step as well as the issues of findability and discoverability. In essence, we’ll look at how a web Thing can expose its API in a way that makes it easy to be found, understood, and used by other applications, web Things, or even human beings!