12. Namespaces & Modularization
In this chapter we primarily discuss two quite simple and somewhat related concepts. The first is modularization: breaking an application down into subparts. This is accomplished by dividing one’s code into several files, which can then be reassembled when the application is compiled.
The second subject is namespaces, which is kind of new to C++ (and not found in C at all). The more you program and the more complex your applications become, the more necessary namespaces are. You’ve actually been dealing with namespaces without even knowing it throughout the entire book, so it’s about time you formally learn about that subject.
Included in this mix of subjects is another explanation of variable scope: where variables exist. When a program has multiple functions, there are different scopes. When a program has multiple, separate files, the same is also true. The concept of linkage comes into play in such cases, which will be covered at the chapter’s end.
Working with Included Files
Although it’s feasible to write an entire advanced C++ program in a single source file, accomplishing that task would be unnecessarily tedious and edits would require more effort than otherwise necessary. By using the strength of the C preprocessor (discussed in detail later in the chapter) and the compiler, you can break complex applications down into multiple files, while still retaining the same functionality.
The C preprocessor’s #include directive provides a mechanism for including the contents of another file while compiling a primary file. You’ve seen this many times with the iostream include. Quite often, these included files exist solely to provide function declarations and, in C++, class declarations. Such included files are called header files. As an example, string defines how the string type can be created and used.
The two kinds of header files are system header files and your own header files. System header files do things like define functionality that allow your C++ code to work on a particular operating system (so the definition of cout on a Mac does the same thing as cout on Windows, but how each does its thing may differ). When your program needs to use these features, you must include the appropriate file. As you might infer, system header files, in part, allow for the portability of C++ code, which is vitally important.
You include system header files by using angle brackets (< >) around the filename in the directive. This tells the preprocessor to grab that code out of the standard location for your operating system:
#include <iostream>
#include <string>
You include your own header files by using double quotation marks around the filename:
#include "myfile1.h"
#include "includes/myfile3.h"
Over the next few pages, you’ll learn how to create and include your own header files, thus making your applications more modular and easier to maintain. After these examples, a little knowledge of the other C preprocessor directives you’ll want to use is provided.
Creating a header file
A header file is just a standard text file, given the .h extension to signify its header nature. Normally you would place these headers files in the same directory as the rest of the application files or in their own special folder within the application’s directory.
You can use header files to store any pieces of code that the application needs. For example, a header file might contain function or class declarations (but not the implementations of them).
To demonstrate exactly that, the following header file will contain the declaration of the Rational class, developed back in Chapter 9, “Advanced OOP.”
To create a header file
- Create a new text file in your IDE or text editor.
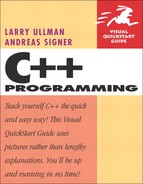
- Add detailed comments explaining the purpose of this file (Script 12.1).
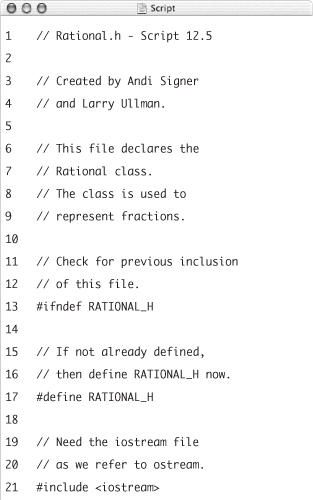
// Rational.h - Script 12.1
// Created by Andi Signer
// and Larry Ullman.
// This file declares the
// Rational class.
// The class is used to
// represent fractions.Script 12.1. The header file contains the declaration (but not the implementation) of the
Rationalclass.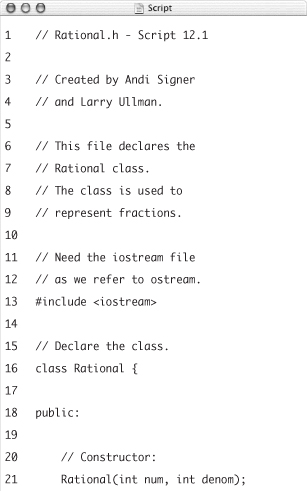
It’s a good idea with header files to include even more comments than you do in your standard C++ files. Header files are often not related to any one application, so their purpose should be independently noted. You can mention such things as creation date, purpose of the file, who created it, the last time it was modified, what contingencies exist, and so forth.
You should also thoroughly document what the declared classes and functions do.
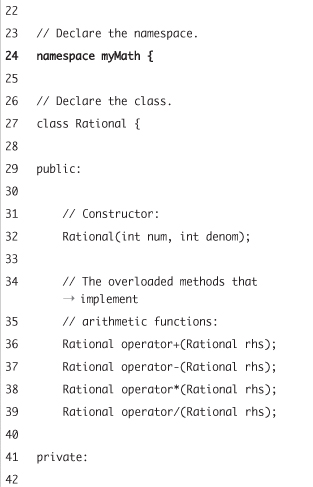
- Include the
iostreamfile.The
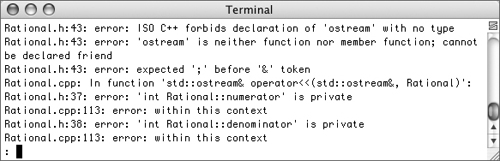
Rationalclass makes a friend of theostream <<operator, so theiostreamheader file must be included into this one. If it isn’t included, you’ll see all sorts of errors when you go to compile the application (Figure 12.1).Figure 12.1. Headers files sometimes need to include other files as well. If you fail to do so, you can get errors like these.
- Begin defining the
Rationalclass.class Rational {
public:
Rational(int num, int denom);
Rational operator+(Rational rhs);
Rational operator-(Rational rhs);
Rational operator*(Rational rhs);
Rational operator/(Rational rhs);The class will be defined exactly the same as it was at the end of Chapter 9. The class has its own constructor, which takes two arguments. The class also overrides the four arithmetic operators.
We have not created any virtual methods in
Rational, as we don’t foresee it being used as a base class, certainly not in this book. We also have not added a copy constructor nor an overridden assignment operator (see Chapter 11, “Dynamic Memory Management,” for discussion of both). Because the class does not make use of pointers, any time a copy is made of aRationalobject, the default bitwise copy will work just fine (which is why no copy constructor or overridden assignment operator is required). - Complete the class declaration.
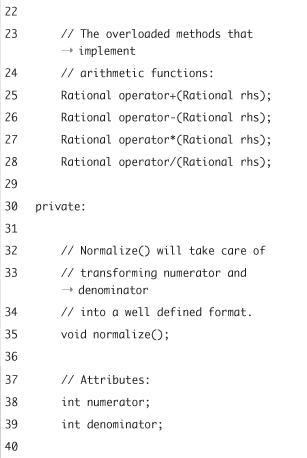
private:
void normalize();
int numerator;
int denominator;
friend std::ostream& operator<<(std::ostream& os, Rational f);
};The
privatemembers of the class are the same as they were before. There are two attributes and onefriend. As a reminder, theostream <<operator is a friend so that aRationalcan be sent to the output stream without needing its ownprint()method.And, of course, don’t forget the semicolon after the class’s closing curly bracket.
- Save the file as
Rational.h.Normally you’ll want your header files to use a descriptive name such as, in this case, the same name as the class whose declaration it contains.
 Tips
Tips
• Although included files can contain any fragments of code, they are typically reserved for declaring functions, user-defined data types (structures and classes), templates, and sometimes constants.
• If a program makes use of the same function several times, or if you have a function or set of functions that you use in many applications, you’ll want to place these in their own header file.
• Your header files should do the bare minimum, like declare a single class or only an associated group of functions. Putting too much, let alone unrelated items, in a header file defeats the purpose of modularization.
Including header files
Once you create your own header file, you include it by surrounding the filename with straight double quotation marks in the directive:
#include "filename.h"
If no pathname is indicated, as in that code, the compiler will search the current directory, as well as other logical directories for that environment, to find the file. To eliminate this guesswork, you can use relative pathnames when including your own header files. To state that the file is in the same directory as the including (or parent) file, use an initial period followed by a slash:
#include "./filename.h"
If the file is in a subdirectory, begin with that subdirectory’s name:
#include "includes/filename.h"
Finally, if the included file is located in a directory parallel to the current directory, use two periods and a slash:
#include "../common/filename.h"
Note that Windows normally uses a backslash. In C++, the backslash is the escape character, so you would have to use two backslashes instead:
#include "..\common\filename.h"
Fortunately, you can use the forward slash on Windows, which saves you from having to remember to escape the backslash and makes your code more portable.
The easiest and most trouble-free solution is to keep the header file and the files that will use it in the same directory.
With this in mind, let’s create a simple program that does some math using fractions (exactly as you had in Chapter 9).
To include a header file
- Create a new text file in your IDE or text editor (Script 12.2).
// main.cpp - Script 12.2
#include <iostream>Even though the
Rational.hfile, which will be included next, includesiostream, you should still formally include it here, as this file also requires its functionality. - Include the
Rational.hheader file.#include "Rational.h"
The syntax of this include assumes that the
Rational.hfile is located within the same directory as this one. If you placed the header file in a different location, you’ll need to change the pathname so that it accurately points to the header file. - Begin the
main()function and declare a couple ofRationals.int main() {
Rational f1(3,5);
Rational f2(3,4);These two fractions are created and will be used in some basic arithmetic.
- Do a little math.
std::cout << f1 << " + " << f2 << " == " << (f1+f2) << " ";
std::cout << f1 << " - " << f2 << " == " << (f1-f2) << " ";
std::cout << f1 << " * " << f2 << " == " << (f1*f2) << " ";
std::cout << f1 << " / " << f2 << " == " << (f1/f2) << " ";Script 12.2. This program will use the
Rationalclass to perform arithmetic using fractions.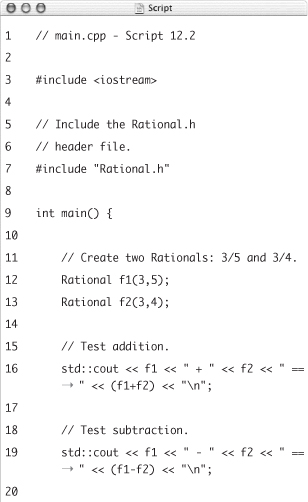

- Complete the
main()function.std::cout << "Press Enter or Return to continue.";
std::cin.get();
return 0;
} - Save the file as
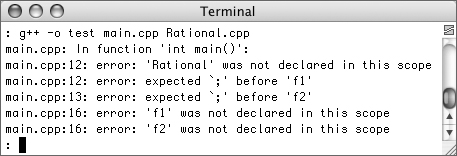
main.cpp(saved to the same directory asRational.h) and compile (Figure 12.2).Figure 12.2. The program as currently written cannot be compiled because it only has access to the
Rationalclass declaration, and not to its implementation.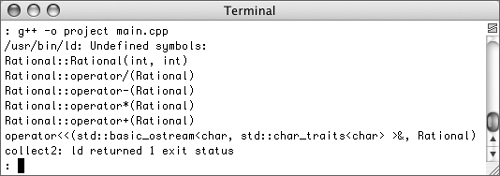
Hopefully you’ll see a slew of errors, but why? Because the class and its members have been declared (prototyped) but not formally implemented (defined). We’ll need to do that in a separate file.
Tips
• You should avoid absolute pathnames when including files because this makes your code less portable.
• When you compile a file, you can direct the compiler to search for included files in additional locations as well. The exact syntax for doing so depends upon your compiler and environment, but, for example, you can often use the -I command-line argument with g++.
• Most IDEs will let you compile a single file or compile the entire application. Compiling just this one file—main.cpp—won’t cause errors, but compiling all of them will. The reason why will be explained next.
Creating the implementation file
The Rational.h header file contains the declaration of the class but does not contain the implementation of the class where the methods are defined. This separation may seem strange, but it’s actually quite common. One of the principles of modularizing your code is to separate the interface, which is the declaration, from the implementation (or definition).
Header files are important not only because they tell the compiler how a class, structure, or function behaves but because they also tell the programmer this information. If you look at just the declaration of a function, you can see everything you need to know: the name of the function, what type of value it returns (if any), and what type and number of arguments it takes (if any). You can then use that function without ever seeing how the function does its thing.
That being said, the compiler does need access to a class or function implementation (as you saw in Figure 12.2), so that stuff must go somewhere. As a rule of thumb, put declarations in a header file, implementations in a .cpp file. We’ll do that now, and then show you how to tie it all together.
To create an implementation file
- Create a new text file in your IDE or text editor.
- Add detailed comments explaining the purpose of this file (Script 12.3).
// Rational.cpp - Script 12.3
// Created by Andi Signer
// and Larry Ullman.
// This file implements the
// Rational class.
// The class is used to
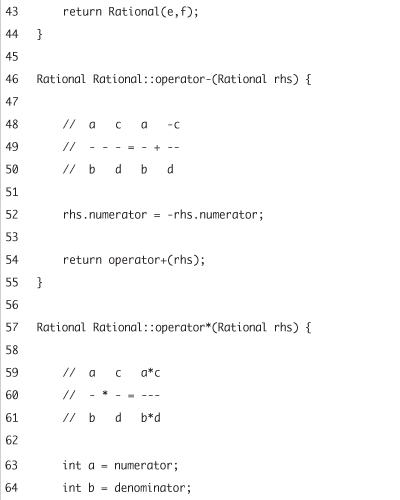
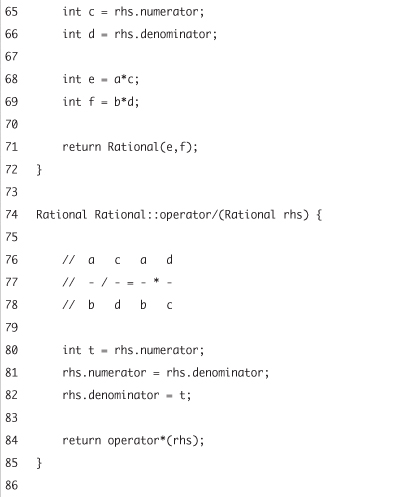
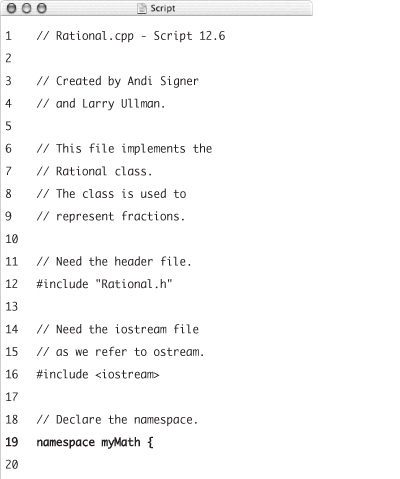
// represent fractions.Script 12.3. The
Rational.cppfile contains the implementation of theRationalclass. It also includes theRational.hdeclaration file.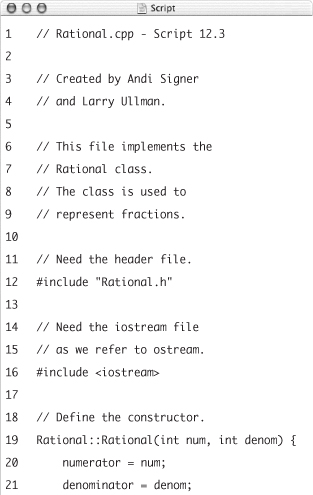
Again, it’s very important that you thoroughly document your files.
- Include the
iostreamandRationalheader files.#include "Rational.h"
#include <iostream>The implementation file also needs access to the class declaration, so it must be included here. Again, you can get away with not including the
iostreamfile, since it is included byRational.h, but it’s best to be explicit and not to rely upon such things. - Define the constructor.
Rational::Rational(int num, int denom) {
numerator = num;
denominator = denom;
normalize();
}Refer back to Chapter 9 if you are unsure of the syntax for any of these methods.
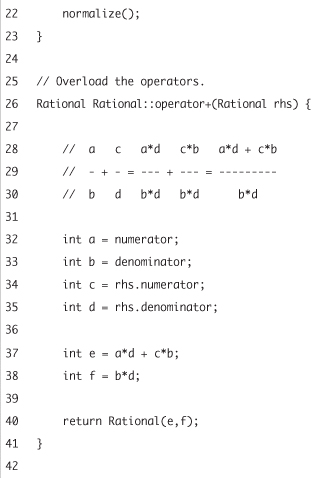
- Overload the arithmetic operators.
Rational Rational::operator+(Rational rhs) {
int a = numerator;
int b = denominator;
int c = rhs.numerator;
int d = rhs.denominator;
int e = a*d + c*b;
int f = b*d;
return Rational(e,f);
}
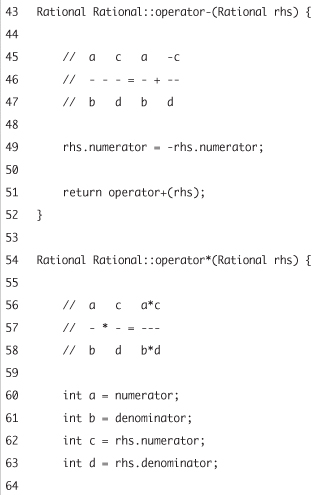
Rational Rational::operator-(Rational rhs) {
rhs.numerator = -rhs.numerator;
return operator+(rhs);
}
Rational Rational::operator*(Rational rhs) {
int a = numerator;
int b = denominator;
int c = rhs.numerator;
int d = rhs.denominator;
int e = a*c;
int f = b*d;
return Rational(e,f);
}
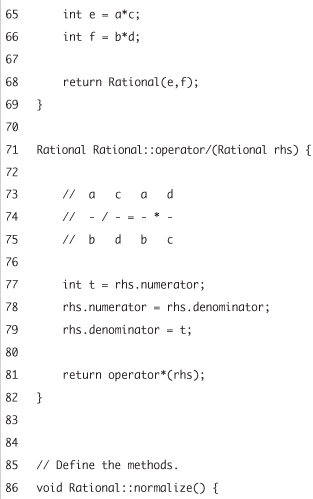
Rational Rational::operator/(Rational rhs) {
int t = rhs.numerator;
rhs.numerator = rhs.denominator;
rhs.denominator = t;
return operator*(rhs);
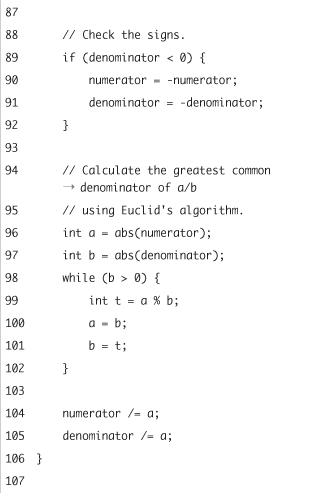
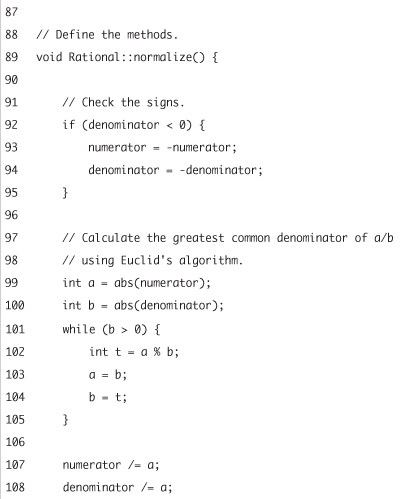
} - Implement the
normalize()method.void Rational::normalize() {
if (denominator < 0) {
numerator = -numerator;
denominator = -denominator;
}
int a = abs(numerator);
int b = abs(denominator);
while (b > 0) {
int t = a % b;
a = b;
b = t;
}
numerator /= a;
denominator /= a;
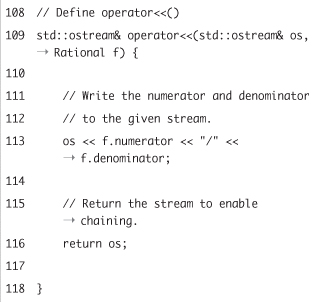
} - Overload the
<<operator.std::ostream& operator<<(std::ostream& os, Rational f) {
os << f.numerator << "/" << f.denominator;
return os;
} - Save the file as
Rational.cpp(saved to the same directory asRational.handmain.cpp).The name of the implementation file should match the name of the header file.
Tip
• Separating out your C++ code over multiple .cpp files, as appropriate, can speed up compilation in the long run.
Compiling multiple files
Okay, now you have three separate files: the header file, Rational.h, which declares the class; the implementation file, Rational.cpp, which implements the methods; and the main file, main.cpp, which has the code that actually dictates what the program does. The question now is: How do we put this all together?
You may think that you could just include Rational.cpp in test.cpp and be done with it. While that would technically work, it’s not a good idea. It’s best to compile all of your .cpp files together. Using the command-line compiler, you can do this:
g++ -o executableName filename1.cpp
filename2.cpp
This will create one executable from multiple files. Note that you do not compile a header file this way, as header files are included in the .cpp files.
To compile multiple files using g++
- Access a command-line prompt.
You should know how to do this by now but, if not, refer back to Chapter 1, “Creating a Basic Program.”
- Type
cd /path/to/directoryand press Return (Mac) or Enter (PC) to access the project directory.You’ll obviously need to change this so that it’s correct for your computer and the location of all the project files.
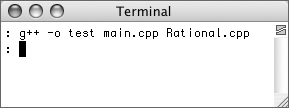
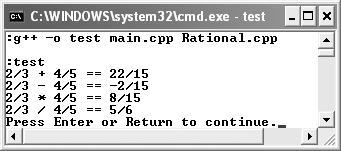
- Type
g++ -o test main.cpp Rational.cppand press Return or Enter (Figure 12.3).Figure 12.3. Compiling multiple files into one executable.
It makes no difference which file you list first. The instruction
g++ -o test Rational.cpp main.cpp
is equally acceptable.
- Run the application (Figure 12.4).
Figure 12.4. The successful execution of the project.
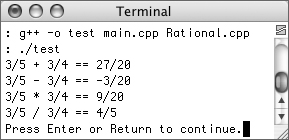
The syntax for running the file will depend on your operating system:
testortest.exe(Windows)or
./test(Mac OS X and Unix)
Tips
• Once you start developing larger programs that involve multiple files, compiling them can become really time-consuming. One solution is to use a utility called make. This program reads instructions from a makefile, telling it how to compile the program. Among these instructions will be the suggestion to compile only the files that have changed. So if you tweak main.cpp but not Rational.cpp, rebuilding the whole project will only mandate recompiling main.cpp. Compiling your programs like this will actually be much faster.
• Using an integrated development environment (IDE) like Dev-C++ or Xcode for your software development has numerous benefits. When you create multifile projects like the one starting off this chapter, the ability to easily manage the documents is even more important. Furthermore, the IDE will also recompile only the files changed since the last build, saving you time. See the sidebar for a brief discussion on using multiple files with these IDEs.
The C Preprocessor
There’s still one minor issue to quibble over with this project. Two files—Rational.cpp and main.cpp—both include the same Rational.h header file. This essentially means that the Rational class is being declared twice, which is unnecessary (and if it were a structure being declared twice, that would actually cause errors).
One solution would be to remove the #include directive from one of the two files. You could get away with that (as long as one file still included Rational.h), but it could lead to problems in the future (when using either main.cpp or Rational.cpp in a different project). The better solution is to have the header file only declare the class if it has not already been declared. This can be accomplished using the C preprocessor.
The C preprocessor is a special tool created to facilitate the programming of C applications and expedite their execution. This is an important and, at the same time, confusing thing: the C preprocessor is a wholly separate entity from the C and C++ languages. The preprocessor is not used in C++ nearly as much as it is in C, but it still has its place.
You invoke the C preprocessor by using a directive that begins with the hash mark (#). It is very important that you include the hash mark as the first character in a line: no spaces should come immediately before or after it. You’ve been doing this from the get-go: #include is a preprocessor directive.
Besides #include, the #define directive is most commonly used, particularly to create a different type of constant (that is otherwise frowned upon in C++).
#define CONSTANT_NAME VALUE
#define TEN 10
Notice that you never end directives with semicolons, as this is not C or C++ code.
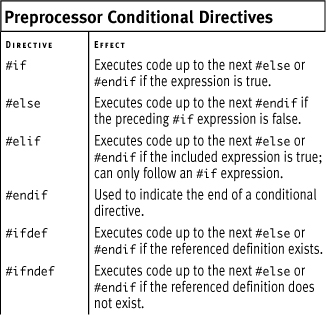
The preprocessor also has directives that let you create conditionals (Table 12.1). By using these directives, along with a preprocessor constant, we can create a flag variable that indicates whether or not something has happened. For example:
#ifndef THIS_THING
#define THIS_THING
#endif
Table 12.1. These directives are used to create conditionals for the C preprocessor.
This may not look like much, or like anything useful, but it actually is. The code says that if THIS_THING is not defined, then define it (with no value). Why would you want to do that? So you could mark whether or not a class or function has already been declared!
#ifndef THIS_THING
#define THIS_THING
class MyClass {...
}; // End of MyClass
#endif
Two things happen here: if THIS_THING is not defined, then it will be defined. Secondarily, the MyClass will be declared. Therefore, if the file that contains this code is included by a project one hundred times, MyClass will only ever be declared once (because every other time THIS_THING will have been defined).
As a convention, the constant is normally given a name that matches the file itself, replacing periods with an underscore. So the MyClass.h file would use a MYCLASS_H constant. We should now apply this information to the Rational.h file.
To modify the header file
- Open
Rational.h(Script 12.1) in your text editor or IDE. - After the comments but before the class declaration, add a preprocessor conditional that checks if
RATIONAL_Hhas been defined (Script 12.4).#ifndef RATIONAL_H
Since the file is called
Rational.h, the associated constant should beRATIONAL_H(again, this is conventional, not required). The first time any file in the project includesRational.h,RATIONAL_Hwill not be defined, making this conditional true. - Define the constant.
#define RATIONAL_H
In order for this system to work, the constant must be created. You can give it an actual value, if you prefer, but that’s not required.
- At the end of the file, after the class declaration, complete the preprocessor conditional.
#endif
All of the code from the
#ifndefto this point will be run ifRATIONAL_His not defined. - Save the file as
Rational.h, recompile the whole project, and run the application (Figure 12.5).Script 12.4. A preprocessor conditional is added to the header file so that the class will only be declared once, no matter how many times it is included by the same project.
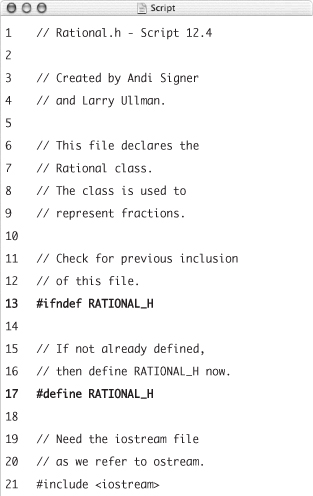
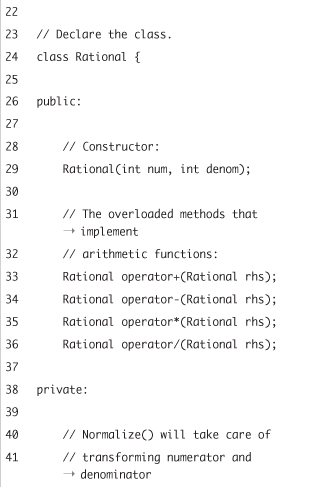
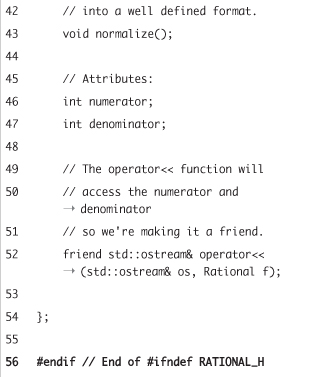
Figure 12.5. The program works exactly as it did before (different fractions were used this time), but it no longer declares the same class multiple times.
Tips
• The compiler didn’t throw an error even though Rational was declared multiple times, because in C++ you can generally declare the same thing multiple times, but you can only define it once. The exception to this rule is the structure, which cannot be declared multiple times with the same name.
• The files in the standard C++ library, like iostream and string, have built-in protection like that we’ve added here.
• The reason that using the C preprocessor is frowned upon in C++ is that it circumvents the very important type and error checking that the compiler does (because the preprocessor instructions are not C++).
• The #undef directive undefines (deletes) an existing constant definition:
#undef TEN
Understanding Namespaces
Every class, function, and variable you create is available within a certain realm. The largest realm is the global scope. The smallest realm is a single block of code, like this:
{
int a = 20;
}
// a no longer exists.
As your programs become more complicated, you can end up with more and more items within the global realm, particularly as you make use of extra libraries. This can become a problem, as no two items can have the same name. One solution is to give every variable, function, class, etc., a unique identifier. This can be difficult or just plain tedious (how many times do you want to type out larrysCounterOfItemsInTheArray?). This is where namespaces come in.
Namespaces are user-created realms. The names of items within any one namespace only need to be unique to it. Therefore, namespaces protect programs that might, for example, have many different included or compiled files, each with its own list of declarations.
Creating your own namespace
To create a namespace, type the keyword namespace, followed by the name, followed by all of the stuff in that namespace put within curly braces:
namespace myNamespace {
// Stuff.
}
Note that you do not need a semicolon after the final closing brace, as you do with classes and structures.
Script 12.5. The class declaration is placed within a namespace in order to avoid potential conflicts.
As we said before, namespaces let you use the same identifiers without conflict:
namespace author {
std::string person;
}
namespace programmer {
std::string person;
}
Even if a program uses both namespaces, the two person strings won’t be a problem. The one is within the author namespace, and the other is within programmer.
You can even use the namespace keyword to add to an existing namespace, in the same file or in another:
// Library.h
namespace author {
std::string person;
}
// Bookstore.h
namespace author {
std::string storeName;
}
Assuming that both files are included by the same program, then author namespace now contains both strings.
Let’s place the definition of Rational inside of its own namespace. By doing so, we won’t have to worry about that identifier potentially conflicting with other things called Rational.
To create your own namespace
- Open
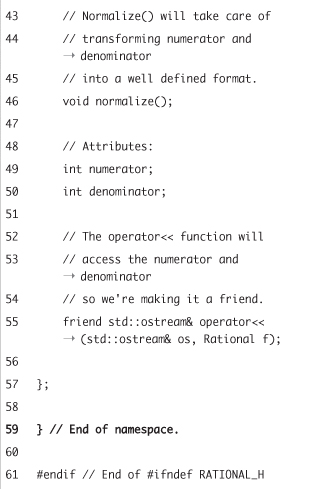
Rational.h(Script 12.4) in your text editor or IDE, if it is not already. - After the preprocessor directives but before the class declaration, begin declaring the namespace (Script 12.5).
namespace myMath {
We’re going to call this namespace
myMath, as it will include our own generated math-related code. It is important that you use logical yet unique namespace names. - At the end of the file, after the class declaration, but before the
#endif, close the namespace.} // End of namespace.
- Save the file as
Rational.h. - Open
Rational.cpp(Script 12.3) in your text editor or IDE.We also need to place the class implementation within the namespace.
- After the
#includedirectives but before the constructor implementation, begin declaring the namespace (Script 12.6).namespace myMath {
- At the very end of the file, close the namespace.
} // End of namespace.
- Save the file as
Rational.cppand recompile the whole project (Figure 12.6).Figure 12.6. Trying to refer to something in a namespace without using the proper syntax leads to errors.
D’oh! Now we’re back to the project not working again. Why? Because the
main()function does not have access to the items in themyMathnamespace, which is what we’ll fix next.Script 12.6. The class implementation should also be put within the same namespace as its declaration.


Tips
• You can only define a namespace within the global scope or within another namespace (you can nest namespaces). You cannot define a namespace inside of a function or a class.
• To be clear, you can put anything within a namespace, not just a class.
• You can also use the namespace keyword to create an alias to an existing namespace:
namespace turtle = reallyLongTurtleBasedNamespace;
Using your namespace
As you just saw, if something is defined within a namespace, it is not immediately usable by your programs. This is, of course, the whole point of namespaces: putting things into their own little box so that they don’t conflict with other things that could have the same names.
To access something defined inside of a namespace, there are three options. The first is the using directive:
using namespace myNamespace;
Now everything that is defined within myNamespace is available as if it were part of the global scope. As an example, cout is defined within the std namespace. Instead of
std::cout << "Hello, World!";
you could do:
using namespace std;
cout << "Hello, World!";
You may be thinking: Doesn’t bringing everything in a namespace into the global scope defeat the whole purpose of namespaces? Yes, yes it does, which is why we don’t use this method in this book (although many other resources do). Make no mistake: the using directive will work, but it’s imprecise programming.
The second option is not so heavy-handed: just bring a specific item into the global scope with a using declaration:
using std::cout;
cout << "Hello, World!";
Now cout can be used without std::, but all of the other stuff in std is still safely hidden.
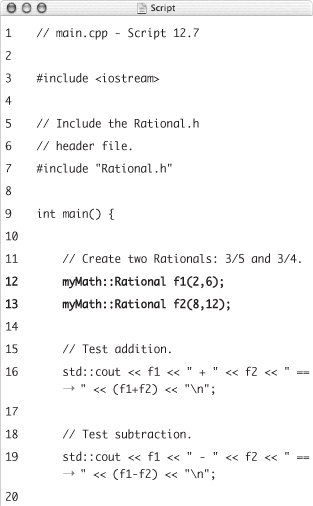
Script 12.7. Because the Rational class is defined within the myMath namespace, the main() function must now use myMath::Rational in order to create objects of that type.
Note that wherever you put the using directive or declaration dictates where the namespace is available. If you place it prior to any function definition, then it applies to all those functions. If you use it within a single function, like main(), then it only applies within that one function.
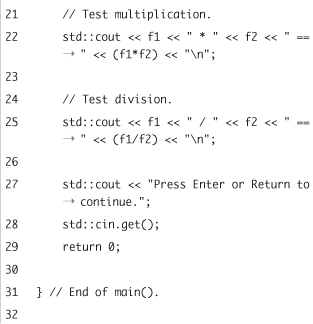
The final option is to do what we’ve been doing all along: use the namespaceName::thing syntax. Let’s rewrite main.cpp in this way.
To use your own namespace
- Open
main.cpp(Script 12.4) in your text editor or IDE, if it is not already. - Within the
main()function, change the declaration of the twoRationals (Script 12.7).myMath::Rational f1(2,6);
myMath::Rational f2(8,12);Instead of just using
Rational, we now specify theRationalclass that’s in themyMathnamespace.At the same time, we also change the value of the fractions, just to mix it up a bit.
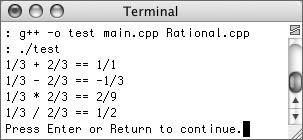
- Save the file and recompile the whole project (Figure 12.7).
Figure 12.7. Now the project works properly, having successfully incorporated namespaces.
Tip
• You should never have a using directive inside of a header file, as it could have all sorts of bad effects on files that include it. The only exception would be should you put one within the namespace itself. Still, we think it’s best not to rely upon using at all.
Linkage and Scope
Now that you’ve begun creating projects that use multiple files, it’s time to revisit the discussion of variable scope. You should recall that the scope of a variable is the realm in which you can access it. This was demonstrated in Chapter 5, where you saw that a variable defined before every function is available within every function (this is a global variable). Conversely, a variable defined within a function is only available to that one function (it is considered local to that function; also called an automatic variable). When a project has multiple files, there are scope implications as well.
Related to scope is linkage. When you compile multiple files together—
g++ -o test main.cpp Rational.cpp
—each individual file is referred to as a translation unit. Whether or not (or how) an item defined in one translation unit is available in the other translation unit is where linkage comes into play.
Scope, linkage, and storage classes (see the sidebar) are all inter-related and use many of the same terms, sometimes in slightly different ways. The information here can be somewhat confusing, so we hope that by tackling it from all angles and by using simple examples, the ideas will be made clear.
Variable linkage and scope
Linkage is a little obscure, so we’ll try to explain it in the simplest terms. When you build a program using a compiler, it’s actually a three-step process:
- Executing the preprocessor
- Compiling the
.cppfiles into.ofiles - Linking the files into one executable application
Today’s compilers do all of this at once, so you don’t see the individual steps (unless you request to). Step 1 was discussed earlier: execution of preprocessor directives. Most often this is the replacement of a #include directive with the included file’s code. The net effect is that the header file code behaves as if it were always part of the .cpp file.
By now you’ve also done step 2 to death: turning C++ code into a compiled object file. In this step, the compiler allocates memory for the variables in the file as needed, along with performing all of the error checking.
With a single C++ source file, step 3 normally just involves adding in any standard library code and popping out the application. When you have multiple C++ files that will be built together to create an application, as you just did with main.cpp and Rational.cpp, after compiling each component, the two must be linked together. (It’s because of the linking that only a modified file needs to be recompiled when rebuilding a project.) The potential confusion comes into play when one compiled object—which is a translation unit—refers to something that may or may not exist in the other. You can use linkage to dictate these relationships.
Anything with a name—a function, class, constant, variable, template, namespace, etc.—has one of three types of linkage: external, internal, or none.
External linkage means that every translation unit can access the item, provided the translation unit knows the item exists. By default, normal functions, variables, templates, and namespaces all have external linkage. You’ve seen what this means already: main.cpp can use the class and functions defined in Rational.cpp as long as it has access to the class declaration in Rational.cpp.
With variables, you could try to do:
// this.cpp
int i1 = 3;
// that.cpp
int i2 = i1; // Problem!
The problem is that when that.cpp is compiled (separately from this.cpp, prior to linking), it has no knowledge of i1’s existence. To fix this, the keyword extern is used in the second translation unit to access a variable declared in the first:
// this.cpp
int i1 = 3;
// that.cpp
extern int i1;
int i2 = i1; // Good!
In layman’s terms, using extern like this is a way of telling the compiler, “Trust me. I know this variable exists; it’s just not declared in this file.”
Conversely, internal linkage means that the item is available only in the translation unit where it is defined (the item has file scope). Static variables defined outside of any function have internal linkage:
// this.cpp
static int d = 8;
// that.cpp
static int d = 9000; // Different
These two files have unrelated variables that have the same name. If you refer to d in this.cpp, its value is 8. If you refer to d in that.cpp, its value is 9000.
Finally, variables defined within a function only exist within that function and have no linkage at all.
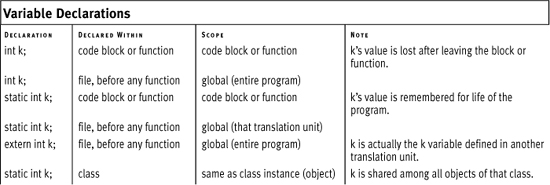
As you can see, if you’ve plowed through all this text on scope and linkage, the two subjects are related and somewhat abstract. We’ve tried to simplify how the different variable declarations differ in Table 12.2.
Table 12.2. Using static and extern when declaring a variable impacts its scope and linkage.
As an exercise that puts this information to use, let’s create an application that uses one header file and two .cpp files. Functions and variables will be declared and defined in different places and in different ways, in order to best demonstrate the differences.
To affect linkage and scope
- Create a new, blank document in your text editor or IDE (Script 12.8).
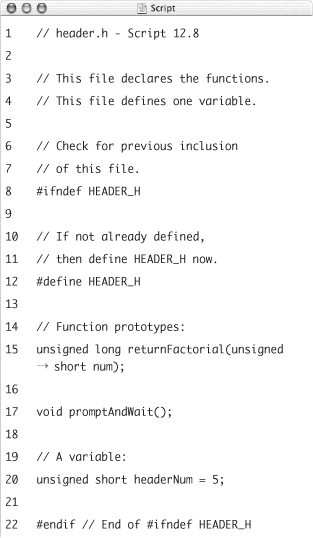
// header.h - Script 12.8
The header file will prototype two functions and declare one variable of its own.
- Complete the header file.
#ifndef HEADER_H
#define HEADER_H
unsigned long returnFactorial(unsigned short num);
void promptAndWait();
unsigned short headerNum = 5;
#endifThe two function prototypes have been used several other times in this book. The variable,
headerNum, will be a global variable in this program.The header file also makes use of the preprocessor directives as a safety measure.
- Save the file as
header.h.You’ll probably want to create a new directory for this project, or use your IDE to manage all three files to be created.
- Create a new, blank document in your text editor or IDE (Script 12.9).
// that.cpp - Script 12.9
This C++ file, which will be its own translation unit, will implement one of the two functions and define its own variables (of varying types).
- Include the necessary file.
#include "header.h"
The header file is necessary here because it prototypes the
returnFactorial()function, which this file will define. TheiostreamC++ library file is not necessary, as the code here does not use anything defined iniostream.Script 12.8. This header file doesn’t do much; it just prototypes the two functions used by the program and creates one global variable.
- Create two variables.
unsigned short thatNum = 8;
bool printMe = true;The first variable is a standard unsigned short integer with global scope and external linkage. The same is true of the
printMeBoolean variable. - Implement the
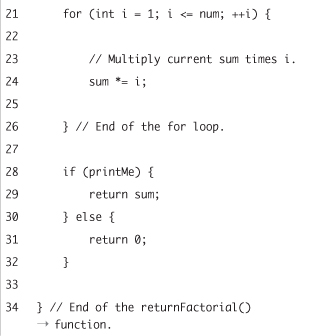
returnFactorial()function.unsigned long returnFactorial(unsigned short num) {
unsigned long sum = 1;
for (int i = 1; i <= num; ++i) {
sum *= i;
}
if (printMe) {
return sum;
} else {
return 0;
}
}You’ve seen this function many times by now. It takes an unsigned short integer and returns that number’s factorial. It’s been modified in this example to return either the factorial or the number 0, depending upon the value of
printMe. This is only for demonstration purposes, as you’ll see when the application runs. - Save the file as
that.cpp, in the same directory or project asheader.h.Script 12.9. This
.cppfile has its own variables and implements one function, which is prototyped inheader.h.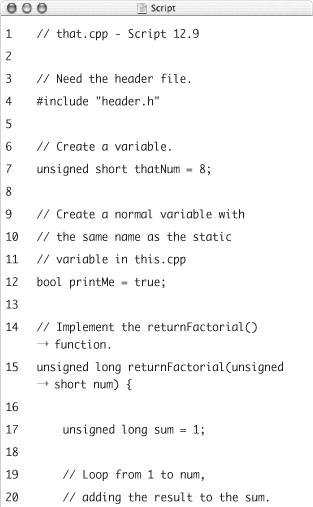
- Create a new, blank document in your text editor or IDE (Script 12.10).
// this.cpp - Script 12.10
This will be the most important C++ file, as it contains the
main()function. During compilation, this file will also be its own translation unit. - Include the necessary files.
#include <iostream>
#include "header.h"This file needs
iostreambecause it will usecout, which is defined there. It also needsheader.h, as that file has the prototype for the functions. One of those functions will be called by this program, so the compiler must have access to its prototype. - Reference the external variable defined in
that.cpp.extern unsigned short thatNum;
This line states that this file will use an unsigned short called
thatNum, which is defined in another translation unit. - Create a static variable.
static bool printMe = false;
This variable is declared as
static, meaning that it has internal linkage (it only exists in this translation unit). - Begin the
main()function.int main() {
unsigned short thisNum = 10;One local (or automatic) variable called
thisNumis defined within themain()function. This variable only exists within this function. - Call the
returnFactorial()function using the local variable.std::cout << thisNum << "! is equal to " << returnFactorial(thisNum) << " ";
Script 12.10. The last
.cppfile has its own variables, implements one function, and has themain()function. Inmain(), the function defined inthat.cpp(Script 12.9) will be called.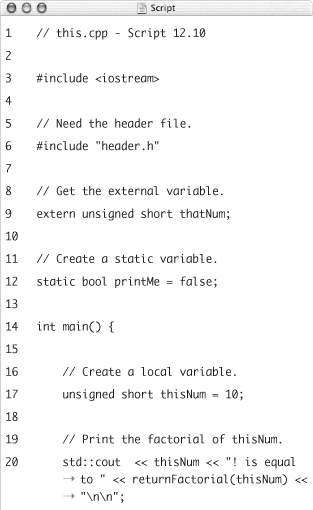
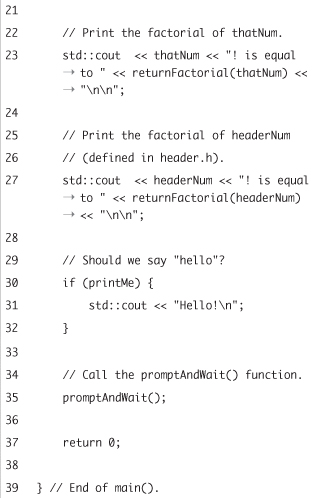

This translation unit can call the
returnFactorial()function, even though it is defined inthat.cpp. This is possible because this file has access to its prototype and functions have external linkage by default. - Call the
returnFactorial()function using theexternvariable.std::cout << thatNum << "! is equal to " << returnFactorial(thatNum) << " ";
Since
thatNumwas declared asexternearlier in this file, themain()function can use it even though its value is established inthat.cpp. - Call the
returnFactorial()function using the global variable.std::cout << headerNum << "! is equal to " << returnFactorial(headerNum) << " ";
The
headerNumvariable is defined inheader.h. It has global scope, somain()can also use it. - Write a conditional based upon the static
printMevariable.if (printMe) {
std::cout << "Hello! ";
}This
printMeis the static one defined withinthis.cpp. Its value isfalse, so thiscoutline will never be executed.In contrast,
that.cpphas its ownprintMevariable which is referenced inreturnFactorial(), also defined inthat.cpp. That function will use that otherprintMevariable (because this one is static). - Call the
promptAndWait()function, and complete themain()function.promptAndWait();
return 0;
} - Implement the
promptAndWait()function.void promptAndWait() {
std::cout << "Press Enter or Return to continue. ";
std::cin.get();
} - Save the file as
this.cpp, compile the whole project, and run the application (Figure 12.8).Figure 12.8. Examine the results of running the program while reviewing all the source code. You’ll be able to see where each variable’s value comes from and how the two different
printMevariables affect the end result.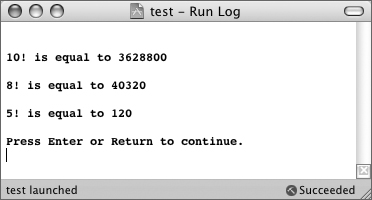
Tips
• Functions can also be declared as static, meaning that they can only be called by the translation unit in which they are defined (they have internal linkage). To be clear, static functions are not the same as static methods, which are static functions defined within a class. These have external linkage, as does the class.
• Remember that if you create a static variable inside of a function, that has a different meaning. Such a variable will retain its value over multiple function calls (during the current execution of the program). Non-static function variables forget their value with each function call. Static variables still exist only inside of the function in which they are defined, though (they retain local scope).
• Whereas variables have external linkage by default, constants have internal linkage. This is true for constants defined in another translation unit or in a header file. This behavior is also the opposite of how constants behave in C.