7. Introducing Objects
Programming with objects is at the heart of C++ and gives it advantages over C and many other languages. In case you are apprehensive about this novel way to approach your programs, it should be made clear that objects are just a new data type, with nearly unlimited potential. You start by defining a class, a formal model of what something should do, and then you can create an instance of that class, which is the object itself. This is somewhat like how structures work (see Chapter 6, “Complex Data Types”) but more potent. For starters, an object can have within it both variables and functions, whereas structures are typically only made up of other variables.
The first thing you’ll need to know is how to write a simple class. The chapter starts with that syntax and then shows how to add functions to a class. At that point, you can create an instance of the class: your first object. The subsequent sections in this chapter cover special kinds of functions, called constructors and destructors. Because the information presented in this chapter is critical for understanding object-oriented programming, the pace will be slow, with a wee bit of OOP theory tossed into the mix. In the next two chapters, you will learn much about the ways you can expand your classes.
Creating a Simple Class
A class is a blueprint for what an object should be, so creating your class is the first step in the process of object-oriented programming (OOP). All classes have a name, so let’s start the declaration there:
class MyFirstClass {
};
Voilà! There’s a class. It doesn’t do anything, but it’s a start. The naming rules for classes are the same as for variables and functions in C++: alphanumeric plus the underscore, case sensitive, do not use existing keywords, etc. It is standard to capitalize the first letter in a class, but that’s not a requirement. Do notice that you have to add a semicolon after the closing curly brace, just as you do with structure definitions.
Classes are made up of variables and functions. An object that is based upon a class can use those variables to store information and call those functions to perform actions. Within a class, special terminology is used, where variables are called attributes and functions are called methods. They’re still just variables and functions, but because they’re in a class, they’re distinguished in this way. You add attributes to a class just as if you were defining a variable:
class Car {
std::string color;
float weight;
};
Again, that’s all there is to it. Well, actually there is a little more to it. For the time being, you need to precede the variables with the word public, followed by a colon. An introduction as to the reason why is in the sidebar “public, private, and protected,” later in this chapter, but for the time being, start your classes like this:
class Car {
public:
std::string color;
float weight;
};
Adding methods requires a little more work, so we’ll do that separately. For now, let’s write a program that defines a class.
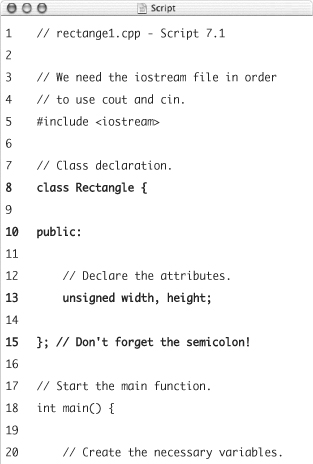
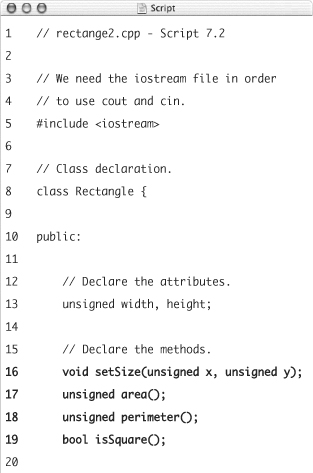
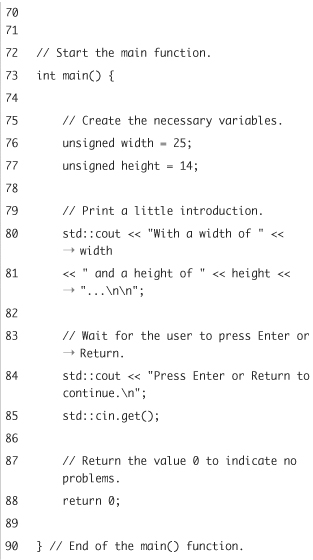
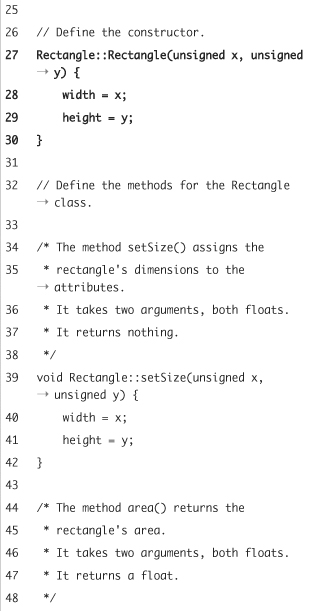
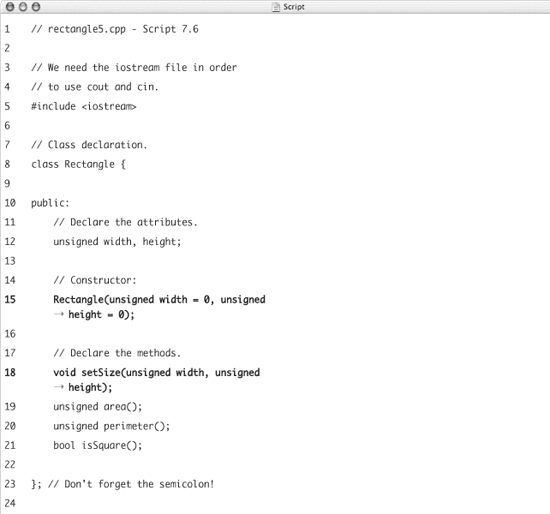
Script 7.1. A very simple class called Rectangle is defined in this program. The class has two attributes (or variables), both of type unsigned integer.
To create a barebones class
- Create a new, blank text document in your text editor or IDE (Script 7.1).
// rectange1.cpp - Script 7.1
#include <iostream> - Begin the class declaration.
class Rectangle {
public:All you need to do is use the word
class, followed by the class name. This class is called Rectangle, and it will be used for dealing with that geometric shape. The need for the second line is explained in the sidebar; it’ll make more sense in the next chapter. - Declare any required attributes.
unsigned width, height;
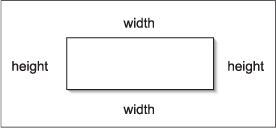
In this class there are two variables, both of type unsigned integer (the word integer is optional). The one stores the numerical width of the rectangle—the length of two parallel sides along the X axis—and the other stores the height—the length of the two parallel sides along the Y axis (Figure 7.1).
Figure 7.1. The class will be used to describe and work with a rectangle, like this one. The class attributes (see Script 7.1) represent the rectangle’s sides.
- Complete the class.
};
Again, do not forget the semicolon here! It may look a little odd, but that’s the way these definitions work.
- Create the
main()function.int main() {
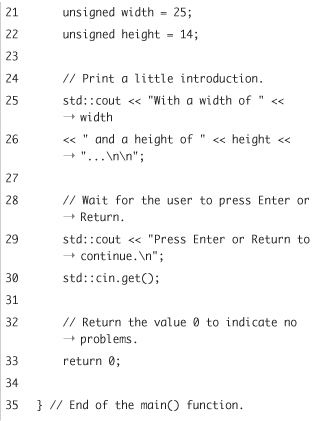
unsigned width = 25;
unsigned height = 14;
std::cout << "With a width of " << width
<< " and a height of " << height << "... ";
std::cout << "Press Enter or Return to continue. ";
std::cin.get();
return 0;
}The
main()function has two of its own variables, also calledwidthandheight. Because of scope—see Chapter 5, “Defining Your Own Functions”—these are entirely different variables from those defined in the class. These values are immediately printed so that the user knows what size of rectangle exists.Other ways you could alter this function would be to determine the width and height of the rectangle from user input. Using the information covered in Chapter 5, you could also separate out some of the functionality as its own
promptAndWait()function, if you prefer a more modularized format. - Save the file as
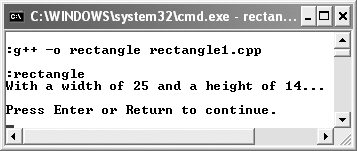
rectangle1.cpp, compile, and run the application (Figure 7.2).Figure 7.2. The program doesn’t do anything with the class yet, but making sure that an application runs successfully is always a good idea.
 Tips
Tips
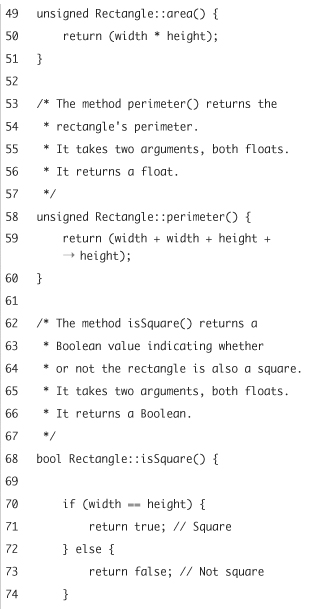
• Both the attributes and methods of a class are considered to be members of that class.
• Objects are a lot like structures, but with the ability to have their own functions. If you start off with this mentality, it makes OOP easier to approach. See Chapter 6 for the discussion of structures.
• Constants in classes are trickier than variables. You can declare a constant in a class, but you cannot give it a value. This won’t work:
class Car {
public:
const float TANKSIZE = 12.5; // No!
};
The workaround is to create a static constant. This will work:
class Car {
public:
static const float TANKSIZE = 12.5;
};
There are other implications with this second example, which you’ll learn about in time.
• Object-oriented programming is an alternative to procedural programming, which is what you’ve been doing to this point. If you look at programs as the processing of data, then the procedural approach focuses on the process, in a sequential manner. Conversely, OOP tackles a problem by fixating on the data.
Adding Methods to a Class
Classes are made up of both attributes and methods. In the last section, you saw how easy it is to define a class with attributes. Well, methods in a class are just user-defined functions, exactly like those you created in Chapter 5, “Defining Your Own Functions.” In those pages, it was explained that creating your own functions is a two-step process: first you create the function prototype (or declaration) and then you create the actual function definition (or implementation). With methods it is the same, although the prototype goes within the class declaration and the definition comes afterward. For starters...
class Car {
public:
float gasTank;
void fillTank(float gallons);
};
The Car class now has one method, called fillTank, which takes one argument and returns no value. This is the function’s declaration, or prototype. To be usable, though, the function still needs to be formally defined (implemented). This is normally done after the class declaration. The function definition process should be familiar, with one minor addition. Here is an example:
void Car::fillTank(float gallons) {
// Assumes gasTank has a value.
gasTank += gallons;
}
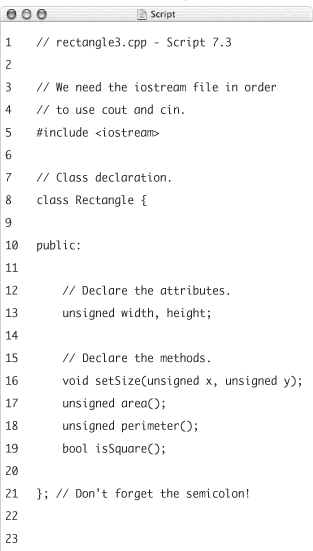
Script 7.2. Four methods are added to the class, each of which represents something you can do with rectangles.
In the function definition you have to indicate where the function exists, i.e., within which class. To do so, you precede the function’s name with the class name (Car) followed by the scope resolution operator (::). The preceding code states that the function fillTank(),which adds gallons to the tank, is defined within the Car class. It is also interesting to see that the gasTank variable, which is an attribute within the Car class, is automatically available within every class method (i.e., the variable has class scope).
So with this in mind, let’s add some methods to the existing Rectangle class. A method is the “verb” of classes; it does something, so the methods to be added to this class represent things one would do with a Rectangle.
To create methods
- Open
rectangle1.cpp(Script 7.1) in your text editor or IDE if it is not open already. - Within the class declaration, add the first method prototype (Script 7.2).
void setSize(unsigned x, unsigned y);
The first method in the class is called setSize. It takes two arguments of type
unsigned intbut returns no value. - Add two more method declarations.
unsigned area();
unsigned perimeter();These two functions both take no arguments but return unsigned integers. They’ll be used to calculate and return the area and perimeter of the rectangle.
- Add the final method prototype.
bool isSquare();
This method take no arguments but returns a Boolean value (
trueorfalse). - After the class declaration, define the
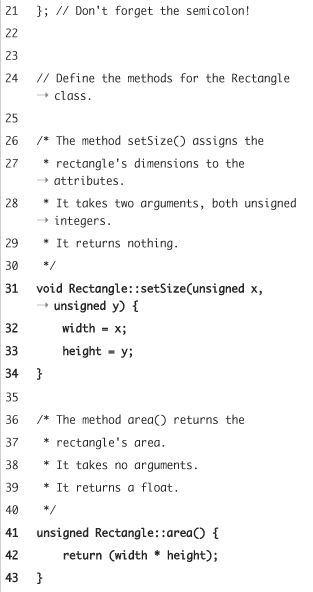
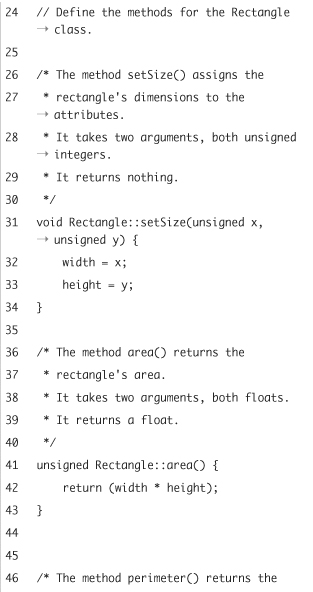
setSize()method.void Rectangle::setSize(unsigned x, unsigned y) {
width = x;
height = y;
}The function definition begins like the prototype but includes
Rectangle::. The function body assigns the value of the first argument,x, to the class’swidthvariable and the second argument,y, to the class’sheightvariable. - Define the next two functions.
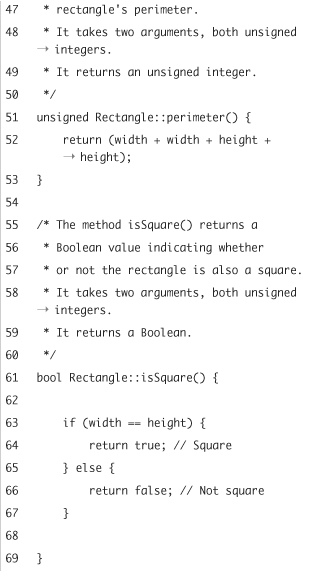
unsigned Rectangle::area() {
return (width * height);
}
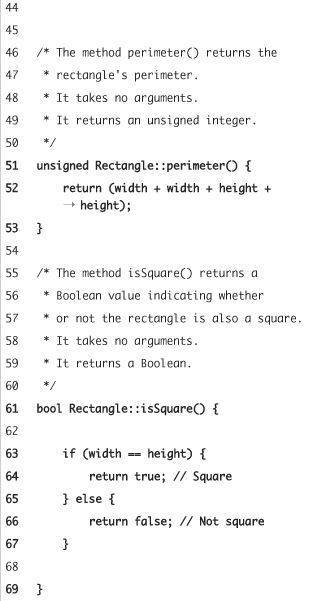
unsigned Rectangle::perimeter() {
return (width + width + height + height);
}These function definitions are very simple; each returns the value of a calculation. Neither needs to take any arguments, as they can both access the
widthandheightattributes, which will have been assigned values in thesetSize()method. - Define the final method.
bool Rectangle::isSquare() {
if (width == height) {
return true;
} else {
return false;
}
}A rectangle is also a square if its four sides are of the same length. The conditional here checks if
widthequalsheight. If so, the Booleantrueis returned. Otherwise, the Booleanfalseis returned. - Save the file as
rectangle2.cpp, compile, and run the application (Figure 7.3).Figure 7.3. The result of running the application after adding the methods to the class should be unchanged (see Figure 7.2).
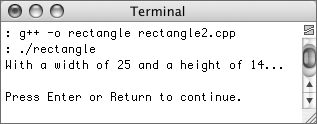
Of course the application doesn’t do anything new yet, so running it won’t impress anyone, but the compilation/execution process does confirm that no errors exist.
Tips
• Most classes have some function like setSize() in Rectangle whose purpose is to assign values to the class’s attributes. As you’ll learn later in the chapter, constructor functions often serve this purpose.
• Some programmers separate out class declarations from their class function definitions. The former would go in a classname.h file, and the functions would go in a corresponding .ccp file. We haven’t discussed how to use multiple files, and more important, we’re trying to keep things simple here, so we’ll just throw all of our programming eggs into a single basket. Chapter 12, “Namespaces and Modularization,” will demonstrate this other organization scheme.
• You can declare and define your functions within the class declaration, although it is less commonly done. If you were to do so, the effect would be a request to the compiler to make every function inline. See Chapter 5 for the sidebar on inline functions.
• If you would rather work with fractional representations of a rectangle, you can change all the variables to floats. Be certain to change the return type of the area() and perimeter() methods to float as well.
• The scope resolution operator (::) should look familiar, as you’ve been using it ever since the first chapter. The code std::cout refers to cout, which is defined within std. Furthermore, the std::string data type is actually an object. Little did you know you’ve been using objects this whole time!
• Methods can call each other, just as they would any other function. The following is unnecessary, but valid:
unsigned Rectangle::area() {
if (isSquare()) {
return (width * width);
} else {
return (width * height);
}
}
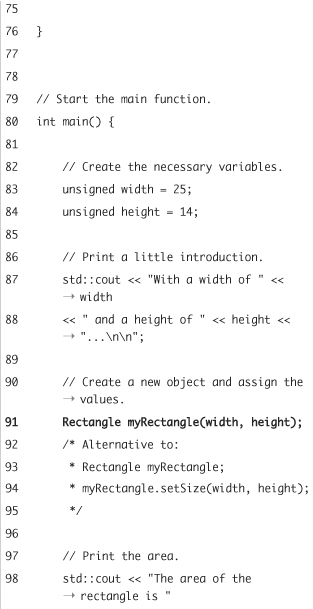
Script 7.3. An object of the type Rectangle is created and its methods invoked in this program.

Creating and Using Objects
After creating a class, you can make instances of that class, which are objects. You do so as you would create a variable of any type. Here is how you would create a class called Car and an object of that class:
class Car {
public:
float gasTank;
void fillTank(float gallons);
};
void Car::fillTank(float gallons) {
// Assumes gasTank has a value.
gasTank += gallons;
}
Car sienna;
In your programs you can create multiple objects of the same class:
Car sienna, prius;
Once you’ve created an object, you can call its methods using the objectName.methodName() syntax:
sienna.fillTank(15.4);
This should be somewhat familiar to you, as you’ve already programmed things like
std::string name = "Rebecca";
std::cout << "There are " << name.size() << " letters in the name " << name;
With this in mind, it’s time to finally make use of the Rectangle class!
To create and use an object
- Open
rectangle2.cpp(Script 7.2) in your text editor or IDE if it is not open already. - Within the
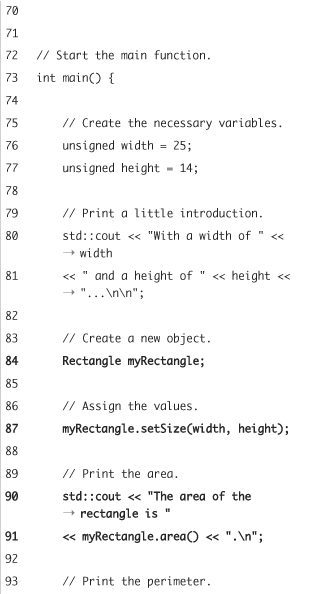
main()function, create a variable of typeRectangle(Script 7.3).Rectangle myRectangle;
Now you have an object of type
Rectangle. This variable can now call any of the functions defined within the class. - Assign the rectangle size values.
myRectangle.setSize(width, height);
The
setSize()function assigns values to thewidthandheightattributes within the function. If you follow the logic by looking at the definitions, the value ofwidthwithin themain()function is25. This is assigned tox, the first argument insetSize(). Within that function, the value ofxis assigned to the class’width. The same process works forheight. Remember that because of variable scope, thewidthandheightvariables in themain()function are separate entities from those same-named attributes within the class. - Print the area of the rectangle.
std::cout << "The area of the rectangle is "
<< myRectangle.area() << ". ";The rectangle’s area is calculated and returned by the
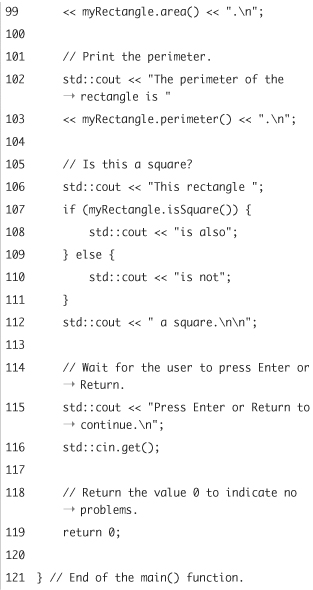
area()function. To call it, use theobjectName.methodName()syntax. Since this method returns the value, it can be called and immediately sent tocout. - Print the rectangle’s perimeter.
std::cout << "The perimeter of the rectangle is "
<< myRectangle.perimeter() << ". "; - Print a message indicating whether or not the rectangle is a square.
std::cout << "This rectangle ";
if (myRectangle.isSquare()) {
std::cout << "is also";
} else {
std::cout << "is not";
}
std::cout << " a square. ";The
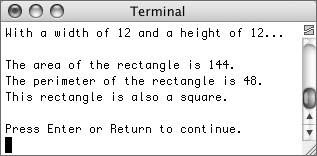
isSquare()method returns a Boolean value stating whether the given rectangle is or is not a square. Because it returns eithertrueorfalse, the function call can be used as a condition in anif-elsestatement. The result of these lines will be either This rectangle is not a square (Figure 7.4) or This rectangle is also a square (Figure 7.5).Figure 7.4. The result of running the application, where each function’s returned value is used to generate some information about the rectangle.

Figure 7.5. If the object has different attribute values, different results are calculated and printed. In this case, the rectangle is also a square, because all sides are of the same length.
- Save the file as
rectangle3.cpp, compile, and run the application (Figure 7.4). - Change the values of
widthandheightwithin themain()function, save the file again, recompile, and rerun the application (Figure 7.5).
Tips
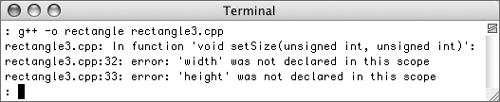
• If the compiler spits out an error message like that in Figure 7.6, it means that the function was not defined as part of the class. Be certain to use the ClassName::functionName syntax when implementing the methods outside of the class.
Figure 7.6. It’s fairly easy to forget to associate a defined function with the right class, which will create errors when you go to compile the program.
• As when working with structures, you can immediately create objects based upon a class when you declare the class:
class ClassName {
// Class body.
} object1, object2;
You won’t, or shouldn’t, find yourself doing this with any regularity, but it is allowed.
• Suppose you have
Rectangle r1, r2;
r1.setSize(100, 35);
r2 = r1;
In this case r2 will have the same width and height attribute values as r1 (100 and 35 respectively). When assigning objects of the same type to each other, the compiler will give corresponding attributes the same values.
• The period in objectName.methodName() is called the membership operator, in case you were wondering.
Defining Constructors
The preceding three sections cover the absolute basics of object-oriented programming: define a class with attributes and methods, and then create a variable of that class. This is the basis for OOP, which you’re hopefully finding to be simple enough. Now it’s time to start building on this information with more complex and useful object-related concepts.
First up are constructors, which are a special kind of method found in a class. A constructor is different from other methods in that it
• Has the same name as the class itself.
• Will automatically be called as soon as a new instance of a class is created.
• Never returns any values.
To create a constructor, you first add its declaration to the class:
class Human {
public:
char gender;
Human(char g);
};
Function names are case-sensitive in C++, so the constructor’s name and case must exactly match the class name and case.
The constructor’s definition is then created after the class, as before:
Human::Human(char g) {
gender = g;
}
Because the constructor never returns a value, you do not even put void before the definition. You still need to use the ClassName:: syntax to indicate to which class the function belongs.
Creating an object of this Human class now requires that the gender be set when the object is created:
Human larry('M'),
You can probably see how this would apply to the existing Rectangle class, but let’s modify it and run through the example just to be clear.
To create a constructor
- Open
rectangle3.cpp(Script 7.3) in your text editor or IDE if it is not open already. - Within the class declaration, create a new method called Rectangle (Script 7.4).
Rectangle(unsigned x = 0, unsigned y = 0);
This is the class’s constructor. It takes two arguments but returns nothing (in fact it doesn’t even have a return value indicator like
voidorunsigned). Both arguments have default values, making them optional. Because of this, the rectangle’s size can be assigned when the object is created or by calling thesetSize()function. - After the class declaration, define the
Rectangle()constructor.Rectangle::Rectangle(unsigned x, unsigned y) {
width = x;
height = y;
}This looks a lot like the
setSize()function, except that it does not reflect any return value. - Within the
main()function, change the object declaration.Rectangle myRectangle(width, height);
Script 7.4. A method whose name exactly matches the class name is a constructor (here, Rectangle). It will automatically be called when an object of that class is created.

Instead of creating the object and then calling the
setSize()function, this one line will do the trick. - Remove the existing call to the
setSize()function.This method is no longer required, as the constructor takes care of the attribute assignment. The method remains as part of the class, though, in case you need to change an existing rectangle’s size.
- Save the file as
rectangle4.cpp, compile, and run the application (Figure 7.7).Figure 7.7. A constructor has been added to the
Rectangleclass (see Script 7.4) but the end result is exactly the same.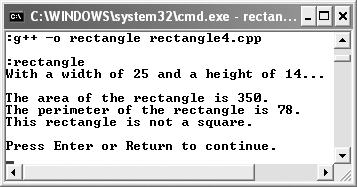
Tips
• A constructor like the one in this example is called a default constructor, in that it provides default values for its arguments. The benefit is that creating an object using just Rectangle myRectangle will still work, even if it doesn’t have much meaning. You could alternatively create a default constructor like so:
Rectangle::Rectangle() {
width = 0;
height = 0;
}
It’s normally a good idea to include some form of default constructor in your classes.
• If you don’t include a constructor in your class, the compiler will create one for you, with the definition
ClassName::ClassName() {}
This is an empty constructor. The compiler will also create a second function, called a copy constructor. This all goes on behind the scenes, but you should know this as an indication of how important constructors are in classes.
• Even though the constructor is automatically called when the object is created, you could still create a Rectangle object the old way:
Rectangle myRectangle;
myRectangle.setSize(width, height);
From the time the object is created until the setSize() method is invoked, the rectangle will have the default dimensions of 0 by 0.
• The ability to do something when an object is created or to do it as a separate step is common in classes. You’ve already seen this in Chapter 4, “Input, Output, and Files,” when working with an ofstream object. With that object you can open the file when the object is created or as a second step:
std::ofstream fileOutput
("/path/to/filename");
or
std::ofstream fileOutput;
fileOutput.open("/path/to/filename");
• As you’ll see in Chapter 8, “Class Inheritance,” constructors are often overloaded. To refresh your memory on overloading functions (see Chapter 5), this means that a single class may have multiple definitions of the same constructor. The correct constructor will then be used according to the types and number of arguments provided when the object is created.
• Using the Human class example, if the constructor takes just one argument, you can also use this syntax to create a new object:
Human larry = 'M';
This is equivalent to
Human larry('M'),
Defining Destructors
If classes have a special method that’s automatically called when the object is created, it only makes sense that there’s another method that’s invoked when the object is destroyed. This method is called a destructor, the archenemy of the constructor. The destructor comes into play when an object is discarded, such as when you delete the object, when the object goes out of scope, or when the program ends. Whereas the constructor normally initializes values or does other preliminary work, the destructor is used to perform cleanup as needed.
Since these two special methods are counterparts, they have a lot in common. First, the destructor also has the same name as the constructor and as the class, but it is preceded by the tilde:
class Human {
public:
char gender;
Human(char g); // Constructor
~Human(); // Destructor
};
And also like the constructor, destructors never return a value. One difference between the two methods is that destructors do not accept parameters either. Your destructor’s declaration will always be just
~ClassName();
When you implement the destructor, you have to use the tilde again, which leads to slightly ugly syntax. Your destructor’s definition will always look like:
ClassName::~ClassName() {
// Do whatever.
}
In simple classes like Rectangle, a destructor isn’t necessary. In more sophisticated classes, such as where the constructor requests a block of memory from the computer, the destructor is vital, as it would in such an example release the allotted block of memory. In short, destructors are necessary where, for every action in the constructor, an equal and opposite reaction is a must. As a good example of this, a new class will be written. This class will mimic the functionality of the quote2.cpp (Script 4.8) application from Chapter 4. The constructor will open a file for writing, and the destructor will close that file.
Script 7.5. The StoreQuote class is used expressly for taking user-submitted text and storing it in a file. The destructor closes the file stream.
To create a destructor
- Create a new, blank text document in your text editor or IDE (Script 7.5).
// quote.cpp - Script 7.5
#include <iostream>
#include <string>
#include <fstream>You can refer back to Script 4.8 if you need any refreshers on the basic functionality of the script. In short, the
stringheader file is needed because the program takes two string inputs, and thefstreamfile is required to work with files on the computer. - Begin the class declaration.
class StoreQuote {
public:
std::string quote, speaker;
std::ofstream fileOutput;The class has two attributes of type
stringand one of typeofstream(output file stream). - Declare the constructor and destructor.
StoreQuote();
~StoreQuote();Both methods have the same name as the class, and neither returns any value, which is always the case. In this class, neither method takes any arguments, although you could modify the constructor to accept as a parameter the name of the file where the data will be stored.
- Declare the other methods and complete the class.
void inputQuote();
void inputSpeaker();
bool write();
};These three methods are also required in this class. Two will take the user-submitted data but have no arguments and return no values. The last method will do the actual writing of the data to the text file. It will return a Boolean value to indicate its success.
- Define the constructor and the destructor.
StoreQuote::StoreQuote() {
fileOutput.open("quotes.txt", std::ios::app);
}
StoreQuote::~StoreQuote() {
fileOutput.close();
}The constructor opens the file for appended writing (see Chapter 4 for more on this syntax). The destructor closes the opened file. This is a natural example of a situation where the destructor should be created to tidy up something done within the constructor.
- Define the
inputQuote()andinputSpeaker()methods.void StoreQuote::inputQuote() {
std::getline(std::cin, quote);
}
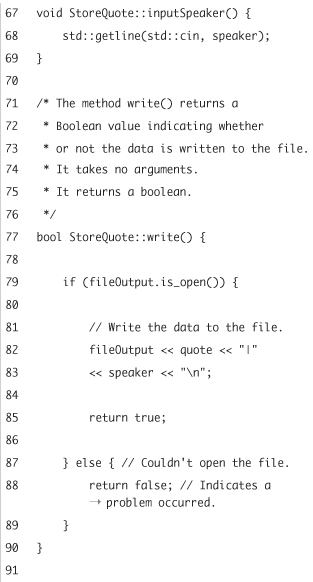
void StoreQuote::inputSpeaker() {
std::getline(std::cin, speaker);
}These two methods do very similar things, just with different attributes. For explanation of the
getline()call, revisit Chapter 4. - Define the
write()method.bool StoreQuote::write() {
if (fileOutput.is_open()) {
fileOutput << quote << "|"
<< speaker << " ";
return true;
} else {
return false;
}
}This method tests if the file is open and, if so, writes the data to it and returns a value of
true. The data itself is written with a pipe (|) separating the quote from the speaker and a newline at the end to separate one quote-speaker combination from the next. If the file wasn’t open, then nothing happens andfalseis returned. - Begin the
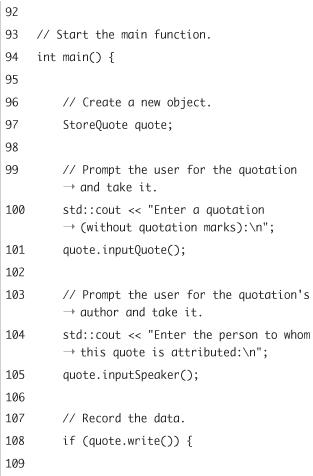
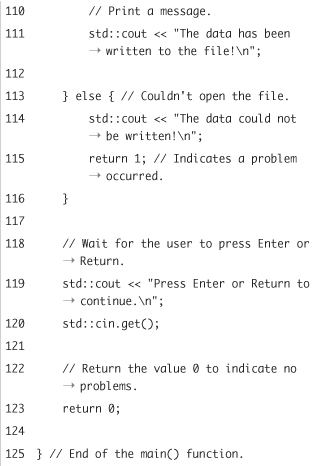
main()function.int main() {
StoreQuote quote;The only variable the function needs is an object of type
StoreQuote. All of the remaining functionality of the program is wrapped up within this one object. - Prompt for and read in the quotation and the speaker.
std::cout << "Enter a quotation (without quotation marks): ";
quote.inputQuote();
std::cout << "Enter the person to whom this quote is attributed: ";
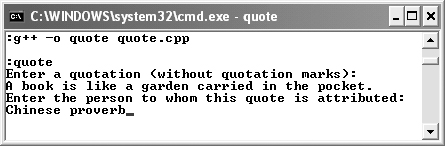
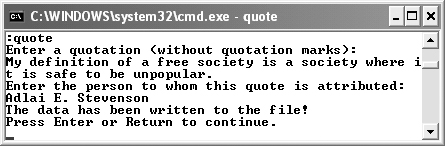
quote.inputSpeaker();This process works exactly as it did before, first prompting and then taking each input (Figure 7.8). The input is read and assigned to an attribute within the class.
Figure 7.8. The application prompts the user for, and reads in, two long strings.
- Report upon the success of storing the data.
if (quote.write()) {
std::cout << "The data has been written to the file! ";
} else {
std::cout << "The data could not be written! ";
return 1;
}The
write()method both writes the data to the file and reports upon the success of the operation (of opening the file, technically), so calling it as a condition here serves two purposes. Different messages are printed depending upon the result. - Complete the
main()function.std::cout << "Press Enter or Return to continue. ";
std::cin.get();
return 0;
} - Save the file as
quote.cpp, compile, and run the application (Figure 7.9).Figure 7.9. The successful execution of the program.
Tips
• As with constructors, the compiler will automatically generate a destructor for you if you do not define one.
• There are any number of ways that you could write this class differently. For starters, the constructor could take the name of the file to be opened. Another option would be to put the prompts within the inputQuote() and inputSpeaker() methods, although that level of specificity undermines the general nature a class should aspire to (see the sidebar). You could also create new methods for retrieving and displaying stored quotes.
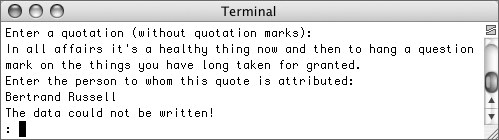
• If the file cannot be opened for some reason (such as the filename or path being invalid), the class and program will report a problem (Figure 7.10).
Figure 7.10. The result if the data could not be written to the text file because the file was not successfully opened.
• This quote example is a pretty good demonstration as to how one might use OOP. You start with a problem that needs to be solved, in this case, prompting for, reading in, and storing some quotations. Then you define a class that provides for this functionality. All a program has to do then is create an object of this type and invoke its methods.
The this Pointer
In Chapter 6, “Complex Data Types,” you learned about the more sophisticated types used in C++. Of these, one of the most important is the pointer, which lets you refer to stored data without using a variable’s name. Within objects there is a special pointer, called this. The this pointer is used within a class to refer to the current object (because the class itself has no knowledge what name was used for an object of that class’s type). The this pointer is necessary sometimes to avoid ambiguity when referring to variables and attributes.
Let’s say you have the following:
class Human {
public:
char gender;
Human(char gender);
};
Human::Human(char gender) {
gender = gender; // Uh-oh
}
Up until the assignment to the gender attribute, all of the syntax is fine. It’s acceptable for the Human() constructor to have an argument called gender, because this will be a separate variable from the Human class attribute with the same name. But how would you go about assigning a value to the class attribute then? By being more specific:
Human::Human(char gender) {
this->gender = gender; // OK
}
That line states that the attribute called gender, which is part of this object, should be assigned the value of gender, which is a variable within the function.
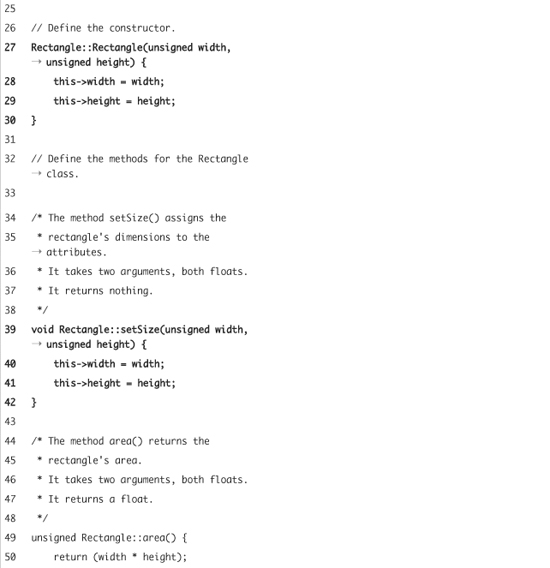
Script 7.6. The special this pointer can be used within a class to clear up ambiguities when referring to class attributes.

You do not always need to use the this pointer, just when ambiguity exists. The following method is fine as is:
char Human::returnGender() {
return gender;
}
As a final example, let’s modify the Rectangle class to do away with the nonspecific x and y arguments.
To use the this pointer
- Open
rectangle4.cpp(Script 7.4) in your text editor or IDE if it is not open already. - Within the class declaration, change the constructor and
setSize()prototypes (Script 7.6).Rectangle(unsigned width = 0, unsigned height = 0);
void setSize(unsigned width, unsigned height);Although the class worked just fine before, the arguments in these two methods were called
xandy, which had no apparent meaning. Using the nameswidthandheightmakes a lot more sense. - Change the constructor’s definition to match the prototype and use the
thispointer.Rectangle::Rectangle(unsigned width, unsigned height) {
this->width = width;
this->height = height;
}Since the arguments in the function and the attributes in the class have the same names, the
thispointer is used to clarify when you are referring to the attributes. - Repeat Step 3 for the
setSize()method.void Rectangle::setSize(unsigned width, unsigned height) {
this->width = width;
this->height = height;
} - If you want, change the values of the variables within the
main()function. - Save the file as
rectangle5.cpp, compile, and run the application (Figure 7.11).Figure 7.11. No changes have been made to the end result, but the
thispointer has been incorporated into the class (see Script 7.6).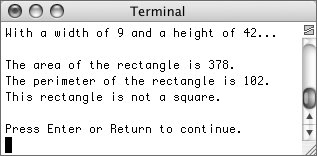
Tips
• The compiler actually uses the this pointer all the time itself. If you have two objects of the same type, behind the scenes the this pointer is used to refer to the right object and attributes.
• The this pointer is also used in much more advanced methods, but we’re trying to keep the introduction to objects on a more accessible level. You’ll see another discussion of it in Chapter 9, “Advanced OOP.”