In the first half of this book, we looked at how to set up your development environment to take advantage of C# 5.0, had a look at the history and evolution of C#, and reviewed the new features available to you in the latest release. In this chapter (and for the rest of the book), we will look at some practical applications where you can use these features.
This chapter will walk you through creating a Windows Store app. This application will run in the new Windows Runtime Environment, which can target both x86 and ARM architectures. In this chapter we will create a Windows Store application, connect to an HTTP-based web service over the Internet and parsing JSON, and display the results in a XAML page.
When you are done with this chapter, you will have a fully working project that you can use as the basis for your own application. You can then upload this application to the Windows Store and potentially make money off the sales.
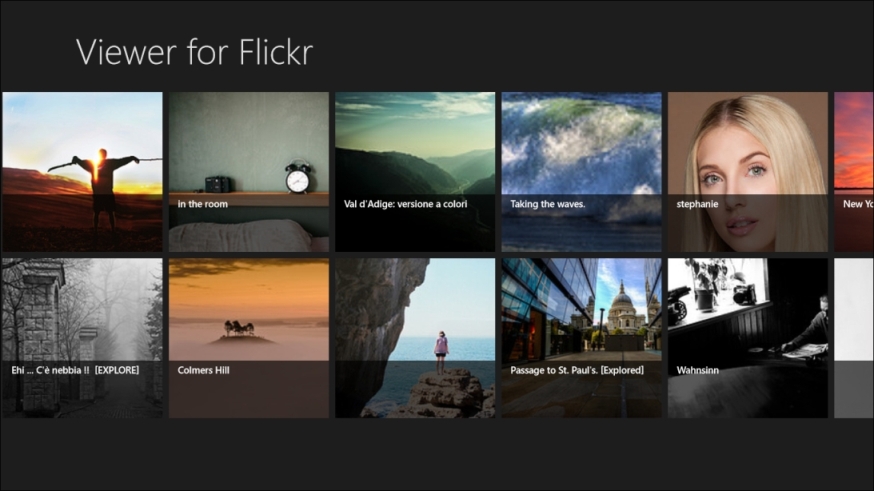
The project we are going to create is an application to browse through images. As a source, we will use the popular picture website http://flickr.com.

There are several reasons for choosing this as our project. First, Flickr provides an extensive web API to browse the various sections of their website, so it is an easy way to access data repositories. Secondly, many times you will find yourself accessing external data over the Internet, so this is a great example of how to handle this kind of access in a native application. And finally, pictures make for great eye candy, so the application ends up being something that you can show off.
If you are using Visual Studio Express, you have to be using the version called VS Express for Windows 8. We begin the process by creating a new Windows Store application from the New Project dialog shown in the following screenshot:
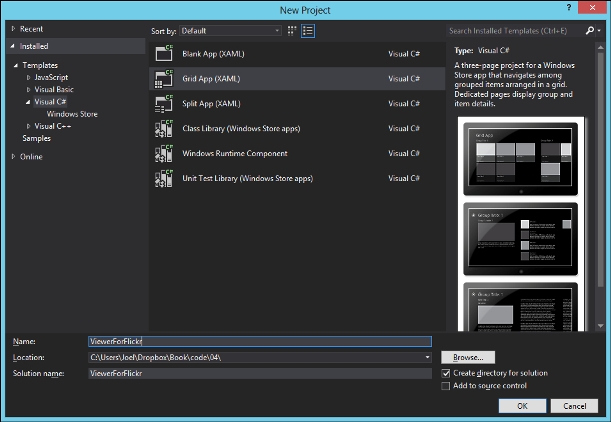
Choose the Blank App (XAML) project template, which gives you the bare minimum required to create an app. You should of course feel encouraged to create projects using the other templates to see how some common UI paradigms, such as grid apps, are created. But for now, the blank app template keeps things simple.
Now that we have our project structure, we can begin the project by first connecting to the Flickr API. Once you have created a user account on Flickr, you can access the API documentation at http://www.flickr.com/services/api/.
Be sure to browse through the documentation to get an idea of what is possible. Once you are ready to continue, a key ingredient in gaining access to their data will be to provide an API key, and applying to get one is very easy—simply access the application form at http://www.flickr.com/services/apps/create/apply/.
Apply for a non-commercial key, and then provide information about the app that you are going to build (name, description, and so on).
Once you have completed the application, you will get two pieces of data: the API Key and API Secret. The Windows RT version of the .NET Framework contains a number of differences. For developers used to using the regular desktop version of the framework, one of those differences is the absence of the configuration system. So, although C# developers are used to entering static configuration values, such as an API Key, into an app.config file, we will not be able to do that here because those APIs are simply not available in WinRT applications. For a simple analog to a full configuration system, we can just create a static class to contain the constants and make them easily accessible.
We start by adding a new class to the DataModel namespace. If the project does not already contain it, simply add a folder named DataModel, and then add a new class with the following contents:
namespace ViewerForFlickr.DataModel
{
    public static class Constants
    {
        public static readonly string ApiKey = "<The API Key>";
        public static readonly string ApiSecret = "<The API Secret>";
    }
}
Of course, where it says, <The API Key> and <The API Secret>, you should replace this with the key and secret assigned to your own account.
Next up, we need a way to actually access the API over the Internet. Because of the new async features in C# 5.0, this is very simple. Add another class, named WebHelper, to the DataModel folder, as follows:
internal static class WebHelper
{
    public static async Task<T> Get<T>(string url)
    {
        HttpClient client = new HttpClient();
        Stream stream = await client.GetStreamAsync(url);

        Var  serializer = new DataContractJsonSerializer(typeof(T));
        return (T)serializer.ReadObject(stream);
    }
}
Despite the small number of lines of code, there is actually a lot going on in this code. Using the HttpClient class, there is a single method call to download the data asynchronously. The data being returned will be in JavaScript Object Notation (JSON) format. Then, we use DataContractJsonSerializer
to deserialize the result directly into a strongly typed class, which we define using the generic parameter on the method. That is one of the great things about C# 5.0; this method had many more lines of code in previous versions of the framework.
With the WebHelper class defined, we can start gathering the actual data from the remote API. One interesting API endpoint that Flickr provides is the Interesting list, which returns a list of the most interesting photos posted recently to their service. This is great because you are guaranteed to always have a fantastic set of pictures to display. You can become familiar with the method by reading through the API documentation at http://www.flickr.com/services/api/flickr.interestingness.getList.html.
The data that the service returns, when configured to use the JSON format, looks like the following:
{
    "photos": {
        "page": 1,
        "pages": 5,
        "perpage": 100,
        "total": "500",
        "photo": [
            {
                "id": "7991307958",
                "owner": "8310501@N07",
                "secret": "921afedb45",
                "server": "8295",
                "farm": 9,
                "title": "Spreading one's wings [explored]",
                "ispublic": 1,
                "isfriend": 0,
                "isfamily": 0
            }
        ]
    },
    "stat": "ok"
}
The object that is returned as JSON contains paging information, such as what page you are currently on, and an array of photo information. As we are going to use the built-in DataContractJsonSerializer class to parse the JSON result, we need to create what are called data contracts
. These are the classes that match the structure of the object represented by the JSON string; the serializer will take the data from the JSON string and populate the properties of the data contract, so you can access it in a strongly typed fashion.
Tip
There are a number of other solutions available for working with JSON in C#. Arguably, one of the more popular solutions is James Newton-King's Json.NET, which you can find at http://json.net.
It is a very flexible library that can be faster than other libraries when parsing and creating JSON strings. Many open source projects take a dependency on this library. The only reason we are not using it here is for the sake of simplicity, as DataContractJsonSerializer comes with the framework.
We begin creating data contracts by looking at the deepest level of the JSON structure, which represents information about a single photo. A data contract is simply a class with a property for each field in the JSON object that has been decorated with some attributes. At the top of the class definition, add the [DataContract] attribute, which just tells the serializer that this class can be used, and then for each property add a [DataMember(Name="<field name>")] attribute, which helps the serializer know which members map to which JSON properties.
Compare the class in the following example code with the JSON string:
[DataContract]
public class ApiPhoto
{
    [DataMember(Name="id")]
    public string Id { get; set; }
    [DataMember(Name="owner")]
    public string Owner { get; set; }
    [DataMember(Name="secret")]
    public string Secret { get; set; }
    [DataMember(Name="server")]
    public string Server { get; set; }
    [DataMember(Name="farm")]
    public string Farm { get; set; }
    [DataMember(Name="title")]
    public string Title { get; set; }

    public string CreateUrl()
    {
        string formatString = "http://farm{0}.staticflickr.com/{1}/{2}_{3}_{4}.jpg";

        string size = "m";

        return string.Format(formatString,
            this.Farm,
            this.Server,
            this.Id,
            this.Secret,
            size);
    }
}
The Name parameter passed into the data member attribute is used here because the case of the property does not match what is coming back in the JSON object. Of course, you could just name the property exactly the same as the JSON object, but then it would not match regular .NET naming conventions.
One thing that you should notice is that the photo object itself does not have a URL to the image. Flickr gives you guidance on how to construct image URLs. The .CreateUrl method included in the class, in the previous example, will construct the URL to the image using the information in the properties of the class. You can get more information about the different options for constructing Flickr URLs at http://www.flickr.com/services/api/misc.urls.html
.
Next up the object chain, we have an object that contains some metadata about the result, such as the page, number of pages, and items per page. You can use this information to allow the user to page through the results. The object also contains an array of ApiPhoto objects, as follows:
[DataContract]
public class ApiPhotos
{
    [DataMember(Name="page")]
    public int Page { get; set; }
    [DataMember(Name="pages")]
    public int Pages { get; set; }
    [DataMember(Name="perpage")]
    public int PerPage { get; set; }
    [DataMember(Name="total")]
    public int Total { get; set; }
    [DataMember(Name="photo")]
    public ApiPhoto[] Photo { get; set; }
}
And finally, we create an object to represent the outer level object, which has just one property, as follows:
[DataContract]
public class ApiResult
{
    [DataMember(Name="photos")]
    public ApiPhotos Photos { get; set; }
}
Now that we have all of the data contracts created, we are ready to put everything together. Remember that this code will be going out over the Internet to retrieve data, which makes it a great candidate to use async/await. So, when we are planning out our interface, we want to make sure that it will be awaitable. Create a new class, named Flickr.cs, in the Models folder.
public static class Flickr
{
    private static async Task<ApiPhotos> LoadInteresting()
    {
        string url = "http://api.flickr.com/services/rest/?method=flickr.interestingness.getList&api_key={0}&format=json&nojsoncallback=1";
        url = string.Format(url, Constants.ApiKey);

        ApiResult result = await WebHelper.Get<ApiResult>(url);

        return result.Photos;
    }
}
In this class, we created a method called .LoadInteresting(), which constructs a URL pointing to the interesting endpoint using the API Key that we provisioned earlier in the chapter. Next, it uses the WebHelper class to make the HTTP call and passes in the ApiResult class, as that is the object that represents the format of the JSON result. Once the web call returns a value, it will be deserialized, and we return the photo information.
We now have the data in an easy-to-access method and are ready to begin creating the user interface. When you are working with XAML, as you will be when creating apps using C# for the Windows Store (formerly known as Metro ), a very common pattern for you to use is Model-View-ViewModel (MVVM). This architectural model is similar to Model-View-Controller (MVC), in that you have a model and view at either end, with a component in the middle to "glue" those pieces together. It differs from MVC in that the role of the "controller" is taken by the binding system provided by XAML, which takes care of updating the view whenever data changes. So, all you have to do is provide a light wrapper around your model to make certain binding scenarios a bit easier in the form of the ViewModel. So, all you have to do is provide a light wrapper around your model to make certain binding scenarios a bit easier in the form of the ViewModel as you can see in the following diagram:

In this application, your Model component represents the core logic of your problem domain. The ApiPhotos and the .LoadInteresting methods represent the model in this relatively simple program. The View block is represented by the XAML code that we are going to create. So, we need the ViewModel block to link the Model block to the View block.
When you created the project, there were several bits of code that were automatically included. One of these helpful pieces of code can be found in the Common/StandardStyles.xaml file. This file contains a number of helpful styles and templates that you can use in your application. We are going to use one of these templates to display our images. The template named Standard250x250ItemTemplate is defined as follows:
<DataTemplate x:Key="Standard250x250ItemTemplate">
    <Grid HorizontalAlignment="Left" Width="250" Height="250">
        <Border Background="{StaticResource ListViewItemPlaceholderBackgroundThemeBrush}">
            <Image Source="{Binding Image}" Stretch="UniformToFill" AutomationProperties.Name="{Binding Title}"/>
        </Border>
        <StackPanel VerticalAlignment="Bottom" Background="{StaticResource ListViewItemOverlayBackgroundThemeBrush}">
            <TextBlock Text="{Binding Title}" Foreground="{StaticResource ListViewItemOverlayForegroundThemeBrush}" Style="{StaticResource TitleTextStyle}" Height="60" Margin="15,0,15,0"/>
            <TextBlock Text="{Binding Subtitle}" Foreground="{StaticResource ListViewItemOverlaySecondaryForegroundThemeBrush}" Style="{StaticResource CaptionTextStyle}" TextWrapping="NoWrap" Margin="15,0,15,10"/>
        </StackPanel>
    </Grid>
</DataTemplate>
Please pay attention to the way the data is being bound to the various properties of the controls of the template. This binding format automatically does a lot of the work that would normally be done in the "Controller" component of the MVC pattern. As a result, you may need to change the representation of the data in some of the models to make it easy to bind, which is why we use ViewModels.
The properties being bound in this template are different from the properties available in the ApiPhoto class. We will use the ViewModel to convert the model into something that can easily be bound. Go ahead and create a new class, called FlickrImage, that contains the properties that the template is expecting, as follows:
public class FlickrImage
{
    public Uri Image { get; set; }
    public string Title { get; set; }
}
Add the following field and method to the Flickr class:
public static readonly ObservableCollection<FlickrImage> Images = new ObservableCollection<FlickrImage>();

public static async void Load()
{
    var result = await LoadInteresting();

    var images = from photo in result.Photo
                    select new FlickrImage
                    {
                        Image = new Uri(photo.CreateUrl()),
                        Title = photo.Title
                    };

    Images.Clear();
    foreach (var image in images)
    {
        Images.Add(image);
    }
}
The Load() method starts by calling the LoadInteresting() method, which goes out to the Flickr API over the Internet and retrieves interesting photos (asynchronously, of course). It then converts the result into a list of the ViewModels using LINQ and updates the static Images property. Note how it does not reinstantiate the actual collection, instead of a regular list, the Images property is an ObservableCollection collection, which is the preferable collection type to use in ViewModels. You can bind to the XAML UI when you initialize the page and then reload the data any time you want, the collection takes care of notifying the UI, and the binding framework takes care of updating the screen.
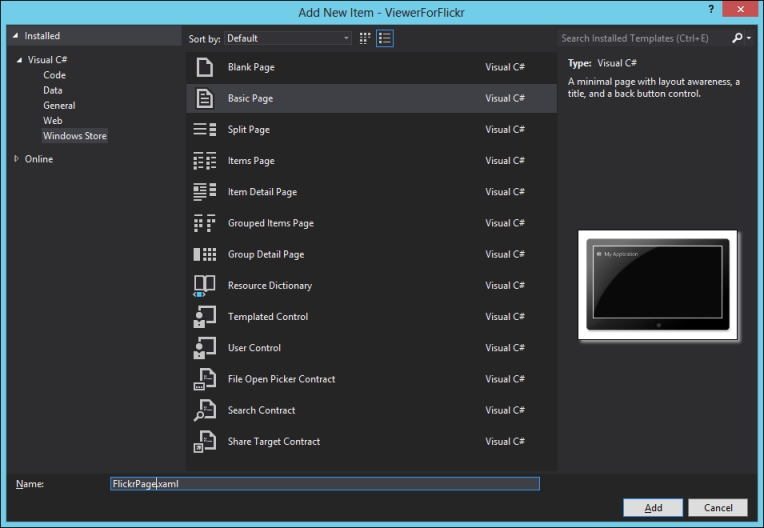
With the ViewModel defined, we are ready to create the actual user interface. Begin by adding a Basic Page item from the Visual C# | Windows Store menu in the Add New Item dialog. Name the file FlickrPage.xaml, as shown in the following screenshot:
This creates a very basic page with a few simple things such as a back button. You can change the page that the application starts up on by opening the App.xaml.cs file and changing the OnLaunched method to launch FlickrPage instead of MainPage, which is the default. We could, of course, have used MainPage for this sample, but most pages that you use will need a back button, so you should become comfortable with using the Basic Page template.
Our interface will be minimal, in fact, it consists of a single control that we will place in the FlickrPage.xaml file, below the section that contains the back button, as follows:
<GridView
    Grid.Row="2"
    ItemsSource="{Binding Images}"
    ItemTemplate="{StaticResource Standard250x250ItemTemplate}"/>
GridView will take care of displaying the items that we bind to it in a grid layout, perfect for displaying a bunch of pictures. We bind the ItemsSource property to our images, and ItemTemplate, which is used to format every single item, is bound to the standard template.
Now that the XAML has been set up, all we have to do is actually load the data and set DataContext for the page! Open the file named FlickrPage.xaml.cs and add the two following lines of code to the LoadState method:
Flickr.Load();
this.DataContext = new { Images = Flickr.Images };
We begin by initiating the load process. Remember that this is an asynchronous method, so it will start the process of requesting the data from the Internet. And then, we set the data context, which is what the XAML bindings use to pull their data from. See the following screenshot: