In the previous chapter, we looked at the creation of a native desktop application, meant for distribution on the Windows Store. In this chapter, we will create a web application that lets a user log in, and see other users in the same physical area on a map. We will be using the following technologies:
- ASP.NET MVC 4: This lets you build web applications using the Model-View-Controller design pattern and asynchronous programming
- SignalR: This is an asynchronous two-way communication framework
- HTML5 GeoLocation: This provides real-world location to the application
- Client-side mapping with Google: This is to visualize geospatial information
These technologies together let you create very powerful web applications, and with ASP.NET MVC 4—which was released along with C# 5—it is easier than ever to create mobile applications that are easily accessible to everyone over the Internet. By the end of this chapter, we will have a web application which uses modern browser features such as WebSockets lets you to connect with other web users that are physically in your vicinity. All of this makes choosing the C# technology stack a very compelling option for creating web applications.
ASP.NET has evolved as a server platform that supports a number of different products. On the web side, we have Web Forms and MVC. On the service side we have ASMX web services, Windows Communication Framework (WCF), and Web Services, even some open source technologies, such as ServiceStack have emerged.
Development for the Web can be summarized as a melting pot of technologies. A successful web developer should be well-versed in HTML, CSS, JavaScript, and the HTTP protocol. In this sense, web development can help you develop into a polyglot programmer, someone who can work in several programming languages. We will use ASP.NET MVC for this project because of the way it applies the Model-View-Controller design pattern in the context of web development, while at the same time allowing each contributing technology the chance to do what it does best. It is shown in the following diagram:
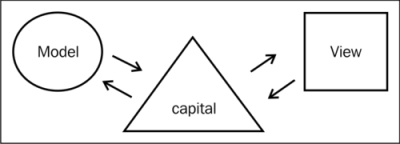
Your Model blocks will be all the code that contains your business logic, and the code that connects to remote services and databases. The Controller block will retrieve information from your Model layer, and pass information into it as your user interacts with the View block.
An interesting observation with regards to client-side development with JavaScript is that many of the application's architecture choices will be very similar to when developing any other native application. From the way you have to maintain the state of the application in memory, to the way you access and cache remote information, there are many parallels.
On to the application we are going to build!
Just as the term CyberSpace refers to the digital realm, the term MeatSpace is colloquially used to refer to things or interactions that happen in the real world. The project we are going to create in this chapter is a mobile application to help you connect with other users of the web application that are physically near you. Something about the juxtaposition of building a mobile website that knows your location in the real world is very appealing, because just a few short years ago these kinds of applications were impossible on the Web.
This application will use the HTML 5 geolocation APIs to let you see other users of the application on a map. When a user connects, it will open a persistent connection to the server using SignalR, an open source project that was started by several Microsoft employees.
Before we can begin writing code, we have to start the project, iteration zero . We start by creating a new ASP.NET MVC 4 project, as shown in the following screenshot. In this example, I am using Visual Studio 2012 Express for Web, though of course the full version of Visual Studio 2012 will work as well.
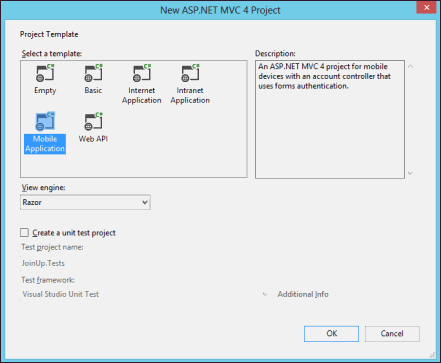
Once you have chosen the MVC 4 project, you are presented with a dialog of several different kinds of project templates. As we want our web application to be accessible from a mobile phone, we choose one of the new project templates included in Visual Studio 2012, Mobile Application. This template comes preloaded with a number of helpful JavaScript libraries listed as follows:
- jQuery and jQuery.UI: This is a very popular library for simplifying access to the HTML DOM. The UI portion of the library provides a nice widget toolkit that works across browsers with controls such as date pickers.
- jQuery.Mobile: This provides a framework to create mobile-friendly web applications.
- KnockoutJS: This is a JavaScript binding framework that lets you implement the Model-View-ViewModel pattern.
- Modernizr: This allows you to do rich feature detection, instead of looking at the browser's user agent string to determine what features you can count on.
We will not be using all of these libraries, and of course you could use different JavaScript libraries if you so choose. But these provide a convenient starting point. You should take some time to get familiar with the files created by the project template.
The first thing you should look at is the main HomeController class, as this is (by default) the entry point of your application. There is some placeholder text included by default; you can easily change this to suit the application you are building. For our purposes we just change some of the text to act as simple information, and a call to action for the user to sign up.
Modify the Views/Home/Index.cshtml file as follows:
<h2>@ViewBag.Message</h2>
<p>
    Find like-minded individuals with JoinUp
</p>
Note the @ViewBag.Message header, you can change this particular value in the Index action method of the HomeController class as follows:
public ActionResult Index()
{
    ViewBag.Message = "MeetUp. TalkUp. JoinUp";

    return View();
}
There are other views which you can change to add your own information, such as the about and contact pages, but they are not critical for the purposes of this particular demonstration.
One of the most powerful additions to this latest version of ASP.NET MVC is the ability to use new async and await keywords in C# 5 to write asynchronous action methods. To be clear, you have had the ability to create asynchronous action methods since ASP.NET MVC 2, but they were rather ungainly and difficult to use.
You had to manually keep track of the number of asynchronous operations that were going on, and then let the asynchronous controller know when they were complete so that it could finalize the response. In ASP.NET MVC 4 this is no longer necessary.
As an example, we can rewrite the Index method that we went over in the previous section, to be asynchronous. Let's say that we wanted the message that we print in the title of the landing page to come from a database. Because that would likely be communicating with a database server on another machine, it is a perfect candidate for an asynchronous method.
First, create an awaitable method that will serve as a placeholder for retrieving the message from the database as follows:
private async Task<string> GetSiteMessage()
{
    await Task.Delay(1);
    return "MeetUp. TalkUp. JoinUp";
}
Of course in your actual code, this would connect to a database, as an example, it simply introduces a very small delay before returning the string. Now you can rewrite the Index method as follows:
public async Task<ActionResult> Index()
{
    ViewBag.Message = await GetSiteMessage();

    return View();
}
You can see the changes to the method highlighted in the previous code, all you have to do is add the async keyword to the method, make the return value a Task<ActionResult> class, and then use await in the method body somewhere. And that's it! Your method will now let the ASP.NET runtime optimize its resources as best as possible by processing other requests while it is waiting for your method to finish processing.
Once we have defined our initial landing page, we can start looking at the logged in interface. Remember that the stated goal of our application is to help you connect with other users in the real world. To do so, we will use a feature that is included in many of the modern browsers, including mobile browsers, to retrieve the user's location. To connect everyone together, we will also use a library called SignalR , which lets you establish a two-way communication channel with the user's browser.
The project's website describes itself simply as follows:
Async library for .NET to help build real-time, multi-user interactive web applications.
With SignalR, you can write an application that lets you communicate bidirectionally to and from the user's browser. So rather than waiting for the browser to initiate communication with the server, you can actually call out and send information to the browser from the server. Interestingly, SignalR is open source, so you can dig into the implementation if you are curious. But for our purposes, we will start by adding a reference to our web application. You can do so easily through Nuget by running the following command in the package management console:
install-package signalr
Or if you would prefer to use the GUI tools, you can right-click on your project's reference nodes and choose Manage NuGet Packages. From there you can search for the SignalR package and click on the Install button.
With that dependency installed, we can begin sketching out the interface that our users will see when they are logged in, and provide us with the primary functionality of the app. We start the process of adding the new screen by adding a new controller to the Controllers folder using the Empty MVC Controller template. Name the class MapController as follows:
public class MapController : Controller
{
    public ActionResult Index()
    {
        return View();
    }
}
By default, the file you create will look like the one in the previous code; make note of the controller prefix (Map), and action method name (Index). After you have created the controller, you can add the view which, as per the conventions, uses the controller name and action method name.
First, add a folder to the Views folder named Map, all views for this controller will go in here. In that folder, add a view called Index.cshtml. Make sure to select the Razor view engine, if it's not chosen already. The generated razor file is pretty bare, it just sets the title of the page (using a razor code block), and then outputs a heading with the name of the action as follows:
@{
    ViewBag.Title = "JoinUp Map";
}

<h2>Index</h2>
Now we can start modifying this view and adding the geolocation features. Add the following block of code to the bottom of Views/map/Index.cshtml:
@section scripts {
    @Scripts.Render("~/Scripts/map.js")
}
This scripts' section is defined in the site-wide template and makes sure to render the script reference in the correct order so that all other primary dependencies, such as jQuery, are already referenced.
Next we create the map.js file that we referenced in the previous code, which will hold all of our JavaScript code. The first thing we want to do in our application is to get our geolocation working. Add the following code to map.js to get an understanding of how the user's location is obtained:
$(function () {
    var geo = navigator.geolocation;

    if (geo) {
        geo.getCurrentPosition(userAccepted, userDenied);
    } else {
        userDenied({message:'not supported'});
    }
});
This starts with a function definition being passed to jQuery, which will be executed when the DOM has been loaded. In that method, we get a reference to the navigator.geolocation property. If that object exists (for example, the browser implements geolocation), then we call the .getCurrentPosition method and pass in two callbacks, which we define as follows:
function userAccepted(pos) {
alert("lat: " +
pos.coords.latitude +
", lon: " +
pos.coords.longitude);
}
function userDenied(msg) {
alert(msg.message);
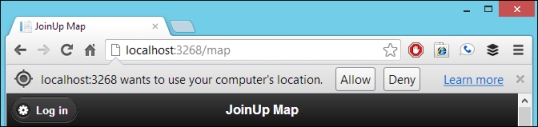
}Once you have saved map.js with the previous code, you can run the web application (F5) to see how it behaves. As you can see in the following screenshot, the user will be prompted to accept whether they want the web application to track their whereabouts. If they click on Allow, the userAccepted method will be executed. If they click on Deny, the userDenied message will be executed. You can use this method to adjust your application accordingly, when no location is provided.
With the user's location established, the next part of the process will involve using SignalR to broadcast everybody's location to every other user that is connected.
The first thing we can do is add script references for SignalR by adding the following two lines to the script references in Views/Map/Index.cshtml:
<ul id="messages"></ul>

@section scripts {
    @Scripts.Render("~/Scripts/jquery.signalR-0.5.3.min.js")
    @Scripts.Render("~/signalr/hubs")
    @Scripts.Render("~/Scripts/map.js")
}
This initializes the SignalR infrastructure and allows us to build out the client side of the application before we implement the server.
Tip
At the time of writing, Version 0.5.3 of the jQuery.signalR library was the latest one. Depending on when you read this book, there's a good chance this version will have changed. Simply look at the Scripts directory after you add the SignalR dependency via Nuget to see what version you should use here.
Next, erase all of the previous contents of the map.js class. To keep things organized, we begin by declaring a JavaScript class with a few methods, as follows:
var app = {
    geoAccepted: function(pos) {
        var coord = JSON.stringify(pos.coords);
        app.server.notifyNewPosition(coord);
    },

    initializeLocation: function() {
        var geo = navigator.geolocation;

        if (geo) {
            geo.getCurrentPosition(this.geoAccepted);
        } else {
            error('not supported'),
        }
    },

    onNewPosition: function(name, coord) {
        var pos = JSON.parse(coord);
        $('#messages').append('<li>' + name + ', at '+ pos.latitude +', '+ pos.longitude +'</li>'),
    }
};
You will recognize the initializeLocation method as the same code we had in there previously to initialize the geolocation API. In this version, the initialization function passes another function, geoAccepted, as the callback that executes when the user accepts the location prompt. The final function, onNewPosition, is meant to execute when somebody notifies the server of a new position. SignalR will broadcast the location and execute this function to let this script know the name of the user, and their new coordinate.
When the page loads, we want to initialize the connection to SignalR, and in the process use the object that we just created in the variable named app, and this can be done as follows:
$(function () {
    var server = $.connection.serverHub;

    server.onNewPosition = app.onNewPosition;

    app.server = server;

    $.connection.hub.start()
        .done(function () {
            app.initializeLocation();
        });
});
Hubs
, in SignalR, is a very simple way of exposing methods that can be invoked easily by JavaScript code on the client. Add a new class to your Models folder called ServerHub as follows:
public class ServerHub : Hub
{
    public void notifyNewPosition(string coord)
    {
        string name = HttpContext.Current.User.Identity.Name;

        Clients.onNewPosition(name, coord);
    }
}
We are defining a single method in this hub, notifyNewPosition
, which accepts a string. When we get the coordinates from a user, this method will broadcast it to all other connected users. To do so, the code first gets the user's name and then calls the .onNewPosition method to broadcast the name and coordinate with all connected users.
It is interesting to note that the Clients property is a dynamic type, so onNewPosition doesn't actually exist as a method on that property. The name of that method is used to automatically generate the client-side method that is called from the JavaScript code.
In order to ensure that the user is logged in when they visit the page, all we have to do is add the [Authorize] attribute to the top of the MapController class as follows:
[Authorize]
public class MapController : Controller
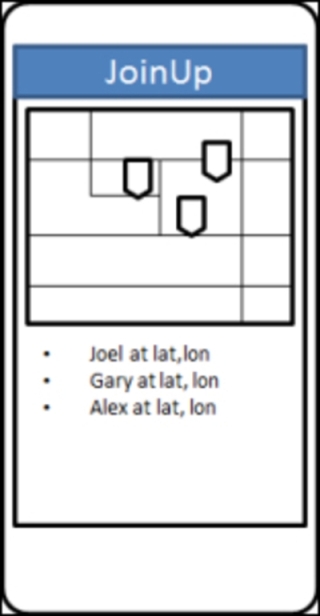
Press F5 to run your application and see how we are doing. If everything is in working order, you will see a screen like the one shown in the following screenshot:
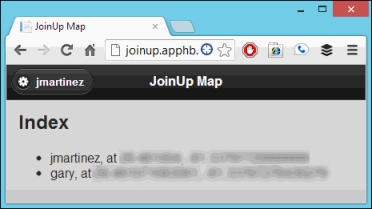
As people join the site, their location is acquired and pushed to everyone else. Meanwhile, on the client side, when a new location is received, we append a new list item element detailing the name and coordinate that was just received.
We are slowly building up our features one by one, once we have verified that this works, we can start fleshing out the next piece.
With location information being pushed to everyone, we can start displaying their location on a map. For this sample, we are going to use Google Maps, but you could easily use Bing, Nokia, or OpenStreet maps. But the idea is to give you a spatial reference to see who else is viewing the same web page and where they are relative to you in the world.
Start by adding an HTML element to hold the map to Views/Map/Index.cshtml, as follows:
<div
    id="map"
    style="width:100%; height: 200px;">
</div>
This <div> will serve as a container for the actual map, and will be managed by the Google Maps API. Next add the JavaScript to the scripts section above the map.js reference as follows:
@section scripts {
    @Scripts.Render("~/Scripts/jquery.signalR-0.5.3.min.js")
    @Scripts.Render("~/signalr/hubs")
    @Scripts.Render("http://maps.google.com/maps/api/js?sensor=false");
    @Scripts.Render("~/Scripts/map.js")
}
As with the SignalR scripts, we just need to ensure that it is referenced before our own script (map.js) so that it is available in our source. Next we add code to initialize the map as follows:
function initMap(coord) {
    var googleCoord = new google.maps.LatLng(coord.latitude, coord.longitude);

    if (!app.map) {
        var mapElement = document.getElementById("map");
        var map = new google.maps.Map(mapElement, {
            zoom: 15,
            center: googleCoord,
            mapTypeControl: false,
            navigationControlOptions: { style: google.maps.NavigationControlStyle.SMALL },
            mapTypeId: google.maps.MapTypeId.ROADMAP
        });
        app.map = map;
    }
    else {
        app.map.setCenter(googleCoord);
    }
}
This function will be invoked when the location is obtained. It works by taking the user's initially reported location, and passing a reference to the <div> HTML element we created earlier with the map ID to a new instance of google.maps.Map object, setting the center of the map to the user's reported location. If the function is called again, it will simply set the center of the map to the user's coordinates.
To show all the locations, we will use a feature of Google Maps to be able to drop a marker onto the map. Add the following function to map.js:
function addMarker(name, coord) {
    var googleCoord = new google.maps.LatLng(coord.latitude, coord.longitude);

    if (!app.markers) app.markers = {};

    if (!app.markers[name]) {
        var marker = new google.maps.Marker({
            position: googleCoord,
            map: app.map,
            title: name
        });
        app.markers[name] = marker;
    }
    else {
        app.markers[name].setPosition(googleCoord);
    }
}
This method keeps track of the markers that have been added by using an associative JavaScript array, which is similar to a Dictionary<string, object> collection in C#. When a user reports a new position, it will take the existing marker and move it to the new position. So this means that, for every unique user that signs in, the map will display a marker and then move it every time a new location is reported.
Finally, we make three small changes to the existing functions in the app object to interact with the map. First in initializeLocation, we change from getCurrentPosition to use the watchPosition method as follows:
initializeLocation: function() {
    var geo = navigator.geolocation;

    if (geo) {
        geo.watchPosition(this.geoAccepted);
    } else {
        error('not supported'),
    }
},
The watchPosition method will update the user's location every time it changes, which should result in a real-time view of all the locations as they report it to the server.
Next, we update the geoAccepted method, which is run every time the user gets a new coordinate. We can take advantage of this event to initialize the map before we notify the server of the new position as follows:
geoAccepted: function (pos) {
    var coord = JSON.stringify(pos.coords);

    initMap(pos.coords);

    app.server.notifyNewPosition(coord);
},
Lastly, in the method that notifies our page whenever a new position is reported by a user, we add a call to the addMarker function as follows:
onNewPosition: function(name, coord) {
    var pos = JSON.parse(coord);

    addMarker(name, pos);

    $('#messages').append('<li>' + name + ', at '+ pos.latitude +', '+ pos.longitude +'</li>'),
}When the time comes to test the application, you can do some of the preliminary testing locally on your own computer. But it means that you will always have only a single marker in the middle of the map (that is you). In order to do a deeper test, you will need to deploy your web application to a server accessible from the Internet.
There are many options available, ranging from free (great for testing) to solutions that cost money. And of course you can always set up a server with IIS on your own and manage it that way. A great resource for finding a host can be found on the ASP.NET site at the URL http://www.asp.net/hosting.
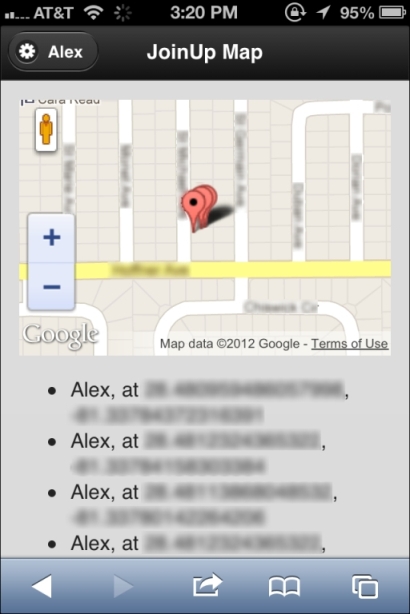
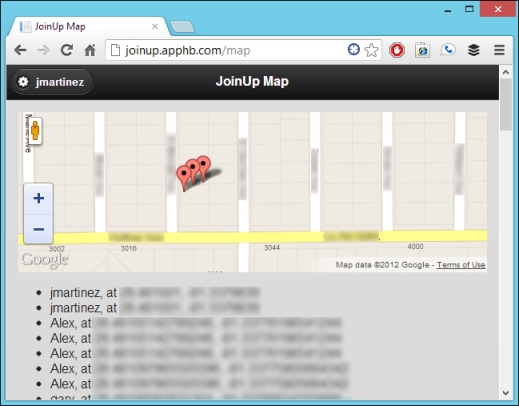
Once the application has been uploaded to the server, try accessing it from various different devices in different places. The next three screenshots demonstrate proof of the app working on the desktop:
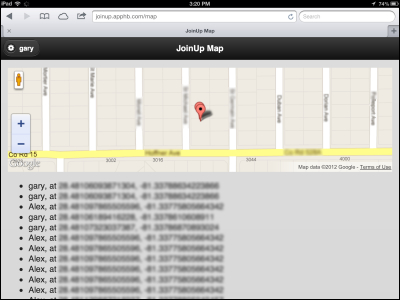
On an iPad you will see the following screen:
And on an iPhone you will see the following screen: