

Successful Workflow
There are monthly articles in almost every photography-related magazine, lectures given by experts in or near your fair city several times a year, and a never-ending stream of tips, ideas or just plain hearsay from store clerks and friends regarding just exactly what proper workflow is and how to accomplish it. For all the discussion, it’s a very difficult subject to pin down because of one simple truth: workflow is a little different for everyone.
Beginning here, we’ll take a hard look at workflow and how understanding the Canon system can lead you to make the right workflow choices to maximize your production time and minimize any necessary post-production. The idea is to get from Point A (the shoot) to Point B (completion and delivery) with a great product and the least expenditure of time.
Proper workflow begins at the camera, and there are some choices you need to make before you take your first picture.
Color Space: Adobe RGB vs. sRGB
Prior to beginning a job, it’s necessary to think of the end result. Will the images be published on a mechanical press, like this book, or will they be printed through a desktop printer or by a commercial lab? The end result may dictate your choice of Color Space.
Adobe RGB (1998), is an industry standard and offers a very wide range of reproducible colors and shades, the “gamut” of that color space, and is similar to the reproduction range of film stock. When an image is prepared for mechanical reproduction, such as this book, each image is separated into its complimentary opposites; red becomes cyan, green becomes magenta, and blue becomes yellow. This reproduction color space, called CMYK (cyan, magenta, yellow, and “key” or black) represents the smallest gamut, allowing for the proper reproduction of roughly one-half of the colors present in a full-gamut RGB image. See “Common Ground” on page 65 for more information (FIG 2.1).
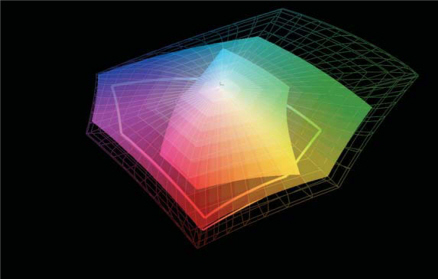
FIG 2.1 Here’s another graph representing the comparative size of the three primary color spaces. Adobe RGB (1998) is the largest, followed by sRGB and CMYK
It stands to reason that in order to get the maximum reproduction quality from an image that one would need to start with the color space that would present the largest selection of colors and shades, which is Adobe RGB. But, is that true?
The sRGB color space is smaller than its Adobe RGB counterpart, allowing for reproduction of approximately 4/5 of the maximum reproducible gamut. Many people incorrectly see RGB as a flawed color space, and shoot everything, including weddings and portraits, as Adobe RGB imagery, assuming that more colors are better than fewer and that their pictures will always look better when made in Adobe RGB.
In actuality, the vast majority of devices for printing or viewing any image are native sRGB machines. With a few notable and very high-end exceptions, all commercial lab printers are sRGB, the Internet is sRGB, and so are computer monitors whether they are CRT or LCD devices (again, with few, very high-end, exceptions).
The sRGB color space is completely acceptable as a starting point for any image meant for printing by a lab or desktop machine. While some colors might change slightly to conform to the sRGB space, those changes are generally not noticed.
When you look at the Color Space options available on Canon gear you’ll see that Canon gives you a choice of sRGB or Adobe RGB. Adobe RGB is a generic, encompassing, color space that’s meant to be tweaked by image manipulation software such as Photoshop or by a pre-press service that will optimize the images for conversion to CMYK. Does this mean you can’t shoot a portrait in Adobe RGB? Of course it doesn’t, but it does mean that you should convert those images to the sRGB profile before sending them to your lab or to the Internet, extra steps that will add to your workflow.
Shooting RAW
Another shooting option is to shoot RAW. Unlike the .jpg file format, in which the camera makes the processing decisions based on the parameters you set, a RAW file is the equivalent of a digital negative, and you decide, via Canon’s Digital Photo Professional software (supplied with the camera with free updates available online) how you want the photo to look. You can correct the exposure over about a two stop range, up or down, adjusting for exposure errors, until you get a correct image. You can also change color temperature, make contrast and sharpness adjustments, even batch process a whole folder’s worth of images. In a way, it’s like shooting color transparency film, with its very tight tolerances, but having exposure latitude closer to color negative film.
The downside is that you can spend a significant amount of time processing these files. One or two at a time, of course, is minimal. It’s when you shoot a major event, like a wedding with its requisite hundreds of shots, or a day’s worth of graduate portraits, that you’ll feel the time constraints of processing RAW files.
Personally, I have nothing against the RAW format. In fact, I think it’s a digital gift. The problem I do have with it, and with those folks who propose it as the only way to work, is that there are better ways to spend your time than sitting in front of your screen, opening, and tweaking files that should not need so much of your attention (FIGS 2.2 and 2.3)

FIG 2.2 When exposure is tightly controlled, jpegs may be all you need to produce great work. This jpeg is just as the camera made it, and has not been adjusted
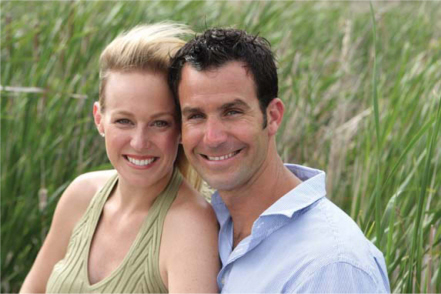
FIG 2.3 There are few discernible differences between the jpeg and this RAW file, both of which were opened “as is”
In terms of workflow (and this is only my opinion and based on my own clients and workflow), I think RAW should be used judiciously. If you are a photographer who may only shoot a minimal number of frames per day, a landscape or architectural photographer perhaps, then RAW is a great option for you, as it will allow you the greatest amount of control over your work.
For those of you who have a more production-intensive schedule, here is a solution that could save hours of post-production offof every day of your professional lives.
Canon allows you several compression ratios for your images (explained elsewhere) and also allows you to shoot RAW and .jpg at the same time. Now, RAW files do take up a fair amount of space on the storage cards, and you may have to buy more cards or download more frequently to shoot both formats, but if you want the convenience of shooting jpegs and the flexibility of RAW, shooting both RAW and high jpeg is the
best bet.
On prosumer EOS bodies, and on the Rebel, find and select Quality from the Menu. Select RAW+L. You’re good to go (FIG 2.4).

FIG 2.4
Current EOS-1 bodies, 1Ds Mark II, 1D Mark II N, use the Image Size Selection Button (the new Mark III uses the Function button), found on the bottom of the camera’s back, along with the Quick Control Dial. The selection is indicated on the camera’s rear LCD.
Note that on earlier models, such as the 1Ds, RAW+Jpeg had to be selected in the Menu, along with the desired jpeg quality, in order to obtain both formats. After the Menu selection, use the Quality button and the Quick Control Dial to find RAW. Both files will be created.
When your download is complete, open DPP and compare the two files side by side. If you’ve really messed up you use the RAW files, fix and process them, and create a file of perfect images. If the .jpg files are perfect (which should always be a goal), ignore the RAW files, make the proofs, and take the orders. Additional tweaking to get a perfect image will be minimal, and can be accomplished when client-selected files are made ready for printing (FIG 2.5).

FIG 2.5 As this screengrab indicates, there is no reason to spend extra time processing RAW files
File Accessibility
The question of how to easily access and store files is frequently raised, and is another situation that should be studied by each photographer, then implemented according to individual needs.
Regardless of how you access your files, keeping your primary computer’s hard drive full of files you might work on is not the best solution. Some say that computers function best when they are about half-full, and I have no logical argument against that. Using de-fragmenting software assures that the information that comprises your images is stored in as linear a position as possible, which means the search arm of your hard drive won’t have to skip all over the drive’s surface to reconstruct an image. Also, if you’ve got free space, you’ll never have to worry about having enough room to download a big job.
The important thing to know, especially if you’ve never experienced it, is that all devices will fail, sooner or later. It’s inevitable; a fact of life, and a problem that you must address if you want to keep your images for any reason.
My own workflow solution works like this: After a shoot, I’ll download the files and immediately make a CD or DVD of those files (what can I say, I’m paranoid) which goes into a physical file reserved for original data.
I try to shoot as much work as possible in low compression (high quality) jpeg mode, to avoid additional time processing RAW files, and I routinely shoot those jpegs for commercial, stock, or portrait work. With the tight control that I exercise over my lighting and exposure, whether with my Canon’s features or through hand-held light meters, my exposures are terrific (and my clients never complain).
If my shoot is deadlined and I will have the file on my machine for a short time, I’ll keep it there and do whatever work I need to do on the files my client orders, saving my retouched images as separate files, designated by “v.2” after the camera-given or batch-renamed file name. Once the work is complete I’ll burn another disc and file both discs together in an archive file. Once the second disc has been verified I can trash the file off the hard drive.
If my shoot is one I’ll have to work on for a while, such as a large group of stock photographs, I’ll make the first disc for insurance and keep the data on an external hard drive where I can work on it as time allows. Finished files are renamed to reflect the subject matter and are additionally copied to a special file I call “Saved Work #--,” which I back up on another drive and which is burned to two separate DVDs when the file is large enough. These discs are cataloged so I have quick reference to what I’ve finished and which “Saved Work” disc it’s on. Because this is important work, the second disc is kept in a safe place away from my office.
Being able to save more than one copy of an image is a tremendous step above film negatives. Copy negatives were never as good as originals, and if the originals were lost or damaged they could never be re-shot. Still, CD and DVD discs do fail sometimes, and the extra copy is an additional measure of insurance. Please be aware that there is great debate over the longevity of CDs and DVDs. The life expectancy of a standard CD or DVD is somewhat dicey unless it’s kept in ideal conditions.
Some say that the Gold CDs and DVDs make all the difference. A quote from the Delkin Devices website regarding their “Archival Gold” CD would indicate: “CD-R’s are known to deteriorate quickly due to Earth’s common elements: ultraviolet light, heat, and humidity. Using N.I.S.T.’s (National Institute of Standards and Technology) accelerated aging process to test the longevity of CD-R media, the Archival Gold CD-R’s have been shown to safely store your images for more than 300 years.”
If you feel your work warrants long-term storage, which is to say, longer life than that of a negative, you owe it to yourself to investigate storage methods and make the best decision for your work. “Diamonds Are Forever,” Ian Fleming wrote. Most digital media, as it’s currently defined, is not.
Want more info? Type this link into your browser to check out an optical media longevity study from the Library of Congress: http://www.itl.nist.gov/iad/894.05/docs/Public%20SP%20500263%20November%202005.pdf.
I wrote earlier that workflow is slightly different for everyone, and I think there are many important stories to tell. I’ve interviewed a few high-test Canon shooters and was given insight into their workflow habits, which I’d like to pass on to you. Read each interview to see how others do their jobs, then take what you like and apply it to your own situation.
“It was surprisingly difficult for me to fully embrace digital. I had such a familiarity for film; there’s nostalgia there, but there’re some advantages, like dynamic range. I’ve always liked to think I’m willing to change, but making the total switch to digital was one of the toughest things I’ve ever done. Younger photographers, who come in without a history in film, well, I think it’s easier for them because they have no nostalgia to overcome.”
Paul Gero started shooting with film at age 12. He saw his first prints materialize in the developer tray and fell in love with the process. He learned what his equipment could do by shooting as much as he could afford, knowing that photography was his calling.
While attending college, it took Gero 3 years of persistent interviewing to land a job as an intern at the Chicago Tribune, going full time after just 6 months. He began his professional career as a photojournalist thoroughly immersed in the medium of film. “I tried to do everything ‘right’, ” he says. “While the more seasoned guys would soup their film in hot chemistry, and be dry-to-dry in around six minutes, I’d be in the darkroom going the D-76 route, developing for the recommended period of time at the recommended temperature. I’ve always felt I was recording legacies, not mere assignments.”
For a number of reasons, newspapers were on the rise in the 1980s, and, as Gero says, “I was livin’ the dream, baby!” Indeed, while under the employ of the Tribune, Gero covered the second administration of Reagan, the conflict in Haiti, and Kennedy weddings.
Even though the majority of Tribune photographers shot a different brand, Gero felt totally at ease with his Canon T90s, working them hard every day, whether on call or shooting for pleasure.
After he left the Tribune, Gero spent the next 18 months as a contract shooter with Sygma, the photojournalism stock photography powerhouse, settling into a stint in Washington, DC. “I was basically working on my own,” he said. “I missed the ‘group collective’ feel of a newspaper. I also realized that being on call 24/7 was no longer that appealing. I wanted my own life.”
Gero accepted a job offer from the Arizona Republic, landing in Phoenix on a day that was so hot planes were actually grounded because of the heat danger to the tires, and spent the next several years on a wide variety of assignments. “It was the most fun I ever had,” he recalled. “Among other things, I covered the start of both Charles Barkley’s and Michael Jordan’s pro basketball careers; it was a terrific place to be!” Branching out, Gero began shooting weddings on the side, mostly for friends. Because it was terra incognita to him, Paul says his first efforts were “very posed, highly technical, but without much feeling.”
During his parent’s 50th anniversary party, Gero had the chance to compare their commissioned wedding album against a second album that had been shot by a friend of his mother’s, who’d shot with a Leica in available light. “The shot’s from the hired photographer were a lot like mine; technically excellent, no life. That’s when it struck me that we don’t shoot photos for now, we shoot them for the grandkids, for years from now. Wedding photography is the beginning of a family’s visual history.”
For Paul, shooting weddings brought back the euphoric feelings he’d had when he first started as a photojournalist. “I realized I’d been missing what I’d gotten into photography for, to see life as it happened naturally and to record those moments.”
Paul shoots fine portraiture and quality architectural interiors, too, but weddings are what floats his boat. “I can’t wait for ’em,” he says. “It’s such a loaded situation, good stuff’s gotta happen!”
When it does, he’s ready. Paul wears two 5D cameras at a time, one with a 24–70 zoom, the other with a 70–200 (or fast primes like the 35 mm f1.4 and the 85 mm f1.8), and shoots everything in RAW because he likes the flexibility for color temperature adjustments more than exposure. “I like to work in reverse, and let the ISO I need be dictated by the f-stop I want to use and the shutter speed I need to get it,” he says. “Being exposureconsistent is much more critical than anything else; shooting RAW makes that easy” (FIGS 2.6–2.11).
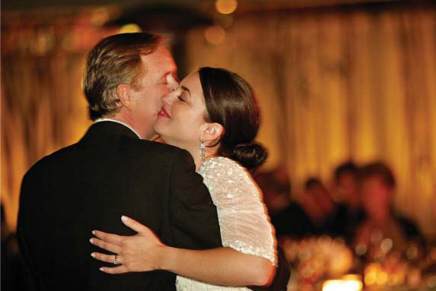
FIG 2.6 This image was made at a private home in the San Fernando Valley, on the tennis courts. The lighting behind drew me to this angle and I positioned myself to place the subjects in front of the background. Using a 70–200 2.8 IS lens at 2.8 at 1/8th of a second (handheld – this is the reason the IS is so fantastic) I used a bit of fill flash – a 550EX with a Stofen Omni-bounce aimed directly at the bride – to fill the foreground
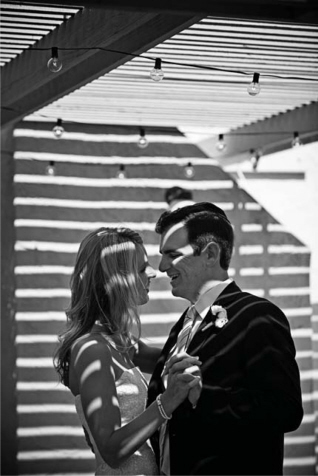
FIG 2.7 The couple dance in the shadows cast underneath the ramada at her home. Using a 70–200 IS at f2.8, 1/1000th of a second (90 mm) at 100 ISO, I was able to isolate them a bit. I converted the image to black and white in Photoshop and darkened the corners to bring the eye back to the couple

FIG 2.8 In this recessional photograph, I used available light at 400 ISO with a 70–200 2.8 IS lens at 130 mm, 1/400th at f2.8 in manual exposure mode. I stay on the couple for as long as I can as they proceed down the aisle, and then switch to a second camera with a 24–70 mm lens when they get closer to me. Working with two cameras such as I do is very typical of newspaper photographers and I bring that style of working to my wedding photography

FIG 2.9 During the speeches, I kept a close watch on the couple using a 70–200 2.8 lens (1/320th at f2.8, 200 ISO, 200 mm). This is a tricky scene because you have to watch your metering carefully. The bright values in the background can cause many meters to underexpose the foreground so you have to be aware that may happen

FIG 2.10 I kept watching the cake throughout the afternoon and evening, periodically stopping by to photograph it. But I suspected that the optimum time would be about 20–30 minutes after sunset, so I made sure to come back when the sky was dark blue, and the lanterns lit. It paid off. This image was made with a 50 mm f1.4 lens at 1/30th at f1.6 at 400 ISO, handheld
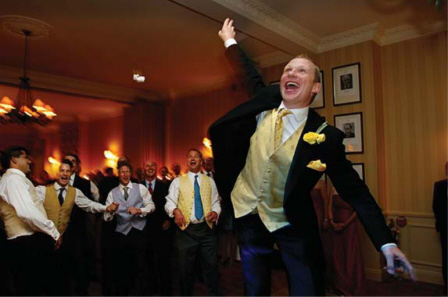
FIG 2.11 Phil tosses the garter at his wedding in London. Using a 16–35 f2.8 lens at 400 ISO and 1/15th at f2.8 with a Canon D60 camera, I knew I had basically one shot at this image (because of the speed of the camera). The slow shutter speed helped render the available light in the scene and the slightly movement and blur during the shot helps give the image some vibrancy
Note: This image was actually shot as a medium fine jpeg and the original file is approximately 8 megapixels when opened in photoshop, though I have taken it up to fit on a spread that is 20 15 and it looks amazing (rezzing up in 10% increments). The reason I shot as a medium fine jpeg is that at the time (2002) Compact Flash cards were still very expensive and I would often shoot in jpeg mode to conserve card space. Now, card costs are dramatically lower, RAW processing software incredibly good, and computer processing speeds are much faster.
He also shoots the majority of his frames in Auto White Balance. “Back when I shot color transparency film, exposure was very tight, yet I never let the lack of a critical light meter reading stop me from making an image. I’ve always been a ‘seat of my pants’ shooter, and, to be honest, I hate making Custom White Balance adjustments when I’m moving from situation to situation. I’d rather wait until I edit to gang up the similars and fix them all at one time, which is another advantage to shooting RAW.”
Editing presents its own problems, since Gero will shoot up to 3500 frames at a wedding, which makes his back-end work quite extensive. “I make four backups before I edit anything,” he says. “I have a rack of three Lexar Professional CompactFlash Readers which can download simultaneously through Photo Mechanic, a software program that was originally developed for newspaper photographers. Everything is loaded into a working hard drive as well as a backup hard drive. Then, before I do anything else, I’ll burn duplicate DVDs of all the files.” After the edit iscomplete, he processes the chosen images in Photoshop Bridge. Catalogs of available images are made with IView Media Pro.
“As I envision my workflow,” he says, “there is no one piece of current software that I can use for everything. I need one program to download, one to process, and one to catalog.”
For lighting on location, Paul is a true minimalist. “If I didn’t have to use flash, I wouldn’t,” he says. “I prefer to keep a low profile.” He goes on, “I’m just trying to maintain a documentary look, and I don’t want to announce my presence in a room by setting up multiple lights and making white balance adjustments.”
For a guy who primarily uses one Canon 580EX on-camera flash, Gero is still able to create an impressively wide range of looks by bouncing or tilting the flash. Unless the flash is bounced offa ceiling or wall, it’s most often fitted with a StoFen Omni Bounce, with many effects achieved by varying the camera’s ISO speed and the output power of the flash. He knows the newer sensors produce less noise at higher speeds than their predecessors, and he exploits that benefit whenever possible. Most of his shots are made at f2.8 or faster, allowing him to retain about 35% of the scene’s ambient light. “I like a splash of tungsten for depth and warmth,” he says, noting that he will frequently bounce light offa wall rather than a ceiling but that he always considers the angle of the bounce. “Whatever light I choose has to flatter my subject or it’s useless.”
When using flash, Paul sets the camera’s drive for One-Shot AF, which emits an infrared beam to lock focus. He’ll use the AI Servo function whenever there is enough light, to track focus between shots, although not when he’s using flash.
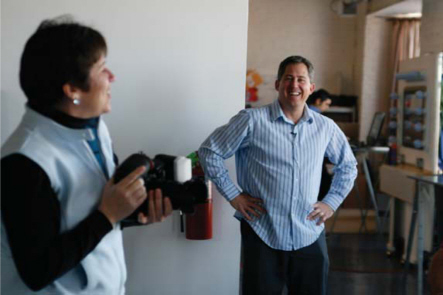
FIG. 2.12 Paul Gero at work, teaching his popular wedding photography class at ShootSmarter University, Aurora, IL
Custom Function 4.1, back-button focus, is “My bread and butter, because I can tap for focus, lock it, and recompose on the fly either in AI Servo or One Shot AF.”
In addition to being an extremely busy wedding photographer, the author of a terrific book, Digital Wedding Photography, Paul Gero is also a sought-after workshop instructor (just Google him to see what he’s up to). Should you have the chance to catch his “One Light Wonder” class, you’ll get first-hand instruction on how to make your Canon on-camera flash sing like an Italian soprano (http://www.paulfgero.com) (FIG 2.12).
