Wise and Thoughtful Features
All Canon cameras share some common features, giving the system a cohesiveness that any great camera line must have, especially when it’s the leader of the pack. Although some of the controls may look different, or be placed in other locations, anyone who’s enjoyed one EOS machine can become totally familiar with another EOS model in just a few minutes.
Power Switch
All prosumer and professional Canon cameras have a two-stepped power switch (the Rebel does not). To power the camera up, raise the toggle to either the first or second position. On prosumer EOS bodies, the first position is a general “on” switch with the Quick Control Dial disabled. The second on position will allow you to make exposure setting adjustments. Because the Quick Control Dial is so close to where you may have your thumb when shooting, it’s possible to nudge the dial inadvertently. When shooting in Program, Aperture Priority or Shutter Priority, this adjusts your exposure compensation. In Manual, this dial controls aperture. With the dial turned on, it would be possible to throw off the exposure without realizing it, so it’s a good idea to keep the power switch in the first position until you want to make adjustments (FIG 4.1).

FIG 4.1
On most EOS-1 bodies, the second power switch only powers the audible signal. On the EOS-1 bodies prior to the 1D Mark III, there is an additional switch, the Quick Control Dial Switch, located in 11 o’clock position just above and to the left of the Quick Control Dial. You may make exposure and vertical focus point adjustments only when this switch is active, however even when turned off, the Quick Control Dial will work for scrolling through the menu or moving around within an enlarged image you are reviewing (FIG 4.2).
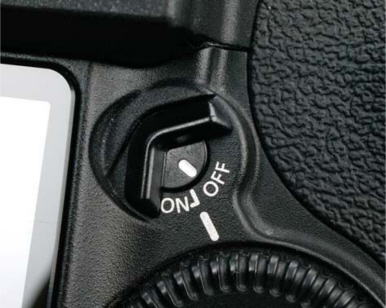
FIG 4.2
The Main Dial is located just behind the shutter button on the cameraright side. You will use this wheel to change Focus Points, make Exposure Compensation adjustments, change ISO, and to control many more functions (FIG 4.3).
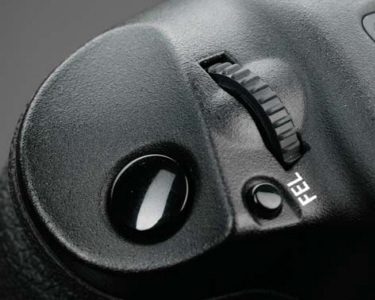
FIG 4.3
EOS-1 bodies have an extra Main Dial (with its own on/off switch), along with an additional FEL button and shutter release, located under the camera’s right side grip. Called the Vertical Grip Dial, this extra dial allows the photographer to control everything while holding the camera in a vertical position. If you’ve never had a camera with this feature it may take a little getting used to, but once you do you’ll wonder how you ever got by without it (FIG 4.4).
Quick Control Dial
Found on the back of every EOS prosumer model and EOS-1 camera, the Quick Control Dial works in conjunction with a great many of the camera’s settings (the Rebel uses a set of Cross-Keys). You will use it to dial through the many Menu items, select AF (Auto Focus) points, make exposure adjustments, or just to check images on the LCD screen.
The Quick Control Dial is also used to change focus points. On the 1Ds Mark II, for example, the only way to move your focus point up and down (without employing a Custom Function) is to have the QC dial turned on (FIG 4.5).


FIG 4.5
Please note that, on EOS prosumer bodies, you will not be able to use the Quick Control Dial to make exposure changes unless the power switch is set to the second position (FIG 4.6).

Shutter Release Button
When holding the camera as if to take a picture, the Shutter Button will be easy to reach with your right index finger (FIG 4.7).
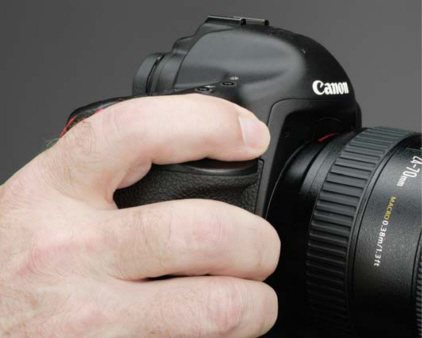
FIG 4.7
The Shutter Button is a two-stepped switch. Push it halfway down and it will activate and set auto focus (AF) and auto exposure metering(AE) for every Zone except Manual. In Manual Mode, you can use the Quick Control Dial and the Main Control Dial to move shutter speed and aperture until the Exposure Level Indicator is centered or otherwise where you want it to be. If you’re using a lens with Image Stabilization, it is also activated by a half-press of the shutter button.
With prosumer EOS bodies, the Exposure Level Indicator is found on the bottom of the viewfinder; with EOS-1 bodies it’s found on the right side of the viewfinder.
After pressing the Shutter Button halfway, it will remain active for a few seconds, after which you’ll have to press it again to reactivate it.
Pressing the Shutter Button all the way will take the picture.
Should you be checking the Menu or reviewing images, you can return to shooting almost immediately just by pushing the Shutter Button to the halfway position.

FIG 4.8
Menu
A source of wonder for some photographers, and a source of confusion for others, the Menu can look daunting. Don’t let it bother you. My suggestion is to open it, dive in, and play with it. You won’t wreck the camera, and if you mess something up and don’t know how to fix it, you can always return to Canon’s default settings and start from scratch.
Each camera model’s Menu is divided by topic and each topic is delineated by an icon. As Canon’s models move up the scale, from consumer to prosumer to professional, the number of menu items naturally increases, although the icons are consistent (FIG 4.8).
The number of Menu options varies from model to model, from 17 on the current Rebel XTi to 57 on the new Mark III, but here are some that are common to all models, with explanations of what they do and some practical advice on how to make them work for you.
Quality
Canon cameras provide a number of options for image type from RAW, with the most data and flexibility of all file types that the camera’s sensor can provide, to Large (L), Medium (M), and Small (S) jpegs. Each file size will provide high quality images. The difference is in the degree of enlargement a given file will withstand before artifacts and pixelization become noticeable.
Large jpegs deliver a full size file, so if you have a 10 megapixel sensor you will see a 30 mb file (10 mb for each channel of red, green, and blue) when it’s opened in software like Photoshop.
Medium jpegs will produce files about one-half the size, or about 15 mb for a 10 megapixel sensor. Basically, the camera ignores about half the data. This reduction in resolution will not be noticeable if the print size does not exceed the capabilities of the file.
Small jpegs will be roughly one-fourth the size of a full file, in this case about 7.5 mb. While you have less opportunity for enlargement, the lower resolution of the file will not be appreciably noticed as long as you understand, and work within, its limitations.
Based on the job at hand, it will be up to you to determine the most efficient resolution choice for your work. High-ticket jobs like commercial, advertising, portraiture, or weddings will generally demand RAW or Large jpeg files. Depending on your camera’s sensor size and resolution, images meant for snapshot prints, even 5 + 7s, will look great when shot as Medium jpegs; Small is fine for web use, possibly even for 3 + 5s or 4 + 6s.
Canon cameras offer the opportunity to shoot both RAW and jpeg files at the same time. All models allow at least RAW Large (aka High) jpeg and RAW Small jpeg. Newer models also provide RAW Medium as well as slightly more compressed versions of Large and Small jpegs. With the addition of the new, 2.5 megapixel Small RAW (sRAW) file available on the Mark III, the total number of quality options is a staggering 14 different ways to save your files (FIG 4.9).
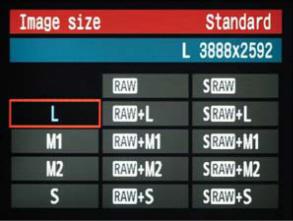
FIG 4.9
Auto Exposure Bracketing
If you primarily work in jpeg, Auto Exposure Bracketing (AEB) is a great little tool, easy to implement, that will help you get even more out of your images. There are many instances in a photographer’s career when “just a little more” or “just a little less” would have made the difference between a great image and an outstanding one, but there was no opportunity to download to a calibrated computer to judge the final image. And, although one could certainly shoot RAW and adjust an imagein manipulation software later, that does require more work. Even though it might take only a few minutes, time is money.
When you engage this feature, the camera will set itself to shoot a bracketed series of three exposures, in one-third stop increments, up to three full f-stops under and over the target exposure. This feature works in every Creative Zone mode except Bulb and is perfect for adding a bit of subtlety to your work.
With EOS-1 bodies, push the Mode and AF buttons at the same time. The top LCD panel will change from its usual inclusive display to a minimalist view showing only Exposure Compensation, 0.0, and an icon that represents a bracketed exposure (FIG 4.10).
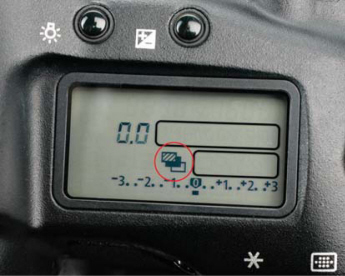
FIG 4.10
Use the Quick Control Dial to select the amount of difference between exposures (FIG 4.11).

FIG 4.11 This LCD indicates a two-stop spread between the three exposures
The AEB feature is just as easy to use with prosumer EOS bodies. Just find the item in the Menu, select it, and use the Quick Control Dial to set the amount of exposure bracket you wish. Push the shutter three times to record the exposure bracket (FIGS 4.12 and4.13).
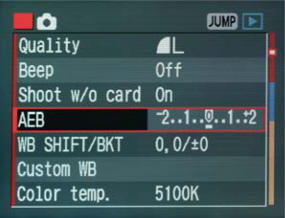
FIG 4.12

FIG 4.13
Once your picture is composed, click the shutter three times. The first exposure will be what you’ve determined to be “on the mark,” the next will be the underexposed frame, followed by the frame that’s brighter than the mark (FIGS 4.14–4.16).

FIG 4.14
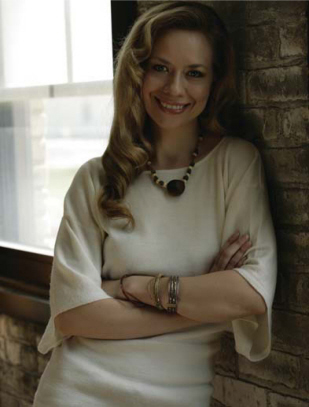
FIG 4.15
Shooting Tip
Most cameras will allow as many additional series as you wish, and AEB will remain active until you either dial the exposure spread back to zero or turn the machine off. You can change the sequence of shots and whether or not AEB stays active after a series by engaging a Custom Function. Refer to your manual to determine which Custom Function allows this on your camera.
White Balance
From the Rebel to the Mark III, all Canons have a menu of preset white balances. Meant to be used “on the fly” when walking into a scene or under rapidly changing conditions (such as dark clouds moving across sunny blue skies), they are based on predetermined color temperature numbers and will, in a general way, neutralize colors found in the situations they were built for.
Canon has placed eight of these white balance presets into each of its cameras. Let’s see how each will interpret the white balance of a typical daylight scene.
AWB (Auto White Balance) will look at any scene as it’s being shot and attempt to neutralize the color it sees from 3000–7000 K. It’s largely successful, but can be skewed (see Custom White Balance below).
Daylight uses Canon’s default color temperature of 5200 K; Shade works at 7000 K; Cloudy at 6000 K; Tungsten at 3200 K; White Fluorescent is set to 4000 K (there are huge color temperature variations in fluorescent lights); Flash at 6000 K; and Custom White Balance, which can neutralize light with a color temperature anywhere between 2000 and 10,000 K. Photos of bike in snow (FIGS 4.17–4.23).

FIG 4.17 Daylight

FIG 4.18 Shade
Custom White Balance
One of the most valuable of all the Menu items, using Custom White Balance (Custom WB or CWB) will permit you to neutralize whatever light you’re working under, changing the colors of that light, whatever they may have been, to clean, non-biased colors.


FIG 4.20 Tungsten

FIG 4.21 White Fluorescent


FIG 4.23 Custom White Balance
Light is not a constant color, except to our eyes and brain. Humans have the cerebral ability to white balance on the fly, interpreting whatever color we see to be neutral, based on our ability to see something we know to be a certain color (white, for instance) and balancing all other colors against that reference. The CWB function of the camera does exactly the same thing, except that the camera can leave us with a physical record, a print, of a situation that has been neutrally balanced.
There are a number of generic white balance settings already in play on every Canon DSLR (explained elsewhere), but they are not nearly as precise as a measured, custom, white balance.
To do this effectively you will need to meter and photograph a neutral gray or white card under the light conditions within the frame. If you’re working under studio strobes, you will need to use a calibrated flash meter to accurately measure the strength of the light. Either way, it’s important to purchase a neutral target. Typewriter paper, tablecloths, bridal gowns, or other objects contain chemicals or bluing agents that make them look neutral, but they will not white balance properly because of that chemistry. A commercially available 18% gray target will produce the most accurate white balance.

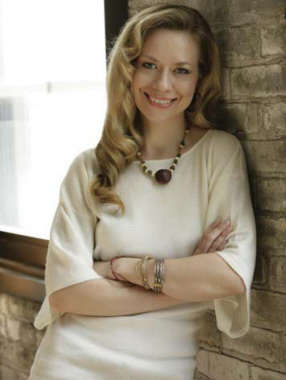
FIG 4.24 Auto White Balance sees the red background more than the subject and attempts to neutralize the two blocks of color, which it cannot do
Check your instruction manual to know how much of the frame you will have to fill to get a correct measurement. I think you should err on the side of caution and fill as much of the frame as you can. It’s not necessary for the image to be in focus, although a target like this BalanceSmarter (www.BalanceSmarter.com) with its printed lines, is helpful because you won’t have to disable AF to make the shot (FIG 4.26).
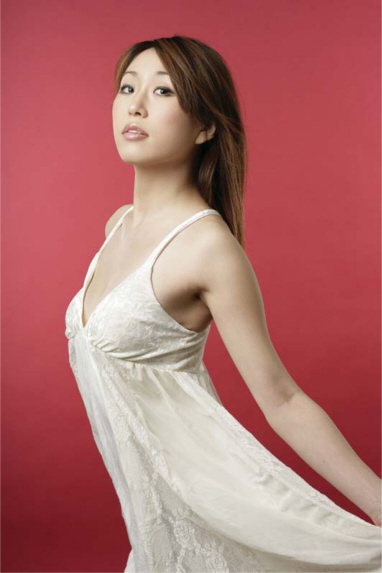
FIG 4.25 CWB doesn’t care what colors are in the scene, only the color temperature of the light that falls into it
In the Shooting menu choose Custom WB (FIG 4.27).
You will be asked to select an image, but the camera always defaults selection to the last image made. If you’re happy with that image, press Select (or Set, depending on your model) (FIG 4.28).
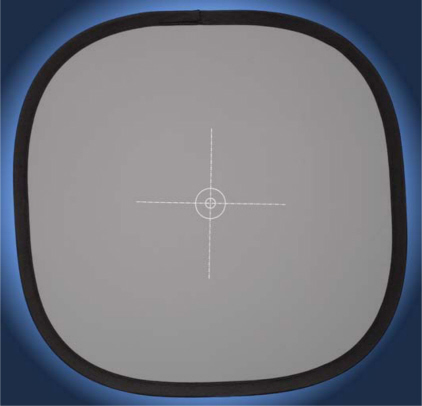

FIG 4.27

FIG 4.28
On current EOS bodies, if your White Balance icon is not set to Custom, you will be told to set it accordingly. Push the WB/AF button and scroll to the CWB icon. Custom White Balance has been set.
EOS-1 bodies will ask you if you want to “Use this white tone?”
Use the Select button and the Quick Control Dial to choose “OK” (FIG 4.29).
Push the WB (White Balance) button and use the Quick Control Dial to select the CWB icon (FIG 4.30).

FIG 4.29
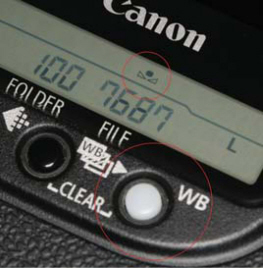
FIG 4.30

FIG 4.31 If you were to shoot some images under daylight, and then move into a fluorescent light environment, the shot you’d make of the daylight-balanced gray target would look off-color

FIG 4.32 A new image of the target shows that bad color has been neutralized
White Balance Shift/Bracket
Similar to Auto Exposure Bracketing, White Balance Shift/Bracket can produce from one to three color variations from a single exposure. It’s an interesting feature because you don’t need to shoot a bracket set, which means that if you routinely like your images a little warmer or cooler, or a little more yellow or green, you can set the screen where you wish. From the moment the feature is engaged, all of your images will exhibit the color change, regardless of which white balance mode you are in, including Custom White Balance.
To access this feature, open the Menu and select WB Shift/Bracket. Entering that screen will get you what is, essentially a color chart that you can navigate through to select either a Blue/Amber or Magenta/Green bias (FIG 4.33).
On the 30D, 5D and Mark III, you’ll use either the Main Dial or the Quick Control Dial (the Rebel doesn’t have a Quick Control Dial) to select the number of bracketed images. Use the Multi-Controller to position the bias where you want it (FIG 4.34).

FIG 4.33
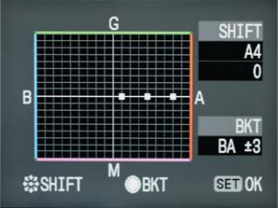
FIG 4.34
Note that the 1Ds Mark II and 1D Mark II N access this feature differently. Just check the manual for directions.
Remember, if you don’t want multiple exposures, leave BKT at ±0 (FIGS 4.35–4.37).

FIG 4.35

FIG 4.36
Color Space/Color Matrix
Color Space determines the number of colors that will be recorded (the “gamut”) when a picture is taken. Adobe RGB (1998) is a wide gamut, recording a very large range of colors. Photographers who photograph for mechanical reproduction on a press (books, catalogs, brochures) should use the Adobe RGB color space so that, when those colors are converted to the very small CMYK reproduction gamut the most information possible will be retained.
For almost all other uses, weddings, portraits, snapshots and the like, the smaller gamut sRGB is all you need. Some have decried the sRGB color space as inadequate, which I don’t believe to be true for a number of reasons. For instance, all labs use sRGB printers almost exclusively. From the 1-hour photo kiosk at the mall to the large machines at your pro lab, the sRGB color space is what the machines prefer (only a very few printers, are able to make use of Adobe RGB color space). In fact, your lab may add charges to your bill should you provide them with RGB files that they will have to convert.
Additionally, the Internet is an sRGB environment and doesn’t treat Adobe RGB images kindly. Putting an Adobe RGB image on the web will flatten some colors and make it look, well, bad.
Finally, your computer monitor, either CRT or LCD, is an sRGB device and, as such, is incapable of seeing all the colors in the Adobe RGB space. At the moment, there are very few monitors that even claim to be Adobe RGB compatible, fewer still that can live up to the claim (FIG 4.38).

FIG 4.38 This three dimensional representation of three traditional color spaces clearly shows the size of the Adobe RGB space (the largest envelope of color), sRGB (the graphed space), and CMYK, representing mechanically reproduced color
EOS bodies offer your choice of Adobe RGB or sRGB but also offer a second system, Picture Styles (described elsewhere) to change the visual characteristics of the final image.
Early EOS-1 bodies offer five different designations, similar to Picture Styles but using older logarithms, found under Color Matrix. Four of the five are sRGB color spaces, engineered to render images that mimic a number of classic film emulsions. Newer EOS bodies, currently the Rebel XTi, 30D, 5D and 1D Mark III, offer the aforementioned Picture Styles.
Protect
With this feature, you can protect any image from normal erasure. This would be useful should you find yourself running out of card space in the middle of a shoot. All photographers tend to go overboard when shooting digital because there are no processing costs associated witheach image, and usually erase images during the post-shoot edit. When you use the Protect feature you can edit in the field, save your best images, and gain important memory space.
On the Rebel and the prosumer cameras, find Protect in the Playback portion of the Menu, then use the Set button to select it. Images stored on the memory card will appear on the LCD screen, beginning with the last image made. As you scroll through the images, push the Set button for each image you wish to protect. You’ll see a small icon, a skeleton key, appear on the image, indicating that the image is locked (push the Set button a second time to unlock the image and void the protection)
(FIG 4.39).

FIG 4.39
Protecting an image is faster with the EOS-1 cameras. On the back of the camera, at the top of the row of buttons on the left side (bottom center on the 1D Mark III), is the Protect/Sound Recording button. As you scroll through the images simply push this button when you see an image you wish to protect. It won’t matter if you scroll through the images individually or in groups of four or nine, the skeleton key icon will appear on each image you select (FIG 4.40).
Erasing Images
On the bottom of “Button Row,” found on the left side of any Rebel or prosumer camera’s back, the noble trashcan patiently waits for you to use it. Scroll through the images on the memory card. When you see one you don’t want, just push the button. The rear LCD will display three boxes: Cancel, Erase, and All. Use the Quick Control Dial to erase just the selected image (Erase), or to erase every non-protected image on the card (All). You can change your mind by selecting Cancel, or just by pushing the shutter button halfway down (FIG 4.41).
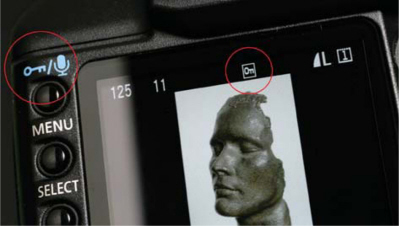
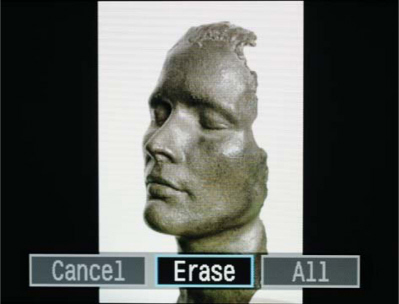
FIG 4.41
Format
In the Menu of every Canon DSLR is a function always designated as Format. Selecting Format will do two things: (1) It will completely erase all data, including any protected images, from the CF (Compact Flash) card,or the SD (Secure Data) card. (2) It will change a card that has been used in another camera for use in the camera you have in your hand (FIG 4.42).

FIG 4.42
Note that Formatting in camera simply deletes the file directory structure and allows that images on the card to be overwritten. In most cases, the images can still be rescued after an accidental format as long as the card is not overwritten.
Let’s look at each in turn.
First, think of a clean CF or SD card as a straight line. When you take two (or more) consecutive pictures on a clean card the camera writes them in sequence, one after another, using as much space on the card as is necessary for a comfortable fit. When the straight line is exhausted, the card says, “Whoa, Cowboy!” (your display may say “CARD FULL”), and won’t allow you to take any more pictures until you swap out the card for a fresh one.
Let’s assume that, instead of swapping out the card, you choose to go back through the files and eliminate those that are clearly inferior by using the Erase function. Unlike a motored hard drive, which will put bits and pieces of a file wherever there is a little room, your camera’s card can only write in a straight line, which means it will place smaller images into whatever larger slots are available or truncate (cut off) larger files which it cannot fit into an existing slot. Aside from files being truncated, a big enough problem by itself, placing smaller files into larger spaces means that some memory space, those little bits and pieces, will not be used. When that happens, there’s no way to realize the full memory potential of the card, and you won’t be able to get all the images you should.
In practical terms, what does this mean? Simply put, you should re-format each card between uses to maximize its potential. Although you can use the Erase function in the field when you find yourself without enough card space, just erasing individual images, even selecting Erase All, will ultimately hamper the performance of the card.
ISO Speed
ISO is a number that indicates the chip’s sensitivity to, and is based on formulas presented by the International Organization of Standards (who couldn’t get their initials right, but at least did a good job figuring out exposure). Based on a set series of tests, an exposure under a controlled light source at a given shutter/aperture combination will yield a perfect exposure. When the ISO is increased, the same perfect exposure will be attained at a predictable (and constant) shutter/aperture combination. Generally speaking, setting your camera to a higher ISO will allow faster shutter speeds under dimmer light, while lower ISO means slower shutters to record the same exposure.
I say generally, because with any ISO, you can manipulate the shutter/ aperture combination for creative effects (FIGS 4.43 and 4.44).
You can set your camera’s sensor to record a wider range of ISO speeds than were ever available to film shooters, even those who manipulated film stock by “pushing” or “holding” the exposure in processing, and with incredible precision. Just as you can adjust shutter and aperture values by thirds of stops, so can you adjust ISO.

FIG 4.43 A 25th of a second is close to the hand-held shutter speed limit without an IS lens. At f2.8 and ISO 100 the scene was still a little too dark for a good representation

FIG 4.44 Boosting the ISO to 200 is the equivalent of opening the lens one more stop, but without the requisite loss of depth of fi eld

FIG 4.45 The proper ISO 100 exposure was 1/60 second at f8, not quite fast enough to freeze motion in the flag


FIG 4.47 This marble statue, photographed under a table lamp, required 1/15 second at f2.8. There is almost no depth of field at that aperture

FIG 4.48 Increasing the ISO to 400 allowed f5.6 at 1/15th. Notice how much more “complete” the image appears
All Canons begin their default ISO range at ISO 100, with most capping out at ISO 1600 (the Mark III default caps at ISO 3200 but is expandable to ISO 6400!). Except for the Rebel, the ISO on all Canon models may be expanded. Using the correct Custom Function will expand the ISO range to 3200 for most cameras.
ISO expansion works the other way, too, lowering the minimum ISO to 50. This is the solution for when your shot will look better with less depth of field or more blur. Please note that, although the rule of thumb is always to shoot at the lowest ISO possible for maximum image quality, using ISO 50 will actually decrease the dynamic range of the image. This is why Canon puts 50 outside of the normal range and accessible only via a Custom Function. The highest ISO setting, 3200 on most and 6400 on the Mark III is noisier than Canon generally considers acceptable. This is why these ISO settings are not included in the regular selections.
Highlight Alert
It’s not totally accurate, but if you are close to overexposure you’ll see small portions of your image blink in the LCD. Canon’s overexposure threshold is relatively low, and any minor blinking areas should not be a huge source of alarm. When you see major portions of your displayed image blinking black to white you might want to reevaluate your exposure strategy. Test your own equipment to determine limits you find acceptable, then dial in appropriate Exposure Compensation or adjust your external light meter, if necessary.
Sensor Cleaning
It doesn’t matter that you take great pains to mount and dismount lenses properly, or that your particular camera may have a weather seal, sooner or later you will get dust on the sensor, and of a size large enough to leave a shadow of itself on an image. When that happens, the sensor must be carefully cleaned or the spot will probably stay forever.
Most dust is unnoticeable, especially at apertures larger than f22 and against patterned backgrounds. Here’s what to do to find out if your sensor is dirty.
First, set your camera’s aperture to its maximum aperture (at least f22) and the shooting Mode to Aperture Priority. You’ll want the smallest aperture to provide enough depth of field so even small spots will cast a discernible shadow.
Take a picture of any clean, white background, such as a sheet of typing paper. Because you’re using the camera’s meter on a pure white field, you may have to add Exposure Compensation to get a clean, but not overexposed, white. Make sure the background is evenly lit. It won’t matter if the image is in focus or not.
Download your image and open it in DPP or Photoshop. Enlarge it to 100% or 200%, scroll through it to look for crud. My test indicated some small chunks of crud in the frame (FIG 4.49).

FIG 4.49
Canon recommends only one method of cleaning the sensor, rapidly squeezing fresh air from an air bladder onto the sensor while holding the camera upside down. Under no circumstances should you use canned air. While the air may be clean, the propellant itself may spray out and land on the sensor, drying immediately and seriously degrading image quality. Using non-recommended methods may, in fact, void the warranty.
In a clean, relatively dust-free environment, hold the camera upside down and remove the lens or body cap. If removing a lens, place a cap on the mount before proceeding. This will keep airborne dust from landing on the mount or the rear element of the lens. Continue to hold the camera upside down, so loose particles will fall to the floor. Blow any dust offthe mirror and the interior assembly (FIG 4.50).
Find and select Sensor Cleaning in the Menu (FIG 4.51).
Your EOS-1 camera may want assurances that you’ll do the procedure correctly. Assure it that you mean it no harm and select OK. Prosumer bodies will tell you what to do when you’re done (FIGS 4.52 and 4.53).
With EOS-1 bodies, push the shutter button all the way down. Doing so will lock the mirror to the top of the viewfinder. With the prosumer bodies, the mirror will flip up and lock a second or two after you choose the Sensor Cleaning menu item.
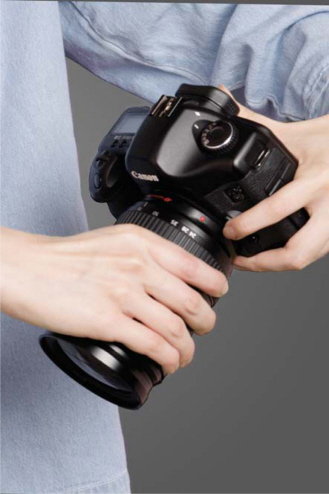
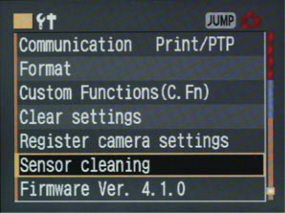

FIG 4.52 Pro EOS-1 screen
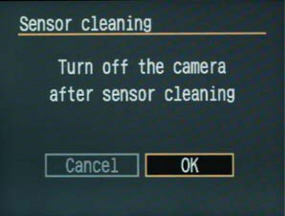
FIG 4.53 Prosumer EOS screen
Use the bladder to blow offthe sensor, taking care not to touch the surface of the chip with the end of the bladder. Be sure to blow air onto the corners of the sensor as well as across the center. Dust likes to hide out in the corners (FIG 4.54).
When you’re finished, and while still holding the camera upside down, replace the lens or body cap. Turn off the power, returning the mirror to its ready position (FIG 4.55).


FIG 4.56
As of this writing, both the Rebel XTi and the 1D Mark III feature automatic sensor cleaning which eliminates most of the need for manual sensor cleaning.
LCD Brightness
Canon allows you to adjust the brightness of the LCD screen to suit your environment. If you’re working in a studio, for example, the brightest setting may be too bright to provide an adequate estimation of the image quality, and you may think it necessary to adjust the exposure. Working outside, you’ll probably want to boost the level as high as possible. Checking an LCD image outdoors is difficult, especially in bright sun, so you’ll want all the help you can get. Both EOS body styles use a slider to select brightness with this Function, although they don’t have the same design (FIG 4.56).
Walking into Rod Evans’ studio reception room in Sioux Falls, South Dakota, is a bit like walking into an art gallery. Huge (4’ + 6’ inch and larger) prints are hung on sandblasted brick walls over plush sofas and chairs. Large windows, with carefully restored woodwork, illuminate the room with east and north light. Occupying the first floor corner of a building built in 1897 (which he purchased a number of years ago), Evans’ studio is a well thought out mix of tasteful elegance and digital convenience.
The beautiful, massive, prints look a lot more like paintings than traditional photographs, and that’s intentional. They represent the high end of Evans’ considerable talent, and have been worked in Photoshop and Painter, sometimes painted by hand, until he’s satisfied he’s created an heirloom. Says Evans, “I believe the uniqueness you bring to your work is what people are looking for, so I think the more unique you can be with posing and design, and all the technical info you have will make you better as a creator. Whatever artistic vision you bring to the table will help you survive this market.”
Rod Evans draws visual inspiration from one of the great masters of painting, John Singer Sargent. “I’m very passionate about his work,” he says, “which gives me passion for my own. I think the more passion you have, as an artist in any media, can’t help but make you better. I’m not trying to copy him, I’m trying to be inspired by his work and creativity.”
“He had the same challenges that we, as photographers have; pleasing your client and pleasing yourself as an artist. There’s a balance you have to create” (FIG 4.57).

FIG 4.57 Hans and Sanna Evans created this dramatic portrait as a wedding present for the subjects, master portrait painters Sanna Tomac and Hans-Peter Szameit. He built a special stand for Tomac to lie on so she could arch her back and drape her hair over her husband’s shoulders. Lighting was one 5 + 7 Larson softbox from camera left. Evans mounted a Canon EF 100mm f2.0 on a Hasselblad H1 fitted with a DCS Proback 645. ISO 100 at F8
Evans’ photography career started as a fluke. “I had a real job (as a sales trainer for Citibank), and someone asked me to shoot their wedding. I said yes, then realized what a huge mistake I’d made. I bought books, a camera, lights, because I knew a huge responsibility this was.” He obviously did a good job. “One thing led to the next, and I booked a few more. Pretty soon I had more business than … well, I had to make a decision of one job over the other, and I was completely enamored with photography.”
These days, Evans is strictly a portrait shooter, having left the wedding business behind years ago. “We’ve been fortunate in our market, a city of about 150,000 people which is growing rapidly,” he says. “I’m able to work Tuesday to Friday, 9 to 5, and just shoot children and families. The children and family markets are very big right now, segments of the business that are actually growing” (FIG 4.58).

FIG 4.58 Chloe To create a true work of art for this client’s home, Evans departed from his tried and true formula of placing the subject 8–10 feet from the background and, instead, had her stand right in front of the tapestry. After some exposures, Chloe tired of standing and crouched down to rest. Evans shot, and knew he had the image he wanted. Because the file was large, Evans split it into nine segments and painted each one individually, primarily using Photoshop’s Smudge tool. The incredible number of brush strokes in this image required over 60 hours of work, and was worth every minute of it. Lit by one 5 + 7 Larson softbox, 70–200mm f2.8 at f11, ISO 100
Evans has always been a Canon shooter. “I had a number of Canon film cameras, including the 1N RS, a fantastic camera,” he said. “My first Canon digital was a Kodak DCS 560 (a Canon/Kodak hybrid), one of the first 35mm digital cameras, which I keep as a memento of my $33,000 foray into digital. Technology moves so fast; today, a camera with its features would cost $800.00.”
These days Evans shoots with the venerable EOS-1Ds, although he doesn’t use it in a conventional manner. “I like to shoot under incandescent light with the camera set for a Daylight white balance,” he says. “It was a mistake I made some years ago, resulting in images with really orange light, but I liked it. Pictures I make this way have a degree of intimacy that I don’t see when I shoot ‘correctly’. It’s amazing what comes out of the camera” (FIGS 4.59 and 4.60).
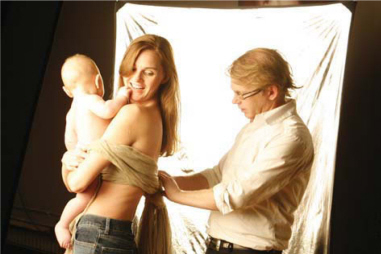
FIG 4.59 Rod Evans adjusts wardrobe for his client
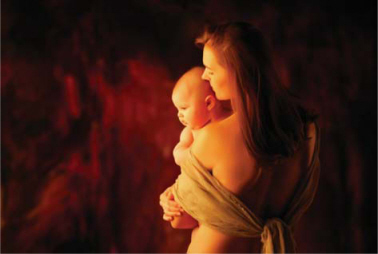
FIG 4.60 Nicole and Hugh The finished product. Evans used C.Fn4 (back button focus), Daylight white balance under tungsten light, “To give a feeling of warmth to the love that binds a mother and child.” Canon 1Ds, 70–200mm f2.8 at 1/60 second, ISO 250
He goes on. “There’s an intimacy that happens when you don’t use flash, even in the studio. Right now probably 85–90% of my portraiture is made without any flash, just higher ISO. When the flash goes off, people relax, but that’s the moment I want. So by photographing them without a flash they’re always relaxed” (FIG 4.61).
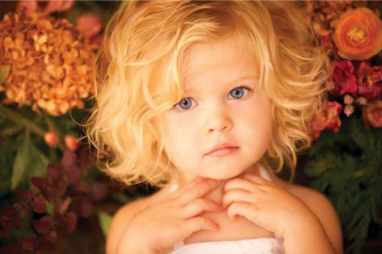
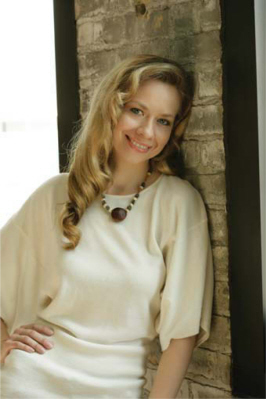
FIG 4.61 Lily Evans perched this beautiful girl on the side of a large table in his gallery, against a large vase of dried flowers. The light was totally natural, north light from three 10’ + 10’ windows, no additional reflectors or fill. Since the focus of the image was the girl’s eyes, Evans enhanced them in Photoshop, adding blue and purple accents, and changing the catchlights. “I love vibrating color,” he says. Canon 1Ds, 70-200mm f2.8 at f2.8, 1/60 at ISO 320.
Does he shoot RAW? “Absolutely,” he says. “Is there any other choice?”
Evans processes his RAW files in Capture One. Unlike many other photographers, he edits in-camera first. A typical session with a mother and child, for example, would produce approximately 150 edited images. As he explains, “Obviously, I won’t show them that many, only 30, maybe 40. More would be too overwhelming. There’s a subtlety I’m looking for. I’m very confident in my ability, so I do a great deal of in-camera editing, checking focus, expression, composition, and getting rid of what I don’t like, on the fly, so my final edit will be easier. It saves me a lot of time on the backend. Even though I’m an over-shooter, I’m also an in-camera editor.”
Evans’ somewhat unorthodox approach to shooting extends to his session philosophy as well. “I want things to go wrong,” he says. “I want there to be a mistake. Technically, I understand things; I’ve studied them for years. I want something to go wrong that will challenge me artistically. For instance, if one of my lights doesn’t function properly I won’t freak out – I like that because it forces me to do something differently, and I have to adapt and do something new. I invite challenge.”
After a somewhat low-tech session, his clients are often surprised by Evans’ high-tech presentation. After being seated in what may be the most comfortable leather couch in the world, clients watch as their images seemingly materialize in front of them. “I’m using a rear projector against a screen, called Glassfire, that’s suspended in the air on aircraft cable. So the client sits down and watches a presentation, with music, using a program called ProSelect. Think about it; clients know about computer monitors, plasma and flat-screen televisions. I want something the customer will look at and say, ‘Wow! I’ve never seen this before’ versus something that’s just too familiar.”
“The projector I’m using is very old, probably 10 years or more, and it’s only 1200 lumens, but I don’t need a lot of lumens to show images in a slightly lit room. The whole setup cost about $3000.00, a small price for the “Wow!” (FIG 4.62).

FIG 4.62 Mr. Kobal To create a distinguished portrait of this director, Evans used a silver umbrella on his key light along with a silver reflector at camera right. It’s Evans’ attention to detail and eye for nuance that makes this portrait so insightful. He used his favorite lens, the 70–20mm f2.8 at f8, ISO 100
Even though it’s taken him years to build up his market, he’s not afraid of competition, and freely offers advice to new photographers.
“First, if you’re new, you need to learn everything you can learn about this business, so that you can freely create because you have the technical expertise and knowledge. That foundation is so incredibly important.”
“Secondly, you have to find out who you are creatively and artistically, so you know what makes you different from your competition. What angle, what direction, what artistic vision, do you have. Find out what makes you excited, takes your breath away and stops you in your tracks. Study it, understand it, learn as much as you can about it, then apply it to your that subject. Your enthusiasm will only grow.”
own work. As you learn you’ll get even more excited and fascinated about
See more of Rod’s work at .http://www.evansimages.com.