Chapter 12
Security
THE FOLLOWING ICND1 EXAM TOPICS ARE COVERED IN THIS CHAPTER:
- ✓ 4.0 Infrastructure Services
- 4.6 Configure, verify, and troubleshoot IPv4 standard numbered and named access list for routed interfaces
 If you’re a sys admin, it’s my guess that shielding sensitive, critical data, as well as your network’s resources, from every possible evil exploit is a top priority of yours, right? Good to know you’re on the right page because Cisco has some really effective security solutions to equip you with the tools you’ll need to make this happen in a very real way!
The first power tool I’m going to hand you is known as the access control list (ACL). Being able to execute an ACL proficiently is an integral part of Cisco’s security solution, so I’m going to begin by showing you how to create and implement simple ACLs. From there, I’ll move to demonstrating more advanced ACLs and describe how to implement them strategically to provide serious armor for an internetwork in today’s challenging, high-risk environment.
In Appendix C, “Disabling and Configuring Network Services,” I’ll show you how to mitigate most security-oriented network threats. Make sure you don’t skip this appendix because it is chock full of great security information, and the information it contains is part of the Cisco exam objectives as well!
The proper use and configuration of access lists is a vital part of router configuration because access lists are such versatile networking accessories. Contributing mightily to the efficiency and operation of your network, access lists give network managers a huge amount of control over traffic flow throughout the enterprise. With access lists, we can gather basic statistics on packet flow and security policies can be implemented. These dynamic tools also enable us to protect sensitive devices from the dangers of unauthorized access.
In this chapter, we’ll cover ACLs for TCP/IP as well as explore effective ways available to us for testing and monitoring how well applied access lists are functioning. We’ll begin now by discussing key security measures deployed using hardware devices and VLANs and then I’ll introduce you to ACLs.
Perimeter, Firewall, and Internal Routers
You see this a lot—typically, in medium to large enterprise networks—the various strategies for security are based on some mix of internal and perimeter routers plus firewall devices. Internal routers provide additional security by screening traffic to various parts of the protected corporate network, and they achieve this using access lists. You can see where each of these types of devices would be found in Figure 12.1.

Figure 12.1 A typical secured network
I’ll use the terms trusted network and untrusted network throughout this chapter, so it’s important that you can see where they’re found in a typical secured network. The demilitarized zone (DMZ) can be global (real) Internet addresses or private addresses, depending on how you configure your firewall, but this is typically where you’ll find the HTTP, DNS, email, and other Internet-type corporate servers.
As you now know, instead of using routers, we can create VLANs with switches on the inside trusted network. Multilayer switches containing their own security features can sometimes replace internal (LAN) routers to provide higher performance in VLAN architectures.
Let’s look at some ways of protecting the internetwork using access lists.
Introduction to Access Lists
An access list is essentially a list of conditions that categorize packets, and they really come in handy when you need to exercise control over network traffic. An ACL would be your tool of choice for decision making in these situations.
One of the most common and easiest-to-understand uses of access lists is to filter unwanted packets when implementing security policies. For example, you can set them up to make very specific decisions about regulating traffic patterns so that they’ll allow only certain hosts to access web resources on the Internet while restricting others. With the right combination of access lists, network managers arm themselves with the power to enforce nearly any security policy they can invent.
Creating access lists is really a lot like programming a series of if-then statements—if a given condition is met, then a given action is taken. If the specific condition isn’t met, nothing happens and the next statement is evaluated. Access-list statements are basically packet filters that packets are compared against, categorized by, and acted upon accordingly. Once the lists are built, they can be applied to either inbound or outbound traffic on any interface. Applying an access list causes the router to analyze every packet crossing that interface in the specified direction and take the appropriate action.
There are three important rules that a packet follows when it’s being compared with an access list:
- The packet is always compared with each line of the access list in sequential order—it will always start with the first line of the access list, move on to line 2, then line 3, and so on.
- The packet is compared with lines of the access list only until a match is made. Once it matches the condition on a line of the access list, the packet is acted upon and no further comparisons take place.
- There is an implicit “deny” at the end of each access list—this means that if a packet doesn’t match the condition on any of the lines in the access list, the packet will be discarded.
Each of these rules has some powerful implications when filtering IP packets with access lists, so keep in mind that creating effective access lists definitely takes some practice.
There are two main types of access lists:
Standard access lists These ACLs use only the source IP address in an IP packet as the condition test. All decisions are made based on the source IP address. This means that standard access lists basically permit or deny an entire suite of protocols. They don’t distinguish between any of the many types of IP traffic such as Web, Telnet, UDP, and so on.
Extended access lists Extended access lists can evaluate many of the other fields in the layer 3 and layer 4 headers of an IP packet. They can evaluate source and destination IP addresses, the Protocol field in the Network layer header, and the port number at the Transport layer header. This gives extended access lists the ability to make much more granular decisions when controlling traffic.
Named access lists Hey, wait a minute—I said there were only two types of access lists but listed three! Well, technically there really are only two since named access lists are either standard or extended and not actually a distinct type. I’m just distinguishing them because they’re created and referred to differently than standard and extended access lists are, but they’re still functionally the same.
Once you create an access list, it’s not really going to do anything until you apply it. Yes, they’re there on the router, but they’re inactive until you tell that router what to do with them. To use an access list as a packet filter, you need to apply it to an interface on the router where you want the traffic filtered. And you’ve got to specify which direction of traffic you want the access list applied to. There’s a good reason for this—you may want different controls in place for traffic leaving your enterprise destined for the Internet than you’d want for traffic coming into your enterprise from the Internet. So, by specifying the direction of traffic, you can and must use different access lists for inbound and outbound traffic on a single interface:
Inbound access lists When an access list is applied to inbound packets on an interface, those packets are processed through the access list before being routed to the outbound interface. Any packets that are denied won’t be routed because they’re discarded before the routing process is invoked.
Outbound access lists When an access list is applied to outbound packets on an interface, packets are routed to the outbound interface and then processed through the access list before being queued.
There are some general access-list guidelines that you should keep in mind when creating and implementing access lists on a router:
-
You can assign only one access list per interface per protocol per direction. This means that when applying IP access lists, you can have only one inbound access list and one outbound access list per interface.
- Organize your access lists so that the more specific tests are at the top.
- Anytime a new entry is added to the access list, it will be placed at the bottom of the list, which is why I highly recommend using a text editor for access lists.
-
You can’t remove one line from an access list. If you try to do this, you will remove the entire list. This is why it’s best to copy the access list to a text editor before trying to edit the list. The only exception is when you’re using named access lists.
- Unless your access list ends with a
permit anycommand, all packets will be discarded if they do not meet any of the list’s tests. This means every list should have at least onepermitstatement or it will deny all traffic. - Create access lists and then apply them to an interface. Any access list applied to an interface without access-list test statements present will not filter traffic.
- Access lists are designed to filter traffic going through the router. They will not filter traffic that has originated from the router.
- Place IP standard access lists as close to the destination as possible. This is the reason we don’t really want to use standard access lists in our networks. You can’t put a standard access list close to the source host or network because you can only filter based on source address and all destinations would be affected as a result.
- Place IP extended access lists as close to the source as possible. Since extended access lists can filter on very specific addresses and protocols, you don’t want your traffic to traverse the entire network just to be denied. By placing this list as close to the source address as possible, you can filter traffic before it uses up precious bandwidth.
Before I move on to demonstrate how to configure basic and extended ACLs, let’s talk about how they can be used to mitigate the security threats I mentioned earlier.
Mitigating Security Issues with ACLs
The most common attack is a denial of service (DoS) attack. Although ACLs can help with a DoS, you really need an intrusion detection system (IDS) and intrusion prevention system (IPS) to help prevent these common attacks. Cisco sells the Adaptive Security Appliance (ASA), which has IDS/IPS modules, but lots of other companies sell IDS/IPS products too.
Here’s a list of the many security threats you can mitigate with ACLs:
- IP address spoofing, inbound
- IP address spoofing, outbound
- Denial of service (DoS) TCP SYN attacks, blocking external attacks
- DoS TCP SYN attacks, using TCP Intercept
- DoS smurf attacks
- Denying/filtering ICMP messages, inbound
- Denying/filtering ICMP messages, outbound
- Denying/filtering Traceroute
It’s generally a bad idea to allow into a private network any external IP packets that contain the source address of any internal hosts or networks—just don’t do it!
Here’s a list of rules to live by when configuring ACLs from the Internet to your production network to mitigate security problems:
- Deny any source addresses from your internal networks.
- Deny any local host addresses (127.0.0.0/8).
- Deny any reserved private addresses (RFC 1918).
- Deny any addresses in the IP multicast address range (224.0.0.0/4).
None of these source addresses should be ever be allowed to enter your internetwork. Now finally, let’s get our hands dirty and configure some basic and advanced access lists!
Standard Access Lists
Standard IP access lists filter network traffic by examining the source IP address in a packet. You create a standard IP access list by using the access-list numbers 1–99 or numbers in the expanded range of 1300–1999 because the type of ACL is generally differentiated using a number. Based on the number used when the access list is created, the router knows which type of syntax to expect as the list is entered. By using numbers 1–99 or 1300–1999, you’re telling the router that you want to create a standard IP access list, so the router will expect syntax specifying only the source IP address in the test lines.
The following output displays a good example of the many access-list number ranges that you can use to filter traffic on your network. The IOS version delimits the protocols you can specify access for:
Corp(config)#access-list ?

 <1-99>            IP standard access list
 <100-199>         IP extended access list
 <1000-1099>       IPX SAP access list
 <1100-1199>       Extended 48-bit MAC address access list
 <1200-1299>       IPX summary address access list
 <1300-1999>       IP standard access list (expanded range)
 <200-299>         Protocol type-code access list
 <2000-2699>       IP extended access list (expanded range)
 <2700-2799>       MPLS access list
 <300-399>         DECnet access list
 <700-799>         48-bit MAC address access list
 <800-899>         IPX standard access list
 <900-999>         IPX extended access list
 dynamic-extended  Extend the dynamic ACL absolute timer
 rate-limit        Simple rate-limit specific access list
Wow—there certainly are lot of old protocols listed in that output! IPX and DECnet would no longer be used in any of today’s networks. Let’s take a look at the syntax used when creating a standard IP access list:
Corp(config)#access-list 10 ?
  deny    Specify packets to reject
  permit  Specify packets to forward
  remark  Access list entry comment
As I said, by using the access-list numbers 1–99 or 1300–1999, you’re telling the router that you want to create a standard IP access list, which means you can only filter on source IP address.
Once you’ve chosen the access-list number, you need to decide whether you’re creating a permit or deny statement. I’m going to create a deny statement now:
Corp(config)#access-list 10 deny ?
  Hostname or A.B.C.D  Address to match
  any                  Any source host
  host                 A single host address
The next step is more detailed because there are three options available in it:
- The first option is the
anyparameter, which is used to permit or deny any source host or network. - The second choice is to use an IP address to specify either a single host or a range of them.
- The last option is to use the
hostcommand to specify a specific host only.
The any command is pretty obvious—any source address matches the statement, so every packet compared against this line will match. The host command is relatively simple too, as you can see here:
Corp(config)#access-list 10 deny host ?
  Hostname or A.B.C.D  Host address
Corp(config)#access-list 10 deny host 172.16.30.2
This tells the list to deny any packets from host 172.16.30.2. The default parameter is host. In other words, if you type access-list 10 deny 172.16.30.2, the router assumes you mean host 172.16.30.2 and that’s exactly how it will show in your running-config.
But there’s another way to specify either a particular host or a range of hosts, and it’s known as wildcard masking. In fact, to specify any range of hosts, you must use wildcard masking in the access list.
So exactly what is wildcard masking? Coming up, I’m going to show you using a standard access list example. I’ll also guide you through how to control access to a virtual terminal.
Wildcard Masking
Wildcards are used with access lists to specify an individual host, a network, or a specific range of a network or networks. The block sizes you learned about earlier used to specify a range of addresses are key to understanding wildcards.
Let me pause here for a quick review of block sizes before we go any further. I’m sure you remember that the different block sizes available are 64, 32, 16, 8, and 4. When you need to specify a range of addresses, you choose the next-largest block size for your needs. So if you need to specify 34 networks, you need a block size of 64. If you want to specify 18 hosts, you need a block size of 32. If you specify only 2 networks, then go with a block size of 4.
Wildcards are used with the host or network address to tell the router a range of available addresses to filter. To specify a host, the address would look like this:
172.16.30.5 0.0.0.0The four zeros represent each octet of the address. Whenever a zero is present, it indicates that the octet in the address must match the corresponding reference octet exactly. To specify that an octet can be any value, use the value 255. Here’s an example of how a /24 subnet is specified with a wildcard mask:
172.16.30.0 0.0.0.255This tells the router to match up the first three octets exactly, but the fourth octet can be any value.
Okay—that was the easy part. But what if you want to specify only a small range of subnets? This is where block sizes come in. You have to specify the range of values in a block size, so you can’t choose to specify 20 networks. You can only specify the exact amount that the block size value allows. This means that the range would have to be either 16 or 32, but not 20.
Let’s say that you want to block access to the part of the network that ranges from 172.16.8.0 through 172.16.15.0. To do that, you would go with a block size of 8, your network number would be 172.16.8.0, and the wildcard would be 0.0.7.255. The 7.255 equals the value the router will use to determine the block size. So together, the network number and the wildcard tell the router to begin at 172.16.8.0 and go up a block size of eight addresses to network 172.16.15.0.
This really is easier than it looks! I could certainly go through the binary math for you, but no one needs that kind of pain because all you have to do is remember that the wildcard is always one number less than the block size. So, in our example, the wildcard would be 7 since our block size is 8. If you used a block size of 16, the wildcard would be 15. Easy, right?
Just to make you’ve got this, we’ll go through some examples that will definitely help you nail it down. The following example tells the router to match the first three octets exactly but that the fourth octet can be anything:
Corp(config)#access-list 10 deny 172.16.10.0 0.0.0.255The next example tells the router to match the first two octets and that the last two octets can be any value:
Corp(config)#access-list 10 deny 172.16.0.0 0.0.255.255Now, try to figure out this next line:
Corp(config)#access-list 10 deny 172.16.16.0 0.0.3.255This configuration tells the router to start at network 172.16.16.0 and use a block size of 4. The range would then be 172.16.16.0 through 172.16.19.255, and by the way, the Cisco objectives seem to really like this one!
Let’s keep practicing. What about this next one?
Corp(config)#access-list 10 deny 172.16.16.0 0.0.7.255This example reveals an access list starting at 172.16.16.0 going up a block size of 8 to 172.16.23.255.
Let’s keep at it… What do you think the range of this one is?
Corp(config)#access-list 10 deny 172.16.32.0 0.0.15.255This one begins at network 172.16.32.0 and goes up a block size of 16 to 172.16.47.255.
You’re almost done practicing! After a couple more, we’ll configure some real ACLs.
Corp(config)#access-list 10 deny 172.16.64.0 0.0.63.255This example starts at network 172.16.64.0 and goes up a block size of 64 to 172.16.127.255.
What about this last example?
Corp(config)#access-list 10 deny 192.168.160.0 0.0.31.255This one shows us that it begins at network 192.168.160.0 and goes up a block size of 32 to 192.168.191.255.
Here are two more things to keep in mind when working with block sizes and wildcards:
- Each block size must start at 0 or a multiple of the block size. For example, you can’t say that you want a block size of 8 and then start at 12. You must use 0–7, 8–15, 16–23, etc. For a block size of 32, the ranges are 0–31, 32–63, 64–95, etc.
- The command
anyis the same thing as writing out the wildcard 0.0.0.0 255.255.255.255.
Standard Access List Example
In this section, you’ll learn how to use a standard access list to stop specific users from gaining access to the Finance department LAN.
In Figure 12.2, a router has three LAN connections and one WAN connection to the Internet. Users on the Sales LAN should not have access to the Finance LAN, but they should be able to access the Internet and the marketing department files. The Marketing LAN needs to access the Finance LAN for application services.

Figure 12.2 IP access list example with three LANs and a WAN connection
We can see that the following standard IP access list is configured on the router:
Lab_A#config t
Lab_A(config)#access-list 10 deny 172.16.40.0 0.0.0.255
Lab_A(config)#access-list 10 permit any
It’s very important to remember that the any command is the same thing as saying the following using wildcard masking:
Lab_A(config)#access-list 10 permit 0.0.0.0 255.255.255.255Since the wildcard mask says that none of the octets are to be evaluated, every address matches the test condition, so this is functionally doing the same as using the any keyword.
At this point, the access list is configured to deny source addresses from the Sales LAN to the Finance LAN and to allow everyone else. But remember, no action will be taken until the access list is applied on an interface in a specific direction!
But where should this access list be placed? If you place it as an incoming access list on Fa0/0, you might as well shut down the FastEthernet interface because all of the Sales LAN devices will be denied access to all networks attached to the router. The best place to apply this access list is on the Fa0/1 interface as an outbound list:
Lab_A(config)#int fa0/1
Lab_A(config-if)#ip access-group 10 out
Doing this completely stops traffic from 172.16.40.0 from getting out FastEthernet0/1. It has no effect on the hosts from the Sales LAN accessing the Marketing LAN and the Internet because traffic to those destinations doesn’t go through interface Fa0/1. Any packet trying to exit out Fa0/1 will have to go through the access list first. If there were an inbound list placed on F0/0, then any packet trying to enter interface F0/0 would have to go through the access list before being routed to an exit interface.
Now, let’s take a look at another standard access list example. Figure 12.3 shows an internetwork of two routers with four LANs.

Figure 12.3 IP standard access list example 2
Now we’re going to stop the Accounting users from accessing the Human Resources server attached to the Lab_B router but allow all other users access to that LAN using a standard ACL. What kind of standard access list would we need to create and where would we place it to achieve our goals?
The real answer is that we should use an extended access list and place it closest to the source! But this question specifies using a standard access list, and as a rule, standard ACLs are placed closest to the destination. In this example, Ethernet 0 is the outbound interface on the Lab_B router and here’s the access list that should be placed on it:
Lab_B#config t
Lab_B(config)#access-list 10 deny 192.168.10.128 0.0.0.31
Lab_B(config)#access-list 10 permit any
Lab_B(config)#interface Ethernet 0
Lab_B(config-if)#ip access-group 10 out
Keep in mind that to be able to answer this question correctly, you really need to understand subnetting, wildcard masks, and how to configure and implement ACLs. The accounting subnet is the 192.168.10.128/27, which is a 255.255.255.224, with a block size of 32 in the fourth octet.
With all this in mind and before we move on to restricting Telnet access on a router, let’s take a look at one more standard access list example. This one is going to require some thought. In Figure 12.4, you have a router with four LAN connections and one WAN connection to the Internet.

Figure 12.4 IP standard access list example 3
Okay—you need to write an access list that will stop access from each of the four LANs shown in the diagram to the Internet. Each of the LANs reveals a single host’s IP address, which you need to use to determine the subnet and wildcards of each LAN to configure the access list.
Here is an example of what your answer should look like, beginning with the network on E0 and working through to E3:
Router(config)#access-list 1 deny 172.16.128.0 0.0.31.255
Router(config)#access-list 1 deny 172.16.48.0 0.0.15.255
Router(config)#access-list 1 deny 172.16.192.0 0.0.63.255
Router(config)#access-list 1 deny 172.16.88.0 0.0.7.255
Router(config)#access-list 1 permit any
Router(config)#interface serial 0
Router(config-if)#ip access-group 1 out
Sure, you could have done this with one line:
Router(config)#access-list 1 deny 172.16.0.0 0.0.255.255But what fun is that?
And remember the reasons for creating this list. If you actually applied this ACL on the router, you’d effectively shut down access to the Internet, so why even have an Internet connection? I included this exercise so you can practice how to use block sizes with access lists, which is vital for succeeding when you take the Cisco exam!
Controlling VTY (Telnet/SSH) Access
Trying to stop users from telnetting or trying to SSH to a router is really challenging because any active interface on a router is fair game for VTY/SSH access. Creating an extended IP ACL that limits access to every IP address on the router may sound like a solution, but if you did that, you’d have to apply it inbound on every interface, which really wouldn’t scale well if you happen to have dozens, even hundreds, of interfaces, now would it? And think of all the latency dragging down your network as a result of each and every router checking every packet just in case the packet was trying to access your VTY lines—horrible!
Don’t give up—there’s always a solution! And in this case, a much better one, which employs a standard IP access list to control access to the VTY lines themselves.
Why does this work so well? Because when you apply an access list to the VTY lines, you don’t need to specify the protocol since access to the VTY already implies terminal access via the Telnet or SSH protocols. You also don’t need to specify a destination address because it really doesn’t matter which interface address the user used as a target for the Telnet session. All you really need control of is where the user is coming from, which is betrayed by their source IP address.
You need to do these two things to make this happen:
- Create a standard IP access list that permits only the host or hosts you want to be able to telnet into the routers.
- Apply the access list to the VTY line with the
access-class incommand.
Here, I’m allowing only host 172.16.10.3 to telnet into a router:
Lab_A(config)#access-list 50 permit host 172.16.10.3
Lab_A(config)#line vty 0 4
Lab_A(config-line)#access-class 50 in
Because of the implied deny any at the end of the list, the ACL stops any host from telnetting into the router except the host 172.16.10.3, regardless of the individual IP address on the router being used as a target. It’s a good idea to include an admin subnet address as the source instead of a single host, but the reason I demonstrated this was to show you how to create security on your VTY lines without adding latency to your router.
Extended Access Lists
Let’s go back to the standard IP access list example where you had to block all access from the Sales LAN to the finance department and add a new requirement. You now must allow Sales to gain access to a certain server on the Finance LAN but not to other network services for security reasons. What’s the solution? Applying a standard IP access list won’t allow users to get to one network service but not another because a standard ACL won’t allow you to make decisions based on both source and destination addresses. It makes decisions based only on source address, so we need another way to achieve our new goal—but what is it?
Using an extended access list will save the day because extended ACLs allow us to specify source and destination addresses as well as the protocol and port number that identify the upper-layer protocol or application. An extended ACL is just what we need to affectively allow users access to a physical LAN while denying them access to specific hosts—even specific services on those hosts!
We’re going to take a look at the commands we have in our arsenal, but first, you need to know that you must use the extended access-list range from 100 to 199. The 2000–2699 range is also available for extended IP access lists.
After choosing a number in the extended range, you need to decide what type of list entry to make. For this example, I’m going with a deny list entry:
Corp(config)#access-list 110 ?
  deny     Specify packets to reject
  dynamic  Specify a DYNAMIC list of PERMITs or DENYs
  permit   Specify packets to forward
  remark   Access list entry comment
And once you’ve settled on the type of ACL, you then need to select a protocol field entry:
Corp(config)#access-list 110 deny ?
  <0-255>  An IP protocol number
  ahp      Authentication Header Protocol
  eigrp    Cisco's EIGRP routing protocol
  esp      Encapsulation Security Payload
  gre      Cisco's GRE tunneling
  icmp     Internet Control Message Protocol
  igmp     Internet Gateway Message Protocol
  ip       Any Internet Protocol
  ipinip   IP in IP tunneling
  nos      KA9Q NOS compatible IP over IP tunneling
  ospf     OSPF routing protocol
  pcp      Payload Compression Protocol
  pim      Protocol Independent Multicast
  tcp      Transmission Control Protocol
udp User Datagram ProtocolSo now, let’s filter an Application layer protocol that uses TCP by selecting TCP as the protocol and indicating the specific destination TCP port at the end of the line. Next, we’ll be prompted for the source IP address of the host or network and we’ll choose the any command to allow any source address:
Corp(config)#access-list 110 deny tcp ?
  A.B.C.D  Source address
  any      Any source host
  host     A single source host
After we’ve selected the source address, we can then choose the specific destination address:
Corp(config)#access-list 110 deny tcp any ?
  A.B.C.D  Destination address
  any      Any destination host
  eq       Match only packets on a given port number
  gt       Match only packets with a greater port number
  host     A single destination host
  lt       Match only packets with a lower port number
  neq      Match only packets not on a given port number
  range    Match only packets in the range of port numbers
In this output, you can see that any source IP address that has a destination IP address of 172.16.30.2 has been denied:
Corp(config)#access-list 110 deny tcp any host 172.16.30.2 ?
  ack          Match on the ACK bit
  dscp         Match packets with given dscp value
  eq           Match only packets on a given port number
  established  Match established connections
  fin          Match on the FIN bit
  fragments    Check non-initial fragments
  gt           Match only packets with a greater port number
  log          Log matches against this entry
  log-input    Log matches against this entry, including input interface
  lt           Match only packets with a lower port number
  neq          Match only packets not on a given port number
  precedence   Match packets with given precedence value
  psh          Match on the PSH bit
  range        Match only packets in the range of port numbers
  rst          Match on the RST bit
  syn          Match on the SYN bit
  time-range   Specify a time-range
  tos          Match packets with given TOS value
  urg          Match on the URG bit
  <cr>
And once we have the destination host addresses in place, we just need to specify the type of service to deny using the equal to command, entered as eq. The following help screen reveals the options available now. You can choose a port number or use the application name:
Corp(config)#access-list 110 deny tcp any host 172.16.30.2 eq ?
  <0-65535>    Port number
  bgp          Border Gateway Protocol (179)
  chargen      Character generator (19)
  cmd          Remote commands (rcmd, 514)
  daytime      Daytime (13)
  discard      Discard (9)
  domain       Domain Name Service (53)
  drip         Dynamic Routing Information Protocol (3949)
  echo         Echo (7)
  exec         Exec (rsh, 512)
  finger       Finger (79)
  ftp          File Transfer Protocol (21)
  ftp-data     FTP data connections (20)
  gopher       Gopher (70)
  hostname     NIC hostname server (101)
  ident        Ident Protocol (113)
  irc          Internet Relay Chat (194)
  klogin       Kerberos login (543)
  kshell       Kerberos shell (544)
  login        Login (rlogin, 513)
  lpd          Printer service (515)
  nntp         Network News Transport Protocol (119)
  pim-auto-rp  PIM Auto-RP (496)
  pop2         Post Office Protocol v2 (109)
  pop3         Post Office Protocol v3 (110)
  smtp         Simple Mail Transport Protocol (25)
  sunrpc       Sun Remote Procedure Call (111)
  syslog       Syslog (514)
  tacacs       TAC Access Control System (49)
  talk         Talk (517)
  telnet       Telnet (23)
  time         Time (37)
  uucp         Unix-to-Unix Copy Program (540)
  whois        Nicname (43)
  www          World Wide Web (HTTP, 80)
Now let’s block Telnet (port 23) to host 172.16.30.2 only. If the users want to use FTP, fine—that’s allowed. The log command is used to log messages every time the access list entry is hit. This can be an extremely cool way to monitor inappropriate access attempts, but be careful because in a large network, this command can overload your console’s screen with messages!
Here’s our result:
Corp(config)#access-list 110 deny tcp any host 172.16.30.2 eq 23 logThis line says to deny any source host trying to telnet to destination host 172.16.30.2. Keep in mind that the next line is an implicit deny by default. If you apply this access list to an interface, you might as well just shut the interface down because by default, there’s an implicit deny all at the end of every access list. So we’ve got to follow up the access list with the following command:
Corp(config)#access-list 110 permit ip any anyThe IP in this line is important because it will permit the IP stack. If TCP was used instead of IP in this line, then UDP, etc. would all be denied. Remember, the 0.0.0.0 255.255.255.255 is the same command as any, so the command could also look like this:
Corp(config)#access-list 110 permit ip 0.0.0.0 255.255.255.255
0.0.0.0 255.255.255.255
But if you did this, when you looked at the running-config, the commands would be replaced with the any any. I like efficiency so I’ll just use the any command because it requires less typing.
As always, once our access list is created, we must apply it to an interface with the same command used for the IP standard list:
Corp(config-if)#ip access-group 110 inOr this:
Corp(config-if)#ip access-group 110 outNext, we’ll check out some examples of how to use an extended access list.
Extended Access List Example 1
For our first scenario, we’ll use Figure 12.5. What do we need to do to deny access to a host at 172.16.50.5 on the finance department LAN for both Telnet and FTP services? All other services on this and all other hosts are acceptable for the sales and marketing departments to access.

Figure 12.5 Extended ACL example 1
Here’s the ACL we must create:
Lab_A#config t
Lab_A(config)#access-list 110 deny tcp any host 172.16.50.5 eq 21
Lab_A(config)#access-list 110 deny tcp any host 172.16.50.5 eq 23
Lab_A(config)#access-list 110 permit ip any any
The access-list 110 tells the router we’re creating an extended IP ACL. The tcp is the protocol field in the Network layer header. If the list doesn’t say tcp here, you cannot filter by TCP port numbers 21 and 23 as shown in the example. Remember that these values indicate FTP and Telnet, which both use TCP for connection-oriented services. The any command is the source, which means any source IP address, and the host is the destination IP address. This ACL says that all IP traffic will be permitted from any host except FTP and Telnet to host 172.16.50.5 from any source.
After the list is created, it must be applied to the FastEthernet 0/1 interface outbound because we want to block all traffic from getting to host 172.16.50.5 and performing FTP and Telnet. If this list was created to block access only from the Sales LAN to host 172.16.50.5, then we’d have put this list closer to the source, or on FastEthernet 0/0. In that situation, we’d apply the list to inbound traffic. This highlights the fact that you really need to analyze each situation carefully before creating and applying ACLs!
Now let’s go ahead and apply the list to interface Fa0/1 to block all outside FTP and Telnet access to the host 172.16.50.5:
Lab_A(config)#int fa0/1
Lab_A(config-if)#ip access-group 110 out
Extended Access List Example 2
We’re going to use Figure 12.4 again, which has four LANs and a serial connection. We need to prevent Telnet access to the networks attached to the E1 and E2 interfaces.
The configuration on the router would look something like this, although the answer can vary:
Router(config)#access-list 110 deny tcp any 172.16.48.0 0.0.15.255
eq 23
Router(config)#access-list 110 deny tcp any 172.16.192.0 0.0.63.255
eq 23
Router(config)#access-list 110 permit ip any any
Router(config)#interface Ethernet 1
Router(config-if)#ip access-group 110 out
Router(config-if)#interface Ethernet 2
Router(config-if)#ip access-group 110 out
Here are the key factors to understand from this list:
- First, you need to verify that the number range is correct for the type of access list you are creating. In this example, it’s extended, so the range must be 100–199.
-
Second, you must verify that the protocol field matches the upper-layer process or application, which in this case, is TCP port 23 (Telnet).
- Third, verify that the destination port number matches the application you’re filtering for. In this case, port 23 matches Telnet, which is correct, but know that you can also type
telnetat the end of the line instead of 23. - Finally, the test statement
permit ip any anyis important to have there at the end of the list because it means to enable all packets other than Telnet packets destined for the LANs connected to Ethernet 1 and Ethernet 2.
Extended Access List Example 3
I want to guide you through one more extended ACL example before we move on to named ACLs. Figure 12.6 displays the network we’re going to use for this last scenario.

Figure 12.6 Extended ACL example 3
In this example, we’re going to allow HTTP access to the Finance server from source Host B only. All other traffic will be permitted. We need to be able to configure this in only three test statements, and then we’ll need to add the interface configuration.
Let’s take what we’ve learned and knock this one out:
Lab_A#config t
Lab_A(config)#access-list 110 permit tcp host 192.168.177.2 host 172.22.89.26 eq 80
Lab_A(config)#access-list 110 deny tcp any host 172.22.89.26 eq 80
Lab_A(config)#access-list 110 permit ip any any
This is really pretty simple! First we need to permit Host B HTTP access to the Finance server. But since all other traffic must be allowed, we must detail who cannot HTTP to the Finance server, so the second test statement is there to deny anyone else from using HTTP on the Finance server. Finally, now that Host B can HTTP to the Finance server and everyone else can’t, we’ll permit all other traffic with our third test statement.
Not so bad—this just takes a little thought! But wait—we’re not done yet because we still need to apply this to an interface. Since extended access lists are typically applied closest to the source, we should simply place this inbound on F0/0, right? Well, this is one time we’re not going to follow the rules. Our challenge required us to allow only HTTP traffic to the Finance server from Host B. If we apply the ACL inbound on Fa0/0, then the branch office would be able to access the Finance server and perform HTTP. So in this example, we need to place the ACL closest to the destination:
Lab_A(config)#interface fastethernet 0/1
Lab_A(config-if)#ip access-group 110 out
Perfect! Now let’s get into how to create ACLs using names.
Named ACLs
As I said earlier, named access lists are just another way to create standard and extended access lists. In medium to large enterprises, managing ACLs can become a real hassle over time! A handy way to make things easier is to copy the access list to a text editor, edit the list, then paste the new list back into the router, which works pretty well if it weren’t for the “pack rat” mentality. It’s really common to think things like, “What if I find a problem with the new list and need to back out of the change?” This and other factors cause people to hoard unapplied ACLs, and over time, they can seriously build up on a router, leading to more questions, like, “What were these ACLs for? Are they important? Do I need them?” All good questions, and named access lists are the answer to this problem!
And of course, this kind of thing can also apply to access lists that are up and running. Let’s say you come into an existing network and are looking at access lists on a router. Suppose you find an access list 177, which happens to be an extended access list that’s a whopping 93 lines long. This leads to more of the same bunch of questions and can even lead to needless existential despair! Instead, wouldn’t it be a whole lot easier to identify an access with a name like “FinanceLAN” rather than one mysteriously dubbed “177”?
To our collective relief, named access lists allow us to use names for creating and applying either standard or extended access lists. There’s really nothing new or different about these ACLs aside from being readily identifiable in a way that makes sense to humans, but there are some subtle changes to the syntax. So let’s re-create the standard access list we created earlier for our test network in Figure 12.2 using a named access list:
Lab_A#config t
Lab_A(config)# ip access-list ?
  extended    Extended Access List
  log-update  Control access list log updates
  logging     Control access list logging
  resequence  Resequence Access List
  standard    Standard Access List
Notice that I started by typing ip access-list, not access-list. Doing this allows me to enter a named access list. Next, I’ll need to specify it as a standard access list:
Lab_A(config)#ip access-list standard ?
  <1-99>       Standard IP access-list number
  <1300-1999>  Standard IP access-list number (expanded range)
  WORD         Access-list name

Lab_A(config)#ip access-list standard BlockSales
Lab_A(config-std-nacl)#
I’ve specified a standard access list, then added the name, BlockSales. I definitely could’ve used a number for a standard access list, but instead, I chose to use a nice, clear, descriptive name. And notice that after entering the name, I hit Enter and the router prompt changed. This confirms that I’m now in named access list configuration mode and that I’m entering the named access list:
Lab_A(config-std-nacl)#?
Standard Access List configuration commands:
  default  Set a command to its defaults
  deny     Specify packets to reject
  exit     Exit from access-list configuration mode
  no       Negate a command or set its defaults
  permit   Specify packets to forward

Lab_A(config-std-nacl)#deny 172.16.40.0 0.0.0.255
Lab_A(config-std-nacl)#permit any
Lab_A(config-std-nacl)#exit
Lab_A(config)#^Z
Lab_A#
So I’ve entered the access list and then exited configuration mode. Next, I’ll take a look at the running configuration to verify that the access list is indeed in the router:
Lab_A#sh running-config | begin ip access
ip access-list standard BlockSales
 deny   172.16.40.0 0.0.0.255
 permit any
!
And there it is: the BlockSales access list has truly been created and is in the running-config of the router. Next, I’ll need to apply the access list to the correct interface:
Lab_A#config t
Lab_A(config)#int fa0/1
Lab_A(config-if)#ip access-group BlockSales out
Clear skies! At this point, we’ve re-created the work done earlier using a named access list. But let’s take our IP extended example, shown in Figure 12.6, and redo that list using a named ACL instead as well.
Same business requirements: Allow HTTP access to the Finance server from source Host B only. All other traffic is permitted.
Lab_A#config t
Lab_A(config)#ip access-list extended 110
Lab_A(config-ext-nacl)#permit tcp host 192.168.177.2 host 172.22.89.26 eq 80
Lab_A(config-ext-nacl)#deny tcp any host 172.22.89.26 eq 80
Lab_A(config-ext-nacl)#permit ip any any
Lab_A(config-ext-nacl)#int fa0/1
Lab_A(config-if)#ip access-group 110 out
Okay—true—I named the extended list with a number, but sometimes it’s okay to do that! I’m guessing that named ACLs don’t seem all that exciting or different to you, do they? Maybe not in this configuration, except that I don’t need to start every line with access-list 110, which is nice. But where named ACLs really shine is that they allow us to insert, delete, or edit a single line. That isn’t just nice, it’s wonderful! Numbered ACLs just can’t compare with that, and I’ll demonstrate this in a minute.
Remarks
The remark keyword is really important because it arms you with the ability to include comments—remarks—regarding the entries you’ve made in both your IP standard and extended ACLs. Remarks are very cool because they efficiently increase your ability to examine and understand your ACLs to superhero level! Without them, you’d be caught in a quagmire of potentially meaningless numbers without anything to help you recall what all those numbers mean.
Even though you have the option of placing your remarks either before or after a permit or deny statement, I totally recommend that you choose to position them consistently so you don’t get confused about which remark is relevant to a specific permit or deny statement.
To get this going for both standard and extended ACLs, just use the access-list access-list number remark remark global configuration command like this:
R2#config t
R2(config)#access-list 110 remark Permit Bob from Sales Only To Finance
R2(config)#access-list 110 permit ip host 172.16.40.1 172.16.50.0 0.0.0.255
R2(config)#access-list 110 deny ip 172.16.40.0 0.0.0.255 172.16.50.0 0.0.0.255
R2(config)#ip access-list extended No_Telnet
R2(config-ext-nacl)#remark Deny all of Sales from Telnetting to Marketing
R2(config-ext-nacl)#deny tcp 172.16.40.0 0.0.0.255 172.16.60.0 0.0.0.255 eq 23
R2(config-ext-nacl)#permit ip any any
R2(config-ext-nacl)#do show run
[output cut]
!
ip access-list extended No_Telnet
 remark Stop all of Sales from Telnetting to Marketing
 deny   tcp 172.16.40.0 0.0.0.255 172.16.60.0 0.0.0.255 eq telnet
 permit ip any any
!
access-list 110 remark Permit Bob from Sales Only To Finance
access-list 110 permit ip host 172.16.40.1 172.16.50.0 0.0.0.255
access-list 110 deny   ip 172.16.40.0 0.0.0.255 172.16.50.0 0.0.0.255
access-list 110 permit ip any any
!
Sweet—I was able to add a remark to both an extended list and a named access list. Keep in mind that you cannot see these remarks in the output of the show access-list command, which we’ll cover next, because they only show up in the running-config.
Speaking of ACLs, I still need to show you how to monitor and verify them. This is an important topic, so pay attention!
Monitoring Access Lists
It’s always good to be able to verify a router’s configuration. Table 12.1 lists the commands that we can use to achieve that.
Table 12.1 Commands used to verify access-list configuration
| Command | Effect |
show access-list |
Displays all access lists and their parameters configured on the router. Also shows statistics about how many times the line either permitted or denied a packet. This command does not show you which interface the list is applied on. |
show access-list 110 |
Reveals only the parameters for access list 110. Again, this command will not reveal the specific interface the list is set on. |
show ip access-list |
Shows only the IP access lists configured on the router. |
show ip interface |
Displays which interfaces have access lists set on them. |
show running-config |
Shows the access lists and the specific interfaces that have ACLs applied on them. |
We’ve already used the show running-config command to verify that a named access list was in the router, so now let’s take a look at the output from some of the other commands.
The show access-list command will list all ACLs on the router, whether they’re applied to an interface or not:
Lab_A#show access-list
Standard IP access list 10
    10 deny   172.16.40.0, wildcard bits 0.0.0.255
    20 permit any
Standard IP access list BlockSales
    10 deny   172.16.40.0, wildcard bits 0.0.0.255
    20 permit any
Extended IP access list 110
    10 deny tcp any host 172.16.30.5 eq ftp
    20 deny tcp any host 172.16.30.5 eq telnet
    30 permit ip any any
    40 permit tcp host 192.168.177.2 host 172.22.89.26 eq www
    50 deny tcp any host 172.22.89.26 eq www
Lab_A#
First, notice that access list 10 as well as both of our named access lists appear on this list—remember, my extended named ACL was named 110! Second, notice that even though I entered actual numbers for TCP ports in access list 110, the show command gives us the protocol names rather than TCP ports for serious clarity.
But wait! The best part is those numbers on the left side: 10, 20, 30, etc. Those are called sequence numbers, and they allow us to edit our named ACL. Here’s an example where I added a line into the named extended ACL 110:
Lab_A (config)#ip access-list extended 110
Lab_A (config-ext-nacl)#21 deny udp any host 172.16.30.5 eq 69
Lab_A#show access-list
[output cut]
Extended IP access list 110
    10 deny tcp any host 172.16.30.5 eq ftp
    20 deny tcp any host 172.16.30.5 eq telnet
    21 deny udp any host 172.16.30.5 eq tftp
    30 permit ip any any
    40 permit tcp host 192.168.177.2 host 172.22.89.26 eq www
    50 deny tcp any host 172.22.89.26 eq www
You can see that I added line 21. I could have deleted a line or edited an existing line as well—very nice!
Here’s the output of the show ip interface command:
Lab_A#show ip interface fa0/1
FastEthernet0/1 is up, line protocol is up
  Internet address is 172.16.30.1/24
  Broadcast address is 255.255.255.255
  Address determined by non-volatile memory
  MTU is 1500 bytes
  Helper address is not set
  Directed broadcast forwarding is disabled
  Outgoing access list is 110
  Inbound access list is not set
  Proxy ARP is enabled
  Security level is default
  Split horizon is enabled
[output cut]
Be sure to notice the bold line indicating that the outgoing list on this interface is 110, yet the inbound access list isn’t set. What happened to BlockSales? I had configured that outbound on Fa0/1! That’s true, I did, but I configured my extended named ACL 110 and applied it to Fa0/1 as well. You can’t have two lists on the same interface, in the same direction, so what happened here is that my last configuration overwrote the BlockSales configuration.
And as I’ve already mentioned, you can use the show running-config command to see any and all access lists.
Summary
In this chapter you learned how to configure standard access lists to properly filter IP traffic. You discovered what a standard access list is and how to apply it to a Cisco router to add security to your network. You also learned how to configure extended access lists to further filter IP traffic. We also covered the key differences between standard and extended access lists as well as how to apply them to Cisco routers.
Moving on, you found out how to configure named access lists and apply them to interfaces on the router and learned that named access lists offer the huge advantage of being easily identifiable and, therefore, a whole lot easier to manage than mysterious access lists that are simply referred to by obscure numbers.
Appendix C, “Disabling and Configuring Network Services,” which takes off from this chapter, has a fun section in it: turning off default services. I’ve always found performing this administration task fun, and the auto secure command can help us configure basic, much-needed security on our routers.
The chapter wrapped up by showing you how to monitor and verify selected access-list configurations on a router.
Exam Essentials
Remember the standard and extended IP access-list number ranges. The number ranges you can use to configure a standard IP access list are 1–99 and 1300–1999. The number ranges for an extended IP access list are 100–199 and 2000–2699.
Understand the term implicit deny. At the end of every access list is an implicit deny. What this means is that if a packet does not match any of the lines in the access list, it will be discarded. Also, if you have nothing but deny statements in your list, the list will not permit any packets.
Understand the standard IP access-list configuration command. To configure a standard IP access list, use the access-list numbers 1–99 or 1300–1999 in global configuration mode. Choose permit or deny, then choose the source IP address you want to filter on using one of the three techniques covered in this chapter.
Understand the extended IP access-list configuration command. To configure an extended IP access list, use the access-list numbers 100–199 or 2000–2699 in global configuration mode. Choose permit or deny, the Network layer protocol field, the source IP address you want to filter on, the destination address you want to filter on, and finally, the Transport layer port number if TCP or UDP has been specified as the protocol.
Remember the command to verify an access list on a router interface. To see whether an access list is set on an interface and in which direction it is filtering, use the show ip interface command. This command will not show you the contents of the access list, merely which access lists are applied on the interface.
Remember the command to verify the access-list configuration. To see the configured access lists on your router, use the show access-list command. This command will not show you which interfaces have an access list set.
Written Lab 12
In this section, you’ll complete the following lab to make sure you’ve got the information and concepts contained within them fully dialed in:
Lab 12.1: Security
The answers to this lab can be found in Appendix A, “Answers to Written Labs.”
In this section, write the answers to the following questions:
- What command would you use to configure a standard IP access list to prevent all machines on network 172.16.0.0/16 from accessing your Ethernet network?
- What command would you use to apply the access list you created in question 1 to an Ethernet interface outbound?
- What command(s) would you use to create an access list that denies host 192.168.15.5 access to an Ethernet network?
- Which command verifies that you’ve entered the access list correctly?
- What two tools can help notify and prevent DoS attacks?
- What command(s) would you use to create an extended access list that stops host 172.16.10.1 from telnetting to host 172.16.30.5?
- What command would you use to set an access list on a VTY line?
- Write the same standard IP access list you wrote in question 1 but this time as a named access list.
- Write the command to apply the named access list you created in question 8 to an Ethernet interface outbound.
- Which command verifies the placement and direction of an access list?
Hands-on Labs
In this section, you will complete two labs. To complete these labs, you will need at least three routers. You can easily perform these labs with the Cisco Packet Tracer program. If you are studying to take your Cisco exam, you really need to do these labs!
- Lab 12.1: Standard IP Access Lists
- Lab 12.2: Extended IP Access Lists
All of the labs will use the following diagram for configuring the routers.
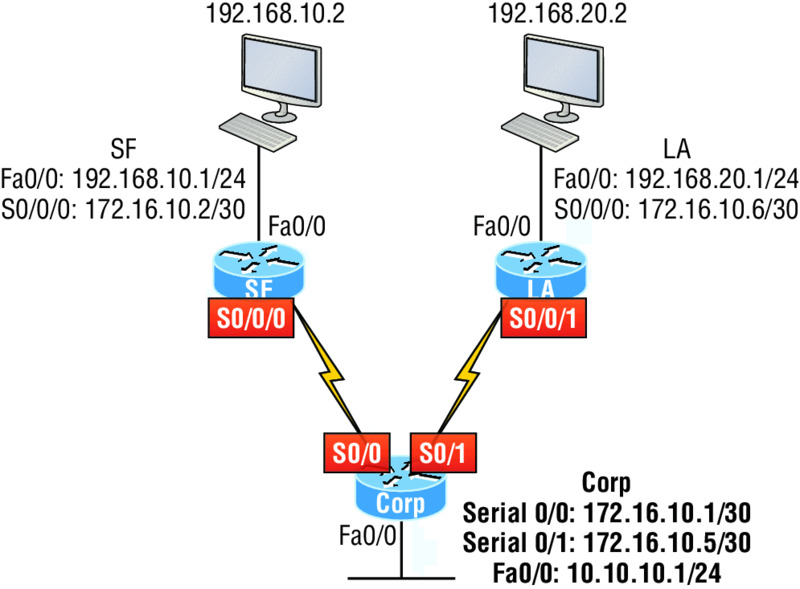
Hands-on Lab 12.1: Standard IP Access Lists
In this lab, you will allow only packets from a single host on the SF LAN to enter the LA LAN.
- Go to LA router and enter global configuration mode by typing
config t. - From global configuration mode, type
access-list ?to get a list of all the different access lists available. - Choose an access-list number that will allow you to create an IP standard access list. This is a number between 1 and 99 or 1300 and 1399.
-
Choose to permit host 192.168.10.2, which is the host address:
LA(config)#access-list 10 permit 192.168.20.2 ?
  A.B.C.D  Wildcard bits
  <cr>
To specify only host 192.168.20.2, use the wildcards 0.0.0.0:
LA(config)#access-list 10 permit 192.168.20.2 0.0.0.0 -
Now that the access list is created, you must apply it to an interface to make it work:
LA(config)#int f0/0 Lab_A(config-if)#ip access-group 10 out -
Verify your access list with the following commands:
LA#sh access-list Standard IP access list 10 permit 192.168.20.2 LA#sh run [output cut] interface FastEthernet0/0 ip address 192.168.20.1 255.255.255.0 ip access-group 10 out - Test your access list by pinging from 192.168.10.2 to 192.168.20.2.
- If you have another host on the LA LAN, ping that address, which should fail if your ACL is working.
Hands-on Lab 12.2: Extended IP Access Lists
In this lab, you will use an extended IP access list to stop host 192.168.10.2 from creating a Telnet session to router LA (172.16.10.6). However, the host still should be able to ping the LA router. IP extended lists should be placed close to the source, so add the extended list on router SF. Pay attention to the log command used in step 6. It is a Cisco objective!
- Remove any access lists on SF and add an extended list to SF.
- Choose a number to create an extended IP list. The IP extended lists use 100–199 or 2000–2699.
-
Use a
denystatement. (You’ll add apermitstatement in step 7 to allow other traffic to still work.)SF(config)#access-list 110 deny ? <0-255> An IP protocol number ahp Authentication Header Protocol eigrp Cisco's EIGRP routing protocol esp Encapsulation Security Payload gre Cisco's GRE tunneling icmp Internet Control Message Protocol igmp Internet Gateway Message Protocol igrp Cisco's IGRP routing protocol ip Any Internet Protocol ipinip IP in IP tunneling nos KA9Q NOS compatible IP over IP tunneling ospf OSPF routing protocol pcp Payload Compression Protocol tcp Transmission Control Protocol udp User Datagram Protocol -
Since you are going to deny Telnet, you must choose TCP as a Transport layer protocol:
SF(config)#access-list 110 deny tcp ? A.B.C.D Source address any Any source host host A single source host -
Add the source IP address you want to filter on, then add the destination host IP address. Use the
hostcommand instead of wildcard bits.SF(config)#access-list 110 deny tcp host 192.168.10.2 host 172.16.10.6 ? ack Match on the ACK bit eq Match only packets on a given port number established Match established connections fin Match on the FIN bit fragments Check fragments gt Match only packets with a greater port number log Log matches against this entry log-input Log matches against this entry, including input interface lt Match only packets with a lower port number neq Match only packets not on a given port number precedence Match packets with given precedence value psh Match on the PSH bit range Match only packets in the range of port numbers rst Match on the RST bit syn Match on the SYN bit tos Match packets with given TOS value urg Match on the URG bit <cr> -
At this point, you can add the
eq telnetcommand to filter host 192.168.10.2 from telnetting to 172.16.10.6. Thelogcommand can also be used at the end of the command so that whenever the access-list line is hit, a log will be generated on the console.SF(config)#access-list 110 deny tcp host 192.168.10.2 host 172.16.10.6 eq telnet log -
It is important to add this line next to create a
permitstatement. (Remember that 0.0.0.0 255.255.255.255 is the same as theanycommand.)SF(config)#access-list 110 permit ip any 0.0.0.0 255.255.255.255You must create a
permitstatement; if you just add adenystatement, nothing will be permitted at all. Please see the sections earlier in this chapter for more detailed information on thedeny anycommand implied at the end of every ACL. -
Apply the access list to the FastEthernet0/0 on SF to stop the Telnet traffic as soon as it hits the first router interface.
SF(config)#int f0/0 SF(config-if)#ip access-group 110 in SF(config-if)#^Z - Try telnetting from host 192.168.10.2 to LA using the destination IP address of 172.16.10.6. This should fail, but the
pingcommand should work. -
On the console of SF, because of the
logcommand, the output should appear as follows:01:11:48: %SEC-6-IPACCESSLOGP: list 110 denied tcp 192.168.10.2(1030) -> 172.16.10.6(23), 1 packet 01:13:04: %SEC-6-IPACCESSLOGP: list 110 denied tcp 192.168.10.2(1030) -> 172.16.10.6(23), 3 packets
Review Questions
You can find the answers to these questions in Appendix B, “Answers to Review Questions.”
-
Which of the following statements is false when a packet is being compared to an access list?
- It’s always compared with each line of the access list in sequential order.
- Once the packet matches the condition on a line of the access list, the packet is acted upon and no further comparisons take place.
- There is an implicit “deny” at the end of each access list.
- Until all lines have been analyzed, the comparison is not over.
-
You need to create an access list that will prevent hosts in the network range of 192.168.160.0 to 192.168.191.0. Which of the following lists will you use?
access-list 10 deny 192.168.160.0 255.255.224.0access-list 10 deny 192.168.160.0 0.0.191.255access-list 10 deny 192.168.160.0 0.0.31.255access-list 10 deny 192.168.0.0 0.0.31.255
-
You have created a named access list called BlockSales. Which of the following is a valid command for applying this to packets trying to enter interface Fa0/0 of your router?
(config)#ip access-group 110 in(config-if)#ip access-group 110 in(config-if)#ip access-group Blocksales in(config-if)#BlockSales ip access-list in
-
Which access list statement will permit all HTTP sessions to network 192.168.144.0/24 containing web servers?
access-list 110 permit tcp 192.168.144.0 0.0.0.255 any eq 80access-list 110 permit tcp any 192.168.144.0 0.0.0.255 eq 80access-list 110 permit tcp 192.168.144.0 0.0.0.255 192.168.144.0 0.0.0.255 any eq 80access-list 110 permit udp any 192.168.144.0 eq 80
-
Which of the following access lists will allow only HTTP traffic into network 196.15.7.0?
access-list 100 permit tcp any 196.15.7.0 0.0.0.255 eq wwwaccess-list 10 deny tcp any 196.15.7.0 eq wwwaccess-list 100 permit 196.15.7.0 0.0.0.255 eq wwwaccess-list 110 permit ip any 196.15.7.0 0.0.0.255access-list 110 permit www 196.15.7.0 0.0.0.255
-
What router command allows you to determine whether an IP access list is enabled on a particular interface?
show ip portshow access-listsshow ip interfaceshow access-lists interface
-
In the work area, connect the
showcommand to its function on the right.
-
If you wanted to deny all Telnet connections to only network 192.168.10.0, which command could you use?
access-list 100 deny tcp 192.168.10.0 255.255.255.0 eq telnetaccess-list 100 deny tcp 192.168.10.0 0.255.255.255 eq telnetaccess-list 100 deny tcp any 192.168.10.0 0.0.0.255 eq 23access-list 100 deny 192.168.10.0 0.0.0.255 any eq 23
-
If you wanted to deny FTP access from network 200.200.10.0 to network 200.199.11.0 but allow everything else, which of the following command strings is valid?
-
access-list 110 deny 200.200.10.0 to network 200.199.11.0 eq ftpaccess-list 111 permit ip any 0.0.0.0 255.255.255.255 access-list 1 deny ftp 200.200.10.0 200.199.11.0 any anyaccess-list 100 deny tcp 200.200.10.0 0.0.0.255 200.199.11.0 0.0.0.255 eq ftp-
access-list 198 deny tcp 200.200.10.0 0.0.0.255 200.199.11.0 0.0.0.255 eq ftpaccess-list 198 permit ip any 0.0.0.0 255.255.255.255
-
-
You want to create an extended access list that denies the subnet of the following host: 172.16.50.172/20. Which of the following would you start your list with?
access-list 110 deny ip 172.16.48.0 255.255.240.0 anyaccess-list 110 udp deny 172.16.0.0 0.0.255.255 ip anyaccess-list 110 deny tcp 172.16.64.0 0.0.31.255 any eq 80access-list 110 deny ip 172.16.48.0 0.0.15.255 any
-
Which of the following is the wildcard (inverse) version of a /27 mask?
- 0.0.0.7
- 0.0.0.31
- 0.0.0.27
- 0.0.31.255
-
You want to create an extended access list that denies the subnet of the following host: 172.16.198.94/19. Which of the following would you start your list with?
access-list 110 deny ip 172.16.192.0 0.0.31.255 anyaccess-list 110 deny ip 172.16.0.0 0.0.255.255 anyaccess-list 10 deny ip 172.16.172.0 0.0.31.255 anyaccess-list 110 deny ip 172.16.188.0 0.0.15.255 any
-
The following access list has been applied to an interface on a router:
access-list 101 deny tcp 199.111.16.32 0.0.0.31 host 199.168.5.60Which of the following IP addresses will be blocked because of this single rule in the list? (Choose all that apply.)
- 199.111.16.67
- 199.111.16.38
- 199.111.16.65
- 199.11.16.54
-
Which of the following commands connects access list 110 inbound to interface Ethernet0?
Router(config)#ip access-group 110 inRouter(config)#ip access-list 110 inRouter(config-if)#ip access-group 110 inRouter(config-if)#ip access-list 110 in
-
What is the effect of this single-line access list?
access-list 110 deny ip 172.16.10.0 0.0.0.255 host 1.1.1.1- Denies only the computer at 172.16.10
- Denies all traffic
- Denies the subnet 172.16.10.0/26
- Denies the subnet 172.16.10.0/25
-
You configure the following access list. What will the result of this access list be?
access-list 110 deny tcp 10.1.1.128 0.0.0.63 any eq smtp access-list 110 deny tcp any any eq 23 int ethernet 0 ip access-group 110 out- Email and Telnet will be allowed out E0.
- Email and Telnet will be allowed in E0.
- Everything but email and Telnet will be allowed out E0.
- No IP traffic will be allowed out E0.
-
Which of the following series of commands will restrict Telnet access to the router?
-
Lab_A(config)#access-list 10 permit 172.16.1.1Lab_A(config)#line con 0Lab_A(config-line)#ip access-group 10 in -
Lab_A(config)#access-list 10 permit 172.16.1.1Lab_A(config)#line vty 0 4Lab_A(config-line)#access-class 10 out -
Lab_A(config)#access-list 10 permit 172.16.1.1Lab_A(config)#line vty 0 4Lab_A(config-line)#access-class 10 in -
Lab_A(config)#access-list 10 permit 172.16.1.1Lab_A(config)#line vty 0 4Lab_A(config-line)#ip access-group 10 in
-
-
Which of the following is true regarding access lists applied to an interface?
- You can place as many access lists as you want on any interface until you run out of memory.
- You can apply only one access list on any interface.
- One access list may be configured, per direction, for each layer 3 protocol configured on an interface.
- You can apply two access lists to any interface.
-
What is the most common attack on a network today?
- Lock picking
- Naggle
- DoS
auto secure
-
You need to stop DoS attacks in real time and have a log of anyone who has tried to attack your network. What should you do your network?
- Add more routers.
- Use the
auto securecommand. - Implement IDS/IPS.
- Configure Naggle.