Chapter 5. Security Overview on the Cisco Expressway
This chapter covers the following topics:
![]() Describe SIP Media Encryption Mode: This topic will explain how signaling and media is encrypted and sent through its call legs. We will also cover the encryption policy options.
Describe SIP Media Encryption Mode: This topic will explain how signaling and media is encrypted and sent through its call legs. We will also cover the encryption policy options.
![]() Certificates: This topic will explain how certificates are used and applied regarding the Cisco Expressway.
Certificates: This topic will explain how certificates are used and applied regarding the Cisco Expressway.
![]() Administrator Authentication: This topic will summarize the security approach from an administrative level and define Advanced Account Security and FIPS 140-2 relative to the Cisco Expressway.
Administrator Authentication: This topic will summarize the security approach from an administrative level and define Advanced Account Security and FIPS 140-2 relative to the Cisco Expressway.
Chapter 5 focused on the security aspects of the Cisco Expressway and security relative topics.
This chapter covers the following objectives from the Implementing Cisco Collaboration Cloud and Edge Solutions (CLCEI) exam 300-820:
![]() 1.6.a Describe SIP Media Encryption Mode – Auto
1.6.a Describe SIP Media Encryption Mode – Auto
![]() 1.6.b Describe SIP Media Encryption Mode – Force Encrypted
1.6.b Describe SIP Media Encryption Mode – Force Encrypted
![]() 1.6.c Describe SIP Media Encryption Mode – Force Unencrypted
1.6.c Describe SIP Media Encryption Mode – Force Unencrypted
![]() 1.6.d Describe SIP Media Encryption Mode – Best Effort
1.6.d Describe SIP Media Encryption Mode – Best Effort
![]() 1.8.c Describe Key Expressway – Certificates
1.8.c Describe Key Expressway – Certificates
![]() 2.1.c Configure Key Expressway Settings – Certificates
2.1.c Configure Key Expressway Settings – Certificates
![]() 2.4.b Configure a Business to Business (B2B) Collaboration Solution – Certificates (focus on Microsoft CA)
2.4.b Configure a Business to Business (B2B) Collaboration Solution – Certificates (focus on Microsoft CA)
“Do I Know This Already?” Quiz
The “Do I Know This Already?” quiz allows you to assess whether you should read this entire chapter thoroughly or jump to the “Exam Preparation Tasks” section. If you are in doubt about your answers to these questions or your own assessment of your knowledge of the topics, read the entire chapter. Table 5-1 lists the major headings in this chapter and their corresponding “Do I Know This Already?” quiz questions. You can find the answers in Appendix A, “Answers to the ‘Do I Know This Already?’ Quizzes.”
Table 5-1 ”Do I Know This Already?” Section-to-Question Mapping

Caution
The goal of self-assessment is to gauge your knowledge of the topics in this chapter. If you do not know the answer to a question or are only partially sure of the answer, you should mark that question as wrong for purposes of the self-assessment. Giving yourself credit for an answer you correctly guess skews your self-assessment results and might provide you with a false sense of security.
1. When using encryption signaling for SIP, what protocol will Transport Layer Security (TLS) be implemented on?
a. UDP
b. TCP
c. RTP
d. RTMT
2. Which encryption policy delegates the encryption decision to the endpoints?
a. Forced encryption
b. Forced unencryption
c. Best effort
d. Auto
3. Which component of the certificate process issues the certificates?
a. Expressway
b. Certificate Authority (CA)
c. Firewall
d. Certificate Policy
4. Which of the following web pages allows you to manage the list of certificates for the Certificate Authorities (CAs) trusted by an Expressway?
a. Trusted CA certificate page
b. Server certificate page
c. Certificate-based authentication configuration page
d. CRL management page
5. When in secure mode, which the following changes and limitations to standard Expressway functionality apply? (Choose two.)
a. Access over Telnet and through the serial port is disabled and cannot be turned on (the pwrec password recovery function is also unavailable).
b. The command line interface (CLI) and API access are unavailable.
c. Administrator account authentication source is set to Local only and cannot be changed.
d. Only the administrator account may change the emergency account.
e. The command line interface (CLI) and API access are unavailable.
6. FIPS140-2 compliance requires the following restrictions? (Choose two.)
a. System-wide SIP transport mode settings must be TCP: On, and UDP: On.
b. All SIP zones must use UDP.
c. System-wide SIP transport mode settings must be TLS: On, TCP: Off, and UDP: Off
d. All SIP zones must use TLS.
Foundation Topics
Describe SIP Media Encryption Mode
With more services extending beyond the internal network, and with internal networks potentially subject to internal attacks, encryption and authentication are becoming increasingly critical. Encryption protects against attacks such as eavesdropping, tampering, and session replay. If an unauthorized user is able to capture the traffic, he/she would not be able to decrypt the contents of the communication or modify it without knowing the encryption keys. Encryption can also provide authentication through digital certificates when the encrypted communication is set up. Cisco Collaboration Solutions use Transport Layer Security (TLS) and Secure Real-time Transport Protocol (SRTP) for signaling and media encryption.
The TLS protocol is designed to provide authentication, data integrity, and confidentiality for communications between two applications. TLS operates in a client/server mode with one side acting as the “server” and the other side acting as the “client.” TLS requires TCP as the reliable transport layer protocol to operate over. TLS is used to secure the SIP signaling protocol in Cisco Collaboration devices to the call controls such as the Cisco Expressway or Unified CM.
Secure RTP (SRTP), defined in IETF RFC 3711, details the methods of providing confidentiality and data integrity for both Real-time Transport Protocol (RTP) voice and video media, as well as their corresponding Real-time Transport Control Protocol (RTCP) streams. SRTP accomplishes this through the use of encryption and message authentication headers.
In SRTP, encryption applies only to the payload of the RTP packet. Message authentication, however, is applied to both the RTP header and the RTP payload. Because message authentication applies to the RTP sequence number within the header, SRTP indirectly provides protection against replay attacks as well. SRTP ciphers include Authentication Encryption with Associated Data (AEAD) with Advanced Encryption Standards (AES) 256 or 128 and with Secure Hash Algorithm (SHA) 2. SRTP cipher based on Hash-based Message Authentication Code with AES 128 and SHA-1 could also be negotiated if it is not disallowed in the configuration.
Signaling and media encryption is important for business-to-business calls, but it needs to be deployed carefully so as not to restrict or limit the ability to receive calls. There is a variety of older SIP and H.323 systems that you may be communicating with that do not support signaling or media encryption.

Based on zone configuration, encryption policies might be set as forced (force encrypted), desirable (best effort), not allowed (force unencrypted), or left to the endpoint decisions (auto).
If force encrypted is configured on a target zone and the Expressway is receiving a call for an endpoint on that remote zone, then Expressway will set up an encrypted call. If the remote party accepts only unencrypted calls, the call will be dropped. If the calling endpoint is using TCP and sending unencrypted media, and force encrypted is configured on the target zone, Expressway will terminate the call leg and set up another call leg to the destination with TLS and encryption.
When Expressway performs RTP to SRTP, it uses a back-to-back user agent (B2BUA) for business-to-business calls. The B2BUA terminates both signaling and media and sets up a new call leg to the destination. The B2BUA is engaged any time the media encryption mode is configured to a setting other than auto. Note that SIP TLS to TCP interworking requires the B2BUA only if the media is sent encrypted; otherwise it does not require the B2BUA. Exception occurs only in the following scenario affecting Expressway-E: if the inbound zone and outbound zone are set to the same encryption media type and one of those zones is a Traversal Server zone, Expressway-E checks the value of the associated Traversal Client zone. If all three of these zones are set to the same value, the Expressway-E will not engage the B2BUA. In this case, B2BUA will be engaged only on Expressway-C. With best effort, if Expressway cannot set up an encrypted call, it will fall back to unencrypted.
Depending on the requirements, different media encryption policies might be configured. If a corporate enforcing policy is not in place, the recommendation is to set up zones with auto specified as the media encrypted mode. A setting of auto delegates the encryption decisions to endpoints, and Expressway does not perform any sort of RTP-to-SRTP conversion.
When the encryption policy is enforced on Expressway, the call will be divided into many call legs due to B2BUA engagement, as in the following scenario:
![]() Expressway-C neighbor zone to Unified CM set to auto
Expressway-C neighbor zone to Unified CM set to auto
![]() Expressway-C traversal client zone set to best effort
Expressway-C traversal client zone set to best effort
![]() Expressway-E traversal server zone set to best effort
Expressway-E traversal server zone set to best effort
![]() Expressway-E DNS zone set to auto
Expressway-E DNS zone set to auto
![]() Calling endpoint on Unified CM configured for encryption, and Unified CM configured in mixed mode
Calling endpoint on Unified CM configured for encryption, and Unified CM configured in mixed mode
![]() Called endpoint or system does not support encryption
Called endpoint or system does not support encryption
For example, consider a scenario where Unified CM is in mixed mode and the calling endpoint is configured for encryption. In this scenario, a secure endpoint on Unified CM calls an unencrypted endpoint on the Internet. The call will consist of the following call legs:
1. Unified CM endpoint to Expressway-C B2BUA, encrypted
2. Expressway-C B2BUA to Expressway-E B2BUA, encrypted
3. Expressway-E B2BUA to the Internet, up to unknown remote edge or final destination, unencrypted
4. Remote edge to final destination, encrypted or unencrypted depending on called partner’s settings
If call legs 1 through 3 are encrypted, the lock icon will display correctly. If one of these legs is not encrypted, the lock icon will not display. Note that the last call leg is under the control of another company, and as such does not influence the lock status.
Every company has the control of encryption up to the other company’s edge, thus allowing an endpoint to establish an encrypted call from the endpoint to the remote edge. Encryption policy protects media on the Internet if force encrypted is configured on Expressway; but once the call hits the remote edge, the call might be decrypted at the edge level before sending it to the called endpoint.
Certificates
For TLS encryption to work successfully in a connection between a client and server:
![]() The server must have a certificate installed that verifies its identity, which is issued by a Certificate Authority (CA).
The server must have a certificate installed that verifies its identity, which is issued by a Certificate Authority (CA).
![]() The client must trust the CA that signed the certificate used by the server.
The client must trust the CA that signed the certificate used by the server.
Expressway lets you install a certificate that can represent the Expressway as either a client or a server in TLS connections. Expressway can also authenticate client connections (typically from a web browser) over HTTPS. You can upload certificate revocation lists (CRLs) for the CAs used to verify LDAP server and HTTPS client certificates. Expressway can generate server certificate signing requests (CSRs), so there is no need to use an external mechanism to do this. Use Table 5-2 to assist with who acts as the TLS server or client. Certificate and CRL files are managed via the web interface and cannot be installed using the CLI.
Table 5-2 Expressway Role in Different Connection Types

For all secure communications (HTTPS and SIP/TLS), it is strongly recommended that you replace the Expressway default certificate with a certificate generated by a trusted CA. TLS can be difficult to configure. So, if using it with an LDAP server, for example, we recommend verifying that the system works correctly over TCP, before you attempt to secure the connection with TLS. We also recommend using a third-party LDAP browser to verify that your LDAP server is correctly configured for TLS.
Caution
Certificates must be RFC-compliant. Do not allow CA certificates or CRLs to expire, as this may cause certificates signed by those CAs to be rejected.
Configuring Certificate-Based Authentication
The Certificate-based authentication configuration page (Maintenance > Security > Certificate-based authentication configuration) is used to configure how the Expressway retrieves authorization credentials (the username) from a client browser’s certificate. This configuration is required if Client certificate-based security (defined on the System page) is set to Certificate-based authentication. This setting means that the standard login mechanism is no longer available and that administrators (and FindMe accounts, if accessed via the Expressway) can log in only if they present a valid browser certificate—typically provided via a smart card (also referred to as a Common Access Card or CAC)—and the certificate contains appropriate credentials that have a suitable authorization level.
Enabling Certificate-Based Authentication
The following recommended procedure describes how to enable certificate-based authentication:
Step 1. Add the Expressway’s trusted CA and server certificate files (on the Trusted CA certificate and Server certificate pages, respectively).
Step 2. Configure certificate revocation lists (on the CRL management page).
Step 3. Use the Client certificate testing page to verify that the client certificate you intend to use is valid.
Step 4. Set Client certificate-based security to Certificate validation (on the System administration page).
Step 5. Restart the Expressway.
Step 6. Use the Client certificate testing page again to set up the required regex and format patterns to extract the username credentials from the certificate.
Step 7. Only when you are sure that the correct username is being extracted from the certificate, set Client certificate-based security to Certificate-based authentication.
Authentication Versus Authorization
When the Expressway is operating in certificate-based authentication mode, user authentication is managed by a process external to the Expressway.
When a user attempts to log in to the Expressway, the Expressway will request a certificate from the client browser. The browser may then interact with a card reader to obtain the certificate from the smart card (or alternatively the certificate may already be loaded into the browser). To release the certificate from the card/browser, the user will typically be requested to authenticate themselves by entering a PIN. If the client certificate received by the Expressway is valid (signed by a trusted certificate authority, in date and not revoked by a CRL) then the user is deemed to be authenticated.
To determine the user’s authorization level (read-write, read-only and so on) the Expressway must extract the user’s authorization username from the certificate and present it to the relevant local or remote authorization mechanism.
Note that if the client certificate is not protected (by a PIN or some other mechanism) then unauthenticated access to the Expressway may be possible. This lack of protection may also apply if the certificates are stored in the browser, although some browsers do allow you to password protect their certificate store.
Obtaining the Username from the Certificate
The username is extracted from the client browser’s certificate according to the patterns defined in the Regex and Username format fields on the Certificate-based authentication configuration page:
![]() In the Regex field, use the (?<name>regex) syntax to supply names for capture groups so that matching sub-patterns can be substituted in the associated Username format field, for example: /(Subject:.*, CN=(?<Group1>.*))/m.
In the Regex field, use the (?<name>regex) syntax to supply names for capture groups so that matching sub-patterns can be substituted in the associated Username format field, for example: /(Subject:.*, CN=(?<Group1>.*))/m.
![]() The regex defined here must conform to PHP regex guidelines.
The regex defined here must conform to PHP regex guidelines.
![]() The Username format field can contain a mixture of fixed text and the capture group names used in the Regex. Delimit each capture group name with #, for example, prefix#Group1#suffix. Each capture group name will be replaced with the text obtained from the regular expression processing.
The Username format field can contain a mixture of fixed text and the capture group names used in the Regex. Delimit each capture group name with #, for example, prefix#Group1#suffix. Each capture group name will be replaced with the text obtained from the regular expression processing.
You can use the Client certificate testing page (Maintenance > Security > Client certificate testing) to test the outcome of applying different Regex and Username format combinations to a certificate.
Emergency Account and Certificate-based Authentication
Advanced account security mode requires that you use only remote authentication, but also mandates that you have an emergency account in case the authentication server is unavailable. If you are using certificate-based authentication, the emergency account must be able to authenticate by presenting a valid certificate with matching credentials. You should create a client certificate for the emergency account, make sure that the CN matches the Username format, and load the certificate into the emergency administrator’s certificate store.
Managing the Trusted CA Certificate List
The Trusted CA certificate page (Maintenance > Security > Trusted CA certificate) allows you to manage the list of certificates for the Certificate Authorities (CAs) trusted by this Expressway. When a TLS connection to Expressway mandates certificate verification, the certificate presented to the Expressway must be signed by a trusted CA in this list and there must be a full chain of trust (intermediate CAs) to the root CA.
![]() To upload a new file containing one or more CA certificates, select Browse to locate the required PEM file and click Append CA certificate. This will append any new certificates to the existing list of CA certificates. If you are replacing existing certificates for a particular issuer and subject, you have to manually delete the previous certificates.
To upload a new file containing one or more CA certificates, select Browse to locate the required PEM file and click Append CA certificate. This will append any new certificates to the existing list of CA certificates. If you are replacing existing certificates for a particular issuer and subject, you have to manually delete the previous certificates.
![]() To replace all of the currently uploaded CA certificates with the system’s original list of trusted CA certificates, click Reset to default CA certificate.
To replace all of the currently uploaded CA certificates with the system’s original list of trusted CA certificates, click Reset to default CA certificate.
![]() To view the entire list of currently uploaded trusted CA certificates, click Show all (decoded) to view it in a human-readable form, or click Show all (PEM file) to view the file in its raw format.
To view the entire list of currently uploaded trusted CA certificates, click Show all (decoded) to view it in a human-readable form, or click Show all (PEM file) to view the file in its raw format.
![]() To view an individual trusted CA certificate, click on View (decoded) in the row for the specific CA certificate.
To view an individual trusted CA certificate, click on View (decoded) in the row for the specific CA certificate.
![]() To delete one or more CA certificates, tick the box(es) next to the relevant CA certificate(s) and click Delete.
To delete one or more CA certificates, tick the box(es) next to the relevant CA certificate(s) and click Delete.
Note that if you have enabled certificate revocation list (CRL) checking for TLS encrypted connections to an LDAP server (for account authentication), you must add the PEM encoded CRL data to your trusted CA certificate file.
Expressway X12.6 and later includes these trusted root CAs, which are installed as part of the Cisco Intersection CA Bundle by default:
![]() O=Internet Security Research Group, CN=ISRG Root X1
O=Internet Security Research Group, CN=ISRG Root X1
![]() O=Digital Signature Trust Co., CN=DST Root CA X3
O=Digital Signature Trust Co., CN=DST Root CA X3
Managing the Expressway Server Certificate
Use the Server certificate page (Maintenance > Security > Server certificate) to manage the Expressway server certificate, which identifies Expressway when it communicates with client systems using TLS encryption and with web browsers over HTTPS. You can view details of the currently loaded certificate, generate a CSR, upload a new certificate, and configure the ACME service. These tasks are described in the Cisco Expressway Certificate Creation and Use Deployment Guide on the Expressway configuration guides page. We strongly recommend using certificates based on RSA keys. Other types of certificate, such as those based on DSA keys, are not tested, and may not work with Expressway in all scenarios.
Using the ACME Service
From X12.5 the Cisco Expressway Series supports the ACME protocol (Automated Certificate Management Environment) which enables automatic certificate signing and deployment to the Expressway-E from a certificate authority such as Let’s Encrypt.
Server Certificates and Clustered Systems
When a CSR is generated, a single request and private key combination is generated for that peer only. If you have a cluster of Expressways, you must generate a separate signing request on each peer. Those requests must then be sent to the certificate authority and the returned server certificates uploaded to each relevant peer. Make sure that the correct server certificate is uploaded to the appropriate peer, otherwise the stored private key on each peer will not correspond to the uploaded certificate.
Managing Certificate Revocation Lists (CRLs)
Certificate revocation list files (CRLs) are used by the Expressway to validate certificates presented by client browsers and external systems that communicate with the Expressway over TLS/HTTPS. A CRL identifies those certificates that have been revoked and can no longer be used to communicate with the Expressway.
We recommend that you upload CRL data for the CAs that sign TLS/HTTPS client and server certificates. When enabled, CRL checking is applied for every CA in the chain of trust.
Certificate Revocation Sources
The Expressway can obtain certificate revocation information from multiple sources:
![]() Automatic downloads of CRL data from CRL distribution points.
Automatic downloads of CRL data from CRL distribution points.
![]() Through OCSP (Online Certificate Status Protocol) responder URIs in the certificate to be checked (SIP TLS only).
Through OCSP (Online Certificate Status Protocol) responder URIs in the certificate to be checked (SIP TLS only).
![]() Manual upload of CRL data.
Manual upload of CRL data.
![]() CRL data embedded within the Expressway’s Trusted CA certificate file.
CRL data embedded within the Expressway’s Trusted CA certificate file.
The following limitations and usage guidelines apply:
![]() When establishing SIP TLS connections, the CRL data sources are subject to the Certificate revocation checking settings on the SIP configuration page.
When establishing SIP TLS connections, the CRL data sources are subject to the Certificate revocation checking settings on the SIP configuration page.
![]() Automatically downloaded CRL files override any manually loaded CRL files (except for when verifying SIP TLS connections, when both manually uploaded or automatically downloaded CRL data may be used).
Automatically downloaded CRL files override any manually loaded CRL files (except for when verifying SIP TLS connections, when both manually uploaded or automatically downloaded CRL data may be used).
![]() When validating certificates presented by external policy servers, the Expressway uses manually loaded CRLs only.
When validating certificates presented by external policy servers, the Expressway uses manually loaded CRLs only.
![]() When validating TLS connections with an LDAP server for remote login account authentication, the Expressway only uses CRL data that has been embedded into the Trusted CA certificate (Tools > Security > Trusted CA certificate).
When validating TLS connections with an LDAP server for remote login account authentication, the Expressway only uses CRL data that has been embedded into the Trusted CA certificate (Tools > Security > Trusted CA certificate).
For LDAP connections, the Expressway does not download the CRL from Certificate Distribution Point URLs in the server or issuing CA certificates. Also, it does not use the manual or automatic update settings on the CRL management page.
Automatic CRL Updates
We recommend that you configure the Expressway to perform automatic CRL updates. This ensures that the latest CRLs are available for certificate validation.
To configure the Expressway to use automatic CRL updates:
Step 1. Go to Maintenance > Security > CRL management.
Step 2. Set Automatic CRL updates to Enabled.
Step 3. Enter the set of HTTP(S) distribution points from where the Expressway can obtain CRL files.
Note
![]() You must specify each distribution point on a new line
You must specify each distribution point on a new line
![]() Only HTTP(S) distribution points are supported; if HTTPS is used, the distribution point server itself must have a valid certificate
Only HTTP(S) distribution points are supported; if HTTPS is used, the distribution point server itself must have a valid certificate
![]() PEM and DER encoded CRL files are supported
PEM and DER encoded CRL files are supported
![]() The distribution point may point directly to a CRL file or to ZIP and GZIP archives containing multiple CRL files
The distribution point may point directly to a CRL file or to ZIP and GZIP archives containing multiple CRL files
![]() The file extensions in the URL or on any files unpacked from a downloaded archive do not matter as the Expressway will determine the underlying file type for itself; however, typical URLs could be in the format:
The file extensions in the URL or on any files unpacked from a downloaded archive do not matter as the Expressway will determine the underlying file type for itself; however, typical URLs could be in the format:
• http://example.com/crl.pem
• http://example.com/crl.der
• http://example.com/ca.crl
• https://example.com/allcrls.zip
• https://example.com/allcrls.gz
Step 4. Enter the Daily update time (in UTC). This is the approximate time of day when the Expressway will attempt to update its CRLs from the distribution points.
Step 5. Click Save.
Manual CRL Updates
You can upload CRL files manually to the Expressway. Certificates presented by external policy servers can only be validated against manually loaded CRLs.
To upload a CRL file:
Step 1. Go to Maintenance > Security > CRL management.
Step 2. Click Browse and select the required file from your file system. It must be in PEM encoded format.
Step 3. Click Upload CRL file. This uploads the selected file and replaces any previously uploaded CRL file.
Click Remove revocation list if you want to remove the manually uploaded file from the Expressway. If a certificate authority’s CRL expires, all certificates issued by that CA will be treated as revoked.
Online Certificate Status Protocol (OCSP)
The Expressway can establish a connection with an OCSP responder to query the status of a particular certificate. The Expressway determines the OCSP responder to use from the responder URI listed in the certificate being verified. The OCSP responder sends a status of ‘good’, ‘revoked’ or ‘unknown’ for the certificate. The benefit of OCSP is that there is no need to download an entire revocation list.
Outbound communication from the Expressway-E is required for the connection to the OCSP responder. Check the port number of the OCSP responder you are using (typically this is port 80 or 443) and ensure that outbound communication is allowed from the Expressway-E.
Configuring Revocation Checking for SIP TLS Connections
You must also configure how certificate revocation checking is managed for SIP TLS connections.
Step 1. Go to Configuration > SIP.
Step 2. Scroll down to the Certificate revocation checking section and configure the settings accordingly to Table 5-3:
Table 5-3 Certificate Revocation Settings

The Client certificate testing page (Maintenance > Security > Client certificate testing) is used to check client certificates before enabling client certificate validation. You can:
![]() Test whether a client certificate is valid when checked against the Expressway’s current trusted CA list and, if loaded, the revocation list.
Test whether a client certificate is valid when checked against the Expressway’s current trusted CA list and, if loaded, the revocation list.
![]() Test the outcome of applying the regex and template patterns that retrieve a certificate’s authorization credentials (the username).
Test the outcome of applying the regex and template patterns that retrieve a certificate’s authorization credentials (the username).
You can test against a certificate on your local file system or the browser’s currently loaded certificate. To test if a certificate is valid:
Step 1. Select the Certificate source. You can choose to:
![]() upload a test file from your file system in either PEM or plain text format; if so click Browse to select the certificate file you want to test
upload a test file from your file system in either PEM or plain text format; if so click Browse to select the certificate file you want to test
![]() test against the certificate currently loaded into your browser (only available if the system is already configured to use Certificate validation and a certificate is currently loaded)
test against the certificate currently loaded into your browser (only available if the system is already configured to use Certificate validation and a certificate is currently loaded)
Step 2. Ignore the Certificate-based authentication pattern section - this is only relevant if you are extracting authorization credentials from the certificate.
Step 3. Click Check certificate.
Step 4. The results of the test are shown in the Certificate test results section.
To retrieve authorization credentials (username) from the certificate:
Step 1. Select the Certificate source as described previously.
Step 2. Configure the Regex and Username format fields as required. Their purpose is to extract a username from the nominated certificate by supplying a regular expression that will look for an appropriate string pattern within the certificate. The fields default to the currently configured settings on the Certificate-based authentication configuration page but you can change them as required.
![]() In the Regex field, use the (?<name>regex) syntax to supply names for capture groups so that matching sub-patterns can be substituted in the associated Username format field, for example, /(Subject:.*, CN=(?<Group1>.*))/m.
In the Regex field, use the (?<name>regex) syntax to supply names for capture groups so that matching sub-patterns can be substituted in the associated Username format field, for example, /(Subject:.*, CN=(?<Group1>.*))/m.
• The regex defined here must conform to PHP regex guidelines.
![]() The Username format field can contain a mixture of fixed text and the capture group names used in the Regex. Delimit each capture group name with #, for example, prefix#Group1#suffix. Each capture group name will be replaced with the text obtained from the regular expression processing.
The Username format field can contain a mixture of fixed text and the capture group names used in the Regex. Delimit each capture group name with #, for example, prefix#Group1#suffix. Each capture group name will be replaced with the text obtained from the regular expression processing.
Step 3. Click Check certificate. The results of the test are shown in the Certificate test results section. The Resulting string item is the username credential that would be checked against the relevant authorization mechanism to determine that user’s authorization (account access) level.
Step 4. If necessary, you can modify the Regex and Username format fields and repeat the test until the correct results are produced. Note that if the Certificate source is an uploaded PEM or plain text file, the selected file is temporarily uploaded to the Expressway when the test is first performed:
![]() if you want to keep testing different Regex and Username format combinations against the same file, you do not have to reselect the file for every test
if you want to keep testing different Regex and Username format combinations against the same file, you do not have to reselect the file for every test
![]() if you change the contents of your test file on your file system, or you want to choose a different file, you must click Browse again and select the new or modified file to upload
if you change the contents of your test file on your file system, or you want to choose a different file, you must click Browse again and select the new or modified file to upload
Step 5. If you have changed the Regex and Username format fields from their default values and want to use these values in the Expressway’s actual configuration (as specified on the Certificate-based authentication configuration page) then click Make these settings permanent.
Note
![]() Any uploaded test file is automatically deleted from the Expressway at the end of your login session.
Any uploaded test file is automatically deleted from the Expressway at the end of your login session.
![]() The regex is applied to a plain text version of an encoded certificate. The system uses the command openssl x509 -text -nameopt RFC2253 -noout to extract the plain text certificate from its encoded format.
The regex is applied to a plain text version of an encoded certificate. The system uses the command openssl x509 -text -nameopt RFC2253 -noout to extract the plain text certificate from its encoded format.
Administrator Authentication
Next, we will cover a security overview specifically towards the authentication of an administrator.
Configuring SSH
The Expressway pair uses SSH tunnels to securely transfer data from the Expressway-E to the Expressway-C without requiring Expressway-E to open the connection. The Expressway-C opens a TCP session with the Expressway-E which is listening on a fixed TCP port. The pair then use the selected cipher and algorithms to establish an encrypted tunnel for securely sharing data.
The cipher and algorithms that the pair use to encrypt SSH tunnels are configured as follows:
Step 1. Go to Maintenance > Security > SSH configuration.
Step 2. Modify the following settings, only if necessary:

Step 3. Click Save.
Advanced Security
The Advanced security page (Maintenance > Advanced security) is used to configure the Expressway for use in highly secure environments. You need to install the Advanced Account Security option key to see this page.
You can configure the system for:
![]() Advanced account security mode
Advanced account security mode
![]() FIPS140-2 cryptographic mode
FIPS140-2 cryptographic mode
Enabling advanced account security limits login access to remotely authenticated users using the web interface only, and also restricts access to some system features. To indicate that the Expressway is in advanced account security mode, any text specified as the Classification banner message is displayed on every web page.
A system reboot is required for changes to the advanced account security mode to take effect.
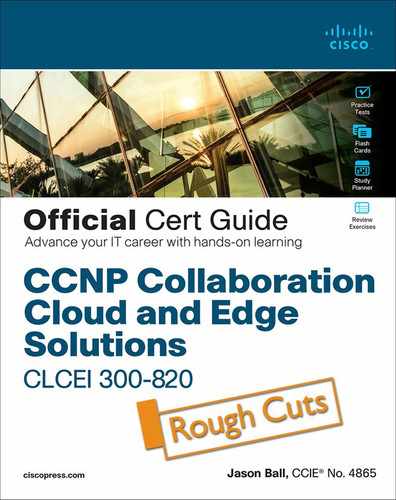
HTTP Methods
The Expressway web server allows the following HTTP methods shown in Table 5-4:
Table 5-4 HTTP Methods
Administrators have API access by default. This can be disabled in two ways:
![]() If the Expressway is running in advanced account security mode, then API access is automatically disabled for all users.
If the Expressway is running in advanced account security mode, then API access is automatically disabled for all users.
![]() API access for individual administrators can be disabled through their user configuration options.
API access for individual administrators can be disabled through their user configuration options.
Before you can enable advanced account security mode, the following items are required:
![]() The system must be configured to use remote account authentication for administrator accounts.
The system must be configured to use remote account authentication for administrator accounts.
![]() The Advanced Account Security option key must be installed.
The Advanced Account Security option key must be installed.
![]() You must create a local administrator account and nominate it as the emergency account, so that you can get in if remote authentication is unavailable. You cannot use a remote account for this purpose. Do not use the built-in admin account.
You must create a local administrator account and nominate it as the emergency account, so that you can get in if remote authentication is unavailable. You cannot use a remote account for this purpose. Do not use the built-in admin account.
Caution
The Expressway will disallow local authentication by all accounts except the emergency account. Ensure that the remote directory service is working properly before you enable the mode.
You are also recommended to configure your system so that:
![]() SNMP is disabled.
SNMP is disabled.
![]() The session time out period is set to a non-zero value.
The session time out period is set to a non-zero value.
![]() HTTPS client certificate validation is enabled.
HTTPS client certificate validation is enabled.
![]() User account LDAP server configuration uses TLS encryption and has certificate revocation list (CRL) checking set to All.
User account LDAP server configuration uses TLS encryption and has certificate revocation list (CRL) checking set to All.
![]() Remote logging is disabled.
Remote logging is disabled.
![]() Incident reporting is disabled.
Incident reporting is disabled.
![]() Any connection to an external manager uses HTTPS and has certificate checking enabled.
Any connection to an external manager uses HTTPS and has certificate checking enabled.
Alarms are raised for any non-recommended configuration settings.
Enabling Advanced Account Security
To enable advanced account security:
Step 1. Go to Maintenance > Advanced security.
Step 2. Enter a Classification banner. The text entered here is displayed on every web page.
Step 3. Set Advanced account security mode to On.
Step 4. Click Save.
Step 5. Reboot the Expressway (Maintenance > Restart options).
Expressway Functionality: Changes and Limitations
When in secure mode, the following changes and limitations to standard Expressway functionality apply:
![]() Access over SSH and through the serial port is disabled and cannot be turned on (the pwrec password recovery function is also unavailable).
Access over SSH and through the serial port is disabled and cannot be turned on (the pwrec password recovery function is also unavailable).
![]() Access over HTTPS is enabled and cannot be turned off.
Access over HTTPS is enabled and cannot be turned off.
![]() The command line interface (CLI) and API access are unavailable.
The command line interface (CLI) and API access are unavailable.
![]() Administrator account authentication source is set to Remote only and cannot be changed.
Administrator account authentication source is set to Remote only and cannot be changed.
![]() Local authentication is disabled. There is no access using the root account or any local administrator account except the emergency account.
Local authentication is disabled. There is no access using the root account or any local administrator account except the emergency account.
![]() Only the emergency account may change the emergency account.
Only the emergency account may change the emergency account.
![]() If you are using certificate-based authentication, the emergency account must be authenticated by credentials in the client’s certificate.
If you are using certificate-based authentication, the emergency account must be authenticated by credentials in the client’s certificate.
![]() If there are three consecutive failed attempts to log in (by the same or different users), login access to the Expressway is blocked for 60 seconds.
If there are three consecutive failed attempts to log in (by the same or different users), login access to the Expressway is blocked for 60 seconds.
![]() Immediately after logging in, the current user is shown statistics of when they previously logged in and details of any failed attempts to log in using that account.
Immediately after logging in, the current user is shown statistics of when they previously logged in and details of any failed attempts to log in using that account.
![]() Administrator accounts with read-only or read-write access levels cannot view the Event Log, Configuration Log and Network Log pages. These pages can be viewed only by accounts with Auditor access level.
Administrator accounts with read-only or read-write access levels cannot view the Event Log, Configuration Log and Network Log pages. These pages can be viewed only by accounts with Auditor access level.
![]() The Upgrade page only displays the System platform component.
The Upgrade page only displays the System platform component.
The Event Log, Configuration Log, Network Log, call history, search history and registration history are cleared whenever the Expressway is taken out of advanced account security mode. Note that if intrusion protection is enabled, this will cause any existing blocked addresses to become unblocked.
Disabling Advanced Account Security
This operation wipes all configuration. You cannot maintain any configuration or history when exiting this mode. The system returns to factory state.
Step 1. Sign in with the emergency account.
Step 2. Disable Advanced Account Security mode (Maintenance > Advanced security).
Step 3. Sign out.
Step 4. Connect to the console.
Step 5. Sign in as root and run factory-reset.
Configuring FIPS140-2 Cryptographic Mode
FIPS140 is a U.S. and Canadian government standard that specifies security requirements for cryptographic modules. FIPS140-1 became a mandatory standard for the protection of sensitive data in 1994 and was superseded by FIPS140-2 in 2001. Expressway X8.8 or later implements FIPS140-2 compliant features. When in FIPS140-2 cryptographic mode, system performance may be affected due to the increased cryptographic workload. You can also cluster Expressways that have FIPS140-2 mode enabled.
Before you enable FIPS140-2 mode:
![]() Ensure that the system is not using NTLM protocol challenges with a direct Active Directory Service connection for device authentication; NTLM cannot be used while in FIPS140-2 mode.
Ensure that the system is not using NTLM protocol challenges with a direct Active Directory Service connection for device authentication; NTLM cannot be used while in FIPS140-2 mode.
![]() If login authentication via a remote LDAP server is configured, ensure that it uses TLS encryption if it is using SASL binding.
If login authentication via a remote LDAP server is configured, ensure that it uses TLS encryption if it is using SASL binding.
![]() The Advanced Account Security option key must be installed.
The Advanced Account Security option key must be installed.
FIPS140-2 compliance also requires the following restrictions:
![]() System-wide SIP transport mode settings must be TLS: On, TCP: Off, and UDP: Off.
System-wide SIP transport mode settings must be TLS: On, TCP: Off, and UDP: Off.
![]() All SIP zones must use TLS.
All SIP zones must use TLS.
![]() SNMP and NTP server connections should use strong hashing and encryption. Use these settings:
SNMP and NTP server connections should use strong hashing and encryption. Use these settings:
![]() System > SNMP > v3 Authentication > Type = SHA
System > SNMP > v3 Authentication > Type = SHA
![]() System > SNMP > v3 Privacy > Type = AES
System > SNMP > v3 Privacy > Type = AES
![]() System > Time > NTP server n > Authentication = Symmetric key
System > Time > NTP server n > Authentication = Symmetric key
![]() System > Time > NTP server n > Hash = SHA-1
System > Time > NTP server n > Hash = SHA-1
If your system is running as a virtualized application and has never been through an upgrade process, perform a system upgrade before you continue. You can upgrade the system to the same software release version that it is currently running. If you do not complete this step, the activation process described in the next section will fail.
Enable FIPS140-2 Cryptographic Mode
The transition to FIPS140-2 cryptographic mode requires a system reset to be performed. This will remove all existing configuration data. To preserve your data, you should take a backup immediately prior to performing the reset, and then restore the backup file when the reset has completed. The reset removes all administrator account information and reinstates the default security certificates. To log in after the reset has completed you will have to first complete the Install Wizard.
To turn your system into a compliant FIPS140-2 cryptographic system:
Step 1. Enable FIPS140-2 cryptographic mode:
a. Go to Maintenance > Advanced security.
b. Set FIPS140-2 cryptographic mode to On.
c. Click Save.
Step 2. Fix any alarms that have been raised that report non-compliant configuration.
Step 3. Take a system backup if you want to preserve your current configuration data. Note that all backups require password protection.
Step 4. Reset the system and complete the activation of FIPS140-2 mode:
a. Log in to Expressway as root.
b. Type fips-activate and the reset takes up to 30 minutes to complete.
Step 5. Follow the prompts to complete the Install Wizard.
Step 6. When the system has applied the configuration and restarted, log in as admin using the password you set. You may see alarms related to non-compliance with FIPS 140-2. Ignore these alarms if you intend to restore the backup taken prior to the reset. You must take action if they persist after restoring the backup.
Step 7. Restore your previous data, if required. Note that while in FIPS140-2 mode, you can only restore backup files that were taken when FIPS140-2 cryptographic mode was set On. Any previous administrator account information and passwords will be restored, however the previous root account password will not be restored. If the data you are restoring contains untrusted security certificates, the restart that occurs as part of the restore process may take up to 6 minutes to complete.
Step 8. From X12.6 you must manually change the SIP TLS Diffie-Hellman key size from the default 1024 bits, to at least 2048. To do this type the following command in the Expressway command line interface (change the value in the final element if you want a key size higher than 2048): xconfiguration SIP Advanced SipTlsDhKeySize: “2048”
The following Expressway features are FIPS140-2 compliant / use FIPS140-2 compliant algorithms:
![]() Administration over the web interface
Administration over the web interface
![]() Clustering
Clustering
![]() XML and REST APIs
XML and REST APIs
![]() SSH access (restricted to only use AES or 3DES ciphers)
SSH access (restricted to only use AES or 3DES ciphers)
![]() Login authentication via a remote LDAP server (must use TLS if using SASL binding)
Login authentication via a remote LDAP server (must use TLS if using SASL binding)
![]() Client certificate verification
Client certificate verification
![]() SIP certificate revocation features
SIP certificate revocation features
![]() SNMP (SNMPv3 authentication is restricted to SHA1, and SNMPv3 privacy is restricted to AES)
SNMP (SNMPv3 authentication is restricted to SHA1, and SNMPv3 privacy is restricted to AES)
![]() NTP (NTP server authentication using symmetric key is restricted to SHA1)
NTP (NTP server authentication using symmetric key is restricted to SHA1)
![]() Device authentication against the local database
Device authentication against the local database
![]() SIP connections to/from the Expressway providing they use TLS
SIP connections to/from the Expressway providing they use TLS
![]() H.323 connections to/from the Expressway
H.323 connections to/from the Expressway
![]() Delegated credential checking
Delegated credential checking
![]() SRTP media encryption
SRTP media encryption
![]() SIP/H.323 interworking
SIP/H.323 interworking
![]() Unified Communications Mobile and Remote Access (MRA)
Unified Communications Mobile and Remote Access (MRA)
![]() TURN server authentication
TURN server authentication
![]() Backup/restore operations
Backup/restore operations
![]() Connections to an external manager
Connections to an external manager
![]() Connections to external policy services
Connections to external policy services
![]() Remote logging
Remote logging
![]() Incident reporting
Incident reporting
![]() CSR generation
CSR generation
Other Expressway features are not FIPS140-2 compliant, including:
![]() SIP authentication over NTLM / Active Directory
SIP authentication over NTLM / Active Directory
![]() SIP/H.323 device authentication against an H.350 directory service
SIP/H.323 device authentication against an H.350 directory service
![]() Microsoft Interoperability service
Microsoft Interoperability service
![]() Use of Cisco TMSPE
Use of Cisco TMSPE
Managing Domain Certificates and Server Name Indication for Multitenancy
Multitenancy is part of Cisco Hosted Collaboration Solution (HCS) and allows a service provider to share an Expressway-E cluster among multiple tenants.
Using the Server Name Indication (SNI) protocol extension within TLS, the Expressway can now store and use domain-specific certificates that can be offered to a client during the TLS handshake. This capability allows seamless integration of endpoints registering through MRA in a multitenant environment and ensures the certificate domain name matches the client’s domain. During a TLS handshake, the client includes an SNI field in the ClientHello request. The Expressway looks up its certificate store and tries to find a match for the SNI hostname. If a match is found the domain-specific certificate is returned to the client.
Note that in multitenant mode, you must configure the system hostname on the System > DNS page of the Cisco Expressway-E to match the hostname configured in DNS (case-specific before X8.10.1, case insensitive from X8.10.1). Otherwise, Cisco Jabber clients will be unable to register successfully for MRA.
SNI Call Flow:
1. On the MRA client being registered, the user enters [email protected] where example.com is the user’s service domain (customer domain).
2. The client does a DNS resolution.
a. It sends a DNS SRV request for _collab-edge._tls.example.com.
b. The DNS replies to the request:
• In a single tenant setup: the DNS reply usually includes the hostname within the service domain (for example, mra-host.example.com).
• In a multitenant setup: DNS may instead return the service provider’s MRA hostname in the service provider’s domain, which is different from the user’s service domain (for example, mra-host.sp.com).
3. The client sets up SSL connection.
a. The client sends SSL ClientHello request with an SNI extension:
• If the DNS-returned hostname has the same domain as the user’s service domain, the DNS hostname is used in SNI server_name (unchanged).
• Otherwise, in the case of a domain mismatch, the client sets the SNI server_name to the DNS hostname plus the service domain (for example instead of the DNS-returned mra-host.sp.com it changes to mra-host.example.com).
b. The Expressway-E searches its certificate store to find a certificate matching the SNI hostname.
• If a match is found, the Expressway-E will send back the certificate (SAN/dnsName=SNI hostname)
• Otherwise, MRA will return it’s platform certificate.
c. The client validates the server certificate.
• If the certificate is verified, SSL setup continues and SSL setup finishes successfully.
• Otherwise, a certificate error occurs.
4. Application data starts. Note, for SIP and HTTPS, the application starts SSL negotiation immediately. For XMPP, the SSL connection starts once the client receives XMPP StartTLS.
Managing the Expressway’s Domain Certificates
You manage the Expressway’s domain certificates through the Domain certificates page (Maintenance > Security > Domain certificates). These certificates are used to identify domains when multiple customers — in a multitenant environment — are sharing an Expressway-E cluster to communicate with client systems using TLS encryption and with web browsers over HTTPS. You can use the domain certificate page to:
![]() View details about the currently loaded certificate.
View details about the currently loaded certificate.
![]() Generate a Certificate Signing Request (CSR).
Generate a Certificate Signing Request (CSR).
![]() Upload a new domain certificate.
Upload a new domain certificate.
![]() Configure the Automated Certificate Management Environment (ACME) service to automatically submit a CSR to an ACME provider, and automatically deploy the resulting server certificate.
Configure the Automated Certificate Management Environment (ACME) service to automatically submit a CSR to an ACME provider, and automatically deploy the resulting server certificate.
Note that it is highly recommend using certificates based on RSA keys. Other types of certificate, such as those based on DSA keys, are not tested, and may not work with the Expressway in all scenarios. Use the Trusted CA certificate page to manage the list of certificates for the Certificate Authorities (CAs) trusted by this Expressway.
When you click on a domain, the domain certificate data section shows information about the specific domain certificate currently loaded on the Expressway. To view the currently uploaded domain certificate file, click Show (decoded) to view it in a human-readable form, or click Show (PEM file) to view the file in its raw format. To delete the currently uploaded domain click Delete. Do not allow your domain certificate to expire as this may cause other external systems to reject your certificate and prevent the Expressway from being able to connect to those systems.
The following steps are for adding a new domain:
Step 1. Go to Maintenance > Security > Domain certificates.
Step 2. Click New.
Step 3. Under New local domain, enter the name of the domain you wish to add. An example valid domain name is 100.example-name.com.
Step 4. Click Create domain.
Step 5. The new domain will be added on the Domain certificates page and you can proceed to upload a certificate for the domain.
The Expressway can generate domain CSRs, which removes the need to use an external mechanism to generate and obtain certificate requests. To generate a CSR:
Step 1. Go to Maintenance > Security > Domain certificates.
Step 2. Click on the domain for which you wish to generate a CSR.
Step 3. Click Generate CSR to go to the Generate CSR page.
Step 4. Enter the required properties for the certificate.
Step 5. Click Generate CSR. The system will produce a signing request and an associated private key. The private key is stored securely on the Expressway and cannot be viewed or downloaded. Never disclose your private key, not even to the certificate authority.
Step 6. You are returned to the Domain certificate page. From here you can:
![]() Download the request to your local file system so that it can be sent to a certificate authority. You are prompted to save the file (the exact wording depends on your browser).
Download the request to your local file system so that it can be sent to a certificate authority. You are prompted to save the file (the exact wording depends on your browser).
![]() View the current request (click Show (decoded) to view it in a human-readable form, or click Show (PEM file) to view the file in its raw format).
View the current request (click Show (decoded) to view it in a human-readable form, or click Show (PEM file) to view the file in its raw format).
Note
![]() Only one signing request can be in progress at any one time. This is because the Expressway must keep track of the private key file associated with the current request. To discard the current request and start a new request, click Discard CSR.
Only one signing request can be in progress at any one time. This is because the Expressway must keep track of the private key file associated with the current request. To discard the current request and start a new request, click Discard CSR.
![]() The user interface provides an option to set the Digest Algorithm. The default is set to SHA-256, with options to change it to SHA-384 or SHA-512.
The user interface provides an option to set the Digest Algorithm. The default is set to SHA-256, with options to change it to SHA-384 or SHA-512.
![]() The user interface provides an option to set the key length. Expressway supports a key length of 1024, 2048 and 4096.
The user interface provides an option to set the key length. Expressway supports a key length of 1024, 2048 and 4096.
When the signed domain certificate is received back from the certificate authority, it must be uploaded to the Expressway. Use the Upload new certificate section to replace the current domain certificate with a new certificate.
To upload a domain certificate:
1. Go to Maintenance > Security > Domain certificates.
2. Use the Browse button in the Upload new certificate section to select and upload the domain certificate PEM file.
3. If you used an external system to generate the CSR you must also upload the server private key PEM file that was used to encrypt the domain certificate. (The private key file will have been automatically generated and stored earlier if the Expressway was used to produce the CSR for this domain certificate.)
![]() The server private key PEM file must not be password protected.
The server private key PEM file must not be password protected.
![]() You cannot upload a server private key if a certificate signing request is in progress.
You cannot upload a server private key if a certificate signing request is in progress.
4. Click Upload domain certificate data.
The ACME service on the Expressway-E, from version X12.5, can request and deploy domain certificates (used with SNI).
When you go to Maintenance > Security > Domain certificates, the list of domains has an ACME column that shows the status of the ACME service for each domain. Click View/Edit next to the domain name to enable the ACME service.
The process of configuring ACME service for domain certificates is the same as it is for the server certificate, only from a different place in the Expressway-E interface. See Cisco Expressway Certificate Creation and Use Deployment Guide on the Expressway configuration guides page for more information.
When a CSR is generated, a single request and private key combination is generated for that peer only. If you have a cluster of Expressways, you must generate a separate signing request on each peer. Those requests must then be sent to the certificate authority and the returned domain certificates uploaded to each relevant peer. Make sure that the correct domain certificate is uploaded to the appropriate peer, otherwise the stored private key on each peer will not correspond to the uploaded certificate.
Exam Preparation Tasks
As mentioned in the section “How to Use This Book” in the Introduction, you have a couple of choices for exam preparation: the exercises here, Chapter 22, “Final Preparation,” and the exam simulation questions in the Pearson Test Prep Software Online.
Review All Key Topics
Review the most important topics in this chapter, noted with the Key Topics icon in the outer margin of the page. Table 5-5 lists a reference of these key topics and the page numbers on which each is found.
Table 5-5 Key Topics for Chapter 5

Complete Tables and Lists from Memory
There are no Memory Lists or Tables in this chapter.
Define Key Terms
Define the following key terms from this chapter and check your answers in the glossary:
Automatic Certificate Management Environment (ACME)
Advanced Encryption Standard (AES)
Application Programmer Interface (API)
Back-to-Back User Agent (B2BUA)
Certificate Revocation List (CRL)
Certificate Signing Request (CSR)
Cisco Unified Communications Manager (CUCM)
HyperText Transfer Protocol (HTTP)
Secure HyperText Transfer Protocol (HTTPS)
Lightweight Directory Access Protocol (LDAP)
Online Certificate Status Protocol (OCSP)
Real-time Transport Control Protocol (RTCP)
Real-time Transport Protocol (RTP)
Session Initiation Protocol (SIP)
Secure Real-time Transport Protocol (SRTP)
Transmission Communication Protocol (TCP)
Transport Layer Security (TLS)
Q&A
The answers to these questions appear in Appendix A. For more practice with exam format questions, use the Pearson Test Prep Software Online.
1. If adding a cluster, will you need to generate 2 CSRs for each server?
2. What will happen if the time stamp for the certificate has expired?
Answers
1. The best practice is to generate a separate CSR for each server, so you have a common name for each server. If you have a cluster of Expressways, you must generate a separate signing request. Also, if you want to use single certificate for each server in the cluster, you need to upload the private key as well. It is recommended to use Cluster FQDN in CN for each node and generate a separate CSR.
2. There will be an alarm generated on all the nodes. The services like MRA and secured calls will be down until the certs are renewed