
Chapter 7. Remote Access VPNs
This chapter covers the following subjects:
• Remote VPN Architecture: This section provides an overview of what you need to consider as you develop a remote VPN architecture.
• Remote Access Components: This section reviews Cisco technology that supports remote access VPN as well as other possible technology components and configurations commonly used with remote VPN deployments.
• Encryption Algorithms: This section covers fundamental concepts behind encryption used within VPN technology.
• High Availability: This section takes a quick look at different high availability options for remote VPN deployments.
• Cisco ASDM Remote Access Configuration: This section shows how to configure a remote access VPN on a Cisco ASA using Cisco ASDM.
• Cisco ASA CLI Remote Access Configuration: This section shows how to configure a remote access VPN on a Cisco ASA using command line.
• Cisco Secure Firewall Remote Access VPN: This section shows how to configure a remote access VPN on a Cisco Secure Firewall appliance.
• Cisco Meraki Remote Access VPN: This section shows how to configure a remote access VPN on a Cisco Meraki solution
• Remote Access on Cisco Router: This section shows how to configure a remote access VPN on a Cisco router.
“When people are free to choose where in the world they want to work, they simply enjoy their day-to-day work more.”
—Brian De Haff
We live in a world driven by information. People access social media, make purchases, and send digital messages at any point from anywhere using mobile devices. According to an article by Pew Research Center, as of early 2019, more than 5 billion people on the planet had mobile devices, and more than half of those devices were smartphones. The workforce expects the same type of access to work-related data as to personal data, and your organization can be exposed to risk if proper security measures are not put in place while providing such access. You need a way to balance the productivity benefits of allowing employees access to corporate data from anywhere in the world while maintaining security that protects that data from unauthorized access. Remote access VPN technology, if implemented properly, can help solve this challenge.
This chapter looks closely at remote access VPN concepts and configuration. It covers the technology you need and how to properly scope a remote access VPN project. This chapter provides examples of how to configure basic remote access VPNs on different Cisco technologies as well as design best practices, such as how to build high availability into your remote access architecture. The format of this chapter similar to the format of Chapter 3, “Site-to-Site VPNs.” The chapters that follow go even deeper into specific Cisco remote access VPN concepts. You will want to master this chapter before proceeding to those chapters.
Tip
We highly recommend taking notes and researching any concepts that are new to you to ensure that you fully understand each topic covered.
This chapter covers the following exam objectives:
• 2.0 Remote Access VPNs
• 2.1 Implement AnyConnect IKEv2 VPNs on ASA and Routers
• 4.0 Secure Communications Architectures
• 4.2 Describe Functional Components of FlexVPN, IPsec, and Clientless SSL for Remote Access VPN Solutions
• 4.6.a VPN Technology Considerations Based on Functional Requirement
• 4.7 Design Remote Access VPN Solutions
• 4.7.a VPN Technology Considerations Based on Functional Requirements
• 4.7.b High Availability Considerations
• 4.7.c Clientless SSL Browser and Client Considerations and Requirements
• 4.8 Describe Elliptic Curve Cryptography (ECC) Algorithms
Learning beyond the SVPN concepts:
• Remote Access Architectures
• Remote Access Components
• Remote Access Design Considerations
• Cisco Secure Firewall
• Cisco Meraki
• Remote Access on Cisco Router
“Do I Know This Already?” Quiz
The “Do I Know This Already?” quiz enables you to assess whether you should read the entire chapter. If you miss no more than one of these self-assessment questions, you might want to move ahead to the “Exam Preparation Tasks” section of the chapter. Table 7-1 lists the major headings in this chapter and the “Do I Know This Already?” quiz questions related to the material in each of those sections to help you assess your knowledge of these specific areas. The answers to the “Do I Know This Already?” quiz appear in Appendix A, “Answers to the ‘Do I Know This Already?’ Quizzes.”
Table 7-1 “Do I Know This Already?” Foundation Topics Section-to-Question Mapping

1. What are the two fundamental components of a remote access VPN architecture?
a. A VPN concentrator and endpoint
b. A user and client-side software
c. A network access server (NAS) and client-side software
d. Encryption and an endpoint
2. Which of the following is not a Cisco appliance option that offers remote access VPN service?
a. Cisco Adaptive Security Device Manager (ASDM)
b. Cisco Adaptive Security Appliance (ASA) Series
c. Cisco Firepower Series
d Cisco Meraki MX Series
3. Which of the following is not a supported VPN protocol choice for Cisco AnyConnect?
a. SSL
b. TLS
c. DTLS
d. IPsec IKEv2
e. SHA256
4. Which of the following is not an option for deploying Cisco AnyConnect to an endpoint for a VPN setup?
a. Automatically launch installation upon connection
b. Download AnyConnect from cisco.com
c. Use Windows ActiveX to push Cisco AnyConnect to an endpoint
d. Use Java to push Cisco AnyConnect to an endpoint
5. What is the difference between clientless mode and thin client mode?
a. Thin client mode allows for applications such as POP3, SMTP, IMAP, Telnet, and SSH.
b. Thin client mode provides secure access to private web resources and private content.
c. Clientless mode extends cryptographic functions to enable remote access TCP-based applications.
d. Clientless mode allows for a full tunnel, and thin client doesn’t
6. What is a value of using high availability between two standalone ASAs instead of using a cluster?
a. User connections are shared between systems.
b. If an outage occurs, the secondary ASA picks up the VPN connections.
c. If an outage occurs, users do not disconnect.
d. After an outage, users have to reestablish the VPN, which occurs automatically.
7. When using the AnyConnect wizard in ASDM, which of the following is not a step in the wizard configuration process?
a. Choose Client image
b. NAT exempt
c. Select VPN protocols
d. Encryption selection
8. Which of the following is not a feature included with a SEC-K9 bundle?
a. BGP
b. IKEv1/IPsec/PKI
c. Easy VPN with DVTL
d. DMVPN
9. What step is needed to enable SSLVPN on a Cisco IOS router running Release 15.3 or greater software?
a. Nothing. Cisco IOS Release 15.3 has SSLVPN already enabled.
b. Install a special LIC file along with a SEC-K9 bundle.
c. Install a special LIC file.
d. Nothing is needed. Just boot a SEC-K9 technology package.
10. Which of the following is not true?
a. A VAM may be needed to enable FlexVPN.
b. All Cisco routers support FlexVPN with some type of configuration, license, or hardware.
c. Sometimes additional hardware is required, such as an Integrated Services Router adapter, for a router to support FlexVPN.
d. Some Cisco routers require special software to support FlexVPN.
11. Which tunneling protocol is used by a Meraki security appliance for remote access VPN service?
a. PPTP
b. L2F
c. OpenVPN
d. L2TP
12. Which of the following is not true regarding Cisco Firepower Threat Defense support for remote access VPNs?
a. Cisco Firepower Threat Defense supports up to three AAA servers.
b. Cisco Firepower Management Center supports all combinations, such as IPv6 over an IPv4 tunnel.
c. Cisco Firepower Threat Defense supports multiple interfaces.
d. Cisco Firepower Threat Defense supports both SSL and IPsec/IKEv2.
13. What is the CLI command to create a tunnel group on a Cisco ASA?
a. ASA1(config)# tunnel-group MYTUNNELGROUP type ipsec-ra
b. ASA1(config)# tunnel-group type MYTUNNELGROUP ipsec-ra
c. ASA1(config)# tunnel-group MYTUNNELGROUP type
d. ASA1(config)# tunnel-group ipsec-ra type MYTUNNELGROUP
Foundation Topics
Demands for simple ways to provide remote access to sensitive systems and data will continue to grow as organizations move away from having employees work only from a physical office. Every organization, regardless of business sector, is looking at different forms of work-from-anywhere strategies because it not only offers huge benefits but is just what is being expected from the future workforce. Gartner and other analysts have identified work-from-anywhere trends and have made predications that by 2026, 40% of enterprises will be using a cloud-based form of security coined by the industry as Secure Access Services Edge (SASE), pronounced Sassy.
One option for delivering cloud security services is using remote access–based VPN technology to force traffic through a range of security features delivered through cloud providers. When most of the planet was forced to work from home during the 2020 COVID-19 pandemic, the work-from-anywhere concept was put to the test for many organizations that had previously offered limited work-from-home flexibility. Today, all major technology providers are looking to the cloud as the future of how they will deliver services, and secure remote connectivity is essentially a foundational requirement. We point this out because the specific remote access VPN concepts covered in this book may change as SASE technology evolves, but the foundational remote access concepts will remain as security technology makes its journey to the cloud.
A remote access VPN enables individual users to establish a secure connection with a remote computer network. The challenge many organizations face is not only provisioning such access but enforcing least-privilege access best practices and providing only the access needed to meet that user’s business requirements—and nothing more. However, allowing remote access can be challenging for many organizations as there may be many types of users who need to be authenticated, different levels of access that continuously need to be authorized, and accounting that needs to be included to monitor how resources are accessed. The goals of this chapter and the next few chapters are to give you tools and techniques to address a variety of remote-access VPN challenges and help you answer remote access questions on the SVPN 300-730 exam. This chapter focuses on foundational remote access VPN concepts.
Remote VPN Architecture
Chapter 2, “Introduction to Virtual Private Networks (VPNs),” describes the two categories of VPN technology: site-to-site and remote access VPNs. Remote access VPN technology provides individual users access to remote networks and resources. Individual users could be using various types of devices, ranging from laptops to mobile phones as well as different operating systems and web browsers. Imagine accommodating any type of user, such as an Android phone user who only requires access to a specific internal application or an administrator who requires full access to the inside network from a Windows desktop. Such factors will impact the approach that is recommended for your remote access VPN project. The good news is that proven remote access VPN concepts have been around for a while, and options for provisioning VPNs continuously mature as mobile device technology advances.
The first version of remote access VPN technology relied on dial-up networks. If you are old enough to have experienced dial-up, you have probably heard people talk about the loud screech sounds and the slow and unreliable service. We have come a long way from dial-up networks. VPNs today provide much better performance speed, and reliability—and even options for high availability.
NAS and Client-Side Software
Today’s remote access VPN architectures require two fundamental components. First, you need some form of network access server (NAS)—also called a media access gateway or remote access server [RAS])—which can be a dedicated server or a software application. A remote user connects to a NAS in order to access the trusted network from an untrusted outside network (typically the Internet). The NAS is responsible for validating user credentials using its own authentication process or by referencing a separate authentication solution. Cisco Adaptive Security Appliance (ASA) is an example of a Cisco NAS option.
The other required component of a remote access VPN is the client-side software, which is the VPN technology on the system attempting to access the NAS. Most modern operating systems have built-in software that supports remote access VPN solutions. However, some operating systems require additional or alternative software, depending on what and how the VPN technology is configured. Cisco AnyConnect is an example of remote access VPN software that can be deployed on various device types, from tablets, phones, and laptops to desktops and servers. Figure 7-1 provides a high-level diagram of how these components work.

Figure 7-1 Using a NAS and Client-Side Software
Remote Access Technology Considerations
There are many options for the NAS and client software you could use for a remote access VPN project. To determine which remote access VPN is the right option for your project, you need to consider a number of factors. When we consult with customers regarding how to architect their remote access VPN project, we ask a series of questions to narrow down options to the best possible choices. Considering the following questions will give you a good start in determining the remote access VPN project that would be ideal for your VPN needs:
• What is your budget?
• What technology is available for the VPN project?
• What authentication requirements do you face?
• What is the current workload on the devices and the network?
• What types of devices do you expect to connect to the solution?
• What locations in the world need to connect to the solution?
• How many users do you expect to use the solution?
• What kind of growth do you expect in the future?
• What are your high availability and network resilience requirements?
• What are the existing skillsets and technology familiarity in your organization?
• What are your in-house versus external management expectations for the solution?
• What compliance requirements does your organization need to meet?
This list is similar to the questions you need to consider for site-to-site VPNs (refer to Chapter 3) but with slight changes for identifying information about endpoints. Some of the answers to these questions need to be more heavily weighted than others. Available technology is typically a huge influencer because organizations do not want to buy new technology if they have existing technology that will work. Many security tools include remote access VPN capabilities; sometimes they require an additional cost for licenses, and other times it is only necessary to ensure that the remote access VPN is enabled and configured. Available budget and regulatory compliance requirements are very important factors. For example, if a certain level of encryption is required, many lower-end remote access VPN options will not be available for your deployment.
Another important factor is the type of remote access VPNs supported by the technology being used. Answers to questions about the types of endpoints and required encryption will narrow down the possible options for your remote access VPN project.
Sizing requirements are based on the number of expected devices, expected growth, and redundancy requirements. If you don’t know the expected growth, using a 20% growth expectancy is a common method. This chapter covers different methods to accommodate growth, including load balancing and flexible license options. With a flexible license, you can increase the size of a VPN solution only when needed to avoid overspending on unnecessary resources.
Note
It is critical to consider the entire lifecycle of a VPN project as you design the architecture and scope the expected level of effort. The same concepts described for assessing a site-to-site VPN project in Chapter 3 also apply to scoping a remote access VPN project.
Remote Access Components
Chapter 3 groups the hardware required for a site-to-site VPN into two groups: security appliances and network routers. Many of the same technologies covered for site-to-site VPNs also offer remote access VPN capabilities, depending on available resources, licenses, and configurations. Many network devices and security appliances can fulfill the role of the NAS for a remote access VPN. Each NAS has different options and limitations on the number and types of VPN clients that can be supported. This chapter provides configuration examples for a Cisco ASA acting as the NAS and Cisco AnyConnect acting as the VPN software client. It also covers Cisco IOS routers fulfilling the NAS role and Cisco Firepower as the software client.
Remote Access Capable Routers
Chapter 2 provides an overview of Cisco technologies that offer VPN capabilities. Most of those technologies support both site-to-site and remote access VPNs. When it comes to the NAS role, routers are as popular as security appliances, although security appliances offer more feature-rich NAS capabilities.
The following are some Cisco router series that offer remote access VPN capabilities:
• 4000 Series Integrated Services Router (ISR)
• 900 Series ISR
• 800 Series ISR
• UC/SR500, 870, 880, and 890 Series routers
• 1800 and 1900 fixed routers
• 1841 and 1941 routers
• 2811, 2821, 2901, 2911, 2921, 2851, and 2951 routers
• 3800 and 3900 series routers
• 1000 Series Aggregation Services Router (ASR)
One or the most common router-based remote access VPN approaches is using FlexVPN, which is the focus of Chapter 6, “FlexVPN Configuration and Troubleshooting.” Some Cisco routers require certain software images to support FlexVPN, as well as sometimes additional hardware, such as an ISR adapter or a VPN Acceleration Module (VAM). Some routers do not support FlexVPN. Make sure to validate requirements using the associated data sheet with the NAS you plan to use.
Figure 7-2 shows some of the advanced software licenses that are available for the Cisco 1900, 2900, and 3900 Series ISR. Notice that the SEC bundle is required for VPN capabilities. (We cover how to configure an IOS remote access VPN later in this chapter, including how to validate the IOS images that are installed.)
Figure 7-2 IOS Advanced Software Bundle Example
Remote Access Capable Security Appliances
Cisco security appliances also offer both site-to-site and remote access capabilities. Each offering has different hardware limitations and license options, which will determine if and how many VPN sessions are supported. As with routers, the Cisco security appliance hardware limitations can be found by looking at a model’s data sheet. Keep in mind that certain licensing may be required to be installed before a security appliance can be configured as a NAS. The Cisco security appliance series that support remote access capabilities include the following:
• Cisco Adaptive Security Appliance (ASA) Series
• Cisco Firepower Series
• Cisco Meraki MX Series
After you select your NAS, you must install and configure which types of VPN clients will be supported. Options could include IKEv2 remote access clients, Android, Apple or Microsoft L2TP/IPsec clients, and Bluefire clients to name a few. The most popular VPN client from Cisco is AnyConnect, which is the VPN software client you are expected to know for the SVPN 300-730 exam.
AnyConnect Secure Mobility Client
Cisco AnyConnect Secure Mobility Client can act as the endpoint client for a remote access VPN deployment and is the client used for most examples in this book. One really cool feature AnyConnect offers is that it can leverage always-on intelligence, which means it can choose to automatically enable or disable the VPN; the VPN can automatically turn on when a device is connected to an untrusted network, which is typically configured with any non-inside network IP address range. Many organizations that allow employees to manually enable the VPN find that the VPN is not always enabled in practice, and remote users are exposed to external threats. People might not understand the technology, and they may either be lazy or fail to understand how important it is to protect themselves while connected to untrusted networks; they also may just not care about security and forget to click the VPN enablement button on their VPN client while they’re off the internal network. The best practice is to configure the client to automatically connect.
User Experience
AnyConnect has options to ensure that end users get a very good VPN experience. AnyConnect can select the best network access point and adapt its tunneling protocol to the most efficient method. This allows for maximum performance when there are different connection points/NAS options available for the user to leverage for a VPN connection. Adaptation could include considerations for voice over IP (VoIP) traffic, TCP-based application access, or use of Datagram Transport Layer Security (DTLS) protocol for latency-sensitive traffic. For example, a traveling salesperson might attempt to connect to a NAS while on the road. With AnyConnect, the salesperson doesn’t have to know which NAS will provide the best performance from wherever they are in the world because AnyConnect can figure it out automatically.
AnyConnect Protocol Support
AnyConnect-supported VPN protocol choices include SSL for TLS, DTLS, IPsec, and IKEv2. DTLS is an ideal option if AnyConnect will be supporting latency-sensitive traffic such as VoIP traffic. If IPsec is desired, IKEv2 is also available to accommodate latency-sensitive traffic. Encryption support includes AES-256, 3DES-268, Suite B algorithms, ESPv3 with IKEv2, 4096-bit RSA keys, Diffie–Hellman group 24, and enhanced SHA-2. We will look more closely at VPN encryption later in this chapter.
AnyConnect Security Capabilities
The real value of AnyConnect is its ability host multiple security offerings beyond VPN options. AnyConnect can perform posture checks of endpoints, including assessments and remediations of the status of antivirus, personal firewall, and antispyware products. Validating posture can reduce the risk of permitting onto the network endpoints that are vulnerable because they fail to meet minimum security requirements. AnyConnect can check posture or act as a supplicate for Cisco ISE, with ISE also performing posture checking. (An additional Apex license is required for the ISE posture checking feature.)
Other built-in features in AnyConnect include web security, malware threat defense, phishing protection, and command and control callback blocking. Web security leverages either the premises-based Cisco Secure Web Appliance or cloud-based Cisco Secure Web security. When AnyConnect is not providing VPN protection, a cloud roaming security service called Cisco Umbrella Roaming can be automatically enabled. Cisco AnyConnect has a Network Visibility Module (NVM) that allows tools such as Cisco Secure Network Analytics (formally called Stealthwatch) to gain visibility into the endpoint to add anomaly and behavior-based security capabilities. Another antimalware option in AnyConnect is Cisco Secure Endpoint (formally called Advanced Malware Protection [AMP]), which can act as a signature-based antivirus as well as anomaly behavior-based antimalware. As you can see, Cisco AnyConnect is more than a VPN client, and you can enable a number of capabilities, depending on how you customize your AnyConnect deployment.
Figure 7-3 provides a high-level overview of the features that can be enabled using Cisco AnyConnect. Keep in mind that some of these features require additional licenses and technology.

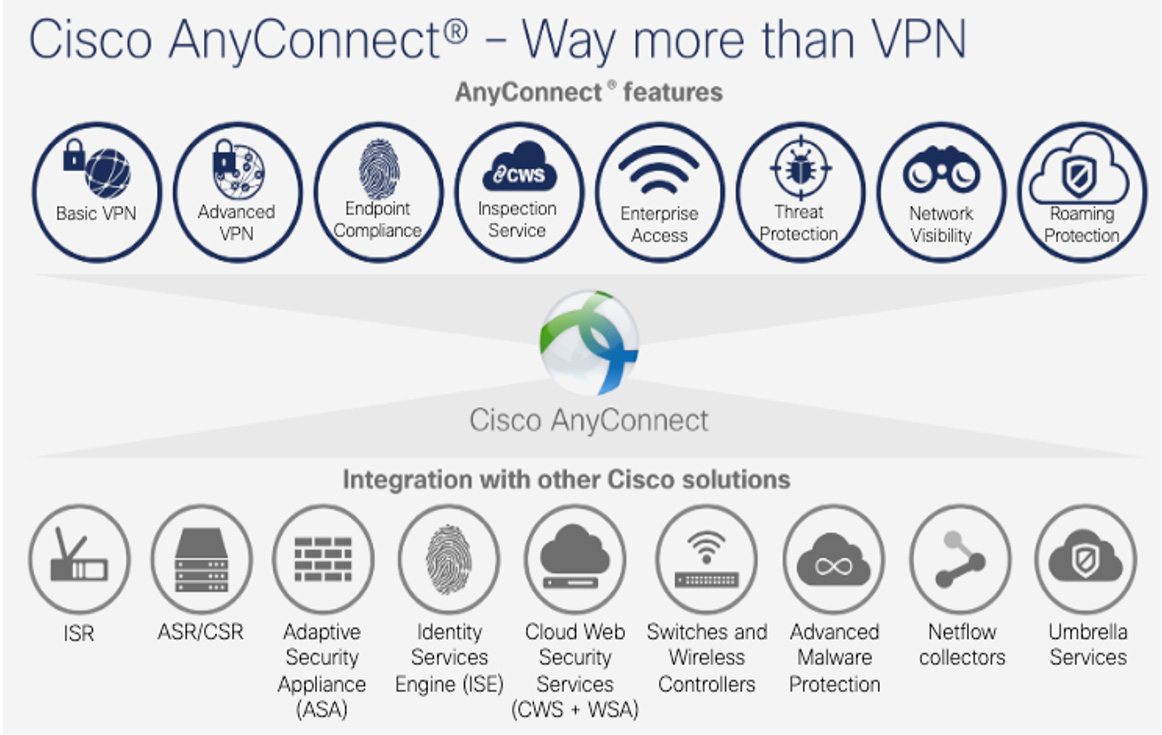
Figure 7-3 Cisco AnyConnect Options
AnyConnect Platform Support
There are AnyConnect options available for most versions of Windows, macOS X, Linux, and different mobile devices. The different options are associated with AnyConnect client profiles.
When you deploy a remote access VPN offering, you need to consider the types of devices that will be using the VPN solution. Different operating systems, such as Windows or macOS, require different types of installation and support packages.
AnyConnect can be deployed to hosts using a Microsoft installer, automatically launched when a host connects to the NAS, or launched using Windows, ActiveX, and Java. Links to the NAS can be distributed using most communication methods so that employees can simply click a link, be redirected to the NAS, and start the AnyConnect installation process. Admin rights to install software are required to install AnyConnect on a host.
Cisco offers many client packages that are designed for the various types of endpoints you are likely to encounter. Depending on the technology being used, you are likely required to download different packages for the expected device types. For example, you will see later in this chapter how to deploy a remote access VPN solution using a Cisco ASA, with options for downloading Windows, Linux 64-bit, and macOS client packages. Figure 7-4 shows an example of some of the AnyConnect client options that you can download from Cisco.
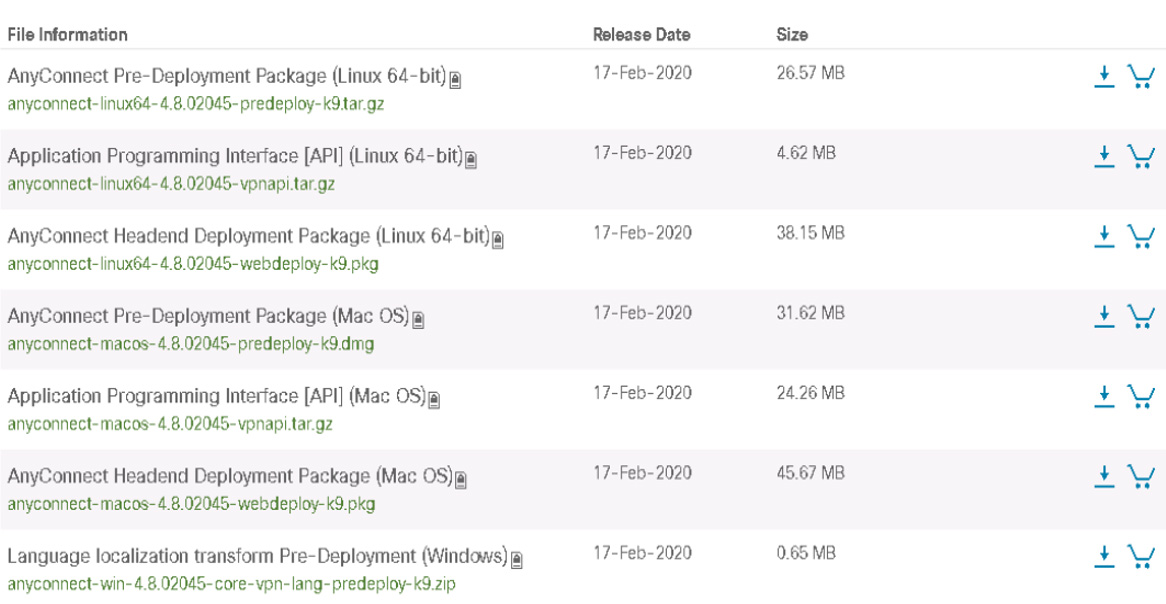
Figure 7-4 Examples of AnyConnect Client Packages
Some configuration elements must be applied to an installation package, and these elements influence how you set up the client profile. For example, you must tell the installation package where the VPN NAS is located, what types of security protocols to use, what VPN option are available, and many other details that get bundled in with the AnyConnect installation package as you build your remote access VPN setup. For Cisco IOS routers, there isn’t a built-in configuration tool to configure the AnyConnect client. Instead, you need to use an editor.
Note
A client profile is required to tell the installation package what it should do.
AnyConnect Profile Editor
The Cisco AnyConnect security mobility client software package includes a profile editor for all operating systems. For example, ASDM activates the profile editor when you load an AnyConnect client image on the ASA. IOS, on the other hand, does not offer this option. Instead, you can use a standalone profile editor that runs on Windows, or you can create a profile in ASDM and export it for your routers.
AnyConnect VPN Profile Example
Let’s look at how to build a customized AnyConnect VPN profile. The result could be used on Cisco security appliances as well as Cisco IOS remote access VPN deployments.
This example uses ASDM rather than the standalone option. You need to first create a client profile before you can edit it. Follow these steps:
Step 1. Log in to ASDM by going to Configuration > Remote Access VPN > Network (Client) Access > AnyConnect Customization/Localization > AnyConnect Client Profile. Figure 7-5 shows two existing profiles: one that is for a Cisco Umbrella roaming client and an existing SSLVPN profile.
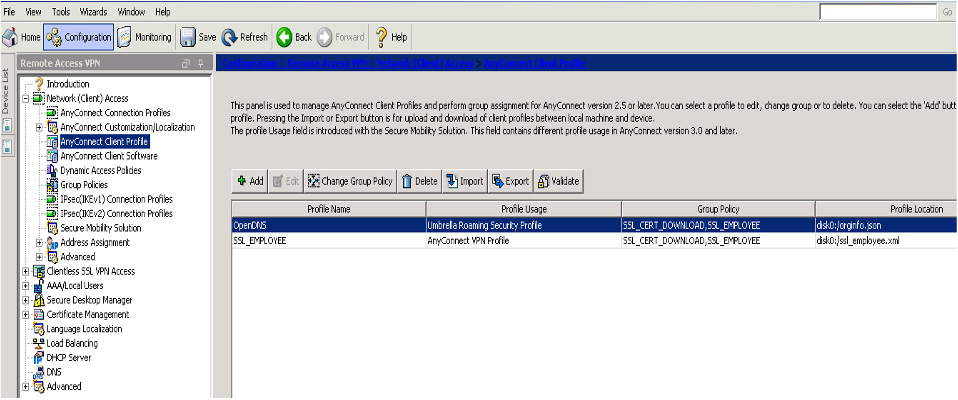
Figure 7-5 Creating a Client Profile
Step 2. Configure a new profile by clicking the Add button and specifying a profile name, usage (in this case, AnyConnect VPN), location for the file, and which group policy it should be assigned to (see Figure 7-6). The usage could range from the Umbrella client to what you want in this case, which is an AnyConnect VPN profile.

Figure 7-6 Configuring a New Profile
Step 3. Select the new profile and click the Edit button. Notice the option to export this as well as import other profiles if you already have a profile ready to go (see Figure 7-7).

Figure 7-7 Importing and Exporting Profiles
Clicking Edit on a profile will bring up several options. You can find a detailed document covering each specific item on Cisco.com. Here is a summary of the main sections:
• Preferences Part 1: Includes various check box options, such as what will be seen before the user logs in, what is controllable by the user, protocol support, auto upgrade options, RSA integration options, and Windows logon and VPN establishment options.
• Preferences Part 2: Addresses certificate selection, whether local proxies are permitted, gateway selection, and automatic VPN policies. You can set PPP exclusion options, scripting options, and whether and for how long the VPN remains upon logout.
• Backup Servers: Allows a list of backup servers the client would use in case the user-selected server fails.
• Certificate Pinning, Matching, and Enrollment: Provide options for configuring how certificates are used by the remote VPN solution.
• Mobile Policy: Offers the option to require a device lock as well as some settings for device locking. This is ideal when a mobile device is being used for a remote access VPN.
• Server List: Provides where the client should go to find the VPN NAS. If you are using either an appliance option such as a Cisco ASA or a Cisco IOS router as the headend, you need to specify the FQDN that you configured while setting up the router as the NAS device.
Caution
You must include a fully qualified domain name or IP address to ensure that AnyConnect knows where the servers are located. It is highly recommended to include at least one backup server for high-availability purposes.
Once you have configured your AnyConnect client profile, you can save it to ASDM if you are using it on that specific deployment or export it for another deployment. In our previous example using an IOS router as the VPN NAS, you would need to export the new AnyConnect profile and copy it over to the router (see Figure 7-8).
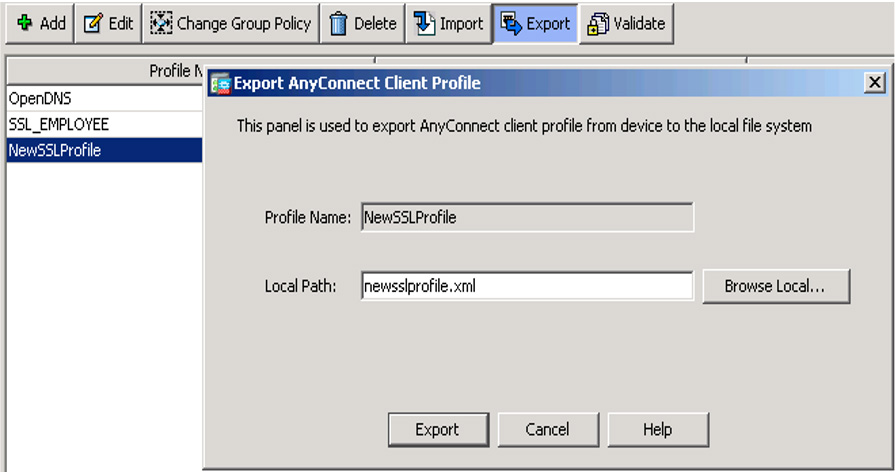
Figure 7-8 Exporting an AnyConnect Client Profile
Client profiles are essential for informing the ASA how to install the proper settings for Cisco AnyConnect. Other profile settings must be configured to provide more details about how the VPN will be used when AnyConnect is installed, and these configurations can be made with the help of connection profiles, groups, and users, discussed next.
VPN Connection Profiles, Group Policies, and Users
One commonly used security practice is to control access to a network that contains sensitive data. The security industry refers to this as a need for AAA, which stands for authentication, authorization, and accounting (and is pronounced “triple A”). With a Cisco VPN, you want to have the ability to control who can use the VPN and what they will have access to, and you need to be able to log what is accessed. You can be accomplish all this by controlling attributes configured for groups and users.
Group Policies
A group is a collection of users treated as a single entry. For example, an organization made up 50 users could group administrators into the admin group, employees into an employee group, and any contractors into a contractor group. As users are placed into one of these three groups, they will get their attributes from the group policy. The Cisco ASA has a generic default group policy that applies any time a group policy isn’t assigned to a user; this means all users without a group policy will fall under the generic default group policy.
Connection Profiles
A VPN connection profile (formerly called a tunnel group) identifies the group policy for a specific connection. A connection profile consists of a set of records that determines tunnel connection policies. Connection profile records identify the servers to which the VPN tunnel user is authenticated, as well as the accounting servers, if any, to which connection information will be sent. These records also contain protocol-specific connection parameters, including parameters identifying the default group policy for the connection.
Note
The command tunnel-group is used to configure connection profiles. For the SVPN 300-730 exam, make sure to remember that the terms connection profile and tunnel group refer to the same concept.
The Cisco ASA provides a few default connection profiles. You can modify these profiles, but you can’t delete them. Connection profiles are local to the ASA and cannot be configured by an external server. The following are the three default connection profiles found within a Cisco ASA:
• DefaultL2Lgroup: Default policy for LAN-to-LAN connections
• DefaultRAgroup: Default policy for IPsec remote access connections
• DefaultWEBVPNGroup: Default policy for both browser-based and AnyConnect client-based SSLVPNs
When using connection profiles, group policies, and users, as an administrator, you first configure a connection profile to set the values for the VPN connection. Next, you configure group policies that set values for users, which will be inherited as users are added to the group policy. Finally, you create users and add them to group policies. We will dig into connection profiles and group policies further in configuration examples throughout this book.
Split Tunneling
One very popular VPN concept is split tunneling, which enables a mobile user to access dissimilar security domains such as a public untrusted network as well as a local LAN or WAN at the same time, using the same network connection or different connections. Imagine a remote employee having a coffee at a coffeeshop and requiring accessing a local coffee shop printer to print a document while also needing to download the document from the organization’s internal network. In order for this to work, the remote employee will need a VPN connection to the internal organization network in order to access the document. However, if all traffic is pushed through the VPN, the user will not have access to any local coffeeshop-owned resources. Allowing this type of connection could help with productivity but could also expose the user to risk. Pushing all traffic through the VPN could also impact the NAS’s performance if users consume bandwidth while streaming movies or music over the VPN.
Note
The majority of organizations use some form of split tunneling to maintain proper levels of performance for their VPN deployments.
Split tunneling is commonly designed to push services through a VPN while allowing Internet resources such as public websites or cloud services to flow outside the tunnel. The goal of designing a VPN in this fashion is to alleviate bottlenecks and conserve bandwidth since Internet traffic can be very resource intensive if video and audio streaming traffic is permitted within the organization. Rather than force a remote users’ Netflix streaming through a VPN, it makes sense for many organizations to just allow that connection to occur directly from the user’s local Internet connection. Another value is providing access to both protected and local resources, much as in the example of the remote employee needing to print a document using a local printer while maintaining connection to the organization’s network over a VPN.
Split Tunneling Configuration
To configure split tunneling on a Cisco security solution, you first need to define the traffic for the subnets or hosts that must be encrypted. Then any other traffic can pass through a default policy that does not encrypt the traffic. You can control traffic by using an access control list (ACL) from the NAS end and pushing to the client end. The routes for subnets are installed on the client system’s routing table.
Note
Split tunnel configuration occurs in the Group Policies section under Network (Client) Access.
Let’s look at how split tunneling can be configured on a Cisco ASA. This example uses ASDM. Follow these steps:
Step 1. Log in to ASDM.
Step 2. Click the Configuration tab, select Remote Access VPN on the left, and select Group Policies in the Network (Client) Access (see Figure 7-9). This is where you will create a split tunneling policy.
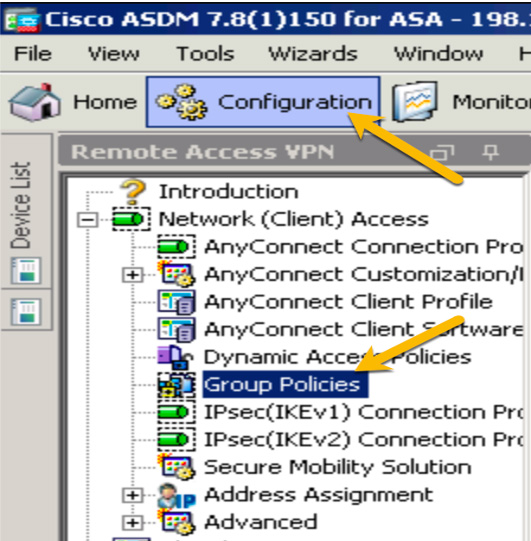
Figure 7-9 Group Policies
Step 3. Click Edit (see Figure 7-10) to bring up the edit window and use the navigation tree on the left to select Advanced > Split Tunneling (see Figure 7-11).
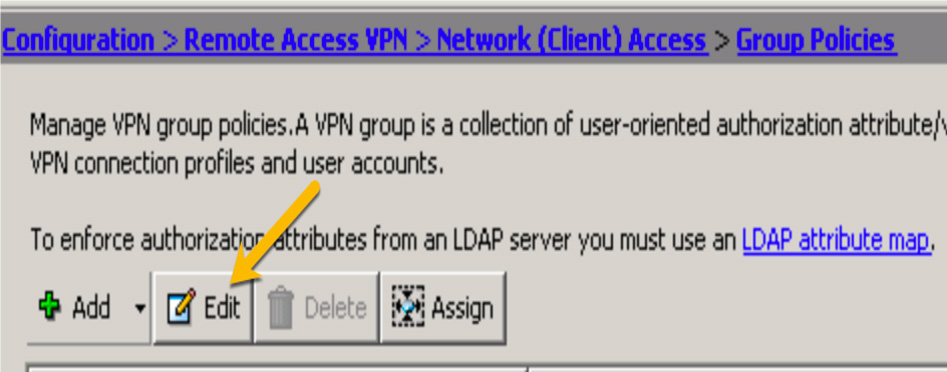
Figure 7-10 Group Policies > Edit

Figure 7-11 Advanced > Split Tunneling
Step 4. Click in the IPv4 Policy drop-down and choose Tunnel Network List Below (see Figure 7-12).
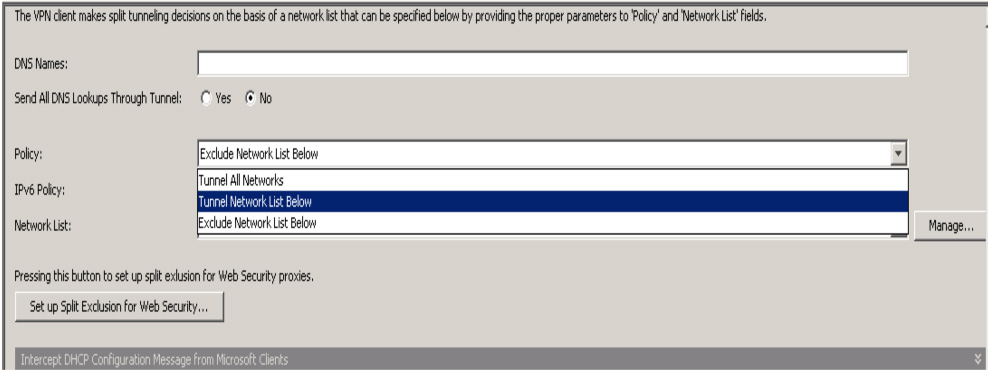
Figure 7-12 IPv4 Policy
Step 5. Click the Manage button to bring up the ACL options for this policy. Click Add to add a new standard ACL (see Figure 7-13). (This example shows ACLs already associated with the split tunnel deployment. When you create an ACL for a new split tunnel, you will not see these existing ACLs.)

Figure 7-13 Adding an ACL
Step 6. When ASDM asks you to name your ACL, give it a name and click OK (see Figure 7-14).

Figure 7-14 Naming the ACL
Step 7. To add access control entries (ACEs) to the ACL policy, click Add while your new ACL policy is highlighted and choose Add ACE (see Figure 7-15).
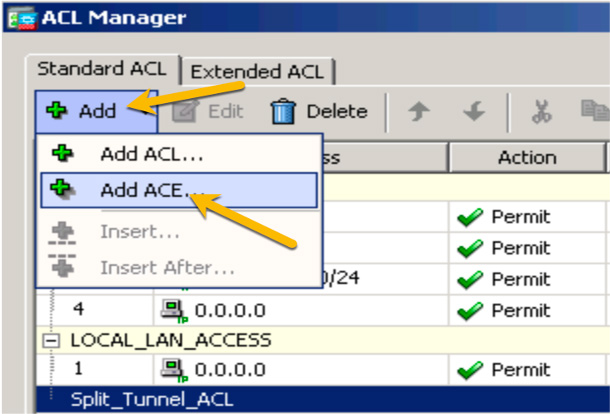
Figure 7-15 Adding an ACE to an ACL
Step 8. To choose what traffic should be encrypted through the VPN, type in the address or, if the objects already exist, click the three-dot button to bring up the network objects and choose the one that represents the network range you want to impact with the ACL. This example shows the 10.64.0.0/10 range. You should include a description regarding what this ACL will do in the event that another administrator needs to understand this ACL. Click OK when you are finished (see Figure 7-16).

Figure 7-16 Choosing Encrypted Traffic
Step 9. Click Apply. Whenever a host connects to a remote access VPN, the routes for the subnets or hosts on the split ACL will be added to the routing table of the client machine. For this example, the 10.64.0.0/10 range would be added to the host routing table.
For the SVPN 300-730 exam, you need to understand how this same configuration would look using the command-line option on the Cisco ASA. Using the CLI preview, Figure 7-17 shows the CLI version of the new split tunnel ACL.
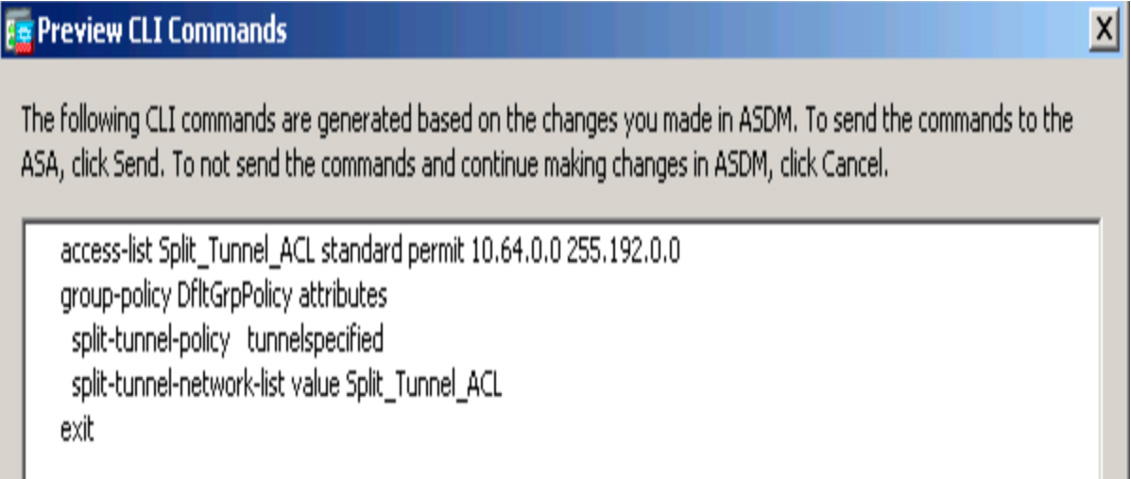
Figure 7-17 CLI for Split Tunnel ACL
You will see more split tunneling configuration examples later in this chapter, when you see how to build a few remote access VPN designs using both Cisco security appliances and IOS routers.
SSLVPN/WebVPN
SSLVPN, or WebVPN, provides remote VPN access through Secure Sockets Layer (SSL) enabled on the VPN gateway. The SSLVPN gateway allows remote users to establish the VPN tunnel using a web browser rather than a software client. The biggest value of this approach is that it simplifies requirements since most mobile devices have a browser that supports SSL and so do not need to install additional software. A remote user can simply launch a web browser and connect directly to a trusted network resource through the SSLVPN-enabled NAS. SSLVPN also functions over common data ports, reducing the chance that a security tool such as a firewall will prevent the VPN connection from occurring. Figure 7-18 shows an example of a Cisco IOS router providing SSLVPN to a roaming user’s mobile device.
Figure 7-18 Remote User SSLVPN Example
WebVPN Example
Figure 7-19 shows a very basic WebVPN portal, which you will build later in this chapter on a Cisco IOS router. Notice that there is a URL search bar, which enables the user to search the VPN. You could set up bookmarks to reach internal servers; this would be helpful, for example, for a contractor who needs access to only specific items in the protected network. Notice on the right the option to launch a full tunnel using Cisco AnyConnect. There are many options available in Cisco portal configurations.

Figure 7-19 Basic WebVPN Portal
SSLVPN traffic flow starts with the remote user accessing the Internet. The user enters the IP address of the VPN NAS and, upon connecting, is redirected to the SSLVPN login page, which, on an ASA, is https://IP ADDRESS/index.html. You will see how to build this on a Cisco IOS router later in this chapter. Figure 7-20 provides an example of how the traffic would flow between a user’s web browser and VPN NAS.
Figure 7-20 SSLVPN Traffic Flow Diagram
SSLVPN Options
SSLVPN offers a few VPN modes. Clientless mode provides secure access to private web resources and private content. Thin client mode extends the cryptographic functions of the web browser to enable remote access TCP-based applications such as POP3, SMTP, IMAP, Telnet, and SSH. The assumption is that the client application users TCP to connect to a well-known server and port. A Java applet initiates an HTTP request from the remote user client to the SSLVPN NAS. The name and port number of the internal email server are included in the HTTP request. The SSLVPN NAS creates a TCP connection to the internal server and port to allow for access. Finally, with full tunnel mode, a user can flip to a full tunnel by downloading the Cisco AnyConnect VPN client for SSL. For example, a user logged in to a web portal might have the option to select Tunnel Connect (AnyConnect).
The WebVPN GUI can be customized to fit your business requirements. The login page’s logo, colors, languages, and text are all customizable. You can add unique messages and images, for example, to provide information to remote users on topics such as your corporate policies for remote VPN access. The SSLVPN portal page is also customizable. As services and other internal links are added to the bookmarks, application access is built, and other details are tuned, the SSLVPN page will begin to look like the one shown in Figure 7-21.
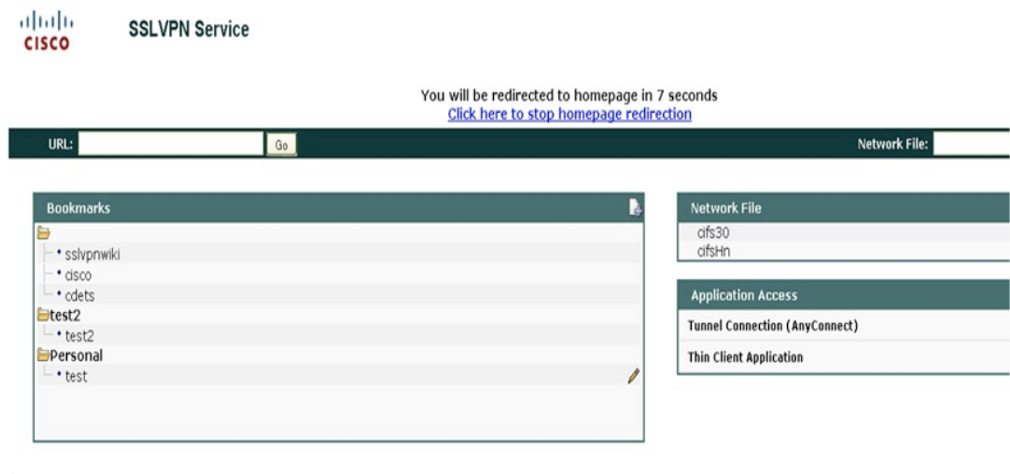
Figure 7-21 SSLVPN Example
SSLVPN Licensing
There are a few SSLVPN license options. A license is consumed when a user creates a VPN session. The same user can create multiple sessions, which would consume a seat count per session. For example, a user working from home and using both a mobile phone and laptop to connect over the SSLVPN would count as two seats. When the maximum license count of the current active license is reached, no new sessions are allowed until seats become available. Seats open up when a user logs out, a session timeout occurs, a session is cleared by the administrator, or another disconnection event occurs.
The following license options are available for SSLVPN:
• Permanent license: This type of license does not have a usage period and node locked.
• Evaluation license: This type of licenses is valid for only a short period of time, allowing for the evaluation of the SSLVPN capability. This type of license is not node locked, and it bases its time on the system clock.
• Extension license: This type of license is a node locked, metered license. Metered means you are billed as the licenses are used. These licenses are ideal when you don’t plan to use large license counts but need the option to expand if a special event occurs. An example could be a situation forcing the entire workforce to work from home. It would be ideal to not have to pay for that number of licenses but be able to expand to that count when that event occurs.
• Grace-rehost license: This type of license is node locked or metered. It is used in a rehost operation.
You will see how to configure SSLVPN on an IOS router later in this chapter. You will also see SSLVPN configuration examples using a Cisco ASA in next Chapter 8, “Clientless Remote Access SSLVPNs on the ASA.”
Encryption Algorithms
So far this chapter has covered the possible options for the NAS and VPN client software required for a remote access VPN deployment. Another component to consider is the type of encryption used by the VPN. Encryption quality and performance are essential to the success of any VPN solution because they determine the VPN experience and level of offered protection.
In Chapter 3, we looked at the technology components of a site-to-site VPN, including various options for encrypting the traffic as it moves between locations. That chapter does not cover encryption concepts, even though they apply to all forms of VPNs, including remote access VPNs. Using the best encryption option for your business is critical to effectively preventing unwanted access to your data. This is especially true with remote access VPNs because remote devices can connect from anywhere in the world, increasing the risk of exposing a VPN session to attack from public networks.
Encryption Trends
Cybersecurity is continuously changing as attack and defense methods adapt to changes in technology and the cyber landscape. The same holds true for cryptography. Over the years, numerous cryptographic algorithms have been developed and used for processes such as encrypting VPN communication. Many older algorithms have been modified or replaced to accommodate modern threats. As you decide which type of encryption you will use to protect your data, it is critical to consider the likelihood that an encryption algorithm could be compromised. Using a deprecated encryption option will lead to a compromise today or a breach in the near future. Computers are constantly becoming faster, and the time required to break an encryption algorithm will continue to decrease. It is critical to understand that encryption is not about permanently preventing attackers from compromising the encryption being used. Eventually, all encryption algorithms will be compromised. The goal should be to delay the ability of an adversary to successfully decrypt your VPN.
The cryptography industry considers an encryption acceptable if it can provide security for 10 or more years into the future. Sometimes, acceptable encryption requires a very strong algorithm. Other times, legacy algorithms can be improved by using additional encryption or by including specific configuration and usage, such as enabling short key lifetimes and required password lengths.
Encryption Algorithm Categories
There are four general cryptographic algorithm categories you should be aware of:
• Symmetric key algorithm: A symmetric key algorithm uses the same key for encryption and decryption. Older symmetric key algorithms can be broken easily due to the small key size. An example of a legacy symmetric key algorithm that should not be used is DES. Triple DES (3DES) improves DES but is still risky to use unless keys are renewed often. The cryptography industry recommends using AES with 128-bit keys for standard use when using symmetric key algorithms and using AES with 256-bit keys for extremely sensitive information.
• Public key algorithm: A public key algorithm uses different keys for encryption and decryption. It is common to call these algorithms public/private key algorithms because one key is privately held and kept secret, and the other key is publicly available. These keys are separate and can’t be derived from one another. The private key is designed to be used only by its owner, while anybody can use the public key to perform actions with the key owner. However, even if people do not have the private key, data can still be compromised. RSA algorithms for encryption and digital signatures as well as Diffie–Hellman algorithms are becoming more vulnerable to compromise as attack research and technology continue to improve. The cryptography community continues to recommend increasing the key sizes as a countermeasure, but every year RSA and Diffie–Hellman are becoming less effective at protecting encrypted data.
• Elliptic curve algorithms: Elliptic curve algorithms, or elliptic curve cryptography (ECC), are a relatively new alternative to public key cryptography. These algorithms function on elliptic curves over finite fields, which means ECC is efficient and performs well. ECC can be added to Diffie–Hellman and RSA to create ECDH and ECRSA, which, when used over 284-bit prime modules, can be used for very secure information, such as classified information. The SVPN 300-730 exam covers elliptic curve algorithms.
• Hash algorithm: Hash algorithms, also known digital fingerprinting algorithms, are irreversible functions that provide a fixed size output based on various inputs. This means you could enter 40 characters for one hash and 20 characters for another statement to be hashed, and both hash outputs would be the same length, such as 30 characters. The strength of hashing is based on the output being irreversible and resistant to collisions. Having two different inputs produce the same hash would violate the value of using a hash to validate that something is authentic. Examples of hash algorithms are Secure Hash Algorithm 1 (SHA-1), SHA-256, and Message Digest 5 (MD5). Of these examples, MD5 and SHA-1 are legacy algorithms that should be avoided.
Comparing Encryption Options
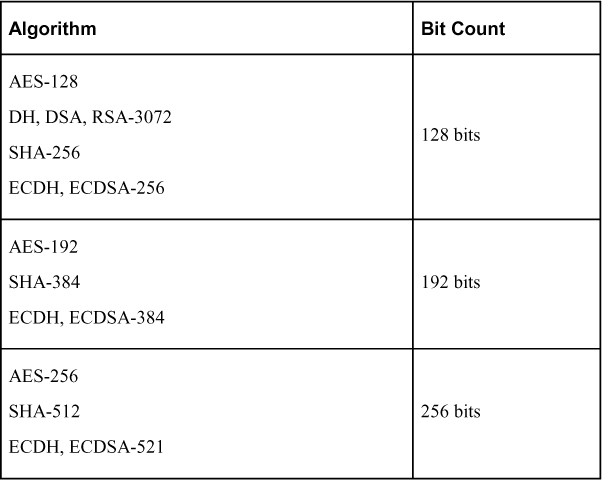
Table 7-2 is a helpful chart that groups together different encryption algorithms, based on their bit counts. Using 128 bits could be sufficient for encrypting data that isn’t extremely sensitive; however, the industry recommends using higher bit levels, such as 256-bit encryption, for protecting sensitive data. The higher the bit count, the harder it is to break the encryption.
Table 7-2 Encryption Strength Summary
For remote access VPN encryption, this chapter focuses on the use of ECC. To better understand ECC, let’s look more closely at the fundamentals of ECC algorithms.
Elliptic Curve Cryptography Algorithms
ECC is the latest encryption and decryption method for stronger security. It can perform much faster than other options, such as RSA, based on using smaller key sizes (and therefore consuming fewer computational resources). To put things in perspective, a 256-bit ECC key would be similar to a 3072-bit RSA key. Agencies such as the National Security Agency (NSA) have certified ECC, making it a recommended method for encrypting websites and infrastructure; ECC is safer than traditional RSA and DSA options.
Asymmetric encryption such as ECC is used for many things, including bitcoin, X.509/PKI, Transport Layer Security/Secure Sockets Layer (SSL), Internet Key Exchange (IKE), Secure Shell (SSH), Domain Name System Security Extensions (DNSSEC), Secure Multipurpose Internet Mail Extensions (S/MIMI), and most things using digital signatures. ECC is also adaptable to many existing cryptographic schedules and protocols, including Diffie–Hellman (Elliptic Curve Diffie Hellman [ECDH]), Digital Signatures (Elliptic Curve Digital Signatures [ECDSA]), and Integrated Encrypted Scheme (Elliptic Curve Integrated Encryption Scheme [ECIES]). Today many smart cards, cell phones, and Internet of Things (IoT) devices implement ECC for their asymmetric encryption requirements. There is not a known timeline for how long ECC will be effective, but numerous standards define and govern ECC, including the American National Standards Institute (ANSI) X9.62/X9.63/FRP256V1, the Institute of Electrical and Electronics Engineers (IEEE) P1363, the Standards for Efficient Cryptography Group (SECG), NIST’s Federal Information Processing Standards (FIPS), and the NSA’s Suite B requirements. With this level of support, ECC should remain a trusted option for the foreseeable future.
ECC Threats
ECC does face some potential threats. There is a potential for a side-channel attack, which could result in a leak of information. For example, an attacker could measure the difference in time between observed peaks in power consumption using a tool such as an oscilloscope. Because there are signification time variances for input values, an attacker could deduce the secret key in a timing attack. A similar approach could be used for measuring power consumption, by mapping changes in power against input to deduce the key. Over time, ECC has developed countermeasures to threats such as side-channel attacks, including the implementation of the Montgomery power ladder, which is designed to mask resource consumption and timing. Unfortunately, not all ECC support ladders and other attack methods will continue to show up as general technology and ECC evolves. Quantum computing is one of the upcoming potential threats to ECC.
Encryption Algorithm Math
Before we dive further into ECC, we need to look at the basics of how asymmetric encryption math works. Public key cryptography is based on the concept that factoring is slow, while multiplication is fast. For example, the easy part of the RSA algorithm is multiplying two prime numbers, and the hard part of the RSA algorithm is factoring the product of the multiplication into two component primes. In the world of mathematics, algorithms that are easy in one direction and difficult in the other are called trapdoor functions. Generally, the bigger the difficulty in one direction than in the other, the more secure the algorithm.
As described earlier, asymmetric encryption involves two components—the public key and the private key—that enable two parties to communicate in a secure manner without having to meet each other to exchange a secret key (because only the public key is revealed). The encryption behind this process works by applying to the message a mathematical operation to get a random-looking number. Decryption works by applying another random-looking number, which returns the target number back to its original number. For asymmetric encryption, encrypting with the public key can only be undone by decrypting with the private key.
Limits called maximum wrappers permit the results of calculations to exceed the limits of the computer processing the encryption. Think of a wrapper as a clock; after the value exceeds 12, the next digit is 1. The public and private keys are special numbers that sit between the maximum number and zero. To encrypt a message, you simply multiply a number times the value of the public key wrapping the value around when it hits the maximum value. For example, say the public key is 10 and you are using the number 4. You would end with a result of 6 based on 4 [ts] 4 = 16. However, you would wrap back to 0 when you hit the wrapper at 10, resulting in the remaining value ending with a result of 6. To decrypt the message, you multiply the number by the private key number, which brings you back to the original number.
RSA and Diffie–Hellman were great options when computing prime factorization was challenging. Specialized algorithms such as the quadratic sieve and general number field sieve algorithms were developed to handle prime factorization, and required key lengths increased to avoid the possibility of an unwanted party breaking the encryption being used. As computers increase in power, applying larger keys obviously does not create a sustainable cryptography system.
ECC Math
Elliptic curve mathematics improves a trapdoor function by applying this mathematic equation:
E = {(x,y) | y^2 = x^3 + ax + b}
When you run numbers through this equation, you end up with different elliptic curve shapes. Figure 7-22 shows an example of a curve that can be produced using this equation.
Figure 7-22 Example Elliptic Curve
By using known variables and seeing where the factors plot the curve, it is easy to solve for the public key; however, it is extremely difficult to construct a seed from the domain parameters, which means you solve a hash inversion to cheat. This difficult part of the logarithm underpins elliptic curve encryption. Despite more than three decades of research and testing, mathematicians around the world have been unable to find an algorithm to function as a shortcut to narrow the gap within the elliptic curve trapdoor, so the trapdoor has maintained its strength as the backbone for EEC. Essentially, solving the elliptic curve logarithm is significantly more difficult than solving the factoring involved with RSA and Diffie–Hellman. The industry has therefore moved away from recommending larger keys for algorithms such as Diffie–Hellman and instead has looked to elliptic curve to improve security.
Combining ECC with Other Algorithms
Now that you have a basic understanding of trapdoor mathematics and why ECC has become the industry recommendation, let’s look at how ECC is used in the real world. Two extremely popular but dated algorithms are digital signatures and Diffie–Hellman. To overcome their weaknesses, many security products offer a combination of ECC with these two algorithms; the combinations, as mentioned earlier, are known as ECDH and the ECDSA.
Diffie–Hellman (DH) is a public key cryptography protocol that enables two parties to establish a shared secret over an insecure communications channel. It is used in IKE to establish session keys. DH can be configured to support its default of 768 bits or to go as high as 4096 bits. The industry recommends at least 2048 bits, but changes in technology are causing the bit recommendations to continually increase. Adding elliptic curve mathematics to Diffie–Hellman, ECDH, dramatically improves security, allowing a 256-bit ECDH key to meet industry recommendations. It is estimated that a DH 3072-bit key could provide similar protection to an ECDH 256-bit key. Increasing an ECDH key to 384 bits would equate to around the same protection as a 7680-bit DH key. A 512-bit ECDH key would increase the standard asymmetric key’s equivalent protection to around 15,360 bits. The bottom line is that ECDH can get you the same level of protection as DH but with much smaller keys. You can see why the industry is moving toward ECC.
ECC can also be applied to digital signatures. The industry has used RSA for a number of years, but now ECDSA is being used for increased performance and security. RSA uses a public key that is a product of two prime numbers, plus a smaller number. Applying elliptic curve mathematics can allow a 256-bit ECDSA key to provide as much protection as a 3248-bit asymmetric key. An average website uses a 2048-bit RSA key, and an ECDSA key of around 256 bits would perform faster and be much stronger than that. As with DH, you could use a large digital signature key to improve security or leverage ECDSA, which can provide high security with a much smaller key. For use cases such as remote access VPNs, this can be critical for performance and protection.
Applying Elliptic Curve Cryptography to a VPN
This section applies what you have learned about elliptic curve cryptography to VPN technology. We look first at generating IPsec keys. When you configure a remote access VPN, you can use different Diffie–Hellman key derivation algorithms to generate IPsec security association (SA) keys. Different group options have different modulus sizes. Cisco set things up so that the larger the group number, the better the security applied; however, better security may require more processing time. As discussed earlier, elliptic curve mathematics has helped improve performance and increase security. When you create a VPN, you need to select certain minimum levels of security, depending on the type of encryption being used. For example, if you use AES encryption, you should use group 5 or higher. IKEv1 policies allow only groups 1 and 5. Groups specify the level of security being applied.
Diffie Hellman Groups
The Diffie–Hellman group options are as follows:
• Diffie–Hellman Group 1: 768-bit modulus. DH group 1 is considered insecure; do not use it.
• Diffie–Hellman Group 2: 1024-bit modulus. This option is no longer considered good protection.
• Diffie–Hellman Group 5: 1536-bit modulus. Formerly considered good protection for 128-bit keys, this option is no longer considered good protection.
• Diffie–Hellman Group 14: 2048 bit modulus. Considered good protection for 192-bit keys.
• Diffie–Hellman Group 19: 256-bit elliptic curve.
• Diffie–Hellman Group 20: 384-bit elliptic curve.
• Diffie–Hellman Group 21: 521-bit elliptic curve.
• Diffie–Hellman Group 24: 2048-bit modulus and 256-bit prime order subgroup. This option is no longer recommended.
You can see that DH bit sizes start at 768 bits and increase to more than 2,000 bits. With groups 19 and higher, elliptic curve is applied (that is, ECDH), which reduces the bit size. As mentioned earlier, the current recommendation is either a large-bit-size DH option or an ECDH option. The options and recommendations will continue to change as technology and mathematics matures.
When you need to protect classified or extremely sensitive information, it is best to use a 384-bit elliptic curve option for ECDH. Regardless of the security with ECDH, there is no method to authenticate the parties during the exchange. ECDSA is used to sign the content and fill this gap with ECDH.
ECDH is used for establishing a public key. ECDSHA is used for signing certificates. This means you use ECDH to share a secret key and ECDSHA to authenticate parties since ECDH doesn’t have the ability to authenticate.
High Availability
Redundancy must be part of your VPN design considerations. For some organizations, remote access VPN capabilities are a luxury; other organizations depend on having remote access to critical resources. Examples of business-critical use cases can include administrators accessing equipment within an organization, sales teams requiring access to internal sensitive applications, and remote systems requiring updates from internal sources.
Load Balancing
Cisco customers have a few options for high availability, as mentioned in Chapter 3. The first option is load balancing VPN traffic between members of a virtual cluster. A virtual cluster is made of two or more headend devices, where one acts as the virtual master, and others are backups. The headend devices do not have to be the same type or have identical software or configurations to participate in the virtual cluster. All active devices in the virtual cluster are responsible for session loads. Load balancing works by directing traffic to the least-loaded device in the cluster, and that device attempts to balance the distribution of sessions between all headend devices.
Failover Design
Another option is to use a failover design. The most basic of these is a cold failover, which involves having similar hardware available but not powered on. In the event that a VPN system goes down, you could power on the standby unit and redirect traffic to the new unit by copying over the configuration. If you use a cold standby approach, best practice is to have a system that periodically downloads the most current configuration from the primary headend to prevent the loss of recent configuration changes.
A better failover approach is to use two identical headend devices, such as two Cisco ASAs, and connect them with a dedicated failover link. A heartbeat check takes place between the primary and secondary devices, and certain conditions will trigger failover. For the ASA, active/active and active/standby options are available. Active/active means a high-availability configuration is established and requires multi-context mode to be enabled. This approach allows for balancing traffic between two active systems. Active/standby involves only the primary ASA providing VPN capabilities with a standby system that waits for failover to occur.
Note
One key value of a high-availability design in which each ASA is considered standalone is that if an ASA fails, users do not need to disconnect. With a failover design that clusters the ASAs, if one ASA goes down, the users get disconnected and have to reestablish the VPN connection after the failover occurs.
Load Balancing Considerations
There are a few things to consider that may or may not allow your design to include load balancing. Here is a quick summary of important items:
• Many Cisco offerings do not support load balancing or stateful failover when a security appliance is in multi-context mode. If you are using multi-context mode, check to see if your designed failover and load balancing option is supported. For example, ASAs do not support multi-context mode and load balancing.
• If you have limited IP address pools available for a remote access deployment, you may not want to perform load balancing. The load balancing algorithm is based on the load that each backup cluster member supplies. This means you can quickly run out of IP addresses if you are using multiple systems in a load balancing cluster. Also, each device must have a unique IP address.
• When clustering devices, all devices are active, which means the maximum number of devices for each device is in play. For example, if one device in a cluster supports 100 devices and another supports 200 remote devices, you could support 300 devices with this cluster.
• Some VPN clients may not be able to participate in load balancing. For example, the Cisco ASA supports IPsec clients, SSLVPN clients, and clientless sessions. The Cisco ASA allows support for LT2P, PPTP clients, or L2TP/IPsec, but they do not participate in load balancing.
Another failover factor to consider is how the clients react during a failover. Cisco AnyConnect offers the ability to configure a backup server, which will be the fallback if the primary server is not available. This is configured within the AnyConnect client profile, which is discussed earlier in this chapter. Within the server list settings is an option to add one or more backup servers. You need to include either a fully qualified domain name (FQDN) or an IP address. Figure 7-23 shows the configuration page for adding a backup server.
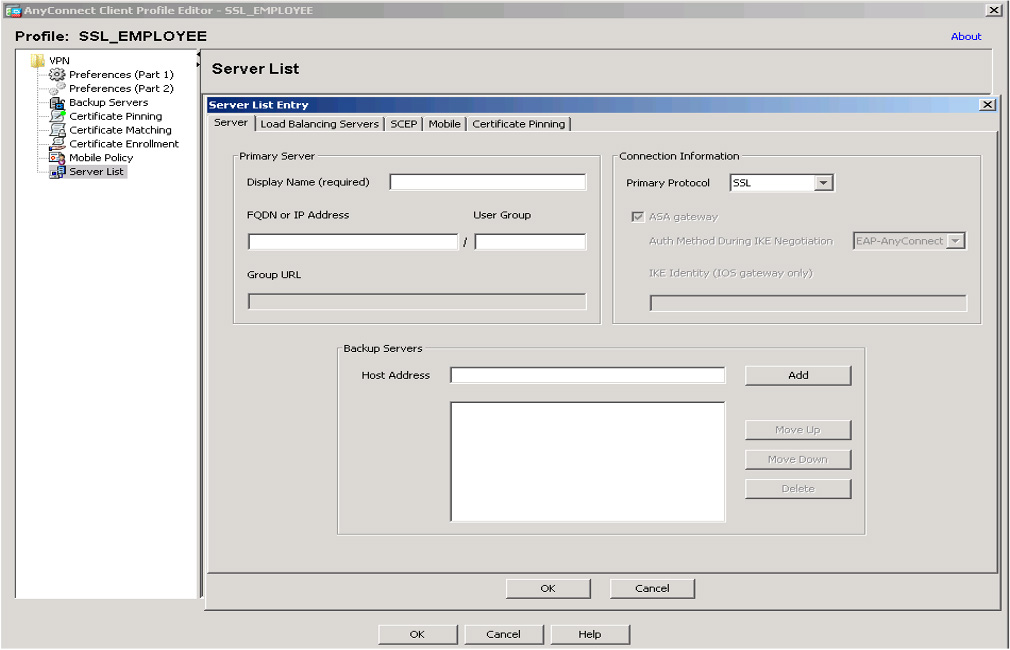
Figure 7-23 Adding a Backup Server in AnyConnect
Cisco ASDM Remote Access Configuration
It’s time to configure a remote access VPN! In the first example, you will see how to configure a Cisco ASA to provide remote access to employees running Cisco AnyConnect. You will see how to build this by using the ASDM VPN wizard and will also see the command-line code that is created for the configuration. Then you will work through a similar project using the ASA command line to ensure that you understand how to build a basic remote access VPN setup.
The design for this deployment will accommodate a remote user connecting over the public Internet to access the outside interface of the ASA security appliance. Any traffic that crosses the VPN will be routed to the 10.64.0.0/10 network. The outside IP address for the ASA will be 172.16.21.1. Figure 7-24 shows this design.
Figure 7-24 ASA Remote Access Design
Let’s start off this configuration example by accessing Cisco ASDM:
Step 1. Log in to ASDM and select Wizards > VPN Wizards > AnyConnect VPN Wizard (see Figure 7-25).

Figure 7-25 Navigating to the AnyConnect VPN Wizard
Step 2. On the introduction page, click Next.
Step 3. Give your connection profile a name and choose the outside interface as the termination point (that is, the point to which people will connect from outside the network). Click Next (see Figure 7-26).
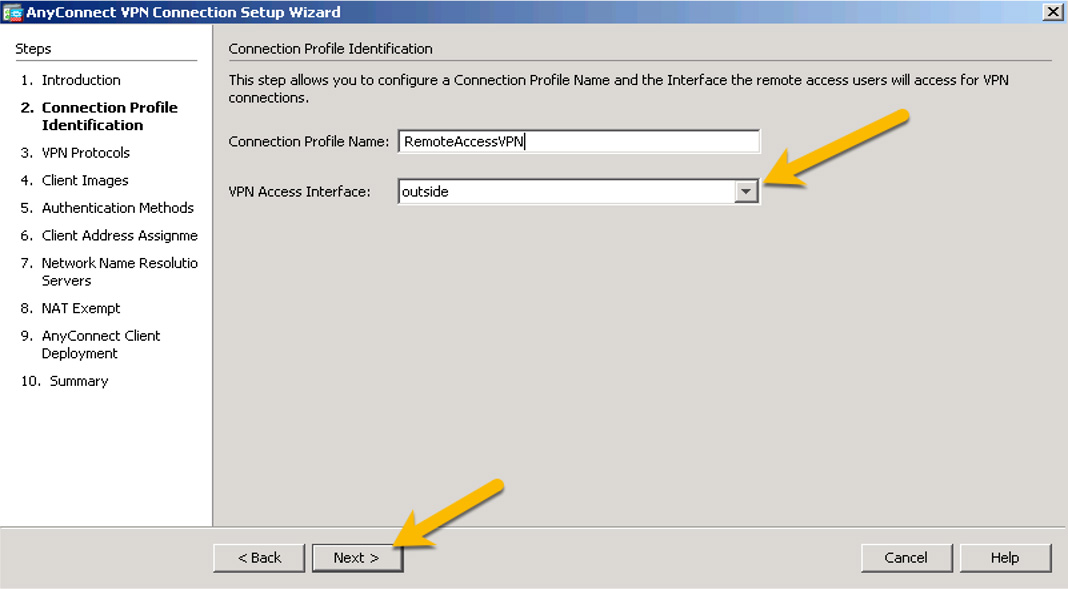
Figure 7-26 Connection Profile Identification
Step 4. Check the SSL check box to enable SSL and choose the device certificate. You could use a self-signed certificate, but it is recommended to use a third-party certificate authority (CA), such as Entrust or Verisign, because many companies have approved the trust provided by such CAs. Also, some applications have built-in trust for popular third-party CAs. This example uses a certificate created using Active Directory, as shown in Figure 7-27. If you do not have a certificate available, click Manage.
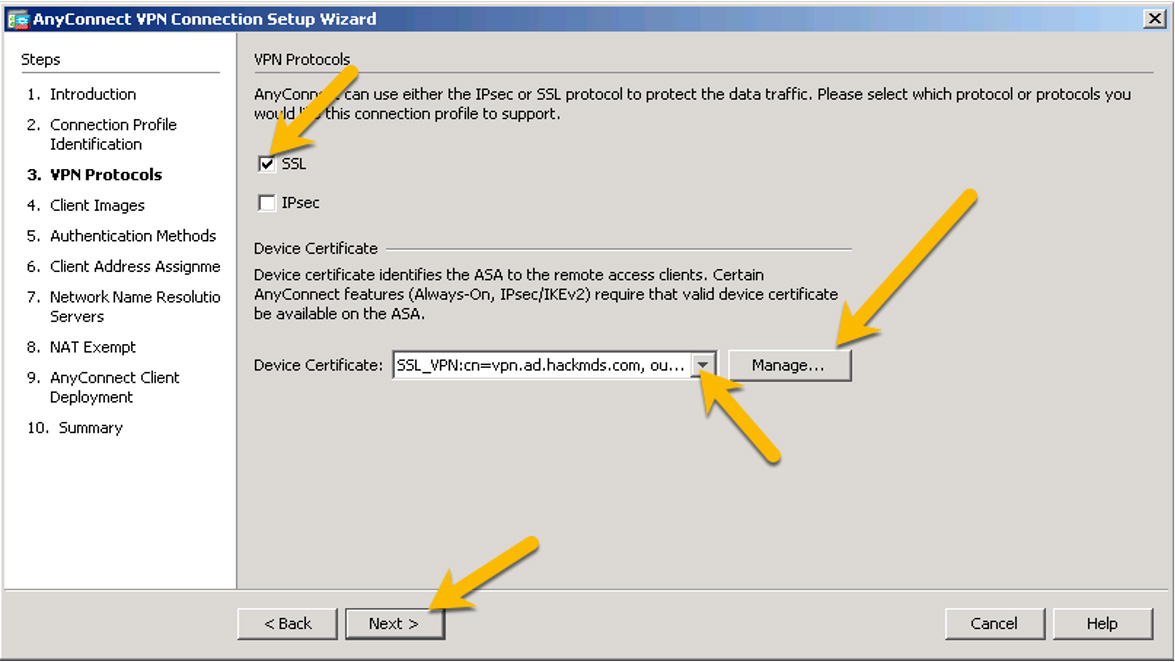
Figure 7-27 VPN Protocols
Step 5. If you needed to create or import a certificate, click Add (to import) and choose Enroll ASA SSL certificate with Entrust or Launch ASM Identity Certificate Wizard, as shown in Figure 7-28. Once you have created your certificate option, select it and click Next.

Figure 7-28 Creating or Importing a Certificate
Step 6. On the page that allows you to choose your AnyConnect image, click Add if an image isn’t already selected. If you have not downloaded an AnyConnect image, you can upload it here or select one that has been downloaded to flash. After you select an AnyConnect image, click Next (see Figure 7-29).
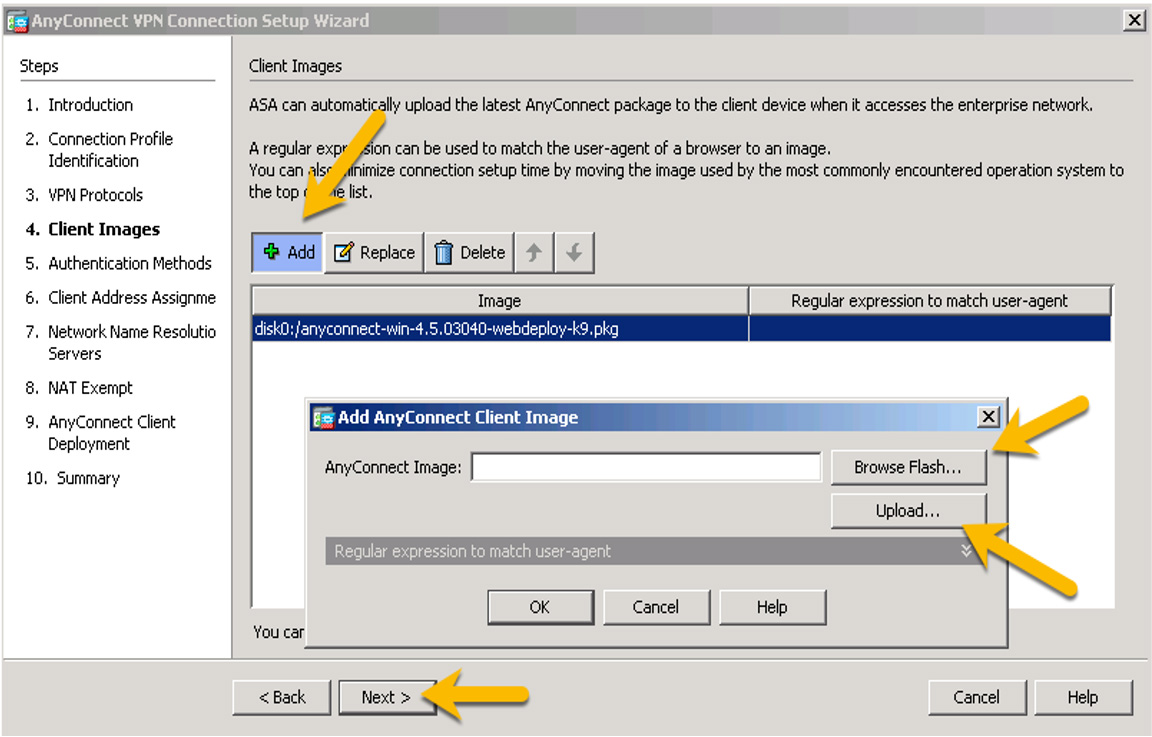
Figure 7-29 Choosing an AnyConnect Image
Step 7. On the next page, where you can select authentication methods used for logins to the VPN, click New to add a new authentication option or select the one you want to use and click Next (see Figure 7-30).
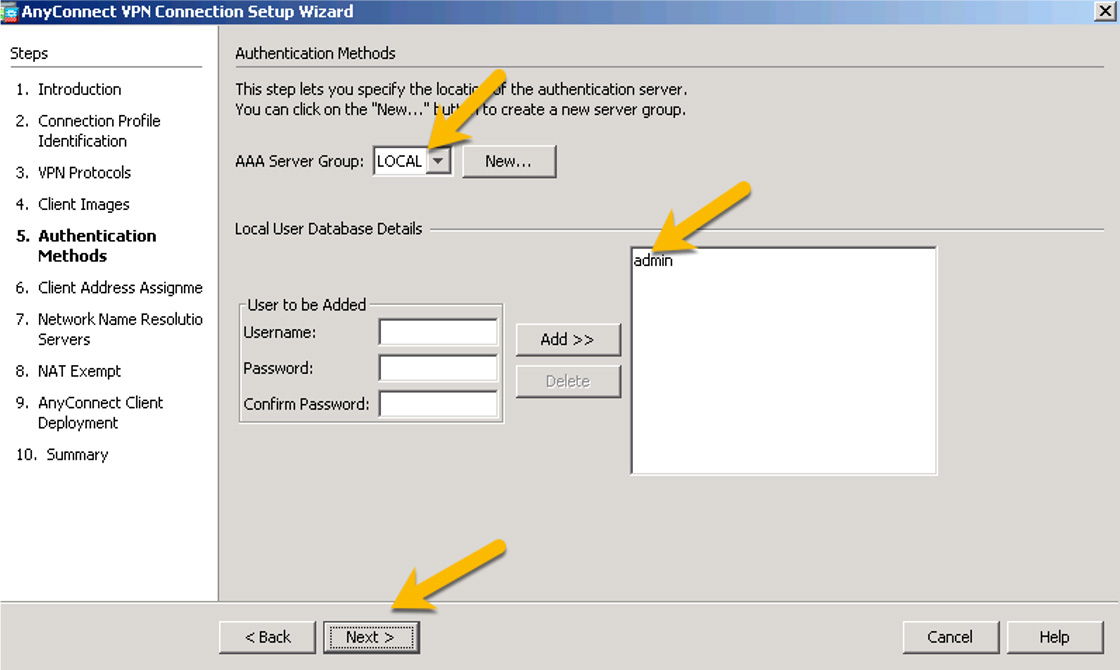
Figure 7-30 Authentication Methods for Login
After you click New, you can click the Authentication Protocol drop-down to see the options (Figure 7-31).
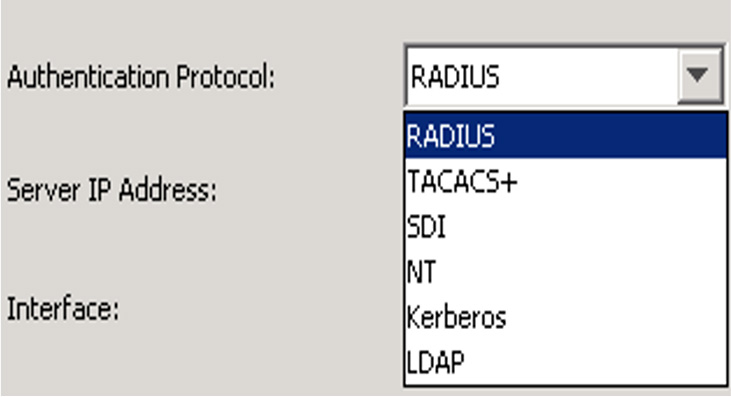
Figure 7-31 Authentication Protocol Drop-down
Figure 7-32 provides an example of using ISE for the authentication protocol. After you have chosen your authentication protocol, click Next.

Figure 7-32 ISE as the Authentication Protocol
Step 8. On the Client Address Assignment screen, select an existing IP address pool or create a new pool of IP addresses by clicking the New button. Select with IPv4 and IPv6 address pool(s) you want to use, and click Next. This example uses VPN-POOL with IP addresses between 198.19.40.51 and 198.19.40.60 because there will not be very many VPN users (see Figure 7-33).

Figure 7-33 Client Address Assignment
Step 9. Specify a DNS server and a domain name, and then click Next (see Figure 7-34).

Figure 7-34 Specifying the Network Name Resolution Servers
Step 10. When asked to choose whether to exempt the VPN from NAT, leave the check box unselected and click Next (see Figure 7-35).

Figure 7-35 Exempting the VPN from NAT
You will see an explanation indicating that there are two options for the AnyConnect client to be installed on hosts. After reading this explanation, click Next. Now you see the summary page (see Figure 7-36).
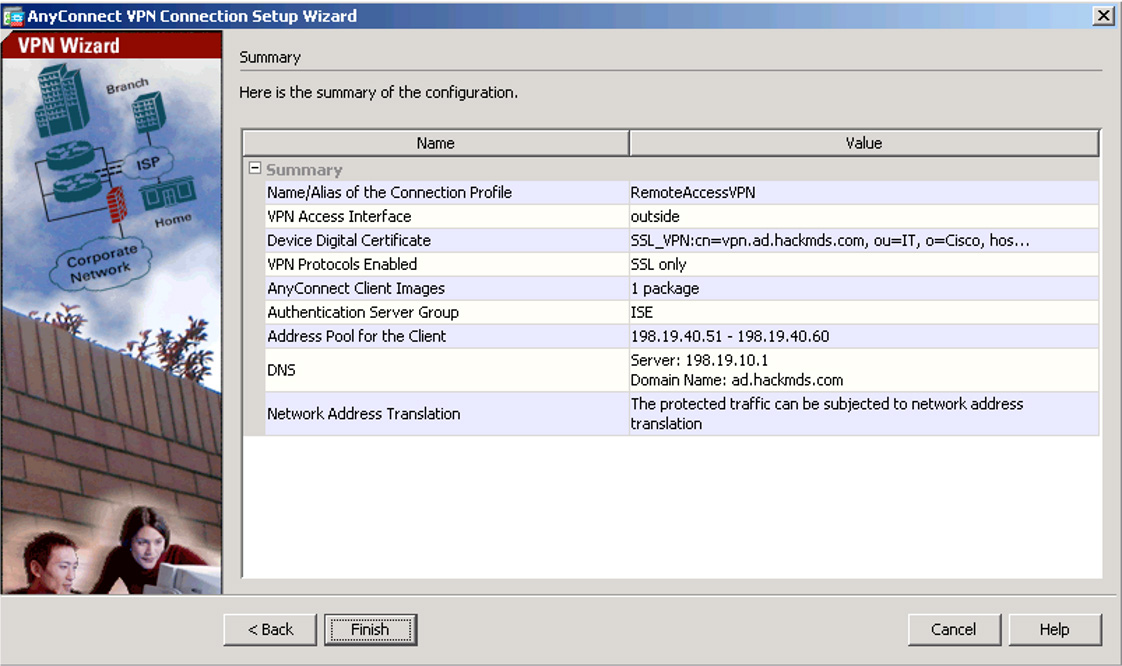
Figure 7-36 Summary Page
If you are studying for the SVPN 300-730 exam, you need to understand the command-line code associated with an ASDM wizard configuration. Figure 7-37 shows a summary of the code used for this configuration. To better understand this command-line code, in the next section, you will build a similar basic remote access VPN setup using the command-line options in a Cisco ASA. You can view the configuration and also use an SSH client and view the configuration from the command line.
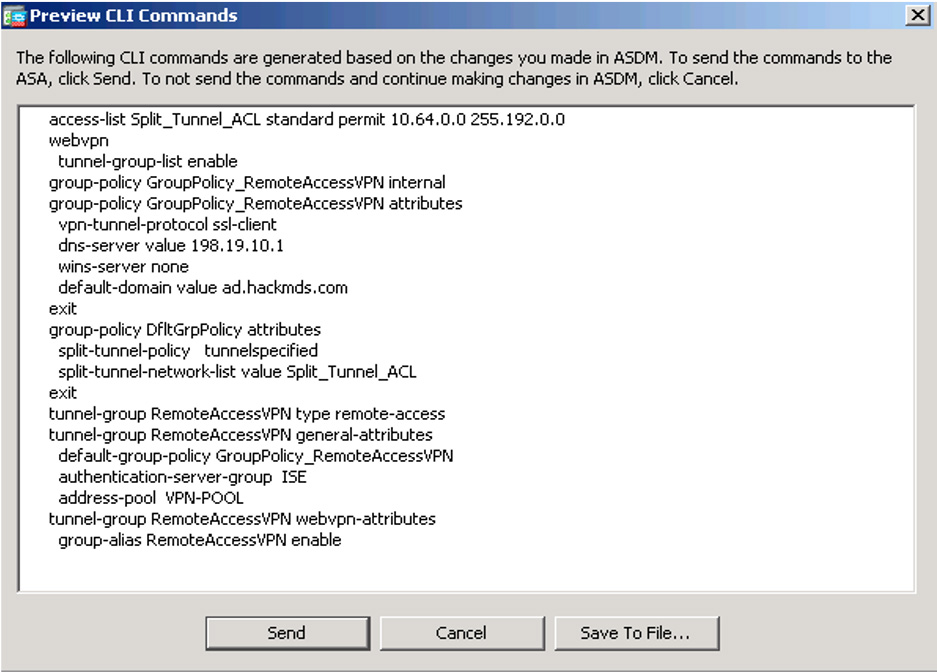
Figure 7-37 Summarized CLI Commands
Cisco ASA CLI Remote Access Configuration
The previous section showed how to use ASDM to configure a remote access VPN. It also shows the command-line configuration that would be created using the VPN wizard in the GUI. This section shows how to build a remote access VPN by using the command-line interface (CLI) in a Cisco ASA so you have multiple examples of different options.
Note
If you are attempting the SVPN 300-730 exam, you need to understand both the GUI and CLI steps for configuring remote access VPNs.
To build a remote access VPN by using the CLI in a Cisco ASA, follow these steps:
Step 1. Decide which interfaces on the Cisco ASA will act as the management and outside interfaces. The outside interface will be used by remote devices to connect to the VPN headend/NAS. For the outside interface, you access the interface, provide an IP address, and name it outside:
ASA1(config)# interface ethernet0
ASA1(config-if)# ip address 10.10.5.100 255.255.0.0
ASA1(config-if)# nameif outside
ASA1(config-if)# no shutdown
Step 2. Specify the configuration method:
ASA1(config)# crypto ikev1 policy 1 encryption aes-256
Other options include aes, aes-129, aes-256, des, and 3des. des and 3des are not recommended due to their weak security capabilities.
Step 3. Specify the hash algorithm for the IKE policy (which is also known as the HMAC variant).
ASA1(config)# crypto ikev1 policy 1 hash sha
Instead of using SHA, you could use MD5.
Step 4. Specify the Diffie–Hellman group for the IKE policy:
ASA1(config)# crypto ikev1 policy 1 group 14
This is the crypto protocol that allows the IPsec client and the Cisco ASA to establish a shared secret key. It is not recommended to use group 1 due to its weak security.
Step 5. Specify the encryption key lifetime, which is configured using the number of seconds each security association should use before it expires:
ASA1(config)# crypto ikev1 policy 1 lifetime 43200
This example uses 43200, which equals 12 hours. The available range is 120 to 2147483647.
Step 6. Enable ISAKMP on the interface, which in this case is the outside interface, and save the configuration:
ASA1(config)# crypto ikev1 enable outside
ASA1(config)# write memory
Step 7. Assign the pool of addresses that will be assigned to remote users as they connect over the VPN, and add a test user and a basic password (or passphrase):
ASA1(config)# ip local pool testpool 192.168.0.10-192.168.0.15
ASA1(config)# username testuser password sftsvpne
The passphrase in this case is created from the first letter of each word in the sentence “Studying for the SVPN 300-730 exam,” which equals sftsvpne.
Step 8. Create an IKEv1 transform set that specifies the IPsec IKEv1 encryption and hash algorithms used to ensure data integrity:
ASA1(config)# crypto ipsec transform set FirstSet esp-aes esp-sha-hmac
You can use ESP-AES, ESP-AES-192, ESP-AES-256, ESP-DES, ESP-3DES, or ESP-NULL if you don’t want to use encryption. For the hash, you can use ESP-MD5-HMAC, ESP-SHA-HMAC, or ESP-NONE if you don’t want to use a HMAC.
Step 9. Specify an IKEv2 proposal set to name the IPsec IKEv2 protocol, encryption, and integrity algorithms that will be used:
ASA1(config)# crypto ipsec ikev2 ipsec-proposal secure_proposal
ASA1(config-ipsec-proposal)# protocol esp encryption aes integrity sha-1
Once again, you can use DES, 3DES, AES, AES-192, AES-256, or NULL. For the hash, you also once again use MD5 or SHA-1.
Next, you need to define a tunnel group. Think of a tunnel group as a collection of one or more tunnel policies. Policies might, for example, identify AAA servers, specify connection parameters, and define the default group policy.
Default Tunnels Groups
There are two default tunnel groups on the Cisco ASA. It is okay to change these default groups, but you can’t delete them. The ASA needs default tunnel parameters for remote access. The default groups are as follow:
DefaultRAGroup: The default remote-access tunnel group.
DefaultL2Lgrooup: The default LAN-to-LAN tunnel group.
Follow these steps to define a tunnel group:
Step 1. Create a tunnel group:
ASA1(config)# tunnel-group MYTUNNELGROUP type ipsec-ra
Step 2. Enter the general-attributes mode:
ASA1(config)# Tunnel-group MYTUNNELGROUP general-attributes
ASA1(config-tunnel-general)#
Step 3. In the general-attributes mode, specify an address pool that will be used for the tunnel group (in this case TESTPOOL):
ASA1(config-tunnel-general)# address-pool TESTPOOL
ASA1(config-tunnel-general)# exit
Step 4. Enter the IPsec-specific attributes for IKEv1 connections and, if desired, a pre-shared key, which applies only to IKEv1 and can be a string of 1 to 128 characters:
ASA1(config)# tunnel-group MYTUNNELGROUP ipsec-attributes
ASA1(config-tunnel-ipsec)# pre-shared-key MYPRESHAREDKEY12345
Step 5. Create a dynamic crypto map, in this case using IKEv2 (though you can also use IKEv1):
ASA1(config)# crypto dynamic-map MYDYNAMICMAP 1 set ikev2 ipsec-proposal SECURE_PROPOSAL
Note
Recall that crypto maps are important for defining policy templates when some parameters are not configured. For example, a remote peer that doesn’t have a known IP address still needs to connect to establish the remote access VPN.
Optionally, enable a reserve route injection for AnyConnect:
ASA1(config)# crypto dynamic-map MYDYNAMICMAP 1 set reverse route
Step 6. Create a crypto map entry that permits the ASA to use the dynamic crypto map to set the parameters of IPsec security associations:
ASA1(config)# crypto map mymap 1 ipsec-isakmp dynamic MYDYNAMICMAP
Step 7. Apply the crypto map to the outside interface:
ASA1(config)# crypto map mymap 1 ipsec-isakmp dynamic MYDYNAMICMAP
The configuration is now complete. Example 7-1 shows a summary of the code you just built.
Example 7-1 Cisco ASA CLI Remote Access Configuration
hostname(config)# crypto ikev1 policy 1 encryption aes-256
hostname(config)# crypto ikev1 policy 1 hash sha
hostname(config)# crypto ikev1 policy 1 group 14
hostname(config)# crypto ikev1 policy 1 lifetime 43200
hostname(config)# crypto ikev1 enable outside
hostname(config)# crypto ikev2 policy 1
hostname(config-ikev2-policy)# group 2
hostname(config-ikev2-policy)# integrity sha512
hostname(config-ikev2-policy)# prf sha512
hostname(config)# crypto ikev2 enable outside
hostname(config)# ip local pool POOL 192.168.0.10-192.168.0.15
hostname(config)# username testuser password 12345678
hostname(config)# crypto ipsec ikev2 ipsec-proposal  AES256-SHA512
hostname(config-ipsec-proposal)# protocol esp encryption  aes-256
hostname(config-ipsec-proposal)# protocol esp integrity sha-512
hostname(config)# tunnel-group RAVPN type remote-access
hostname(config)# tunnel-group RAVPN general-attributes
hostname(config-general)# address-pool POOL
hostname(config)# tunnel-group RAVPN ipsec-attributes
hostname(config-tunnel-ipsec)# ikev2 local-authentication
pre-shared-key localravpnkey
hostname(config-tunnel-ipsec)# ikev2 remote-authentication
pre-shared-key remoteravpnkey
hostname(config)# crypto dynamic-map DYNMAP 1 set ikev2
ipsec-proposal AES256-SHA512
hostname(config)# crypto dynamic-map DYNMAP 1 set reverse-route
hostname(config)# crypto map CMAP 1 ipsec-isakmp dynamic DYNMAP
hostname(config)# crypto map CMAP interface outside
Cisco Secure Firewall Remote Access VPN
The next configuration example involves a remote access VPN on a Cisco Secure Firewall (formally called Firepower Threat Defense appliance). Remote access can be accomplished using SSL and IPsec/IKEv2 VPNs. In this example, you will once again be using AnyConnect Security Mobility Client to provide a full tunnel, which could use secure SSL or IPsec/IKEv2 to secure the gateway for remote users.
Cisco Secure Firewall concepts VPN is not a learning requirement for the SVPN exam; however, it is a widely deployed option and concept we believe is very relevant for real-world remote access VPN requirements. If your focus is to pass the SVPN exam, you can skip this section. We highly recommend validating the latest version of the SVPN learning objectives because Cisco Secure Firewall could be added in the near future!
Note
As of Firepower Version 6.2.3, AnyConnect is the only Firepower-supported client.
Cisco Secure Firewall Features
A Cisco Secure Firewall solution provides the following remote access features:
• AnyConnect Security Mobility Client provides SSL and IPsec/IKEv2.
• Cisco Secure Firewall Management Center supports multiple combinations, such as IPv6 over an IPv4 tunnel.
• Cisco Secure Firewall provides configuration support on both Cisco Secure Firewall Management Center and Cisco Secure Device Manager.
• Cisco Secure Firewall provides support for both Cisco Secure Firewall Management Center and Cisco Secure Firewall high-availability options.
• Cisco Secure Firewall provides support for multiple interfaces and multiple AAA servers.
Just as with the Cisco ASA, with Cisco Secure Firewall, if the Cisco AnyConnect client isn’t already installed, users can access the IP address of the browser interface for the Cisco Secure Firewall appliance. The browser interface can be configured to accept SSL or IPsec/IKEv2 VPN connections. The user is presented with a login screen (unless they are using HTTP:// and redirected to HTTPS://), and after logging in, the user can download the AnyConnect VPN client, as discussed in the previous section.
Follow these steps to configure a remote access VPN on Cisco Secure Firewall:
Step 1. Log in to Cisco Secure Firewall.
Step 2. Select Devices > VPN > Remote Access (see Figure 7-38).
Figure 7-38 Logging In to Cisco Secure Firewall
Step 3. If this is your first time setting up a remote access VPN on this device, click the Add button to add a new configuration (see Figure 7-39).

Figure 7-39 Adding a Configuration
Step 4. Work through the five steps of the Cisco Secure Firewall Remote Access VPN Wizard (see Figure 7-40):
1. On the policy assignment page, give your policy a name and a description and decide whether you want to use SSL and/or IPsec/IKEv2, and select which headend device will offer remote access VPN services. Make your choices and click Next.
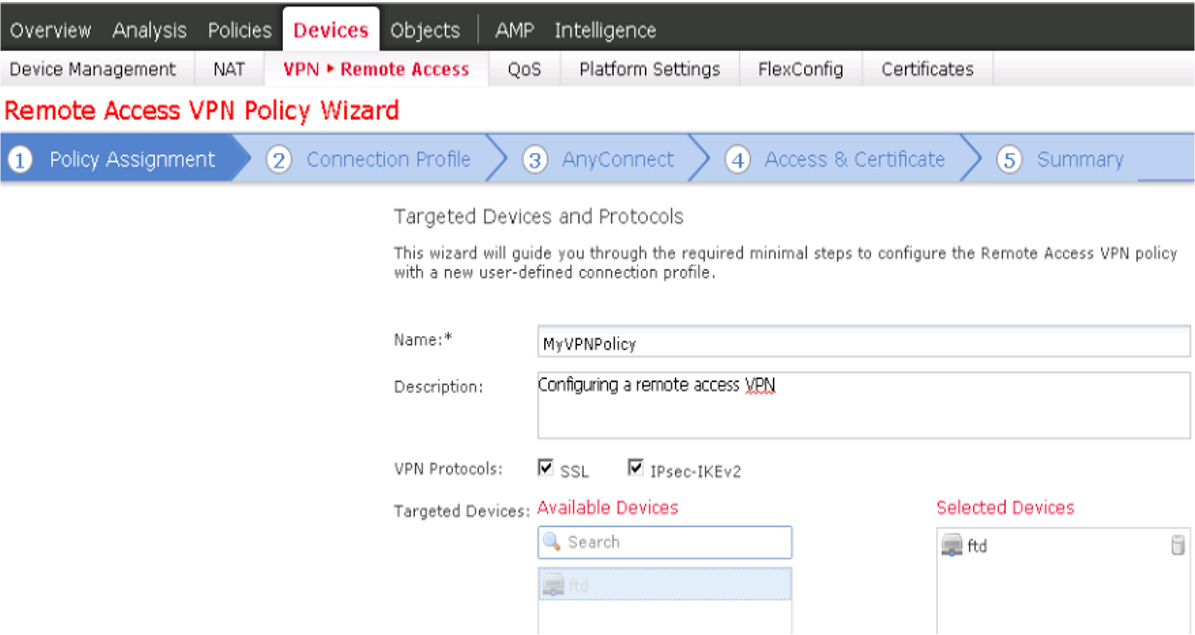
Figure 7-40 Cisco Secure Firewall Remote Access VPN Wizard
2. On the Connection Profile page, choose the authentication method, authentication server (realm or RADIUS), IPv4 and IPv6 IP address pools for remote devices, and the group policy (see Figure 7-41). For this example, use an Active Directory setup called AD and the default group policy called DfltGrpPolicy. You can edit the group policy by clicking the selected group policy or selecting another group policy if one is available. Once you make your selection, click the Next button.
Note
Consider giving your group policies names that are easily identifiable because it makes it easier to locate the appropriate one when you are trying to choose between many of them.
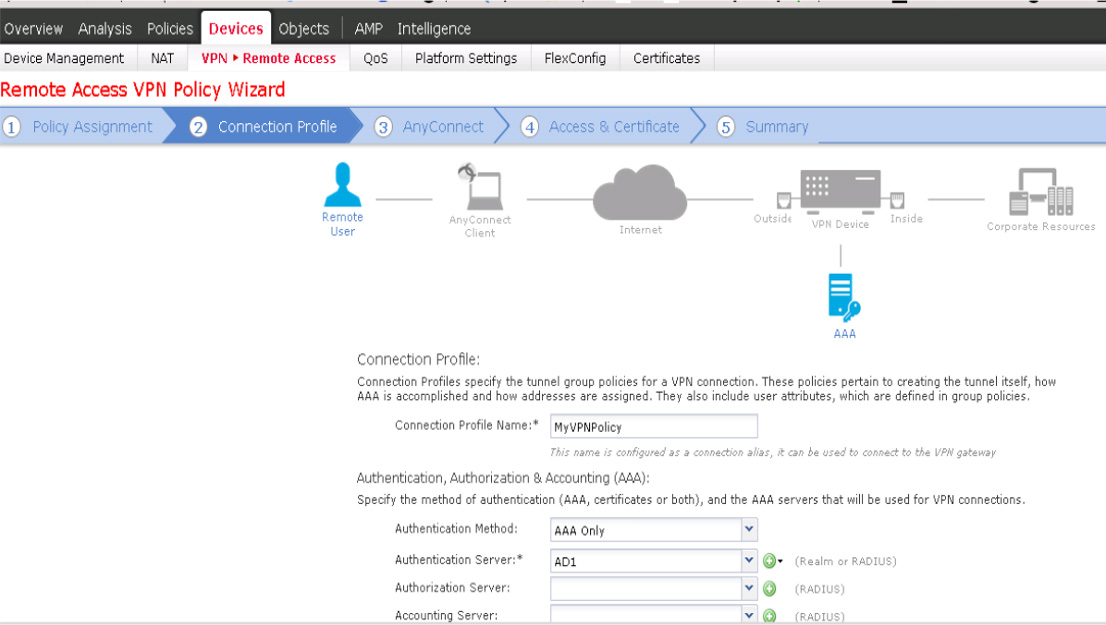
Figure 7-41 Connection Profile Page
3. On the AnyConnect page, select Mac OS to choose the macOS AnyConnect package and then click Next (see Figure 7-42).
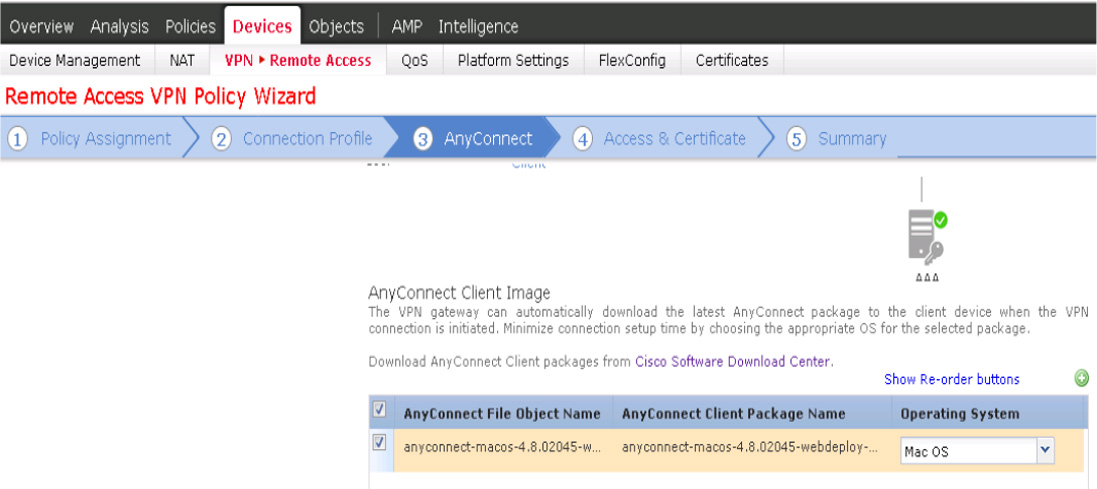
Figure 7-42 AnyConnect Page
If you don’t have the package, you can click the Cisco Software Download Center link to quickly access the different packages. Figure 7-43 shows an example of uploading a macOS AnyConnect package to Firepower; it must be a .pkg file.
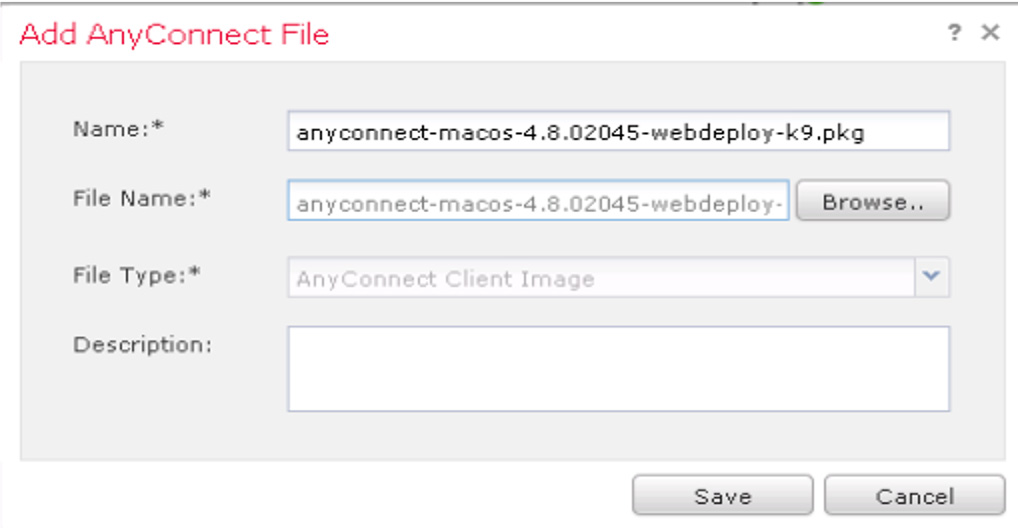
Figure 7-43 Uploading a macOS AnyConnect Package to Firepower
Note
You need a Cisco CCO login and authorized access to download the AnyConnect packages.
4. On the Access & Certificates page, choose VLAN 1 as the interface group or security zone users will be able to access (which is essentially what a remote user can connect to; see Figure 7-44).
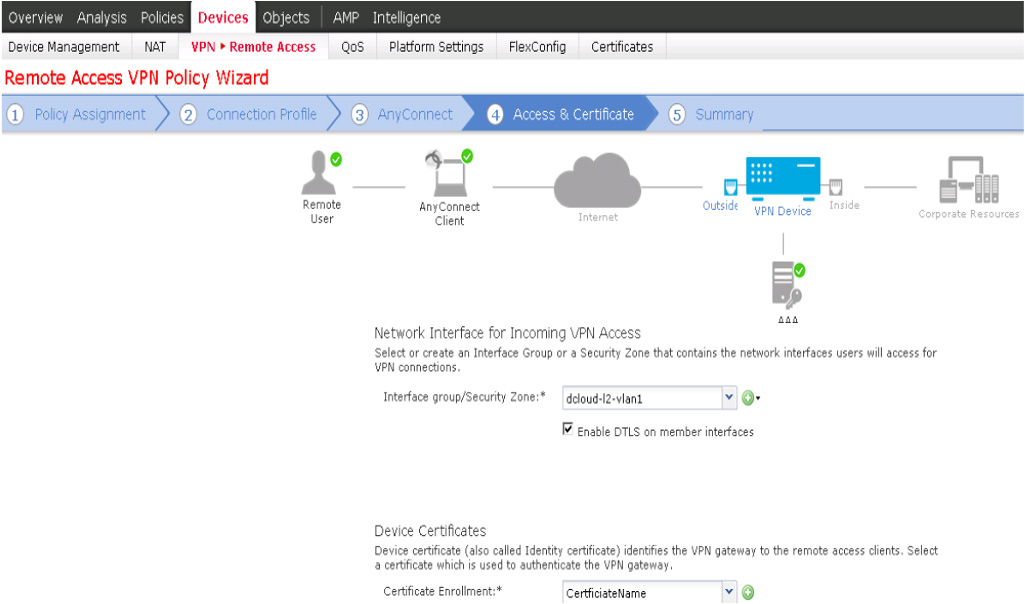
Figure 7-44 Access & Certificates Page
Another item to address is the device certificates that will be used. You can select an existing certificate or configure a new one by clicking the + button. You have the options SCEP, Self-Signed Certificate, Manual Certificate, or PKCS12. For this example, use Self-Signed Certificate (see Figure 7-45).
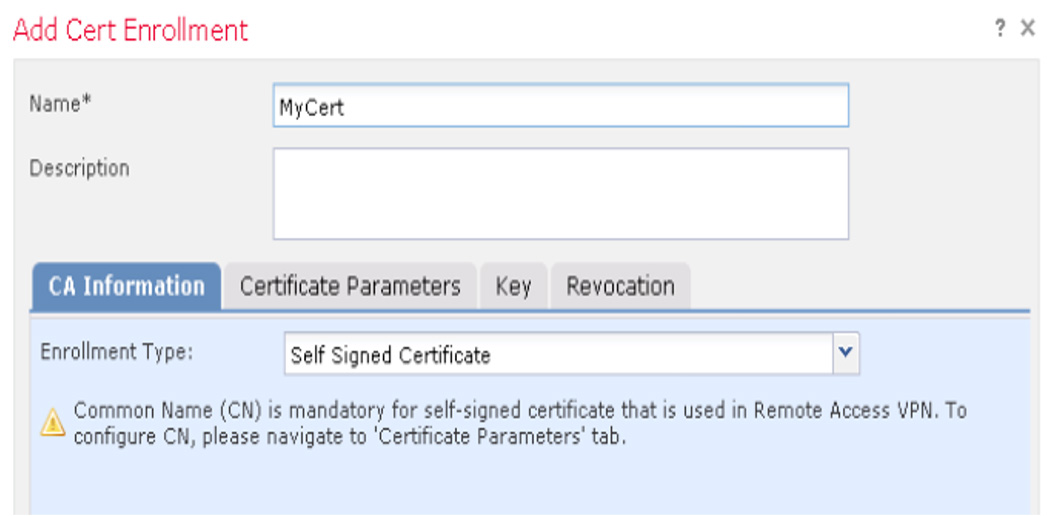
Figure 7-45 Device Certificates
On the Certificate Parameters tab, fill out information about you certificate. If you choose to use an FQDN, you have to provide that name in the Common Name (CN) section (see Figure 7-46).

Figure 7-46 Certificate Parameters Tab
The next tab reviews the security key (see Figure 7-47). You have the option to use RSA or ECDSA (the elliptic curve version).
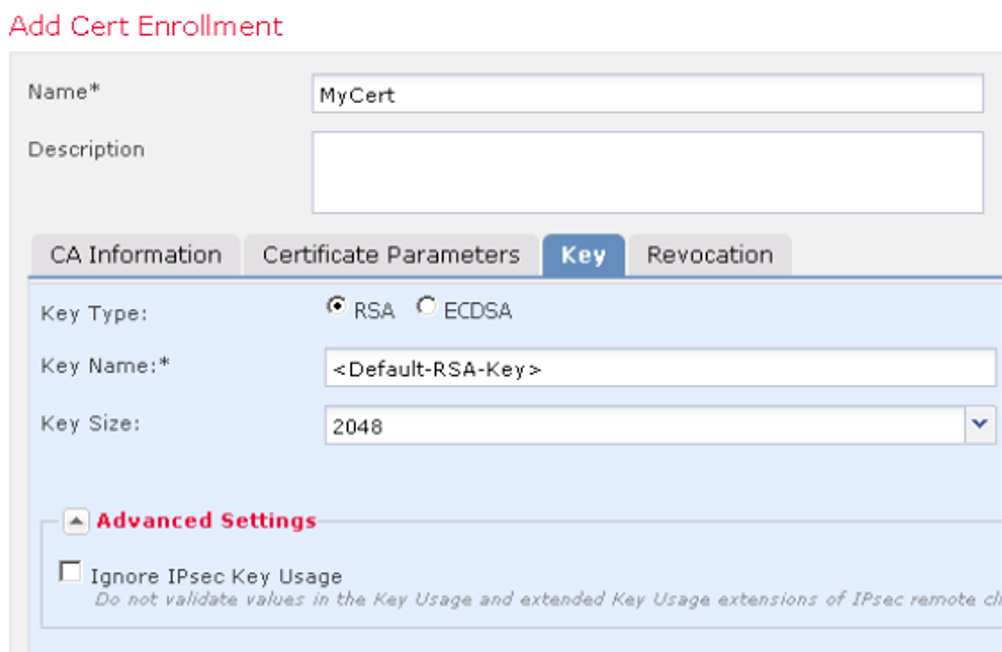
Figure 7-47 Choosing the Security Key
The final tab covers the revocation options (see Figure 7-48).
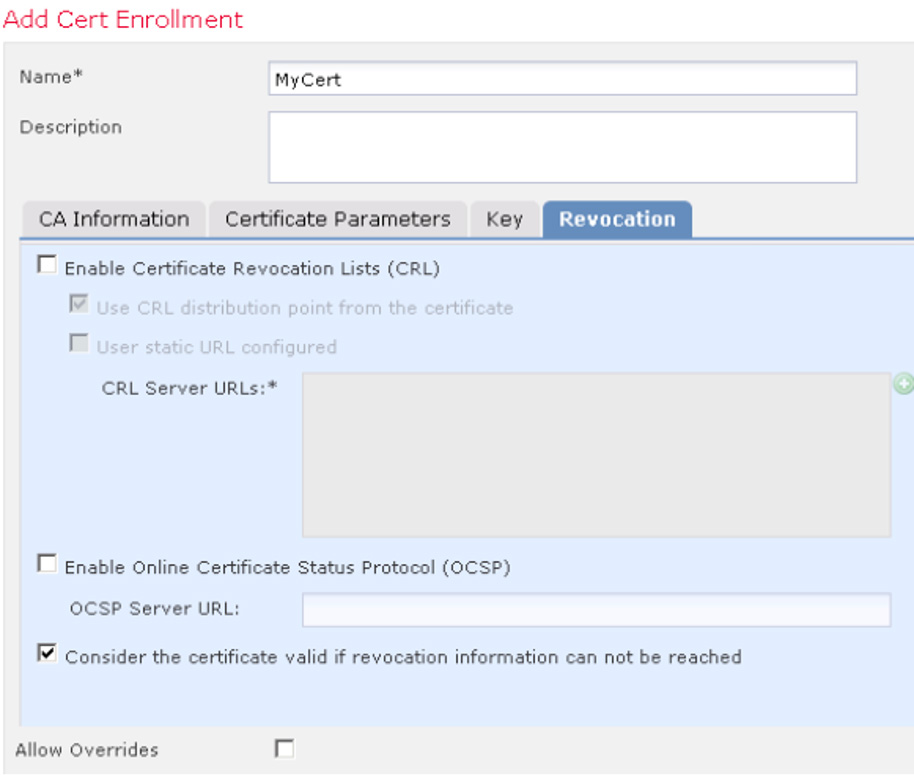
Figure 7-48 Revocation Options
There is also an option to bypass access control for VPN traffic available on the Access & Certificates page of the wizard. You can enabled this by selecting the checkbox and then click Next (see Figure 7-49).

Figure 7-49 Bypassing Access Control for VPN Traffic
Step 8. On the last page of the configuration wizard, which provides a summary of what you have set up, if everything looks good, click the Finish button (see Figure 7-50).
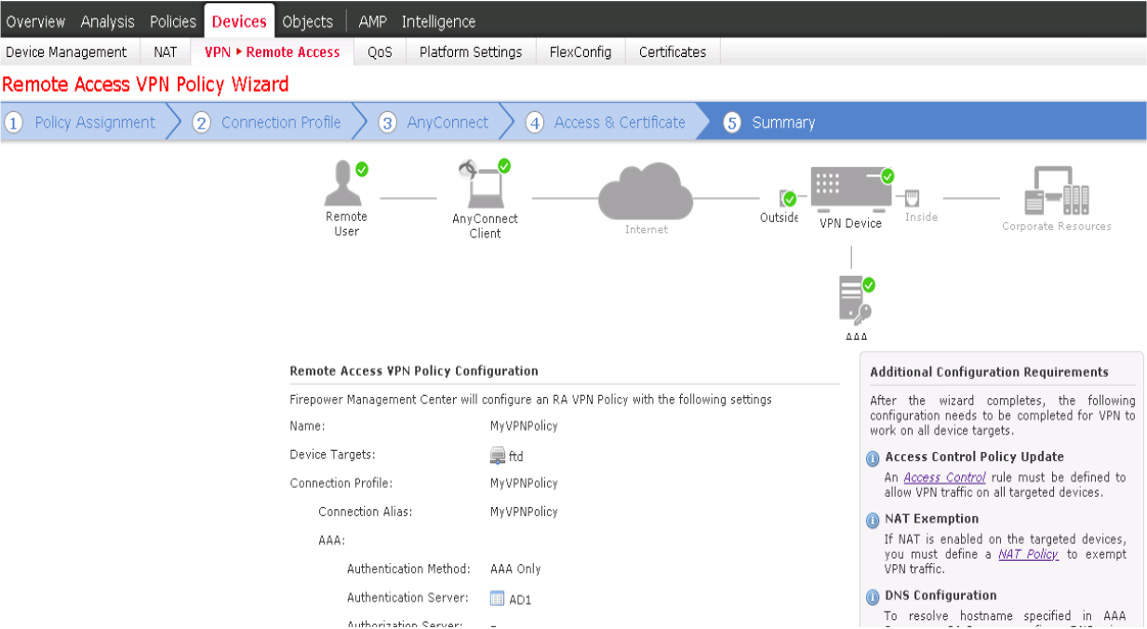
Figure 7-50 Summary Page
You need to deploy your configuration by clicking the Deploy button to make remote access VPN services available to users. You can use the User Activity window to monitor VPN users after your VPN configuration is deployed. You can reach this window to selecting Analysis > Users > User Activity > User Activity (see Figure 7-51).

Figure 7-51 User Activity for Monitoring VPN Users
Cisco Meraki Remote Access VPN
Another popular Cisco security solution that offers remote access VPN functionality is the Meraki security appliance series. Client VPN services use the L2TP tunneling protocol, which doesn’t require any additional software for various device types that have native support for L2TP, including Windows, macOS, iOS, and Android devices. In order to use Linux devices, you need to support L2TP through a third-party package.
Once again, we want to point out that Meraki remote access concepts are not part of the SVPN learning objectives, but we have included a small section based on its popularity within organizations around the world. If your focus is passing the SVPN exam, feel free to skip this section; however, we once again recommend keeping an eye out on the latest SVPN learning objectives. Based on Meraki’s popularity, Cisco might add Meraki as a future SVPN learning objective.
Hash algorithms that are supported along with L2TP are 3DES and SHA-1 for Phase 1 nd AES-128/3DES and SHA-1 for Phase 2. Meraki has disclaimers for offering stronger encryption methods to support PCI-DSS; if you need such encryption, you must contact Meraki support about AES-128 encryption with Diffie–Helman group 5 capabilities.
Meraki Remote Access Configuration Example
Meraki is simple, and the entire remote access VPN configuration is located on one screen, which you reach by selecting Security & SD-WAN > Configure > Client VPN (see Figure 7-52).

Figure 7-52 Meraki Client VPN
Configuration starts with enabling the remote access VPN capability. Next, you specify the client subnet pool that will be used as people use the VPN to access the network. You choose the DNS name server, configure authentication, and add users. Authentication includes a secret as well as the user password. This setup is very straightforward. Authentication can be local or can use an external source, such as Active Directory or RADIUS. On a mobile device, you choose L2TP as the VPN protocol, put in the server that Meraki generates for you, choose an account that was created, and enter the password and the secret you added to Meraki—and that’s it. Figure 7-53 shows an example of an iOS device set up to connect to a Meraki remote access VPN.

Figure 7-53 Mobile Device Setup to Use a Meraki Remote Access VPN
Router Configuration
To this point in the chapter, you have seen a number of examples of configuring remote access VPNs on Cisco’s popular security appliances. In this section, you will see how to configure a remote access VPN on a Cisco IOS router. The concepts here are similar to those you’ve already seen, but you don’t have a pretty GUI or wizards available to help with the configuration.
You can configure a Cisco router to act as an AnyConnect SSLVPN headend. For the router example in this section, we use a Cisco Cloud Services Router (CSR) device running IOS XE 16.9.2 and Cisco AnyConnect 4.6.03049 running on Windows 10. Figure 7-54 provides a diagram of this configuration.
Figure 7-54 AnyConnect IOS XE Router Design Diagram
It is important to know that remote access VPN concepts are not on the SVPN exam, but client based remote access VPN is still an available option for real-world deployments. Clientless SSLVPN on Cisco routers has been marked as end-of-sale, making it a depreciated option that eventually will not be supported. If your focus for this book is passing the SVPN exam, feel free to skip this section.
Key Concepts for Remote Access on Routers
There are a few key points to keep in mind regarding requirements for the Cisco router. First, the Cisco router must have a SEC-K9 feature set in order to support SSLVPN features, regardless of the IOS version that is installed. SEC-K9 offers additional features that are included with the base router image. Examples of features included when a SEC-K9 bundle is enabled include IKEv1/IPsec/PKI, IPsec/GRE, Easy VPN with DVTI, DMVPN, static VTI, firewall, network foundation protection, and GETVPN. The SSLVPN license is counted, which means you buy a certain number of seats or allowed VPN users. Intrusion prevention and content filtering are also possible, but both of these features require a subscription.
Another key point is the end-of-sale and end-of-life announcement for clientless SSLVPN/WebVPN on Cisco IOS software. This announcement means you should be using only client-based remote access VPN options when using a Cisco router. That announcement can be found at https://www.cisco.com/c/en/us/products/collateral/security/ios-sslvpn/eos-eol-notice-c51-731468.html.
The steps you take to enable the ability to use SSLVPN on a router depend on which version of code or IOS is being used. Anything after IOS Release 15.3 has SSLVPN enabled upon booting the SEC-K9 technology package. Older images may require a special LIC file to be installed, depending on whether the image is older than Release 15.1. It is recommended to verify the version of software you are running and consult with the latest data sheet to ensure that you have the proper level of code and licenses installed.
Remote Access on Router Configuration Example
To configure a Cisco router to act as an AnyConnect SSLVPN headend, follow these steps:
Step 1. Verify that you have the right licenses by using the commands show license and show version.
Step 2. Enable AAA, configure AAA lists, and add a username to the local database:
aaa new-model
!
aaa authentication login a-eap-authen-local local
aaa authorization network a-eap-author-grp local
!
username test password PASSWORD123
Step 3. Configure a trust point that will hold the router certificate (in this case, pkcs12):
Router(config)# crypto pki import IKEv2-TP pkcs12
bootflash:IKEv2-TP.p12 password PASSWORD123
Step 4. Define a local IP address pool to assign addresses to AnyConnect VPN clients:
ip local pool ACPOOL 192.168.10.5 192.168.10.10
Step 5. Create an IKEv2 local authorization policy:
crypto ikev2 authorization policy ikev2-auth-policy pool
ACPOOL
dns 10.0.1.1
Step 6. Optionally, create an IKEv2 proposal and policy (otherwise, smart defaults will be used):
crypto ikev2 proposal IKEv2-prop1
  encryption aes-cbc-256
  integrity sha256
  group 14
!
crypto ikev2 policy IKEv2-pol
  proposal IKEv2-prop1
Step 7. Create an AnyConnect profile that will be delivered to the client machine by using the AnyConnect profile editor (see Figure 7-55).
Figure 7-55 Accessing the AnyConnect Profile Editor
Step 8. Click Add to create an entry for the VPN gateway, select IPsec as the primary protocol, and uncheck the ASA gateway option (see Figure 7-56).
Figure 7-56 Configuring the AnyConnect Profile Editor
Step 9. Save the profile by selecting File > Save As and using the filename acvpn.xml.
Step 10. Create an IKEv2 profile for the AnyConnect-EAP method of client authentication:
crypto ikev2 profile AnyConnect-EAP
    match identity remote key-id *$AnyConnectClient$*
    authentication local rsa-sig
    authentication remote anyconnect-eap aggregate
    pki trustpoint IKEv2-TP
    aaa authentication anyconnect-eap a-eap-authen-local
    aaa authorization group anyconnect-eap list a-eap-author-grp   ikev2-auth-policy
    aaa authorization user anyconnect-eap cached
    virtual-template 100
    anyconnect profile acvpn
Step 11. Disable HTTP-URL-based certificate lookup and the HTTP server on the router:
no crypto ikev2 http-url cert
no ip http server
no ip http secure-server
Step 12. Define the encryption and hash algorithms used to protect data that will travel over the VPN:
crypto ipsec transform-set TS esp-aes 256 esp-sha256-hmac
 mode tunnel
Step 13. Configure a loopback interface with a dummy IP address (in this case, 10.0.0.1), from which the Virtual-Access interfaces will borrow the IP address:
interface loopback100
 ip address 10.0.0.1 255.255.255.255
Step 14. Configure a virtual template (associated in the IKEv2 profile):
interface Virtual-Template100 type tunnel
   ip unnumbered Loopback100
   ip mtu 1400
   tunnel mode ipsec ipv4
   tunnel protection ipsec profile AnyConnect-EAP
Step 15. Optionally, enable split tunneling (such as if you don’t want all traffic to be sent through the tunnel):
ip access-list standard split_tunnel
 permit 10.0.0.0 0.255.255.255
!
crypto ikev2 authorization policy ikev2-auth-policy
 route set access-list split_tunnel
Step 16. If all traffic is going through the VPN, use NAT to allow Internet connectivity for remote clients:
ip access-list extended NAT
 permit ip 192.168.10.0 0.0.0.255 any
!
ip nat inside source list NAT interface GigabitEthernet1 overload
!
interface GigabitEthernet1
 ip nat outside
!
interface Virtual-Template 100
 ip nat inside
Step 17. Test the configuration. Using a fresh installation of the AnyConnect client (with no XML profiles added), ensure that the user is able to manually enter the FQDN of the VPN gateway in the address bar of AnyConnect client. This should result in an SSL connection being made to the gateway. The AnyConnect client does not attempt to establish the VPN tunnel with IKEv2/IPsec protocols by default. Having the XML profile installed on the client is mandatory to establish the IKEv2/IPsec tunnel with IOS XE VPN gateway.
To use a particular profile, select its name from the drop-down list in the AnyConnect address bar. The name that appears is the same name as specified with Display Name in the AnyConnect profile editor. In this case, select the newly configured profile, as shown in Figure 7-57, and click Connect.
Figure 7-57 Selecting a Profile in AnyConnect
Note
If you are using IOS XE software older than Release 16.9.1, you need to disable the AnyConnect downloader capabilities. Before that release, it was not possible to upload an XML profile to a router. If a profile is not available, the connection will fail. Disabling the AnyConnect downloader capability is a workaround.
Step 18. Verify that the VPN is established:
show crypto ikev2 sa detailed
You should see details such as the following information about the status being ready:
1 192.0.2.1/4500 192.0.2.100/50899 none/none READY
That wraps up our overview of remote access with Cisco technology. The SVPN exam will focus on remote access within a Cisco ASA using both the command line and ASDM. We dive deeper into remote access VPN deployment options in the remaining chapters. We also included additional learning topics, such as Cisco Secure Firewall, Meraki, and client-based remote access on Cisco routers as additional learning topics that won’t be on the SVPN exam but are leveraged in organizations around the world. Know that any of these topics could one day be added to future versions of the SVPN exam learning objectives.
Summary
This chapter kicks off our review of remote access VPNs. It discusses planning for a remote access deployment, including the questions to consider during VPN design sessions. This chapter also looks at the different components involved with remote access VPN deployments, including hardware, software, encryption, and everything in between. This chapter examines the different forms of encryption, including the value of elliptic curve cryptography. This chapter provides a handful of basic remote access VPN configuration examples, including using the Cisco ASA CLI, Cisco ASA GUI (ASDM), Cisco IOS, Cisco Secure Firewall, and Cisco Meraki.
Now that you have a basic understanding of how remote access VPN technology works, it’s time to look more closely at the different VPN frameworks Cisco offers that support remote access VPN capabilities. Topics moving forward will be focused on remote access VPN and related to what is required in the SVPN version 1.1 of the exam.
Next up, we will dive into clientless Access SSLVPNs on the ASA.
References
2017 Cisco AnyConnect Secure Mobility Client. Retrieved from https://www.cisco.com/c/dam/en/us/products/collateral/security/anyconnect-secure-mobility-client/at_a_glance_c45-578609.pdf
Anand, Adity (July 14, 2018). SSL Strip & How Awesome It Is! Retrieved from https://medium.com/bugbountywriteup/ssl-strip-how-awesome-it-is-a0eb79e28bcc
AnyConnect: Configure Basic SSLVPN for IOS Router Headend With the User of CLI. Retrieved from https://www.cisco.com/c/en/us/support/docs/security/anyconnect-secure-mobility-client/200533-AnyConnect-Configure-Basic-SSLVPN-for-I.html
Cisco AnyConnect Secure Mobility Client Administrator Guide, Release 4.0 Retrieved from https://www.cisco.com/c/en/us/td/docs/security/vpn_client/anyconnect/anyconnect40/administration/guide/b_AnyConnect_Administrator_Guide_4-0/anyconnect-profile-editor.html#ID-1430-0000000c
Cisco AnyConnect Secure Mobility Client Data Sheet. Retrieved from https://www.cisco.com/c/en/us/products/collateral/security/anyconnect-secure-mobility-client/datasheet-c78-733184.html
CLI Book 3: Cisco ASA Series VPN CLI Configuration Guide, 9.5. Retrieved from https://www.cisco.com/c/en/us/td/docs/security/asa/asa95/configuration/vpn/asa-95-vpn-config/vpn-remote-access.html#ID-2444-00000088
Configure AnyConnect Secure Mobility Client with Split Tunneling on an ASA. Retrieved from https://www.cisco.com/c/en/us/support/docs/security/anyconnect-secure-mobility-client/119006-configure-anyconnect-00.html
FlexVPN: AnyConnect IKEv2 Remote Access with Local User Database, https://www.cisco.com/c/en/us/support/docs/security/flexvpn/200555-FlexVPN-AnyConnect-IKEv2-Remote-Access.html
Next Generation Cryptography. Retrieved from https://tools.cisco.com/security/center/resources/next_generation_cryptography
Silver, Laura (February 5, 2019). Smartphone Ownership Is Growing Rapidly Around the World, but Not Always Equally. Retrieved from https://www.pewresearch.org/global/2019/02/05/smartphone-ownership-is-growing-rapidly-around-the-world-but-not-always-equally/
Smeets, Marten (July 4, 2017). How to Choose Your Cipher Suite. Retrieved from https://technology.amis.nl/2017/07/04/ssltls-choose-cipher-suite/#prettyPhoto
Snyder, Joel (March 21, 2011). Retrieved from https://www.networkworld.com/article/2200809/cisco-has-long-history-with-vpns.html
Sullivan, Nick (October 14, 2013). A (Relatively Easy to Understand) Primer on Elliptic Curve Cryptography. Retrieved from https://arstechnica.com/information-technology/2013/10/a-relatively-easy-to-understand-primer-on-elliptic-curve-cryptography/3/
Exam Preparation Tasks
As mentioned in the section “How to Use This Book” in the Introduction, you have a couple of choices for exam preparation: the exercises here, Chapter 11, “Final Preparation,” and the exam simulation questions in the Pearson Test Prep software online.
Review All Key Topics
Review the most important topics in the chapter, noted with the key topics icon in the outer margin of the page. Table 7-3 lists these key topics and the page number on which each is found.

Complete Tables and Lists from Memory
There are no memory tables in this chapter.
Define Key Terms
Define the following key terms from this chapter and check your answers in the glossary: