
Section 3: Cisco IOS IPS
It is common for networks to be protected by a firewall, a device that limits communication from an untrusted network to the trusted network. Firewalls make decisions whether to allow or disallow traffic from one network to another based on the rules configured in the firewall rule base or security policy.
This rule base consists of firewall rules that normally look at the source IP address, destination IP address, and destination port to make its decision.
Intrusion prevention is a technology based on intrusion detection. Intrusion detection was the initial technology that detected and reported on network-level attacks. Intrusion prevention systems (IPS) offer a more proactive approach and include advanced blocking techniques to actually block the attack traffic, preventing it access to the network.
Intrusion detection systems (IDS) normally listen to traffic on the network and report on what passes on the network. Intrusion prevention systems are usually inline in the data path. They make decisions based on the traffic that is flowing through them.
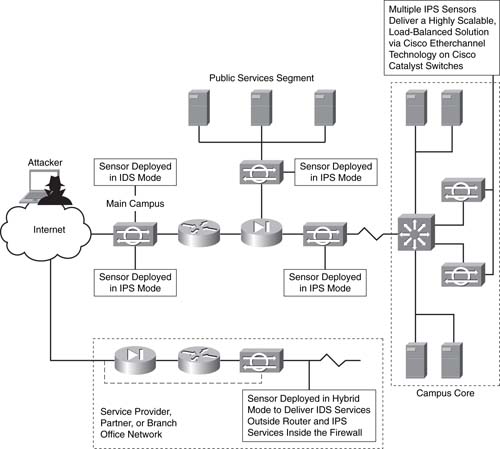
Figure 5 shows the intrusion detection and intrusion prevention devices within a network.
FIGURE 5 IDS and IPS Device Placement
Cisco has released a full range of intrusion prevention products. These range from IDS modules for the Adaptive Security Appliances (ASA) and various IOS routers, dedicated hardware IPS appliances to host-based intrusion prevention software that is installed directly onto a server. IPS functionality is available in the router and firewall product family.
Cisco IOS IPS is an intrusion prevention solution that is integrated within the Cisco IOS Software and supported by all the ISRs. Cisco IOS IPS is an inline, deep-packet inspection feature that effectively mitigates a wide range of network attacks. A component of the Cisco IOS Integrated Threat Control framework and complemented by Cisco IOS Flexible Packet Matching feature, Cisco IOS IPS provides your network with the intelligence to accurately identify, classify, and stop or block malicious traffic in real time.
Cisco IOS IPS Signatures
Current Cisco IOS Software, later than IOS 12.4(11)T, use the new 5.x format for the IOS IPS signature format. Before this IOS, the older 4.x format was used.
The 4.x signatures relied on Signature Definition Files that had to be loaded into the flash of the IOS router that you were configuring. There were two SDFs that were used depending on the amount of RAM installed in your router. These were 128MB.sdf and 256MB.sdf and were used accordingly. There were also 135 built-in IPS signatures that could be used before IOS 12.4(11)T.
The 5.x signatures are split into two signature categories: IOS Basic or IOS Advanced.
IOS Basic and IOS Advanced signature categories are preselected signature sets intended to serve as a good starting set for most users of IOS IPS. They contain the latest worm, virus, IM, or P2P blocking signatures for detecting security threats, allowing easier deployment and signature management. Cisco IOS IPS also allows selection and tuning of signatures outside those two categories.
Signature Micro-Engines
Cisco IOS IPS uses Signature Micro-Engines (SME) to load and scan for a set of attack signatures. Each engine is customized for inspecting a Layer 4 or 7 protocol and its fields/arguments. Within each packet carrying data for that protocol, it looks for a set of legal parameters that have allowable ranges or sets of values. It also scans for malicious activity specific to that protocol using a parallel signature scanning technique to scan for multiple patterns within an SME at any given time.
Attack Mitigation
Cisco IOS IPS can protect your network against nearly 2250 attacks, exploits, worms, and viruses listed on the latest signature list for IOS IPS. Examples of attacks that can be detected and stopped by Cisco IOS IPS include the following:
• ANTS
• Bagle
• MyDoom
• Netsky
• Agobot
• Minmai
• Klez
• Sober
• Zotob
• Norvag
• Phatbot
• GaoBot
• Blaster
• W2K RPC DoS
• ZAFI.D
• Slapper
• Apache/mod_ssl
• Slammer
• GaoBot
• Blaster
• Nachi
• Ping Tunnel
Actions for Detected Signatures
Each individual signature or category of signatures selected to scan traffic for matching attacks can be configured to take any combination of the following five actions when triggered:
• Send an alarm via syslog or generate/log an SDEE (Secure Device Event Exchange) event.
• Drop malicious packet.
• Send TCP Reset packets to both ends of the connection to terminate the session.
• Deny all packets from the attacker (source address) temporarily.
• Deny further packets belonging to the same TCP session (connection) from the attacker (source address).
You can find the full list of supported signatures for IOS IPS at http://www.cisco.com/en/US/prod/collateral/
iosswrel/ps6537/ps6586/ps6634/
prod_white_paper0900aecd8062ac75.html.
Configuring Cisco IOS IPS
We are going to look at an example configuration of IOS IPS using IPS signature format 5.x.
As with other configurations, this can be broke down into steps. There are five steps involved in configuring IOS IPS on a Cisco router:
STEP 1 Download the IOS and install the IPS signatures on the router.
STEP 2 Create a directory on the router’s flash for use by IPS.
STEP 3 Install Cisco’s IOS IPS public key.
STEP 4 Load the IOS IPS signature package.
STEP 5 Configure the IOS IPS rules on the router.
Step 1: Download and Install the IOS IPS Signatures on the Router
By default, no IPS signatures are installed with IOS later than 12.4(11)T. We can prove this with the show ip ips signatures count command:
Router# sh ip ips signatures count
Cisco SDF release version S0.0
Trend SDF release version V0.0
Signature Micro-Engine: multi-string (INACTIVE)
Signature Micro-Engine: service-http (INACTIVE)
Signature Micro-Engine: string-tcp (INACTIVE)
Signature Micro-Engine: string-udp (INACTIVE)
Signature Micro-Engine: state (INACTIVE)
Signature Micro-Engine: atomic-ip (INACTIVE)
Signature Micro-Engine: string-icmp (INACTIVE)
Signature Micro-Engine: service-ftp (INACTIVE)
Signature Micro-Engine: service-rpc (INACTIVE)
Signature Micro-Engine: service-dns (INACTIVE)
Signature Micro-Engine: normalizer (INACTIVE)
Signature Micro-Engine: service-smb-advanced (INACTIVE)
Signature Micro-Engine: service-msrpc (INACTIVE)
Total Signatures: 0
Total Enabled Signatures: 0
Total Retired Signatures: 0
Total Compiled Signatures: 0
Note from the above that the Total Signatures is 0; this is because we have not downloaded and installed an IOS IPS signature file to the router.
You have to download the IOS IPS signatures from http://www.cisco.com/pcgi-bin/tablebuild.pl/ios-v5sigup.
You are required to download the following two files:
• IOS-S xxx-CLI.pkg: Signature package (xxx will be the latest number)
• Realm-cisco.pub.key.txt: Public crypto key used by IOS IPS
Step 2: Create a Directory on the Router’s Flash for Use by IPS
After you have downloaded these two files, you must create a directory on your router’s flash for storing the IPS signature files and configuration files.
To create a directory on your flash, use the following command:
Router# mkdir ips
This command creates a directory on your flash called ips. To confirm this, enter the command show flash, and you should see a directory called ips, as shown here:
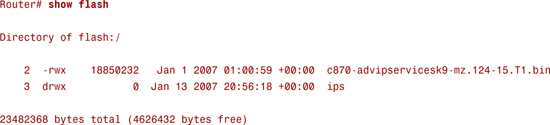
You can now see that we have a directory called ips.
Step 3: Configure the IOS Crypto Key
When you load the IPS signatures onto the router, they are compiled by the router before they are ready for use. The initial check the router makes is to check for the presence and validity of the IOS crypto key.
This acts as a safeguard to ensure the signatures downloaded are official and have not been tampered with in any way. We downloaded the realm-cisco.pub.key.txt file at Step 1 of this configuration. We now need to enter the contents of this file into the running configuration of the router.
To do this, open the text file and paste the contents into the router from configuration mode.
The contents of a sample realm-cisco.pub.key.txt file are shown here:
Router# show crypto key pubkey-chain rsa
crypto key pubkey-chain rsa
named-key realm-cisco.pub signature
key-string
30820122 300D0609 2A864886 F70D0101 01050003 82010F00 3082010A 02820101
00C19E93 A8AF124A D6CC7A24 5097A975 206BE3A2 06FBA13F 6F12CB5B 4E441F16
17E630D5 C02AC252 912BE27F 37FDD9C8 11FC7AF7 DCDD81D9 43CDABC3 6007D128
B199ABCB D34ED0F9 085FADC1 359C189E F30AF10A C0EFB624 7E0764BF 3E53053E
5B2146A9 D7A5EDE3 0298AF03 DED7A5B8 9479039D 20F30663 9AC64B93 C0112A35
FE3F0C87 89BCB7BB 994AE74C FA9E481D F65875D6 85EAF974 6D9CC8E3 F0B08B85
50437722 FFBE85B9 5E4189FF CC189CB9 69C46F9C A84DFBA5 7A0AF99E AD768C36
006CF498 079F88F8 A3B3FB1F 9FB7B3CB 5539E1D1 9693CCBB 551F78D2 892356AE
2F56D826 8918EF3C 80CA4F4D 87BFCA3B BFF668E9 689782A5 CF31CB6E B4B094D3
F3020301 0001
exit
After the IOS Crypto Key has been entered, be sure to save the configuration.
Step 4: Load the IOS IPS Signature Package
Now that you have created the IOS crypto key, you are able to load the IOS IPS signature package to the router for it to be compiled and for you to start using it.
There are many ways to copy the file from your workstation to your router. Here is an example showing the file copied from an Apple Mac via the built-in Apache web server:
Router# copy http://192.168.1.10/~andrewmason/IOS-S364-CLI.pkg idconf
This copies the file called IOS-S364-CLI.pkg to the router’s flash using HTTP from 192.168.1.10.
Provided you correctly installed the Cisco IPS public key, signatures will begin compiling as soon as the signature file is uploaded.
After the IOS IPS signatures are compiled, running the show ip ips signatures count command should now show you that you have successfully loaded and compiled the IPS signatures for the router to use:
Router# sh ip ips signatures count
Cisco SDF release version S364.0 signature package release version
Trend SDF release version V0.0
Signature Micro-Engine: multi-string (INACTIVE)
Signature Micro-Engine: service-http (INACTIVE)
Signature Micro-Engine: string-tcp (INACTIVE)
Signature Micro-Engine: string-udp (INACTIVE)
Signature Micro-Engine: state (INACTIVE)
Signature Micro-Engine: atomic-ip (INACTIVE)
Signature Micro-Engine: string-icmp (INACTIVE)
Signature Micro-Engine: service-ftp (INACTIVE)
Signature Micro-Engine: service-rpc (INACTIVE)
Signature Micro-Engine: service-dns (INACTIVE)
Signature Micro-Engine: normalizer (INACTIVE)
Signature Micro-Engine: service-smb-advanced (INACTIVE)
Signature Micro-Engine: service-msrpc (INACTIVE)
Total Signatures: 2136
Total Enabled Signatures: 807
Total Retired Signatures: 1779
Total Compiled Signatures: 351 ? total compiled signatures for the IOS IPS Basic category
Total Signatures with invalid parameters: 6
Total Obsoleted Signatures: 11
If you look in the ips folder, you should now see six files in the flash:
Router# show flash
Directory of flash:/ips/
7 -rw- 203419 Dec 30 2008 16:45:24 -08:00 router-sigdef-default.xml
8 -rw- 271 Dec 30 2008 16:43:36 -08:00 router-sigdef-delta.xml
9 -rw- 6159 Dec 30 2008 16:44:24 -08:00 router-sigdef-typedef.xml
10 -rw- 22873 Dec 30 2008 16:44:26 -08:00 router-sigdef-category.xml
11 -rw- 257 Dec 30 2008 16:43:36 -08:00 router-seap-delta.xml
12 -rw- 491 Dec 30 2008 16:43:36 -08:00 router-seap-typedef.xml
64016384 bytes total (12693504 bytes free)
Now you have successfully loaded and compiled the IOS IPS signatures, and you can now look configure the IPS rules on the router.
Step 5: Configure the IOS IPS Rules on the Router
We are now going to configure IPS on the router using the command-line interface (CLI). We are going to just enable the basic IOS IPS signatures and apply these to inbound traffic from everywhere apart from a third-party site with an address of 10.1.0.0/24.
Figure 6 shows the router placed inline for the network we are going to offer IPS services for.
FIGURE 6 Router Offering IPS Services
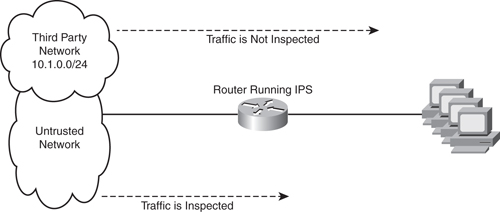
The first step is to configure the access list that will inspect the traffic through the IPS engine. All traffic that is permitted by this ACL will be inspected, so we want to create an ACL that will deny the third-party site and permit everything else:
Router(config)# access-list 130 deny ip 10.1.0.0 0.0.0.255 any
Router(config)# access-list 130 permit ip any any
We can now create an IOS IPS rule and apply this access list to the rule:
Router(config)# ip ips name IOSIPS list 130
The preceding command creates an IOS IPS rule called IOSIPS and applies access list 130 to the IPS rule. Only traffic that is permitted by access list 130 will be inspected by IPS.
We now tell the router where to locate the IPS signatures and configuration:
Router(config)# ip ips config location flash:ips
Before applying this to an interface, we want to ensure that only the basic IOS IPS signatures are enabled. The best way to do this is to disable all the signatures on the router and then enable the basic IOS IPS signatures. We are also going to set the IPS to drop the packets and to send an alert to the configured logging destination:
Router(config)# ip ips signature-category
Router(config-ips-category)# category all
Router(config-ips-category-action)# retired true
Router(config-ips-category-action)# exit
Router(config-ips-category)# category ios_ips basic
Router(config-ips-category-action)# event-action produce-alert
Router(config-ips-category-action)# event-action deny-packet-inline
Router(config-ips-category-action)# retired false
The preceding configuration will disable all but the basic IOS IPS signatures. We can now apply this to an interface. You can see in Figure 6 that we need to apply this rule to the fa0/0 interface to inspect inbound traffic:
Router(config)# interface fa0/0
Router(config-if)# ip ips IOSIPS in
The preceding configuration applies the IOSIPS named rule inbound on the fa0/0 interface.
All traffic apart from traffic from the 10.1.0.0/24 network entering the router on the fa0/0 interface will be inspected against the basic IPS signatures. If a packet matches a basic IPS rule, the packet will be dropped, and an alert will be sent to the configured logging destination.
Section 3 Summary
In this section, we covered the IOS intrusion prevention functionality. We examined IDS and IPS technologies before covering the new 5.x/6.x IPS signature implementation on IOS that is now standard after Cisco IOS 12.4(11)T.
The SNRS exam covers the newer IPS technology, so it is important to learn this aspect rather than the older 4.x signature format, where there used to be built-in IPS signatures on the router and separate Signature Definition Files.
The new method of configuring IPS within IOS brings with it many benefits that address the configuration issued that the earlier versions suffered from.
We ended this section with the configuration steps required to download, compile, install, and configure IPS on an IOS router.
In the next section, we cover secure connectivity with virtual private networks on IOS routers.
You can find more information about IOS intrusion prevention on the Cisco website at http://www.cisco.com/go/ips.