
Chapter 2: CSS Architecture and Organization
If you’ve ever worked on a CSS codebase of any size—or even a small codebase with multiple developers—you’ll have realized how difficult it is to create CSS that’s predictable, reusable, and maintainable without being bloated. With added developers often comes added complexity: longer selectors, colliding selectors, and larger CSS files.
In this chapter, we’ll explore CSS architecture and organization. First up: file organization. We’ll take a look at strategies for managing CSS across projects, or as part of your own CSS framework.
Then we’ll look at specificity. It’s a frequent pain point for CSS development, especially for teams. Specificity is the means by which browsers decide which declarations to apply. If you’ve ever wondered why all of the buttons on your site are green when you wanted some of them to be orange, this section is for you. We’ll discuss how to calculate selector specificity, and choose selectors that maximize reusability while minimizing the number of characters you’ll need.
Finally, we’ll discuss some guidelines and methodologies for writing CSS. These rules make it easier to avoid selector-naming collisions and overly specific selectors—the kinds of issues that arise when working within teams.
File Organization
Part of a good CSS architecture is file organization. A monolithic file is fine for solo developers or small projects. For large projects—sites with multiple layouts and content types—it’s smarter to use a modular approach and split your CSS across multiple files.
Splitting your CSS across files makes it easier to parcel tasks out to teams. One developer can work on form input components, while another can focus on a card pattern or media object component. Teams can split work sensibly and increase overall productivity.
So what might a good file structure that splits the CSS across files look like? Here’s a structure that’s similar to one I’ve used in projects:
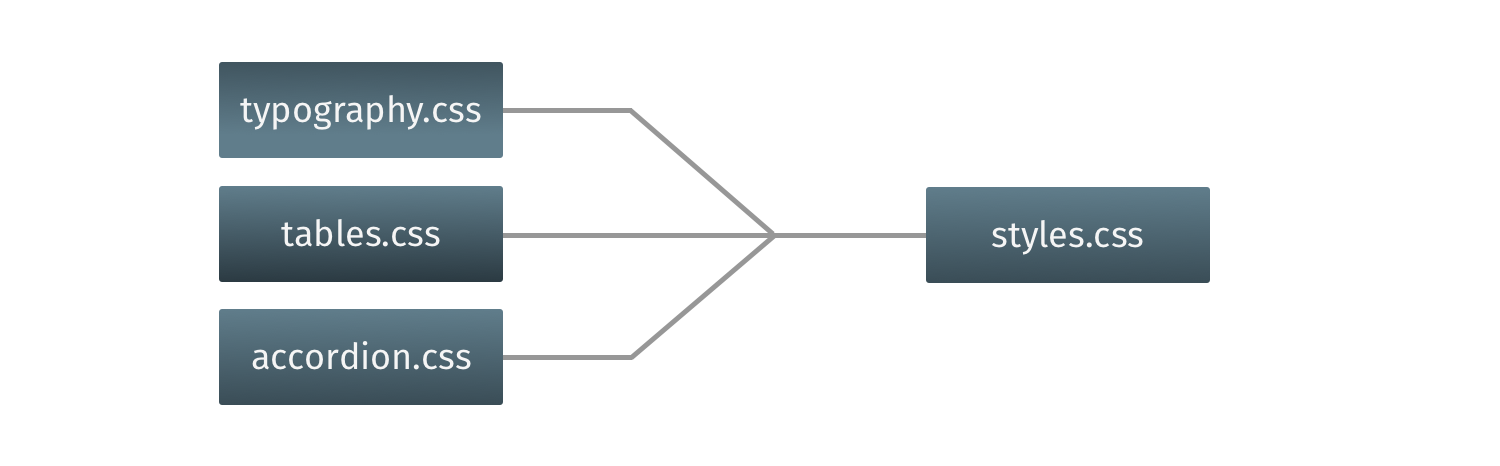
typography.css: font faces, weights, line heights, sizes, and styles for headings and body textforms.css: styles for form controls and labelslists.css: list-specific stylestables.css: table-specific stylesaccordion.css: styles for the accordion componentcards.css: styles for the card component
CSS frameworks such as Bootstrap, Bulma, and UIkit use a similar approach. They all become quite granular, with separate files for progress bars, range inputs, close buttons, and tooltips. That granularity allows developers to include only the components they need for a project.
The details of how you split your CSS will depend on your own preferences and practices. If your workflow includes a preprocessor such as Sass or Less, these might be partials with a .scss or .less extension. You may also add a _config.scss or _config.less file that contains color and font variables.
Or perhaps you have a more component-centric workflow, as with the component library tool Fractal, or JavaScript frameworks like React and Vue.js. You might instead opt for a single base.css or global.css file that smooths out browser differences, and use a separate CSS file for each pattern or component.
Something to avoid: organizing your CSS by page or view. Page-centric approaches encourage repetitious code and design inconsistencies. You probably don’t need both .contact-page label and .home-page label rule sets. Instead, try to find common patterns or components in your site’s design and build your CSS around them.
Using multiple files during site development doesn’t necessarily mean you’ll use multiple files in production. In most cases, you’ll want to optimize CSS delivery by concatenating files, and separating critical from non-critical CSS. We discuss optimization techniques in Chapter 3, “Debugging and Optimization”.
File organization is just one aspect of CSS architecture. Despite its position in this chapter, it’s actually the least important aspect. In my experience, most CSS architecture problems arise from selector choice and specificity. We’ll discuss how to avoid these issues in the next section.
Specificity
Developers who come to CSS from more traditional programming languages sometimes note that CSS has a global scope. In other words, using button as a selector applies those declarations to every <button> element, whether that was intended or not.
A Quick CSS Vocabulary Review
A CSS declaration consists of a property paired with a value. Properties are features that you can modify, such as box-sizing or display. A value is the modification or settings for a property (such as border-box or none). Both box-sizing: border-box and display: none are examples of declarations. A set of declarations enclosed by curly braces ({ and }) is a declaration block. Together, declaration blocks and their selectors are called rules or rule sets.
The “global” nature of CSS is really an issue of specificity and the cascade in Cascading Style Sheets. Although it may seem arbitrary at first, CSS has well-defined rules for determining what declarations to apply. Understanding specificity may be what separates CSS developers from CSS masters.
Calculating exact specificity values can seem tricky at first. As explained in the Selectors Level 4 specification, you need to:
- count the number of ID selectors in the selector (= A)
- count the number of class selectors, attribute selectors, and pseudo-classes in the selector (= B)
- count the number of type selectors and pseudo-elements in the selector (= C)
- ignore the universal selector
We then need to combine A, B, and C to get a final specificity value. Take the following rule:
input {
    font-size: 16px;
}
The selector for this rule, input, is a “type” or “element” selector. Since there’s only one type selector, the specificity value for this rule is 0,0,1. What if we add an attribute selector, as shown below?
input[type=text] {
    font-size: 16px;
}
Adding an attribute selector raises the value for this rule to 0,1,1. Let’s add a pseudo-class:
input[type=text]:placeholder-shown {
    font-size: 16px;
}
Now our selector’s specificity is 0,2,1. Adding an ID selector, as shown below, increases the specificity value to 1,2,1:
#contact input[type=text]:placeholder-shown {
    font-size: 16px;
}
Think of specificity as a score or rank that determines which style declarations get applied to an element. The universal selector (*) has a low degree of specificity. ID selectors have a high degree. Descendant selectors such as p img, and child selectors such as .panel > h2, are more specific than type selectors such as p, img, or h1. Class names fall somewhere in the middle.
Higher-specificity selectors are higher-priority selectors. Declarations associated with higher-specificity selectors are the declarations that the browser will ultimately apply.
Calculating Specificity
Keegan Street’s Specificity Calculator and Polypane’s CSS Specificity calculator are helpful for calculating selector specificity. Polypane’s calculator also supports selector lists.
However, when two selectors are equally specific, the cascade kicks in, and the last rule wins. Here’s an example:
a:link {
    color: #369;
}
a.external {
    color: #f60;
}
Both a:link and a.external have a specificity value of 0,1,1: zero ID selectors, one class or pseudo-class, and one type (or element) selector. However, the a.external rule set follows the a:link rule set. As a result, a.external takes precedence. Most of our links will be cadet blue, but those with class="external" will be orange.
Complex and combinator selectors, of course, give us higher-specificity values. Consider the following CSS:
ul#story-list > .book-review {
    color: #0c0;
}
#story-list > .book-review {
    color: #f60;
}
Although these rule sets look similar, they aren’t the same. The first selector, ul#story-list > .bookreview, contains a type selector (ul), an ID selector (#story-list), and a class selector (.bookreview). It has a specificity value of 1,1,1. The second selector, #story-list > .book-review, only contains an ID and a class selector. Its specificity value is 1,1,0. Even though our #story-list > .book-review rule follows ul#story-list > .bookreview, the higher specificity of the former means that those elements with a .book-review class will be green rather than orange.
Although most pseudo-classes increase the specificity of a selector, :not() and :is() work a bit differently. They don’t change the specificity value of a selector. Instead, the specificity value of these selectors gets replaced by the value of the most specific selector in their arguments. In other words, the specificity value :not( [type=text] ) is the same as [type=text]: 0,1,0.
Understanding the Impact of !important
The !important keyword upends some of these rules. When a declaration contains an !important keyword, that declaration takes precedence, regardless of specificity or cascade rules. Consider the following CSS:
body {
    background: pink !important;
}
html body {
    background: yellow;
}
Although html body has a higher level of specificity (0,0,2) than body (0,0,1), the !important keyword means that our document will have a pink background instead of a yellow one.

The Cascade in Cascading Style Sheets
Read more about how declarations are sorted in the “Cascade Sorting Order” section of the CSS Cascading and Inheritance Level 3 specification.
Overriding an !important declaration requires another !important declaration paired with a selector of equal or higher specificity. In other words, if we really wanted a yellow background, we’d need to add an !important keyword to the html body rule set.
Removing the body rule altogether is also an option. If you have complete control over your stylesheets and markup, doing so would save a few bytes. If you’re using a component library, or customizing a theme, you may prefer to override the rule instead. That way, your changes won’t be undone by a new release of the component or theme.
Choosing Low-specificity Selectors
Err on the side of using low-specificity selectors. They make it easier to reuse your CSS, and extend patterns in new ways.
Consider the following:
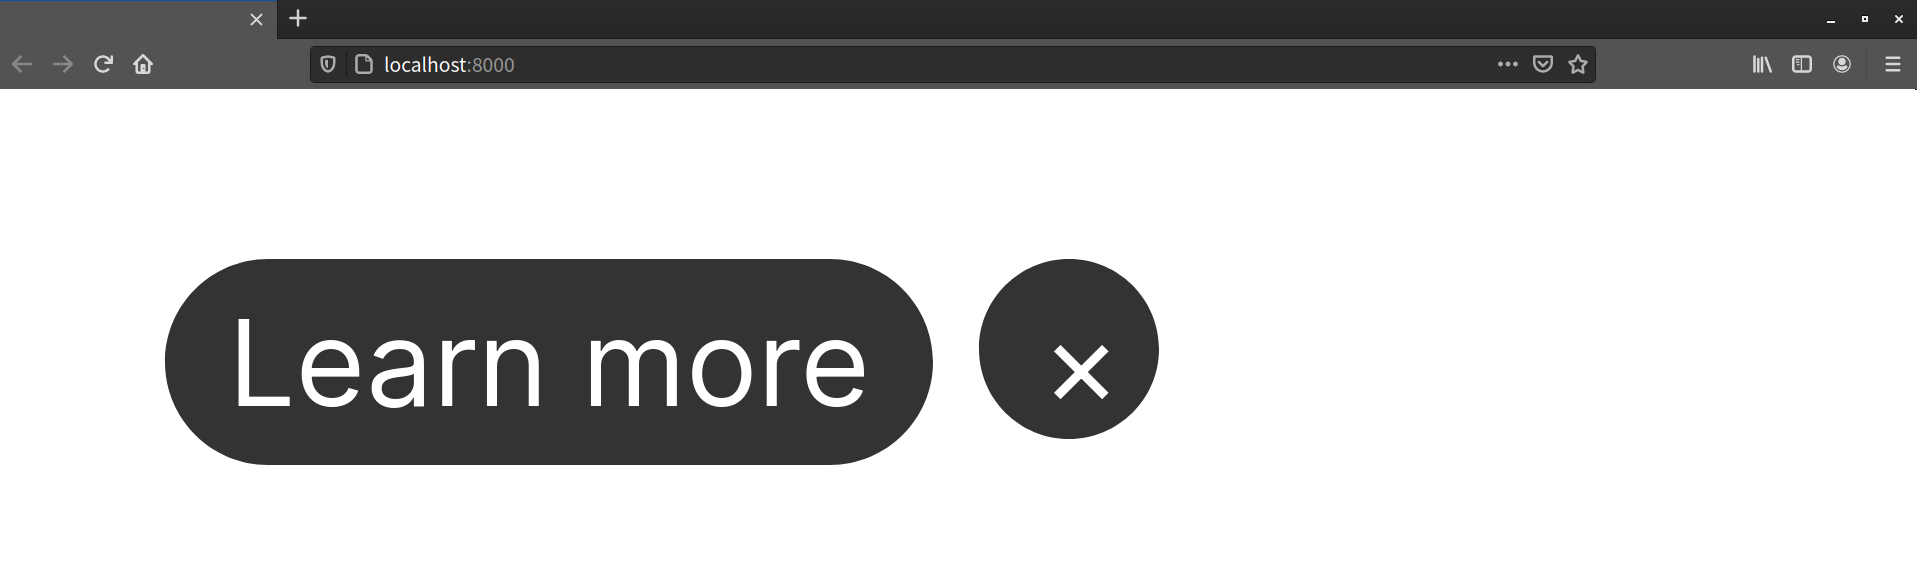
button[type=button] {
    background: #333;
    border: 3px solid #333;
    border-radius: 100px;
    color: white;
    line-height: 1;
    font-size: 2rem;
    font-family: inherit;
    padding: .5rem 1rem;
}
This gives us a charcoal-gray button with white text and rounded ends, as shown in the following image.

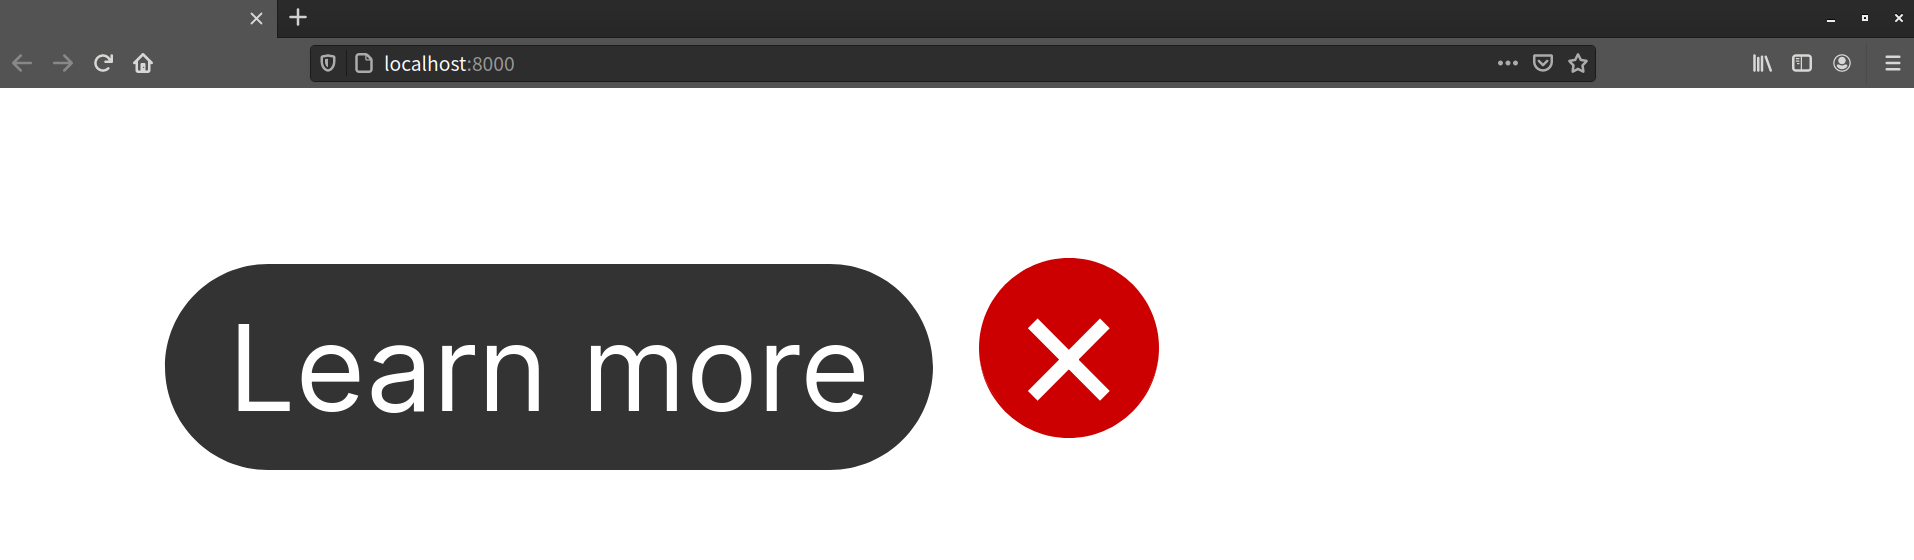
Let’s add some styles for a close button. We’ll use a .close class, as shown below:
button[type=button] {
    background: #333;
    border: 3px solid #333;
    border-radius: 100px;
    color: white;
    line-height: 1;
    font-size: 6rem;
    font-family: inherit;
    padding: .5rem 1rem;
}
.close {
    width: 9rem;
    height: 9rem;
    background: #c00;
    border: 0;
    border-bottom: 5px solid #c00;
    font-size: 3rem;
    line-height: 0;
    padding: 0;
}
Now we have two charcoal-gray buttons with white text and rounded ends.
What’s happening? Our button[type=button] selector has a specificity of 0,1,1. However, .close is a class selector. Its specificity is only 0,1,0. As a result, most of our .close rules don’t get applied to <button type="button" class="close">.
We can ensure that our .close styles are applied by either:
- changing
.closetobutton[type=button].close - making
button[type=button]less specific
The second option adds fewer bytes, so let’s use that:
[type=button] {
    background: #333;
    border: 3px solid #333;
    border-radius: 100px;
    color: white;
    line-height: 1;
    font-size: 6rem;
    padding: .5rem;
}
.close {
    width: 9rem;
    height: 9rem;
    background: #c00;
    border: 0;
    border-bottom: 5px solid #c00;
    font-size: 3rem;
    line-height: 0;
}
Changing the specificity of our selector leaves us with our intended result.
Avoid Chaining Selectors
Another way to minimize specificity is to avoid chaining selectors. Selectors such as .message.warning have a specificity of 0,2,0. Higher specificity means they’re hard to override. What’s more, chaining classes may cause side effects. Here’s an example:
.message {
    background: #eee;
    border: 2px solid #333;
    border-radius: 1em;
    padding: 1em;
}
.message.error {
    background: #f30;
    color: #fff;
}
.error {
    background: #ff0;
    border-color: #fc0;
}
Using <p class="message"> with this CSS gives us a nice gray box with a dark gray border.

Using <p class="message error">, however, gives us the background of .message.error and the border of .error, as shown below.

The only way to override a chained selector is to use an even more specific selector. To be rid of the yellow border, we’d need to add a class name or type selector to the chain, such as .message.warning.exception or div.message.warning. It’s more expedient to create a new class instead.
If you do find yourself chaining selectors, go back to the drawing board. Either the design has inconsistencies, or you’re chaining prematurely in an attempt to prevent problems you don’t yet have. The maintenance headaches you’ll prevent and the flexibility you’ll gain are worth it.
Avoid Using ID Selectors
HTML allows an identifier (that is, an id attribute) to be used once per document. As a result, rule sets that use ID selectors are hard to repurpose. Doing so typically involves using a list of ID selectors—for example, #sidebar-feature, #sidebar-sports, and so on.
Identifiers also have a high degree of specificity, and require longer selectors to override declarations. In the example that follows, we need to use #sidebar.sports and #sidebar.local to undo the background color of #sidebar:
/* Avoid doing this in your CSS */
#sidebar {
    float: right;
    width: 25%;
    background: #eee;
}
#sidebar.sports  {
    background: #d5e3ff;
}
#sidebar.local {
    background: #ffcccc;
}
Instead, we can use a simple .sidebar class selector:
.sidebar {
    float: right;
    width: 25%;
    background: #eee;
}
.sports  {
    background: #d5e3ff;
}
.local {
    background: #ffcccc;
}
Not only does this save a few bytes, but our .sports and .local rules can now be used with other elements.
Using an attribute selector such as [id=sidebar] avoids the higher specificity of an identifier. Though it lacks the reusability of a class selector, the low specificity means we can avoid selector chaining.
A Case for Higher Specificity
In some circumstances, you may want the higher specificity of an ID selector. For example, a network of media sites might wish to use the same navigation bar across all of its web properties. This component must be consistent across sites in the network, and should be hard to restyle. Using an ID selector reduces the chances of those styles being overridden accidentally. You can also achieve this using the !important keyword.
Let’s discuss a selector such as #content article.sports table#stats tr:nth-child(even) td:last-child. Not only is it absurdly long, but with a specificity of 2,3,4, it’s also not reusable. How many possible instances of this selector can there be in your markup?
Let’s make this better. We can immediately trim our selector to #stats tr:nth-child(even) td:last-child. It’s specific enough to do the job. An even simpler approach is to use a class name such as .stats.
It’s a much shorter selector, and those styles aren’t limited to #stats tables.
Minimizing Nesting When Using a Preprocessor
Overly long, highly specific selectors are often caused by nested rule sets. Both Sass and Less support nested rule set syntax, which is useful for grouping related styles and saving keystrokes. Take, for example, the following CSS:
article {
    margin: 2em auto;
}
article p {
    margin: 0 0 1em;
    font-family: 'Droid Serif','Liberation Serif',serif;
}
In both Less and Sass, we can rewrite this to take advantage of nesting:
article {
    margin: 2em auto;
    p {
        margin: 0 0 1em;
        font-family: 'Droid Serif','Liberation Serif',serif;
    }
}
This gives us a descendant selector, and the output will match the standard CSS above.
It’s also possible to nest a rule set inside a nested rule set. Take a look at this example:
nav {
    > ul {
        height: 1em;
        overflow: hidden;
        position: relative;

        &::after {
            content: ' ';
            display: block;
            clear: both;
        }
    }
}
Here, we’ve nested styles for ::after inside a declaration block for ul, which itself is nested inside a nav declaration block. When compiled, we end up with the following CSS:
nav > ul {
    height: 1em;
    overflow: hidden;
    position: relative;
}
nav > ul::after {
    content: ' ';
    display: block;
    clear: both;
}
So far, so good. Our selectors aren’t terribly long or specific. Now let’s look at a more complex example of nesting:
article {
    color: #222;
    margin: 1em auto;
    width: 80%;

    &.news {
        h1 {
            color: #369;
            font-size: 2em;

            &[lang]{
                font-style: italic;
            }
        }
    }
}
That doesn’t seem too egregious, right? Our [lang] selector is only four levels deep. Well, take a look at our compiled CSS output:
article {
    color: #222;
    margin: 1em auto;
    width: 80%;
}
article.news h1 {
    color: #369;
    font-size: 2em;
}
article.news h1 [lang] {
    font-style: italic;
}
Uh-oh! Now we have a couple of high-specificity selectors: article.news h1 and article.news h1[lang]. They use more characters than necessary, and require longer and more specific selectors to override them. Mistakes like this can swell the size of our CSS when repeated across a codebase.
Neither Less nor Sass has a hard limit on how deeply rules can be nested. A good rule of thumb is to avoid nesting your rules by more than three levels. Less nesting results in lower specificity and CSS that’s easier to maintain.
Using Type and Attribute Selectors with Caution
It’s good to keep specificity low, but be careful about the selectors you use to accomplish that. Type and attribute selectors can be the most bothersome.
Type selectors are element selectors such as p, button, and h1. Attribute selectors include those such as [type=checkbox]. Style declarations applied to these selectors will be applied to every such element across the site. Let’s look at another example using buttons, this time with an element selector:
button {
    background: #FFC107;
    border: 1px outset #FF9800;
    display: block;
    font: bold 16px / 1.5 sans-serif;
    margin: 1rem auto;
    width: 50%;
    padding: .5rem;
}
This seems innocuous enough. But what if we want to create a button that’s styled differently? Let’s create a .tab-rounded button for tab panels:
<div class="tabs">
    <button type="button" role="tab" aria-selected="true" aria-controls="tab1" id="tab-id" class="tab-rounded">Tab 1</button>
</div>
<div tabindex="0" role="tabpanel" id="tab1" aria-labelledby="tab-id">
    <p>This is the tab 1 text</p>
</div>
Now we need to write CSS to override every line that we don’t want our rounded button to inherit from the button rule set:
.tab-rounded {
    background: inherit;
    border: 1px solid #333;
    border-bottom: 0;  /* We only need borders on three sides for tabs */
    border-radius: 3px 3px 0 0;
    diplay: inline-block;
    font-weight: normal;
    margin: .5rem 0 0;
    width: auto;
    padding: 1rem 2rem;
}
We’d still need many of these declarations to override browser defaults, but what if we assign our button styles to a .default class instead? We can then drop the display, font-weight and width declarations from our .tab-rounded rule set. That’s a 21% reduction in size:
.default {
    background: #FFC107;
    border: 1px outset #FF9800;
    display: block;
    font: bold 16px / 1.5 sans-serif;
    margin: 1rem auto;
    width: 50%;
    padding: .5rem;
}
.tab-rounded {
    background: inherit;
    border: 1px solid #333;
    border-bottom: 0;
    border-radius: 3px 3px 0 0;
    padding: 1rem 2rem;
}
Just as importantly, avoiding type and attribute selectors reduces the risk of styling conflicts. A developer working on one module or document won’t inadvertently add a rule that creates a side effect in another module or document.
Choosing What to Name Things
When choosing class-name selectors, use semantic class names.
When we use the word semantic, we mean meaningful. Class names should describe what the rule does or the type of content it affects. Ideally, we want names that will endure changes in the design requirements. Naming things is harder than it looks.
Here are examples of what not to do: .red-text, .blue-button, .border-4px, .margin10px. What’s wrong with these? They’re too tightly coupled to the existing design choices. Using class="red-text" to mark up an error message does work. But what happens if the design changes and error messages become black text inside orange boxes? Now your class name is inaccurate, making it tougher for you and your colleagues to understand what’s happening in the code.
A better choice in this case is to use a class name such as .alert, .error, or .message-error. These names indicate how the class should be used and the kind of content (error messages) they affect.
Recommended Reading
Philip Walton discusses these and other rules in his article “CSS Architecture”. I also recommend Harry Roberts’ site CSS Guidelines and Nicolas Gallagher’s post “About HTML Semantics and Front-end Architecture” for more thoughts on CSS architecture. For a different take, read “CSS Utility Classes and ‘Separation of Concerns’” by Adam Wathan, the creator of Tailwind CSS.
We’ll now look at two methodologies for naming things in CSS. Both methods were created to improve the development process for large sites and large teams, but they work just as well for teams of one. It’s up to you whether you choose one or the other, neither, or a mix of both. The point of introducing them is to help you to think through approaches for writing your own CSS.
Block-Element-Modifier (BEM)
BEM, or Block-Element-Modifier, is a methodology, a naming system, and a suite of related tools. Created at Yandex, BEM was designed for rapid development by sizable development teams. In this section, we’ll focus on the concept and the naming system.
BEM methodology encourages designers and developers to think of a website as a collection of reusable component blocks that can be mixed and matched to create interfaces. A block is simply a section of a document, such as a header, footer, or sidebar, as illustrated below.
Perhaps confusingly, “block” here refers to the segments of HTML that make up a page or application.
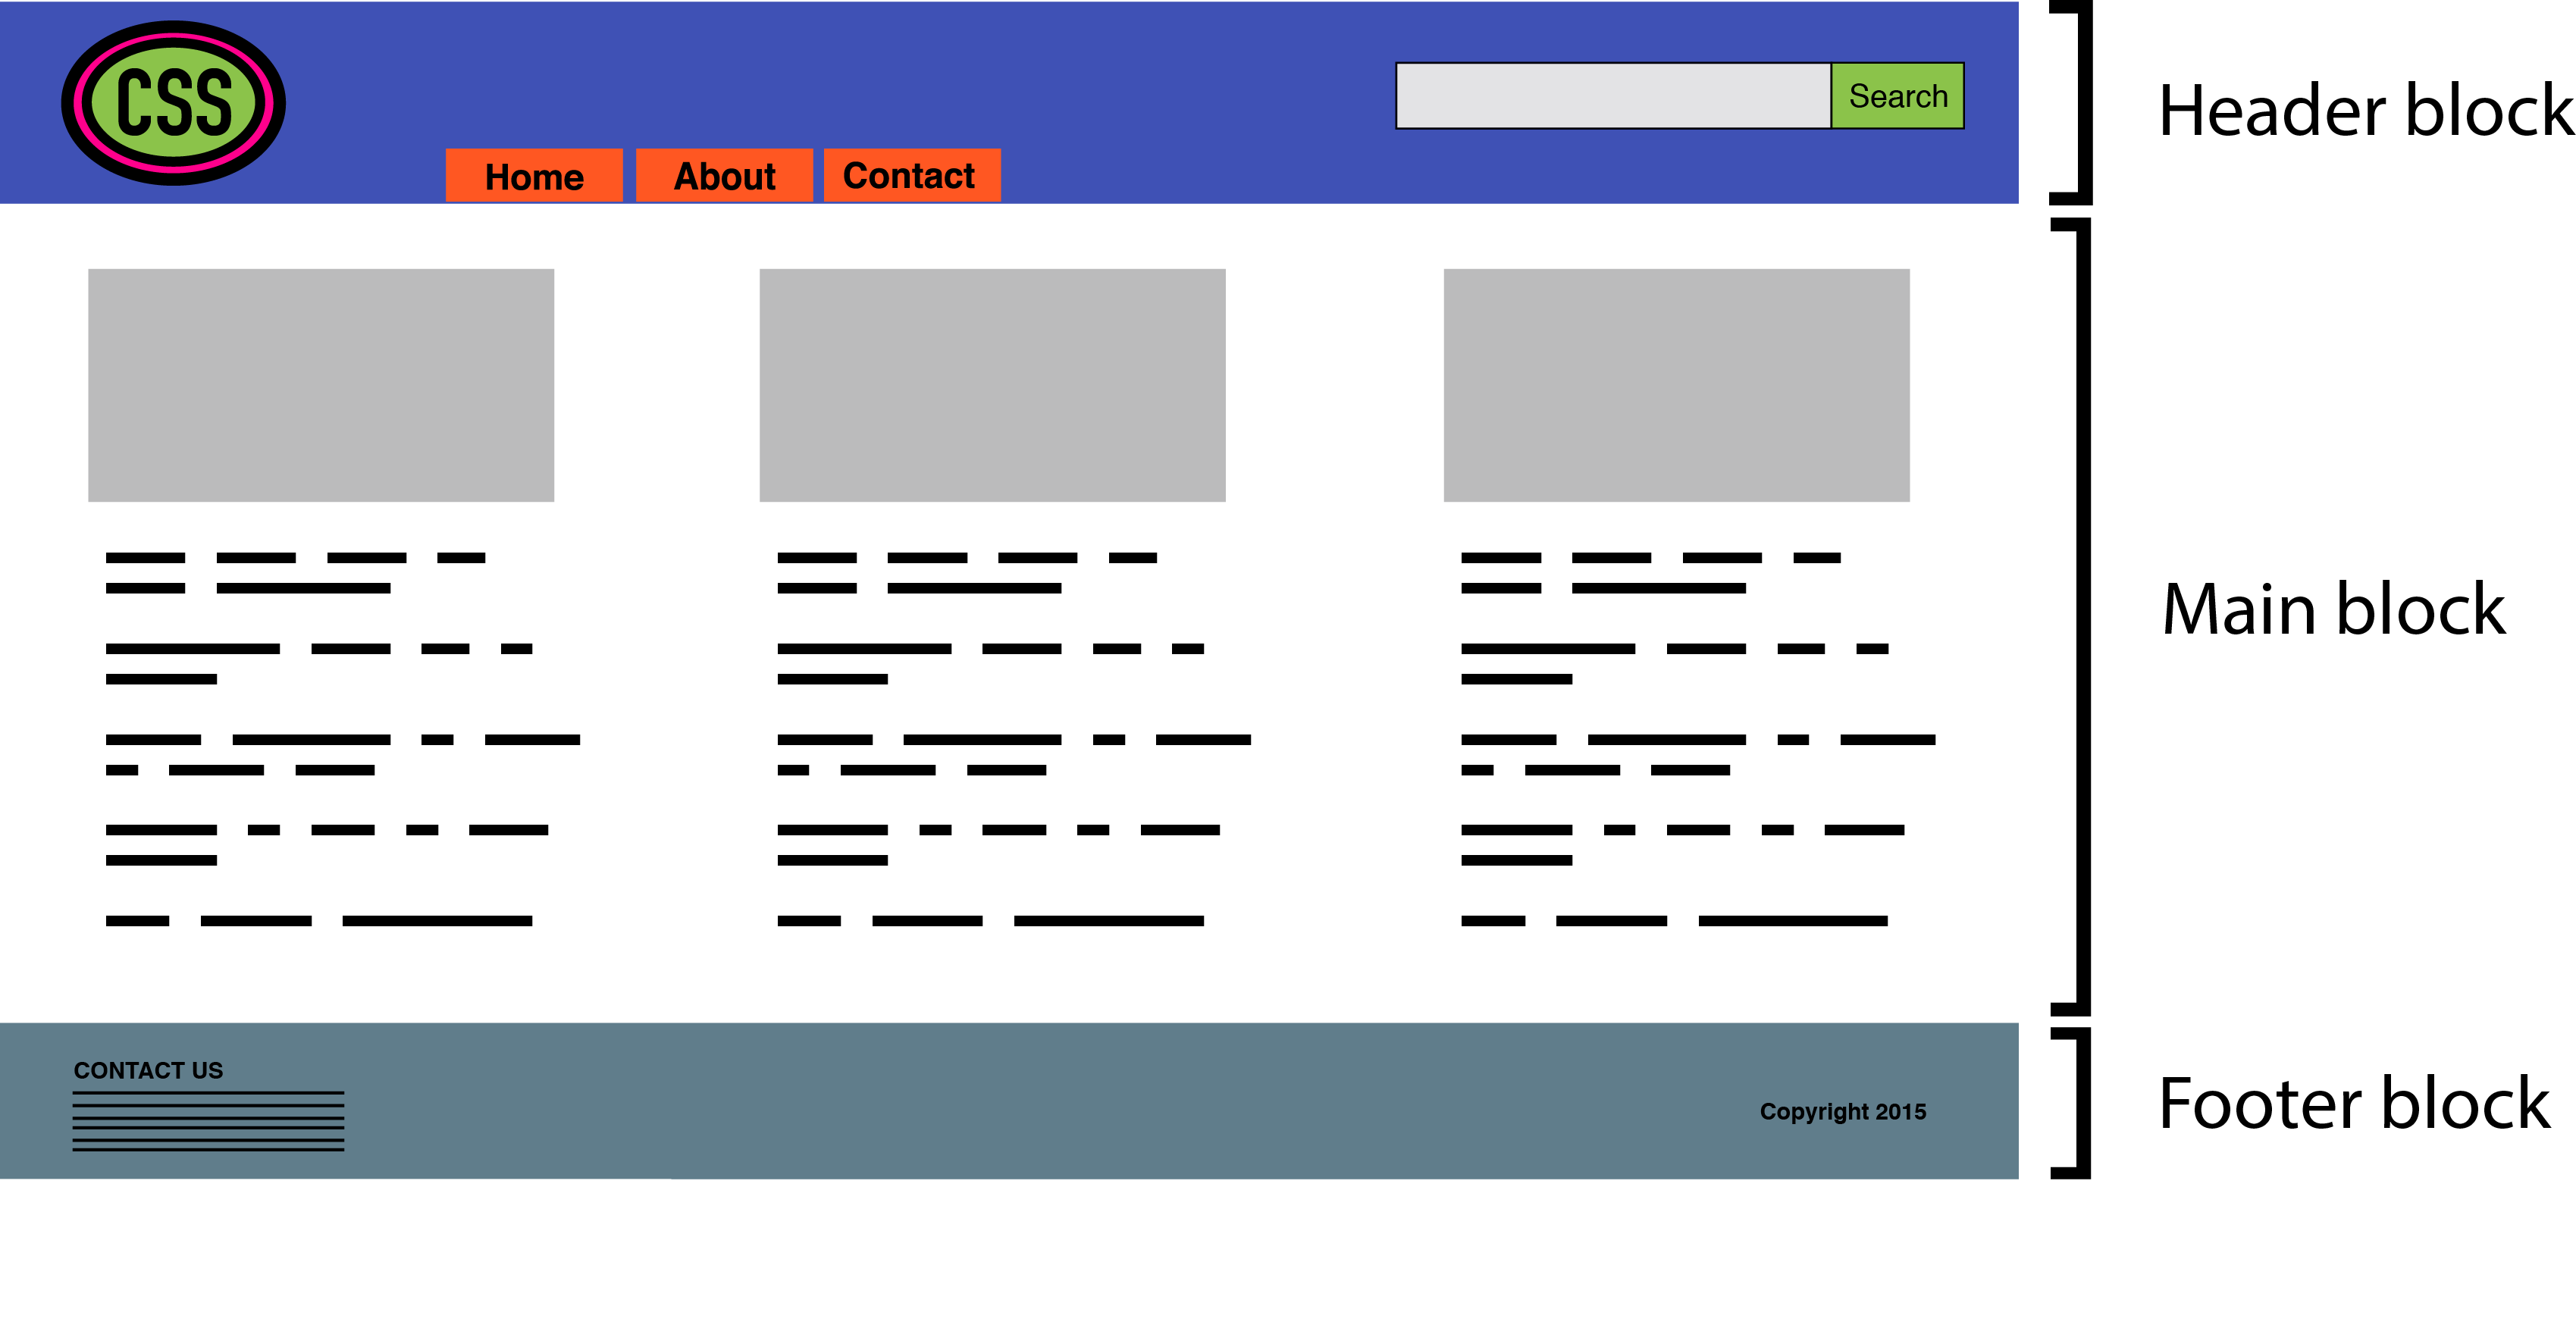
Blocks can contain other blocks. For example, a header block might also contain logo, navigation, and search form blocks, as seen below. A footer block might contain a site map block.

More granular than a block is an element. As the BEM documentation explains:
An element is a part of a block that performs a certain function. Elements are context-dependent: they only make sense in the context of the block they belong to.
A search form block, for example, contains a text input element and a submit button element, as illustrated below. (To clarify, we’re using “element” as a shorthand for “design element” rather than in the sense of HTML elements.)

A main content block, on the other hand, might have an article list block. This article list block might contain a series of article promo blocks. And each article promo block might contain image, excerpt, and “Read more” elements, as presented below.

Together, blocks and elements form the basis of the BEM naming convention. According to the rules of BEM:
- block names must be unique within a project
- element names must be unique within a block
- variations of a block—such as a search box with a dark background—should add a modifier to the class name
In a BEM naming system, block and element names are separated by a double underscore (as in .block__element). Block and element names are separated from modifier names by a double hyphen (for example, .block--modifier or .block__element--modifier).
Here’s what BEM looks like using a search form example:
<form class="search">
    <div class="search__wrapper">
        <label for="s" class="search__label">Search for: </label>
        <input type="text" id="s" class="search__input">
        <button type="submit" class="search__submit">Search</button>
    </div>
</form>
A variation of this form with a dark background might use the following markup:
<form class="search search--inverse">
    <div class="search__wrapper search__wrapper--inverse">
        <label for="s" class="search__label search_label--inverse">Search for: </label>
        <input type="text"  id="s" class="search__input search__input--inverse">
        <button type="submit" class="search__submit search__submit--inverse">Search</button>
    </div>
</form>
Our CSS might look like this:
.search {
    color: #333;
}
.search--inverse {
    color: #fff;
    background: #333;
}
.search__submit {
    background: #333;
    border: 0;
    color: #fff;
    height: 2rem;
    display: inline-block;
}
.search__submit--inverse {
    color: #333;
    background: #ccc;
}
In both our markup and CSS, search--inverse and search__label--inverse are additional class names. They’re not replacements for search and search__label. Class names are the only type of selector used in a BEM system. Child and descendant selectors may be used, but descendants should also be class names. Element and ID selectors are verboten. Enforcing block and element name uniqueness also prevents naming collisions, which can become a problem among teams.
There are several advantages to this approach:
- it’s easy for new team members to read the markup and CSS, and understand its behavior
- adding more developers increases team productivity
- consistent naming reduces the possibility of class-name collisions and side effects
- the CSS is independent of the markup
- the CSS is highly reusable
Learning More about BEM
Atomic CSS
Atomic CSS takes a markedly different approach from BEM. Named and explained by Thierry Koblentz of Yahoo in his 2013 piece “Challenging CSS Best Practices”, Atomic CSS uses a tight library of class names. These class names are often abbreviated and divorced from the content they affect. In an Atomic CSS system, you can tell what the class name does—but there’s no relationship between class names (at least, not those used in the stylesheet) and content types. Today, Tailwind CSS and Tachyons use a similar approach.
Let’s illustrate with an example. Below is a set of rules in what we might call a conventional CSS architecture. These rule sets use class names that describe the content to which they apply—a global message box, and styles for “success”, “warning”, and “error” message boxes:
.msg {
    background-color: #a6d5fa;
    border: 2px solid #2196f3;
    border-radius: 10px;
    font-family: sans-serif;
    padding: 10px;
}
.msg-success {
    background-color: #aedbaf;
    border: 2px solid #4caf50;
}
.msg-warning {
    background-color: #ffe8a5;
    border-color:  #ffc107;
}
.msg-error {
    background-color: #faaaa4;
    border-color: #f44336;
}
To create an error message box, we’d need to add both the msg and msg-error class names to the element’s class attribute:
<p class="msg msg-error">An error occurred.</p>
Let’s contrast this with an atomic system, where each declaration becomes its own class:
.bg-a {
    background-color: #a6d5fa;
}
.bg-b {
    background-color: #aedbaf;
}
.bg-c {
    background-color: #ffe8a5;
}
.bg-d {
    background-color: #faaaa4;
}
.bc-a{
    border-color: #2196f3;
}
.bc-b {
    border-color: #4caf50;
}
.bc-c {
    border-color:  #ffc107;
}
.bc-d {
    border-color:  #f44336;
}
.br-1x {
    border-radius: 10px;
}
.bw-2x {
    border-width: 2px;
}
.bss {
    border-style: solid;
}
.sans {
    font-style: sans-serif;
}
.p-1x {
    padding: 10px;
}
That’s a lot more CSS. Let’s now recreate our error message component. Using Atomic CSS, our markup becomes:
<p class="bw-2 bss p-1x sans br-1x bg-d bc-d">
    An error occurred.
</p>
Our markup is also more verbose. But what happens when we create a warning message component?
<p class="bw-2 bss p-1x sans br-1x bg-c bc-c">
    Warning: The price for that item has changed.
</p>
Two class names changed: bg-d and bc-d were replaced with bg-c and bc-c. We’ve reused five rules. Now, let’s create a button:
<button type="button" class="p-1x sans bg-a br-1x">Save</button>
Hey now! Here we’ve reused four rules and avoided adding any more rules to our stylesheet. In a robust atomic CSS architecture, adding a new HTML component such as an article sidebar won’t require adding more CSS (though, in reality, it might require adding a little bit more).
Atomic CSS comes with a few advantages:
- it keeps CSS trim by creating highly granular, highly reusable styles, instead of a rule set for every component
- it greatly reduces specificity conflicts by using a system of low-specificity selectors
- it allows for rapid HTML component development once the initial rule sets are defined
Atomic CSS is a bit like using utility classes in your CSS, but taken to the extreme.
The Case Against Atomic CSS
Atomic CSS runs counter to much of the popular advice about writing CSS. It feels almost as wrong as sticking style attributes everywhere. Indeed, one of the main criticisms of the Atomic CSS methodology is that it blurs the line between content and presentation. If class="fl m-1x" floats an element to the left and adds a 10px margin, what do we do when we no longer want that element to float left?
One answer, of course, is to remove the fl class from our element. But now we’re changing HTML. The whole point of CSS is to separate markup from presentation. Still, updating the HTML may be a small price to pay for rapid component development and trimmer CSS.
Another Answer: Change the CSS
We could also solve this problem by removing the .fl {float: left;} rule from our stylesheet, although that would affect every element with a class name of fl.
In Koblentz’s original post, he used class names such as .M-10 for margin: 10px and .P-10 for padding: 10px. I hope the issue with such a naming convention is obvious. Changing to a margin of 5px or 20px means we’d need to update our CSS and our HTML, or have class names that fail to accurately describe their effect.
Using class names such as p-1x, as done in this section, resolves that issue. The 1x part of the class name indicates a ratio rather than a defined number of pixels. If the base padding is 5px (that is, .p-1x { padding: 5px; }), then .p-2x would set 10px of padding. Yes, that’s less descriptive of what the class name does, but it also means that we can change our CSS without updating our HTML, and without creating a misleading class name.
An atomic CSS architecture doesn’t prevent us from using class names that describe the content. You can still add .button__close or .accordion__trigger to your code. Such class names are preferable for JavaScript and DOM manipulation.
Know When to Go Your Own Way
In practice, your CSS will include a mix of approaches. You may have class names that describe content or components in addition to utility class names that describe color and layout.
If you don’t have full control over the markup, as with some CMS products, neither of these approaches may be useful. You may even need to use long and specific selectors to reach your design goals.
Conclusion
After reading this chapter, you should now know:
- how to organize your CSS for easier development and maintenance
- how browsers determine which CSS rules to use
- why class selectors are the most flexible selector for writing scalable, maintainable CSS
- the basics of BEM and Atomic CSS, and the pros and cons of each
In the next chapter, you’ll learn what to do when you notice a bug in your CSS. We’ll also discuss a few tools for making your CSS files smaller.