
You’ve spent a lot of time learning how to use the plethora of functions on a video camera to take great pictures. But I’d lay my hard-earned money down that you barely understand what the heck is going on with the audio. The default approach for most operators is to plug in a mic, turn the switch to “auto” and be pleased that you’re finished dealing with sound for the day.
Sure, the automatic settings work fine for some things, but you probably already realize that it’s hit-and-miss at best, and definitely not what you should consider professional. That’s why you bought this book!
Sony XDCAM professional shoulder mount camera
Consider what it would be like to put your camera in “automatic everything” mode—with no control over focus, iris, shutter speed, gain, or white balance. Sure, the camera will shoot some kind of an image, but would you be happy with that? Would you be happy with absolutely no creative control over how your pictures look?
If you really want great sound to go along with your great pictures, then you need to go beyond the “auto” trap and have a better understanding of what’s going on. You need to take control of your sound.
There are certain basic audio functions that all video cameras require to record sound. Knowing what they do and how to adjust them will make calibrating the wide variety of cameras out there a lot simpler.
Beyond these common functions, various cameras do have features unique to their model, and you’ll need to know how they can affect calibration and recording. I’ll also warn you that the name given to the various functions will vary from manufacturer to manufacturer. If you see a long list of setting choices, it doesn’t mean that the function has six settings, it means the various camera manufacturers are using different names for that function.
So, to get started, here are the audio functions found on all video cameras, their setting choices, and how they’ll affect the sound.
VIDEO CAMERA


FUNCTION: AUDIO INPUT LEVEL (1)
This readies the camera to receive a signal from a location audio field mixer, direct mic input, wireless system, and/or a camera-mounted mic.
First, you select which type of signal is being used. This depends on which of the above is being connected to the camera. The two options are “LINE” level (a very loud signal) or “MIC” level (a much weaker signal approximately 50dB lower).
You also have the option to send power to microphones that have no onboard battery and need power from the camera to work. This is called “48V phantom power” and is normally identified on the camera as “MIC+48V.”
The audio input level section also has the ability to decrease the overall level of any incoming audio signal by −10dB as it enters the camera. This is called “Mic Attenuation” and is normally identified on the camera as “MIC ATT.”
Setting Choices: Line, Mic, Mic +48Vph, Mic Att, Camera Mic
• Set to “Line” when connecting a field mixer to a video camera
• Set to “Mic +48V” when directly connecting a shotgun microphone or hardwired lavalier microphone
• Set to “Mic” when directly connecting a handheld dynamic microphone or wireless receiver to a video camera
• Set to “Mic Att” (mic attenuation) when using the built-in camera mic in a loud or windy location. This function is found only on cameras with a built-in microphone
FUNCTION: INPUT SELECT/AUDIO IN (2)
This audio function on larger shoulder mount cameras is for selecting the physical input through which the sound source enters the camera. Theses cameras typically have more than two XLR inputs. On the smaller cameras, it will choose between the built-in camera mic and the XLR inputs.
Setting Choices: Front/Cam Mic or Internal Mic, Rear/XLR Inputs or Ext Input, or Wireless
• Set to “Cam Mic”/“Front Mic” when you want to use the camera-mounted microphone on the larger cameras or “Internal Mic” to select the built-in mic on smaller cameras
• Set to “Rear”/“XLR Inputs” or “Ext Input” when you connect a shotgun, lavalier microphone, location audio field mixer, or wireless system to the XLR’s on the back or handle of the camera
• Set to “Wireless” if the camera has a built-in wireless system
FUNCTION: AGC/AUDIO SELECT (3)
This audio function activates what is called Automatic Gain Control or “AGC.” It adjusts the incoming signal (up or down) for an optimal recording level on the camera. Think of this function as a built-in location audio operator who prevents distortion but who also likes to play with the incoming volume a little too much! This is the “auto” function on your camera that can sometimes do a decent job, but can also make a mess of your sound.
How it works:
As sound enters your camera from a mic, wireless system, mixer, or whatever you’ve got connected, the AGC will adjust the incoming audio signal to record an optimal level of sound. If someone is speaking and the camera wants the sound to be at −6dB, then it automatically adjusts the input volume to record at that level. This is great until talent stops speaking. When talent stops speaking, even for a brief moment, the AGC will then detect the signal has dropped and will start to increase the input volume because it wants the audio level to be recorded at −6dB. Now, depending on the quality and set-up of the AGC, this can cause a pumping of the ambience. Every time talent stops speaking, the AGC increases the volume and the ambience gets louder and louder until they speak again and then it turns down.
Technically, there’s more to it, but that’s essentially how the AGC works. No audio geek-speak here!
Setting Choices: Manual/Auto, On/Off
Unfortunately, the label given to the AGC function is all over the map. I’ve seen it named ALC, Audio Select, and Input Mode Rec Level and there’s probably more. By the time this book prints, there may even be a few more.
• Set to “Auto” or “On” when plugging a microphone or wireless system directly into the camera, or when using a camera-mounted mic. This is the default setting of many camera operators, but as you learn more about this function, you’ll learn how to record with this function “off”—your recordings will be better for it. But, and it’s a big BUT, there are times when it’s essential to prevent distortion
• Always set to “Manual” or “Off” when connecting a field mixer to the camera
FUNCTION: AUDIO LEVEL (4)
Use this function to increase or decrease the amount of signal entering the camera when the AGC/Audio Select is in “Manual” mode.
Also called: Input Trim, Input Level
• In most cases, the “Audio Level” adjustment will be a pair of dials on the body of the camera. On some of the smaller hand-held cameras, it’s common for this adjustment to be a soft function in the camera’s menu
This function is used to increase or decrease the volume going to the camera’s headphone jack—and ultimately your headphones. In most cases, the monitor volume adjustment will be a dial or buttons on the body of the camera.
In audio-speak, the word “monitor” means “listen.” So, when anything has to do with monitoring, it’s just a fancy way of saying listening.
• Set this control to “Max” when returning the signal to a field mixer via the camera’s headphone jack
• Set this function to a comfortable listening volume when you’re monitoring the camera’s audio with headphones
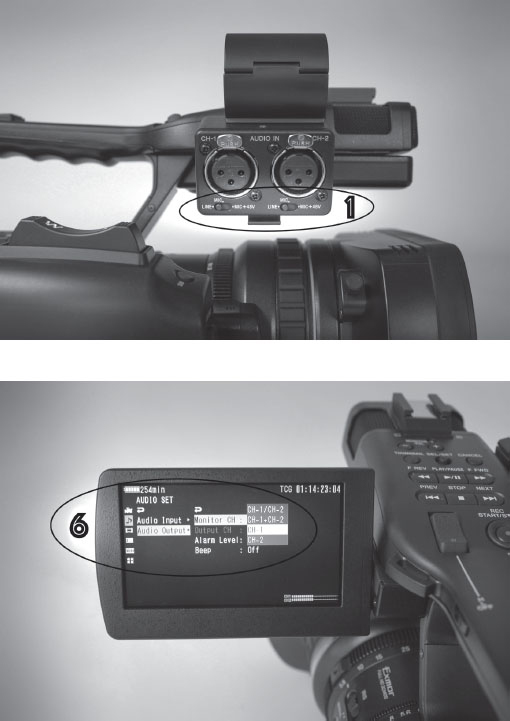
FUNCTION: MONITOR SELECT/AUDIO OUTPUT (6)
This function on a camera chooses which channel on the camera you want to monitor. Most video cameras will have two separate tracks of audio. Some manufacturers will call them “(L) for left and (R) for right” while others will use “CH1, CH2”. Either way, these are separate audio tracks, and you can choose to listen to either one (L, CH1 or R, CH2) or both at the same time (L/R, CH1/CH2, Mix). Some of the larger cameras can record four or even six tracks of audio so the monitor select function will have more monitoring options
Also called: Audio Monitor or Output Channel
Setting Choices: CH1/CH2, CH1, CH2.
• Set this function to CH1/CH2 when you’re monitoring the camera with a field mixer. The location audio operator will need both audio channels sent back to them to monitor the camera properly
• Set this function to CH1 or CH2 if you’re monitoring the camera and want to focus on a single channel. For example, if you have a wireless system connected to XLR input 1 and the onboard camera mic connected to XLR input 2, you could listen to the wireless system by selecting CH1 (input 2 would be muted to your headphones) or if you chose CH2, you would only hear the onboard camera mic in your headphones (input 1 would be muted to your headphones)
Calibrating a video camera
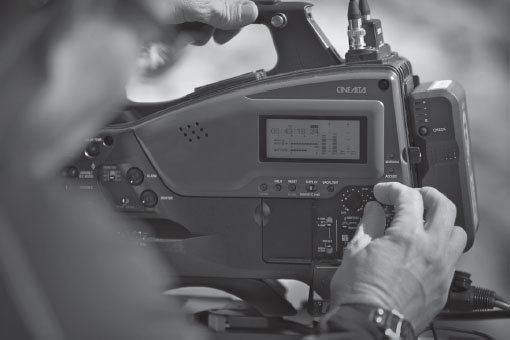
Larger shoulder mounted professional cameras will have more flexibility for routing and monitoring the audio signal. Most, if not all, of their audio functions will be on the body of the camera. This style of camera is primarily for the one-person camera crew when gathering news footage or something similar. The dials, meters and switches located on the camera are designed for easy accessibility and adjusting while shooting.
Smaller professional cameras, due to a lack of real estate, will have many audio functions in their menu systems. When using these types of cameras, most of the audio functions need to be adjusted during setup and are very difficult, if not impossible, to adjust on the fly. I’ve found that many essential monitoring and routing functions are not available on these smaller cameras. I’m guessing there are camera functions and options that are omitted on the smaller cameras as well.
It’s usually the sound op’s responsibility to calibrate all camera audio functions when on set, now it’s yours!
Your camera is the only recorder you have. If it’s not set up and functioning properly, your pictures, as well the audio could be compromised. After all the setting up, lens changing, light moving, tripod leveling and audio adjusting, things get bumped, moved and accidentally changed. After the first shot, quickly play it back and make sure that not only are your pictures a thing of great beauty but that the audio is perfect as well.
|
Equipment breaks! Most camera operators don’t pay close attention to the audio portion of their camera. Sorry, camera dudes, but most of you don’t! You don’t want to be asked to play back a take for the director half way through the day and find out that the audio playback function is not working correctly. I know most of you check your shots a lot, but how many of you put on a set of headphones to check the audio? Checking the audio, as well as the picture throughout the day catches problems. Scot and I check shots constantly and have caught issues many times. It’s one thing to have a shot or two with problems. It’s quite another to be riding home after the day is done only to find that the audio crapped out during the first hour of shooting. |
// Watch Class 5—Video cameras, the basics //