Chapter 1
Getting Up and Running
IN THIS CHAPTER
![]() Preparing the camera for its first outing
Preparing the camera for its first outing
![]() Getting acquainted with camera features
Getting acquainted with camera features
![]() Viewing and adjusting camera settings
Viewing and adjusting camera settings
![]() Setting a few basic preferences
Setting a few basic preferences
If you’re like many people, shooting for the first time with a single-lens reflex (SLR) camera produces a blend of excitement and anxiety. On the one hand, you can’t wait to start using your new equipment, but on the other, you’re a little intimidated by all its buttons, dials, and menu options.
Well, fear not: This chapter provides the information you need to start getting comfortable with your Canon EOS 90D. The first section walks you through initial camera setup. Following that, you get an overview of camera controls, discover how to view and adjust camera settings, work with lenses and memory cards, and get advice on some basic setup options.
Preparing the Camera for Initial Use
After unpacking your camera, you have to assemble a few parts. In addition to the camera body and the supplied battery (charge it before the first use), you need a lens and a memory card. Later sections in this chapter provide details about lenses and memory cards, but here’s the short story:
- Lens: Your camera accepts Canon EF and EF-S lenses; the 18–55mm or 18–135mm kit lenses sold as a bundle with the camera body falls into the EF-S category. If you want to buy a non-Canon lens, check the lens manufacturer’s website to find out which lenses work with your camera.
SD, SDHC, or SDXC memory card: The SD stands for Secure Digital; the HC and XC stand for High Capacity and eXtended Capacity. The different labels reflect how many gigabytes (GB) of data the card holds. SD cards hold less than 4GB; SDHC, 4GB to 32GB; and SDXC, more than 32GB.
 The 90D is compatible with UHS-II cards. These cards are blazingly fast and capable of handling data transfer rates needed to shoot 4K video. They are also great for still photography. Look for the Roman numeral II on the card label and a double row of contacts (refer to Figure 1-26, later in this chapter) to confirm that it is UHS-II.
With camera, lens, battery, and card within reach, take these steps:
- Turn the camera off.
Attach a lens.
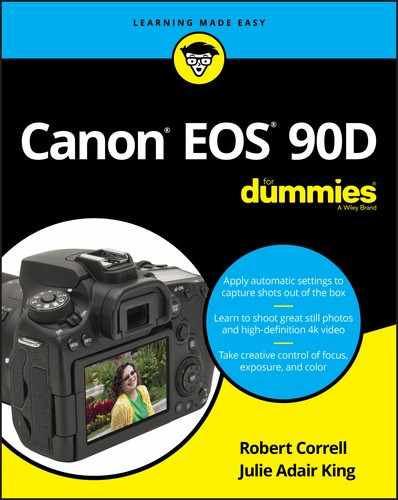
First, remove the caps that cover the front of the camera and the back of the lens. Then locate the proper mount index, which is a mark on the camera’s lens mount that indicates how to align the lens with the camera body. Your camera has two of these markers, one red and one white, as shown in Figure 1-1. Which marker you use depends on the lens type:
- Canon EF-S lens: The white square is the mount index.
- Canon EF lens: The red dot is the mount index.
Your lens also has a mount index; align that mark with the matching one on the camera body, as shown in Figure 1-1. Place the lens on the camera mount and rotate the lens toward the side of the camera that sports the white EOS logo (or, to put it another way, away from the shutter-button side of the camera). You should feel a solid click as the lens locks into place.
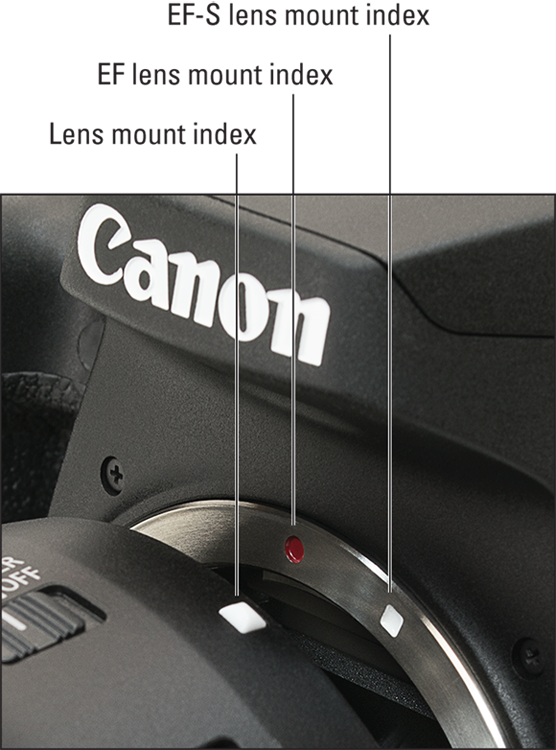
FIGURE 1-1: Align the mounting index on the lens with the one on the camera body.
Insert the battery.
The battery compartment is on the bottom of the camera. When inserting the battery, hold it with the contacts so they go in first and the Canon imprint facing out (toward the side of the camera with the memory card cover). Gently push the battery in until the gray lock clicks into place, then shut the compartment door.
Insert a memory card.
Open the memory card door and orient the card so that the notched corner is on top and the label faces the back of the camera, as shown in Figure 1-2. Push the card gently into the slot and close the card door.
The memory-card access light (refer to Figure 1-2) blinks a few times to let you know that the camera recognizes the card. (The light appears even when the camera is turned off.)
FIGURE 1-2: Insert the memory card with the label facing the back of the camera.
Rotate the monitor to the desired viewing position.
When you first take the camera out of its box, the monitor is positioned with the screen facing inward, protecting it from scratches and smudges. Gently lift the right side of the monitor up and away from the camera back. You can then rotate the monitor to move it into the traditional position on the camera back, as shown on the left in Figure 1-3, or swing the monitor out to get a different viewing angle, as shown on the right.

FIGURE 1-3: Here are just two possible monitor positions.
Turn the camera on.
Slide the Power switch (see Figure 1-4) to the On position.
Set the language, time zone, and date.
When you power up the camera for the first time, the monitor displays a screen asking you to set the date, time, and time zone. The easiest way to adjust these settings is to use the touch screen, which is enabled by default. Just tap an option to select it and then tap the up/down arrows at the bottom of the screen to set the value for that option. Finally, tap OK to exit the screen.
You also can adjust settings by using either multi-contoller. Press the left/right directional keys to highlight a setting, press the Set or center Joystick button to activate the option, press the up/down directional keys to change the value, and press Set or the center Joystick button again to finalize the change.
 The date/time information is included as metadata (hidden data) in the picture file. You can view metadata in some playback display modes (see Chapter 9) and in certain photo programs, including Canon Digital Photo Professional (see Chapter 10).
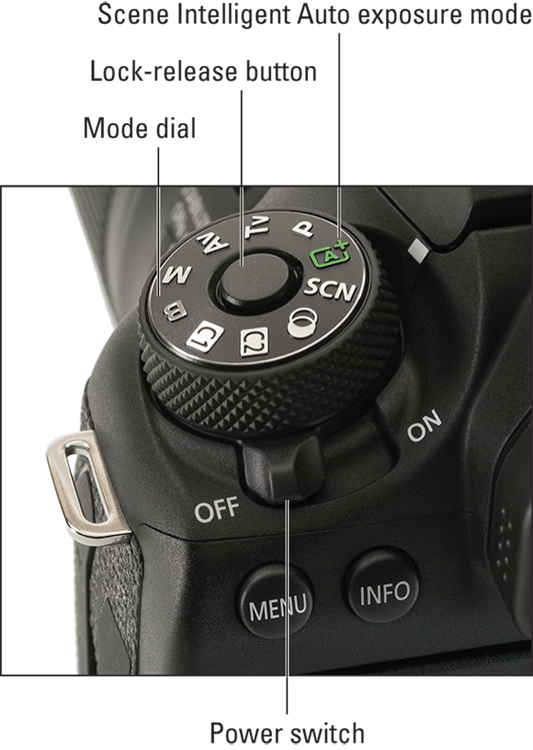
FIGURE 1-4: Rotate the switch to On to power up the camera.
Adjust the viewfinder to your eyesight.
This step is critical; if you don’t set the viewfinder to your eyesight, subjects that appear out of focus in the viewfinder might actually be in focus, and vice versa. If you wear glasses while shooting, adjust the viewfinder with your glasses on.
 You control viewfinder focus through the dial labeled in Figure 1-5. (In official lingo, it’s called the diopter adjustment dial.) After taking off the lens cap, follow these steps:
 Look through the viewfinder, press the shutter button halfway, and then release it.
In dim lighting, the camera may suggest opening the flash; ignore that for now and concentrate on the lines that appear in the center of the frame and the row of data displayed at the bottom of the frame.
Rotate the adjustment dial until the viewfinder markings and data appear sharpest.
Ignore the scene you see through the lens; that won’t change because you’re not actually focusing the camera. If the markings turn off before you finish making your adjustments, give the shutter button another quick half-press and release to redisplay them.
Can’t get the display sharp enough? You may need an adapter that enables further adjustment of the viewfinder. Look for an E-series dioptric adjustment lens adapter.
FIGURE 1-5: Use this dial to adjust the viewfinder focus to your eyesight.
Select an exposure mode by pressing and holding the lock-release button and rotating the Mode dial (refer to Figure 1-4).
The exposure mode determines how much control you have over various camera settings, as well as whether any special effects are applied. Chapter 2 explains the various exposure modes. For easiest operation, set the dial to Scene Intelligent Auto (A+ on the Mode dial), as shown Figure 1-4. Be aware, though, that some camera features are available only in the advanced shooting modes: P, Tv, Av, M, B, C1, and C2. The lock-release button is a handy feature that keeps you from accidentally turning the Mode dial when you aren’t intending to.
That’s all there is to it — the camera is now ready to go. The rest of this chapter familiarizes you with other major camera features and explains such basics as how to navigate menus, use the touch screen, and view and adjust camera settings.
One more thing before you go: The official name for Canon’s fully automatic exposure mode is Scene Intelligent Auto because, in this mode, the camera’s brain analyzes the light and color information it picks up through the lens, consults an internal database to help it determine what type of scene you’re shooting, and then adjusts picture settings as it deems necessary. In other words, Scene Intelligent Auto mode is intelligent enough to set up the camera to best capture the scene.
Exploring External Camera Features
Scattered across your camera’s exterior are numerous features that you use to change picture-taking settings, review your photos, and perform various other operations. Later chapters explain how and when to use these tools; the following sections provide just a basic “What’s this thing do?” introduction to them. (Don’t worry about memorizing the button names; throughout the book, figures and margin symbols tell you exactly which button or switch to use.)
Topside controls
Your virtual tour begins on the top of the camera, shown in Figure 1-6. Note that not all buttons work in the Basic exposure modes. Autofocus, for example, is handled completely by the camera in Scene Intellignet Auto mode. The camera will pop up a note and tell you when this is the case.
Here are the items of note:
Power switch: As outlined in the preceding section, this switch turns the camera on and off.
Even when the switch is in the On position, the camera automatically goes to sleep after a period of inactivity to save battery power. To wake the camera up, press the shutter button halfway and release it. See the section “Setup Menu 2” for help adjusting the timing of the automatic shutoff.
- Mode dial with lock-release button: Press and hold the lock-release button in the center of the Mode dial, and then rotate the dial to select an exposure mode, which determines whether the camera operates in fully automatic, semi-automatic, or manual exposure mode when you take still pictures.
Viewfinder adjustment dial: Use this dial to adjust the viewfinder focus to your eyesight, as outlined in the preceding section.
On some camera screens, you see a symbol that resembles the top half of a dial that has notches around the edge. That’s designed to remind you that you use the Main dial to adjust the setting.
FIGURE 1-6: Here’s a guide to controls found on top of the camera.
- Red-Eye Reduction/Self-Timer/Remote Control Lamp: When you set your flash to Red-Eye Reduction mode, this little lamp emits a brief burst of light prior to the real flash — the idea being that your subjects’ pupils will constrict in response to the light, thus lessening the chances of red-eye. If you use the camera’s self-timer feature, the lamp lights during the countdown period before the shutter is released. The lamp also lights up when you take a picture with a remote. See Chapter 2 for more details about Red-Eye Reduction flash mode and the self-timer function.
- AF Operation button: Press this button to select an AF Operation. These settings are related to autofocusing and determine whether the camera focuses once or continues to focus as long as you hold the shutter button halfway down (see Chapter 5).
- Drive button: The Drive mode settings enable you to switch the camera from single-frame shooting to continuous capture or any of the other drive modes, including remote shooting. See Chapter 2 for details.
- ISO button: True to its name, this button displays a screen where you can adjust the ISO setting, which determines how sensitive the camera is to light. Chapter 4 details this critical setting.
- Metering mode button: Press the button to change metering modes, which alter how the camera evaluates the light in a scene in order to determine the best exposure. Chapter 4 has more information on the different metering modes.
- LCD panel illumination button: This button illuminates the top LCD panel with an amber backlight.
- Shutter button: You no doubt already understand the function of this button, but you may not realize that when you use autofocus and autoexposure, you need to use a two-stage process when taking a picture: Press the shutter button halfway, pause to let the camera set focus and exposure, and then press down the rest of the way to capture the image. You’d be surprised how many people mess up their pictures because they press that button with one quick jab, denying the camera the time it needs to set focus and exposure.
 AF area/AF method button: This button enables you to control how the camera selects autofocus points when using the viewfinder (called AF area) and in Live View (AF method).
- Main dial: As its name implies, this dial is central to many camera functions, from scrolling through menus to changing certain shooting and playback settings.
 Flash hot shoe: This is the connection for attaching an external flash and other accessories such as flash adapters, bubble levels, flash brackets, off-camera flash cords, the GP-E2 GPS Receiver, and the CPH-16 cup holder. Just kidding about the cup holder.
 Focal plane indicator: Should you need to know the exact distance between your subject and the camera, use the focal plane indicator. This mark indicates the plane at which light coming through the lens is focused onto the camera’s image sensor. Basing your measurement on this mark produces a more accurate camera-to-subject distance than using the end of the lens or some other point on the camera body as your reference point.
Back-of-the-body controls
Traveling over the top of the camera to its back, you encounter the smorgasbord of controls shown in Figure 1-7.
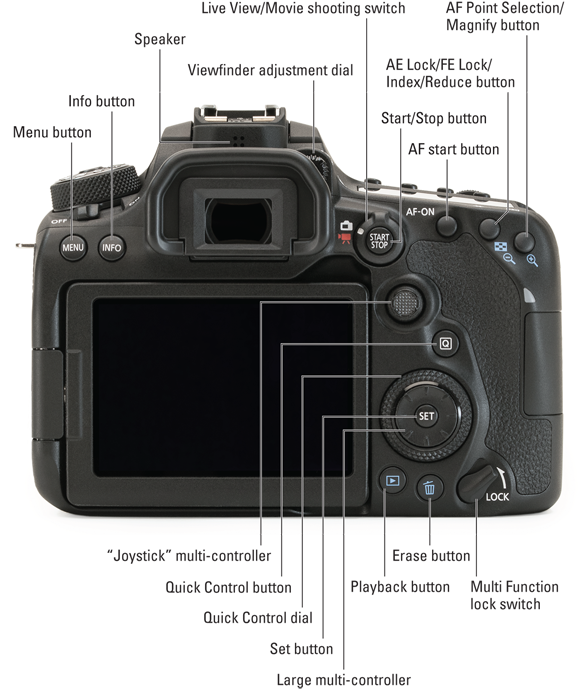
FIGURE 1-7: Having lots of external buttons makes accessing the camera’s functions easier.
Some buttons have multiple “official” names because they serve multiple purposes depending on whether you’re taking pictures, reviewing images, recording a movie, or performing some other function. This book refers to these buttons by the first label you see in the following list (and in Figure 1-7) to simplify things. Again, though, the margin icons show you exactly which button you should press.
Starting at the top-right corner of the camera back and working generally westward (well, assuming that your lens is pointing north, anyway), here’s an introduction to the buttons and other controls on this side of the camera:
 AF Point Selection/Magnify button: In certain shooting modes, you press this button to specify which autofocus points or zones you want the camera to use when establishing focus. You can also use it in Live View or Movie mode to magnify the display to check focus (see Chapter 5). In Playback mode (see Chapter 9), you use this button to magnify the image display (thus, the plus sign in the button’s magnifying glass icon).
 AE Lock/FE Lock/Index/Reduce button: During shooting, press this button to lock autoexposure (AE) settings (see Chapter 4) and to lock flash exposure (FE), a feature detailed in Chapter 2.
This button also serves two image-viewing functions: It switches the display to Index mode, enabling you to see multiple image thumbnails at once. And if you magnify a photo, pressing the button reduces the magnification level.
- AF-ON button: Just like pressing the shutter button halfway, pressing this button initiates autofocus. See Chapter 5 for more information on focusing.
Live View/Movie Shooting switch and Start/Stop button: The Live View/Movie switch changes the behavior of the center Start/Stop button. If the switch points to the camera icon (think still photography), the camera will enter Live View mode when you press the Start/Stop button. Live View enables you to compose your pictures using the monitor instead of the viewfinder. Press the button again to return to viewfinder shooting.
Set the switch to the red movie icon to shoot movies. Press the Start/Stop button to start and stop recording.
- Memory card access light: This light glows while the camera is recording data to the memory card. Don’t power off the camera while the light is lit, or you may damage the card or camera.
Joystick multi-controller: This gizmo consists of an 8-direction key and center button. It works like the larger multi-controller and Set button a bit further down on the back of the camera, except that it’s smaller and the center button is integrated into the controller. To use the Joystick, take your right thumb and gently press it in the direction you want to navigate. Press the center to activate the button. In almost all cases, the Joystick mirrors the functionality of the larger multi-controller.
In this book, we refer to the small multi-controller as the Joystick when we need to identify it specifically. The camera manual identifies it as Multi-controller 1. Graphically, Canon identifies the joystick in the manual and on camera screens as an 8-pointed star with a center button. The larger multi-controller with the Set button in the center is officially called Multi-controller 2, and its icon looks like an 8-pointed star without a center button. Q (Quick Control) button: Press this button to shift to Quick Control mode, which enables you to adjust major shooting settings quickly. See “Using Quick Control Mode,” later in this chapter, for help.
Set button and Multi-controller: The Set button and the surrounding eight-way directional key, which we call the Multi-controller, or large multicontroller in this book, team up to perform several functions, including choosing options from the camera menus. You use the Multi-controller to navigate through menus and then press the Set button to select a specific menu setting. You work the Multi-controller by pressing one of the eight directional marks pointing outwards around its perimeter.
Canon refers to this multi-controller as Multi-controller 2. In this book, the instruction “Press right/left on the Multi-controller” means to press the left or right sides of the large multi-controller.- Quick Control dial: The Quick Control dial surrounds the Set button and Large Multi-controller. Rotating the dial offers a handy way to quickly scroll through options and settings. It’s a timesaver, so we point out when to use it as we provide instructions throughout the book.
 Playback button: Press this button to switch the camera into picture and movie-review mode.
 Erase button: Sporting a trash can icon, the universal symbol for delete, this button lets you erase pictures from your memory card during playback. Chapter 9 has specifics.
- Multi Function Lock switch: You can rotate this switch up, in the direction of the arrow, to lock the Quick Control dial so that you don’t accidentally move the dial and change a camera setting that you aren’t intending to modify. If you want an even larger safety net, you can set things up so that the switch also locks the Main dial and the touch screen (when shooting). The section “Setup Menu 4,” toward the end of this chapter, has details.
- Speaker: When you play a movie that contains audio, or are monitoring audio when recording video, the sound comes wafting through these little holes.
Info button: In Live View, Movie, and Playback modes, pressing this button changes the picture-display style.
During viewfinder photography, you can press the Info button to toggle the display off or cycle between the Quick Control screen and electronic level. (These displays are explained later in this chapter.)
- Menu button: Press this button to display camera menus; press a second time to exit the menus. See the upcoming section “Ordering from Camera Menus” for help navigating menus.
And the rest …
The remaining external features of note are shown in Figure 1-8 and described in the following list.
Wireless remote-control sensor: This sensor can pick up the signal from the optional Canon wireless remote-control unit. The part number is Canon RC-6, and sells for about $20.
You also have two other wireless remote-control options: If you have a smartphone or tablet that can run the Canon Connect app, you can use that device as a wireless remote. The appendix provides more information. Alternatively, you can buy the Canon Wireless Remote Control BR-E1 (about $50), which connects to your camera via Bluetooth, also detailed in the appendix. We bring them up now because unlike the RC-6 unit, these two tools don’t need to be aimed at the camera’s remote-control sensor to work.
- Lens-release button: Press this button to disengage the lens from the lens mount so that you can remove it from the camera. While pressing the button, rotate the lens toward the shutter-button side of the camera to dismount the lens.
- Flash button: Press this button to raise the built-in flash.
- Microphones: You can record movie audio via the built-in microphones, which picks up sound from the two clusters of holes, one of which is labeled in Figure 1-8.
- Depth-of-Field Preview button: When you press this button (hidden by the lens because it is on the other side of the lens mount in this figure), the image in the viewfinder (or, in Live View mode, on the monitor) offers an approximation of the depth of field that will result from your selected aperture setting, or f-stop. Depth of field refers to the distance over which the scene appears to be in focus. Chapter 5 provides details.
Connection ports: Hidden under three covers on the left side of the camera, you find inputs for connecting the camera to various devices. Open the smaller cover to access the connections for a wired remote control. The door above that contains ports for connecting an external microphone and headphones. Under the largest door, you find a digital terminal for connecting the camera to your computer via USB and an HDMI out port that sends the signal from your camera to an HDMI TV. To use either digital feature, you need to purchase a cable to make the connection. For USB downloading, check the Canon website for the cables that will do the trick. For HDMI output, you can use any HD cable that has a Type-C connection on one end (the end that goes into the camera).

FIGURE 1-8: Other important controls reside on the front and left side of the camera.
See Chapter 8 for help with displaying images on an HD television; Chapter 9 explains how to connect the camera via USB in order to download pictures to your computer. (Spoiler alert: Downloading via USB is probably not your cheapest or easiest option; instead, consider using a memory-card reader or taking advantage of wireless transfer.)
If you turn the camera over, you find a tripod socket, which enables you to mount the camera on a tripod that uses a ¼-inch screw, plus the chamber that holds the battery, as well as a connection port for attaching a Canon power adapter. See the camera manual for specifics on running the camera on AC power.
Ordering from Camera Menus
Although you can adjust some settings by using external controls, you access the majority of options via camera menus. The next section provides the basics you need to know to navigate menus and select menu options. Following that, you can find out how to deal with a special category of menu screens, the Custom Functions.
Mastering menu basics
Here’s how to display menus and adjust the options on those menus:
- Opening and closing menus: Press the Menu button to display the menus; press again to exit the menu system and return to shooting. You also can just press the shutter button halfway and release it to exit the menu and switch to shooting mode.
Understanding menu screens: Which menus and menu screens appear depends on the exposure mode, which you set by rotating the Mode dial on top of the camera. Things also change when you switch from viewfinder photography to Live View (press the Start/Stop button with the Live View/Movie shooting switch set to Live View), and from still photography to Movie mode, which you accomplish by rotating the Live View/Movie Shooting switch to the movie-camera symbol. Figure 1-9 shows a menu screen as it appears for normal photography in the advanced exposure modes (P, Tv, Av, M, B, C1, and C2).
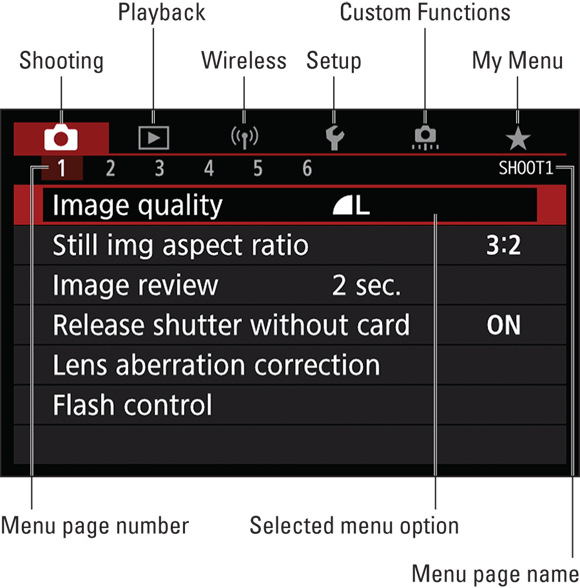
FIGURE 1-9: You can access all menus only when the Mode dial is set to P, Tv, Av, M. B. C1, or C2.
However, the following menu elements are common to all exposure modes:
- Menu icons: Along the top of the screen, you see icons representing individual menus. In the advanced exposure modes, you get the six menus labeled in Figure 1-9: Shooting, Playback, Wireless, Setup, Custom Functions, and My Menu. The Custom Functions menu and the My Menu feature, which enables you to build a custom menu, aren’t available in other exposure modes.
- Menu page numbers: Some menus are multi-page (sometimes called tabs) affairs. The numbers under the menu icons represent the various pages of the current menu.
This book takes the same approach to page references as the Canon instruction manual: Shooting Menu 1 refers to page one of the Shooting menu, Shooting Menu 2 to page 2, and so on. How many pages appear for each menu depends, again, on the exposure mode and whether the camera is set to still photography viewfinder, Live View, or Movie mode.
The highlighted menu icon marks the active menu; options on that menu appear automatically on the main part of the screen. In Figure 1-9, Shooting Menu 1 is active, for example.
Selecting a menu or menu page: You have these options:
- Touch screen: Tap the menu icon to select that menu; tap a page number to display that page.
- Multi-controller or Main dial: Press right or left on the Multi-controller or Joystick, or rotate the Main dial to scroll through the menu icons. If you use this technique, you have to scroll through all pages of a menu to get to the neighboring menu.
- Q button: Press the Q button to cycle through menu icons. This is a fast techcnique if you want to quickly scroll through the main menus.
As you scroll through the menus, notice the color coding: Red for the Shooting menu, blue for the Playback menu, purple for the Wireless menu, mustard for the Setup menu, burnt orange for the Custom Functions menu, and green for My Menu.Select and adjust a menu setting: Again, you have a choice of techniques:
- Touch screen: Tap the menu item to display options for that setting. The current setting is highlighted; tap another setting to select it. On some screens, you see a Set icon; if it appears, tap that icon to lock in your selection and exit the settings screen.
- Quick Control dial, directional keys on the Joystick/Multi-controller, and Set/center Joystick button: Rotate the Quick Control dial or press the up or down on the Multi-contoller or Joystick to highlight the menu setting and then press the Set or center Joystick button to display the available options for that setting. In most cases, you then use the Quick Control dial to highlight the desired option and press Set or the center Joystick button again. If you prefer, use the left/right Multi-controller or Joystick keys to highlight your preferred setting before pressing the Set or center Joystick button.
You can mix and match techniques, by the way: For example, even if you access a menu option via the Joystick, you can use the touch-screen techniques to select a setting.
Instructions from this point forward assume that you don’t need to be told the specifics of how to select menus and menu options at every turn. So instead of stepping you through each button press or touch-screen tap required to adjust a setting, instructions simply say something like “Choose Image Quality from Shooting Menu 1.” If choosing a menu option involves any special steps, however, instructions offer guidance.
Navigating Custom Functions
Custom Functions are a group of advanced settings available only in the P, Tv, Av, M, B, C1, or C2 exposure modes. (Remember: You set the exposure mode via the Mode dial on top of the camera.)
To explore Custom Functions, navigate to the Custom Functions menu and select a Custom Function category, as shown on the left in Figure 1-10. Press Set or the center Joystick button to display specific Custom Functions, as shown on the right in the figure. Here’s a guide to using the Custom Function screens, which work a little differently from other menu screens:

FIGURE 1-10: Navigate to the Custom Functions menu to access additional customization options.
- Interpreting the screens: The Custom Functions screens are a little intimidating until you know what’s what:
- Custom Functions are grouped into three categories: Exposure, Autofocus, and Operation/Others. The category number and name appear in the upper-left corner of the screen. In Figure 1-10, for example, the label indicates that you’re looking at a screen from the Autofocus category. (C.Fn II refers to Custom Functions group two.)
- The number of the selected function appears in the upper-right corner. Custom Function II: 15 is shown in Figure 1-10.
- Settings for the current function appear in the middle of the screen. Blue text indicates the current setting. The default setting is represented by the number 0. So in Figure 1-10, Auto is selected and is the default setting.
Numbers at the bottom of the screen show you the current setting for all Custom Functions in the current category. The top row of numbers represents the Custom Functions, with the currently selected function indicated with a tiny red horizontal bar over the number (15, in the figure). The lower row shows the number of the current setting for each Custom Function; again, 0 represents the default.
Dashes, shown for example under Custom Function II-1, reflect settings that aren’t organized into lists. This is Canon’s way of letting you know that this menu option controls more than one camera setting (thus, there isn’t one single default setting). If you change those settings, a blue dot replaces the dash.
- Scrolling from one Custom Function to the next: Use the Quick Control dial or press the left or right arrows using the Joystick or Multi-controller or tap the left or right scroll arrows at the top of the screen. You can see the arrows in the right screen in Figure 1-10.
Changing the setting: You first must activate the menu by pressing the Set or center Joystick button or tapping one of the available setting options. The screen then changes to look similar to the one shown on the left in Figure 1-11, with the currently selected option highlighted. To select a different option, highlight it by tapping it or pressing up or down using the Joystick or Multi-controller. You can also rotate through options using the Quick Control dial.
To lock in your setting and deactivate the settings screen, tap the Set icon or press the Set or center Joystick button. The screen returns to its inactive state, as shown on the right in Figure 1-11, with the setting you selected appearing in blue and the row of digits at the bottom of the screen reflecting the number for that setting. Again, a blue number at the bottom indicates that you chose a setting other than the default.
- Exiting the Custom Functions submenu: Tap the Menu icon in the lower-right corner of the screen or press the Menu button. Press Menu again to exit the menu system entirely and return to shooting.

FIGURE 1-11: After you select a setting (left), the menu screen updates to reflect your choice (right).
Customizing the Touch Screen
Your camera’s touch screen works much like the ones found on smartphones and other touch-based devices. When the touch screen is enabled, as it is by default, you can simply touch the monitor to choose menu commands, change picture settings, scroll through your pictures, and more.
How you touch the screen depends on the task at hand. Here’s a rundown of the names assigned to various touch-screen moves, or gestures:
- Tap: Tap a finger on the monitor. (Figures and instructions throughout the book indicate exactly where to tap.)
- Drag: Using light pressure, drag your finger across the screen. On some menu screens, for example, you can drag up or down to scroll through a list of options.
- Swipe: Drag one or two fingers quickly across the screen. You use this gesture, known in some circles as a flick, to scroll through your pictures in Playback mode, just as you do when showing off your photos on a smartphone.
- Pinch in/pinch out: To pinch in, place your thumb at one edge of the screen and your pointer finger at the other. Then drag both toward the center of the screen. To pinch out, start in the center of the screen and swipe both fingers outward. Pinching is how you zoom in and out on pictures during playback.
You can customize two aspects of touch-screen behavior:
- Adjust (or disable) the touch-screen response: You can choose from three settings, accessed via the Touch Control option, found on Setup Menu 3 and shown in Figure 1-12. Standard is the default, setting the screen to respond to a “normal” amount of pressure. Don’t ask how the Powers That Be decided what that pressure level is — just know that if your normal pressure doesn’t evoke a response, you can change the setting from Standard to Sensitive. Choose Disable to make the touch screen totally inactive.
- Silence the touch screen: By default, the touch screen emits a tiny “beep” with every tap. If you find that annoying, choose the Beep option, found just beneath the Touch Control option on Setup Menu 3. The option that keeps the beep silent is Touch to Silence — silence indicated by a little speaker with a slash through it. The Disable setting turns off both touch-screen sounds and the beep the camera emits when focus is achieved.
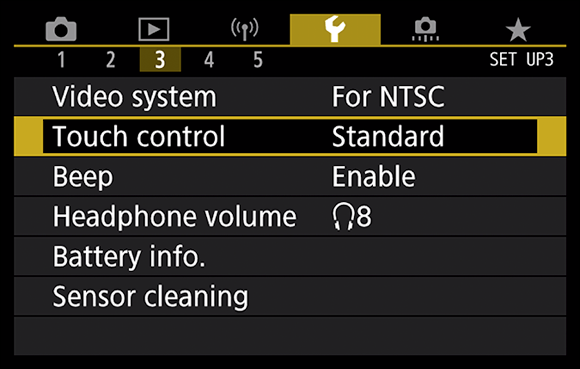
FIGURE 1-12: Control the touch-screen response through this menu item.
Viewing Shooting Settings
Your camera offers several displays that present the current picture-taking settings. The next sections explain the displays that are available during viewfinder photography. See the later section “Switching to Live View Mode” for information about displaying similar data when you use Live View, the feature that enables you to compose photos on the monitor instead of through the viewfinder.
For still photography, you can use either the viewfinder or the Live View screen to compose your shots. But when you set the camera to Movie mode, you’re limited to Live View.
Displaying the Quick Control screen
Shown in Figure 1-13, the Quick Control screen appears on the monitor when the camera is in shooting mode — that is, when you’re not viewing menus, checking out your pictures in Playback mode, and so on. The screen displays different data depending on your exposure mode and whether features such as flash are enabled. The left side of Figure 1-13 shows the screen as it appears in Scene Intelligent Auto exposure mode; the right side, Tv mode (shutter-priority auto-exposure).

FIGURE 1-13: The data displayed on the Quick Control screen depends on your exposure mode.
Here are the keys to taking advantage of this screen:
Display and hide the Quick Control screen. By default, the screen appears automatically when you turn on the camera and then turns off if no camera operations are performed for 30 seconds. You can turn the display on again by pressing the shutter button halfway and then releasing it. To turn off the display before the automatic shutoff occurs, press the Info button (on the back of the camera, just below the power switch). Press the Info button twice to cycle back to the Quick Control screen.
You can adjust the timing of the automatic shutdown of this screen and others via the Auto Power Off option on Setup Menu 2. We provide the details near the end of this chapter, in the section devoted to that menu.- Keep an eye on the battery symbol and the shots remaining value. A full battery like the one in the figure means that the battery is charged; as it runs out of power, bars disappear from the symbol. The shots remaining value indicates how many more pictures will fit in the free space available on your memory card. This value depends in large part on the Image Quality setting, which determines the resolution (pixel count) and file type (Raw or JPEG). If those terms are new to you, the next chapter explains them.
- You can replace the Quick Control screen with an electronic level by pressing the Info button. This feature is useful when you use a tripod and want to ensure that the camera is level to the horizon. When the horizontal line appears green, as shown in Figure 1-14, you’re good to go. Press Info again to return to the Quick Control screen. You can enable or disable the level and Quick Control screen from Setup Menu 4, as described in the Setup Menu 4 section later in this chapter.
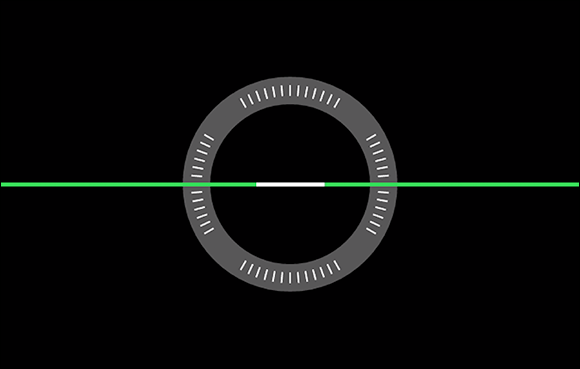
FIGURE 1-14: Press the Info button to toggle between the Quick Control display and an electronic level.
Decoding viewfinder data
A limited assortment of shooting data, such as the shutter speed and f-stop, appears at the bottom of the viewfinder, as shown in Figure 1-15. In the framing area of the viewfinder, you may see marks that indicate the portion of the screen that contains autofocusing points. (The appearance of the autofocus markings depend on your autofocus settings, which you can explore in Chapter 5.) In the first screen in the figure, the four black brackets represent the autofocusing area.

FIGURE 1-15: The default viewfinder display (left) can be customized to include a grid, electronic level, and flicker warning (right).
In the following sections, we walk you through how to display and customize the viewfinder.
Displaying viewfinder data
The markings in the framing area of the viewfinder appear automatically when you first turn on the camera; to display the shooting data, you must press the shutter button halfway. The display remains active for a few seconds after you release the button, and then the viewfinder display data shuts off to save battery power. To wake up the display, press the shutter button halfway and release it.
Adding a level and gridlines to the display
You can display gridlines in the viewfinder, as shown on the right in Figure 1-5, as well as a symbol that represents the electronic level. (When the lines at the sides of the symbol are horizontal, as in the figure, the camera is level.)
To hide or display these features, open Setup Menu 4 and choose Viewfinder Display. On the next screen, change the settings from Hide to Show. As you select each option, a preview appears at the bottom of the screen to remind you how enabling the feature affects the display.
Displaying a flicker-detection warning
When the Mode dial is set to an advanced exposure mode (P, Tv, Av, M, B, C1, or C2), the Viewfinder Display option offers a third setting, Flicker Detection. When the camera detects light sources that are blinking, which can mess up exposure and color, the word Flicker! appears in the area labeled in Figure 1-17. The biggest offenders are tubular fluorescent bulbs, which blink on and off so quickly that it’s difficult for the human eye to detect them. When you see this warning, you may want to enable the Anti-flicker Shoot option on Shooting Menu 5. This feature, covered in Chapter 4, also is available only in the advanced exposure modes.
Noting the bottom right number
The number shown at the bottom of the viewfinder — 39, in Figure 1-15 — represents the number of maximum number of burst frames. This number relates to shooting in the Continuous shooting mode, where the camera fires off multiple shots in rapid succession as long as you hold down the shutter button. (Chapter 2 has details.) Although the highest number that the viewfinder can display is 99, the actual number of maximum burst frames may be higher. At any rate, you don’t really need to pay attention to the number until it starts dropping toward 0, which indicates that the camera’s memory buffer (its temporary internal data-storage tank) is filling up. If that happens, just give the camera a moment to catch up with your shutter-button finger.
The maximum burst value also makes an appearance in the Quick Control screen when the camera is set to an advanced exposure mode (P, Tv, Av, M, B, C1, or C2) after you press the Shutter button halfway down. It is displayed directly to the left of the shots-remaining value. The good news is that you rarely need to even worry about this number; we just bring it up so you don’t scratch your head wondering what that value means when you see it on either display.
Reading the LCD panel
Another way to keep track of shooting information is through the LCD panel on top of the camera, shown in Figure 1-16. Don’t see any data in the panel? The camera is probably in sleep mode; give the shutter button a half-press to wake it up.
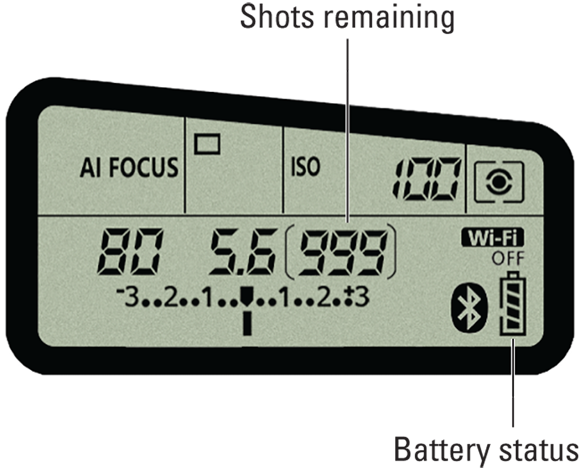
FIGURE 1-16: The top LCD panel is another useful situational awareness tool.
As with the viewfinder and Quick Control screen, the panel shows you the shots remaining value and battery status, as labeled in Figure 1-16.
In dim lighting, you can press the little light bulb button above the right corner of the display to illuminate the panel with an amber light.
Switching to Live View Mode
Your camera offers an alternative way of setting up shots called Live View, which disables the viewfinder and instead displays a live preview of your subject on the camera monitor. The following list explains the basics of using Live View:
Switching to Live View for photography: Set the Live View/Movie shooting switch, labeled in Figure 1-17, to the camera icon. Next, press the Start/Stop button to shift from viewfinder shooting to Live View mode. You hear a clicking noise and then the viewfinder goes dark and the monitor displays the live scene. By default, some shooting data appears as well, with the amount and type of information varying depending on your exposure mode and a few other settings. The figure shows the display as it appears in the Scene Intelligent Auto exposure mode when the default picture-taking settings are used for that mode.

FIGURE 1-17: In Live View mode, a live preview of your subject appears on the monitor, and the viewfinder is disabled.
If nothing happens after you press the Start/Stop button a few times, you may need to reset the Live View Shoot menu option to Enable. This is the default setting, but it’s possible you or another user changed the setting to Disable at some point. Where you find the Live View Shoot option depends on your exposure mode; in the basic exposure modes, the option lives on Shooting Menu 2, as shown on the left in Figure 1-18. In the advanced modes (P, Tv, Av, M, B, C1, and C2), go to Shooting Menu 4, as shown on the right.Why would Canon give you the option to disable Live View functionality? Because it’s possible to accidentally press the Live View button and switch to that mode when you don’t really want to go there.
Engaging Live View for movie recording: For movie recording, simply moving the Live View/Movie shooting switch to the Movie mode setting, represented by the red movie-camera symbol, engages Live View. You can’t use the viewfinder in Movie mode, so you can’t disable Live View shooting from the menu.
In Movie mode, pressing the Start/Stop button starts and stops recording. To exit Movie mode, move the Live View/Movie shooting switch to the camera icon.
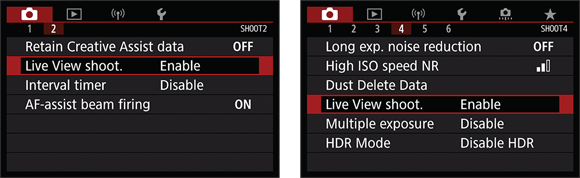
FIGURE 1-18: To use Live View, make sure this menu option is set to Enable.
In many ways, shooting photos in Live View mode is the same as for viewfinder photography, but some important aspects, such as autofocusing, work very differently. Chapter 3 shows you how to take a picture in Scene Intelligent Auto exposure mode using Live View; Chapter 8 covers movie recording. Other chapters mention Live View variations related to specific picture-taking options.
Customizing the Live View display
By default, the Live View display offers the data shown on the left in Figure 1-19 when you’re taking photographs in an advanced exposure mode (P, Tv, Av, M, B, C1, or C2); in Movie mode, the default display appears as shown on the right. Black bars appear at the top and bottom of the movie display to indicate the boundaries of the 16:9 movie frame. As is the case with other information displays, the type and amount of data that appears depends on your exposure mode and whether the camera is set to take still photos or shoot movies.

FIGURE 1-19: Here’s a look at the default Live View display for photography (left) and movie recording (right).
You also can vary the amount of data that appears in either display by pressing the Info button. Figure 1-20 shows the four alternative displays available for photography. In Movie mode, the Histogram display isn’t available.

FIGURE 1-20: Press the Info button to change the type of data that appears during Live View shooting.
Additionally, you can add one of three grids to your screen, which can be helpful when checking alignment of objects in the frame. To enable or hide the grid, turn on Live View or enter Movie mode and then navigate to Setup Menu 4. Select the Shooting Info Display option and press Set or the center Joystick button to show the Grid Display option, featured on the left in Figure 1-21.
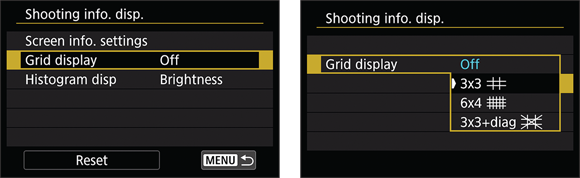
FIGURE 1-21: Through this option, you can add one of three alignment grids to the screen.
Although the various symbols and numbers on the displays won’t make much sense until you explore the rest of the book, here are a few details that may give you a basic understanding of some of the common symbols:
- The white box or corner markings represent the autofocusing frame. The appearance of the frame depends on the AF Method, which Chapter 5 explains.
- Check the areas labeled in Figure 1-19 to view the battery status. The symbol shown in the figure represents a full battery.
- The number of shots remaining or the available movie recording time appears next to the battery symbol. Again, Figure 1-19 shows you where to look.
- You can’t display the Electronic Level when the camera is set to the default AF Method setting (Face + Tracking). To display the level, you must switch to Spot AF, 1-Point AF, or Zone AF. (You can do so via the Quick Control screen, as outlined a little later in this chapter.)
- The chart that appears in the histogram display (bottom-right screen in Figure 1-20) is a tool you can use to gauge exposure. See the discussion on interpreting a Brightness histogram in Chapter 9 to find out how to make sense of what you see. But note that when you use flash, the histogram is dimmed. The histogram can’t display accurate information because the final exposure will include light from the flash and not just the ambient lighting. In addition, the histogram dims when you use B (Bulb) exposure mode, which keeps the shutter open for as long as you hold down the shutter button. The camera can’t predict how long you’re going to hold that button down, so it can’t create a histogram that will reflect your final exposure.
- Also note the Exposure Simulation symbol that appears in the bottom two screens shown in Figure 1-20. (Look in the lower-right corner of the frame next to the magnifying glass.) This symbol indicates whether the monitor is simulating the actual exposure that you’ll record. If the symbol blinks or is dimmed, the camera can’t provide an accurate exposure preview, which can occur if the ambient light is either very bright or very dim. Exposure Simulation is also disabled when you use flash.
Staying safe with Live View
Take the following precautions when you use Live View and Movie modes:
- Cover the viewfinder to prevent light from seeping into the camera and affecting exposure. The camera ships with a cover designed just for this purpose. In fact, it’s conveniently attached to the camera strap. To install it, first remove the rubber eyecup that surrounds the viewfinder by sliding it up and out of the groove that holds it in place. Then slide the cover down into the groove and over the viewfinder (Orient the cover so that the Canon label faces the viewfinder).
- Using Live View or Movie mode for an extended period can harm your pictures and the camera. Using the monitor full-time causes the camera’s innards to heat up more than usual, and that extra heat can create the right conditions for noise, a defect that looks like speckles of sand. More critically, the increased temperatures can damage the camera.
- A thermometer symbol appears on the monitor to warn you when the camera is getting too hot. Initially, the symbol is white. If you continue shooting and the temperature continues to increase, the symbol turns red and blinks, alerting you that the camera soon will shut off automatically.
- Aiming the lens at the sun or other bright lights also can damage the camera. Of course, you can cause problems doing this even during normal shooting, but the possibilities increase when you use Live View and Movie modes.
- Live View and Movie modes put additional strain on the camera battery. The extra juice is needed to power the monitor for extended periods of time. If you do a lot of Live View or movie shooting, you may want to invest in a second battery so that you have a spare on hand when the first one runs out of gas.
Using Quick Control Mode
Earlier in this chapter, the section “Viewing Shooting Settings” introduces the Quick Control screen, which displays current picture settings when you use the viewfinder to compose pictures. Because digital photography isn’t confusing enough, the 90D also offers Quick Control mode, which enables you to change certain settings without using the function buttons (the ISO button, Drive button, and so on) or menus.
Although the name implies that Quick Control mode is specific to the Quick Control screen, you can take advantage of this feature for Live View still photography and movie recording as well. There is one exception: Quick Control mode is not available when the camera is set to Scene Intelligent Auto exposure mode and you activate Live View (see Figure 1-17). There are so few settings you merely have to tap the sceen to access them. Here’s how Quick Control mode works in all the other exposure modes:
Display the Quick Control or Live View screen.
If the monitor is asleep or the screen is showing menus or your existing photos, press the shutter button halfway and release it to redisplay the Quick Control or Live View screen. The left image in Figure 1-22 shows the default photography screen as it appears in the Scene Intelligent Auto exposure mode. The right image shows what the camera looks like in an advanced exposure mode using Live View.
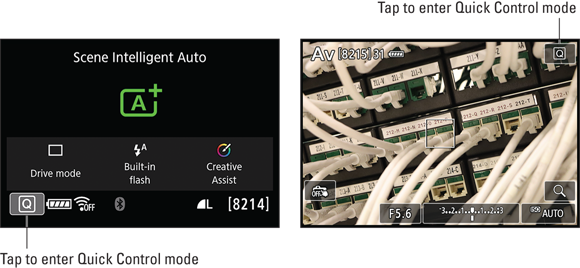
FIGURE 1-22: To activate Quick Control mode, tap the Q symbol or press the Q button.
- Press the Q button or tap the Q icon to enter Quick Control mode.
If you’re using the viewfinder to take pictures, the display changes to look similar to the one shown on the left in Figure 1-23. In Live View mode, the display appears as shown on the left in Figure 1-24.
Select the setting you want to adjust.
The currently selected setting is highlighted; in the figures, the Drive mode is active, for example. To choose a different setting, tap it or press left/right using a multi-controller to highlight it.
On the Quick Control screen, the name of the currently selected option for the setting appears at the bottom of the screen, as shown on the left in Figure 1-23. In Live View mode (refer to Figure 1-24), the text banner initially shows the name of the setting you’re changing, with icons at the bottom of the screen representing the available options. The one surrounded by the orange box is the currently selected option.

FIGURE 1-23: After highlighting the setting you want to adjust, rotate the Quick Control dial or Main dial to cycle through the available options (left) or press the Set button (not the center Joystick button) to display all options on a single screen (right).
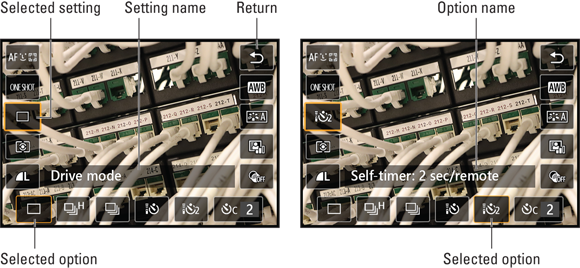
FIGURE 1-24: In Live View mode, tap or use the up/down Multi-controller keys to highlight the setting you want to adjust, and then tap, use the left/right keys, or rotate the Quick Control or Main dial to choose your desired option.
Rotate the Quick Control dial or Main dial to cycle through the available options for the setting.
As soon as you rotate the dial, the text label on the Quick Control screen updates to reflect the name of the setting. And on the Live View screen, the name of the setting you’re adjusting is replaced by the name of the selected option. In the right screen in Figure 1-24, for example, you can see how things look when you change the Drive mode from Single Frame to the Self-Timer: 2 second/remote option. (Chapter 2 explains these and other Drive mode options.)
During viewfinder photography, you can also tap the setting icon or press the Set or center Joystick button to display all the available options on a single screen, as shown on the right in Figure 1-23. Tap, use the left/right multi-controller keys, or rotate the Quick Control dial or Main dial to highlight the option you want to use, and then tap the exit arrow to exit the settings screen. (In Live View mode, tapping the icon on the sides of the screen simply selects the option represented by that symbol.)- Repeat Steps 3 and 4 as needed to adjust other settings.
To exit Quick Control mode, press the Q button.
In Live View mode, you also can tap the return arrow in the upper-right corner of the screen, as shown on the left in Figure 1-24. When using the viewfinder, you can tap the Q symbol that has the return arrow, as shown on the left in Figure 1-23.
A couple of final tips about taking advantage of Quick Control mode:
- For some settings, the Live View preview updates to show the result of your choice. If you adjust the White Balance setting, which affects how colors are rendered, you see colors shift in the preview, for example.
- After you choose some options, additional touch-control icons appear on the options screen. For example, you may see an icon bearing an Info label. By tapping that icon or pressing the Info button, you can access settings that enable you to modify the characteristics of the currently selected option. Instructions throughout the book alert you to these hidden settings.
As with instructions for choosing menu items, the rest of this book assumes that you’re now cool with the basics of using Quick Control mode. So, instead of repeating all the preceding steps for each feature that you can modify by using Quick Control mode, instructions merely say something like “Shift to Quick Control mode to adjust this setting.” Just for good measure, though, the Q button symbol appears in the margin of paragraphs that discuss using Quick Control mode.
Familiarizing Yourself with the Lens
If you’ve never used a dSLR before, you may be unfamiliar with how to operate the lens. The following basics are applicable to either the 18–55mm or 18–135mm (shown in Figure 1-25) kit lenses sold with the 90D, but they also apply to many other lenses that support autofocusing with the camera. (You should explore the lens manual for specifics, of course.)
Focusing
Set the lens to automatic or manual focusing by moving the focus-method switch on the lens, labeled in Figure 1-25. Move the switch to the AF position for autofocusing and to MF for manual focusing. Then proceed as follows:
- Autofocusing: Press and hold the shutter button halfway. In Live View mode, you also have the option of tapping the touch screen to focus.
- Manual focusing: After setting the focus method to MF, rotate the focusing ring on the lens barrel until your subject appears sharp in the viewfinder or on the Live View screen. The position of the focusing ring varies depending on the lens; again, Figure 1-25 shows the ring as it appears on the 18–135mm kit lens.
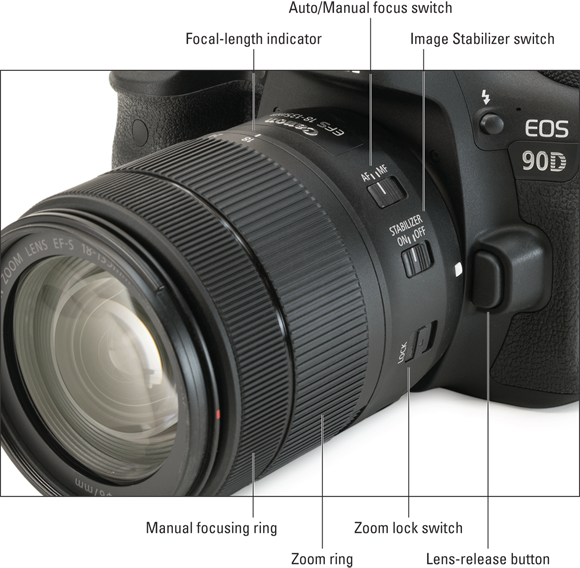
FIGURE 1-25: Here are a few features that may be found on your lens.
To save battery power, the focus motor in STM (stepping motor) lenses such as the 18–55mm kit lens automatically goes to sleep after a period of inactivity. This also applies to the larger 18–135mm USM (ultrasonic motor) kit lens. While the lens is napping, manual focusing isn’t possible (the focusing ring is free to turn, but the lens does not focus). The same is true if the camera itself goes into sleep mode, which is determined by the Auto Power Off feature on Setup Menu 2. Either way, wake up the camera and lens by pressing the shutter button halfway.
See Chapter 5 for more help with both automatic and manual focusing.
Zooming
If you bought a zoom lens, it has a movable zoom ring. The location of the zoom ring on the 18–135mm kit lens is shown in Figure 1-25. To zoom in or out, rotate the ring.
Zooming changes the lens focal length. (If you’re new to that term, the sidebar “Focal length and the crop factor” explains the subject.) On the kit lenses, you can determine the focal length of the lens by looking at the number aligned with the bar labeled focal length indicator in Figure 1-25.
Enabling Image Stabilization
Many Canon lenses, including either kit lens, offer this feature, which compensates for small amounts of camera shake that can occur when you handhold the camera. Camera movement during the exposure can produce blurry images, so turning on Image Stabilization can help you get sharper handheld shots.
However, when you use a tripod, Image Stabilization can have detrimental effects because the system may try to adjust for movement that isn’t actually occurring. Although this problem shouldn’t be an issue with most Canon IS lenses, if you do see blurry images while using a tripod, try turning the feature off. (You also save battery power by turning off Image Stabilization.) If you use a monopod, leave Image Stabilization turned on so it can help compensate for any accidental movement of the monopod.
On non-Canon lenses, Image Stabilization may go by another name: anti-shake, vibration compensation, and so on. In some cases, the manufacturers recommend that you leave the system turned on or select a special setting when you use a tripod, so check the lens manual for information.
Whatever lens you use, Image Stabilization isn’t meant to eliminate the blur that can occur when your subject moves during the exposure. That problem is related to shutter speed, a topic you can explore in Chapter 4.
Removing a lens
After turning the camera off, press and hold the lens-release button on the camera (refer to Figure 1-25), and turn the lens toward the shutter button side of the camera until the lens detaches from the lens mount. Put the rear protective cap onto the back of the lens and, if you aren’t putting another lens on the camera, cover the lens mount with its cap, too.
Always switch lenses in a clean environment to reduce the risk of getting dust, dirt, and other contaminants inside the camera or lens. Changing lenses on a sandy beach, for example, isn’t a good idea. For added safety, point the camera body slightly down when performing this maneuver; doing so helps prevent any flotsam in the air from being drawn into the camera by gravity.
Decoding Canon lens terminology
When you shop for Canon lenses, you encounter these lens specifications:
- EF and EF-S: EF stands for electro focus; the S stands for short back focus. And that simply means the rear element of the lens is closer to the sensor than with an EF lens. The good news is that your 90D works with both of these Canon lens types.
- IS: Indicates that the lens offers image stabilization.
- STM: Refers to stepping motor technology, an autofocusing system that’s designed to provide smoother, quieter autofocusing.
- USM: Refers to the ultrasonic motor. USM is an older technology than STM, but USM lenses still offers quick, professional-quality autofocusing.
The 18–55mm kit lens is an EF-S lens with both Image Stabilization and stepping motor technology. The 18–135mm kit lens is also an EF-S lens with Image Stabilization technology. Complete lens info can also be found on the ring surrounding the front element of the lens.
Working with Memory Cards
As the medium that stores your picture files, the memory card is a critical component of your camera. See the steps at the start of this chapter for help installing a card. Follow the tips in this section for buying and maintaining cards.
Buying SD cards
Again, you can use regular SD cards, which offer less than 4GB of storage space; SDHC cards (4GB–32GB); and SDXC cards (more than 32GB). Aside from card capacity, the other specification to note is card speed, which indicates how quickly data can be moved to and from the card.
Card speed is indicated in several ways. The most common spec is SD Speed Class, which rates cards with a number between 2 and 10, with 10 being the fastest. Most cards also carry another designation, UHS-I, -II, or -III; UHS (Ultra High Speed) refers to a new technology designed to boost data transmission speeds above the normal Speed Class 10 rate. The number 1, 2, or 3 inside a little U symbol tells you the UHS rating.
The 90D supports UHS-II cards, which are much faster than the I. You can opt for a UHS0I card, but you won’t get any extra speed benefits.
Some SD cards also are rated in terms of how they perform when used to record video — specifically, how many frames per second the card can handle. As with the other ratings, a higher video-speed number indicates a faster card.
Formatting a card
The first time you use a new memory card, format it by choosing the Format Card option on Setup Menu 1. This step ensures that the card is properly prepared to record your pictures. See the upcoming section “Setup Menu 1” for more information about card formatting.
Removing a card
First, check the status of the memory card access light, found just above the card door on the right side of the camera. After making sure that the light is off, indicating that the camera has finished recording your most recent photo, turn off the camera. Open the memory card door by gently pressing inwards on it and sliding it to the rear of the camera, depress the memory card slightly, and then lift your finger. The card should pop up a bit, enabling you to grab and remove it.
Handling cards
Don’t touch the gold contacts on the back of the card (see the right card in Figure 1-26). When cards aren’t in use, store them in the protective cases they came in or in a memory card wallet. Keep cards away from extreme heat and cold as well.
Locking cards
The tiny switch on the side of the card, labeled Lock switch in Figure 1-26, enables you to lock your card, which prevents any data from being erased or recorded to the card. If you insert a locked card into the camera, a message on the monitor alerts you to that fact.
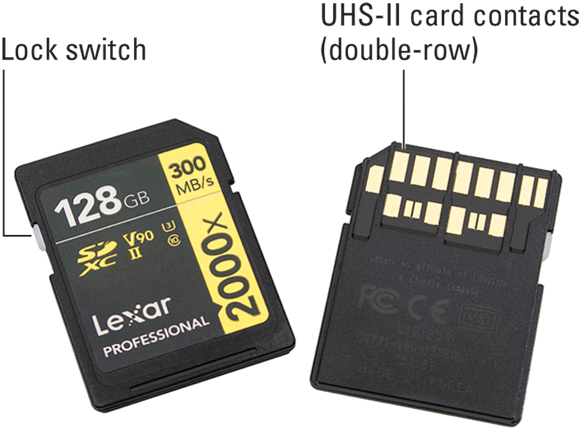
FIGURE 1-26: Avoid touching the gold contacts on the card.
You can safeguard individual images from accidental erasure by using the Protect Images option on the Playback menu; Chapter 9 tells you how. Note, though, that formatting the card does erase even protected pictures; the safety feature prevents erasure only when you use the camera’s Delete function.
Reviewing Basic Setup Options
Your camera offers scads of options for customizing its performance. Later chapters explain settings related to picture-taking, such as those that affect flash behavior and autofocusing. The rest of this chapter offers a quick rundown of options on the Setup menu, which are mainly (but not all) related to general camera operations. Some of these features deserve only a brief glance; others may require your attention on a regular basis.
Note that menu offerings change depending on your exposure mode — Scene Intelligent Auto, P, Special Scenes (SCN), and so on — and whether the camera is set to Movie mode, Live View mode, or viewfinder photography mode. For now, put the camera in still photo mode (set the Live View/Movie switch to the still camera icon) and exit Live View mode, if it’s active (press the Start/Stop button to turn Live View on and off). Then rotate the Mode dial on top of the camera to the P position, which selects the Programmed Autoexposure mode, one of seven advanced exposure modes. You can adjust all the camera’s options only in these advanced exposure modes.
Setup Menu 1
Display Setup Menu 1, shown in Figure 1-27, to access the following options:
- Select Folder: By default, your camera creates an initial filestorage folder named 100Canon and puts as many as 9,999 images in that folder. When you reach image 9999, the camera creates a new folder, named 101Canon, for your next 9,999 images. The camera also creates a new folder if you perform a manual filenumbering reset.
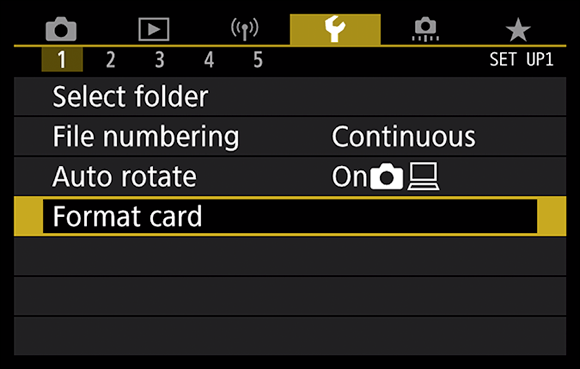
FIGURE 1-27: Setup Menu 1 contains the Format Card option with a handful of others.
Choose Select Folder to see the list of folders on your memory card. If the card contains multiple folders, the currently selected one is highlighted. The number to the right of the folder name shows you how many pictures are in the folder. You also see a thumbnail view of the first and last pictures in the folder, along with the file numbers of those two photos. To choose a different folder, tap it or use the up/down Quick Control keys or dial to select it and then press the Set button. You also can create a new folder by choosing the Create Folder setting; Chapter 11 provides details on this feature.
File Numbering: This option controls how the camera names your picture files. After selecting File Numbering from the menu, choose the Numbering option to select one of these choices:
Continuous: This is the default; the camera numbers your files sequentially, from 0001 to 9999, and places all images in the same folder (100Canon, by default) unless you specify otherwise using the Select Folder option. The numbering sequence is retained even if you change memory cards.
When you reach picture 9999, the camera automatically creates a new folder (101Canon, by default) and restarts the file numbering at 0001 — again, the folder issue being dependent on the status of the Select Folder option.
- Auto Reset: File numbering restarts at 0001 each time you put in a different memory card or create a new folder. It’s easy to wind up with multiple photos that have the same file number if you’re not careful about storing them in separate folders. So think twice — or maybe three times — about using this option.
You also find a separate option, Manual Reset. Select this setting to begin a new numbering sequence, starting at 0001. A new folder is automatically created to store your new files. The camera then returns to whichever Numbering mode is selected (Continuous or Auto Reset).Beware of one gotcha that applies to both the Continuous and Auto Reset options: If you swap memory cards and the new card already contains images, the camera may pick up numbering from the last image on the new card, which throws a monkey wrench into things. To avoid this problem, format the new card before putting it into the camera, as explained later in this list.
- Auto Rotate: This option determines whether vertically oriented pictures are rotated to appear upright during picture playback or when you view them in a photo editor. Stick with the default setting, shown in Figure 1-29 until you explore Chapter 9, which discusses this and other playback issues.
- Format Card: Choose this option to wipe the installed memory card clean of all contents and ensure that it’s properly prepared for use in the camera. For extra deep cleaning, select the Low-Level formatting box after you select the menu option. However, the standard formatting (Low-Level box unchecked) is usually adequate.
Setup Menu 2
Setup Menu 2, posing in Figure 1-28, contains these options:
Auto Power Off: To save battery power, the camera automatically goes to sleep after a certain period of inactivity. At the default setting, the camera nods off after only ten seconds unless the camera is in Playback mode, Live View mode, or Movie mode, in which case it waits until 30 seconds have passed.
You can adjust this timing so that 30 seconds is the minimum delay time (the 10-second variation is disabled at the 30-second setting). Or you can extend the delay up to as long as 15 minutes. To disable auto shutdown altogether, select Off — but be aware that even at that setting, the monitor still turns off if you ignore the camera for 30 minutes.
Regardless of the shutoff time you select, you can bring the camera out of hibernation mode by giving the shutter button a quick half-press and release or pressing the Menu, Info, Playback, or Live View button.

FIGURE 1-28: Through the first option on this menu, you can adjust the delay time of the camera’s automatic shutdown feature.
- Display Brightness: This option enables you to make the camera monitor brighter or darker. But if you take this step, what you see on the display may not be an accurate rendition of exposure. The default setting is 4, which is the position at the midpoint of the brightness scale.
- Screen Off/On button: This option controls whether the back camera screen turns off when you press the Shutter button halfway during viewfinder shooting. The default behavior is for it to replain on, but you can select Shutter button to turn the screen off when you press the Shutter button halfway. The sceen turns back on when you release the button.
- Date/Time/Zone: If you didn’t do so when following the initial camera setup steps at the start of this chapter, enter the time, date, and time zone now. Keeping the date/time accurate is important because that information is recorded as part of the image file. In your photo browser, you can then see when you shot an image and, equally handy, search for images by the date they were taken. Chapter 9 shows you where to locate the date/time data when browsing your picture files.
When the Time Zone setting is active, the Time Difference value that’s displayed is the difference between the time zone you select and Coordinated Universal Time, or UTC, which is the standard by which the world sets its clocks. For example, New York City is five hours behind UTC. This information is provided so that if your time zone isn’t in the list of available options, you can select one that shares the same relationship to the UTC.
- Language: This option determines the language of any text displayed on the camera monitor.
Setup Menu 3
Setup Menu 3, shown in Figure 1-29, contains the following offerings:
- Video System: This option relates to viewing your images and movies on a television. Select NTSC if you live in North America or other countries that adhere to the NTSC video standard; select PAL for playback in areas that follow that code of video conduct. Your selection also determines what frame rate settings you can select when recording movies (refer to Chapter 8).
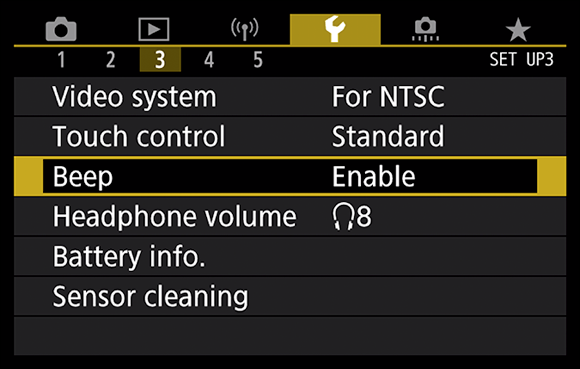
FIGURE 1-29: Still more customization features await on Setup Menu 3.
- Touch Control: Choose this setting to adjust the sensitivity of the touch screen or disable the touch screen altogether. (Julie often does this when wearing her camera on a neck strap so that she can’t accidentally adjust a touch-screen-enabled setting if the monitor bumps against her chest as she walks.) See the earlier section “Customizing the Touch Screen” for more information.
- Beep: Choose Enable if you want the camera to emit an audio cue when you select an option by tapping the touch screen and when the autofocusing system has found its focus point. The second option, Touch, disables touch-screen sounds only; choose Disable to turn off both sound effects.
- Headphone volume: Raise or lower the headphone volume here. Ours goes to 15.
Battery Info: Select this option to see battery information, such as the type of battery in the camera, how much battery juice is left, and the battery’s recharge performance. For this last feature, three green bars means that the battery is working fine; two bars means that recharging is slightly below par; and one red bar means that you should invest in a new battery as soon as possible.
You can register up to six batteries from this menu option. The camera will be able to identify them uniquely. It will help you track them if you label each battery with the serial number provided on the screen.
- Sensor Cleaning: Choose this option to access features related to the camera’s internal sensor-cleaning mechanism. These work like so:
- Auto Cleaning: By default, the camera’s sensor-cleaning mechanism activates each time you turn the camera on and off. This process helps keep the image sensor — which is the part of the camera that captures the image — free of dust and other particles that can mar your photos. You can disable this option, but it’s hard to imagine why you would choose to do so.
- Clean Now: Select this option and press Set to initiate a cleaning cycle. For best results, set the camera on a flat surface during cleaning.
- Clean Manually: In the advanced exposure modes, you can access this third option, which prepares the camera for manual cleaning of the sensor. Because you can easily damage the image sensor, rendering your camera a paperweight, use extreme caution if you decide to try cleaning the sensor yourself. You’re really better off taking the camera to a good service center for cleaning.
Setup Menu 4
Figure 1-30 shows Setup Menu 4.
- Mode guide: Enable or disable helpful guides that describe each mode you select from the Mode dial.
- Feature guide: Enables or disables help text that appears on the monitor and describes certain functions and settings.

FIGURE 1-30: Don’t forget about the Shooting Info Display option on Setup Menu 4.
- Help text size: Increase or decrease the size of the help text shown.
- Viewfinder Display: Customize the viewfinder to display a grid, a level, and a flicker detection warning. Please refer to the “Decoding viewfinder data” section earlier in this chapter for more details on these options.
- Info Button Display Options: This setting enables you to determine which information appears when you press the Info button during shooting. Your two options are the Electronic Level and Quick Control screen.
- HDMI resolution: Sets the camera HDMI output resolution to 1080p or lets the camera automatically match the best resolution of the exernal device it is connected to. Auto is the default setting.
- HDMI HDR Output: Enables you to view images in HDR if you are connected to an HDR TV (sold separately).
Setup Menu 5
Figure 1-31 shows Setup Menu 5.
Multi Function Lock: Control the behavior of the Multi Function Lock from this menu option. This setting (shown in Figure 1-32) is critical because it determines the results of moving the Lock switch on the back of the camera to the locked position.
By default, the switch only affects the Quick Control dial, which has a check above it in Figure 1-32. When the dial is unlocked, rotating it while using the M or B exposure modes changes the aperture setting (f-stop), and spinning it while using the Av, Tv, or P mode changes the amount of Exposure Compensation after you meter the scene. (We explain these exposure controls in Chapter 4.) If you set the switch to the locked position, rotating it has no effect on those settings; a Lock alert appears in the Shooting Settings display, and an L appears in the viewfinder and LCD panel to remind you that the dial is locked. You can still use the dial while navigating menus, selecting other camera settings, and while reviewing pictures.
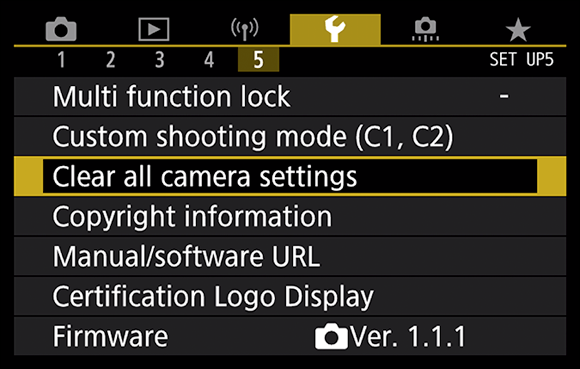
FIGURE 1-31: You will only see all menu options if you have set the Mode dial to P, Tv, Av, M, B, C1, or C2.
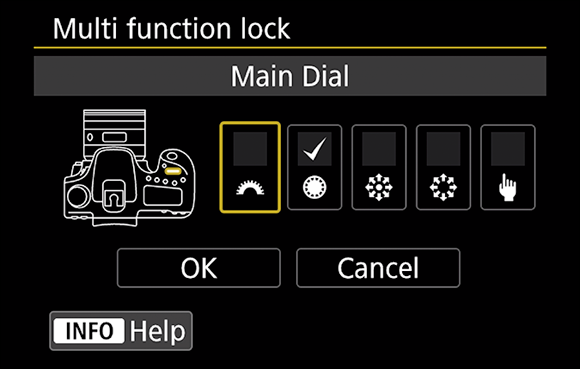
FIGURE 1-32: This menu option determines what control is affected by the Lock switch on the back of the camera.
If you prefer, you can also set the switch to lock the Main dial, either multi-controller, and even Touch control so that an errant movement or tap doesn’t accidentally adjust a camera setting. A check mark above the control’s symbol on the menu indicates that the lock will be in force; toggle the check mark on and off by tapping the item or highlighting it and pressing the Set button.
While using this book, stick with the default setup, shown in the figure. Otherwise, our instructions won’t work.- Custom shooting mode (C1, C2): Select this option to create or reset the two custom shooting modes. See Chapter 12 for more information.
- Clear All Camera Settings: Via this option, you can restore the default shooting and menu settings. This does not reset the Custom Functions settings to their defaults, nor does it reset any menus you create using My Menu.
- Copyright Information: Using this option, explained in Chapter 11, you can embed copyright information in your files.
Manual/software URL: Canon provides a hefty printed camera manual in the 90D shipping box. But you also can download an electronic version of the manual so that you can read it on your smartphone, tablet, or computer.
To make finding the download site easy, choosing this menu option displays a Quick Response (QR) code. If your smartphone or tablet has an app that can read these codes, you simply aim the device’s camera at the code to display the download site’s web address. The site also provides access to the Canon software that’s available for free download to purchasers of the camera.
- Certification Logo Display: You have permission to ignore this screen, which simply displays logos for a couple of electronics-industry certifications claimed by the camera. You can find additional logos on the bottom of the camera.
Firmware Ver.: This screen tells you the version number of the camera firmware (internal operating software). At the time of publication, the current firmware version was 1.1.1. This is a noteworthy firmware update, which Canon released shortly after the camera hit the market due to negative feedback. Inexplicably, they did not originally include the very popular 24fps movie frame rate option, which videographers use to emulate old-school motion pictures. Firmware update 1.1.1 makes shooting video at 24fps possible on the 90D and is a very welcome addition.
Keeping your camera firmware up-to-date is important, so visit the Canon website (www.canon.com) regularly to find out whether your camera sports the latest version. Follow the instructions given on the website to download and install updated firmware if needed.