
10. Advanced Techniques

Impress Your Family and Friends
We covered a lot of ground in the previous chapters, especially on the general photographic concepts that apply to most, if not all, shooting situations. There are, however, some specific tools and techniques that will give you an added advantage in obtaining a great shot. Additionally, we will look at how to customize certain controls on your camera to reflect your personal shooting preferences and always have them at the ready.
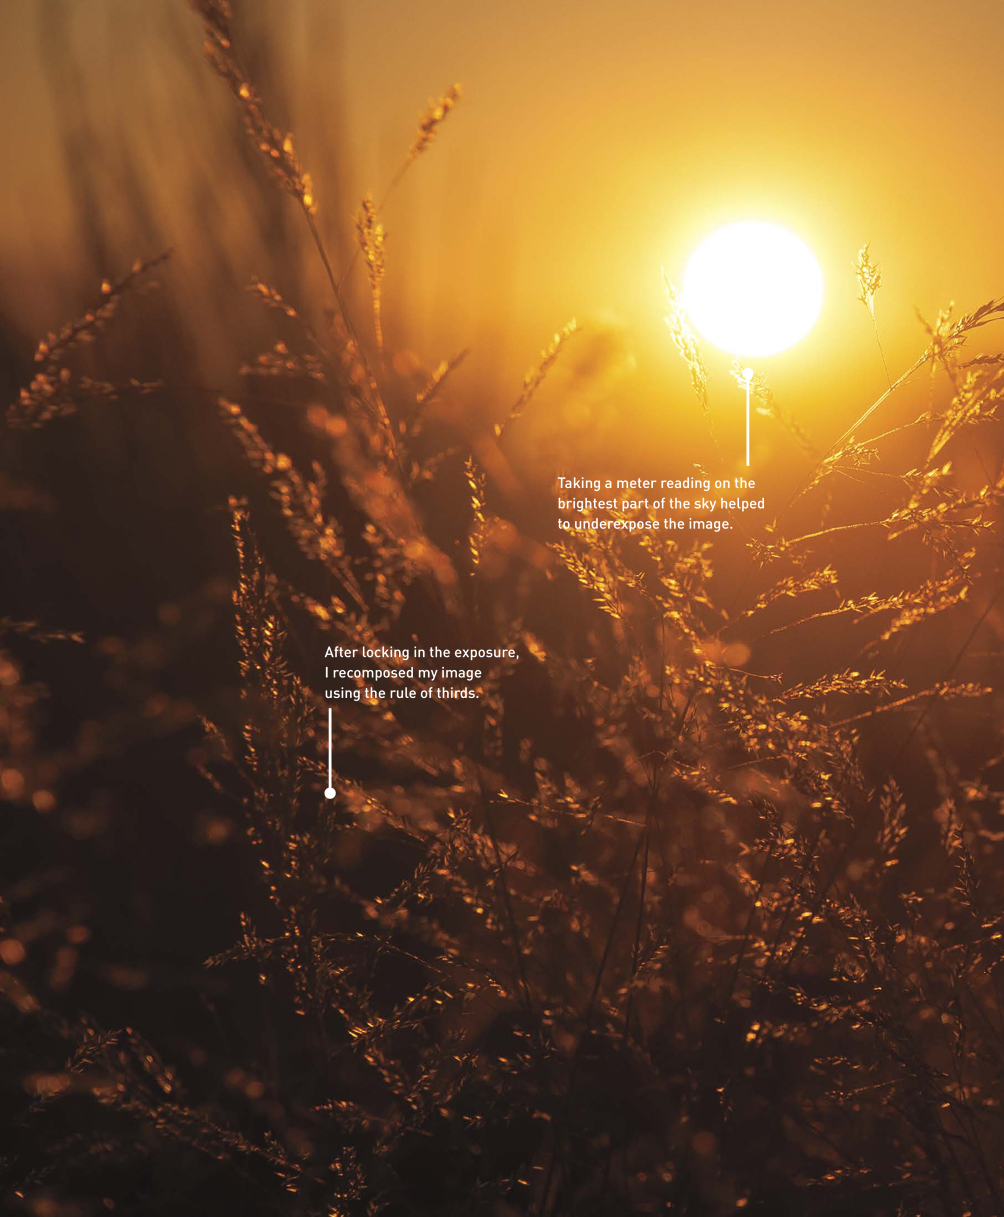
Poring Over the Picture
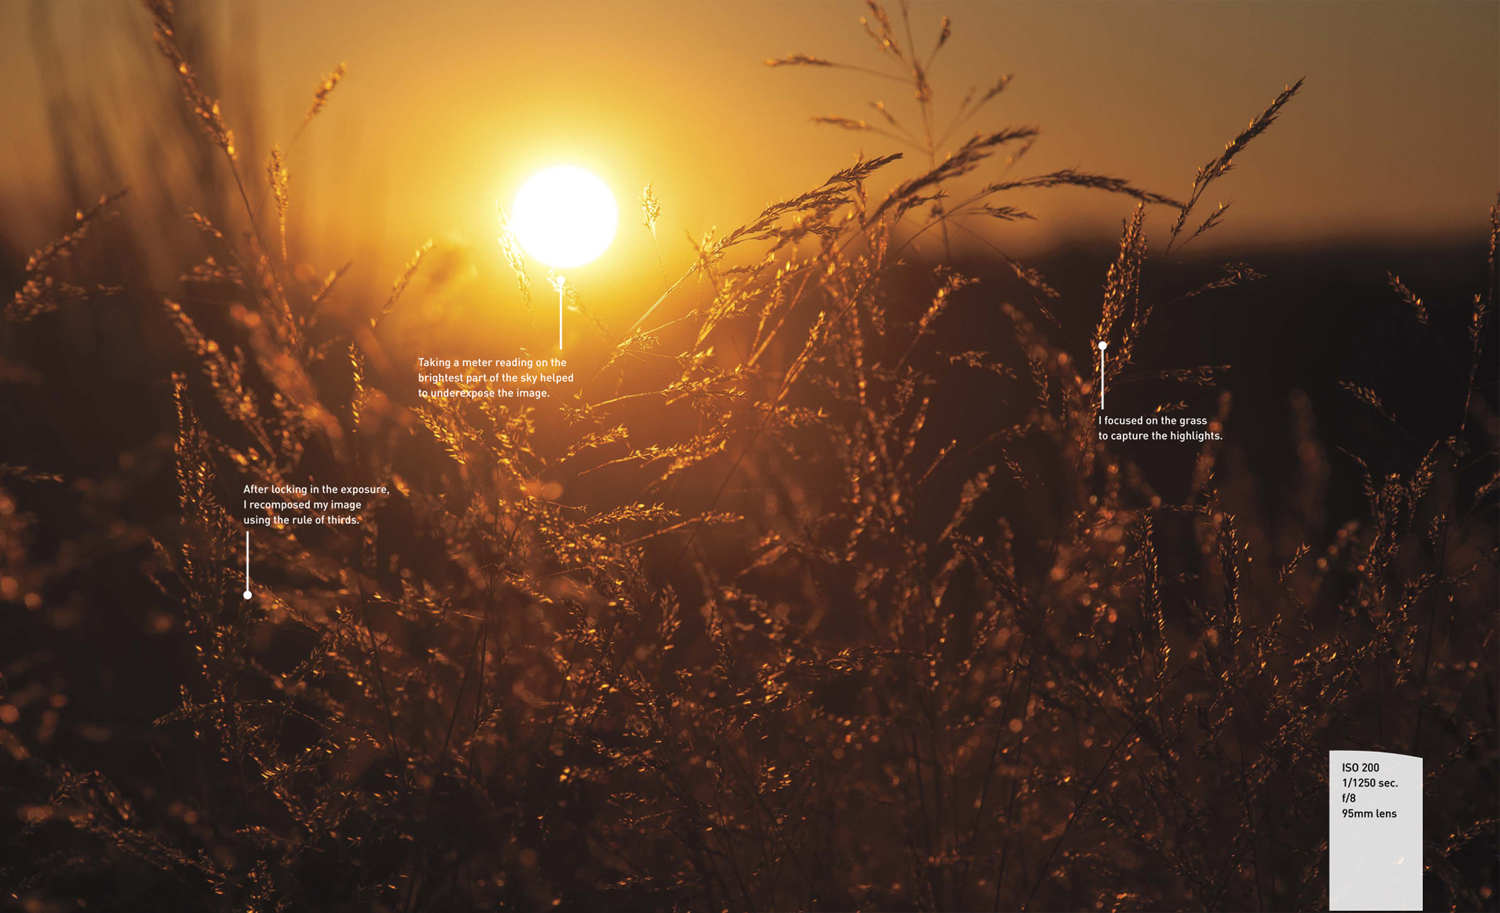
We’re told as kids to never look directly into the sun, but with a camera you can end up with great colors at sunrise or sunset. The sky was already orange, but pointing my lens toward the sun and shooting with a small aperture and fast shutter speed boosted the golden effect on the grass. It’s still not a good idea to look into the sun—too much direct sunlight can damage the camera’s sensor—but it’s okay to sneak a few peeks now and again.

Spot Meter for More Exposure Control
Generally speaking, Evaluative metering mode provides accurate metering information for the majority of your photography. It does an excellent job of evaluating the scene and then relaying the proper exposure information to you. The only problem with this mode is that, like any metering mode on the camera, it doesn’t know what it is looking at. There will be circumstances where you want to get an accurate reading from just a portion of a scene and discount the remaining area. To give you greater control of the metering operation, you can switch the camera to Spot metering mode. This allows you to take a meter reading from a very small circle in the center of the viewfinder, while ignoring the rest of the viewfinder area.
So when would you need to use this? Think of a person standing in front of a very dark wall. In Evaluative metering mode, the camera would see the entire scene and try to adjust the exposure information so that the dark background is exposed to render a lighter wall in your image. This means that the scene would actually be overexposed and your subject would then appear too light. To correct this, you can place the camera in Spot metering mode and take a meter reading right off of—and only off of—your subject, ignoring the dark wall altogether.
Other situations that would benefit from Spot metering include:
• Snow or beach environments where the overall brightness level of the scene could fool the meter
• Strongly backlit subjects that are leaving the subject underexposed (Figures 10.1 and 10.2)
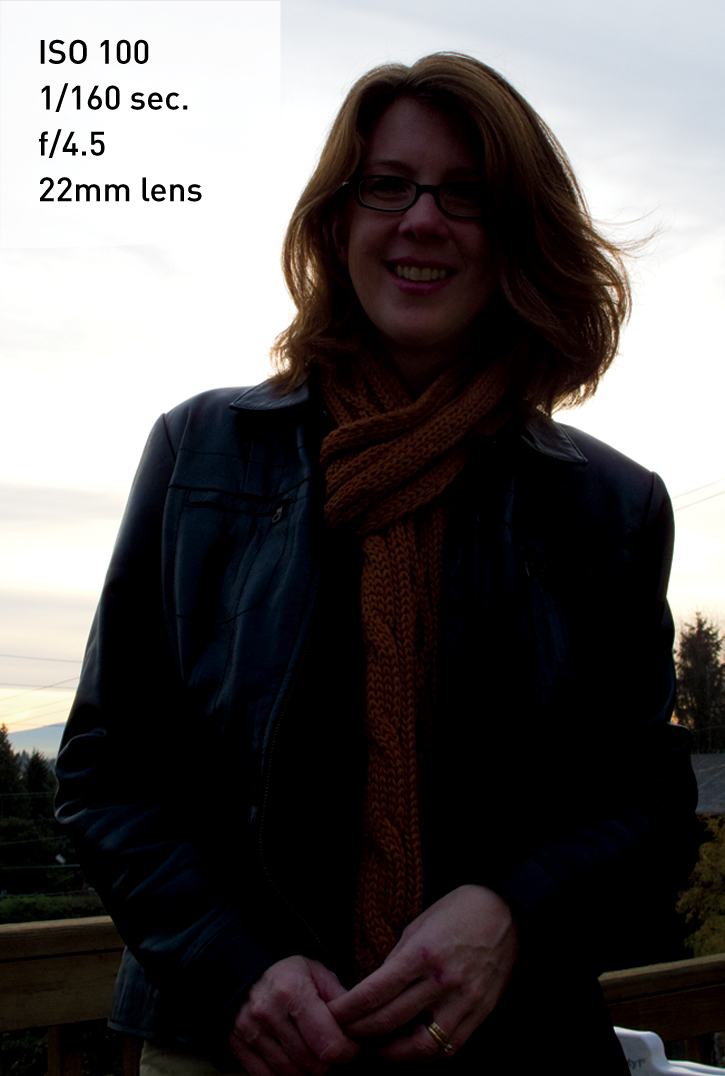
Figure 10.1. The sun in the background is fooling the meter into underexposing the image.
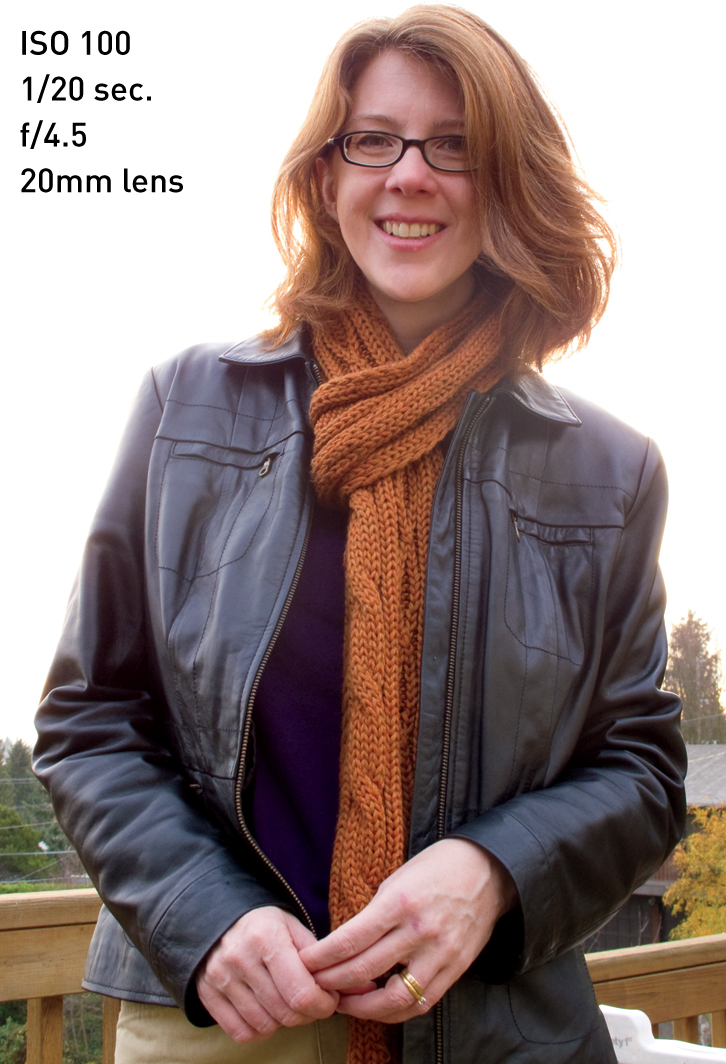
Figure 10.2. A spot meter reading on the face improves the exposure, but at the expense of losing background detail. The next thing to try would be to adjust the Exposure Compensation to regain the texture of the sky.
• Cases where the overall feel of a photo is too light or too dark
Setting Up and Shooting in Spot Metering Mode
1. Press the Q button to bring up the Quick Control screen, and then tap the Metering Mode button.
2. Tap, or rotate the Main dial, to select the Spot metering icon (A), and then press the shutter release button halfway to return to shooting mode.
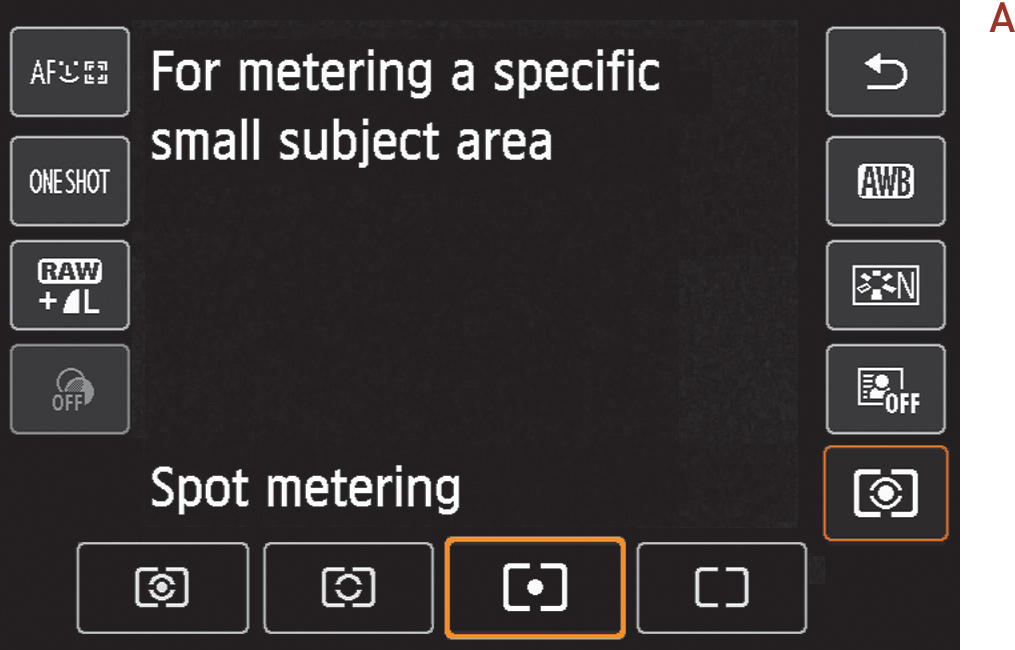
3. Point the center focus point at the subject that you wish to use for the meter reading.
4. Press the ![]() button to enable the AE Lock, which will hold the exposure value while you recompose, and then take the photo.
button to enable the AE Lock, which will hold the exposure value while you recompose, and then take the photo.
When using Spot metering mode, remember that the meter believes it is looking at a medium gray value, so you might need to incorporate some exposure compensation of your own to the reading that you are getting from your subject. This will come from experience as you use the meter.
Metering for Sunrise or Sunset
Capturing a beautiful sunrise or sunset is all about the sky. If there is too much foreground in the viewfinder, the camera’s meter will deliver an exposure setting that is accurate for the darker foreground areas but leaves the sky looking overexposed, undersaturated, and generally just not very interesting. To gain more emphasis on the colorful sky, point your camera at the brightest part of it and take your meter reading there. Use the AE Lock and then recompose. The result will underexpose the foreground but provide a darker, more dramatic sky (Figure 10.3).
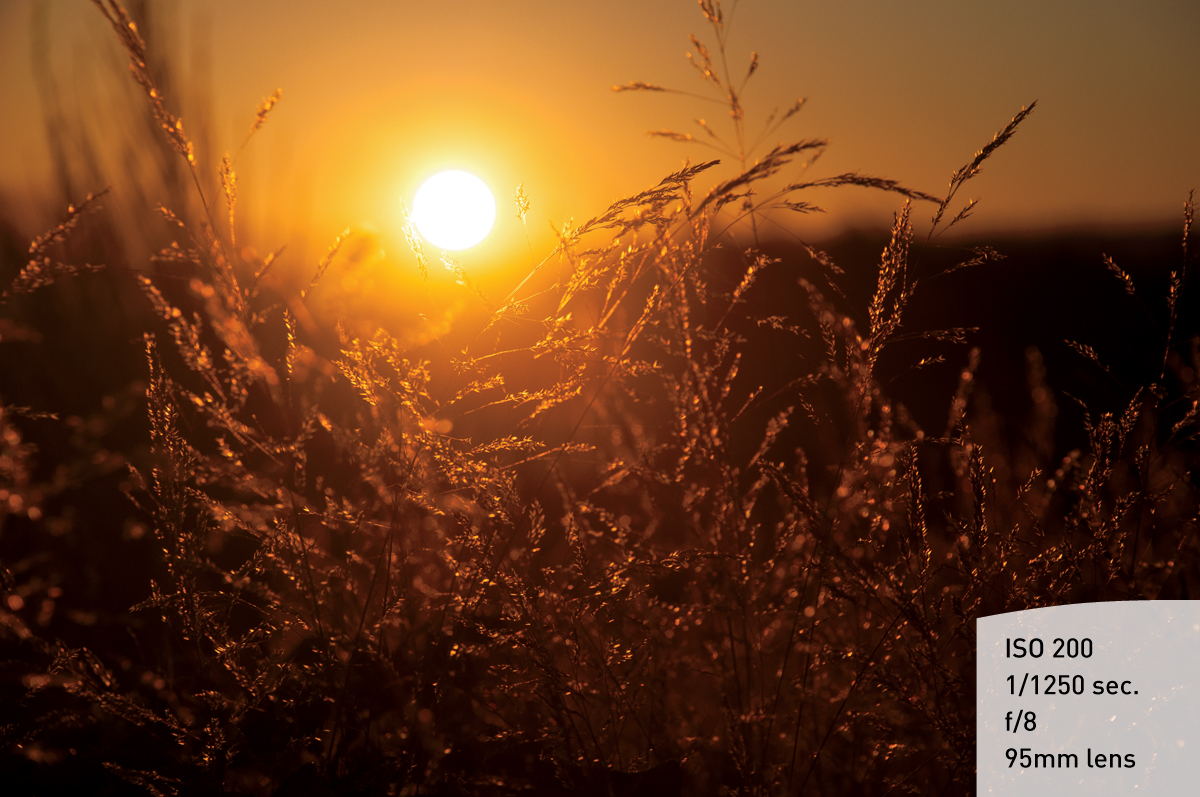
Figure 10.3. By taking the meter reading from the brightest part of the sky, you will get darker, more colorful sunsets.
Manual Mode
Probably one of the most advanced and yet most basic skills to master is shooting in Manual mode. With the power and utility of most of the automatic modes, Manual mode almost never sees the light of day. I have to admit that I don’t select it for use very often, but there are times when no other mode will do. One situation that works well with Manual is studio work with external flashes. I know that when I work with studio lights, my exposure will not change, so I use Manual to eliminate any automatic changes that might happen from shooting in P, Tv, or Av mode.
Since you may not be too concerned with studio strobes at this point, I’ll concentrate on one of the ways in which you will want to use Manual mode for your photography: long nighttime exposures.
Bulb Photography
If you want to work with long shutter speeds that don’t quite fit into one of the selectable shutter speeds, you can select Bulb. This setting is available only in Manual mode, and its sole purpose is to open the shutter at your command and then close it again when you decide. I can think of two scenarios where this would come in handy: shooting fireworks and shooting lightning.
If you are photographing fireworks, you could certainly use one of the longer shutter speeds available in Tv mode, since they are available for exposure times up to 30 seconds. That is fine, but sometimes you don’t need 30 seconds’ worth of exposure and sometimes you need more. If you open the shutter and then see a great burst of fireworks, you might decide that that is all you want for that particular frame, so you click the button to end the exposure (Figure 10.4).
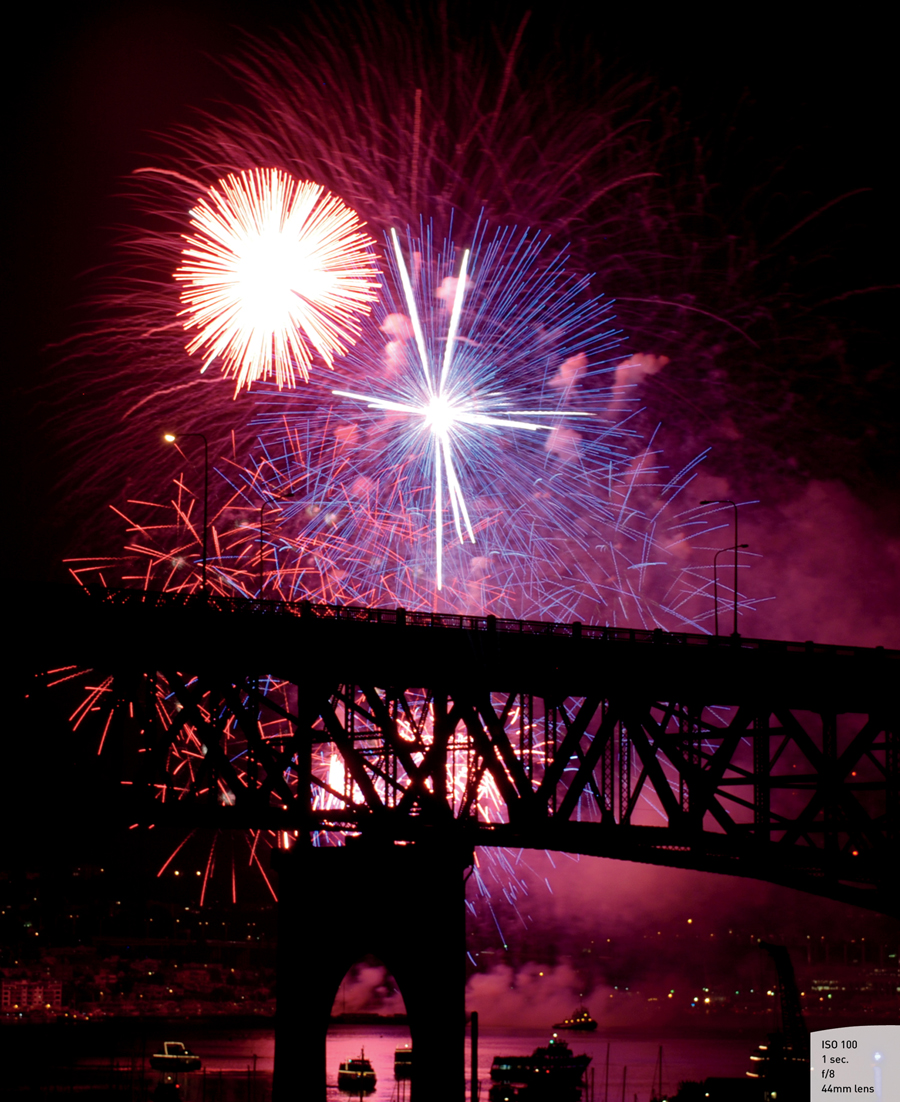
Figure 10.4. A great use for the Bulb setting is capturing fireworks.
The same can be said for photographing a lightning storm. Lightning can be very tricky to capture (and dangerous—a tripod can act like a lightning rod!), and using the Bulb setting to open and then close the shutter at will allows for more creativity, as well as more opportunity to get the shot.
Switching to Bulb Shooting
1. Switch to Manual shooting mode.
2. Press the Q button to bring up the Quick Control screen, and then tap the Shutter Speed button. Or, press the Right cross key to select the Shutter Speed button.
3. Tap, or rotate the Main dial, to select the Bulb option at the far left edge.
4. Press the shutter release button halfway to return to shooting mode.
5. To begin an exposure, press the shutter release button fully and hold it down. A timer appears in the lower-right corner of the screen.
6. Stop pressing the shutter release button to complete the exposure.
When you’re using the Bulb setting, the shutter will stay open only for the duration that you are holding down the shutter button. You will also see a counter on the lower-right portion of the LCD screen that will count off the seconds that the shutter is open. You can use this counter to either add or subtract time for your next shot. You should also be using a sturdy tripod or shooting surface. I want to point out that using your finger on the shutter button for a bulb exposure will definitely increase the chances of getting some camera shake in your images. To get the most benefit from the Bulb setting, I suggest using a remote control such as the Canon RC-6. You’ll also want to turn on the Long Exposure Noise Reduction, as covered in Chapter 7.
Using the Sun Creatively
Have you ever seen photographs where the sun is peeking through a small hole and it creates a very cool starburst effect (Figure 10.5)? There is actually a little trick to pulling it off, and it’s fairly easy once you know how. The real key is to be shooting at f/22 (or whatever your smallest aperture is). Then you need to have just a small bit of the sunlight in your frame, peeking either over an edge or through a small hole. The other thing you need to do is make sure that you are properly exposing for the rest of your scene, not the bright bit of sunlight that you are allowing in. With a little practice, you can really make some very cool shots.
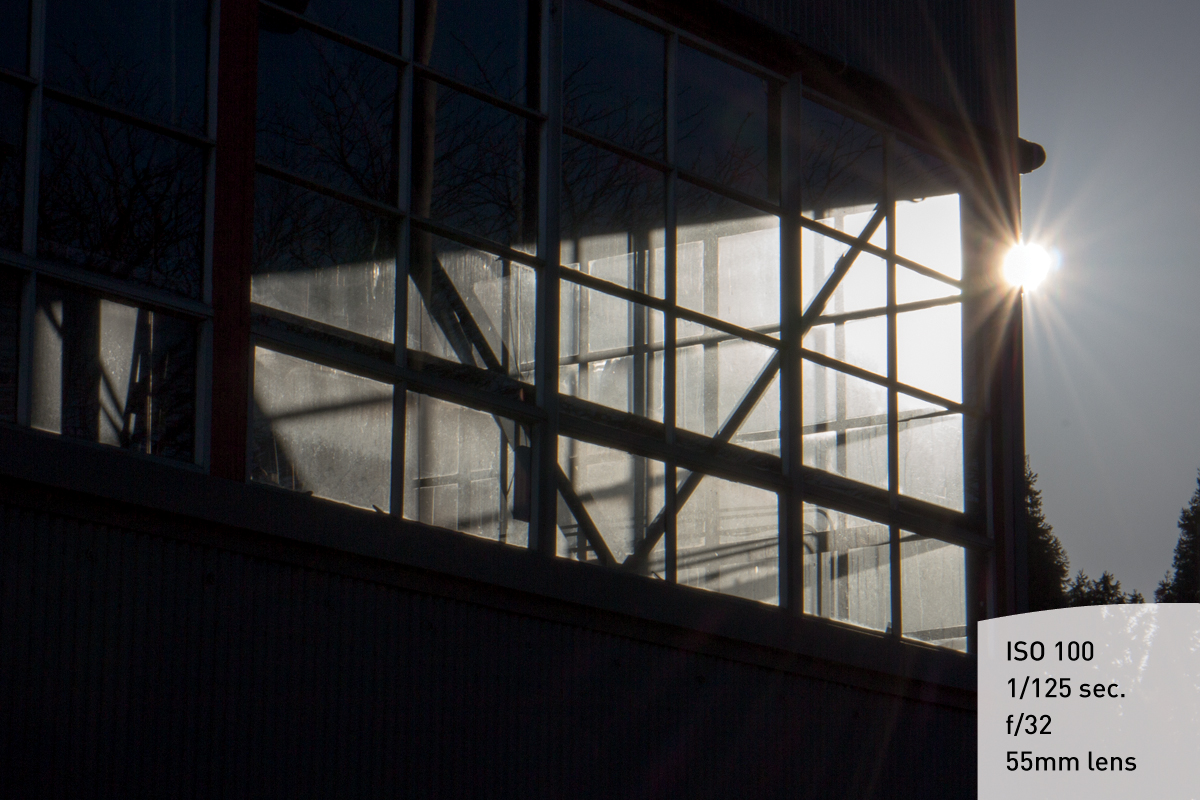
Figure 10.5. By letting the sun peek into my shot and using f/32, I was able to capture this cool starburst.
Avoiding Lens Flare
Lens flare, which appears as bright circles on the image, is one of the problems you will encounter when shooting in the bright sun (Figure 10.6). The flare is a result of the sun bouncing off the multiple pieces of optical glass in the lens and then being reflected back onto the sensor. Lens flare is especially frequent when using wide-angle lenses, because of their greater angle of coverage. You can avoid the problem using one of these methods:
• Try to shoot with the sun coming from over your shoulder, not in front of you or in your scene.
• Use a lens shade to block the unwanted light from striking the lens. You don’t have to have the sun in your viewfinder for lens flare to be an issue. All it has to do is strike the front glass of the lens to make it happen.
• If you don’t have a lens shade, just try using your hand or some other element to block the light.
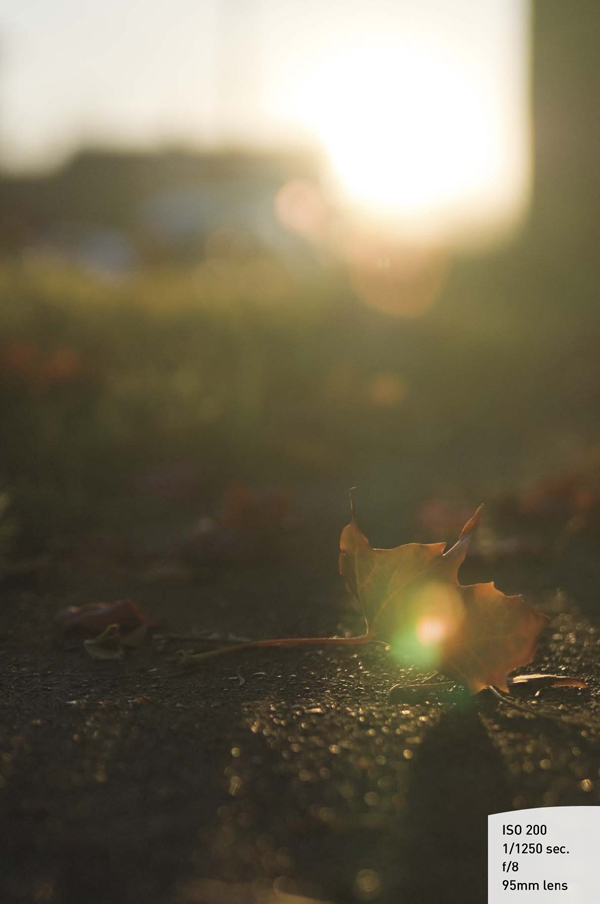
Figure 10.6. The bright sun in the upper portion of the frame has created flare spots that are visible as colored circles radiating down through the image.
Bracketing Exposures
So what if you are doing everything right in terms of metering and mode selection, yet your images still sometimes come out too light or too dark? You can use a technique called bracketing, which will help you find the best exposure value for your scene by taking a normal exposure as well as ones that are over- and underexposed. When I am out shooting, I typically shoot with my camera set to an exposure compensation of –1/3 stop to protect my highlights. If I am dealing with a subject that has a lot of different tonal ranges from bright to dark, I will often bracket by one stop over and one stop under my already compensated exposure. That means I will have exposures of –1 1/3, –1/3, and +2/3.
You can set the amount of exposure bracketing from as little as a third of a stop to as much as two stops per exposure (this is the setting I use for creating HDR images, which we discussed in Chapter 7). You can also dial in the amount of exposure compensation that you might need. You can adjust the compensation as much as five stops in either direction, depending on the range of your bracketed exposures. Either way, bracketing will help you zero in on that perfect exposure, and you can just delete the ones that didn’t make the grade (Figures 10.7 through 10.9).
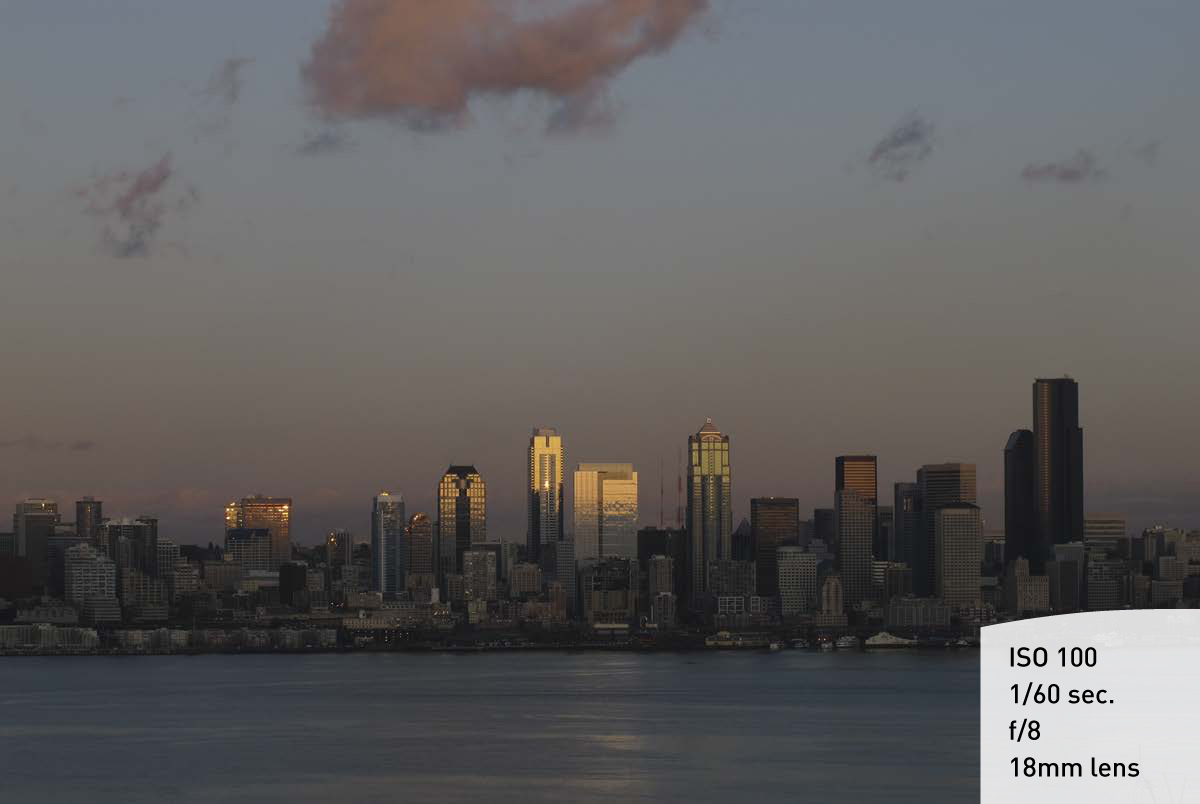
Figure 10.7. One stop of exposure below normal.
Figure 10.8. The normal exposure as indicated by the camera meter.
Figure 10.9. One stop of exposure above normal.
The camera will take the normal image first, then the underexposed image, then the overexposed image. Don’t forget to take all three. The Auto Exposure Bracketing feature will reset itself when the camera is turned off and then on again.
Setting Auto-Exposure Bracketing
1. Press the Info button until you’re viewing just the settings without an image preview (A).
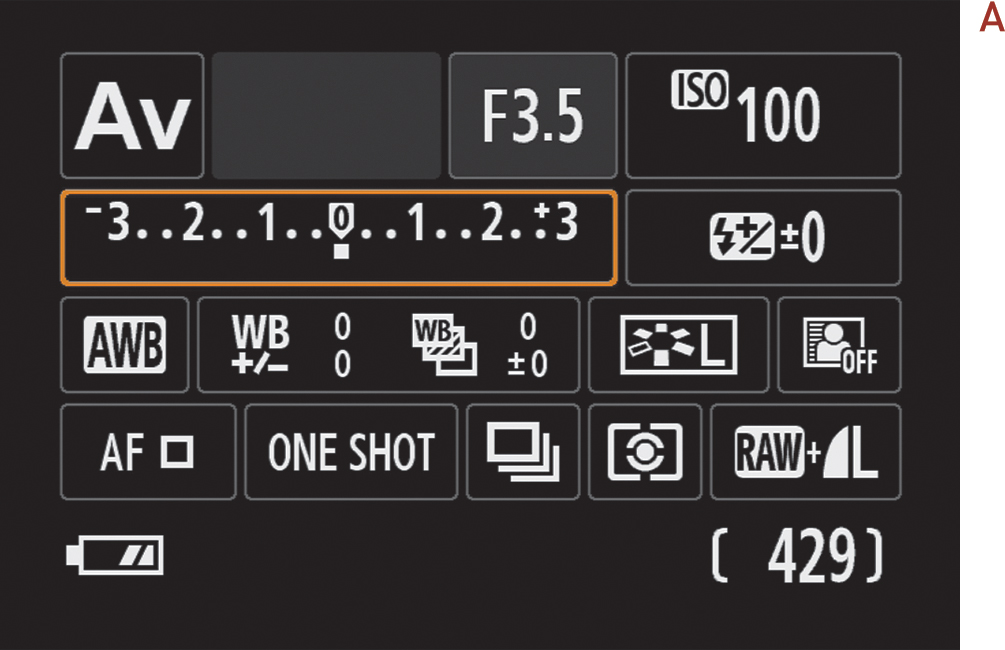
2. Tap the Exposure Compensation/AEB setting button.
3. Use the Main dial to set the amount of over- and underexposure that you desire (B).
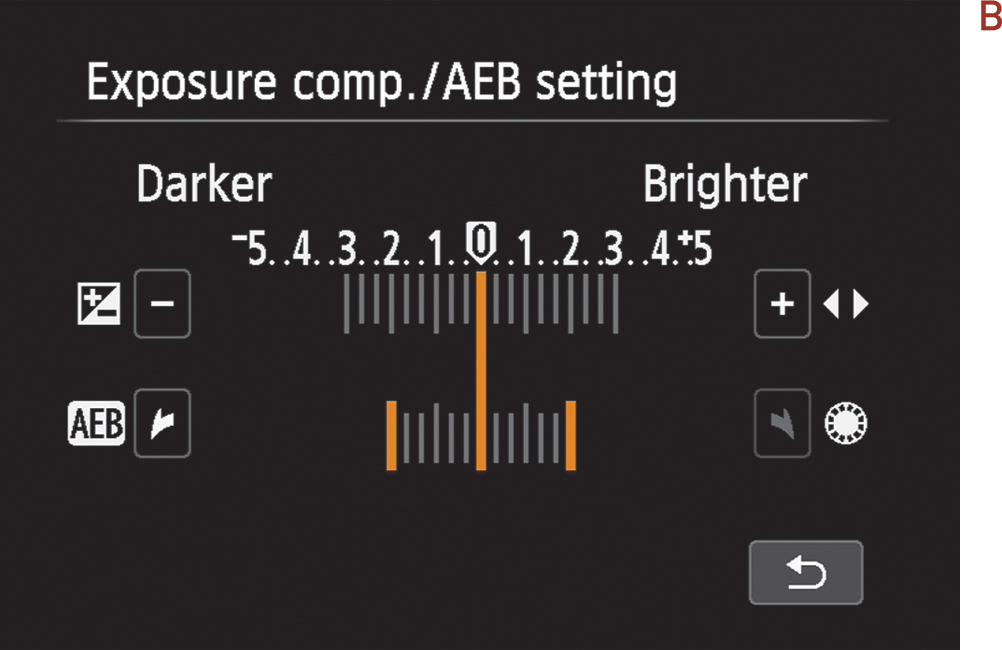
4. If you want the “normal” exposure to be a little over- or underexposed, you can adjust that with your Left/Right cross keys.
HDR Backlight Control
Earlier in the book I explained the process for creating HDR images using three separate images that need to be combined using special software. There is, however, a special feature on your camera that will let you take three images and combine them right in your camera for improved highlight and shadow details. It’s a mode called HDR Backlight Control.
When you switch to HDR Backlight Control mode, the camera will take three consecutive photos with a single click of the shutter button. After the photos have been taken, the camera will combine the images to give you an image with greater detail in the highlights and shadows (Figure 10.10).
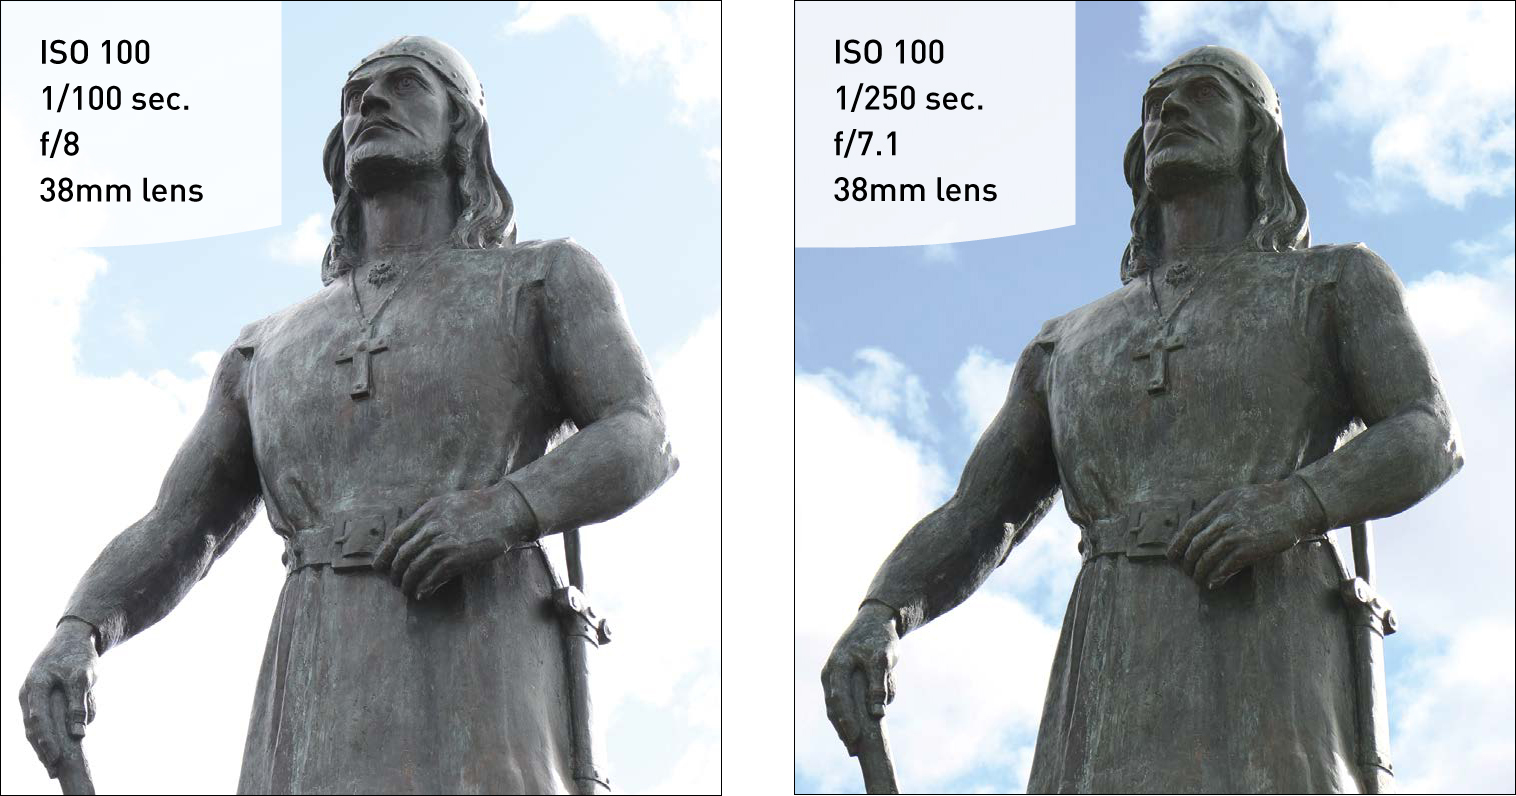
Figure 10.10. The HDR Backlight Control mode darkened the background but also retained detail in the foreground.
There are limitations to using this setting. First, you should always have your camera on a stable surface or a tripod when taking photos. Second, you should only use it on non-moving subjects, because you can get ghosting if there is movement during the exposure process.
Auto Lighting Optimizer
Did you know that your camera provides a function that can automatically make your pictures look better? It’s called Auto Lighting Optimizer. It works this way: The camera evaluates the tones in your image and then lightens any areas that it believes are too dark or lacking in contrast (Figures 10.11 and 10.12). This is different than the HDR Backlight Control because it is working on only a single exposure and boosting the shadows while pulling the exposure down slightly to darken the highlights. This optimization is applied automatically in the shooting modes of the Basic zone.

Figure 10.11. Without the Auto Lighting Optimizer, the shadows are dark and contrasty.
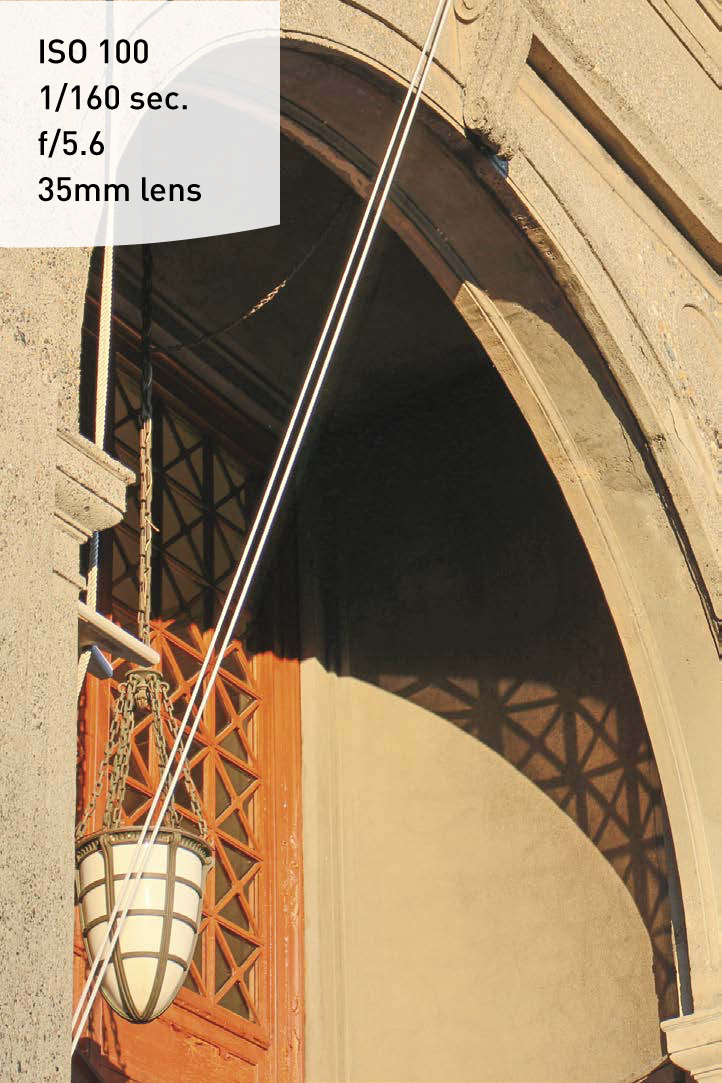
Figure 10.12. Although the exposure hasn’t changed, the shadows are brighter after changing the Optimizer to the High setting.
You can choose from four levels: Disable, Low, Standard, and High. You will need to evaluate the strength of the effect on your images and change it accordingly. I typically leave it set to Standard so that I have brighter, more detailed shadow areas in my photographs. If you are using exposure compensation to darken your image, you might find that your image is too bright with this option turned on. Also, you should disable it if you are using flash exposure compensation since it will try to work against you when you alter the flash strength.
Setting Up the Auto Lighting Optimizer
1. Press the Quick Control button, tap the Auto Lighting Optimizer, and press the Set button (A).

2. Use the cross keys to select the level of optimization that you prefer, and press the Set button to lock in the change.
Handheld Night Scene
Another great little automatic feature in the EOS M is the Handheld Night Scene mode. This is yet another Basic shooting mode, and it acts in a similar fashion to the HDR mode except it is made for getting a sharp image in low-light or night scenes, where handholding a camera usually isn’t possible. To do this, the camera fires off four consecutive frames and then processes them in-camera to create one sharp, properly exposed image (Figure 10.13).

Figure 10.13. Handheld Night Scene combines your photos to give you one sharp, noise-free image.
The My Menu setting
There are a lot of items in the menu that you can change, but some are used and changed more frequently than others.
The My Menu function allows you to place six of your most-used menu items in one place so that you can quickly get to them, make your changes, and get on with shooting. You can see what I have in my My Menu in Figure 10.14.
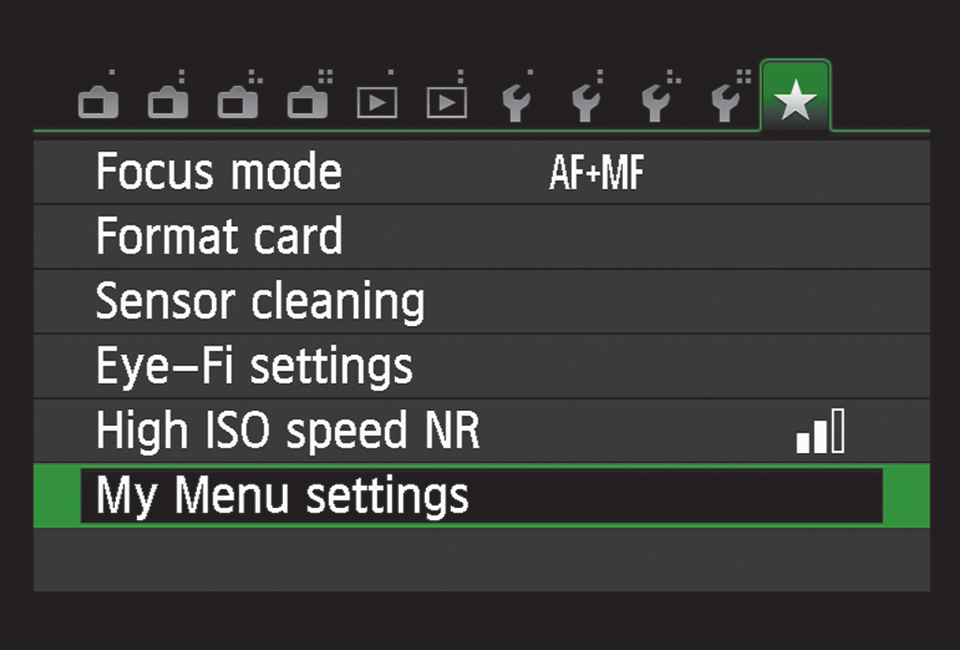
Figure 10.14. The functions I’ve stored in My Menu
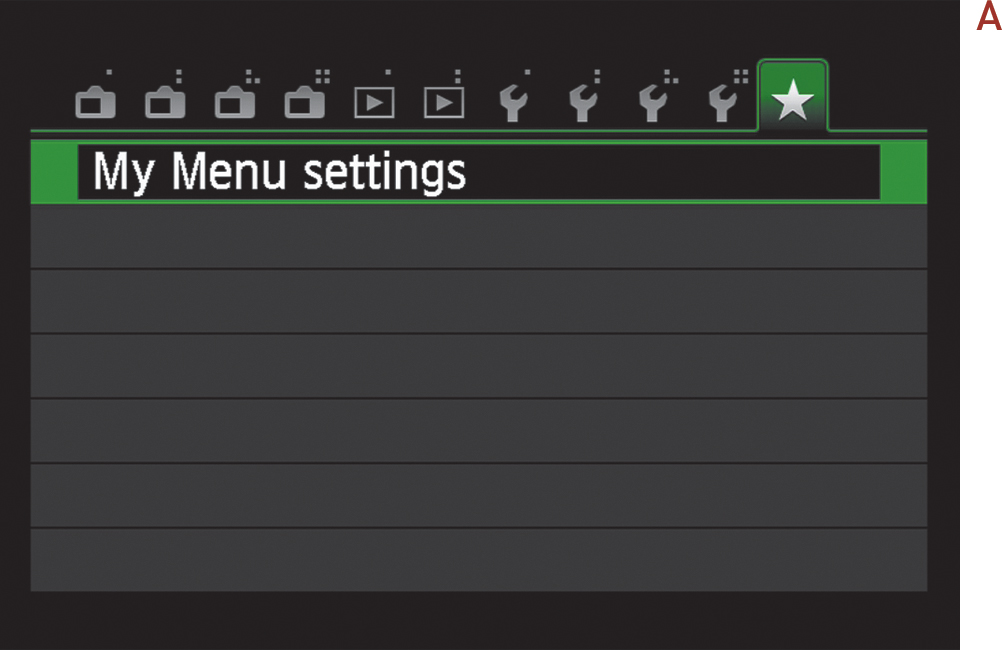
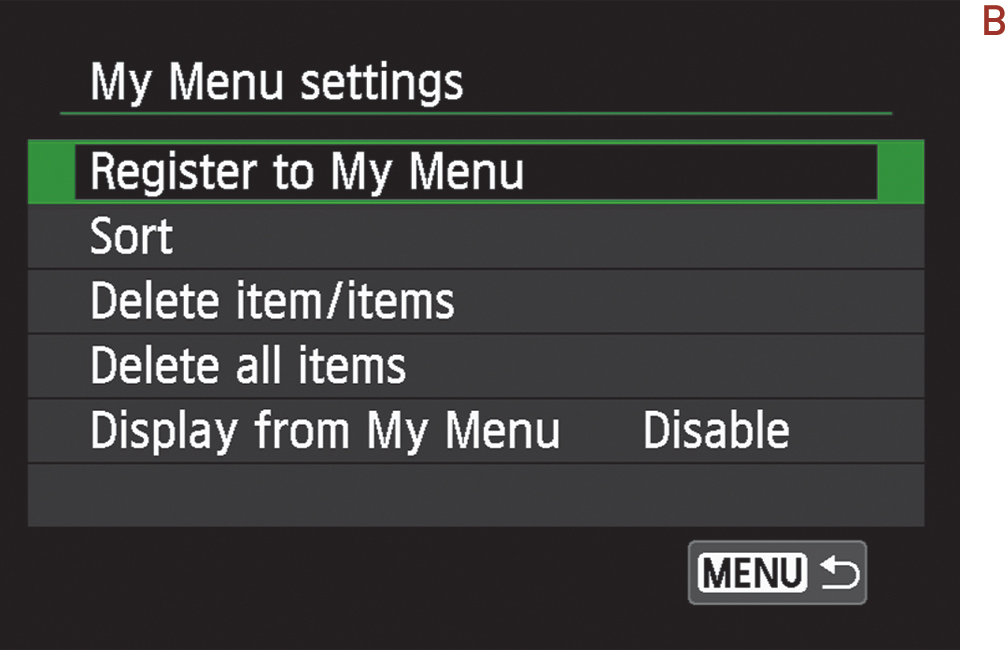
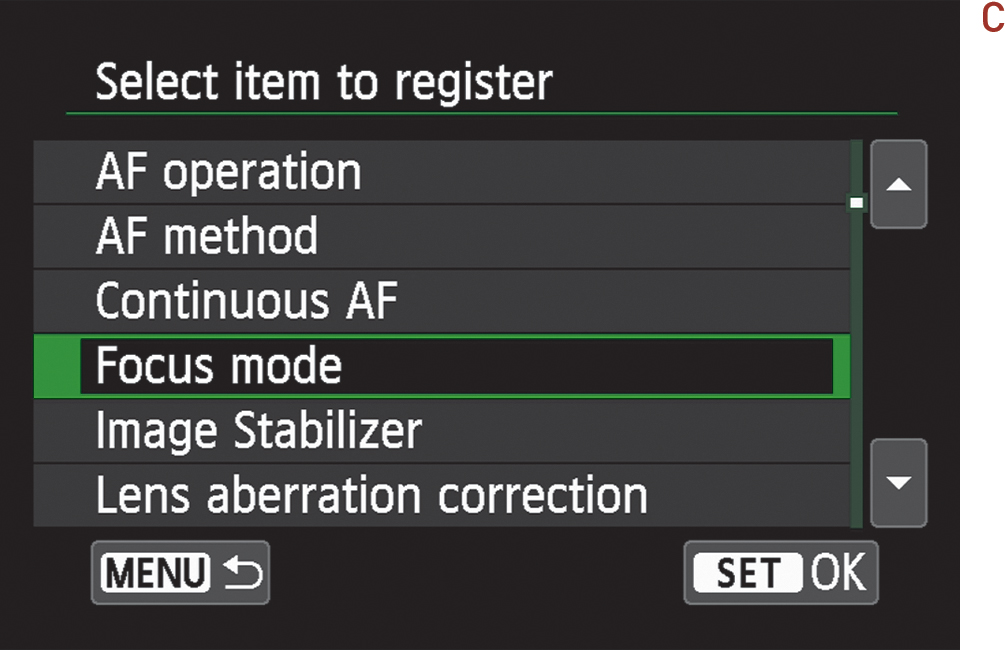
Customizing Your My Menu Setting
1. Press the Menu button, and use the cross keys to select the tab with the star.
2. Select My Menu settings, and press Set (A).
3. Highlight Register to My Menu, and press Set (B).
4. Scroll through the available menu items, and select one you want to add. Press the Set button (C).
5. When asked if you want to register the item, highlight OK and press Set (D).
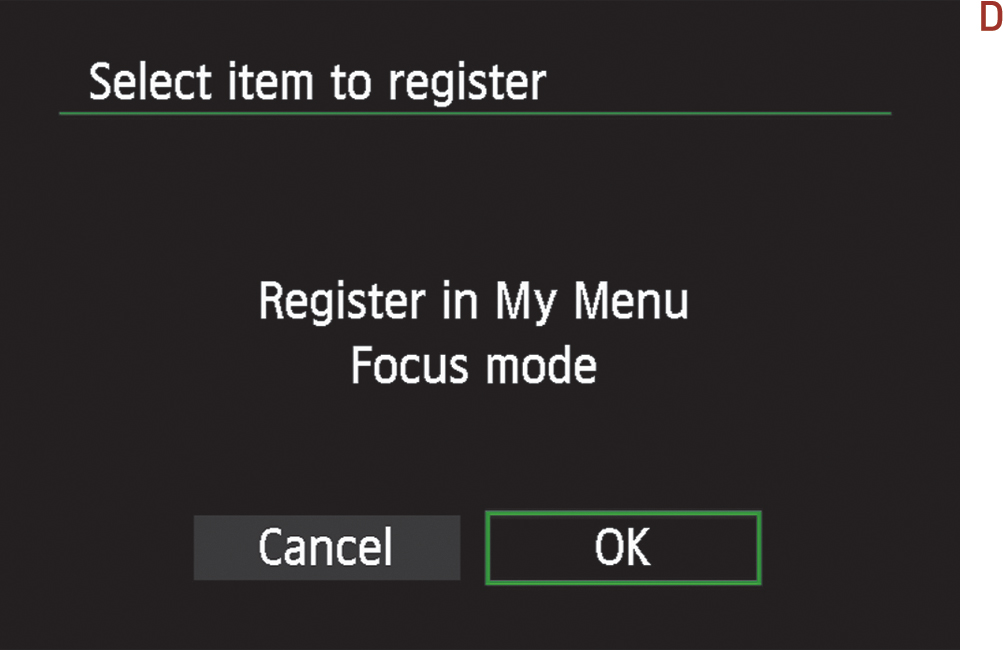
6. Continue adding the items that you want in the list until you have selected your favorites (up to six of them).
Customize Your White Balance
Previous chapters have addressed the issue of setting your white balance, but what if you are in a situation that doesn’t fall neatly into one of the existing categories like Daylight or Tungsten? You might want to consider creating a custom white balance. This is especially helpful if you have more than one kind of light source shining on your subject. A perfect example might be indoors with fluorescent lighting fixtures overhead and daylight coming through a window. To ensure that you are getting the best possible results in a situation like this, perform a quick white balance customization by using the Custom White Balance option. Don’t worry, though—it’s easier than you might think. Typically, the only thing you will need is a piece of white paper.
Creating a Custom White Balance
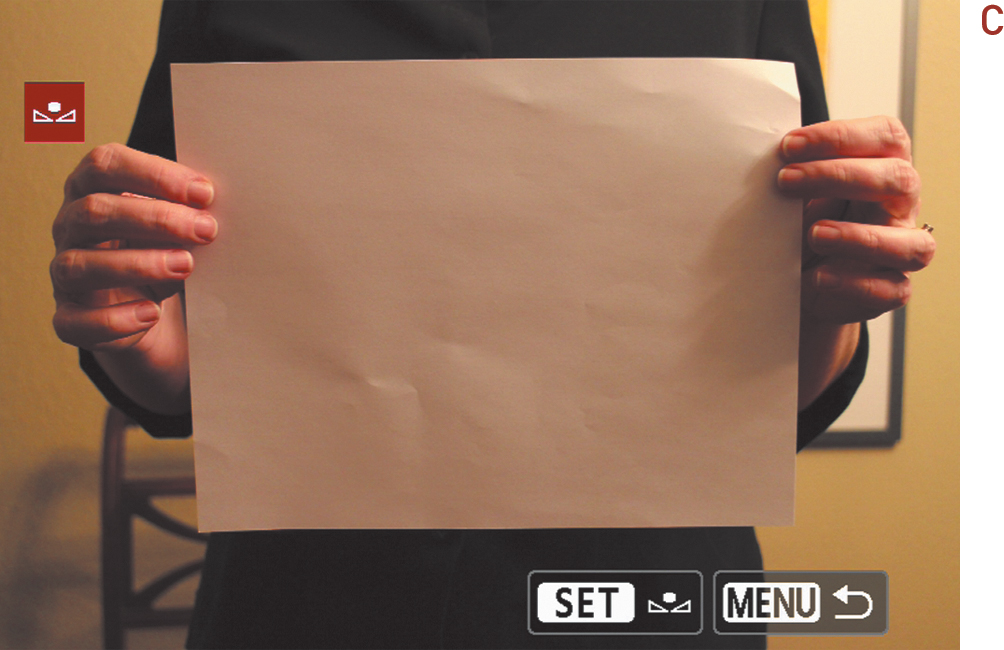
1. Begin by having your subject hold a piece of white paper, and then take a picture of it. You can have the camera set on any white balance preset for this (A).

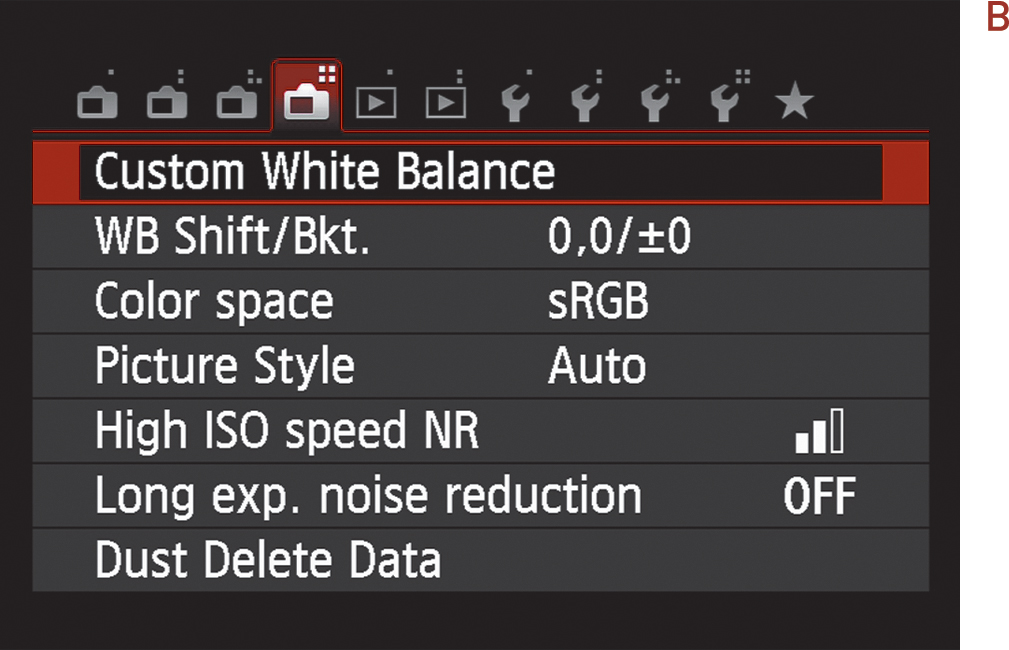
2. Next, press the Menu button, navigate to the second shooting menu, highlight Custom White Balance, and press the Set button (B).
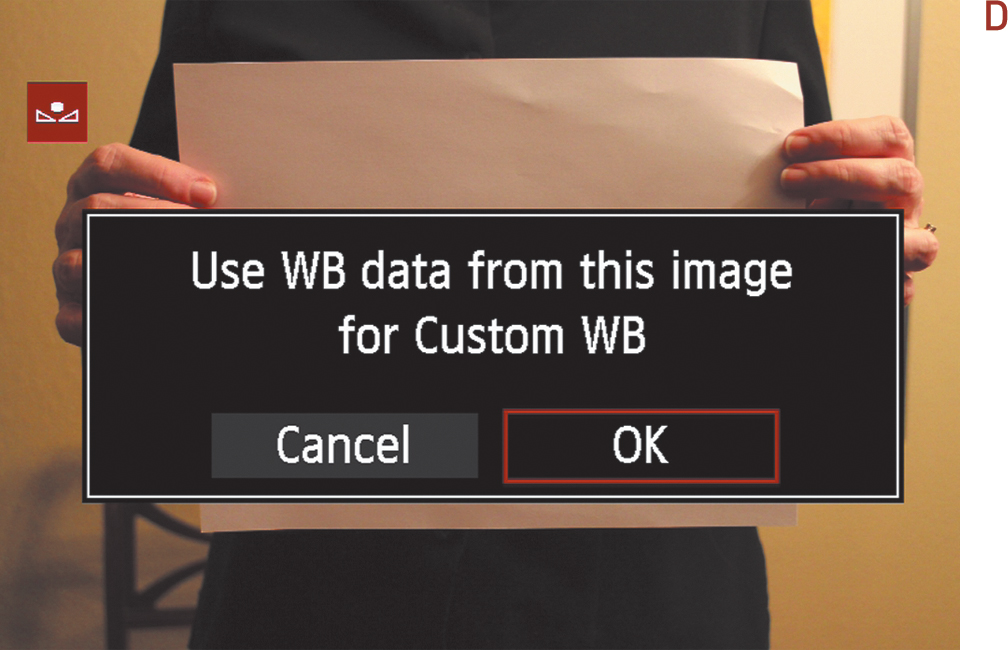
3. The camera should then display the photo that you took of the white paper. If it is the correct image, press the Set button. If it is not, use the Left/Right cross keys to locate the image first (C).
4. Confirm that this is the image you want to use by highlighting the OK option and pressing Set (D).
5. Click OK to set your camera to the Custom White Balance setting.
6. Press the shutter button halfway to return to shooting mode.
7. To shoot with the new white balance setting, press the Quick Control button, tap the White Balance icon, and choose the Custom button (E).

You are now ready to take images with much more accurate color for the environment where you are shooting.
Chapter 10 Assignments
Many of the techniques covered in this chapter are specific to certain shooting situations that may not come about very often. This is even more reason to practice them so that when the situation does present itself you will be ready.
Adding some drama to the end of the day
Most sunset photos don’t reflect what the photographer saw, because they weren’t metered correctly. The next time you see a colorful sunset, pull out your camera, take a meter reading from the sky, and take a photo. Then take a photo without a meter reading, and see what a difference it makes.
Making your exposure spot-on
Using the Spot metering mode can give accurate results, but only when the camera is pointed at something that has a middle tone. Try adding something gray to the scene and taking a reading off it. Now switch back to your regular metering mode and see if the exposure isn’t slightly different.
Using the Bulb setting to capture the moment
This is definitely one of those settings that you won’t use often, but it’s pretty handy when you need it. If you have the opportunity to shoot a fireworks display or a distant storm, try setting the camera to Bulb and then playing with some long exposures to capture just the moments that you want.
Bracketing your way to better exposures
Why settle for just one variation of an image when you can bracket to get the best exposure choice? Set your camera up for a 1/3-stop bracket series, and then expand it to a one-stop series. Review the results to see if the normal setting was the best or perhaps one of the bracketed exposures was even better.
Share your results with the book’s Flickr group!
Join the group here: flickr.com/groups/eosmfromsnapshotstogreatshots