
9. Creative Compositions

ISO 200 • 1/80 sec. • f/8 • 78mm lens
Improve Your Pictures with Sound Compositional Elements
Creating a great photograph takes more than just the right settings on your camera. To take your photography to the next level, you need to gain an understanding of how the elements within the frame come together to create a compositionally pleasing image. Composition is the culmination of light, shape, and, to borrow a word from the iconic photographer Jay Maisel, gesture. Composition is a way for you to pull your viewing audience into your image and guide them through the scene. Let’s examine a few methods you can use to add interest to your photos by using some common compositional elements.
Poring Over the Picture
You can have all of the right camera settings for a photograph, but if you don’t pay attention to your composition you will never achieve anything more than an average-looking photo. It would’ve been easy for me to just put the mosque in the center of the frame, but that would’ve made for a very boring image of a beautiful building. Instead, I took the time to explore the area to find the right angle and lens choice to bring all the elements together in a way that leads the viewer into the image.

ISO 800 • 1/2000 sec. • f/5.6 • 24mm lens


Poring Over the Picture
Landscape photography can sometimes be a bit challenging when it comes to composition, because you are limited by where you are standing and usually the scene is large and limits your choice of lenses. This is when it is important to take a moment and just look at the scene and see how it speaks to you. Usually there will be a key feature that is triggering your interest in the first place. Once you find it, it will be much easier to decide just how to frame the scene.

ISO 400 • 1/60 sec. • f/14 • 35mm lens


Depth of Field
Long focal lengths and large apertures allow you to isolate your subject from the chaos that surrounds it. I use the Av mode for the majority of my shooting. I also like to use a longer focal length lens to shrink the depth of field to a very narrow area (Figure 9.1).

ISO 200 • 1/1250 sec. • f/2.8 • 70mm lens
Figure 9.1 Having a large aperture setting can create a shallow depth of field to isolate the subject.
The blurred background and foreground force the viewer’s eye toward the sharper, in-focus areas, which gives greater emphasis to the subject.
Occasionally a greater depth of field is required to maintain a sharp focus across a greater distance. This might be due to the sheer depth of your subject, where you have objects that are near the camera but sharpness is desired at a greater distance as well (Figure 9.2).

ISO 100 • 1.5 sec. • f/22 • 14mm lens
Figure 9.2 Getting sharp focus from near to far requires a small aperture setting. A wide-angle lens doesn’t hurt either.
Or perhaps you are photographing a reflection in a puddle. With a narrow depth of field, you could only get the reflected object or the puddle in focus. By making the aperture smaller, you will be able to maintain acceptable sharpness in both areas (Figure 9.3).

ISO 400 • 1/125 sec. • f/11 • 55mm lens
Figure 9.3 Getting a distant subject in focus in a reflection, along with the reflective surface, requires a small aperture.
Angles
Having strong angular lines in your image can add to the composition, especially when they are juxtaposed to each other (Figure 9.4). This can create a tension that is different from the standard horizontal and vertical lines that we are so accustomed to seeing in photos.

ISO 100 • 1/250 sec. • f/11 • 18mm lens
Figure 9.4 The strong angular lines of the railings and shadows create a dynamic composition.
Point of View
Sometimes the easiest way to influence your photographs is to simply change your perspective. Instead of always shooting from a standing position, try moving your camera to a place where you normally would not see your subject. Try getting down on your knees or even lying on the ground. This low angle can completely change how you view your subject and create a new interest in common subjects (Figure 9.5).

ISO 100 • 1/800 sec. • f/2.8 • 50mm lens
Figure 9.5 I chose to shoot this old gas pump from a low angle and gave it a tilt for visual tension.
Patterns
Rhythm and balance can be added to your images by finding the patterns in everyday life and concentrating on the elements that rely on geometric influences. Try to find the balance and patterns that often go unnoticed (Figure 9.6).

ISO 1250 • 1/1600 sec. • f/5.6 • 29mm lens
Figure 9.6 Arched pathways always make for classic compositions.
Color
Color works well as a tool for composition when you have very saturated colors to work with. Some of the best colors are those within the primary palette. Reds, greens, and blues, along with their complementary colors (cyan, magenta, and yellow), can all be used to create visual tension (Figure 9.7). This tension between bright colors will add visual excitement, drama, and complexity to your images when combined with other compositional elements.

ISO 400 • 1/250 sec. • f/5.6 • 90mm lens
Figure 9.7 I loved how the vivid blue of the old birdhouse contrasted with the gray bark of the tree.
You can also use a color as a theme for your photography. One of the shots that I am known for is something that I call “The Blue Sky Shot.” If I am out shooting when the skies are blue, I can almost guarantee that I will try to use the sky as part of a background for some element of my image (Figure 9.8). The blue sky can act as a color contrast to my subject, giving a pleasing contrast, visual interest, and isolation to my subject.

ISO 200 • 1/2500 sec. • f/2.8 • 200mm lens
Figure 9.8 The predominance of the blue sky is used as a balance to the warm brick building below.
Contrast
We just saw that you can use color as a strong compositional tool. One of the most effective uses of color is to combine two contrasting colors that make the eye move back and forth across the image (Figure 9.9). There is no exact combination that will work best, but consider using dark and light colors, like red and yellow, or blue and yellow, to provide the strongest contrasts.

ISO 100 • 1.3 sec. • f/22 • 35mm lens
Figure 9.9 The bluish tones of the waterfall create a nice contrast to the vibrant moss of the landscape.
You can also introduce contrast through different geometric shapes that battle (in a good way) for the attention of the viewer. You can combine circles and triangles, ovals and rectangles, curvy and straight, hard and soft, dark and light, and so many more (Figure 9.10). You aren’t limited to just one contrasting element either. Combining more than one element of contrast will add even more interest. Look for these contrasting combinations whenever you are out shooting, and then use them to shake up your compositions.

ISO 400 • 1/30 sec. • f/22 • 48mm lens
Figure 9.10 I loved the contrast of colors in this image combined with the geometric shapes of the window and walls.
Leading Lines
One way to pull a viewer into your image is to incorporate leading lines. These are elements that come from the edge of the frame and then lead into the image toward the main subject (Figure 9.11). This can be the result of vanishing perspective lines, an element such as a river, or some other feature used to move from the outer edge in to the heart of the image.
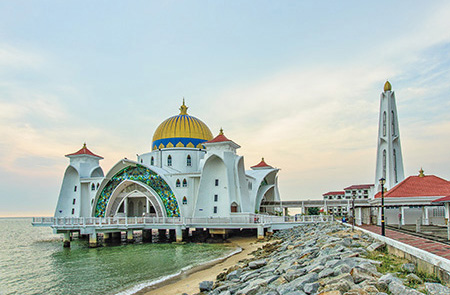
ISO 800 • 1/2000 sec. • f/5.6 • 24mm lens
Figure 9.11 The lines created by the shoreline and the walkway draw the eye back to the mosque.
Splitting the Frame
Generally speaking, splitting the frame right down the middle is not necessarily your best option. Although it may seem more balanced, it can be pretty boring. You should use the rule of thirds when deciding how to divide your frame (Figure 9.12).
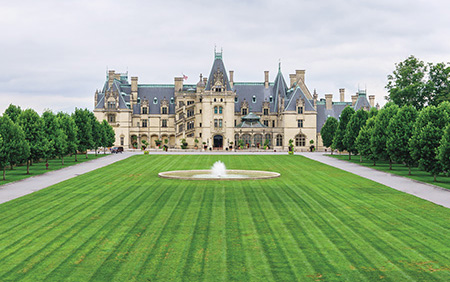
ISO 200 • 1/250 sec. • f/6.3 • 35mm lens
Figure 9.12 The roofline of the mansion runs along the upper third of the image, placing emphasis on everything below.
With horizons, a low horizon will give a sense of stability to the image. Typically, this is done when the sky is more appealing than the landscape below (Figure 9.13). When the emphasis is to be placed on the landscape, the horizon line should be moved upward in the frame, leaving the bottom two-thirds to the subject below.

ISO 400 • 1/60 sec. • f/14 • 35mm lens
Figure 9.13 The sky was much more interesting than the brush below the rock formation so the horizon was placed low in the scene.
Chapter 9 Assignments
Apply the shooting techniques and tools that you have learned in the previous chapters to these assignments, and you’ll improve your ability to incorporate good composition into your photos. Make sure you experiment with all the different elements of composition and see how you can combine them to add interest to your images.
Learning to see lines and patterns
Take your camera for a walk around your neighborhood and look for patterns and angles. Don’t worry so much about getting great shots as much as developing an eye for details.
The ABCs of composition
Here’s a great exercise that was given to me by my friend Vincent Versace: shoot the alphabet. This will be a little more difficult but with practice you will start to see beyond the obvious. Don’t just find letters in street signs and the like. Instead, find objects that aren’t really letters but have the shape of the letters.
Finding the square peg and the round hole
Circles, squares, and triangles. Spend a few sessions concentrating on shooting simple geometric shapes.
Using the aperture to focus attention
Depth of field plays an important role in defining your images and establishing depth and dimension. Practice shooting wide open, using your largest aperture for the narrowest depth of field. Then find a scene that would benefit from extended depth of field, using very small apertures to give sharpness throughout the scene.
Leading them into a frame
Look for scenes where you can use elements as leading lines and then look for framing elements that you can use to isolate your subject and add both depth and dimension to your images.
Share your results with the book’s Flickr group!
Join the group here: flickr.com/groups/t6s_t6ifromsnapshotstogreatshots