12. T6s / T6i Video: Beyond the Basics

ISO 200 • 1/320 sec. • f/9 • 200mm lens
Getting Professional-Looking Video from Your Rebel T6s / T6i
In Chapter 2, “First Things First,” I took you through some of the basics of setting up and using the video recording functions of the Canon EOS Rebel T6s / T6i. In this bonus chapter, we will take a look at some of the creative things you can do with your video. First, though, I’ll show you why the video capture feature is such a big deal in a DSLR.
It’s All About the Lenses
Video cameras have been around for a long time, so why is it such a big deal that you can now use your DSLR camera to record video? The answer is simple: it’s all about the lenses. If you have any experience using a video camcorder, you know that it always seems like everything is in focus. Though this isn’t always a bad thing, it can also be pretty boring. Using DSLR video allows you to use faster lenses (larger apertures), which can give you more shallow depth of field in your videos. This shallow depth of field can add a sense of dimension and depth that is normally lacking in most of your standard video cameras. The truth is that many videographers are turning their attention from video cameras costing many thousands of dollars to the much more affordable DSLR video camera to produce similar high-definition results.
Not only will using the T6s / T6i allow you to capture video with a more shallow depth of field, but you’ll also have the flexibility of using different lenses for different effects. Though you may own only one lens right now, you have the ability to buy specialty lenses to enhance your video as well as your still capture. Any lens that you can use for still photography on your T6s / T6i can also be used for video, including ultra-wide lenses such as the EF 15mm Fisheye f/2.8 ED lens (Figure 12.1), the EF-S 18-200mm f/3.5-5.6 IS, or even the EF-S 60mm Micro f/2.8D for getting extreme close-up videos.
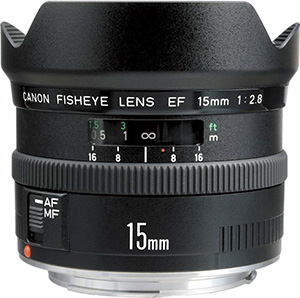
Figure 12.1 Using specialty lenses such as this 15mm fish-eye will add a different perspective to your video.
Speaking of Filters...
Okay, I wasn’t just speaking about filters but we did cover them in the “Pimp My Ride” bonus chapter. A real advantage to using your T6s / T6i as a video camera is that you have the same options for accessories that you have for shooting still images.
Close-up
One of the accessories that we discussed for shooting macro images was the Canon closeup lens/filter and the extension tube. Well, guess what? You can use those same accessories for getting great close-up video of tiny subjects such as insects or flowers. They work just as they did in “Pimp My Ride,” although you will need to do some manual focusing for the extension tubes.
Polarizing
The polarizing filter offers the same benefits to your videos that it does for your photographs. By using this filter, you can eliminate the bluish color cast that can happen on those blue-sky days, bring accurate color and contrast to vegetation, reduce annoying reflections from water and glass, and darken your blue skies, giving them more depth and character. (See “Pimp My Ride” for more detail on the polarizing filter.)
Neutral density
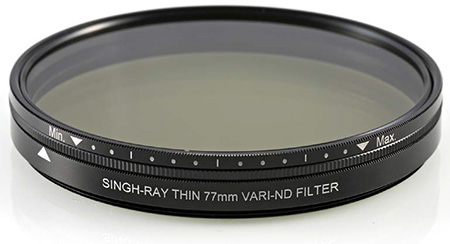
Shooting in bright daylight conditions can sometimes overwhelm any attempts at using a larger aperture, and thus a shallow depth of field (see the section “Getting a Shallow Depth of Field” later in this chapter). To help combat this problem, you might want to use a neutral-density (ND) filter to darken the scene. The filters come in varying densities or darkness values, so you must determine how much light you need to cut down to get the effect you desire. A great filter for this is the Singh Ray Vari ND filter (Figure 12.2), which lets you vary the amount of density by up to eight stops. The filter is available in sizes from 49mm up to 82mm, but it is pretty darned expensive. You can create your own variable ND filter by purchasing a linear polarizing filter and a circular polarizer, which cost much less. Place the linear polarizer on your lens and then the circular on top of that. Then just rotate the circular polarizer and watch the scene get darker and darker. Just dial in the amount of density you want and then start recording.
Tripods
Another topic that was covered in the other bonus chapter was the use of tripods to stabilize the camera for the purpose of achieving sharper images. Using a tripod for video is not quite the same as using one for still image applications. When you are shooting video, you want to present a nice, smooth video scene that is fairly free of camera shake. One particular case for this is the pan shot. When you are following a subject from side to side, you want the viewer’s attention to be focused on the subject, not the shaky look of the video. To help in this cause, your preferred tool of choice should be a tripod with a fluid head. A fluid head looks a little different than a standard tripod head and usually features one long handle for controlled panning. To make things smooth, the head uses a system of small fluid cartridges within the panning mechanisms so that your panning movements are nice and smooth. You can get a fluid pan head like the Slik 504QF-II for around $65 that will mount on your existing tripod legs (if your existing tripod has a removable head) (Figure 12.3).

For more information on the Slik tripod head, go to www.thkphoto.com/products/slik/.
Easier LCD vision
I have one problem with shooting video on the T6s / T6i or any DSLR camera: I can’t use the viewfinder as I record. Instead I’m forced to use the rear LCD screen, and though it is very large and sharp, my old eyes tend to make me hold the camera fairly far away from my body to see the screen. But there is another option that is perfect for eyes like mine, or for anyone who wants a better look at their rear LCD while recording.
In the first bonus chapter I introduced you to the Hoodman Loupe, designed for viewing your rear LCD screen. This small device allows you to get a crisp view of your LCD screen thanks to its built-in diopter. The only problem is that you have to handhold the loupe against the screen while viewing, and doing so obviously ties up one of your hands. That’s why Hoodman came out with this great little device called the Cinema Strap (Figure 12.4), which lets you attach your Hoodman Loupe to the camera for hands-free operation. If you plan to do video recording, you will most certainly want to look into a device like this. Not only is it perfect for getting a great look at the LCD screen while you’re recording, it also helps you avoid glare on the screen while working outdoors.
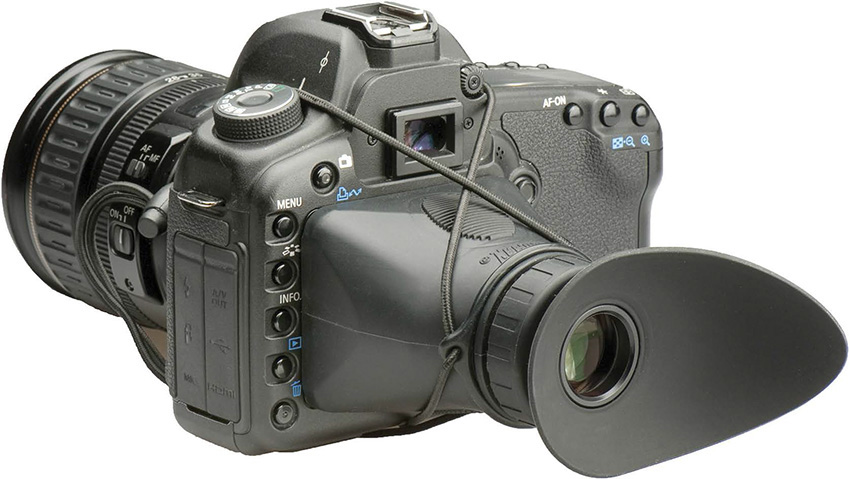
Figure 12.4 The Cinema Strap offers an easy way to mount your Hoodman Loupe to your camera for hands-free use.
Getting a Shallow Depth of Field
Achieving the look of a production cinema camera means working with shallow depths of field. A problem you might encounter when trying to get a large aperture in your video will be that the camera wants to use an auto-exposure mode to establish the correct settings for recording video. To get the benefit of a large aperture, you must do one of two things: either fool the camera for just a bit or shoot in Manual mode. To get a large aperture, point your camera at a dark part of the scene and then engage the AE Lock feature. Because the normal button used for AE Lock is used for autofocus in the video mode, you will have to use the ISO button to lock in the auto-exposure setting.
Locking the exposure
1. Turn your camera power switch to the Movie setting. This will turn on the Live View screen.
2. Focus on your subject and then point your camera at a dark area and press the (![]() ) button to lock in the exposure (a dark scene will force the camera to use a large aperture; a bright scene will use a small aperture with greater depth of field).
) button to lock in the exposure (a dark scene will force the camera to use a large aperture; a bright scene will use a small aperture with greater depth of field).
3. Press the Record button to begin recording your movie.
Adjusting the Metering Timer
Locking in the exposure is pretty handy, but the camera has a timer setting that will cancel the held exposure after a set period of time. The default is 8 seconds, so you will probably want to adjust that to something a bit more useful.
1. Turn your camera power switch to the Movie setting.
2. Press the Menu button and navigate to the first movie menu.
3. Select Metering timer and press Set (A).
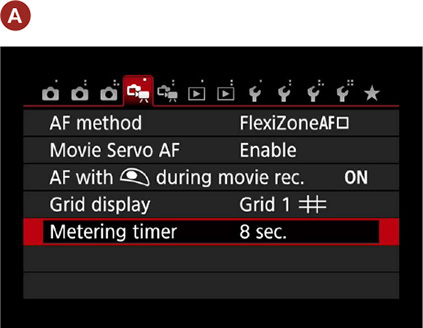
4. Select the time option you want for your recording and press Set (B).
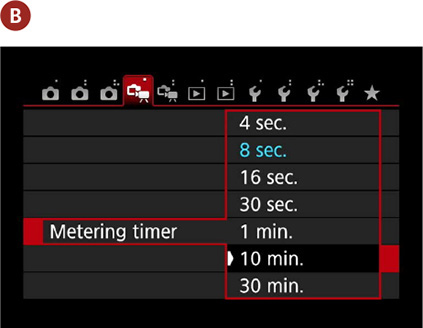
Once you have locked in your exposure, it will hold for the time you have now set. If you want to end it at any time, simply press the magnify button.
This method works well but you will notice that your scene will probably look overexposed because you used a darker area to set the video exposure. To keep the locked in exposure but make the scene darker, rotate the Quick Control dial on the T6s to dial in some exposure compensation. On the T6i, you will press the Av button on the back of the camera and use the main dial to adjust the compensation.
Using the Touchscreen for Fast Focusing
One of my favorite features on the T6s / T6i has got to be the touchscreen. That may be because I’m so used to using my touchscreen on my phone, but in any case it’s an intuitive way to interact with your camera’s video features. This is especially true when you are focusing during video capture. Although there are several different focusing modes for video capture, I find that being able to just tap on the area of the screen where I want the focus to be is extremely fast and fluid. Using the touchscreen also gives you the ability to interact with the camera’s video features and settings by pressing the Q button and then tapping on the item that you want to adjust. It’s just a great way to connect with your camera. If you haven’t tried it, give it a quick touch and you’ll see what I mean.
Giving a Different Look to Your Videos
Anyone can shoot video and get a decent movie, but here are a couple of tips to add some visual excitement to your movies. Don’t settle for average when you can jazz things up with a simple picture style or white balance change.
Using picture styles
Something that a lot of people don’t realize is that you can use the picture styles to give your video a completely different look. Sure, you can use the Standard style for everyday video, but why not add some punch by using a different picture style setting? You can set up your own user-defined style to add color saturation and sharpness, or you can use one of the predefined styles. Maybe you want to shoot a landscape scene. Go ahead and set the picture style to the Landscape setting to improve the look of skies and vegetation. If you want to get creative, try using the Monochrome setting to shoot in black and white. The great thing about using the picture styles is that you will see the effect right on your LCD screen as you record so you will know exactly what your video is going to look like. Want to kick things up a notch? Try customizing the picture styles and do things like shoot sepia-colored video. Check out the “Classic Black and White Portraits” section of Chapter 6, “Say Cheese!,” to learn how to customize the look of your Monochrome picture style.
White balance
Another way to change the look of your video is to select a white balance that doesn’t match your scene. You can warm up your scene by using a cloudy or shade setting. If you want to completely change the mood of the video, try selecting a white balance setting that is different from the actual light source that you are working in, like the Tungsten setting while shooting in daylight, or maybe the Daylight setting while shooting in tungsten. Don’t be afraid to be creative and try out different looks for your video.
Tips for Better Video
Of course there are little things you can do to add to the overall quality, look, and feel of your video. Check out these simple tips that will add some professional touches to your next video shoot.
Shoot short clips
Even though your camera can record fairly long video sequences, you should limit your shooting time to short clips and then edit them together. Here’s the deal: most professional videos shot today consist of short video sequences that are edited together. If you don’t believe me, watch any TV show and see how long you view a continuous sequence. I’m guessing you won’t see any clip that is longer than about 10 seconds in length. You can thank music videos for shortening our attention span, but the reality is that your video will look much more professional if you shoot in shorter clips and then edit them together, which brings me to the next tip.
Stage your shots
If you are trying to produce a good-looking video, take some time before you begin shooting to determine what you want to shoot and where you want to shoot it from. You can mark the floor with tape to give your “actors” a mark to hit. You can also use staging to figure out where your lens needs to be set for correct focus.
Use manual focus
If you want to change the point of focus in your video while you are recording, you should learn to manually focus the lens. The autofocus system will work while you are recording, but it is not always the best option. For one thing, the focus motor can be a little loud during focus operations. This isn’t a problem unless you are recording sound with your video, in which case you will hear the autofocus motor moving back and forth as your camera refocuses. Even if you aren’t recording audio or you’re using an external mic, the autofocus can be slow, and it has a tendency to move in and out of focus several times before settling on the right spot.
To change your focus, you need to set the camera lens to manual focus and then use the focus ring on the front of the lens. Doing so might be difficult at first, especially if you have never had to manually focus in the past. But with a little practice, you can become fairly adept.
Use Movie Servo AF
If you aren’t keen on manually focusing your camera, you can try out one of the automatic AF modes. The default mode is called Movie Servo AF, and it does a decent job of maintaining autofocus, although it’s good to understand the limitations. First, it’s a little slow. You can speed the process along by halfway pressing the shutter release button, but this will make the AF motor work faster and result in extra noise. Second, it helps to have a defined subject for the AF to track on. When it does lock on, it will allow you to follow focus with your subject as they move about the frame. If at any time you want to disable the AF, you can press the flash button on the front of the camera. This will temporarily turn off the Movie Servo AF mode and maintain the current point of focus. To turn the AF mode back on, press the flash button once again.
Get quiet videos with an STM lens
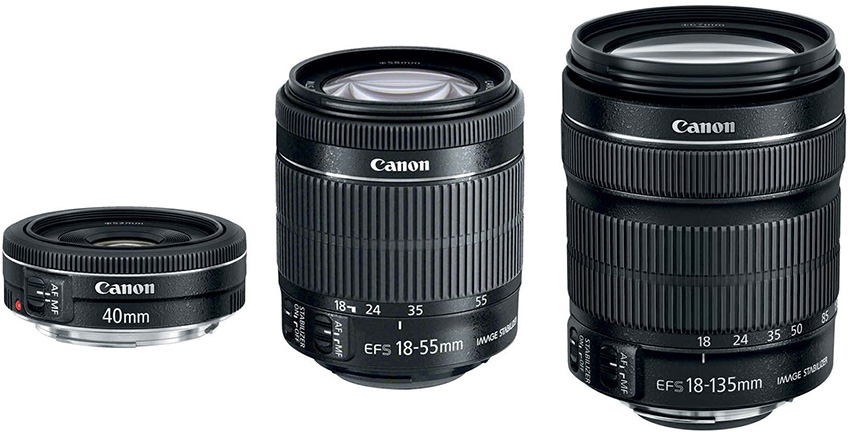
Not long ago, Canon introduced a new lens technology created specifically for video shooting. These special lenses have a technology in them called STM, or Stepping Motor, which allows the lenses to smoothly and silently focus. Using these lenses greatly reduces the AF noise associated with normal lenses, which means that your internal microphones will not pick up the focusing noise, thus allowing for better audio recording. Currently three lenses are available with STM technology: the EF-S 18-135mm f/3.5-5.6 IS STM, the EF 40mm f/2.8 STM, and the EF-S 18-55mm f/3.5-5.6 IS STM (Figure 12.5).
Capture a still frame
You may find that at some time during your movie recording you want to capture a high-resolution still frame. This is possible by using the shutter release button. While you are in record mode, press the shutter button fully to initiate a still frame capture. This is similar to taking a picture in Live View mode. Once the image has been saved, the camera will continue recording the video sequence. Your image will be saved as a separate file on your memory card.
Avoid the quick pan
Your camera uses something called a rolling shutter while recording video that, as the name implies, rolls from the top to the bottom of the frame. If you are panning quickly from one side to another, you will see your video start to jiggle like it is being shot through gelatin. This is something that can’t be overcome except by using a slower panning motion. If you are going to be shooting a fast subject, consider using a lower resolution to get a faster frame rate and smoother motion, such as the 60 frames per second option. The more frames you record, the smoother the video will look when played back.
Use a fast memory card
Your video will be recording at up to 60 frames per second, and as it is recording it’s placing the video into a buffer, or temporary holding spot, while the camera writes the frames to your memory card. If you are using a slower, bargain memory card, it might not be able to keep up with the flow of video—thus resulting in dropped frames. The camera will not record some frames because the buffer will fill up before the images have time to be written. This will be seen as small skips in the video when you watch it later. You can prevent this from happening by using an SD card that has a speed rating of class 6 or higher (Figure 12.6). These cards have faster writing speeds and will keep the video moving smoothly from the camera to the card.
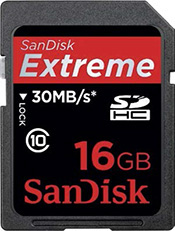
Figure 12.6 A fast card such as this SanDisk SDHC Class 10 card will help capture more of your video frames.
Get yourself a Mini-HDMI cable
When you are ready to play back your video, you can run the video directly from your camera to your TV. To get the best quality picture on your TV, you use a TV capable of displaying high-definition video, which also means you should use an HDMI cable to connect the camera to the TV. HDMI (high-definition multimedia interface) cables will carry your uncompressed video to your HD TV in all its glory. The only problem is that your camera didn’t have an HDMI cable included in the box when you bought it. This means that you will have to purchase one to take advantage of the HD playback. If you are thinking that you already own an HDMI cable for connecting your other media components to your TV, you might want to take another look. Your camera utilizes a mini-HDMI connection, so most standard cables designed for video components won’t work. If you decide to purchase one, make sure you get a Mini-HDMI-to-HDMI cable. You can find them at most electronics stores where HD cameras and TVs are sold. (Here’s a hint for purchasing a Mini-HDMI cable: search the Internet for the best prices. Most electronics stores have huge markups on cables, and you can usually find a suitable one online for about a third of the price of those in your local store.)
Turn off the sound
In Chapter 2, I explained how to turn off the audio option while recording your video. If you don’t have an external mic hooked up to your camera, your only audio option is to use the built-in microphone on the camera. The truth is that the microphone does not produce audio that’s up to the quality of the video. To make your videos stand out, try turning it off and then add a music soundtrack. You will be amazed at how the right music can enhance a video. Of course you will need to do this on your computer, which will require special video-editing software, which leads us to our next section.
Watching and Editing Your Video
You aren’t done when you turn off the camera. Just like photos need to be moved to a computer or printed, your video will need to be sent to another device to be watched or to your computer to be edited. Here are a few ideas of what to do when the director calls “Cut!”
Watching video
You can watch your video in one of three ways:
• In your camera
• On your TV
• On your computer
To watch your video clips on your camera, press the Playback button and then press the Set button to activate the play commands. If you have the touchscreen active, you can use your finger to tap the control buttons right on your screen. Otherwise, just use the left/right buttons (Cross keys) and the Set button to control the playback options. Pretty simple.
To watch on your TV, you can use the Mini-HDMI cable discussed earlier and connect to your HDMI-compatible TV. You’ll need to tune your TV to the channel used for HDMI input and then play the video just as you would if you were watching it in-camera.
If you would like to watch your video on your computer, you will first need to download the files or access them using an SD card reader. For Apple owners, you can use Apple’s QuickTime Player to watch the video. If it is too large for your screen, try pressing Command-0 to make the video half-size, or press Command-3 to fit the video to your screen. For Microsoft Windows users, it is possible to use the Windows Media Player, but you might need to download a special codec. Instead, try downloading the Apple QuickTime Player (www.apple.com/quicktime). The basic player is free and will allow you to view your movie files.
Editing video
If you are a Mac owner, you can edit your HD video using the iMovie application. Several applications are available for Windows editing, such as Adobe’s Premiere Elements 13 video-editing software. You can find more information and download a trial version at www.adobe.com/products/premiere-elements.html.
If you are using the Windows versions 7 or 8 operating systems, check out the Windows Live Movie Maker program. It has a variety of editing features, handles HD video, and allows you to send your finished videos to places like YouTube and Facebook. If you don’t already have Windows Live Movie Maker on your system, go here for more information on how to download and install the free program: http://windows.microsoft.com/en-us/windows-live/movie-maker.
Expanding your knowledge
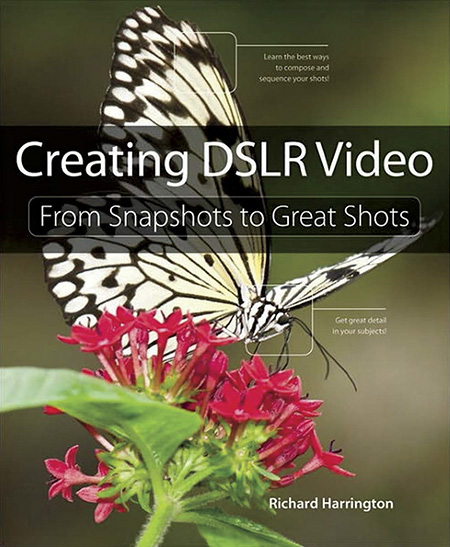
I have given you some quick tips and suggestions to get you started with your movie making, but if you want to get serious there’s a lot more you need to know. Videography can be a complex endeavor, and you have much to learn if you want to move beyond the simple video capture of the kids in the backyard or the trip to the amusement park. To explore all your camera has to offer in the way of video movie making, read Creating DSLR Video: From Snapshots to Great Shots (Peachpit Press, 2012; Figure 12.7). The author, Rich Harrington, is a true master at shooting and editing digital video and a top-notch instructor and author. This book is packed solid with everything you need to know about taking your DSLR video making to the next level and beyond.