
2. First Things First

A Few Things to Know and Do Before You Begin Taking Pictures
Now that we’ve covered the top ten tasks to get you up and shooting, we should probably take care of some other important details. You must become familiar with certain features of your camera before you can take full advantage of it. Additionally, we will take some steps to prepare the camera and memory card for use. So to get things moving, let’s start off with something that you will definitely need before you can take a single picture: a memory card.
Poring Over the Picture
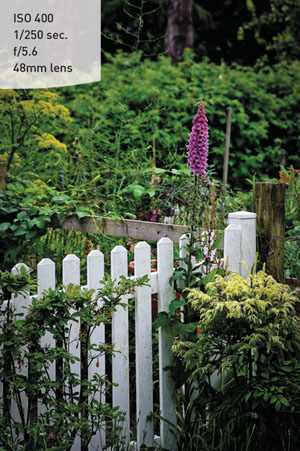
While strolling around Bainbridge Island with some friends, I came upon this small garden scene. It was early evening and it was slightly overcast, which was casting a soft even light down on the area, softening the shadows and adding great saturation to the plants.

Poring Over the Picture
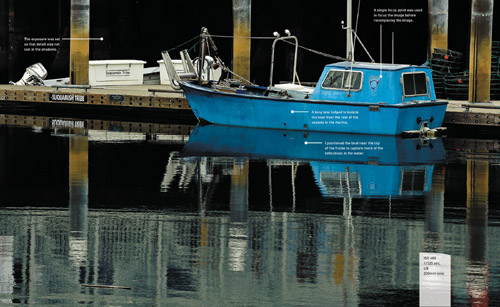
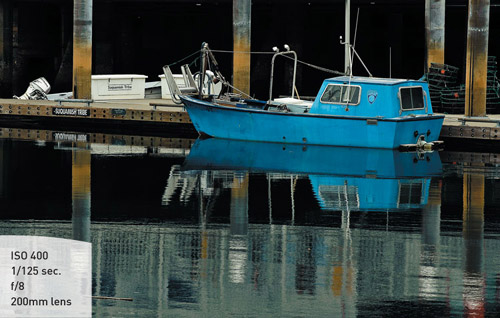
My buddy Don and I were taking a photowalk along the Seattle waterfront and came upon a small marina. Mixed in with all of the large yachts and fishing boats was this small blue boat that looked so out of place. I really loved the weathered look of the boat as it sat in a darker section of the marina. I decided to use a telephoto lens to isolate it from the other ships and make it the sole subject of my photo.
Choosing the Right Memory Card
Memory cards are the digital film that stores every shot you take until you move them to a computer. The cards come in all shapes and sizes, and they are critical for capturing all of your photos. It is important not to skimp when it comes to selecting your memory cards. The T1i uses Secure Digital (SD) memory cards (Figure 2.1).
Figure 2.1 Make sure you select an SD card that has enough capacity to handle your photography needs.

If you have been using a point-and-shoot camera, chances are that you may already own a Secure Digital (SD) media card. Which brand of card you use is completely up to you, but here is some advice about choosing your memory card:
• Size matters, at least in memory cards. At 15.1 megapixels, the T1i will require a lot of storage space, especially if you shoot in the RAW or RAW+JPEG mode (more on this later in the chapter) or shoot HD video. You should definitely consider using a card with a storage capacity of at least 4 GB.
• Consider buying High Capacity (SDHC) cards. These cards are generally much faster, both when writing images to the card as well as when transferring them to your computer. If you are planning on using the Continuous mode (see Chapter 5) for capturing fast action, you can gain a boost in performance just by using an SDHC card with a Class rating of at least 4 or 6. The higher the class rating, the faster the write-speed. Having a fast card will also benefit your video capture by keeping the flow of video frames moving quickly to your card.
• Buy more than one card. If you have already purchased a memory card, consider getting another. Nothing is worse than almost filling your card and then having to either erase shots or choose a lower-quality image format so that you can keep on shooting. With the cost of memory cards what it is, keeping a spare just makes good sense.
Formatting Your Memory Card
Now that you have your card, let’s talk about formatting for a minute. When you purchase any new SD card, you can pop it into your camera and start shooting right away—and probably everything will work as it should. However, what you should do first is format the card in the camera. This process allows the camera to set up the card to record images from your camera. Just as a computer hard drive must be formatted, formatting your card ensures that it is properly initialized. The card may work in the camera without first being formatted, but chances of failure down the road are much higher.
As a general practice, I always format new cards or cards that have been used in different cameras. I also reformat cards after I have downloaded my images and want to start a new shooting session. Note that you should always format your card in the camera, not your computer. Using the computer could render the card useless. You should also pay attention to the manufacturer’s recommendations in respect to moisture, humidity, and proper handling procedures. It sounds a little cliché, but when it comes to protecting your images, every little bit helps.
Most people make the mistake of thinking that the process of formatting the memory card is equivalent to erasing it. Not so. The truth is that when you format the card all you are doing is changing the file management information on the card. Think of it as removing the table of contents from a book and replacing it with a blank page. All of the contents are still there, but you wouldn’t know it by looking at the empty table of contents. The camera will see the card as completely empty so you won’t be losing any space, even if you have previously filled the card with images. Your camera will simply write the new image data over the previous data.
Formatting Your Memory Card
1. Insert your memory card into the camera.
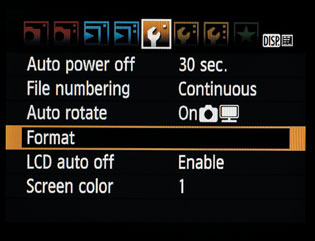
2. Press the Menu button and navigate to the first setup menu screen (the fifth from the left).
3. Press the down Cross key on the back of the camera to highlight the Format option and press Set (A).
A
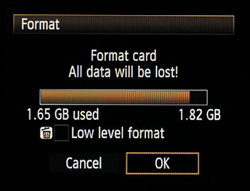
4. The default selection for the Format screen is Cancel, just in case you didn’t really want to format the card (B). Press the right Cross key to highlight OK. The screen will warn you that you will lose any data by formatting your card, so make sure that you have saved any images that you want onto your computer or elsewhere before formatting.
B
5. Press the Set button to finalize the formatting of the card.
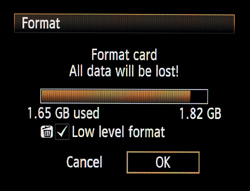
Note that when you perform the card formatting, you can select something called Low-Level Formatting, which performs a much more intensive formatting of the card. During the process, the camera will format all of the recordable sectors on the card. This process takes much longer than a normal formatting and does not need to be performed every time you format. You only need to do this if you see a slow-down in card performance. To enable the Low-Level Formatting option, simply follow the directions above but press the Trash button before starting the format process. This will put a checkmark next to the Low level format option (Figure 2.2).
Figure 2.2 Press the Trash button to enable Low-Level Formatting.
Updating the T1i’s Firmware
I know that you want to get shooting, but having the proper firmware can impact the way the camera operates. It can fix problems as well as improve operation, so you should probably take care of it sooner rather than later. Updating your camera’s firmware is something that the manual completely omits, yet it can change the entire behavior of your camera operating systems and functions. The firmware of your camera is the set of computer operating instructions that controls how your camera functions. Updating this firmware is a great way to not only fix little bugs but also gain access to new functionality. You will need to check out the information on the Canon Firmware update page (www.canon.com/eos-d/) to review how a firmware update will impact your camera, but it is always a good idea to be working with the most up-to-date firmware version available.
Checking the Camera’s Current Firmware Version Number
1. Rotate the Mode dial to select P (or any of the other modes in the Creative zone).
2. Press the Menu button to display the menu.
3. Turn the Main dial to get to the third camera setup menu, and you will see the currently installed firmware version number at the bottom of the settings. If this version is not the latest one listed on the Canon website, follow the steps in the next section to load the latest version.
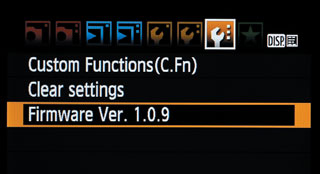
At the time this book was published, the current version of the firmware for the T1i was 1.0.9 and no update was available. Make sure you check the Canon web page often for any updates and then follow the directions below for updating your camera.
Updating the Firmware Directly from Your Computer
1. Download the firmware update file from the Canon website (A). (You can find the file by going to the Download Library section of the EOS camera site and entering the information about your camera.)

A
2. Download the Firmware Update file that matches your computer operating system (Windows or Macintosh).
3. Extract the downloaded firmware file as per your operating system (B).

B
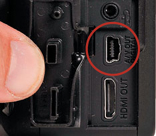
4. Attach your camera to the computer via USB and turn the camera on (C).
C
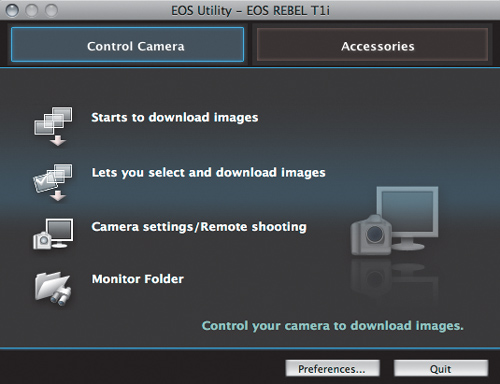
5. Open the EOS Utility program and select the Camera Settings/Remote Shooting option (D). (This program was included on the CD in your camera box. You will need to install it prior to performing this operation.)
D
6. When the panel opens, click the Set-Up icon and then click the Firmware button at the bottom of the panel.
7. Click OK and then locate the extracted firmware file to begin the update (E).
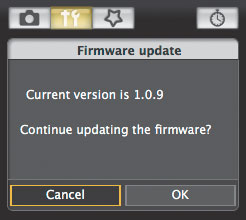
E
8. Click Yes on the confirmation screen to begin the update. Note that the software will not allow you to continue the update unless the camera is plugged into the AC power adapter or the battery is fully charged.
Cleaning the Sensor
Cleaning camera sensors used to be a nerve-racking process that required leaving the sensor exposed to scratching and even more dust. Now cleaning the sensor is pretty much an automatic function. Every time you turn the camera on and off, the sensor in the camera vibrates to remove any dust particles that might have landed on it.
There are three choices for cleaning in the camera setup menu: Auto Cleaning, Clean Now, and Clean Manually. By default, the camera is set to automatically clean the sensor every time you power on and off. You can disable this function, but it is best to leave it on.
The one cleaning function that you will need to use via this menu is the Clean Now feature. This should be done every time that you remove the lens from the camera body. That is because removing or changing a lens will leave the camera body open and susceptible to dust sneaking into the body. If you never change lenses, you shouldn’t have too many dust problems. But the more often you change lenses, the more chances you are giving dust to enter the body. It’s for this reason that I have the Clean Now function added to the custom My Menu list (see Chapter 10).
Every now and then, there will just be a dust spot that is impervious to the shaking of the Auto Cleaning feature. This will require manual cleaning of the sensor. When you activate this feature, it will raise the camera mirror and give you access to the sensor so that you can use a blower or other cleaning device to remove the stubborn dust speck. The camera will need to be turned off after cleaning to allow the mirror to reset.
If you choose to manually clean your sensor, use a device that has been made to clean sensors (not a cotton swab from your medicine cabinet). There are dozens of commercially available devices such as brushes, swabs, and blowers that will clean the sensor without damaging it. To keep the sensor clean, always store the camera with a body cap or lens attached.
The camera sensor is an electrically charged device. This means that when the camera is turned on, there is a current running through the sensor. This electric current can create static electricity, which will attract small dust particles to the sensor area. For this reason, it is always a good idea to turn off the camera prior to removing a lens. You should also consider having the lens mount facing down so that there is less opportunity for dust to fall into the inner workings of the camera.
Using the Clean Now Feature
1. Press the Menu button and use the Main dial to get to the second camera setup menu.
2. Use the down Cross key to highlight Sensor cleaning and then press the Set button (A).
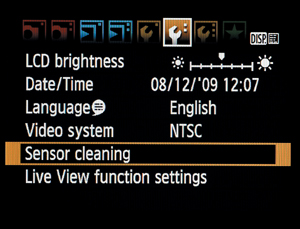
A
3. Use the right Cross key to select Clean now and press the Set button again (B).
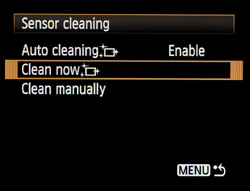
B
4. Press Set one more time to start the cleaning function.
5. To return to shooting mode, just lightly press the shutter release button.
Using the Right Format: RAW vs. JPEG
When shooting with your T1i, you have a choice of image formats that your camera will use to store the pictures on the memory card. JPEG is probably the most familiar format to anyone who has been using a digital camera. I touched on this topic briefly in Chapter 1, so you already have a little background on what JPEG and RAW files are.
There is nothing wrong with JPEG if you are taking casual shots. JPEG files are ready to use, right out of the camera. Why go through the process of adjusting RAW images of the kids opening presents when you are just going to email them to Grandma? Also, for journalists and sports photographers who are shooting nine frames per second and who need to transmit their images across the wire, again, JPEG is just fine. So what is wrong with JPEG? Absolutely nothing—unless you care about having complete creative control over all of your image data (as opposed to what a compression algorithm thinks is important).
As I mentioned in Chapter 1, JPEG is not actually an image format. It is a compression standard, and compression is where things go bad. When you have your camera set to JPEG—whether it is High, Medium, or Low—you are telling the camera to process the image however it sees fit and then throw away enough image data to make it shrink into a smaller space. In doing so, you give up subtle image details that you will never get back in postprocessing. That is an awfully simplified statement, but still fairly accurate.
So What Does RAW Have to Offer?
First and foremost, RAW images are not compressed. (There are some cameras that have a compressed RAW format but it is lossless compression, which means there is no loss of actual image data.) Note that RAW image files will require you to perform post-processing on your photographs. This is not only necessary; it is the reason that most photographers use it.
RAW images have a greater dynamic range than JPEG-processed images. This means that you can recover image detail in the highlights and shadows that just aren’t available in JPEG-processed images.
There is more color information in a RAW image because it is a 14-bit image, which means it contains more color information than a JPEG, which is almost always an 8-bit image. More color information means more to work with and smoother changes between tones—kind of like the difference between performing surgery with a scalpel as opposed to a butcher’s knife. They’ll both get the job done, but one will do less damage.
Regarding sharpening, a RAW image offers more control because you are the one who is applying the sharpening according to the effect you want to achieve. Once again, JPEG processing applies a standard amount of sharpening that you cannot change after the fact. Once it is done, it’s done.
Finally, and most importantly, a RAW file is your negative. No matter what you do to it, you won’t change it unless you save your file in a different format. This means that you can come back to that RAW file later and try different processing settings to achieve differing results and never harm the original image. By comparison, if you make a change to your JPEG and accidentally save the file, guess what? You have a new original file, and you will never get back to that first image. That alone should make you sit up and take notice.
Advice for New RAW Shooters
Don’t give up on shooting RAW just because it means more work. Hey, if it takes up more space on your card, buy bigger cards or more smaller ones. Will it take more time to download? Yes, but good things come to those who wait. Don’t worry about needing to purchase expensive software to work with your RAW files; you already own a program that will allow you to work with your RAW files. Canon’s Digital Photo Professional software comes bundled in the box with your camera and gives you the ability to work directly on the RAW files and then output the enhanced results.
My recommendation is to shoot in JPEG mode while you are using this book. This will allow you to quickly review your images and study the effects of future lessons. Once you have become comfortable with all of the camera features, you should switch to shooting in RAW mode so that you can start gaining more creative control over your image processing. After all, you took the photograph—shouldn’t you be the one to decide how it looks in the end?
Selecting RAW + JPEG
Your camera has the added benefit of being able to write two files for each picture you take, one in RAW and one in JPEG. This can be useful if you need a quick version to email but want a higher-quality version for more advanced processing.
Note that using both formats requires more space on the memory card. I recommend that you use only one format or the other unless you have a specific need to shoot both.
Selecting Your Image Quality Setting
1. Press the Menu button and use the Main dial to select the first shooting menu tab.
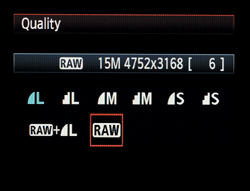
2. Use the Cross keys to highlight the Quality setting and press the Set button to enter the Quality setting page (A).
A
3. Use the left/right Cross keys to change the quality setting (B).
B
4. Press the Menu button to lock in your changes.
Lenses and Focal Lengths
If you ask most photographers what they believe to be their most critical piece of photographic equipment, they would undoubtedly tell you that it is their lens. The technology and engineering that goes into your camera is a marvel, but it isn’t worth a darn if it can’t get the light from the outside onto the sensor. The T1i, as a digital single lens reflex (dSLR) camera, uses the lens for a multitude of tasks, from focusing on a subject, to metering a scene, to delivering and focusing the light onto the camera sensor. The lens is also responsible for the amount of the scene that will be captured (the frame). With all of this riding on the lens, let’s take a more in-depth look at the camera’s eye on the world.
Lenses are composed of optical glass that is both concave and convex in shape. The alignment of the glass elements is designed to focus the light coming in from the front of the lens onto the camera sensor. The amount of light that enters the camera is also controlled by the lens, the size of the glass elements, and the aperture mechanism within the lens housing. The quality of the glass used in the lens will also have a direct effect on how well the lens can resolve details and the contrast of the image (the ability to deliver great highlights and shadows). Most lenses now routinely include things like the autofocus motor and, in some cases, an image-stabilization mechanism.
There is one other aspect of the camera lens that is often the first consideration of the photographer: lens length. Lenses are typically divided into three or four groups depending on the field of view they deliver.
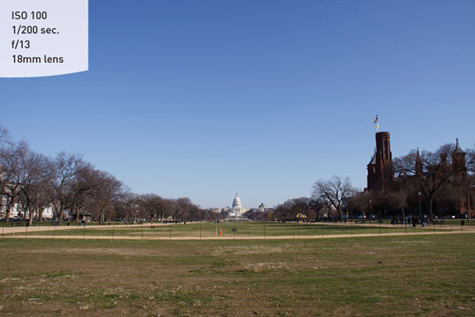
Wide-angle lenses cover a field of view from around 110 degrees to about 60 degrees (Figure 2.3). There is also a tendency to get some distortion in your image when using extremely wide-angle lenses. This will be apparent toward the outer edges of the frame. As for which lenses would be considered wide angle, anything 35mm or smaller could be considered as wide.
Figure 2.3 The 18mm lens setting provides a wide view of the scene but little detail of distant objects.
Wide-angle lenses can display a large depth of field, which allows you to keep the foreground and background in sharp focus. This makes them very useful for landscape photography. They also work well in tight spaces, such as indoors, where there isn’t much elbow room available (Figure 2.4). They can also be handy for large group shots but due to the amount of distortion, not so great for close-up portrait work.
Figure 2.4 When shooting in tight spaces, such as indoors, a nice wide-angle lens helps capture more of the scene.

A normal lens has a field of view that is about 45 degrees and delivers approximately the same view as the human eye. The perspective is very natural and there is little distortion in objects. The normal lens for full-frame and 35mm cameras is the 50mm lens, but for the T1i it is more in the neighborhood of a 35mm lens (Figure 2.5).
Figure 2.5 Long considered the “normal” lens for 35mm photography, the 50mm focal length can be considered somewhat of a telephoto lens on the T1i because it has the same angle of view and magnification as an 80mm lens on a 35mm camera body.

Normal focal length lenses are useful for photographing people, architecture, and most other general photographic needs. They have very little distortion and offer a moderate range of depth of field (Figure 2.6).
Figure 2.6 The normal lens worked well in this image by providing enough coverage area while not distorting the lines of the fence.
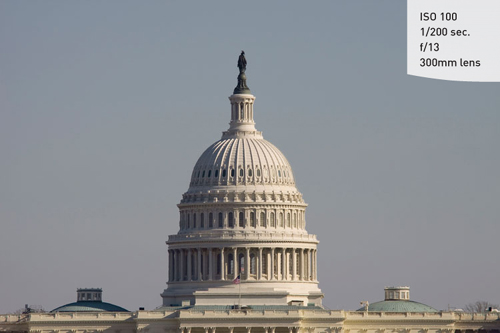
Most longer focal length lenses are referred to as telephoto lenses. They can range in length from 135mm up to 800mm or longer, and have a field of view that is about 35 degrees or smaller. These lenses have the ability to greatly magnify the scene, allowing you to capture details of distant objects, but the angle of view is greatly reduced (Figure 2.7). You will also find that you can achieve a much narrower depth of field. They also suffer from something called distance compression, which means they make objects at different distances appear to be much closer together than they really are.
Figure 2.7 It would have been difficult for me to get this shot of the dome with anything less than a telephoto lens, since I was standing about a quarter of a mile away.
Telephoto lenses are most useful for sports photography or any application where you just need to get closer to your subject (Figure 2.8). They can have a compressing effect—making objects look closer together than they actually are—and a very narrow depth of field when shot at their widest apertures.
Figure 2.8 The long telephoto helped me isolate the boat from the rest of the ships in the area. The smaller aperture helped keep the reflection from becoming too soft.
A zoom lens is a great compromise to carrying a bunch of single focal-length lenses (also referred to as “prime” lenses). They can cover a wide range of focal lengths because of the configuration of their optics. However, because it takes more optical elements to capture a scene at different focal lengths, the light must pass through more glass on its way to the image sensor. The more glass, the lower the quality of the image sharpness. The other sacrifice that is made is in aperture. Zoom lenses typically have smaller maximum apertures than prime lenses, which means they cannot achieve a narrow depth of field or work in lower light levels without the assistance of image stabilization, a tripod, or higher ISO settings. (We’ll discuss all this in more detail in later chapters.)
The T1i can be purchased with the body only, but many folks will purchase it with a kit lens. The most common kit lens is the 18–55mm IS f/3.5–5.6. Another great lens option for the T1i is the 18–200mm EF-S IS lens. It is a great all-around lens that provides a range of focal lengths from the very wide to the medium telephoto. Combine that with some great image stabilization and you have what I like to call the perfect vacation lens. Unfortunately, it is not available as a kit lens at the moment, but it should definitely be considered if you are thinking of adding a new lens to your camera bag.
What Is Exposure?
In order for you to get the most out of this book, I need to briefly discuss the principles of exposure. Without this basic knowledge, it will be difficult for you to move forward in improving your photography. Granted, I could write an entire book on exposure and the photographic process—and many people have—but for our purposes I will just cover some of the basics. This will give you the essential tools to make educated decisions in determining how best to photograph a subject.
Exposure is the process whereby the light reflecting off a subject reflects through an opening in the camera lens for a defined period of time onto the camera sensor. The combination of the lens opening, shutter speed, and sensor sensitivity is used to achieve a proper exposure value (EV) for the scene. The EV is the sum of these components necessary to properly expose a scene. A relationship exists between these factors that is sometimes referred to as the “Exposure Triangle.”
At each point of the triangle lies one of the factors of exposure:
• ISO: Determines the sensitivity of the camera sensor. ISO stands for the International Organization for Standardization, but the acronym is used as a term to describe the sensitivity of the camera sensor to light. The higher the sensitivity, the less light is required for a good exposure. These values are a carryover from the days of traditional color and black and white films.
• Aperture: Also referred to as the f-stop, this determines how much light passes through the lens at once.
• Shutter Speed: Controls the length of time that light is allowed to hit the sensor.
Here’s how it works. The camera sensor has a level of sensitivity that is determined by the ISO setting. To get a proper exposure—not too much, not too little—the lens needs to adjust the aperture diaphragm (the size of the lens opening) to control the volume of light entering the camera. Then the shutter is opened for a relatively short period of time to allow the light to hit the sensor long enough for it to record on the sensor.
ISO numbers for the T1i start at 100 and then double in sensitivity as you double the number. So 200 is twice as sensitive as 100. The camera can be set to use 1/2- or 1/3-stop increments, but for ISO just remember that the base numbers double: 100, 200, 400, 800, and so on. There is also a wide variety of shutter speeds that you can use. The speeds on the T1i range from as long as 30 seconds to as short as 1/4000 of a second. When using the camera, you will not see the one over the number while looking through the viewfinder, so you will need to remember that anything shorter than a second will be a fraction. Typically, you will be working with a shutter speed range from around 1/30 of a second to about 1/2000, but these numbers will change depending on your circumstances and the effect that you are trying to achieve. The lens apertures will vary slightly depending on which lens you are using. This is because different lenses have different maximum apertures. The typical apertures that are at your disposal are f/4, f/5.6, f/8, f/11, f/16, and f/22.
When it comes to exposure, a change to any one of these factors requires changing one or more of the other two. This is referred to as a reciprocal change. If you let more light in the lens by choosing a larger aperture opening, you will need to shorten the amount of time the shutter is open. If the shutter is allowed to stay open for a longer period of time, the aperture needs to be smaller to restrict the amount of light coming in.
How is Exposure Calculated?
We now know about the exposure triangle—ISO, shutter speeds, and aperture—so it’s time to put all three together to see how they relate to one another and how you can change them as needed.
When you point your camera at a scene, the light reflecting off your subject enters the lens and is allowed to pass through to the sensor for a period of time as dictated by the shutter speed. The amount and duration of the light needed for a proper exposure depends on how much light is being reflected and how sensitive the sensor is. To figure this out, your camera utilizes a built-in light meter that looks through the lens and measures the amount of light. That level is then calculated against the sensitivity of the ISO setting and an exposure value is rendered. Here is the tricky part: there is no single way to achieve a perfect exposure because the f-stop and shutter speed can be combined in different ways to allow the same amount of exposure. See, I told you it was tricky.
Here is a list of reciprocal settings that would all produce the same exposure result. Let’s use the “sunny 16” rule, which states that, when using f/16 on a sunny day, you can use a shutter speed that is roughly equal to the ISO setting to achieve a proper exposure. For simplification purposes, we will use an ISO of 100.
RECIPROCAL EXPOSURES: ISO 100

If you were to use any one of these combinations, they would each have the same result in terms of the exposure (i.e., how much light hits the camera’s sensor). Also take note that every time we cut the f-stop in half, we reciprocated by doubling our shutter speed. For those of you wondering why f/8 is half of f/5.6, it’s because those numbers are actually fractions based on the opening of the lens in relation to its focal length. This means that a lot of math goes into figuring out just what the total area of a lens opening is, so you just have to take it on faith that f/8 is half of f/5.6 but twice as much as f/11. A good way to remember which opening is larger is to think of your camera lens as a pipe that controls the flow of water. If you had a pipe that was 1/2″ in diameter (f/2) and one that was 1/8″ (f/8), which would allow more water to flow through? It would be the 1/2″ pipe. The same idea works here with the camera f-stops; f/2 is a larger opening than f/4 or f/8 or f/16.
Now that we know this, we can start using this information to make intelligent choices in terms of shutter speed and f-stop. Let’s bring the third element into this by changing our ISO by one stop, from 100 to 200.
RECIPROCAL EXPOSURES: ISO 200

Notice that, since we doubled the sensitivity of the sensor, we now require half as much exposure as before. We have also reduced our maximum aperture from f/2.8 to f/4 because the camera can’t use a shutter speed that is faster than 1/4000 of a second.
So why not just use the exposure setting of f/16 at 1/250 of a second? Why bother with all of these reciprocal values when this one setting will give us a properly exposed image? The answer is that the f-stop and shutter speed also control two other important aspects of our image: motion and depth of field.
Motion and Depth of Field
There are distinct characteristics that are related to changes in aperture and shutter speed. Shutter speed controls the length of time the light has to strike the sensor; consequently, it also controls the blurriness (or lack of blurriness) of the image. The less time light has to hit the sensor, the less time your subjects have to move around and become blurry. This can let you control things like freezing the motion of a fast-moving subject (Figure 2.9) or intentionally blurring subjects to give the feel of energy and motion (Figure 2.10).
Figure 2.9 A fast shutter speed was used to capture the cutting power of the saw as it chewed through the wood.
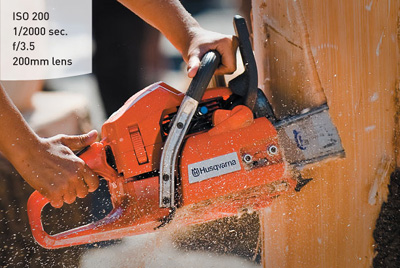
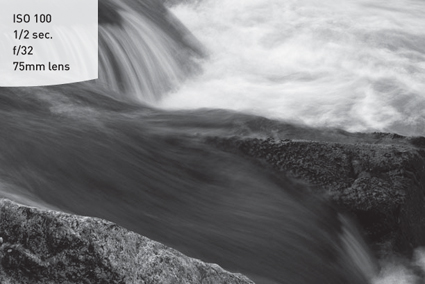
Figure 2.10 The slower shutter speed combined with the Monochrome picture style shows the flow of the water across the rocks.
The aperture controls the amount of light that comes through the lens, but also determines what areas of the image will be in focus. This is referred to as depth of field, and it is an extremely valuable creative tool. The smaller the opening (the larger the number, such as f/22), the greater the sharpness of objects from near to far (Figure 2.11).
Figure 2.11 By using a small aperture, the area of sharp focus extends from a point that is near the camera all the way out to distant objects. In this instance, I wanted the reflection and grass, as well as the temple, to be in focus.

A large opening (or small number, like f/2.8) means more blurring of objects that are not at the same distance as the subject you are focusing on (Figure 2.12).
Figure 2.12 Isolating a subject is accomplished by using a large aperture, which produces a narrow area of sharp focus.

As we further explore the features of the camera, we will learn not only how to utilize the elements of exposure to capture properly exposed photographs, but also how we can make adjustments to emphasize our subject. It is the manipulation of these elements—motion and focus—that will take your images to the next level.
Video and the T1i
One of the reasons you probably purchased the T1i instead of the competing cameras is its ability to capture video. Not just regular video, but high-definition video. As I discussed in the book’s introduction, I am going to keep the focus of this book on the photography aspects of the camera but that doesn’t mean I am going to simply ignore the video functions completely. In fact, I am dedicating a bonus chapter to some fun video tips. But I thought that I would at least cover the video basics here in Chapter 2 since we have already looked at a lot of other camera functions. First, let’s cover some of the basic facts about the movie making features.
First, the video recording is a separate feature from the Live View capabilities of the camera. To shoot video, you will need to turn your Mode dial to the Movie shooting position.
Once Movie mode is active, you will need to focus the camera by placing the white focus box on the subject (Figure 2.13) and holding down the ![]() AF Lock button button until the focus operation is complete and the rectangle turns red.
AF Lock button button until the focus operation is complete and the rectangle turns red.
Figure 2.13 Recording high-def video with your T1i.

Once your subject is in focus, you can push the Live View/Record button to begin the recording process. When the camera begins recording, you will notice that the focus box disappears and a few new icons show up on the LCD. In the top right will be a red Record icon to let you know that the camera is in active record mode. In the bottom of the screen is an exposure compensation scale and the battery level indicator. To stop the video recording, simply press the Live View/Record button a second time.
Video Quality
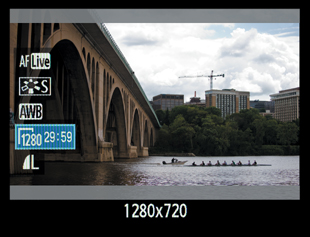
The highest quality video setting on your T1i will render high-definition video with a resolution of 1920 × 1080 or 1280 × 720 pixels. This is also referred to as 1080P and 720P. The “1080” and “720” represent the height of the video image in pixels, and the “P” stands for Progressive, which is how the camera actually records/draws the video on the screen. You can select a lower resolution video depending on your needs. The other video resolution is 640 × 480. For high-definition TV and computer/media station viewing, you will be served best using the 1080 or 720 recording resolutions. If you plan on recording for the internet, iPods, or portable video players, you might want to consider using the 640 × 480 resolution. The benefit of 640 × 480 is that it requires less physical storage since it contains a smaller pixel count. This means that you will not only fit more video on your storage card, you will also require less time to upload the video to the internet.
Setting the Movie Quality
1. To change the quality of your video recording, start by turning the Mode dial to the Movie shooting position.
2. Press the Disp. button to bring up the movie options.
3. Press the Set button to activate the cursor, and then use the Cross keys to highlight the resolution setting.
4. Once it is highlighted, use the Main dial to select the desired movie resolution and press the Set button again to return to Movie mode.
You can also use this method to adjust other settings such as white balance, picture style, Live View focus mode, and image quality for capturing still images.
Sound
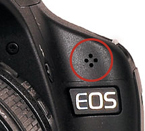
The T1i can record audio to go along with your video, but there are a couple of things to keep in mind when using it. The first is to make sure you don’t block the microphone on the front of the camera. If you look closely at the front of the camera body you will notice four small holes right above the silver EOS nameplate, located just above the lens release button (Figure 2.14). This should not be a problem if you are holding the camera as instructed in Chapter 1.
Figure 2.14 The T1i’s built-in microphone.
The next thing you need to know about the sound is that it is mono, not stereo. There is no way to change this feature, so when you are watching your recorded video on your TV or computer, you might only hear the sound coming from one speaker. You also have the option of turning off the audio all together. This can be useful if the sound might be distracting or you plan on using your own soundtrack to be added to the video at a later time.
Turning Off the Sound
1. Turn the Mode dial to the Movie shooting position.
2. Press the Menu button and navigate to the Sound recording option using the Cross keys, then press the Set button (A).
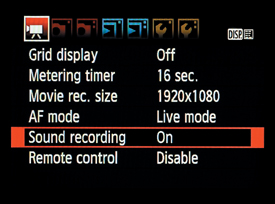
A
3. Select the Off option and press Set to lock in the change (B). Press the Menu button to return to recording mode.
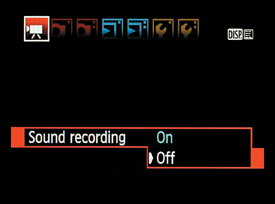
B
Focusing the Camera
As previously mentioned, you must focus the camera using the ![]() AF Lock button before you will be able to start recording video. Once the video is recording, you can refocus using the same button. If your subject moves closer or farther from the camera position, it will be necessary for you to refocus in order to maintain sharp focus. You cannot follow-focus your subject, which means that it will appear out of focus as it moves farther from or closer to the camera position. You can manually focus your lens by setting the focus switch on the lens to the MF position.
AF Lock button before you will be able to start recording video. Once the video is recording, you can refocus using the same button. If your subject moves closer or farther from the camera position, it will be necessary for you to refocus in order to maintain sharp focus. You cannot follow-focus your subject, which means that it will appear out of focus as it moves farther from or closer to the camera position. You can manually focus your lens by setting the focus switch on the lens to the MF position.
You will also need to manually zoom your lens to provide the coverage that is appropriate for the scene you are recording. The more you zoom in to your subject, the more critical the focus will need to be.
Taking Pictures While Recording
It is possible to capture a still image in the midst of a video recording session. To do this, simply press the shutter release button down completely. The image will be stored on the card as a separate file from the video. You will probably notice a small gap in your video where it was paused momentarily to allow the shutter to flip back into photo mode for a moment. Video recording will resume automatically after the picture has been taken.
Watching Your Videos
There are a couple of different options for you to review your video once you have finished recording. The first is probably the easiest: press the Image Review button to bring up the recorded image on the LCD screen, and then use the Set button to start playing the video. The left/right Cross keys act as the video controller and allow you to rewind and fast-forward as well as stop the video altogether.
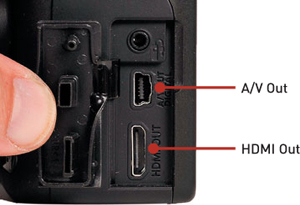
If you would like to get a larger look at things, you will need to either watch the video on your TV or move the video files to your computer. To watch on your TV, you can use the video cable that came with your camera and plug it into the small port on the side of the camera body (Figure 2.15). This will let you watch low-resolution video on your TV. To get the full effect from your HD videos you will need to purchase an HDMI cable (your TV needs to support at least 720 HD and have an HDMI port to use this option). Once you have the cable hooked up to your TV, simply use the same camera controls that you used for watching the video on the LCD screen.
Figure 2.15 The video ports on the T1i.
If you want to watch or use the videos on your computer, you will need to download the images using the Canon software or by using an SD card reader attached to your computer. The video files will have the extension “.mov” at the end of the file name. These files should play on either a Mac or PC using software that came with your operating system or that can be downloaded for free (Apple’s QuickTime for Mac and Windows is available at http://www.apple.com/quicktime/download/).
Manual Callout
You can check out all of the video features of your camera by turning to pages 121–128 of your owner’s manual.
For even more information about using video with your T1i, be sure to download the bonus chapters from Peachpit.com.
Chapter 2 Assignments
Formatting your card
Even if you have already begun using your camera, make sure you are familiar with formatting the SD card. If you haven’t done so already, follow the directions given earlier in the chapter and format as described (make sure you save any images that you may have already taken). Then perform the format function every time you have downloaded or saved your images or use a new card.
Checking your firmware version
Using the most up-to-date version of the camera firmware will ensure that your camera is functioning properly. Use the menu to find your current firmware version and then update as necessary using the steps listed in this chapter.
Cleaning your sensor
You probably noticed the sensor-cleaning message the first time you turned your camera on. Make sure you are familiar with the Clean Now command so you can perform this function every time you change a lens.
Exploring your image formats
I want you to become familiar with all of the camera features before using the RAW format, but take a little time to explore the format menu so you can see what options are available to you.
Exploring your lens
If you are using a zoom lens, spend a little time shooting with all of the different focal lengths, from the widest to the longest. See just how much of an angle you can cover with your widest lens setting. How much magnification will you be able to get from the telephoto setting? Try shooting the same subject with a variety of different focal lengths to note the differences in how the subject looks, and also the relationship between the subject and the other elements in the photo.
Recording some video clips
Take a little time to discover how the video function works on your camera. Set the video quality to 1080 and record a short sequence, and then try it with some of the lower-resolution settings. Open the video clips on your computer or hook the camera up to your TV and review the different video clips to see how the quality settings effect the video.