
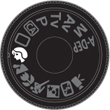
3. The Basic Zone
Get Shooting with the Automatic Camera Modes
The Canon T1i is an amazing camera that has some incredible features. In fact, with all of the technology built into it, it can be pretty intimidating for the person new to dSLR photography. For that reason, the good folks at Canon have made it a little easier for you to get some great-looking photographs without having to do a lot of thinking. Enter the Basic zone. The camera modes that comprise the Basic zone side of the Mode dial are simple, icon-labeled modes that are set up to use specific features of the camera for various shooting situations. Let’s take a look at the different modes and how and when to use them.
Poring Over the Picture
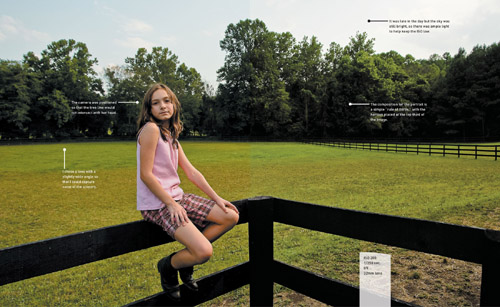
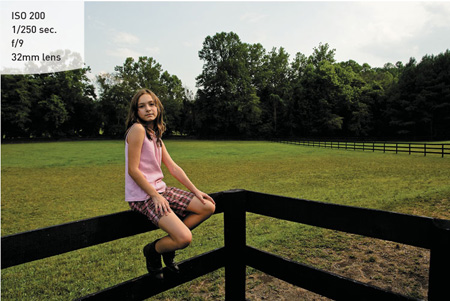
A short time back my nieces came up for a visit, so naturally I had to break out the camera. My oldest niece is quite the model and never passes up a chance to pose for me. We were down by the stables so I had her jump up on the fence and pose for a few shots. I wish all my kids were this cooperative.
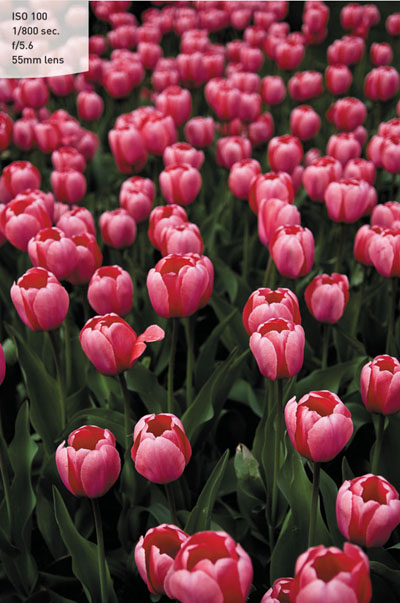
Poring Over the Picture
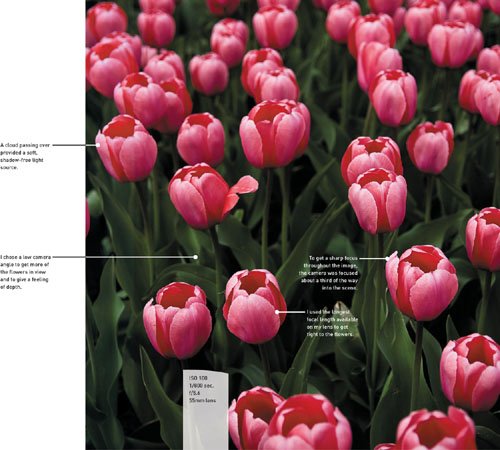
Madison, Wisconsin, is not where I would normally want to spend the spring. Not because it’s not a great town, but because their spring usually comes pretty late in the season. That wasn’t the case this year, and I was blessed with beautiful weather and blossoming flowers at every turn. This group of tulips had been planted on the grounds of the state capitol and were at the peak of their color.
Full Auto Mode

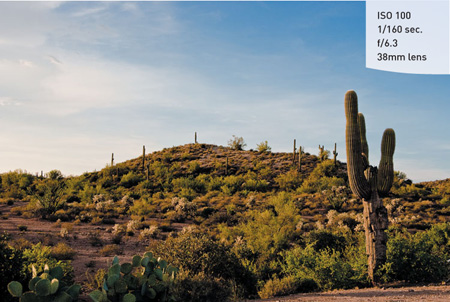
Full Auto mode is all about thought-free photography. There is little to nothing for you to do in this mode except point and shoot. Your biggest concern when using Full Auto mode is focusing. The camera will utilize the automatic focusing modes to achieve the best possible focus for your picture. Naturally, the camera is going to assume that the object that is closest to the camera is the one that you want to have the sharpest focus. Simply press the shutter button down halfway while looking through the viewfinder and you should see one of the focus points light up over the subject. Of course, you know that putting your subject in the middle of the picture is not the best way to compose your shot. So wait for the chirp to confirm that the focus has been set, and then, while still holding down the button, recompose your shot. Now just press down the shutter button the rest of the way to take the photo. It’s just that easy (Figure 3.1). The camera will take care of all your exposure decisions, including when to use flash.
Figure 3.1 Full Auto works great when you don’t want to think too much and just snap some shots. This picture was taken while walking a trail in Arizona.
Let’s face it: This is the lazy man’s mode. But sometimes it’s just nice to be lazy and click away without giving thought to anything but preserving a memory. There are times, though, when you will want to start using your camera’s advanced features to improve your shots.
Portrait Mode
One problem with Full Auto mode is that it has no idea what type of subject you are photographing and, therefore, uses the same settings for each situation. Shooting portraits is a perfect example. Typically, when you are taking a photograph of someone, you want the emphasis of the picture to be on them, not necessarily on the stuff going on in the background.
This is what Portrait mode is for. When you set your camera to this mode, you are telling the camera to select a larger aperture so that the depth of field is much narrower and will give more blur to objects in the background. This blurry background places the attention on your subject (Figure 3.2). The other feature of this mode is the automatic selection of the T1i’s built-in Portrait picture style (we’ll go into more detail about picture styles in later chapters). This style is optimized for skin tones and will also be a little softer to improve the look of skin.
Figure 3.2 Portrait mode is a great choice for shots like this one of my niece. She was placed to the side of the frame to make the composition a little more interesting.
Landscape Mode

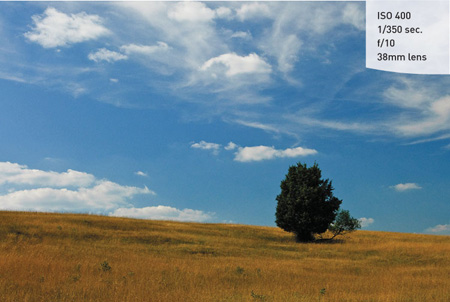
As you might have guessed, Landscape mode has been optimized for shooting landscape images. Particular emphasis is placed on the picture style, with the camera trying to boost the greens and blues in the image (Figure 3.3). This makes sense, since the typical landscape would be outdoors where grass, trees, and skies should look more colorful. This picture style also boosts the sharpness that is applied during processing. The camera also utilizes the lowest ISO settings possible in order to keep digital noise to a minimum. The downfall to this setting is that, once again, there is no control over any settings other than the file type and the ability to use the self-timer in 10-second mode.
Figure 3.3 This type of scene just calls out for the Landscape mode. The vegetation and sky were given more saturation and a small aperture was used for greater depth of field.
Close-up Mode
Although most zoom lenses don’t support true “macro” settings, that doesn’t mean you can’t shoot some great close-up photos. The key here is to use your camera-to-subject distance to fill the frame while still being able to achieve sharp focus. This means that you move yourself as close as possible to your subject while still being able to get a good sharp focus. Oftentimes, your lens will be marked with the minimum focusing distance. On my 18–55mm zoom it is .8 feet. To help get the best focus in the picture, Close-up mode will use the smallest aperture it can while keeping the shutter speed fast enough to get a sharp shot (Figure 3.4). It does this by raising the ISO or turning on the built-in flash—or a combination of the two. Unfortunately, we have no way to turn off or alter these adjustments, so the possibility exists of getting more digital noise (from a high ISO) or harsh shadows (from the flash) in your picture.
Figure 3.4 Close-up mode provided the proper exposure for this field of tulips.
Sports Mode
While this is called Sports mode, you can use it for any moving subject that you are photographing. The mode is built on the principles of sports photography: continuous focusing, large apertures, and fast shutter speeds (Figure 3.5). To handle these requirements, the camera sets the drive mode to Continuous shooting, the aperture to a very large opening, and the ISO to Auto. Overall, these are sound settings that will capture most moving subjects well. We will take an in-depth look at all of these features, like Continuous drive mode, in Chapter 5.
Figure 3.5 This is the type of shot that was made for Sports mode, where action-freezing shutter speeds and continuous focusing capture the moment.
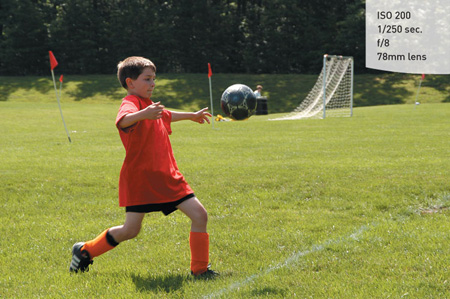
You can, however, run the risk of too much digital noise in your picture if the camera decides that you need a very high ISO (such as 1600). Also, when using Sports mode, you will need to frame your subject in the middle of the viewfinder so that the center focus point is on them. You won’t hear the familiar chirp or see the focus points illuminate in this mode because, as long as you are holding down the shutter button halfway, the camera will continue to focus on the subject. The only problem with this is that you won’t be able to recompose while shooting.
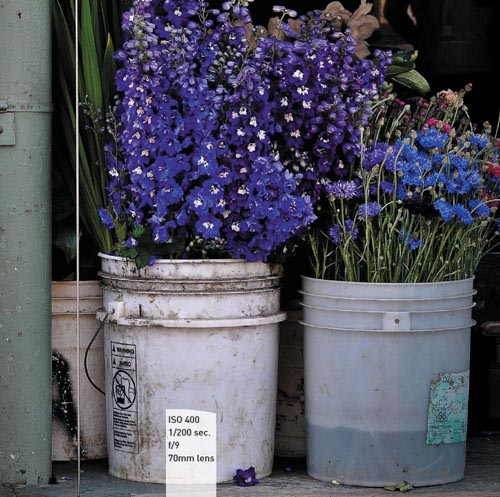
Night Portrait Mode
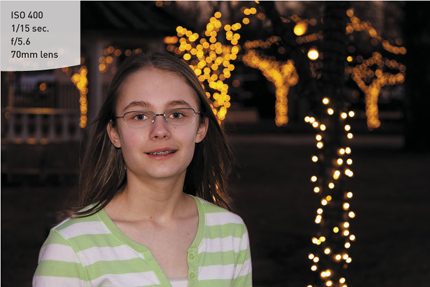
You’re out on the town at night and you want to take a nice picture of someone, but you want to show some of the interesting scenery in the background as well. You could use Full Auto mode, which would probably turn on the flash and take the photo. The problem is that, while it would give you a decent exposure for your subject, the background would be completely dark. The solution is to use Night Portrait mode. When you set the dial to this mode, you are telling the camera that you want to use a slower-than-normal shutter speed so that the background is getting more time (and, thus, more light) to achieve a proper exposure.
The typical shutter speed for using flash is about 1/60 of a second or faster (but not faster than 1/250 of a second). By leaving the shutter open for a longer duration, the camera allows more of the background to be exposed so that you get a much more balanced scene (Figure 3.6). This is also a great mode for taking portraits during sunset. Once again, the camera uses an automatic ISO setting, so you will want to keep an eye on it to make sure that setting isn’t so high that the noise levels ruin your photo.
Figure 3.6 Night Portrait mode uses a slower shutter speed, higher ISO, and larger aperture to balance the background lights with the flash exposure.
Flash Off Mode
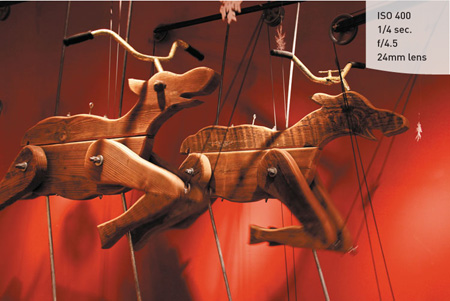
Sometimes you will be in a situation where the light levels are low but you don’t want to use the flash. It could be that you are shooting in a place that restricts flash photography, such as a museum, or it could be a situation where you want to take advantage of the available light, as when shooting candles on a birthday cake. This is where Flash Off mode comes into play.
By keeping the flash from firing, you will be able to use just the available ambient light while the camera modifies the ISO setting to assist you in getting good exposures (Figure 3.7). If the camera feels that the shutter speed is going to be slow enough to introduce camera shake, it will make the shutter speed indicator blink in the viewfinder. Fortunately, most of the new image stabilization (IS) lenses being sold today allow you to handhold the camera at much slower shutter speeds and still get great results. The two downfalls to this mode are the Auto ISO setting, which can quickly raise your ISO setting, and the possibility of getting blur from subject movement.
Figure 3.7 Flash would have ruined this shot of the Christmas sculpture being displayed in a museum. Flash Off mode made sure the pop-up flash stayed disabled in the low-light environment.
Creative Auto Mode
Let’s face it—there will be times when these automatic modes in the Basic zone are nice, but you will want more control over what the camera is doing and how your pictures look. In the Basic zone, this is where the Creative Auto (CA) mode comes in. You won’t have total control over the picture-making process, but you will be able to make some adjustments to gain a little more creative control over things like image brightness, use of flash, and background sharpness (Figure 3.8). To make these adjustments, the camera will display a series of adjustable settings on the LCD screen that can be changed by using the Cross keys and the Main dial (Figure 3.9).
Figure 3.8 Creative Auto mode means you can change how your picture looks, such as making the image lighter or darker. This shot benefited from some darkening, as the normal auto exposure would have tried to make the sky too bright. (Photo: Suzanne Revell)

Figure 3.9 All of the basic shooting information in one easy-to-read screen.
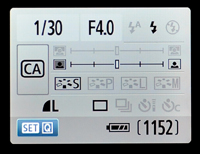
To make changes to your settings, press the Set button and then use the Cross keys to highlight the item that you want to change. Once highlighted, use the Main dial to select your new setting.
Flash
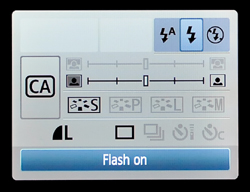
This option allows you to set the flash to one of three positions: Auto, On, or Off. In Auto, the flash will automatically pop up whenever the camera determines that there isn’t enough light in the scene for a proper exposure. If you want to force the flash to come on no matter what (as when you want to fill in some shadows), set the option to On (Figure 3.10). The Off setting will keep the flash from firing, just as it does in Flash Off mode.
Figure 3.10 This setting shows the flash being turned on.
Background Sharpness
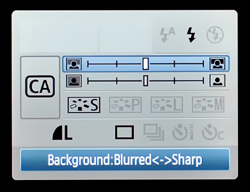
This setting forces the camera to use either a larger or smaller aperture setting to change the depth of field in your image: the smaller the aperture (which means a larger number such as f/16 or f/22), the greater the sharpness in your background. To change this setting, highlight the Background scale. Then move the index point to the right for a sharper background or to the left for more blur (Figure 3.11). Each step will change the exposure by about one f-stop.
Figure 3.11 Moving to the right uses a smaller aperture for greater depth of field.
Exposure
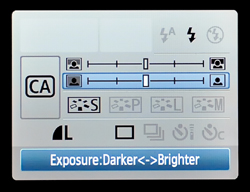
If you notice that your pictures are turning out a little lighter or darker than you wanted, highlight the Exposure setting. Each step that you move the index point will adjust the camera in 2/3-stop increments (Figure 3.12). Move it to the right for increased exposure (brighter) or to the left for decreased exposure (darker). The camera will use a mix of shutter speed and aperture to achieve the desired setting. This could also include using the flash if you have the Flash set to Auto.
Figure 3.12 The Exposure slider will increase or decrease the amount of exposure, resulting in lighter or darker images.
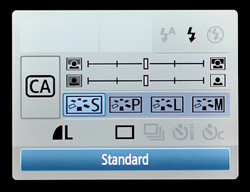
Picture Style
You can change the look of your image by using a different picture style to affect the sharpness, contrast, and color saturation (Figure 3.13). You can even select the Monochrome style to shoot in black and white. Four different styles are available: Standard, which is commonly used for sharp, vivid pictures; Portrait, which gives you smoother skin tones; Landscape, which gives you more vivid blues and greens; and Monochrome, used for black and whites. Note that, unlike with the modes in the Creative zone (see Chapter 4), you cannot change the parameters in the picture styles here; you must use their default values.
Figure 3.13 To add a little zip to your image, try changing the picture style.
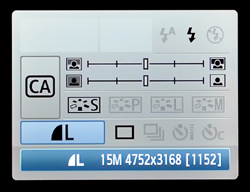
Quality
The Quality setting allows you to change the JPEG quality of your image and the image size, and it even allows you to select the RAW format for ultimate quality (Figure 3.14). Simply highlight this section of the Creative Auto screen and then scroll with the dial until you find your desired quality setting.
Figure 3.14 The L setting is for the large, high-quality JPEG file.
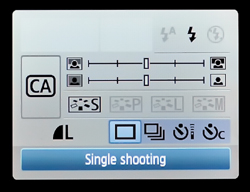
Drive Mode
Three different drive modes are available in the Creative Auto mode: Single shooting, Continuous shooting, and Self-Timer (Figure 3.15). In Single shooting, the camera takes only one picture when the shutter button is depressed all the way. Taking another picture requires releasing the button and then pressing it again. In Continuous, the camera continually takes photographs at about three frames per second until you release the button. You will probably want to use this setting for capturing action. The third setting available here is the Self-Timer option. Using this setting allows you to depress the shutter button and have the camera automatically fire 10 seconds later. The obvious use for this setting is to run around and get yourself in the picture. You might also consider using it for macro (close-up) or landscape photography, when you can set your camera on a tripod or a stable surface. The self-timer will let you take the picture without having to worry about camera shake from physically having your hands on the camera while activating the shutter.
Figure 3.15 You can decide if you want to take one shot at a time or use a more rapid-fire approach.
There is one small annoyance with using the Creative Auto mode. Every time you make changes to any of the settings, they will remain active only during the time that the camera is “awake.” As soon as the camera goes into Auto Off mode, all of the Creative Auto settings return to their defaults. One way to combat this is to go into the camera menu and change the Auto Off setting to a longer period. The default is one minute, but it can be set to as long as 30 minutes. There is even an option to turn it off completely, but I highly advise against using this setting as it will drain your camera battery much faster.
Changing the Auto Power Off
1. Press the Menu button and then use the Main dial to navigate to the first camera setup menu (A).
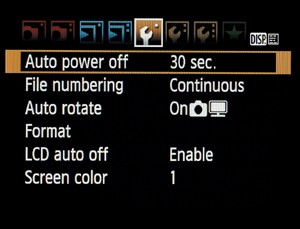
A
2. Use the Cross keys to highlight the Auto power off menu item and press the Set button.
3. Use the up/down Cross keys to select the duration of your choice and press the Set button to lock in the change (B).
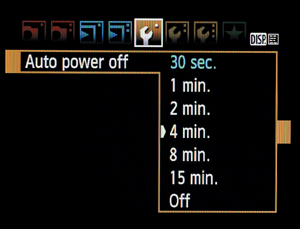
B
Why You Will Never Want to Use the Basic Zone Again
With so many easy-to-use camera modes, why would anyone ever want to use anything else? Well, the first thing that comes to my mind is control. It is the number one reason for using a digital SLR camera. The ability to control every aspect of your photography will open up creative avenues that just aren’t available in the Basic zone. Let’s face it: there is a reason that the Mode dial is split into two different categories. Let’s look at what we are giving up when we work in the Basic zone.
• ISO. No options are available in any of the automatic modes in the Basic zone to change the ISO setting from the default Auto ISO setting. This will undoubtedly lead to unwanted digital noise in your images when the ISO begins to reach up into the higher settings.
• Picture style. If you are using anything but the Creative Auto mode, you cannot change the picture style or any of its attributes to fine-tune your images.
• Color space. The default is set to sRGB, and there is no way to change it. If you plan on printing any of your pictures, the preferred yet unavailable setting is Adobe RGB.
• White balance. There is no choice available for white balance. You are simply stuck with the Auto setting. This isn’t always a bad thing, but your camera doesn’t always get it right. And in the Basic zone, there is just no way to change it.
• Auto focus. Each of the modes uses a specific focus type. CA, Full Auto, and No Flash modes use AI Focus; Sports uses the AI Servo; and the four remaining modes utilize the One Shot focus mode. There is no way to change these. Even more frustrating is the fact that they all use the Auto Focus Point selection. This means that you can’t manually select a focus point, so you must constantly recompose your image.
Another thing you will find when using any of the automatic modes in the Basic zone is that the options in the main camera menu have been reduced to just a few user-friendly choices. And yet another missing camera feature in the Basic zone is Live View. It is disabled in the Basic zone, so to use it you have no choice but to move on over to the Creative zone (see the next chapter). These aren’t the only restrictions to using the Basic zone, but they should be enough to make you want to explore the Creative side of the dial.
Chapter 3 Assignments
These assignments will have you shooting in the various Basic modes so that you can experience the advantages and disadvantages of using them in your daily photography.
Shooting in Full Auto mode
It’s time to give up complete control and just concentrate on what you see in the viewfinder. Set your camera to Full Auto and practice shooting in a variety of conditions, both indoors and outside. Take notice of the camera settings when you are reviewing your pictures. Try using the One Shot focus to pick a focus and then recompose before taking the picture.
Checking out Portrait mode
Grab your favorite photogenic person and start shooting in Portrait mode. Try switching between Full Auto and Portrait mode while photographing the same person in the same setting. You should see a difference in the sharpness of the background as well as the skin tones. If you are using a zoom lens, set it to about 50mm if available.
Capturing the scenery with Landscape and Close-up modes
Take your camera outside for some landscape and macro work. First, find a nice scene and then, with your widest available lens, take some pictures using Landscape mode and then switch back to Full Auto so that you can compare the settings used for each image as well as the changes to colors and sharpness. Now, while you are still outside, find something in the foreground—a leaf or a flower—and switch the camera to Close-up mode. See how close you can get and take note of the f-stop that the mode uses. Then switch to Full Auto and shoot the same subject.
Stopping the action with Sports mode
This assignment will require that you find a subject that is in motion. That could be the traffic in front of your home or your child at play. The only real requirement is that the subject be moving. This will be your opportunity to test out Sports mode. There isn’t a lot to worry about here. Just point and shoot. Try shooting a few frames one at a time and then go ahead and hold down the shutter button and shoot a burst of about five or six frames. It will help if your subject is in good available light to start with so that the camera won’t be forced to use high ISOs.
Capturing the mood with Night Portrait mode
This time, wait for it to get dark outside and have a friend sit in a location that has an incandescent lamp in the background (not too bright, though). Switch the camera to Night Portrait and then, using a wide enough angle to see the subject and some of the room in the background, take a photo. The goal is to get a well-lit picture of your subject and balance that with the light from the lamp in the background. For a comparison, switch the camera back to Full Auto and shoot the same subject. Take notice of the difference in the brightness of the background. Now, take another picture with the camera set to Flash Off, but this time, have your subject sit near the lamp so that it lights up their face. Ask them to sit as still as possible while you hold the camera as still as possible.
Getting a little more creative with Creative Auto mode
Now it’s time to have a little fun exploring the options that are available to you using the Creative Auto shooting mode. Get a feel for navigating through the options. Then, working your way down the screen, start making adjustments to each option, taking a picture with each to see how it impacts the final photo. The key here is to select one scene and then use it for each change in your settings. This will give you reference to see how each of the images (minus the picture quality and image format) will be affected by changing the options. Try using more than one option to fine-tune your photos.