
No matter what kind of setup you choose, you'll have to edit one single file that is located in the same place relative to the project directory and whose name is the same in all configurations, src/BaseApp.cpp. Open it. We will try to understand what the different lines of code mean.
#include "cinder/app/AppBasic.h"
#include "cinder/gl/gl.h"
These are the initial include statements that are responsible for including all the necessary Cinder stuff before we start to write our actual Cinder code.
using namespace ci;
using namespace ci::app;
using namespace std;
Here we tell the compiler that we are going to use some namespaces. We do that to avoid writing the namespace names before the variables and methods that are defined in those namespaces in our code. So, these lines are here just to make our code more readable and our creative lives easier. We are not adding the gl namespace here, because we want to keep the OpenGL drawing code distinguishable from all other code in the file.
class BaseApp : public AppBasic {This is the definition of our base application class. It extends Cinder AppBasic—it is a super class that contains all the basic functionality that we would need to code ourselves if there was no Cinder.
  void setup();
  void update();
  void draw();
These are the methods that we are going to override in this class. These methods can be considered the most important in Cinder, because here you can define what will be done in the main run loop of the program.
setup() is for setting up your program and it is executed just once at the beginning.
update() is called for every frame before the draw() function (the default Cinder frame rate is 30 fps) and here you should put all your calculations, data retrieval, and analysis code.
draw() is for drawing things on the screen. As update() takes care of all the calculations, you can use the results here in order to draw something on the screen. It can be 2D or 3D text, 2D or 3D shapes—a certain point in a movie file. Choose whatever you want, but try to use this method just for drawing.
Then there are implementations of the methods (after the class declaration that starts with the class BaseApp : public AppBasic { and ends with a closing bracket }) and a line of code that is responsible for launching your program is as follows:
CINDER_APP_BASIC( BaseApp, RendererGl )
This tells Cinder that it has to run your program (BaseApp) with the help of RendererGl. RendererGl, one of the available renderers in Cinder. It uses OpenGL for rendering and that lets you use the classes and functions defined in the gl:: namespace as well as pure OpenGL functions.
There are some other renderers available in Cinder, for example, Renderer2d that can be used in combination with Cairo vector-graphics Cinder namespace. It uses the Cairo::createWindowSurface() function for drawing and it may be not so fast as when using OpenGL.
OK, now we are ready to add some visual feedback to our program. We do it inside the implementation of the draw() method.
Let's draw some lines. Edit the draw() method implementation as follows:
void BaseApp::draw()
{
  // clear out the window with black
  gl::clear( Color( 0.0f, 0.0f, 0.0f ) );
Before we begin writing the actual drawing code, let me explain to you the difference between Cinder and OpenGL coordinate space.
In Cinder (as in many other creative coding frameworks and 2D graphics software), we make use of the so called fourth quadrant of the 2D Cartesian coordinate system. That means that the point (0, 0) is located at the top-left corner of the screen. To the right from that point all the x values go positive, and downwards from it all the y values go positive.
It is different with OpenGL. All four quadrants are used and the point (0, 0) is located in the center of the screen. You might remember this from math classes at school—to the left from the (0, 0) point x values go negative, to the right they go positive. Downwards from the (0, 0) point, the y values go negative, and upwards they go positive.
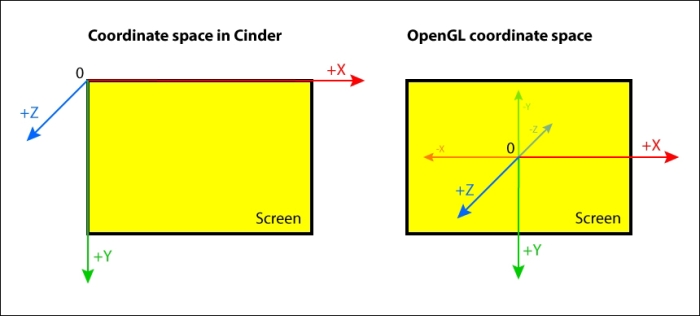
The Cinder gl namespace methods does the conversion from the "top-left-centered" coordinate system to the "actually-centered" for us. So let's draw:
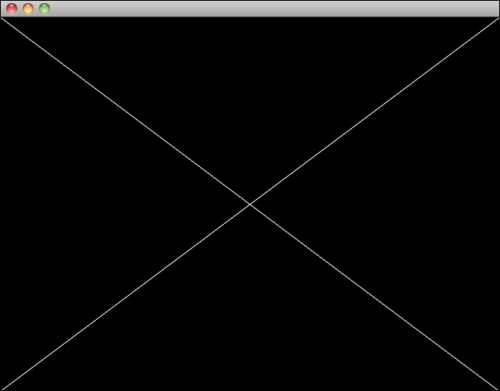
  // draw a x over the whole window area
  gl::drawLine( Vec2f(0.0f, 0.0f),
    Vec2f(getWindowWidth(), getWindowHeight()) );
  gl::drawLine( Vec2f(0.0f, getWindowHeight()),
    Vec2f(getWindowWidth(), 0.0f) );
}
Compile and run the project. You should see the following output:
That's it! We've created a great base for our future applications! We are going to re-use it's structure while going through the next chapters.