
Let's change our background to black again and add the following lines of code:
// draw a line
gl::drawLine( Vec2f(0,0), Vec2f(100,100) );
Compile and run the project to see what happens. You should see a relatively short white line on the screen. This is what the function gl::drawLine() just did. As we can see, there are two parameters that have to be passed to it. The first one represents the start coordinates of the line, the second one defines the end coordinates of the line. These two points are defined as Vec2f objects. It is possible to tell from the name of these objects that they are vectors that store two float values. These are vectors that can be used in a two-dimensional space. Vec2f(0,0) represents a point in the two-dimensional space that resides at the top-left corner of the screen. Let's draw two diagonal lines across the whole window. Add the following code instead of gl::drawLine( Vec2f(0,0), Vec2f(100,100) );:
gl::drawLine( Vec2f(0,0),
Vec2f(getWindowWidth(),getWindowHeight()) );
gl::drawLine( Vec2f(0,getWindowHeight()),
Vec2f(getWindowWidth(),0) );
As you can see we used two new methods here, getWindowWidth() and getWindowHeight(), which are meant for determining the window size while the application is running. It is a very handy way of drawing graphics that can be independent from the window size. Instead of changing the parameters manually each time we decide to change our application window size. We can just place the getWindowWidth() and getWindowHeight() methods in place of the parameters and the graphics will be adjusted automatically whenever the application window is being resized.
Compile and run the application and try to change the size of the window by dragging its lower-right corner—the lines should adjust to the new window size.
Doing this is good but what if we need the lines to be in a color other than white? How about cyan? No problem! Add the following line of code before the drawLine() calls:
gl::color( 0, 1, 1 );
Tip
Downloading the example code
You can download the example code files for all Packt books you have purchased from your account at http://www.packtpub.com . If you purchased this book elsewhere, you can visit http://www.packtpub.com/support and register to have the files e-mailed directly to you.
That was not so hard. We just have to remember to change the color (if we want to) before we call a function that is supposed to draw something. So if we want to draw one line in red and another in cyan, we do it in the following way:
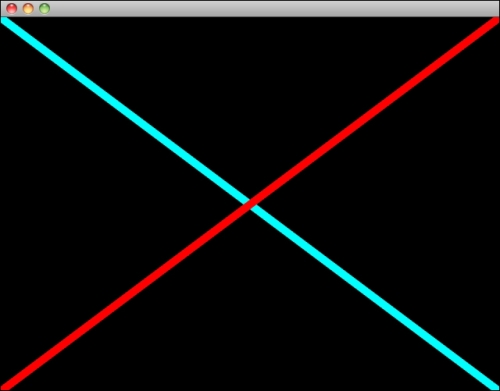
gl::color( 0, 1, 1 ); // set color to cyan
gl::drawLine( Vec2f(0,0),
Vec2f(getWindowWidth(),getWindowHeight()) );
gl::color( 1, 0, 0 ); // set color to red
gl::drawLine( Vec2f(0,getWindowHeight()),
Vec2f(getWindowWidth(),0) );
So now we know how to change the color of the lines. How about changing the thickness? No problem! Place the following line of code before the line draw calls:
glLineWidth( 10.0f );
So now our lines are being drawn with the thickness of 10 pixels. Compile and run the project to see how it looks. Now you should see the lines as shown in the following screenshot:
The following is
the full draw method, if you failed to understand something before (I have changed the line width to 2 in the following code):
void BasicShapesApp::draw(){
  // clear out the window with black
  gl::clear( Color( 0, 0, 0 ) );

  // draw some lines
  glLineWidth( 2 ); // set line width to 2
  gl::color( 0, 1, 1 ); // set color to cyan
  gl::drawLine( Vec2f(0,0),
      Vec2f(getWindowWidth(),getWindowHeight()) );
  gl::color( 1, 0, 0 ); // set color to red
  gl::drawLine( Vec2f(0,getWindowHeight()),
      Vec2f(getWindowWidth(),0) );
}