
In the previous section, we already discussed one of the basic effects that can be applied in almost every image processing software out there, grayscale. Let's create a simple application that loads an image and converts it to grayscale by using methods we just discussed.
Open up TinderBox and make a new application with the name BasicEffects. Place an image (let's call it OurImage.png, I will be using a simple, digitally enhanced hand-drawn sketch from my own archives) in the assets directory of the project and open the xcode/BasicEffects.xcodeproj project file. Windows users can open the vc10BasicEffects.sln file.
Open BasicEfectsApp.cpp in your editor and include a couple of headers that we will need later:
#include "cinder/ImageIo.h"
#include "cinder/gl/Texture.h"
#include "cinder/Surface.h"
Now declare the variables/objects of type Texture and Surface as follows:
Surface surface;
gl::Texture texture;
Also, load an image into the surface object and pass it to the Texture constructor so we can draw it afterwards (this goes in to the setup() method implementation):
surface = Surface( loadImage( loadAsset("OurImage.png") ) );
texture = gl::Texture(surface);
Finally go to the draw() method implementation and add the following lines of code to draw the texture:
if ( texture ) gl::draw( texture );
Before we draw the texture, we need to make sure that it actually exists.
When you compile and run the project our image should appear on the screen. If it does not, make sure that the image really exists in our project's assets directory and that the image filename argument in the loadAsset("OurImage.png") is correct.
We have made the very basic structure for image processing on the CPU. To make the image in grayscale, we will make use of the Channel class. First, we will include the Channel.h file as follows:
#include "cinder/Channel.h"
Next, in the setup() method implementation, where we load the image, create a Channel instance from the Surface instance and construct the texture by using the newly created channel:
surface = Surface( loadImage( loadAsset("image.png") ) );
Channel channel( surface );
texture = gl::Texture( channel );
Compile and run the project. The following screenshot is a comparison image that shows the difference between the result when we use the Surface object for constructing a texture and Channel:
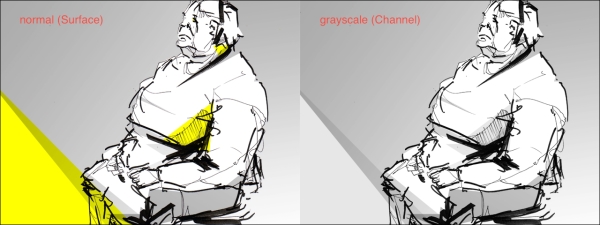
The image is automatically converted to grayscale once we pass it to the Channel constructor and we use the result for creating the texture. You should see it yourself when you compile and run the program.