Chapter 16
Blacklisting Suspicious Addresses by Using Security Intelligence
To compromise a network, an attacker uses various techniques, such as spam, command-and-control (CNC) servers, phishing, and malware. The volume and sources of new threats are increasing every day. As a security engineer, you might find it challenging to keep the access control list of a firewall up to date with all the new suspicious addresses. To make this job easier, FTD offers a unique threat defense mechanism called Security Intelligence. This chapter describes the processes of configuring the Security Intelligence technology and verifying its operations.
Security Intelligence Essentials
Security Intelligence enables you to blacklist a suspicious address without any manual modification to the access control policy. It can block a packet before the packet goes through a deep packet inspection by the Firepower Snort engine. Therefore, it helps reduce the CPU utilization of an FTD device and hence improves performance.
Figure 16-1 shows that any traffic that is not prefiltered goes through the Security Intelligence inspection.

Several enhancements have been made to the Security Intelligence technology since the Firepower System introduced this feature. Besides blacklisting an IP address, which is one of the most common uses of Security Intelligence, FTD also supports the blacklisting of URLs and domain names. To demonstrate the operations of Security Intelligence, this chapter primarily focuses on the blacklisting of IP addresses.
So far, you have been using the diagram shown in Figure 16-1 to understand the flows and drops of packets through an FTD device. In this chapter, we zoom in on both firewall and Firepower engines, view the low-level components of both engines, and determine the flows of packets through them.
Figure 16-2 shows the low-level architecture of an FTD device. It shows that Security Intelligence is one of the earliest lines of defense in a Firepower engine.

Input Methods
To input a potential suspicious address, Security Intelligence supports three methods:
![]() Feed: Cisco has a dedicated threat intelligence and research team, known as Talos. The team analyzes the behavior of Internet traffic, performs in-depth analysis on any suspicious activities, categorizes the potential addresses based on their characteristics, and lists these addresses in a file called the Cisco Intelligence Feed. One of the processes running on the FMC, CloudAgent, periodically communicates with the Cisco cloud to download the latest feed. When the FMC downloads a feed, it sends the feed to its managed devices automatically; redeployment of the access control policy is not necessary.
Feed: Cisco has a dedicated threat intelligence and research team, known as Talos. The team analyzes the behavior of Internet traffic, performs in-depth analysis on any suspicious activities, categorizes the potential addresses based on their characteristics, and lists these addresses in a file called the Cisco Intelligence Feed. One of the processes running on the FMC, CloudAgent, periodically communicates with the Cisco cloud to download the latest feed. When the FMC downloads a feed, it sends the feed to its managed devices automatically; redeployment of the access control policy is not necessary.
![]() List: FMC also allows you to input custom addresses for blacklisting. You can list the addresses in a text file (.txt format) and upload the file manually to the FMC through a web browser. The file requires you to enter one address per line. Table 16-1 shows the key differences between the feed and list types of Security Intelligence input.
List: FMC also allows you to input custom addresses for blacklisting. You can list the addresses in a text file (.txt format) and upload the file manually to the FMC through a web browser. The file requires you to enter one address per line. Table 16-1 shows the key differences between the feed and list types of Security Intelligence input.
Table 16-1 Security Intelligence Feed Versus Security Intelligence List
|
Feed |
List |
Provider |
Created by the Cisco threat intelligence team |
Created by you |
Maintenance |
Automatically updates the existing feed |
You can manually update an old list on demand |
File transfer |
The update file is transferred via HTTPS or HTTP |
You can upload an update file using a local web browser |
![]() Blacklist IP Now: You can blacklist a suspicious address instantly—without adding a new access rule for it. In case of an immediate need, you can avoid the process of scheduling a maintenance window for policy modification and use the Blacklist IP Now option for an instant block. Any addresses that you blacklist using the Blacklist IP Now option become part of the global blacklist.
Blacklist IP Now: You can blacklist a suspicious address instantly—without adding a new access rule for it. In case of an immediate need, you can avoid the process of scheduling a maintenance window for policy modification and use the Blacklist IP Now option for an instant block. Any addresses that you blacklist using the Blacklist IP Now option become part of the global blacklist.
Figure 16-3 illustrates the key operational steps of the Security Intelligence feature on the FMC, FTD, and Cisco Cloud.

Best Practices for Blacklisting
Security Intelligence is an effective tool for controlling suspicious traffic that a traditional firewall is unable to recognize. However, if your goal is to block or monitor traffic based on five tuples—source port, destination port, source IP, destination IP, and protocol—you should consider deploying an access rule with the Block or Monitor action. Do not use Security Intelligence as the primary method of monitoring or blocking all traffic because doing so can affect system performance.
Fulfilling Prerequisites
To use Security Intelligence, you need a Threat license. If that license expires after you enable the Security Intelligence feature, the FMC stops communicating with the cloud for the latest Cisco Intelligence feed. While you are in the process of purchasing a license, you can enable Evaluation Mode to configure an access rule with the Security Intelligence condition, and to deploy the associated access control policy to an FTD. To learn more about Evaluation Mode, read Chapter 7, “Firepower Licensing and Registration.”
Configuring Blacklisting
Security Intelligence is enabled through an access control policy. However, you do not need to add an additional access rule. There are three ways to blacklist an address, as described in the following sections:
![]() Automatic blacklist using the Cisco Intelligence Feed
Automatic blacklist using the Cisco Intelligence Feed
![]() Manual blacklist using a custom intelligence list
Manual blacklist using a custom intelligence list
![]() Immediate blacklist using a connection event
Immediate blacklist using a connection event
Figure 16-4 shows a simple topology that is used in this chapter to demonstrate the configurations of Security Intelligence.

Automatic Blacklist Using Cisco Intelligence Feed
To blacklist suspicious traffic by using the Cisco Intelligence Feed, perform these steps:
Step 1. Navigate to Policies > Access Control > Access Control.
Step 2. Select an access control policy that you want to deploy to an FTD device and click the pencil icon next to it to edit the policy.
Step 3. When the policy editor page appears, select the Security Intelligence tab. A list of available objects and zones appears.
Note
If you are configuring a newly installed system, the list of Security Intelligence objects might not be available for selection. To populate the Security Intelligence categories in the Available Objects field, you might need to update the Cisco Intelligence Feed from the cloud at least once. Without populating these objects, you cannot use them as rule conditions.
Figure 16-5 shows the page to update the Security Intelligence feed and list. The list of intelligence categories may not be available for selection until you update the Cisco Intelligence Feed from the cloud.

Step 4. On the Network subtab, select a category that you want to blacklist. You can also select a specific zone for inspection. By default, FTD inspects traffic from Any zone.
Note
This chapter shows how to enable the Security Intelligence feature based on network and IP addresses. If you want to enable this feature based on URL conditions, select the URL subtab. The remaining configuration steps are identical.
Step 5. Click the Add to Blacklist button. The categories appear inside the Blacklist field. Figure 16-6 illustrates the detailed steps to add the Security Intelligence categories for blacklist.

Step 6. Next to the Blacklist field, click the logging icon to verify whether Log Connections is checked for Security Intelligence events. Click OK to return to the Security Intelligence tab. Figure 16-7 shows the steps to verify logging for the connections that are subject to Security Intelligence blacklist.

Step 7. When the configuration is complete, click Save to save the changes, and click Deploy to deploy the new access control policy to your FTD device.
Now if you attempt to access a malicious IP address that is included in the Cisco Intelligence Feed, FTD should block the connection.
Tip
The “Verification and Troubleshooting Tools” section of this chapter discusses how to reverse engineer the Cisco Intelligence Feed data to identify the addresses that are selected for blacklisting.
Figure 16-8 shows the action of Security Intelligence. After it is enabled, the host is blocked from accessing certain addresses. These addresses, as of this writing, are known for spreading malware and spam.

Figure 16-9 shows an individual page that allows you to find any connections that are triggered due to Security Intelligence.

Manual Blacklisting Using a Custom Intelligence List
As a security engineer, you always need to track the latest threats and vulnerabilities to make sure your network is protected from zero-day threats. Let’s say, for example, that you have found a new security advisory in a security-related community forum or website. While Cisco is investigating the new information, you just want to blacklist the potential malicious address on your own without any delay. Using a text editor, you can create a file to list any potential IP addresses. Firepower System enables you to input this file to blacklist any custom list of IP addresses.
To blacklist a custom list of IP addresses, follow these steps:
Step 1. Write or copy the potential malicious addresses into a text editor, and save the file in .txt format. When you create a list, enter one record per line. Optionally, if you want to insert a comment on an IP address for future reference, use the hash sign (#) at the beginning of a line.
Figure 16-10 shows the creation of a .txt file using notepad. The file contains a custom list of IP addresses. These addresses are listed for demonstration purpose only, and should not be considered as a definitive guideline. Perform your own research before you consider an address for blacklisting; otherwise, a legitimate site might get blocked.
Step 2. In the FMC, navigate to Object > Object Management.
Step 3. On the left panel, select an appropriate option under Security Intelligence. For example, if you want to add a custom list of IP addresses, select the Network Lists and Feeds option. Then click the Add Network Lists and Feeds button to upload your text file to the FMC. Figure 16-11 shows a configuration window for a Security Intelligence list. After you select List from the Type dropdown, you can browse your text file. Upon successful upload, the FMC can show the number of addresses you uploaded.

Step 4. Once the file is uploaded, navigate to Policies > Access Control > Access Control and edit the access control policy that you want to deploy to an FTD.
Step 5. When the policy editor page appears, select the Security Intelligence tab. A list of available objects and zones appears.
Step 6. On the Network subtab, select the custom object you want to blacklist. You can also select a specific zone for inspection. By default, FTD inspects traffic from Any zone.
Note
This chapter enables the Security Intelligence feature based on network and IP addresses. If you want to enable this feature based on URL conditions, select the URL subtab. The remaining configuration steps are identical.
Step 7. Click the Add to Blacklist button, and the custom object appears in the Blacklist field.
Step 8. Next to the Blacklist field, click the logging icon to verify whether Log Connections is checked for Security Intelligence events. Click OK to return to the Security Intelligence tab. Figure 16-12 illustrates the workflow of blacklisting a custom Security intelligence list.

Step 9. When the configuration is complete, click Save to save the changes and deploy the new access control policy to your FTD device. Now if you attempt to access one of the addresses that you included in the text file, FTD will block the connection.
Figure 16-13 shows the blocking of a connection due to a match with the Security Intelligence list.
Immediate Blacklisting Using a Connection Event
The Firepower System enables you to blacklist an address instantly by right-clicking your mouse. This feature is useful when you notice a connection event for a suspicious address but you cannot modify and reapply the access control policy without scheduling a maintenance window.
Adding an Address to a Blacklist
Let’s say, for example, that you have noticed an event from an address that you believe could potentially be malicious activity. Here are the steps to blacklist the address immediately:
Step 1. Navigate to Analysis > Connections > Events.
Step 2. Right-click the address you want to blacklist. For example, if you want blacklist an unknown suspicious address, right-click an address under the Responder IP column.
Step 3. From the context menu that appears, select the Blacklist IP Now option. A confirmation window appears. Click the Blacklist Now button to confirm. Figure 16-14 shows the steps to blacklist an IP address using the context menu. No additional configuration is necessary after these steps. The configuration is complete. If you attempt to connect to that IP address, FTD will block it.
Figure 16-15 shows the result of an immediate blacklist. Although Action and Reason look identical, Security Intelligence categorizes this event as a Global-Blacklist event.

Deleting an Address from a Blacklist
Any addresses that you blacklist by using the Blacklist IP Now option are included in the Global-Blacklist category. If you want to remove the blacklisting attribute from an address and allow the address again, go to the Object Management page and edit Global-Blacklist to remove the address.
Warning
If you delete the entire Global-Blacklist object by using the Security Intelligence configuration page, the access control policy does not enforce the Blacklist IP Now function.
Figure 16-16 shows the IP address that you blacklisted earlier by using the Blacklist IP Now option. To allow this IP address once again, click Delete and then click Save to save the changes.

Monitoring a Blacklist
Occasionally, you might want to monitor the activities of certain hosts in a network instead of blocking them completely. Doing so allows you to analyze the characteristics of suspicious traffic and helps you build an appropriate defense. Follow these steps to enable monitoring functionality using Security Intelligence:
Note
The following steps assume that you have already blacklisted certain traffic by using the instructions in the previous section. This time, you just want to change the action (monitor only instead of block) for certain traffic.
Step 1. In the access control policy editor page, go to the Security Intelligence tab.
Step 2. From the Blacklist field, right-click a category that you want to monitor.
Note
FTD does not support the Monitor-only mode for the Global-Blacklist category.
Step 3. From the context menu that appears, select the Monitor-only (do not block) option. The icon changes from a red × to a green down arrow.
Figure 16-17 shows the steps to enable Monitor-only mode for a certain Security Intelligence category while leaving all other categories in Block mode.

Step 4. When the configuration is complete, click Save to save the changes and redeploy the access control policy.
This configuration changes the action from Block to Monitor-only for any addresses in the custom list. To test the operation of Monitor-only mode, access one of the addresses from the custom list, and FTD allows that connection and generates a monitor event.
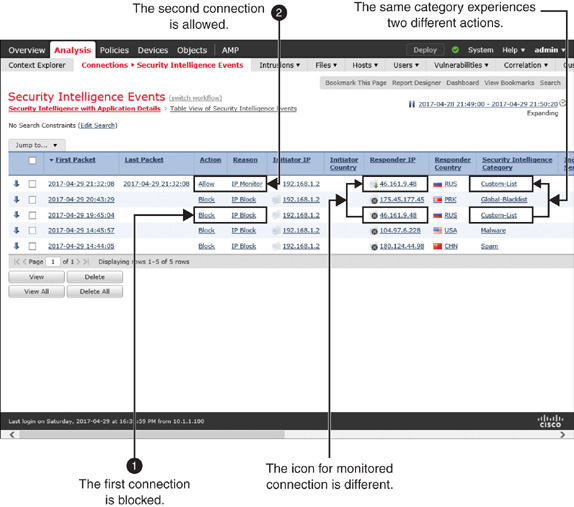
Figure 16-18 shows the difference between the Block and Monitor-only actions. The first connection attempt from host 192.168.1.2 to 46.161.9.48 was blocked; however, the second attempt was allowed, and the connection was monitored.
Bypassing a Blacklist
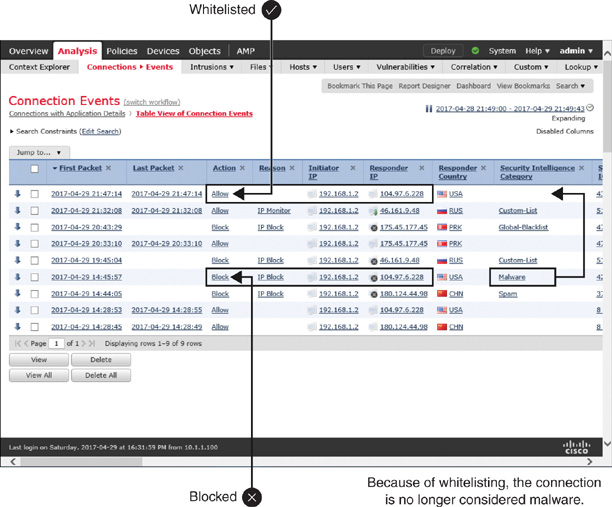
If you find an address blacklisted by the Cisco Intelligence Feed, but it has been essential for your regular business, you can report it to Cisco. If you want to access the address anyway while Cisco reinvestigates, you can whitelist that particular address. Whitelisting bypasses the Security Intelligence check, but traffic is still subject to any subsequent inspection. If other components of an FTD device find any anomaly, they can still block the connection, although Security Intelligence whitelists it initially.
Adding an Address to a Whitelist
The process of whitelisting an address is identical to the process of blacklisting an address. You can add a whitelist in the access control policy as a Security Intelligence object. Alternatively, you can right-click an address and select the Whitelist IP Now option from the context menu (see Figure 16-19).

Figure 16-20 shows an example of a successful whitelisted connection. After overriding a blacklisted address with a whitelist action, a connection looks like a regular allowed event.
Deleting an Address from a Whitelist
When you whitelist an address by using the Whitelist IP Now option, the address is included in the Global-Whitelist object. If you want to stop whitelisting an address, you need to delete the address from the Global-Whitelist object.
Warning
If you delete the entire Global-Whitelist object by using the Security Intelligence configuration page, the access control policy stops enforcing the Whitelist IP Now function.
Figure 16-21 shows the steps to delete an address from the Global-Whitelist object.

Verification and Troubleshooting Tools
Before you begin investigating an issue with Security Intelligence, you should check the following:
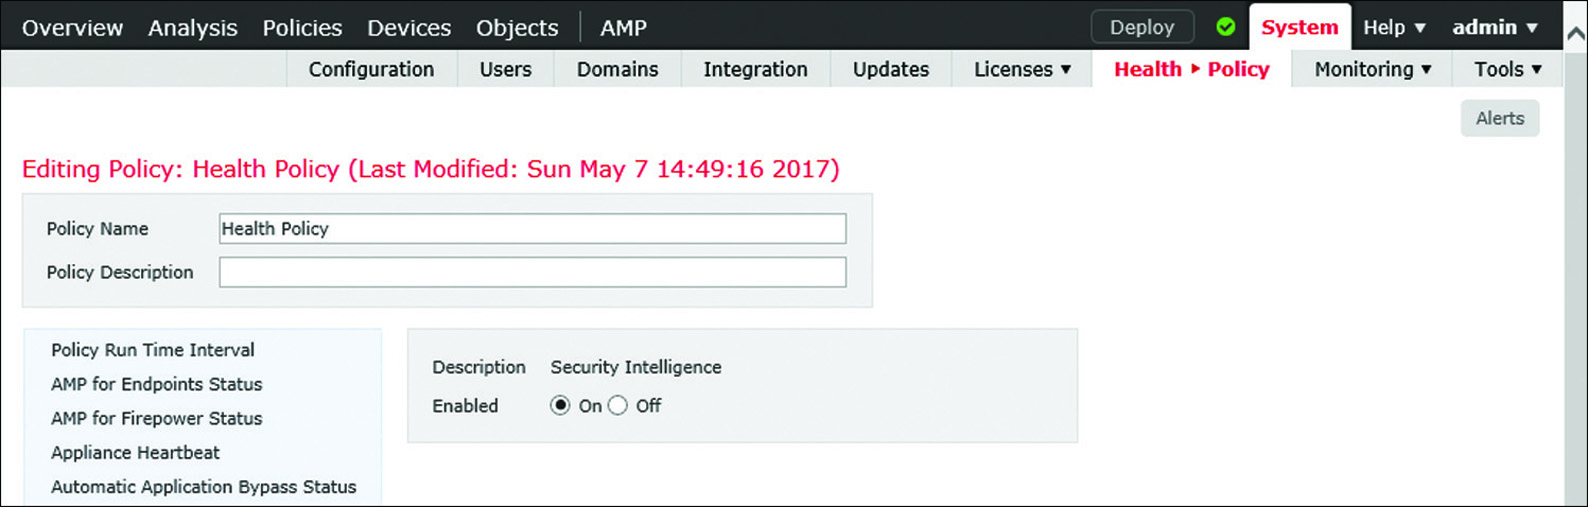
![]() Check whether Security Intelligence’s health module is enabled on the health policy. This module allows the FMC to generate alerts if the system fails to download the Security Intelligence data, and it loads the data into memory.
Check whether Security Intelligence’s health module is enabled on the health policy. This module allows the FMC to generate alerts if the system fails to download the Security Intelligence data, and it loads the data into memory.
Figure 16-22 shows the option to enable the health module for Security Intelligence. To find this page, go to System > Health > Policy, edit a health policy, and select Security Intelligence from the left panel. You must redeploy a health policy if you change any settings.
![]() Check whether the FMC has a valid Threat license and whether the license is applied on the desired FTD device. If the Threat license is disabled or expired, the FMC stops obtaining the latest Cisco Intelligence Feed from the Cisco cloud.
Check whether the FMC has a valid Threat license and whether the license is applied on the desired FTD device. If the Threat license is disabled or expired, the FMC stops obtaining the latest Cisco Intelligence Feed from the Cisco cloud.
Figure 16-23 shows the device management page where you can enable and disable a Threat license for a managed device.

Verifying the Download of the Latest Files
By using the CLI, you can verify whether the FMC has downloaded the Cisco Intelligence Feed from the Cisco cloud. Similarly, by accessing the FTD CLI, you can verify whether an FTD device has received the latest Security Intelligence files from the FMC.
Example 16-1 shows the Security Intelligence files on the FMC before and after a Cisco Intelligence Feed is downloaded.
Example 16-1 Security Intelligence (for IP Address) Files on the FMC
! Right after a fresh installation, an FMC does not contain any blacklist files by
default:
admin@FMC:~$ ls -halp /var/sf/iprep_download/
total 20K
drwxr-xr-x 5 www www 4.0K Apr 28 01:22 ./
drwxr-xr-x 64 root root 4.0K Apr 28 02:20 ../
-rw-r--r-- 1 www www 0 Apr 28 01:22 IPRVersion.dat
drwxr-xr-x 2 www www 4.0K Apr 28 01:22 health/
drwxr-xr-x 2 www www 4.0K Apr 28 01:22 peers/
drwxr-xr-x 2 www www 4.0K Apr 28 01:22 tmp/
admin@FMC:~$
! After updating the Cisco Intelligence Feed from the cloud, FMC shows the blacklist
files:
admin@FMC~$ ls –halp /var/sf/iprep_download/
total 7.3M
drwxr-xr-x 5 www www 4.0K Apr 28 16:39 ./
drwxr-xr-x 64 root root 4.0K Apr 28 02:20 ../
-rw-r--r-- 1 root root 225K Apr 28 16:23 032ba433-c295-11e4-a919-d4ae5275a468
-rw-r--r-- 1 root root 37 Apr 28 16:23 1b117672-7453-478c-be31-b72e89ca1acb
-rw-r--r-- 1 root root 43K Apr 28 16:23 23f2a124-8278-4c03-8c9d-d28fe08b5e98
-rw-r--r-- 1 root root 5.3K Apr 28 16:23 2CCDA18E-DDFF-4F5C-AF9A-F009852183F4
-rw-r--r-- 1 root root 9.4K Apr 28 16:23 2b15cb6f-a3fc-4e0e-a342-ccc5e5803263
-rw-r--r-- 1 root root 52 Apr 28 16:23 30f9e69c-d64c-479c-821d-0e4edab8217a
-rw-r--r-- 1 root root 682K Apr 28 16:23 3e2af68e-5fc8-4b1c-b5bc-b4e7cab598ba
-rw-r--r-- 1 root root 48 Apr 28 16:23 5a0b6d6b-e2c3-436f-b4a1-48248b330a26
-rw-r--r-- 1 root root 32 Apr 28 16:23 5f8148f1-e5e4-427a-aa3b-ee1c2745c350
-rw-r--r-- 1 root root 47K Apr 28 16:23 60f4e2ab-d96c-44a0-bd38-830252b63f46
-rw-r--r-- 1 root root 31 Apr 28 16:23 6ba968f4-7a25-4793-a2c8-7cc77f1ff437
-rw-r--r-- 1 root root 165 Apr 28 16:23 A27C6AAE-8E52-4174-A81A-47C59FECC092
-rw-rw-r-- 1 www www 39 Apr 28 16:42 IPRVersion.dat
-rw-r--r-- 1 root root 6.2M Apr 28 16:22 Sourcefire_Intelligence_Feed
-rw-r--r-- 1 root root 30 Apr 28 16:23 b1df3aa8-2841-4c88-8e64-bfaacec7fedd
-rw-r--r-- 1 root root 1.7K Apr 28 16:23 d7d996a6-6b92-4a56-8f10-e8506e431ca5
drwxr-xr-x 2 www www 4.0K Apr 28 01:22 health/
drwxr-xr-x 2 www www 4.0K Apr 28 01:22 peers/
-rw-r--r-- 1 root root 4.6K Apr 28 16:22 rep_dd.yaml
drwxr-xr-x 2 www www 4.0K Apr 28 16:32 tmp/
admin@FMC:~$
Example 16-2 shows the Security Intelligence blacklist (.blf) and whitelist (.wlf) files. A new FTD installation comes with the global blacklist and whitelist files. The Cisco Intelligence Feed files appear as soon as the FTD device receives an access control policy from the FMC.
Example 16-2 Security Intelligence (for IP Address) Files on an FTD Device
! After a fresh installation, FTD shows only the empty blacklist (.blf) and
whitelist (.wlf) files. At this point, FMC has not applied a Cisco Intelligence
Feed yet:
> expert
admin@firepower:~$ ls -halp /var/sf/iprep_download/
total 40K
drwxr-xr-x 5 www www 4.0K Apr 28 10:44 ./
drwxr-xr-x 66 root root 4.0K Dec 12 00:19 ../
-rw-rw-r-- 1 www www 118 Apr 28 10:17 .zones
-rw-rw-r-- 1 www www 17 Apr 28 10:44 IPRVersion.dat
-rw-r--r-- 1 root root 40 Apr 28 10:17 c76556bc-6167-11e1-88e8-479de99bfdf1.blf
-rw-r--r-- 1 root root 40 Apr 28 10:17 d8eea83e-6167-11e1-a154-589de99bfdf1.wlf
drwxr-xr-x 2 www www 4.0K Sep 19 2016 health/
drwxr-xr-x 2 www www 4.0K Sep 19 2016 peers/
drwxr-xr-x 2 www www 4.0K Apr 28 10:44 tmp/
-rw-rw-r-- 1 www www 151 Apr 28 10:44 zone.info
admin@firepower:~$
! Upon a successful deployment of an Access Control policy, FTD received the
necessary blacklist (.blf) and whitelist (.wlf) files from an FMC. Each of these
files represent a Security Intelligence category.
admin@firepower:~$ ls -halp /var/sf/iprep_download/
total 1.1M
drwxr-xr-x 5 www www 4.0K May 7 16:05 ./
drwxr-xr-x 66 root root 4.0K Dec 12 00:19 ../
-rw-rw-r-- 1 www www 1003 May 7 16:04 .zones
-rw-r--r-- 1 root root 225K May 7 16:04 032ba433-c295-11e4-a919-d4ae5275a468.blf
-rw-r--r-- 1 root root 37 May 7 16:04 1b117672-7453-478c-be31-b72e89ca1acb.blf
-rw-r--r-- 1 root root 43K May 7 16:04 23f2a124-8278-4c03-8c9d-d28fe08b5e98.blf
-rw-r--r-- 1 root root 9.4K May 7 16:04 2b15cb6f-a3fc-4e0e-a342-ccc5e5803263.blf
-rw-r--r-- 1 root root 5.3K May 7 16:04 2ccda18e-ddff-4f5c-af9a-f009852183f4.blf
-rw-r--r-- 1 root root 52 May 7 16:04 30f9e69c-d64c-479c-821d-0e4edab8217a.blf
-rw-r--r-- 1 root root 682K May 7 16:04 3e2af68e-5fc8-4b1c-b5bc-b4e7cab598ba.blf
-rw-r--r-- 1 root root 48 May 7 16:04 5a0b6d6b-e2c3-436f-b4a1-48248b330a26.blf
-rw-r--r-- 1 root root 32 May 7 16:04 5f8148f1-e5e4-427a-aa3b-ee1c2745c350.blf
-rw-r--r-- 1 root root 47K May 7 16:04 60f4e2ab-d96c-44a0-bd38-830252b63f46.blf
-rw-r--r-- 1 root root 31 May 7 16:04 6ba968f4-7a25-4793-a2c8-7cc77f1ff437.blf
-rw-r--r-- 1 root root 373 May 7 16:04 808e55a2-2d33-11e7-ab29-ad43fb3c690a.blf
-rw-r--r-- 1 root root 17 May 7 16:04 IPRVersion.dat
-rw-r--r-- 1 root root 165 May 7 16:04 a27c6aae-8e52-4174-a81a-47c59fecc092.blf
-rw-r--r-- 1 root root 30 May 7 16:04 b1df3aa8-2841-4c88-8e64-bfaacec7fedd.blf
-rw-r--r-- 1 root root 40 May 7 16:04 c76556bc-6167-11e1-88e8-479de99bfdf1.blf
-rw-r--r-- 1 root root 1.7K May 7 16:04 d7d996a6-6b92-4a56-8f10-e8506e431ca5.blf
-rw-r--r-- 1 root root 53 May 7 16:04 d8eea83e-6167-11e1-a154-589de99bfdf1.wlf
drwxr-xr-x 2 www www 4.0K Sep 19 2016 health/
drwxr-xr-x 2 www www 4.0K May 7 14:26 peers/
drwxr-xr-x 2 www www 4.0K May 7 16:04 tmp/
-rw-rw-r-- 1 www www 1006 May 7 16:04 zone.info
admin@firepower:~$
Tip
If you have enabled Security Intelligence based on URL, you can find the list of blacklisted and whitelisted URLs in similar format. The files are located in the /var/sf/siurl_download directory.
Verifying the Loading of Addresses into Memory
Example 16-2 in the preceding section confirms that an FTD device has received the Security Intelligence category files from the FMC. However, it does not prove that all the blacklisted addresses are loaded successfully into the FTD memory. You can verify this by looking at the debugging messages at the FTD CLI while an access control policy is being deployed.
Example 16-3 shows the debugging messages in FTD when it loads the Security Intelligence configuration and entries into the device’s memory. The following messages confirm that the Custom-List object has loaded all 25 of the addresses into its memory.
Example 16-3 FTD Loads the Security Intelligence Data into Its Memory
admin@firepower:~$ sudo tail -f /var/log/messages | grep –i reputation
May 7 16:05:40 ciscoasa SF-IMS[12223]: Reputation Preprocessor: Size of shared
memory segment SFIPReputation.rt.0.0.1 is 134217728
May 7 16:05:40 ciscoasa SF-IMS[12223]: Reputation entries loaded: 1, invalid:
0, re-defined: 0 (from file /ngfw/var/sf/iprep_download/d8eea83e-6167-11e1-a154-
589de99bfdf1.wlf)
May 7 16:05:40 ciscoasa SF-IMS[12223]: Reputation entries loaded: 0, invalid:
0, re-defined: 0 (from file /ngfw/var/sf/iprep_download/c76556bc-6167-11e1-88e8-
479de99bfdf1.blf)
May 7 16:05:40 ciscoasa SF-IMS[12223]: Reputation entries loaded: 25, invalid:
0, re-defined: 0 (from file /ngfw/var/sf/iprep_download/808e55a2-2d33-11e7-ab29-
ad43fb3c690a.blf)
May 7 16:05:40 ciscoasa SF-IMS[12223]: Reputation entries loaded: 3310,
invalid: 0, re-defined: 7 (from file /ngfw/var/sf/iprep_download/60f4e2ab-d96c-
44a0-bd38-830252b63f46.blf)
May 7 16:05:40 ciscoasa SF-IMS[12223]: Reputation entries loaded: 0, invalid:
0, re-defined: 0 (from file /ngfw/var/sf/iprep_download/6ba968f4-7a25-4793-a2c8-
7cc77f1ff437.blf)
May 7 16:05:40 ciscoasa SF-IMS[12223]: Reputation entries loaded: 3050,
invalid: 0, re-defined: 1 (from file /ngfw/var/sf/iprep_download/23f2a124-8278-
4c03-8c9d-d28fe08b5e98.blf)
May 7 16:05:40 ciscoasa SF-IMS[12223]: Reputation entries loaded: 112, invalid:
0, re-defined: 0 (from file /ngfw/var/sf/iprep_download/d7d996a6-6b92-4a56-8f10-
e8506e431ca5.blf)
May 7 16:05:40 ciscoasa SF-IMS[12223]: Reputation entries loaded: 1, invalid:
0, re-defined: 0 (from file /ngfw/var/sf/iprep_download/5a0b6d6b-e2c3-436f-b4a1-
48248b330a26.blf)
May 7 16:05:40 ciscoasa SF-IMS[12223]: Reputation entries loaded: 0, invalid:
0, re-defined: 0 (from file /ngfw/var/sf/iprep_download/5f8148f1-e5e4-427a-aa3b-
ee1c2745c350.blf)
May 7 16:05:40 ciscoasa SF-IMS[12223]: Reputation entries loaded: 676, invalid:
0, re-defined: 3 (from file /ngfw/var/sf/iprep_download/2b15cb6f-a3fc-4e0e-a342-
ccc5e5803263.blf)
May 7 16:05:40 ciscoasa SF-IMS[12223]: Reputation entries loaded: 0, invalid:
0, re-defined: 0 (from file /ngfw/var/sf/iprep_download/1b117672-7453-478c-be31-
b72e89ca1acb.blf)
May 7 16:05:40 ciscoasa SF-IMS[12223]: Reputation entries loaded: 1, invalid:
0, re-defined: 0 (from file /ngfw/var/sf/iprep_download/30f9e69c-d64c-479c-821d-
0e4edab8217a.blf)
May 7 16:05:40 ciscoasa SF-IMS[12223]: Reputation entries loaded: 48044,
invalid: 0, re-defined: 0 (from file /ngfw/var/sf/iprep_download/3e2af68e-5fc8-
4b1c-b5bc-b4e7cab598ba.blf)
May 7 16:05:40 ciscoasa SF-IMS[12223]: Reputation entries loaded: 15962,
invalid: 0, re-defined: 112 (from file /ngfw/var/sf/iprep_download/032ba433-c295-
11e4-a919-d4ae5275a468.blf)
May 7 16:05:40 ciscoasa SF-IMS[12223]: Reputation entries loaded: 0, invalid:
0, re-defined: 0 (from file /ngfw/var/sf/iprep_download/b1df3aa8-2841-4c88-8e64-
bfaacec7fedd.blf)
May 7 16:05:40 ciscoasa SF-IMS[12223]: Reputation entries loaded: 9, invalid:
0, re-defined: 0 (from file /ngfw/var/sf/iprep_download/a27c6aae-8e52-4174-a81a-
47c59fecc092.blf)
May 7 16:05:40 ciscoasa SF-IMS[12223]: Reputation entries loaded: 377, invalid:
0, re-defined: 0 (from file /ngfw/var/sf/iprep_download/2ccda18e-ddff-4f5c-af9a-
f009852183f4.blf)
May 7 16:05:40 ciscoasa SF-IMS[12223]: Reputation Preprocessor shared memory
summary:
May 7 16:05:40 ciscoasa SF-IMS[12223]: Reputation total memory usage: 9442496
bytes
May 7 16:05:40 ciscoasa SF-IMS[12223]: Reputation total entries loaded: 71568,
invalid: 0, re-defined: 123
.
.
! <Output is Omitted for Brevity>
To determine whether the memory is loaded with the latest set of Security Intelligence data, you can verify the timestamp of the FTD shared memory file. The timestamp should record the UTC time of the latest access control policy applied:
admin@firepower:~$ ls -halp /dev/shm/ | grep -i reputation
-rw-rw-rw- 1 root root 128M May 7 16:05 SFIPReputation.rt.0.0.1
admin@firepower:~$
Finding a Specific Address in a List
Let’s say you have just learned about malware and its potential source address. You want to confirm whether the address is included in the active Cisco Intelligence Feed or whether you should consider blacklisting it manually. You can verify this from the FTD CLI by following these steps:
Step 1. Run the following command to search for a specific IP address within the list file:
admin@firepower:/var/sf/iprep_download$ egrep 209.222.77.220 *.blf
60f4e2ab-d96c-44a0-bd38-830252b63f46.blf:209.222.77.220
admin@firepower:/var/sf/iprep_download$
This command uses the IP address 209.222.77.220 as an example; replace it as appropriate.
Step 2. The output from Step 1 shows the list file where the IP address is listed, but it does not display the category. To determine the category type, run the following command to view the first line of the file:
admin@firepower:/var/sf/iprep_download$ head –n1 60f4e2ab-d96c-44a0-
bd38-830252b63f46.blf
#Cisco intelligence feed: CnC
admin@firepower:/var/sf/iprep_download$
Verifying URL-Based Security Intelligence Rules
You can leverage the Security Intelligence technology to blacklist, monitor, and whitelist a suspicious website. The configuration of URL-based Security Intelligence is similar to the configuration of IP address–based Security Intelligence. The only difference is that instead of selecting the Network type intelligence object, you select the URL type intelligence object. This section assumes that you have already selected URL-based intelligence by following a procedure similar to the one you used for configuring IP-based Security Intelligence. Now, you want to verify whether your deployment is successful.
Figure 16-24 shows the Security Intelligence configuration page. To blacklist or whitelist malicious URLs, select the URL subtab (instead of the Network subtab, which you selected for IP-based intelligence).

Likewise, you can apply the same troubleshooting techniques to investigate issues with URL-based Security Intelligence. You can find the blacklist and whitelist files for URL-based Security Intelligence at /var/sf/siurl_download.
Example 16-4 shows the blacklist and whitelist files for URL-based Security Intelligence. Unlike with IP-based Security Intelligence, all the URL-based Security Intelligence files use .lf (list file) as their file extensions.
Example 16-4 Blacklist and Whitelist Files for URL-Based Security Intelligence
admin@firepower:~$ ls -halp /var/sf/siurl_download/
total 31M
drwxrwxr-x 5 www detection 4.0K May 8 18:09 ./
drwxr-xr-x 66 root root 4.0K Dec 12 00:19 ../
-rw-rw-r-- 1 www www 930 May 8 18:08 .zones
-rw-r--r-- 1 root root 422K May 8 18:08 032ba433-c295-11e4-a919-
d4ae5275d599.lf
-rw-r--r-- 1 root root 82 May 8 18:08 127dc4a2-1ea3-4423-a02d-
1f02069828ac.lf
-rw-r--r-- 1 root root 69 May 8 18:08 1b117672-7453-478c-be31-
b72e89ca4bfc.lf
-rw-r--r-- 1 root root 21M May 8 18:08 23f2a124-8278-4c03-8c9d-
d28fe08b8fc9.lf
-rw-r--r-- 1 root root 56 May 8 18:08 2b15cb6f-a3fc-4e0e-a342-
ccc5e5806394.lf
-rw-r--r-- 1 root root 147K May 8 18:08 2ccda18e-ddff-4f5c-af9a-
f0098521b525.lf
-rw-r--r-- 1 root root 53 May 8 18:08 30f9e69c-d64c-479c-821d-
0e4edab852ab.lf
-rw-r--r-- 1 root root 8.8K May 8 18:08 3e2af68e-5fc8-4b1c-b5bc-
b4e7cab5c9eb.lf
-rw-r--r-- 1 root root 65 May 8 18:08 5915d129-0d33-4e9c-969a-
eab3cde32156.lf
-rw-r--r-- 1 root root 52 May 8 18:08 5a0b6d6b-e2c3-436f-b4a1-
48248b333b57.lf
-rw-r--r-- 1 root root 48 May 8 18:08 5f8148f1-e5e4-427a-aa3b-
ee1c2745f481.lf
-rw-r--r-- 1 root root 187K May 8 18:08 60f4e2ab-d96c-44a0-bd38-
830252b67077.lf
-rw-r--r-- 1 root root 47 May 8 18:08 6ba968f4-7a25-4793-a2c8-
7cc77f1f1256.lf
-rw-r--r-- 1 root root 17 May 8 18:08 IPRVersion.dat
-rw-r--r-- 1 root root 20K May 8 18:08 a27c6aae-8e52-4174-a81a-
47c59fecf1c3.lf
-rw-r--r-- 1 root root 2.2M May 8 18:08 b1df3aa8-2841-4c88-8e64-
bfaacec71300.lf
-rw-r--r-- 1 root root 2.6M May 8 18:08 d7d996a6-6b92-4a56-8f10-
e8506e434dd6.lf
-rw-rw-r-- 1 root root 5.1M May 8 18:09 dm_url0.acl
drwxr-xr-x 2 www www 4.0K Sep 19 2016 health/
drwxr-xr-x 2 www www 4.0K May 1 17:18 peers/
drwxr-xr-x 2 www www 4.0K May 8 18:08 tmp/
-rw-rw-r-- 1 www www 1015 May 8 18:08 url.rules
admin@firepower:~$
Because both blacklist and whitelist files use the same .lf extension, you cannot distinguish the purpose of a file by looking at the extension. However, you can use the url.rules file to determine this.
Example 16-5 shows the purpose of each list file. The first file is a whitelist file, and the last file is set to Monitor-only mode. All other list files are configured to block traffic.
Example 16-5 The url.rules File, Showing the Action or Purpose of Each List File
admin@firepower:~$ cat /var/sf/siurl_download/url.rules
#security intelligence manifest file
si,5915d129-0d33-4e9c-969a-eab3cde32156.lf,1048597,white,any
si,127dc4a2-1ea3-4423-a02d-1f02069828ac.lf,1048613,block,any
si,5a0b6d6b-e2c3-436f-b4a1-48248b333b57.lf,1048599,block,any
si,5f8148f1-e5e4-427a-aa3b-ee1c2745f481.lf,1048600,block,any
si,6ba968f4-7a25-4793-a2c8-7cc77f1f1256.lf,1048601,block,any
si,30f9e69c-d64c-479c-821d-0e4edab852ab.lf,1048607,block,any
si,2b15cb6f-a3fc-4e0e-a342-ccc5e5806394.lf,1048612,block,any
si,1b117672-7453-478c-be31-b72e89ca4bfc.lf,1048606,block,any
si,3e2af68e-5fc8-4b1c-b5bc-b4e7cab5c9eb.lf,1048610,block,any
si,a27c6aae-8e52-4174-a81a-47c59fecf1c3.lf,1048604,block,any
si,2ccda18e-ddff-4f5c-af9a-f0098521b525.lf,1048611,block,any
si,60f4e2ab-d96c-44a0-bd38-830252b67077.lf,1048602,block,any
si,032ba433-c295-11e4-a919-d4ae5275d599.lf,1048609,block,any
si,b1df3aa8-2841-4c88-8e64-bfaacec71300.lf,1048603,block,any
si,23f2a124-8278-4c03-8c9d-d28fe08b8fc9.lf,1048605,block,any
si,d7d996a6-6b92-4a56-8f10-e8506e434dd6.lf,1048608,monitor,any
admin@firepower:~$
A list file uses a universally unique identifier (UUID) as its filename. It does not state the type of intelligence category it contains. To find that answer, you can view the first line of the list file. For example, the following example confirms that d7d996a6-6b92-4a56-8f10- e8506e434dd6.lf stores the URLs of the phishing websites.
admin@firepower:~$ head -n1 /var/sf/siurl_download/d7d996a6-6b92-4a56-8f10-
e8506e434dd6.lf
#Cisco DNS and URL intelligence feed: URL Phishing
admin@firepower:~$
Summary
In this chapter, you have learned how to detect a malicious address by using the Security Intelligence feature. When there is a match, you can ask an FTD device to block, monitor, or whitelist an address. This chapter also describes the back-end file systems for the Security Intelligence feature. You can apply this knowledge to troubleshooting issues with Security Intelligence.
Quiz
1. Security Intelligence is a first-level-defense mechanism implemented on which of the following?
a. Firewall engine
b. Firepower engine
c. Firepower Management Center
d. All of the above
2. Which of the following statements is true?
a. FTD allows a whitelisted address to bypass any further inspection.
b. FTD requires a direct connection to the Internet in order to obtain the Cisco Intelligence Feed.
c. The Blacklist IP Now option allows you to block an address without redeploying an access control policy.
d. Monitor-only mode of Security Intelligence works only when FTD is deployed in passive mode.
3. Which of the following commands displays the name of the Security Intelligence category from a blacklist file?
a. tail -f filename.blf
b. tail filename.blf
c. head filename.blf
d. grep category_name filename.blf
4. Which of the following commands displays an exact IP address and confirms that the address is included in the current blacklist file?
a. cat filename.blf
b. head ip_address filename.blf
c. grep ip_address *.blf