
This chapter has been very text heavy so far. It's time we get our hands dirty and build a simple Om application. Since we talked about contacts before, that's what we will start with.
The main driver behind React and Om is the ability to build highly reusable, self-contained components and, as such, even in a simple Contacts application, we will have multiple components working in concert to achieve a common goal.
This is what our users should be able to do in the application:
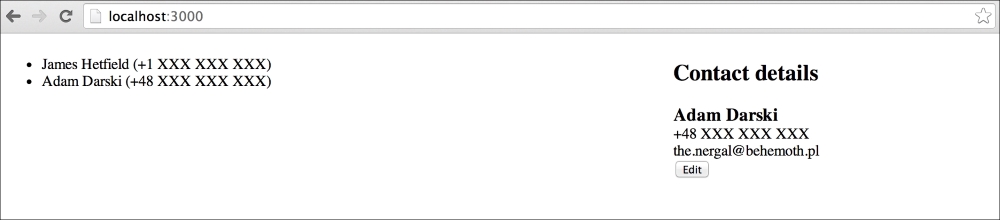
And once we're done, it will look like the following:
As mentioned previously, Om/React will eventually render the DOM based on our application state. We'll be using data that's in memory to keep the example simple. Here's what our application state will look like:
(def app-state
  (atom {:contacts {1 {:id    1
                       :name  "James Hetfield"
                       :email "[email protected]"
                       :phone "+1 XXX XXX XXX"}
                    2 {:id    2
                       :name  "Adam Darski"
                       :email "[email protected]"
                       :phone "+48 XXX XXX XXX"}}
         :selected-contact-id []
         :editing [false]}))
The reason we keep the state in an atom is that Om uses that to re-render the application if we swap! or reset! it, for instance, if we load some data from the server after the application has been rendered for the first time.
The data in the state itself should be mostly self-explanatory. We have a map containing all contacts, a key representing whether there is currently a contact selected, and a flag that indicates whether we are currently editing the selected contact. What might look odd is that both:selected-contact-id and :editing keys point to a vector. Just bear with me for a moment; the reason for this will become clear shortly.
Now that we have a draft of our application state, it's time we think about how the state will flow through the different components in our app. A picture is worth a thousand words, so the following diagram shows the high-level architecture through which our data will flow:
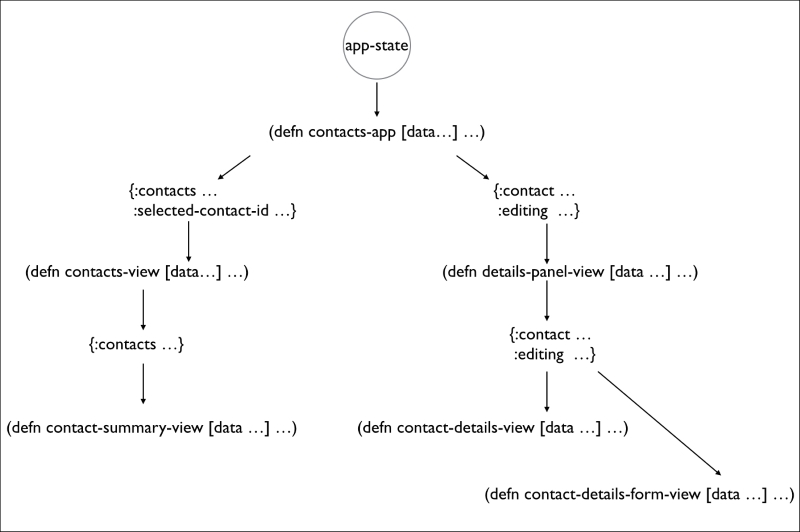
In the preceding image, each function corresponds to an Om component. At the very least, they take some piece of data as their initial state. What is interesting in this image is that as we descend into our more specialized components, they request less state than the main component, contacts-app. For instance, the contacts-view component needs all contacts as well as the ID of the selected contact. The details-panel-view component, on the other hand, only needs the currently selected contact, and whether it's being edited or not. This is a common pattern in Om and we usually want to avoid over-sharing the application state.
With a rough understanding of our high-level architecture, we are ready to start building our Contacts application.
Once again, we will use a leiningen template to help us get started. This time we'll be using om-start (see https://github.com/magomimmo/om-start-template), also by Mimmo Cosenza (see https://github.com/magomimmo). Type this in the terminal to create a base project using this template:
lein new om-start contacts
cd contacts
Next, let's open the project.clj file and make sure we have the same versions for the various different dependencies the template pulls in. This is just so that we don't have any surprises with incompatible versions:
...
  :dependencies [[org.clojure/clojure "1.6.0"]
                 [org.clojure/clojurescript "0.0-2277"]
                 [org.clojure/core.async "0.1.338.0-5c5012-alpha"]
                 [om "0.7.1"]
                 [com.facebook/react "0.11.1"]]
...
To validate the new project skeleton, still in the terminal, type the following to auto-compile your ClojureScript source files:
lein cljsbuild auto
Compiling ClojureScript.
Compiling "dev-resources/public/js/contacts.js" from ("src/cljs" "dev-resources/tools/repl")...
Successfully compiled "dev-resources/public/js/contacts.js" in 9.563 seconds.
Now, we should see the template default "Hello World" page if we open the dev-resources/public/index.html file in the browser.
The next thing we'll do is open the src/cljs/contacts/core.cljs file, which is where our application code will go, and make sure it looks like the following so that we have a clean slate with the appropriate namespace declaration:
(ns contacts.core
  (:require [om.core :as om :include-macros true]
            [om.dom :as dom :include-macros true]))

(enable-console-print!)

(def app-state
  (atom {:contacts {1 {:id    1
                       :name  "James Hetfield"
                       :email "[email protected]"
                       :phone "+1 XXX XXX XXX"}
                    2 {:id    2
                       :name  "Adam Darski"
                       :email "[email protected]"
                       :phone "+48 XXX XXX XXX"}}
         :selected-contact-id []
         :editing [false]}))

(om/root
  contacts-app
  app-state
  {:target (. js/document (getElementById "app"))})
Every Om application starts with a root component created by the om/root function. It takes as arguments a function representing a component—contacts-app—the initial state of the application—app-state—and a map of options of which the only one we care about is :target, which tells Om where to mount our root component on the DOM.
In this instance, it will mount on a DOM element whose ID is app. This element was given to us by the om-start template and is located in the dev-resources/public/index.html file.
Of course, this code won't compile yet, as we don't have the contacts-app template. Let's solve that and create it above the preceding declaration—we're implementing the components bottom-up:
(defn contacts-app [data owner]
  (reify
    om/IRender
    (render [this]
      (let [[selected-id :as selected-id-cursor]
            (:selected-contact-id data)]
        (dom/div nil
                 (om/build contacts-view
                           {:contacts            (:contacts data)
                            :selected-id-cursor selected-id-cursor})
                 (om/build details-panel-view
                           {:contact        (get-in data [:contacts selected-id])
                            :editing-cursor (:editing data)}))))))
This snippet introduces a number of new features and terminology, so it deserves a few paragraphs.
When describing om/root, we saw that its first argument must be an Om component. The contact-app function creates one by reifying the om/IRender protocol. This protocol contains a single function—render—which gets called when the application state changes.
Tip
Clojure uses reify to implement protocols or Java interfaces on the fly, without the need to create a new type. You can read more about this on the data types page of the Clojure documentation at http://clojure.org/datatypes.
The render function must return an Om/React component or something React knows how to render—such as a DOM representation of the component. The arguments to contacts-app are straightforward: data is the component state and owner is the backing React component.
Moving down the source file, in the implementation of render, we have the following:
(let [[selected-id :as selected-id-cursor]
      (:selected-contact-id data)]
  ...)
If we recall from our application state, the value of :selected-contact-id is, at this stage, an empty vector. Here, then, we are destructuring this vector and giving it a name. What you might be wondering now is why we bound the vector to a variable named selected-id-cursor. This is to reflect the fact that at this point in the life cycle of a component, selected-id-cursor isn't a vector any longer but rather it is a cursor.
Once om/root creates our root component, sub-components don't have direct access to the state atom any longer. Instead, components receive a cursor created from the application state.
Cursors are data structures that represent a place in the original state atom. You can use cursors to read, delete, update, or create a value with no knowledge of the original data structure. Let's take the selected-id-cursor cursor as an example:
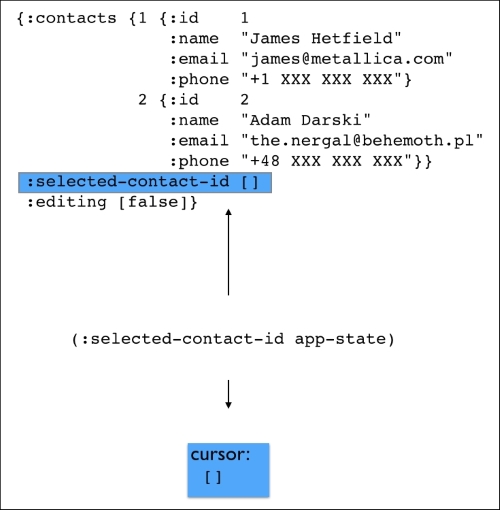
At the top, we have our original application state, which Om turns into a cursor. When we request the :selected-contact-id key from it, Om gives us another cursor representing that particular place in the data structure. It just so happens that its value is the empty vector.
What is interesting about this cursor is that if we update its value using one of Om's state transition functions such as om/transact! and om/update!—we will explain these shortly—it knows how to propagate the change up the tree and all the way back to the application state atom.
This is important because as we have briefly stated before, it is common practice to have our more specialized components depend on specific parts of the application state required for its correct operation.
By using cursors, we can easily propagate changes without knowing what the application state looks like, thus avoiding the need to access the global state.
Moving down the contacts-app component, we now have the following:
(dom/div nil
                 (om/build contacts-view
                           {:contacts            (:contacts data)
                            :selected-id-cursor selected-id-cursor})
                 (om/build details-panel-view
                           {:contact        (get-in data [:contacts selected-id])
                            :editing-cursor (:editing data)}))
The dom namespace contains thin wrappers around React's DOM classes. It's essentially the data structure representing what the application will look like. Next, we see two examples of how we can create Om components inside another Om component. We use the om/build function for that and create the contacts-view and details-panel-view components. The om/build function takes as arguments the component function, the component state, and, optionally, a map of options which aren't important for this example.
At this point, we have already started to limit the state we will pass into the sub-components by creating sub-cursors.
According to the source code, the next component we should look at is contacts-view. Here it is in full:
(defn contacts-view [{:keys [contacts selected-id-cursor]} owner]
  (reify
    om/IRender
    (render [_]
      (dom/div #js {:style #js {:float "left"
                                            :width "50%"}}
               (apply dom/ul nil
                      (om/build-all contact-summary-view (vals contacts)
                                    {:shared {:selected-id-cursor selected-id-cursor}}))))))
Hopefully, the source of this component looks a little more familiar now. As before, we reify om/IRender to provide a DOM representation of our component. It comprises a single div element. This time we give as the second argument to dom/div a hash-map representing HTML attributes. We are using some inline styles, but ideally we would use an external style sheet.
The third argument to dom/div is slightly more complex than what we have seen so far:
(apply dom/ul nil
                      (om/build-all contact-summary-view (vals contacts)
                                    {:shared {:selected-id-cursor selected-id-cursor}}))
Each contact will be represented by a li (list item) HTML node, so we start by wrapping the result into a dom/ul element. Then, we use om/build-all to build a list of contact-summary-view components. Om will, in turn, call om/build for each contact in vals contacts.
Lastly, we use the third argument to om/build-all—the options map—to demonstrate how we can share state between components without the use of global state. We'll see how that's used in the next component, contact-summary-view:
  (defn contact-summary-view [{:keys [name phone] :as contact} owner]
  (reify
    om/IRender
    (render [_]
      (dom/li #js {:onClick #(select-contact! @contact
                                              (om/get-shared owner :selected-id-cursor))}
              (dom/span nil name)
              (dom/span nil phone)))))
If we think of our application as a tree of components, we have now reached one of its leaves. This component simply returns a dom/li node with the contact's name and phone in it, wrapped in dom/span nodes.
It also installs a handler to the dom/li onClick event, which we can use to update the state cursor.
We use om/get-shared to access the shared state we installed earlier and pass the resulting cursor into select-contact! We also pass the current contact, but, if you look closely, we have to deref it first:
@contact
The reason for this is that Om doesn't allow us to manipulate cursors outside of the render phase. By derefing the cursor, we have its most recent underlying value. Now select-contact! has all it needs to perform the update:
(defn select-contact! [contact selected-id-cursor]
  (om/update! selected-id-cursor 0 (:id contact)))
We simply use om/update! to set the value of the selected-id-cursor cursor at index 0 to the id of the contact. As mentioned previously, the cursor takes care of propagating the change.
We are moving at a good pace. It's time we look at the next component, details-panel-view:
(defn details-panel-view [data owner]
  (reify
    om/IRender
    (render [_]
      (dom/div #js {:style #js {:float "right"
                                :width "50%"}}
               (om/build contact-details-view data)
               (om/build contact-details-form-view data)))))
This component should now look fairly familiar. All it does is build two other components, contact-details-view and contact-details-form-view:
(defn contact-details-view [{{:keys [name phone email id] :as contact} :contact
                             editing :editing-cursor}
                            owner]
  (reify
    om/IRender
    (render [_]
      (dom/div #js {:style #js {:display (if (get editing 0) "none" "")}}
             (dom/h2 nil "Contact details")
             (if contact
               (dom/div nil
                        (dom/h3 #js {:style #js {:margin-bottom "0px"}} (:name contact))
                        (dom/span nil (:phone contact)) (dom/br nil)
                        (dom/span nil (:email contact)) (dom/br nil)
                        (dom/button #js {:onClick #(om/update! editing 0 true)}
                                    "Edit"))
               (dom/span nil "No contact selected"))))))
The contact-details-view component receives two pieces of state: the contact and the editing flag. If we have a contact, we simply render the component. However, we use the editing flag to hide it, if we are editing it. This is so that we can show the edit form in the next component. We also install an onClick handler to the Edit button so that we can update the editing cursor.
The contact-details-form-view component receives the same arguments but renders the following form instead:
(defn contact-details-form-view [{{:keys [name phone email id] :as contact} :contact
                                  editing :editing-cursor}
                                 owner]
  (reify
    om/IRender
    (render [_]
      (dom/div #js {:style #js {:display (if (get editing 0) "" "none")}}
               (dom/h2 nil "Contact details")
               (if contact
                 (dom/div nil
                          (dom/input #js {:type "text"
                                                   :value name
                                                   :onChange #(update-contact! % contact :name)})
                          (dom/input #js {:type "text"
                                                   :value phone
                                                   :onChange #(update-contact! % contact :phone)})
                          (dom/input #js {:type "text"
                                                   :value email
                                                   :onChange #(update-contact! % contact :email)})
                          (dom/button #js {:onClick #(om/update! editing 0 false)}
                                                    "Save"))
               (dom/div nil "No contact selected"))))))
This is the component responsible for actually updating the contact information based on the form. It does so by calling update-contact! with the JavaScript event, the contact cursor, and the key representing the attribute to be updated:
(defn update-contact! [e contact key]
  (om/update! contact key (.. e -target -value)))
As before, we simply use om/update! instead of om/transact! as we are simply replacing the value of the cursor attribute with the current value of the form field which triggered the event e.
Note
If you're not familiar with the .. syntax, it's simply a convenience macro for Java and JavaScript interoperability. The previous example expands to:
(. (. e -target) -value)
This and other interoperability operators are described in the Java Interop page of the Clojure website (see http://clojure.org/java_interop).
This is it. Make sure your code is still compiling—or if you haven't yet, start the auto-compilation by typing the following in the terminal:
lein cljsbuild auto
Then, open up dev-resources/public/index.html again in your browser and take our Contacts app for a spin! Note in particular how the application state is always in sync while you edit the contact attributes.
If there are any issues at this stage, make sure the src/cljs/contacts/core.cljs file matches the companion code for this book.