Real-World Scenarios
Real-World Scenarios Introduction
Hi, I’m David L. Prowse and I’d like to welcome you to the Real-World Scenarios. These real-world scenarios are designed to reinforce the concepts covered in the CompTIA Security+ SY0-501 Cert Guide. Read through each scenario, and answer the included questions based on your findings and according to your own experiences with technology. You are expected to research and investigate to find quality solutions. Following each real-world scenario is an example solution. Your solution might vary, but both can certainly be valid. So, remember, there is often more than one potential solution to a problem!
Important!! It is recommended that you go through the scenarios on a “test” computer—meaning one that does not have any important data on it. A clean test network would be preferable as well.
If you haven’t already, be sure to download the PDFs for the Real-World Scenarios. They include the scenario, questions, and solutions. They also state whether there are associated videos and simulations. Go through them in order until you have completed them all!
There are more than 40 videos and 30 simulations within the 50 or so Real-World Scenarios. Hopefully, this extra material will help reinforce what you have read in the book. And of course, don’t forget to go through the practice exams in Pearson’s custom test engine.
Check out my main Security+ webpage at http://www.sy0-501.com, and sign up to my mailing list to be notified when I add content to my site or to the Pearson companion website for the book.
I’m available to answer questions from you at my website as well (https://www.davidlprowse.com/contactme.php).
Good luck on your exam!
Sincerely,
David L. Prowse
Real-World Scenario 2-1: Using Free Malware Scanning Programs
Scenario: As a security administrator, your task is to select a free mal-ware scanning program and scan a computer system.
An anti-malware solution is extremely important when securing a computer's operating system. There are plenty to choose from that will have a price tag attached, but a good security person should also be able to use free tools. Plus, using a free tool provides an easy way to practice without expending any hard-earned capital.
You can select from the following list or search for an alternative using your favorite search engine. These could be programs that are downloadable; if so, be sure that you are downloading the files from a reputable source. There are also online scanners that run directly from within a website. In this case, make sure the website is secured via some kind of website scanning system. Keep in mind that links may change over time, and free software (at the writing of this book) may incur a charge as time goes by.
After you have selected a tool, scan your computer for malware. Remember, this is best done on a test computer if you have one available and not on your main system. Write down the results of your scans.
Windows Defender: (Check first, you might already have this installed on your Windows computer.)
https://www.microsoft.com/en-us/windows/windows-defender
Malicious Software Removal Tool:
https://www.microsoft.com/en-us/download/malicious-software-removal-tool-details.aspx
Microsoft Safety Scanner:
https://www.microsoft.com/en-us/wdsi/products/scanner
Avast: https://www.avast.com/index
AVG:
https://www.avg.com/en-us/homepage
Sophos:
Trend Micro HouseCall:
https://www.trendmicro.com/en_us/forHome/products/housecall.html
Malwarebytes Anti-Malware:
Spybot Search & Destroy:
https://www.safer-networking.org/private/
Real-World Scenario 2-1 Solution
In this example solution we use Windows Defender and a free anti-virus program to analyze two separate computers for viruses. This should be performed on a test computer, but a virtual machine is also acceptable if it doesn't have any direct network connections to the hosting operating system. The steps are as follows:
Step 1. Download the appropriate software from the Internet.
Step 2. When it finishes downloading, install the program.
Step 3. The program should run automatically, but you can also use it to scan your computer for malware. Do so. Click "custom" or a similar option to select different partitions or particular folders. If you find any malware, quarantine it!
Step 4. Consider downloading and utilizing other tools in the list to get a firmer understanding of how these types of scanning tools operate.
Step 5. When you finish working with the free malware scanning programs, uninstall each of them from the computer and clear the cache on the system. If you want, keep the one that you like the best!
Video Solution: Watch the video solution "2-1: Using Free Malware Scanning Programs."
Simulation: Complete the simulation "2-1: Identifying Malware Types."
Real-World Scenario 2-2: Filtering and Screening E-mail
Scenario: You are the security administrator for a midsized organization. One of your many tasks is to train users to filter and/or screen their e-mails.
E-mail vetting (screening) has become increasingly necessary over the past decade due to the amount of spam that dominates the Internet. Imagine how you might reduce the amount of spam (which everyone gets at some point) in Outlook e-mail accounts and free web-based e-mail accounts such as Gmail. Write down your answers and compare them with the following solution.
Real-World Scenario 2-2 Solution
Spam and other junk mail is prevalent in today's e-mail communications. There are so many sources of junk mail that it is impossible to stop altogether; however, through filtering and user education (e-mail screening) it can be reduced to a manageable level.
One way to do this is to increase the level of security for junk e-mail. E-mail applications such as Outlook offer this feature. Another way is to set up filters either through third-party software locally, at the e-mail server (be it in-house or on the Internet), or by using a filtering appliance, such as the Barracuda devices mentioned in Chapter 2. The use of blacklisting (and/or whitelisting) can help with re-occurring spam. However, the best method is to train users to scan their e-mails carefully, deleting any that appear suspicious, and by all means to not open any attachments from an unknown source. While deleting the e-mail, the domain it came from can be marked as blacklisted as well, so that any e-mails originating from that domain (any e-mail address on that domain) will be automatically blocked.
Simulation: Complete the simulation "2-2: Filtering E-mails."
Real-World Scenario 3-1: Securing the UEFI/BIOS
Scenario: Your boss asks you to secure the UEFI/BIOS on a desktop computer. Your job is to modify the boot order, disable unnecessary devices, and configure a supervisory password.
Note
As I did in the book, to simplify, I'll refer to UEFI/BIOS as simply BIOS.
The BIOS boots before the operating system. It can be configured to boot from optical discs and removable media. This change is fairly simple to make as long as a person can log in to the BIOS setup program. If no password is configured, this is even easier. You can imagine the amount of havoc that can be wreaked upon a machine if a malicious individual were to gain access to the BIOS.
Try securing the BIOS program on a test computer. Before you make any changes, back up the BIOS settings. When you are finished, return all settings back to normal.
Real-World Scenario 3-1 Solution
For this example solution we use an Asus BIOS on a physical computer to make some configuration changes, thus securing the BIOS. The steps are as follows:
Step 1. Restart the computer and access the BIOS using the correct key (Delete, F2, etc.), which is usually displayed during bootup.
Note
If your resources are limited and you want to connect to a virtual BIOS, you can use Microsoft Virtual PC, but it must run on Windows 7 or older. However, your best option is to make these configurations on real PCs and laptops.
Step 2. Back up the current BIOS settings.
Step 3. Change the Boot device priority order. Make sure that the hard drive is first on the list so that removable media cannot be booted to.
Step 4. Disable unnecessary devices, such as USB connections and possibly optical drives.
Step 5. Configure a complex administrator password. The user password (AKA power-on password) is not necessary, but you can configure that if you want.
Step 6. Disable virtualization.
Step 7. Return the BIOS settings to normal.
Note
If you would like to keep any of the settings you just configured, be sure to back up the BIOS again. Memorize your passwords!
Video Solution: Watch the video solution "3-1: Securing the BIOS."
Simulation: Complete the simulation "3-1: Securing the BIOS."
Real-World Scenario 3-2: Securing Mobile Devices
Scenario: You have purchased several different mobile devices and are concerned about their out-of-the-box level of security. Implement some basic security measures on the devices.
Take a look at the mobile devices that you own, or try to borrow one. What kind of security measures could you take (or have you taken) to make the devices less vulnerable? If you can't get access to one, use the content in Chapter 3 to help you get some ideas for security measures that you can implement. Write down your list of security implementations, and compare them with the case study solution.
Real-World Scenario 3-2 Solution
The following are some security measures you can implement on a mobile device:
• Configuring screen locks utilizing either a password, a PIN, or a gesture
• Installing (or simply reconfiguring) antivirus software
• Disabling wireless and GPS
• Using encryption
• Installing/configuring backup and remote lock, and remote wipe programs
Video Solution: Watch the video solution "3-2: Securing Mobile Devices."
Real-World Scenario 3-3: Configuring a Rule Using the Windows Firewall with Advanced Security
Scenario: You have been tasked with modifying a local computer's firewall. The specific task at hand is to allow remote desktop connections to the local Windows computer from the Internet.
Use the Windows Firewall with Advanced Security to modify the rule. You can open it by going to Run and typing wf.msc.
Which profile should you modify?
How is this a security risk?
What is the default inbound port for the remote desktop?
Note
Remember that rules for applications can have multiple profiles associated with them, including private and public.
Real-World Scenario 3-3 Solution
In this example solution, we use the Windows Firewall with Advanced Security, which can be accessed by going to the Run prompt and typing wf.msc.
To allow remote computers on the Internet to connect to the local system via the remote desktop program, do the following:
Step 1. Open the Windows Firewall with Advanced Security.
Step 2. Locate the Remote Desktop rules.
Step 3. Enable the rule for the Public profile version of the remote desktop rule. (The domain/private profile rule is already enabled by default and can remain that way.)
Also consider whether the inbound remote desktop port should be changed. Allowing remote desktop connections to a computer on a LAN can be a security risk because the typical attacker knows the default port used by a remote desktop. And if the attacker can control a system on a LAN, that attacker can do a lot of damage to that system and other systems on the network.
The default is port 3389, so you might want to modify that to a less commonly used port. If that is the case, you would have to let the remote connecting user know which port you have selected. (In addition to letting them know the IP address, of course.)
Remember that any connection to or from the Internet has potential risk associated with it. Be sure to secure all connections appropriately.
Video Solution: Watch the video solution "3-3: Working with the Windows Firewall with Advanced Security."
Real-World Scenario 4-1: Securing a Virtual Machine
Scenario: You have been tasked with securing a Type 2 virtual machine that was created by one of the developers in your organization.
You are required to
• Secure the network connection
• Change the BIOS boot order
• Disable unnecessary devices
• Add encryption
• In general, secure the VM as much as possible
Virtual machines that are contained within a Type 2 host are sort of like a computer within a computer. Consider writing down exactly what you are configuring. Try to do this in an illustrative way, or consider using a network documentation program such as Visio. As you progress in the virtual world, you will be using more and more virtual computers, and you will connect to them in a variety of remote ways. The more you document what you are doing, the better you will understand your virtual environments.
Real-World Scenario 4-1 Solution
Virtualization security is vital. VMs should be secured in the same way that a regular operating system is secured; however, the VM itself (and the virtual hosting software) can be further secured by disabling virtual hardware.
This solution utilizes a Windows 10 computer running Hyper-V with a virtual machine that has Ubuntu Linux installed.
Note
Other software manufacturers, such as Virtual Box, will have similar settings.
At the minimum, the solution should include the following:
1. Within Hyper-V, configure the virtual switch in a secure manner. The most secure way would be to use a private virtual switch, which means that VMs within the host can communicate with each other but not with any other systems. A less secure option would be to use an internal virtual switch, where VMs can talk to each other and the host. The least secure option would be to use an external virtual switch, where the VMs can communicate with systems beyond the host.
2. Create a network connection for the VM. To make it more secure (especially if you're using an external virtual switch) consider using a VLAN or a separate IP subnet.
3. Change the BIOS boot order so that the hard drive is first, not optical discs or USB drives.
4. Disable unnecessary devices such as COM ports, USB devices, even diskette drives!
5. Add a key storage drive and encryption within Hyper-V.
Video Solution: Watch the video solution "4-1: Securing a Virtual Machine" for each of the steps listed and much more.
Real-World Scenario 4-2: Stopping Services in the Command-Line
Scenario: You have found that working in the GUI is good, but working in the command-line can be better. Besides, you almost always have a command-line interface (CLI) open, and you can type quickly, so it makes sense to use the CLI as often as possible. You know that unnecessary services can be vulnerabilities to your systems, so you decide to reduce the size of the attack surface by stopping and disabling services— and you do this from the CLI.
Demonstrate that you can stop services in the Windows Command Prompt (such as the Windows Firewall), as well as services in the Linux CLI (such as an Apache web server if installed). Specific commands and syntax will vary depending on the version of the operating system you are working in.
Real-World Scenario 4-2 Solution
Stopping services is an extremely important skill for a security administrator (not to mention it's important to know for the Security+ exam). As an IT person, you should feel at home in the command-line. Running commands, scripting, and testing network connections are all part of a day's work in the computer world. From a security standpoint, some things that cannot be accomplished in the GUI can be performed in the command-line.
To stop a service such as the Windows Firewall in Windows, use the following syntax:
net stop mpssvc
or
sc stop mpssvc
To stop a service in Linux (for example, stopping the udevmonitor service in Ubuntu), use the following syntax:
sudo stop udevmonitor
Be prepared to enter the administrator password because you have invoked the sudo option.
Video Solution: Watch the video solution "4-2: Stopping Services in the Command-Line." This goes into a bit more depth and shows a few more commands, and it deals with processes.
Simulation: Complete the simulation "4-2: Stopping Services in the Command-Line."
Real-World Scenario 5-1: E-mail Security—Digital Signatures
Scenario: Your organization is concerned about spear phishing. The CEO wants to improve the company's overall security posture by proving where e-mail originates from—for all e-mail messages. Examine the figure. What two things must be performed to implement this security control? (This image is from Outlook 2016.)

Real-World Scenario 5-1 Solution
First, you need to obtain a Digital ID. You can either import it (if an ID already exists) by clicking the Import/Export button, or obtain one from a company such as DocuSign or Comodo; simply click the Get a Digital ID button. (Which brings you to this link.)
Next, click the Add Digital Signature to Outgoing Messages checkbox.
These are both accomplished in the Trust Center in Outlook 2016 (and older versions of Outlook, such as 2013 and 2010; Outlook 2007 works a bit differently).
Video Solution: Watch the video solution "5-1: E-mail Security—Digital Signatures."
Real-World Scenario 5-2: Web Security—XSS
Scenario: As a security administrator, you might be called upon to secure websites. What are we seeing in the code shown in the figure?
Real-World Scenario 5-2 Solution
The figure shows cross-site scripting (XSS) code—specifically, stored XSS implemented by way of JavaScript. This can be prevented by secure code review and a web application firewall (WAF) as well as (for the individual) by blocking JavaScript within the browser.
Video Solution: Watch the video solution "5-2: Web Security—XSS."
Real-World Scenario 5-3: Securing Web Browsers
Scenario: Your organization uses Internet Explorer as its main web browser. Your job as the security administrator is to secure Internet Explorer in as many ways as possible.
Take a look at the configuration settings for your version of IE. Write down some of the ways in which IE can be secured.
(Optional) Take a look at any other browsers you might have running (Firefox, Chrome, Edge, Safari, etc.) and define the types of security they have as well.
Real-World Scenario 5-3 Solution
Internet Explorer can be secured in many ways. The first thing you might do is update to the newest version (if your organization's policy permits) and make sure that version is fully patched. Test the new version thoroughly before deployment. Otherwise, the following is a short list of some of the best ways to secure the browser:
• Turn on automatic website checking with the phishing filter or SmartScreen filter.
• Increase the security of the browser's “zones,” such as the Internet zone.
• Increase security for cookies.
• Empty temporary Internet files on exit.
• Set up whitelisting and blacklisting by configuring trusted and restricted websites.
• (Optional) Set up a proxy connection.
Video Solution: Watch the video solution “5-3: Securing Web Browsers.”
Simulation: Complete the simulation “5-3: Securing Web Browsers.”
Real-World Scenario 5-4: Whitelisting and Blacklisting Applications in a Windows Server Policy
Scenario: You have been employed as a consultant to set up several policies in Windows Server. The first of these is to configure which applications can, and can’t, be executed by employees.
Explain in your own words how you would accomplish your goal in Windows Server. If you have access to a Windows Server (for testing purposes), attempt to do this configuration within the operating system. If you don’t, consider downloading an evaluation copy of Windows Server and loading it into a virtual machine.
Real-World Scenario 5-4 Solution
Whitelisting means that you give users access to specific applications only; for example, Microsoft Word (winword.exe) or Internet Explorer (iexplore.exe). Blacklisting means that you deny users access to specific applications. Both of these are possible within the same group policy object (GPO) in Windows Server. To create this GPO and modify it correctly, it is assumed that you have promoted the Windows Server to a domain controller, and that you have created an organizational unit (OU) to work with. It also assumes that you have an MMC to use as your workspace. The video solution shows how to create the OU. The following shows the basic steps involved in configuring the GPO:
Note
Different versions of Windows Server can have slightly different steps but conceptually this works in the same manner.
The following steps are based on Windows Server 2008.
Step 1. Create a new policy based off the OU and add it to the MMC:
A. Go to File > Add/Remove Snap-in. This displays the Add/Remove Snap-ins dialog box.
B. Scroll down to Group Policy Management Editor, highlight it, and click Add. This displays the Select Group Policy Object window.
C. In the Select Group Policy Object dialog box, click Browse.
D. Double-click the name of the OU folder (for example, accounting.dpro3.com). Yours might differ in OU name and domain name.
E. On the upper-right side of the window, click the middle icon, which is called Create New Group Policy Object.
F. Click the New button. Name the policy (for purposes of this example, use acct-policy) and press Enter. Then click OK. This creates a standard policy within the Accounting OU.
G. Click Finish in the Select Group Policy Object window, and click OK in the Add or Remove Snapins window. This should add the new policy to the MMC.
Step 2. Configure the policy:
A. Expand the acct-policy.
B. Navigate to User Configuration > Policies > Administrative Templates > System.
C. Double-click Don’t Run Specified Windows Applications.
D. Click the Enabled radio button.
E. Click Show.
F. Click Add and add an application (for example, winword.exe, the executable for Microsoft Word). Then click OK. Be sure to reset this at the end of the lab if it will affect any computers or users.
G. Click OK for the policy’s Properties window. This brings you back to the MMC. The policy will now be enabled.
H. Double-click the Run Only Specified Windows Applications policy.
I. Enable the policy; then click Show.
J. Add an application by clicking the Add button, typing the name of an application (for example, excel.exe, the executable for Microsoft Excel), and clicking OK.
K. Click OK for the policy’s Properties window. This brings you back to the MMC. The policy will now be enabled.
Step 3. Save your MMC.
Step 4. Test whether your new policy works by logging in to a client computer with one of the user accounts that is part of the OU.
Video Solution: Watch the video solution “5-4: Whitelisting and Blacklisting Applications with a Windows Server Policy.”
Real-World Scenario 6-1: Creating a DMZ
Scenario: Your organization’s network has all of its servers running directly within the LAN. The new IT director knows this is quite insecure, and instructs you to develop a 3-leg firewall scheme.
Your task is to create a network diagram (either handwritten or with a program such as Microsoft Visio or ConceptDraw) that shows the LAN, Internet, firewall, and DMZ areas. Give examples of the IP addresses that might be used for all three connections to the firewall.
Real-World Scenario 6-1 Solution
As shown in the figure below, the 3-leg firewall scheme has a firewall in the center with three connections to the Internet, the LAN, and the DMZ. The LAN is using a Class B private IP network. The DMZ is on a separate Class C IP network, and the Internet connection uses a public IP address so that the firewall can connect directly to other systems and networks on the Internet.
This 3-leg solution is an excellent way (though not the only method) of separating web servers, FTP servers, and mail servers from the rest of the LAN. A separate set of rules (ACLs) can be configured for the DMZ connection and the LAN connection. In this way, the DMZ can be accessed by users on the Internet (and by users on the LAN), but the resources on the LAN are fully protected from users on the Internet. You can create a 3-leg firewall of this sort by using a hardware-based firewall with an Internet connection and two LAN connections (most common), or a server with three network adapters running special firewalling software.
Simulation: Complete the simulation “6-1: Creating a DMZ.” See the following page for the solution.
Real-World Scenario 6-2: Subnetting a Network
Scenario: The organization you work for has several departments. There is a lot of unnecessary traffic flowing between the Human Resources, Accounting, and Marketing departments. Each department has 10 to 15 computers running within it. Your task is to implement subnetting so that each of the three departments’ computers are placed on separate subnets, thus reducing overall traffic, as well as securing the connections between the departments.
In this scenario you will use the 192.168.100.0 network. The current subnet mask is 255.255.255.0. You will need to modify this. Plan the network so that there are eight subnets in total. Specify which subnet ID each department uses and what the usable ranges of IP addresses for those subnets are. Your answers may vary from the example solution.
Real-World Scenario 6-2 Solution
Using subnetting is an excellent way of compartmentalizing the network. It reduces broadcast traffic between the various computers on the network and secures different departments. This is because many types of traffic now cannot pass from one subnet to the next (without an expressed routing rule). Therefore, it is an effective security method.
In the scenario you were given the 192.168.100.0 Class C network to work with. To end up with eight subnets, you would need to use the 255.255.255.224 subnet mask. This can be represented as 192.168.100.0/27 because the subnet mask will have 27 masked bits (1s). The table on the following page shows the eight possible subnets and their ranges. Though they can be used, in many cases a network engineer will opt to not use the first and last subnets, so subnet IDs 1 to 6 become fair game.
Each subnet has 30 usable IP addresses. (Remember that you can’t use the first or the last because they are reserved for the subnet IP and the broadcast IP.) So, for example, we could use subnet ID 1 for the Human Resources department, subnet ID 2 for the Accounting department, and subnet ID 3 for the Marketing department.
The computers in each of those networks would then need to be configured properly. There are a lot of ways to do this. Automation is the best way. For example, set up three DHCP scopes configured on a DHCP server (be it a Microsoft server or a router), each of which corresponds to the appropriate subnetwork within a router. The key is to make sure that the DHCP server hands out the correct subnet ID addresses to each department. This requires additional configuring that goes beyond the extent of this case study. However, for more information on defining DHCP scopes in Windows Server, see the following link:
http://technet.microsoft.com/en-us/library/dd759218.aspx
For more information about DHCP subnet configuration on Cisco routers, see the following link:
http://www.cisco.com/c/en/us/td/docs/voice_ip_comm/cucm/admin/8_5_1/ccmcfg/bccm-851-cm/b02dhsub.html
Or simply search for “Cisco DHCP subnet configuration.”
Video Solution: Watch the video solution “6-2: Subnetting a Network.” This reviews subnet masks and shows an example of subnetting.
Real-World Scenario 6-3: Defending Against the Web Shell
Scenario: One of your associate’s websites was hacked into. The associate contacted you to see if you knew anything about a “web shell.” The person had found that name within the syntax of one of the “new” files on his web server. Your task is to explain to your associate what is going on, and recommend a solution.
What is the web shell?
How did it get there?
What should your recommendations be?
Real-World Scenario 6-3 Solution
Web shells are programs (known under several permutations: C99, C Shell, Web Shell, Web Shell by Orb, and others) that are installed on the web server by an attacker and are used to remotely access and reconfigure the server without the owner’s consent. They are remote access Trojans but are also referred to as backdoors because they offer an alternative way for attackers to access a website.
Most likely, the attacker stole the associate’s FTP password. Once the attacker had the password, it was just a matter of uploading the shell. Then the attacker could log in through the new web shell and do just about anything he wanted to the web server. Many of these web shells allow the operator to access them through a proxy, thus hiding the location of the operator. Also, the shell can be bound to specific ports, and the information can be encrypted and hashed.
First, you should recommend increasing password security for all important FTP accounts. Make the passwords as complex as the web server will allow. Remove any unnecessary FTP accounts. Delete the original RAT files and run a full scan of the system, or at the least, restore data from an older backup. Have the associate verify the web host’s scanning techniques, or scan web files manually.
Simulation: Complete the simulation “6-3: Defending Against the Web Shell.”
Real-World Scenario 7-1: E-mail Connectivity and Security
Scenario: A user (Mr. Underhill) requires a secure e-mail connection using port 995 for incoming mail and port 465 for outgoing mail. Currently, the user cannot send or receive e-mail and all tests fail. Examine the figure and answer the following questions:
Why can't the user receive e-mail?
What should you do to check why the user can't send e-mail?

Real-World Scenario 7-1 Solution
To fix the incoming mail problem the Account Type setting should be changed from IMAP to POP3 because the user is required to use port 995, which is a commonly used secure port for POP3. You will have to change the port by clicking the More Settings button. Most likely, the mail server name is incorrect as well. Many secure e-mail servers will use a name such as secure.domainname.com. The network admin should be contacted to verify all names and ports to be used by the e-mail account. A commonly used secure port for IMAP is 993.
To address the outgoing mail problem you should once again check the server name and then click the More Settings button (and go to Advanced) to check the port number. Secure SMTP connections often use port 465.
Video Solution: Watch the video solution “7-1: E-mail Connectivity and Security.”
Real-World Scenario 7-2: Scanning Ports
Scenario: Your organization has some concerns about the attack surface of its servers. It is unknown what the vulnerabilities to the servers are at this point. Your task is to find out which ports are open on a web server and an FTP server. If any are unnecessary, you are to close or shield them.
Which command-line tools can you use to find out which ports are open?
Where would you go in Windows to secure the unnecessary ports?
What is an example of a deprecated and most likely unnecessary port?
Real-World Scenario 7-2 Solution
Many command-line tools are available that can be used to scan for open ports on a computer. For example, in Windows you could use the netstat command or download the TCPView.exe or PortQry.exe tools from Microsoft's website. A third-party tool, Nmap, is very popular and can be used on Windows and Linux platforms. A common way to use this tool is to type the following syntax:
nmap [nd]sS [IP address]
You also can scan Internet-facing network adapters with syntax such as the following:
nmap -P0 [public IP address]
If nonessential ports are open, turn off their corresponding unnecessary services. For example, if the web server shows that port 21 is open but doesn't need FTP running, stop the service (and disable it) in the services console window (Run > services.msc), or by using the net and sc
commands in the Command Prompt. You could also can configure the Windows Firewall (the best option is with Advanced Security) to block or shield the appropriate ports, and create filters and rules.
An example of a deprecated port is port 23, used by Telnet. This utility is insecure and should be avoided. Windows XP was the last Microsoft operating system to use it, and although Microsoft no longer supports XP, you can easily find that operating system in use. In addition, some routers might have the Telnet protocol installed. The point is, you never know exactly what you might find on a network, even your own. Port scanning enables you to find the open doorways.
Video Solution: Watch the video solution “7-2: Scanning Ports.”
Simulation: Complete the simulations “7-2: Understanding Port Numbers” Parts A, B, and C.
Real-World Scenario 7-3: Identifying Network Attacks
Scenario: You are interviewing for a job with a marketing company. The company's servers have been victims of various DoS attacks and other malicious network attacks over the past year. The company wants to employ a resourceful server technician who can quickly identify the different types of network attacks common today.
Your task is to research the four types of DoS attacks listed below and give a few examples of how they can be prevented.
• DNS amplification attack
__________________________________________________________
__________________________________________________________
__________________________________________________________
• Smurf attack
__________________________________________________________
__________________________________________________________
__________________________________________________________
• SYN flood
__________________________________________________________
__________________________________________________________
__________________________________________________________
• Teardrop attack
__________________________________________________________
__________________________________________________________
__________________________________________________________
Real-World Scenario 7-3 Solution
DoS (and DDoS) attacks can harm routers and other various hosts but are most commonly used to flood servers, causing them to send only intermittent data to clients or fail altogether.
The DNS amplification attack generates a high volume of packets ultimately intended to flood a target website. In a DNS amplification attack, the attacker initiates DNS requests with a spoofed source IP address. The attacker relies on reflection; responses are not sent back to the attacker but are instead sent “back” to the victim server. Because the DNS response is larger than the DNS request (usually), it amplifies the amount of data being passed to the victim. An attacker can use a small number of systems with little bandwidth to create a sizable attack. The primary way of preventing this attack is to block spoofed source packets. It can also be prevented by blocking specific DNS servers, blocking open recursive relay servers, rate limiting, and updating one's own DNS server(s). Finally, make use of the Domain Name System Security Extensions (DNSSEC), which are specifications that provide for origin authentication and data integrity.
The Smurf attack sends large amounts of ICMP packets to multiple targets on a network in an attempt to flood their network interfaces, and the network in general. The most obvious defense is to filter ICMP traffic at the router or firewall. However, you could also use a NIDS solution, filter for spoofed IP addresses, or utilize subnetworking.
In a SYN flood, large amounts of SYN packets are sent to a server, rendering it inoperable. One way to prevent this is to implement flood control at the firewall (which can also help with Smurf and other DoS attacks). Another is to use an IDS.
The teardrop attack sends broken IP packets (fragments) in an attempt to crash the computer. To prevent this, utilize filtering and update and harden the OS.
Try to memorize the various network attacks covered in this chapter. This will undoubtedly help you on the job interview, as well as on the job itself. To help you remember them, run the following simulation.
Simulation: Complete the simulation “7-3: Identifying Network Attacks” Parts A, B, C, and D.
Real-World Scenario 8-1: Access Control Lists
Scenario: You are tasked with blocking both DNS requests and zone transfers coming from outside IP addresses. Your organization uses a firewall configured with an implicit allow. Also, the following ACL is applied to its external interface:
Permit TCP ANY ANY 80
Permit TCP ANY ANY 443
Which of the following solutions would accomplish your task? (Select the two best answers.)
A. Apply the current ACL to all interfaces of the firewall.
B. Add the following ACL to the bottom of the current ACL:
Deny IP ANY ANY 53
C. Add the following ACL to the bottom of the current ACL:
Deny ICMP ANY ANY 53
D. Remove the current ACL.
E. Add the following ACL to the top of the current ACL:
Deny TCP ANY ANY 53
F. Change the default firewall settings so that it implements an implicit deny.
Real-World Scenario 8-1 Solution
The best answers are B and F. Add the following ACL to the bottom of the current ACL: Deny IP ANY ANY 53. Change the firewall default settings so that it implements an implicit deny.
Also, the implicit allow should be removed from the firewall. Most firewalls are configured in the manner of an implicit deny by default. Watch your syntax as well. For example, if you were using a Cisco device, a TCP or UDP deny might require “eg” before the port number. Also, the placement of the ACLs is important.
Video Solution: Watch the video solution “8-1: Access Control Lists.”
Real-World Scenario 8-2: Configuring a Firewall's Rule Set
Scenario: You are the security administrator for a company with 200 computers, five of which are servers. Your company wants you to devise a firewall rule set for a specific client computer and allow it specific access to a server.
Details:
Server IP: 10.18.255.101
Client IP: 10.18.255.16
Access needed to server: HTTPS
In the following table, fill out the required information given the previous details.
Source IP |
Destination IP |
Port Number |
TCP/UDP |
Allow/Deny |
|
|
|
|
|
Real-World Scenario 8-2 Solution
In this scenario you created a basic rule allowing HTTPS access from a client computer to a server. The following table has the solution for the proper configuration.
Source IP |
Destination IP |
Port Number |
TCP/UDP |
Allow/Deny |
10.18.255.16 |
10.18.255.101 |
443 |
TCP |
Allow |
The client is the source IP and the server is the destination IP because it is the device that runs the service. The port number is 443, the one used by HTTPS. Like HTTP, HTTPS uses TCP as its transport mechanism; it is a guaranteed packet delivery system, otherwise known as connection- oriented. Finally, the rule is that connections are allowed.
Consider practicing with hardware-and software-based firewalls. If you can't get access to a Cisco, Check Point, or similar device, try working with Windows or Linux in the command-line. For Windows, configure the Windows Firewall with Advanced Security using the Command Prompt and netsh.exe. For more information on how to add rules with netsh.exe, see the following link:
http://technet.microsoft.com/en-us/library/dd734783(v=ws.10).aspx#BKMK_3_add
For Linux, use iptables or nftables in the command-line. For more information on iptables, see the following MAN page link:
http://ipset.netfilter.org/iptables.man.html
Try to practice working with firewall rules. You are bound to get questions on this topic when you take the exam. Plus, it is a necessary skill for the security administrator.
Simulation: Complete the simulation “8-2: Configuring a Firewall's Rule Set.”
Real-World Scenario 8-3: Configuring Packet Filtering and NAT
Scenario: You are consulting for a small company that has seven computers connected to an all-in-one SOHO router (also known as a multi-function network device). The owner is concerned about whether data passing through the device is being inspected and/or filtered properly. The owner is also not sure whether the internal IP addresses of his computers are being protected from the Internet properly. Your tasks are to make sure packet filtering is functioning and explain to the owner how NAT works on this device.
Consider your options when it comes to packet filtering for a device such as this. Make a recommendation based on today's SOHO routers. If the owner wanted to take packet filtering further, what could you suggest?
________________________________________________________
________________________________________________________
________________________________________________________
In your own words, explain to the owner (as if you were actually speaking to the person) how NAT functions within a SOHO router.
________________________________________________________
________________________________________________________
________________________________________________________
Real-World Scenario 8-3 Solution
First, you should make sure that stateful packet inspection (SPI) is being implemented. SPI keeps track of the individual sessions running through the router. It can differentiate between good and bad packets to a small extent. Small office/home office (SOHO) routers usually can run SPI, at least at a basic level; however, you should test this capability. How much does it slow down communications? For example, VPN or remote connectivity connections. If the difference in communication speed between SPI being enabled and being disabled is great, you might recommend a newer SOHO router.
If the owner requires a greater level of packet filtering, you can suggest a NIDS/NIPS solution that sits inline on the network, and perhaps a proxy server of sorts.
Your explanation of NAT to the owner should include a description of how it translates the private internal IP addresses of the network to the public external IP address. This, you can tell the owner, protects the internal IP addresses from discovery. The public IP address is connected to the Internet, but if firewalled properly, it should be virtually invisible.
Most small four- and eight-port SOHO routers also offer NAT filtering that can filter out TCP and UDP traffic in a variety of ways depending on the IP address and port in question. This is something you should also examine, and see if the filtering capability can be increased without undue slowdown of the network.
Video Solution: Watch the video solution “8-3: Configuring Packet Filtering and NAT.”
Real-World Scenario 8-4: Configuring an Inbound Filter
Scenario: Your boss is concerned with the repeated intrusion attempts from a group of IP addresses on the Internet. They are all part of a single IP network and range between 12.46.14.66 and 12.46.14.100. The main concern is that they are trying to insert unwanted packets into the network. Your public IP address is 65.13.82.14.
Your job is to block these IP addresses at the firewall. What can you implement that will filter out the unwanted IP addresses? How would this work from a logical standpoint?
Real-World Scenario 8-4 Solution
Intrusion attempts on a network are extremely common. A public IP address can expect to be scanned and have intrusion attempts multiple times every day because of the plethora of bots and automatic scanning systems on the Internet.
The first and most obvious defense is to make sure the firewall is on, and test it by scanning it with an online program or with a command-line program such as Nmap. If at all possible, make sure all ports are closed and shielded.
Next, recommend creating an inbound filter for the IP addresses in question. This firewall rule will block all attempts by those IP addresses to access the network. This is often done graphically, but it can also be done in the command-line. In essence, what you are trying to accomplish can be represented as the following:
deny TCP/UDP 12.46.14.66 - 12.46.14.100 65.13.82.14 all ports
In this example, you are denying all TCP and UDP port connections for computers with the IP range of 12.46.14.66 to 12.46.14.100. Again, this is just a representation. The actual syntax for how this is implemented will vary from one system to the next. Or it might simply be done within the GUI of the firewall. That will depend on a variety of factors, including the level of complexity of your hardware and software.
Whatever the case, keep track of your firewall rules. Having too many rules can end up blocking access to known good IP addresses. Finally, if you are worried that external attackers are trying to insert unwanted packets on your network, you should strongly consider a NIDS or NIPS solution, and possibly a honeypot. These might be implemented as individual technologies or as part of the overall UTM solution.
Video Solution: Watch the video solution “8-4: Configuring an Inbound Filter.”
Real-World Scenario 9-1: Password Policies
Scenario: In the figure we see that we are working on a Cisco SG200 switch. Examine the figure carefully. What security issues can you see that are related to passwords?
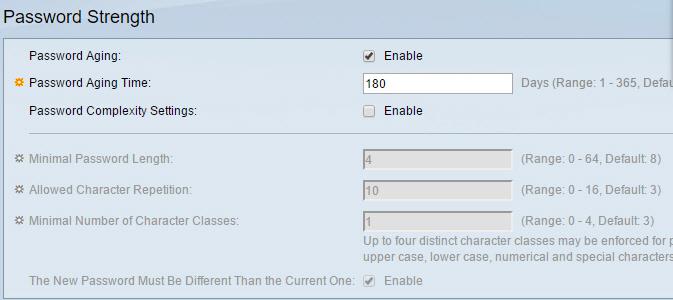
Real-World Scenario 9-1 Solution
The most glaring problem is that the Password Complexity Settings checkbox is not enabled. By default, on a switch such as this it would be enabled, but you should always check just in case. Without complexity, a person could set very weak passwords for a user account allowed to log in to this switch. This doesn't affect other computers but it does affect all user accounts on this switch.
Once that is enabled, the options below it become configurable. Note that the current minimum password length of 4 characters is not nearly enough. Cisco recommends 8, but you might find 10 or even 15 characters as your organization's minimum. In addition, the allowed character repetition is much too high, and the minimal number of character classes is too low. You should opt for either 3 (the default here) or all 4.
Finally, your organization might decide that 180 days is too long for password aging time, and that passwords should be changed more frequently. In fact, this might be necessary for compliance with various third-party auditing organizations.
Video Solution: Watch the video solution “9-1: Password Policies.”
Real-World Scenario 9-2: Securing a Wireless Device
Scenario: You have a new client, a small marketing office with six computers and a SOHO router/WAP. The client wants you to secure the device so that the internal computers will be safe and the wireless network will be difficult to attack.
Define eight ways in which you can protect this wireless network.
_________________________________________________________
_________________________________________________________
_________________________________________________________
_________________________________________________________
_________________________________________________________
_________________________________________________________
_________________________________________________________
_________________________________________________________
Real-World Scenario 9-2 Solution
There are a host of things you can do to secure a wireless network. The following eight-step list should be incorporated into most plans to secure a WAP, but you will undoubtedly add your own zest to the mix!
Step 1. Update firmware. Download the latest firmware, install it, and test it before implementation. Any hotfixes and updates (if the device accepts them) should be installed as well. Check for updates automatically, and have the device's manufacturer e-mail you if new updates are released.
Step 2. Set passwords! Enter separate, complex passwords for the administrator and the user accounts.
Step 3. Disable remote administration. If it is not necessary, remove this functionality by disabling it. Or, if it is necessary, consider changing the port from the commonly used 8080 to something less well known.
Step 4. Disable SSID broadcasting. Once all computers have been connected, make the wireless network invisible by disabling the SSID. Computers can still connect, in a manual, step-by-step fashion, but at least it will be more difficult to scan for the SSID.
Note
Before anyone ever connects to the WAP, change the SSID from the default name to something less common.
Step 5. Enable encryption. As of the writing of this book, WPA2 and AES are the best options. (But anything is better than nothing.) Select a complex preshared key. If possible, use a RADIUS server for authentication.
Step 6. Reduce the output transmitting power of the WAP. Sometimes, the wireless network is too powerful and reaches far beyond the physical perimeter of the office. Antennas are set to a specific output power by default (for example, 90 mW). This can be reduced on some WAPs, which will ultimately reduce the range of the wireless network.
Step 7. Enable MAC filtering. This configuration enables you to allow or deny specific MAC addresses.
Step 8. Configure other rules and ACLs. This might include inbound filters, access control policies, application rules, and so on. Depending on your organization's function, you might decide to implement other options, such as captive portals and secure VPN.
In Steps 7 and 8, be sure that you don't lock down your WAP too tightly, or you might end up restricting access to clients that legitimately need to access your wireless network.
Video Solution: Watch the video solution “9-2: Securing a Wireless Device.”
Real-World Scenario 9-3: Wireless Security Issues
Scenario: You are tasked with securing a WAP. Examine the figure below. What four potential security issues can you identify in the configuration?
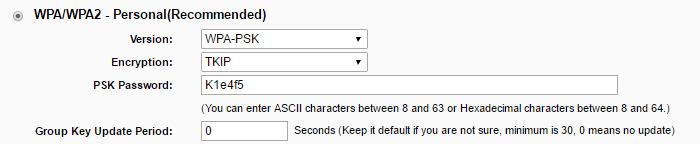
Real-World Scenario 9-3 Solution
This is a fairly insecure configuration.
1. WPA2 is recommended over WPA, though that is not the worst of the offenders.
2. TKIP is considered outdated (deprecated) for most technical scenarios. It should be replaced with AES (or CCMP if necessary). The outdated protocols that the Security+ exam really focus on are WEP, TKIP, and RC4 (though that last one is debatable).
3. The password is fairly weak. Although it employs a certain level of complexity (uppercase letters and numbers), it is only 6 characters long. In fact, this password would not be accepted by this system—like it says, it requires at least 8 characters. Most organizations require 8- or 10-character passwords, and 15 for super-secure enterprise environments. As a side note, the password is showing up as plain text. If at all possible, use a system that allows for the display of asterisks (or some other symbol) in place of the actual characters. Or, if you are the only person administering this router, be sure that no one has viewing access of your screen when you enter the password, and consider a screen protector (a good idea in general for sys admins).
4. If TKIP must be used, the group key update period should be set to something. Zero (0) is the default, which means that the key for the password is not updated. Setting this to a number such as 3600 (60 minutes) is a common practice so that the key updates every hour, thereby increasing security. Setting it to the minimum of 30 seconds is not recommended because that could cause performance issues. Keep in mind that TKIP has security issues concerning technologies such as 802.11n. It should be avoided if at all possible.
Finally, a device such as this one might not be secure enough for your organization. This is something to consider. Although it can be obtained for less than $100, the possible lack of security and options might cause your company to pay the price in other ways. Many companies suffer from a lack of good IT equipment due to an outdated IT budget. A good tech finds ways to encourage the budgeting decision makers to upgrade the company's technology once in a while.
Video Solution: Watch the video solution “9-3: Wireless Security Issues.”
Real-World Scenario 9-4: Enabling MAC Filtering
Scenario: As part of a wireless device security plan, you decide to enable MAC filtering on the client’s WAP. Your task is to allow access to only specific MAC addresses for three Windows computers, a Linux computer, and a Mac computer. Explain how you would find out the MAC addresses for those computers, and give an example of a MAC address. Then, describe how MAC filtering can be enabled given this setting.
Real-World Scenario 9-4 Solution
MAC addresses are groups of six hexadecimal numbers, separated by hyphens or colons.
Example: 00-1C-C0-A1-54-1B
Find out the MAC address of a Windows computer by accessing the Command Prompt and typing ipconfig /all.
Find out the MAC address of a Linux or Mac computer by opening the Terminal and typing ifconfig.
Write down all MAC addresses that are to be given access to the WAP. Then, access the WAP’s firmware, usually from your web browser.
Note
Consider a secure web browser such as Firefox when doing this type of work. Regardless, make sure the browser is updated, and verify that no one is attempting to shoulder surf your computer while you access the WAP!
Access the MAC filter configuration area (sometimes also called network filter). Select the Allow Only These Computers option or a similar name. Add each individual MAC address and save the settings. Then test the system to make sure the computers in question can access the wireless network.
Video Solution: Watch the video solution “9-4: Enabling MAC Filtering.”
Real-World Scenario 9-5: War-driving...and the Cure
Scenario: Your boss has heard of “war-drivers” and has obvious concerns about unauthorized access to your wireless network. He wants to have proof that it will be difficult for a war-driver to access the network, and that there are no jamming devices or other interference-based devices within the perimeter of the building.
Your job is to scan the building, make any configurations necessary, and explain how you have configured the wireless network to be war-driver-proof.
Real-World Scenario 9-5 Solution
The first step is to scan the area to find out which wireless networks are visible. This can be done in several ways. For example, you could use just about any mobile device with Wi-Fi enabled and search for wireless networks. From that, you can glean the name of the wireless network, the connection speed/type, and whether encryption is used. Or, you could use a wireless-enabled desktop or laptop computer by using the built-in wireless network finding software, either by Microsoft, by another OS manufacturer, or by a network adapter manufacturer. However, one of the best ways is to use a third-party Wi-Fi scanning (or “stumbling") program. These can give very detailed information about the wireless networks that are available. In fact, they are the types of tools that war-drivers would use, so it makes sense for you, as the security administrator, to use them as well and see what your enemy sees.
Next, based on your wireless scans and physical inspections, you want to locate and shut down any unauthorized WAPs, rogue devices, or evil twins, and remove any devices causing interference or jamming.
Then, for the authorized WAPs, reduce the power level of the antennas until you can scan them from inside the perimeter of the office but not from the outside. Getting this just right might take several attempts, but it pretty much eliminates the attacker's ability to scan for your network. This is a common method, especially if you are using 802.11n or 802.11ac, which have powerful ranges. Of course, this does not address malicious insiders, but other solutions, such as authentication, NIDS/NIPS, and so on can be used to deal with them.
If possible, disable the SSID to make it invisible. The SSID broadcast is not the only way that a WAP can be located, but disabling it is a good first step.
Finally, secure the authorized WAPs in the manner you did during previous Real-World Scenarios: Update the device, set complex passwords, use strong encryption, and consider MAC filtering.
Video Solution: Watch the video solution “9-5: War-driving...and the Cure.”
Real-World Scenario 9-6: Planning Network Security
Scenario: You have been given a new assignment at your organization's newly built sister office. You have been tasked with installing several security technologies to protect the LAN and the WLAN.
Take a look at the following table, which includes a list of problems that you need to tackle. In the Your Solution column, enter the device, technology, or other solution that you would employ for each situation. Be concise and brief in your answers. This Real-World Scenario spans the content within Chapters 6 through 9.
Real-World Scenario 9-6 Solution
As you can see, being in charge of the security for a network can be a lot of work—a full-time job perhaps, given the size of a network. Remember that you are attempting to do the following:
• Ensure that confidential files remain secret.
• Keep the integrity of your data intact.
• Make sure that data is still available to the appropriate persons.
Use the CIA approach to help govern your actions as a security administrator. Add layers of security so that you end up with a solid defense-in-depth plan, ultimately protecting your network and data on multiple levels. See the following table for some possible solutions to the issues you face.
Simulation: Complete the simulation “9-6: Planning Network Security.”
Real-World Scenario 10-1: Choosing Physical Security Methods
Scenario: You are the security administrator for DPro42, Inc., a technology research firm that has 20 users in the main office, several offsite computers, a data center, and an unsecured computer lab. Your task is to use physical methods to secure these computers.
Name eight types of physical security methods and define them in the following table. The solution to this scenario might have different answers than you.
Physical Security Method |
Description |
|
|
|
|
|
|
|
|
|
|
|
|
Real-World Scenario 10-1 Solution
There are many types of physical security methods. The following table shows eight examples and basic descriptions for them based on the scenario.
Physical Security Method |
Description |
CCTV |
Closed-circuit television, used to monitor and record images from server rooms and data centers. |
Cable locks |
Used to physically lock down computers and monitors; for example, computers in an otherwise unsecured computer lab. |
Cipher lock |
A type of door lock that uses a basic cipher mechanism where the numbers of the code must be entered sequentially—often pushbutton operated. Used in server rooms, data centers, and even for entrances to offices. |
Proximity badges |
Basic swiping cards used to allow access to an office or a server room. The card (or badge) need only be in close proximity to the sensor for the door in question. |
Safe |
A wonderful way to protect items such as optical discs, backup tapes, USB flash drives, application and development discs, and so on. |
Mantrap |
A secure area that can be used to hold a person until that person is authenticated to the area ahead. Often used as entrances to server rooms and data centers (and even offices), while still allowing a means of egress in the case of an emergency. |
Often a type of scanner that can be used on laptops and other mobile devices. It connects via USB and will usually scan a thumbprint. This type of physical security works great for computers that are located outside the office; for example, computers used by salespersons or data commuters. |
|
Smart cards |
Like proximity badges, something a person has. For example, a common access card, which has an embedded chip that can authenticate a user. An excellent choice for highly secure areas such as server rooms and data centers. |
Your organization's physical security methods will vary. They will be based on the IT security budget as well as the level of confidentiality of your data. Consider researching additional methods of physical security on the Internet.
Simulation: Complete the simulation “10-1: Choosing Physical Security Methods.”
Real-World Scenario 10-2: Selecting the Correct Authentication Technology
Scenario: There are many types of authentication technologies. Your organization employs two localized authentication technologies and two remote authentication technologies. It uses a Microsoft Windows Server that runs Active Directory. Also, it uses the PPTP protocol. Finally, the remote authentication technology uses UDP as the transport mechanism.
Your task is to identify the four types of authentication technologies your organization uses, describe each one briefly, and specify the inbound port for each. Enter that information in the following table.
Authentication Technology |
Brief Description |
Port Number Used |
|
|
|
|
|
|
|
|
|
|
|
|
Real-World Scenario 10-2 Solution
This chapter contains many types of authentication technologies, but this particular scenario was asking for four: Kerberos and LDAP, which are used by Active Directory on Microsoft Windows Server domain controllers; a Remote Access Service (namely VPN) in this case utilizing PPTP; and RADIUS server, which uses UDP as its transport mechanism. See the following table for the rest of the solution.
Authentication Technology |
Brief Description |
Port Number Used |
Kerberos |
Authenticates users in an Active Directory environment. |
88 |
LDAP |
Controls access for users and computers in an Active Directory environment. |
389 (636 for Secure LDAP) |
Remote Access Service (VPN using PPTP) |
Allows remote access for computers outside the LAN. |
1723 |
RADIUS |
A powerful remote authentication technology used with VPN. It utilizes the UDP transport mechanism. |
1812 and 1813 (sometimes port 1645 and 1646) |
Simulation: Complete the simulation “10-2: Selecting the Correct Authentication Technology.”
Real-World Scenario 10-3: Understanding 802.1X
Scenario: You are in charge of implementing an 802.1X solution. Your job is to first define the three main elements of an 802.1X authentication scheme. Next, you must specify the exact technologies you will use for each of those three main elements.
In the following table, describe the three main elements of 802.1X. Then, use the Internet to research actual types of 802.1X-compliant network adapters and components that you can use to create an actual working 802.1X authentication scheme.
802.1X Element |
Description |
Actual Component |
|
|
|
|
|
|
|
|
|
Real-World Scenario 10-3 Solution
The three main elements of an 802.1X authentication scheme include the supplicant, the authenticator, and the authentication server. Several companies offer products that comply with 802.1X secure authentication. See the following table for descriptions and examples of companies that offer solutions.
802.1X Element |
Description |
Actual Component |
Supplicant |
A software client running on a workstation. This is also known as an authentication agent. |
Many network adapters (wired and wireless) from Intel and Cisco are 802.1X-compliant. |
Authenticator |
A wireless access point or switch. |
Cisco and D-Link have options for 802.1X-compliant WAPs and switches. |
Authentication server |
An authentication database. |
Microsoft Windows RADIUS Server. |
Video Solution: Watch the video solution “10-3: Understanding 802.1X.”
Simulation: Complete the simulation “10-3: Understanding 802.1X.”
Real-World Scenario 10-4: Setting Up a Secure VPN
Scenario: Your boss wants to enable remote access for several people who will be working from home. You are now in charge of implementing a secure VPN solution for the data commuters.
Name several vendors that offer secure VPN solutions. Describe the two main protocols that are used with VPN connections, and specify their port numbers.
Real-World Scenario 10-4 Solution
Several vendors that offer secure VPN solutions for small offices include D-Link and Cisco (through its subsidiary Linksys), among other manufacturers of SOHO routers. For larger environments you would look to companies such as Cisco, Microsoft, Juniper, and so on. The two main protocols that can be used in a secure VPN solution include PPTP (port 1723) and L2TP (port 1701). L2TP requires specialized certificate services, whereas PPTP does not.
Use the Internet to further research the variety of VPN solutions available, such as SSL/TLS-based always-on VPN.
Video Solution: Watch the video solution “10-4: Setting Up a Secure VPN.”
Real-World Scenario 11-1: Configuring Complex Passwords
Scenario: You are not only the security administrator for your organization but also the IT trainer! Teach your users how to set passwords in Windows, Linux, and OS X. But more importantly, show them how to check whether their passwords are complex enough to meet today's standards. Finally, show the junior network admins how to enforce complex passwords.
In the following table, describe the following:
• How you would set passwords in Windows, Linux, and macOS/OS X
• How to check the complexity of passwords online
• What method should be used to enforce complex passwords
Task |
Your Solution |
Configure a Windows password |
|
Configure a Linux password |
|
Configure a macOS/OS X password |
|
Identify where to check the complexity of passwords online |
|
Choose a method to enforce complex passwords |
|
Real-World Scenario 11-1 Solution
Training users is one of the best ways to increase the security of your IT environment. It can be difficult to keep some users' attention, so you have to make it interesting. Appeal to their curiosity, and have the users practice, practice, practice to make things stick. Remember that users are not techies (usually), and might learn in a different way and at a different pace.
Remember too that users might work with Windows, Linux, macOS/
OS X, iOS, Android, or other operating systems, each with its own way of configuring passwords and passcodes. Also keep in mind that there are many ways to accomplish something in Windows and other operating systems. The following table shows a few examples.
Video Solution: Watch the video solution “11-1: Configuring Complex Passwords.”
Simulation: Complete the simulation “11-1: Password Strength.”
Real-World Scenario 11-2: User Password Security and Account Expiration
Scenario: A consultant (Douglas) will be working at your company for three months. Your company has a policy stating that user passwords must be changed every 42 days. What are the two most important issues that you see in the figure?

Real-World Scenario 11-2 Solution
First of all, the most glaring issue is that the “Password never expires” checkbox is selected. The company has a 42-day change policy, and should also have a policy stating that a user cannot reuse the same password (usually for at least a year, if not forever). So that needs to be deselected and, possibly, we should review our policies and make sure that this account (and its group) have the policies applied to it.
More importantly, the consultant (Douglas) will only be working at the company for three months. We need to set an account expiration date for that user account. This way, the user will not be able to log on to the domain after the consulting period has ended. In the video solution I show how to reconfigure this within Active Directory Users and Computer in Windows Server 2012.
Video Solution: Watch the video solution “11-2: User Password Security and Account Expiration.”
Real-World Scenario 11-3: Configuring Password Policies and User Account Restrictions
Scenario: As the network security administrator of a company with 5000 users, you are required to enforce complex passwords and make sure that user access to the network is restricted to specific times. More importantly, you must employ a certain level of automation. Let's face it, even the fastest computer operator wouldn't be able to keep up with all the password requests and timeframe configurations for users on an individual basis in an enterprise environment such as this. Your organization has a Windows domain with three domain controllers.
In your own words, describe how you would enforce complex passwords and user account restrictions. Explain how you would automate the process, utilize templates, and work with organizational units.
Real-World Scenario 11-3 Solution
A network security administrator will have far too much work to do to have to worry about individual password requests or deal with configuring users one at a time. So the smart admin will utilize password policies that are based on individual organizational units (OUs) in Windows or other similar grouping structures in other operating systems. These policies will default to a self-reset mode, where the users change the passwords themselves, when prompted by the system. And the policy will make sure that the user meets the complexity requirements.
User account restrictions can be configured through policies and by creating a basic user template, off of which other user accounts are based, effectively copying any restrictions from the template to the new user.
By automating as much as possible, the admin reduces the amount of time required for basic configurations and can spend more time researching the latest CVEs and installing required updates.
Video Solution: Watch the video solution “11-3: Configuring Password Policies and User Account Restrictions.”
Simulation: Complete the simulation “11-3: Configuring Logon Hours.”
Real-World Scenario 11-4: Understanding Access Control Models
Access control can deal with a lot of different things, but in technology what we are most concerned with is the access to data and how it is controlled.
Use the Internet to research the four types of access control listed in the table, and give a description of each and an example of technology environments for each.
Access Control Model |
Description |
Example |
DAC |
|
|
MAC |
|
|
RBAC |
|
|
ABAC |
|
|
Real-World Scenario 11-4 Solution
There is some overlap when it comes to access control models. That is partially true because the functional definitions of the various access models have changed over time, and the software that uses them has changed over time as well. For example, you might see that FreeBSD is considered to be either MAC-based or RBAC-based depending on its implementation.
The following table gives sample descriptions and examples of four access control models.
Access Control Model |
Description |
Examples |
DAC |
Access control policy generally determined by the owner. Objects such as files and printers can be created and accessed by the owner. |
Windows domains |
MAC |
Access control policy determined by a computer system, not by a user or an owner. |
Military |
Controlled by the system but works with sets of permissions known as roles. |
Solaris |
|
ABAC |
Access rights are granted to users through the use of multiple policies that combine user/ group/resource attributes together. |
XACML |
Simulation: Complete the simulation “11-4: Understanding Access Control Models.”
Real-World Scenario 11-5: Configuring User and Group Permissions
Scenario: You are required to configure permissions for users on your network. To simplify the process, also create user groups that will allow you to group the users together (most likely by the department of your organization) and apply permissions to multiple users within the group at one time.
Using the book and the Internet, research how you would apply permissions to users, and how you can create groups on a Windows computer.
Real-World Scenario 11-5 Solution
One great resource on the Internet for details about configuring permissions is Microsoft TechNet (https://technet.microsoft.com). It has all kinds of step-by-step instructions that show you how to do just about anything in Windows operating systems. Case in point: working with users and groups, whether on a Windows client or server. Practice working with users and groups, and watch the video on this subject on the website.
Video Solution: Watch the video solution “11-5: Configuring User and Group Permissions.”
Real-World Scenario 12-1: Understanding Risk and Vulnerability
Risk is the possibility of an attack or threat compromising your IT infrastructure. It is normally accomplished by exploiting vulnerabilities in computers, networks, and even people.
Scenario: You work for a medium-sized business with 200 computers and users. The company has experienced extremely fast growth, and until now has not been concerned with risk. Your task is to define risk to your company and develop plans to deal with it effectively. The board of directors is interested in finding out the annualized loss expectancy for the company's servers. The board also wishes to have some kind of management plan in place that includes analyzing network documentation and mitigating threats and potential compromise.
What type of risk assessment should you recommend?
Because you don't know exactly what will happen to your company's servers in the future, it is impossible to predict exactly what will happen to them, and when, and how much it will cost. What concept, in addition to your risk assessment method, can aid in this?
What kind of management plan should you implement? What basic steps does it entail?
(View the solution to this case study before moving on to the next case study.)
Real-World Scenario 12-1 Solution
Remember that solutions to these types of scenarios will vary. The following is one possible solution to the needs of your company.
First, you should recommend a quantitative risk assessment. This uses exact monetary values: SLE × ARO = ALE (the aforementioned annualized loss expectancy).
The problem with quantitative risk assessments is that they are based on the past history of your actual organization. To go beyond this, and perhaps predict the future with a bit more certainty, consider using concepts such as mean time between failures (MTBF). This information can be obtained from the manufacturer of a device. It consists of data gathered from many customers that ultimately shows the average amount of time that elapses before a failure of the device in question. Instead of relying solely on your own data and how costly failures were, you can utilize the data of other customers (anonymous, of course) to better find the median, or average, for failures and predict the future with more clarity.
Finally, you should implement a vulnerability management plan. This means documenting the network, testing the attack surface of servers, scanning systems internally and remotely, mitigating any vulnerabilities you find, and monitoring carefully.
Simulation: Complete simulations 11-1a, 11-1b, and 11-1c.
Real-World Scenario 12-2: Mapping and Scanning the Network
Scenario: Now that you have developed plans for risk assessment and vulnerability assessment, it's time to get your hands dirty and find out what's actually happening on your network. Your job is to use utilities that will help you identify the servers and other computers on the network, and scan for vulnerabilities on those computers.
Warning: The following should be performed on a test computer within a closed test network.
Access the Internet and locate two network mapping programs and two network scanning programs. Look for free utilities or utilities that have free trials. Download and install those programs, then create a basic map of the network and define some of the vulnerabilities, such as open ports on your computers.
Real-World Scenario 12-2 Solution
Remember to perform these types of tests on a closed network that you are allowed to have access to.
A couple examples of network scanning programs include Network Topology Mapper (previously LANsurveyor) and Spiceworks, but there are others as well. Use what works best for you. Two examples of port scanners are Nessus and Nmap (though these are actually full-blown vulnerability scanners). On a Windows client computer, type the command netstat -an. In the left column you will more than likely find that ports 135 and 139 are open (among many others). Some ports such as these need to be open so the computer can be “networkable,” but other ports might need to be closed. From a remote system, scan the same computer with the Nessus and Nmap programs to find out what ports are visible from the network.
Video Solution: Watch the video solution “12-2: Mapping and Scanning the Network.”
Real-World Scenario 12-3: Defending Against Password Cracking
It’s been said over and over again that weak passwords can easily be cracked. Plenty of free tools available on the Internet can crack a weak password in a matter of seconds.
Scenario: You are in charge of a small peer-to-peer Windows network where people configure their own passwords on computers that have no other configured security than the out-of-the-box security that comes with the operating system. Your task is to test the users’ passwords and set up a way to enforce the use of complex passwords. You are not allowed to know the current user passwords (unless of course you can crack them!).
Use freely downloadable tools to test accounts (and their passwords). Then define what a complex password is. Finally, explain how you can enforce whether people use complex passwords.
Real-World Scenario 12-3 Solution
Remember to perform these types of tests on a closed network that you are allowed to have access to.
Passwords can be very unsecure out-of-the-box. An account is generally configured with no password by default. In addition, different operating systems have different ways of hashing the password. In fact, in Windows there are multiple ways of hashing, depending on the Windows version and several other factors. (Hashing is discussed later in the book.) Aside from the lack of default security, users often select very simple passwords such as love, secret, or the best one, password. Those passwords are just about as good as using no password at all. For example, a four-character password can be cracked by today’s password-cracking programs in a matter of seconds.
You can download plenty of tools for free and use them to check the quality of users’ passwords; for example, ophcrack, Cain & Abel, and RainbowCrack. Try some of these programs on a closed network (and a clean machine) and see how they function. You will see that they are designed to use various password-cracking methods (brute force, for example) that are very good at breaking LM and NTLM password hashes in Windows.
In many networks, chances are you will find a lot of non-complex passwords—ones that can be cracked very easily. How do you fix this? Do the following:
• Give the administrator account a complex password. (Also consider making a secondary administrator account—with a complex password—and disabling the original admin account.)
• Disable generic accounts and give them complex passwords.
• Set up a policy that governs the type of password that users can choose.
Now, that last bullet will vary depending on the type of network. In a small peer-to-peer network that has, say, five or six Windows computers, the policy would have to be configured on one machine, then exported, and imported to the rest of the computers. In this scenario you would go to Run and type secpol.msc. That displays the local security policy, and from there you would access Account Policies > Password Policy, where you would enforce complexity and a minimum password length. In a larger network, such as a Windows domain, you would configure the policy based on the OU in question, and/or use the gpedit.msc utility.
Video Solution: Watch the video solution “12-3: Defending Against Password Cracking.”
Real-World Scenario 13-1: Capturing and Analyzing Packets
Scenario: You are doing work for a medium-sized business with several servers. There is concern that one of the servers is running a non- secured FTP service, and is possibly being used for non-work purposes. Your task is to analyze the traffic coming in and out of the server.
What technology should you use to analyze the traffic?
What are a few examples of this technology?
Which layer of the OSI model will tell you about the ports being used by applications?
Real-World Scenario 13-1 Solution
It's a good idea to periodically analyze the traffic that is sent and received by servers. This can help when you are concerned about a potential compromise or just think that the server is being used incorrectly.
A lot of technologies are used to analyze traffic, but the best for this scenario is the protocol analyzer, otherwise known as a network sniffer or packet sniffer. Examples of these tools include Wireshark, Network Monitor, TCPdump, and so on. Wireshark is extremely common and (as of the writing of this book) is a free download.
The transport layer of the OSI model tells all. It defines the port number being used on the source computer and the destination. It also describes the transport mechanism being used (TCP or UDP). The network layer is also important because it shows the IP addresses being used by the communicating systems. The application layer shows what program is being used, but many network and security admins will jump right to the transport layer and glean that information (and much more info) from the port numbers.
Video Solution: Watch the video solution “13-1: Capturing and Analyzing Packets.”
Simulation: Complete the simulation “13-1: Capturing and Analyzing Packets.”
Real-World Scenarios 13-2: Deciphering Log Files
Scenario: The same organization used in Real-World Scenario 13-1 has concerns about its firewall. The IT director thinks that an attacker on the Internet is attempting to (and possibly succeeding in) bypassing the firewall, but doesn't know how it is potentially being done or what port is being used to do it.
What application/protocol can you use to easily analyze the firewall logs from your workstation?
How would you configure this on the firewall and at your workstation?
Describe a typical log message with attempted communication and the two main components of it.
If you see a message such as the one listed below, what does it tell you?
Tues Apr 21 12:36:01 2014 Cisco Firewall System Log: Blocked incoming TCP packet
From 64.58.137.211:23475 65.82.117.241:23 as SYN:ACK received but there is no active connection.
Real-World Scenarios 13-2 Solution
Use the Syslog protocol. Many Syslog programs are available, such as SolarWinds Kiwi Syslog Server. This can pull the logs from a firewall and other network devices so that you can watch them in real time from your workstation.
The firewall would need to have Syslogging enabled and configured to stream log messages to the IP address of your workstation. The firewall will generate a typical log message when someone on the Internet attempts to connect to it. It will have the source IP address and port as well as the destination IP address and port; for example:
S=207.50.135.54:23 – D=10.1.1.80:1
In the Case Study's Syslog message listed, you are told a lot of information, including the potential attacker's IP address and the port used, as well as the IP address of your firewall and the port that was attempted for access; in this case, port 23 Telnet. The important part here is that the TCP packet was blocked. So the firewall succeeded in blocking the potential attack and remained secure. However, devices will fail sometimes. The key is to fail securely. An example of a secure failure would be if a firewall let a packet through (which will happen) but the result was that the firewall was shut off immediately afterward by an automated mechanism. Another example would be if an IPS blocked a packet that was legitimate. This is a failure, but a secure one, albeit an inefficient one. Another example is if a WAP let a potential attacker through but redirected the person to a honeypot, or if the WAP shut down altogether.
If you believe that an attacker is possibly getting through the firewall, some active scanning will be appropriate. Connect to the firewall from the public side and use a port scanner such as Nmap or a vulnerability scanner such as Nessus (or both) to find out what (if any) open ports there are and if any of them are substantial vulnerabilities.
Video Solution: Watch the video solution “13-2: Deciphering Log Files.”
Simulation: Complete the simulation “13-2: Deciphering Log Files.”
Real-World Scenario 13-3: Auditing Files
Scenario: You’ve analyzed packets, checked Syslogs, and checked for vulnerabilities on the firewall. As a final precaution you want to make sure that no one is accessing your file server and compromising the integrity of your data files.
You decide to enable auditing on the server. What steps are involved in accomplishing this?
Real-World Scenario 13-3 Solution
Auditing is an excellent way to check for data integrity issues, check for breach of permissions, or simply make sure your files are being accessed exactly the way you want.
For example, you can enable auditing on a Windows Server and review who tried to access what, and whether they succeeded or failed. What you are most interested in is the attempted deletion or modification of data. The basic steps involved with auditing include enabling auditing in a policy, turning on auditing for a data folder (or other resource) in question, and reviewing the security log often.
Video Solution: Watch the video solution “13-3: Auditing Files.”
Real-World Scenario 14-1: Key Stretching
Scenario: You are working as a security administrator alongside your organization's development team. You are in charge of implementing key stretching whenever there is weak encryption.
Examine the figure below.
What is being encrypted here?
How many iterations (or rounds) were performed during the encryption process?

Real-World Scenario 14-1 Solution
I created a password for the GRUB bootloader in Linux and encrypted it using PBKDF2. This utilized the SHA512 cryptographic hash, which ran for 10,000 rounds (iterations). The amount of rounds can be modified, but be careful when doing so because it might increase computational time considerably. Finally, be sure to test any key stretching technology before putting a system into production.
The video solution below describes key stretching, salting, and PBKDF2, and then demonstrates how the GRUB bootloader password in the figure was encrypted.
Video Solution: Watch the video solution “14-1: Introduction to Key Stretching.”
Real-World Scenario 14-2: PRNGs
Scenario: Once again, you are a security administrator working alongside your organization’s development team. You come across some code as shown in the figure below. Examine the figure. According to one of the developers, the code is being used to collect noise in an attempt to increase entropy.
What type of algorithm are we developing here?

Real-World Scenario 14-2 Solution
Based on the code in the figure we are most likely developing a pseudorandom number generator (PRNG). These are used in cryptography systems and games to generate a sequence of “random” numbers. /dev/random and /dev/urandom are common files used to collect noise in order to increase entropy. They could be used with java.util.rand, for example. Depending on the system and environment you might also use getrandom (Linux) and arc4random (OpenBSD). The video solution below introduces PRNGs.
Video Solution: Watch the video solution “14-2: PRNGs.”
Real-World Scenario 14-3: Understanding Symmetric and Asymmetric Algorithms
Scenario: You have been tasked with selecting cryptographic algorithms for internal storage and Internet-based transmissions. Select the strongest symmetric and asymmetric algorithms possible for each situation.
What algorithm should you select to encrypt an entire hard drive on a laptop?
What asymmetric algorithm should you select for the key exchange during a login to a secure website (using HTTPS)?
What symmetric algorithm should you select for the data exchange during a secure web session?
Real-World Scenario 14-3 Solution
It’s a fact: there are lots of cryptographic algorithms to choose from, but the ones that are the most secure make up a pretty short list. The key here (pun intended) is to select algorithms that will secure data as best possible, while working quickly to do so. The following answers are examples. You might find other answers that better suit your needs, and of course, new algorithms are released periodically.
The most common algorithm used for whole disk encryption (such as BitLocker) is AES. AES 256-bit is preferred. This is a symmetric algorithm that uses a block cipher.
There are three excellent answers for secure key exchange over the Internet; they are all asymmetric. First is RSA 2048-bit. It is commonly used by websites, but it has a massive key length, so elliptic curve technologies are also used: the Diffie-Hellman version ECDH (or ephemeral version ECDHE) and the DSA version (ECDSA). These use less computational power because the elliptic curve method uses a shorter key length.
The best symmetric algorithm for data exchange during a secure web session is AES; however, you might also see RC4 used. In fact, some websites will offer AES connections until too many users are connected simultaneously; at that point, the additional users will receive RC4-based certificates.
Video Solution: Watch the video solution “14-3: Understanding Symmetric and Asymmetric Algorithms.”
This video was recorded in 2014. It shows SHA-1 being used by a couple of websites. Remember that SHA-1 was deprecated as of 1/1/2017 and should be replaced by a more powerful cryptographic hash.
Simulation: Complete the simulation “14-3: Understanding Symmetric and Asymmetric Algorithms.”
Real-World Scenario 14-4: Disabling the LM Hash
Scenario: Your organization is concerned about the current level of password security. Your task is to make sure that a strong cryptographic hash is being used.
If you find that the organization is currently using the LANMAN hash, what should you upgrade to?
In what two ways can you disable the LM hash?
Real-World Scenario 14-4 Solution
You should upgrade to the NTLMv2 cryptographic hash. Make sure it is running and that the LM hash has been disabled. This can be done by turning it off in the local security policy—OU or domain policy if configuring it for a Microsoft domain—and by disabling it in the Registry.
Remember that Windows Server 2012 and higher disable the LM hash by default, but as a security administrator it is something you should check to make sure, especially if your servers have been interfacing with older legacy systems in the past.
Video Solution: Watch the video solution “14-4: Disabling the LM Hash.”
Real-World Scenario 15-1: Understanding PKI
Scenario: Your boss wants you to set up a new website for customers that will allow for a secure login directly on the home page. Your task is to locate two vendors of SSL certificates that have up to 256-bit AES encryption and offer RSA encryption for key exchange.
Identify two SSL certificate vendors and describe their services.
Define what an SLA is.
Explain what happens if more than a certain number of users connect simultaneously.
Real-World Scenario 15-1 Solution
There are plenty of Secure Sockets Layer (SSL) certificate providers. Examples include VeriSign, Comodo, and GoDaddy. The more trusted providers (such as VeriSign) use that trust to increase the price of their products.
A typical SSL certificate from VeriSign will offer RSA 2048-bit asymmetric key exchange with some type of SHA hashing, as well as variable symmetric session encryption. As of the writing of this book, it is common to have 256-bit AES for a certain number of users, and any users who connect beyond that get 128-bit AES or RC4 connections.
Note
Remember that as of 1/1/2017, SHA-1 should be replaced with a more secure cryptographic hash.
An SLA is a service-level agreement, which is effectively a contract defining the terms of service. It is discussed more later in the book.
It’s important to note that this technology changes quickly. Encryption methods are often considered uncrackable—that is, until they are cracked, and then there is a complete paradigm shift in the technology once again. It’s unavoidable. For example, in 2009, a lot of websites used Triple DES (168-bit) for the session data. AES was still gaining traction, but now (as of the writing of this book) AES is the standard and Triple DES is all but extinct. Chances are, the algorithm of choice will be completely different every five years or so. Make sure you don’t sign SLAs that have a span of more than two years. Keep the contracts short, review your technology (and the PKI used) often, and reconsider your options as time goes on.
Video Solution: Watch the video solution “15-1: Understanding PKI.”
Real-World Scenario 15-2: Certificate Creation Example
Scenario: Examine the figure below. What are we attempting to accomplish using the syntax that was typed?

Real-World Scenario 15-2 Solution
We are looking at the terminal in Linux (specifically, Ubuntu 14.04). The syntax that was typed will start the SSL certificate request process to a certificate authority (CA); for example, VeriSign. OpenSSL is installed to this version of Ubuntu by default, but other versions of Linux might need OpenSSL installed before attempting this task. Client versions of Windows will definitely need OpenSSL installed first.
The certificate signing request (CSR) starts with the creation of a private 2048-bit RSA key. In this scenario we are hashing the process with SHA256 and are creating two files: the private key (called key.pem) and the certificate request file (called req.pem). These are both sent to the CA.
Video Solution: Watch the video solution “15-2: Certificate Creation Example.”
Real-World Scenario 15-3: Making an SSH Connection
Scenario: A company you consult for wants to make secure connections to two Linux systems so that they can be remotely controlled in the command-line. The company does not want to use the deprecated Telnet utility. You decide to recommend the SSH protocol because of its known security advantages over Telnet.
What is SSH?
What port does it use, and which computers should have that port open?
What kind of secure algorithm does it support?
What program(s) can you use to remotely control the Linux systems from the command-line?
Real-World Scenario 15-3 Solution
SSH stands for Secure Shell, and it is a cryptographic protocol used to secure communications and command-line–based remote login. It uses port 22 by default. The computer that will be logged in to needs to have SSH installed and inbound port 22 open. SSH2 (as of the writing of this book) is the more secure version of SSH. It supports public key authentication using certificates (X.509), RSA, and DSA. File transfer can be secured by using SFTP. You can also secure the copying of files by using SCP. By default, these use TCP as the transport mechanism, but they can also use STCP. For these file transfers it supports the 3DES, AES, and Blowfish symmetric algorithms.
The most commonly used program to remotely control Linux systems in the command-line is the PuTTy program. It is an open source terminal emulator that allows control over the remote computer and network file transfer. It has support for a wide variety of operating systems. Other SSH clients include SuperPutty, Kitty, Xshell, Open SSH, Dropbear, and Tera Term, though their support for operating systems will vary.
Video Solution: Watch the video solution “15-3: Making an SSH Connection.”
Real-World Scenario 16-1: Configuring RAID
Scenario: You have a mission-critical server that cannot be allowed to fail completely, and you have some IT budget to work with. You must make sure that the operating system, applications, and data do not fail.
What type of RAID should you use to make sure the OS and applications are available all the time?
What type of RAID should you implement to ensure that data will be accessible, even in the event of a failure? For the fault tolerance of the data, should you opt for a hardware solution or a software solution? Should it be internal or external?
Real-World Scenario 16-1 Solution
You should strongly consider RAID 1 (mirroring) with disk duplexing to protect the OS and the applications. This is the type of solution that will mirror the C: drive. If one drive fails, the other will continue to work with no downtime. You can replace the drive during off-hours.
For the data, RAID 5, 6, and possibly 10 are highly recommended. With RAID 5, if one drive fails, the data remains accessible. In RAID 6, two drives can fail and the data remains accessible. And of course, the data can be rebuilt from the parity data when you are ready. If you have the budget backing you, the best option is to use external hard drive boxes with hot-swappable capabilities.
Note
The video for this solution is broken into three pieces. First, I show a RAID 1 hardware-based solution within the BIOS and the resulting volume within Windows. Next, I show how to create a RAID 1 array using Windows only (software-based RAID). Finally, I show how to create a RAID 5 array using a virtual machine (Windows Server).
Video Solution: Watch the video solution “16-1: Configuring RAID.”
Simulation: Complete the simulation “16-1: Configuring RAID.”
Real-World Scenario 17-1: Identifying Social Engineering Attacks
Scenario: As an IT professional, you realize that your job spans much more than just computers; for example, it deals with the intangible world of social engineering. You have recently taken over the position of security administrator for a company with 200 users, but prior to your new appointment there was little, if any, security. You are concerned about people who were previously allowed access to the building and how those people might try to infiltrate your company in the future through social engineering techniques.
Conduct research on the Internet and give one example each of pretexting, hoaxes, and malicious insiders. Then, define ways in which you would protect your company, data, and employees from these social engineering methods.
Real-World Scenario 17-1 Solution
You can read all kinds of stories about social engineering experts and the cons they have pulled off. They might be true, they might not. What matters is this: Does it sound feasible? And if so, how would you protect against it? For example, Kevin Mitnick is one of the most well-known masters of social engineering (as well as a top-notch hacker). Supposedly, in his early days he learned from a bus driver where he could get his own ticket punch, and therefore ride the city bus for free. How did he do this? Probably through the grooming of trust, or because the bus driver simply liked him, but effectively there was some kind of pretexting going on somewhere along the way.
People who are good at employing social engineering techniques are usually very knowledgeable of psychology in one way or another. They can relate to the person they are attempting to con. So, in the case study scenario, can you think of anyone who used to work for the company who fits this image? Could your company withstand a sweet- talking impersonator? To protect against this, identification and authorization become your best friends.
One common example of a hoax is the virus hoax. These come in many shapes and sizes but usually are either received through e-mail or show up on a website that a user has been redirected to. The hoax might state that the user’s computer will catch fire in 10 minutes, or perhaps that the computer’s files have all been encrypted. (Be careful here, though, because there is actual ransomware attacks that will do just this.) The real problem with virus hoaxes is not that they cause computers to fail, but that they decrease productivity: people discuss the hoax, and they forward it (as requested) to friends and co-workers. To defend against this from a technical standpoint, implementing e-mail filters, updating firewalls, IDS/IPS, and updating AV software are all recommended.
To protect from a user standpoint, you should train your users on what to be on the lookout for. Give actual examples on a computer screen. Explain that it is very unlikely that a computer will catch fire from a virus. Train users to screen their e-mails carefully and to not open or accept unknown attachments. If they do get a display that says their computer is doomed, or to pay a ransom immediately, the best thing to do is shut off the computer and notify the IT personnel.
Malicious insiders are among the deadliest, because they already have access to a certain extent, and getting full access is just one step away. Examples of victims and their respective malicious insiders include USB PaineWebber and Roger Duronio (logic bomb); the DoD and Bradley Manning (release of classified documents to Wikileaks); and the city of San Francisco and Terry Childs (network tampering)—the examples go on and on. More often than not, these people are disgruntled and perhaps want some kind of revenge. But there are plenty of cases in which the person was simply in it for the money.
The motive doesn’t really matter to a security administrator, because the end result is increased chaos, decreased productivity, and loss of money for the company. So it is a matter of protection, but how? Here are some tips. First, remember your lessons learned. Learn from past attacks, whether you have read about them or they have happened to your company. Understand how the attack occurred and what security control could have prevented it. Next, protect the most important data first. For example, work on patents, the design schematics for a new computer, the code for an unreleased computer program, the secret ingredient in your latest and greatest barbeque sauce—whatever it is, use all of your security power to protect that all-important data first and foremost.
Watch for suspect behavior. Human Resources will probably keep a file on people with suspect attitudes, so you should interface with HR often. Watch for quick terminations and resignations. It’s good manners for an employee to give two weeks’ notice so as to gracefully transition work to other employees. Quick resignations are a red flag. But all this is commentary; the real way to protect against these threats is to have strong policies, well-planned permissions, tough physical security, strong authentication, and enforcement of principles such as need-to-know and least privilege.
Simulation: Complete the simulations “17-1: Identifying Social Engineering Attacks” Parts A and B.
Video Solution: Watch the video solution “17-1: Solution to Simulation 17-1B.”
Real-World Scenario 18-1: Order of Volatility
Scenario: You have been tasked with gathering information from a computer. It is important to know the order of volatility (OOV) when it comes to components of the computer.
Rearrange the following four possible options in the correct order as it pertains to OOV:
• RAM
• Hard drive
• CPU cache
• Swap file
Real-World Scenario 18-1 Solution
The correct order of volatility that you should follow when gathering information is
1. CPU cache
2. RAM
3. Swap file
4. Hard drive
Your organization’s policies might require you to gather additional information, including snapshots or images of the system, snapshots (meaning photos) of the monitor display, log files stored on remote systems, and archived media.
Video Solution: Watch the video solution “18-1: Order of Volatility.”
Real-World Scenario 18-2: Imaging a Hard Drive and Live Data for Forensic Purposes
Scenario: You work for a small organization and wear multiple hats: network administrator, cable installer, security administrator, and digital forensic analyst, when required. Upper management is concerned that an employee (who left work suddenly and didn’t return) might have been attempting to compromise the organization’s secret data. Your task is to document the potential crime scene (the ex-employee’s workstation), analyze the data on the computer, and learn whether there is any merit to the organization’s concerns.
Name several forensically acceptable software tools you can use to image the hard drive.
Name a forensically acceptable software tool you can use to copy the live data.
Name several LiveCDs that you can use to image the drive (which might or might not be forensically acceptable).
Note
When I use the term LiveCDs I mean any Live optical discs or USB flash drives.
Real-World Scenario 18-2 Solution
The key with a potentially compromised computer is to document everything you see (and can’t see). Take photos, write down what you encounter, and of course, use software and hardware tools to image the machine.
For example, to image a hard drive you might use AccessData’s Forensic Toolkit or Guidance Software’s EnCase. These are commonly used tools that are usually accepted by the courts as forensically sound applications. Of course, these tools come with a price tag (a hefty one), so in some cases a smaller company will go with simply imaging the drive bit by bit, which could be done with cloning software or with a LiveCD (or LiveDVD/Live_Flash_Drive) such as Knoppix or BackTrack. The question here is whether these tools (and the resulting hard drive images) will be acceptable to a court of law. Also, you must be very careful not to disturb the original drive when making the image, something that can easily be done when using a tool not designed specifically for the job.
If you were to use a LiveCD—and there are many options—it would be derived from Linux, so a solid knowledge of the command-line would be necessary. For example, if you were to image a drive, you would need to understand the syntax of the dd and nc commands. Plus, you would need to copy the data from one system to another. Many forensic analysts will use a Linux OS (such as Ubuntu) as the destination computer for the copied image. That system would have a secondary drive that could either be analyzed or booted off of if necessary.
For live data—and we are talking about the RAM and other volatile areas of the computer—you could use Live Response, which might run off of a USB key, and Helix software. That is only if the computer is already powered up when you encounter it. If the computer is off, then volatile areas of storage will most likely be cleared.
Important! Remember your incident response plan phases:
Note
There are no videos or simulations for this real-world scenario.
Real-World Scenario 19-1: Analyzing Test Questions
If you want to do well on the real exam, you must analyze the practice questions carefully. Getting the answer right is only half the battle. You also must be able to identify why the incorrect answers are wrong. If there are any concepts that you don’t understand in a question, review them, even if they were part of a listed answer that was incorrect. Work on your comprehension of the concepts from a theoretical standpoint as well as a hands-on standpoint. Ultimately, this combination of knowledge will enhance your test-taking skills.
Practice as much as you can. Use the Practice Test software that accompanies this book, which emulates the look of the real exam. By practicing in that environment, you will feel much more comfortable when it comes time to take the real test.
Going further, consider accessing the CompTIA website. As I often say, “Go to the source!” CompTIA often has sample practice questions you can go through to gauge your readiness. They are usually listed directly on the main Security+ page, but if not, search a little bit, or run a search for “Security+ sample questions.” If they are available, you should be able to find them on CompTIA’s website.
In summary, practice as much as you can, know the correct answers, understand why the incorrect answers are wrong, and then practice some more! The harder you push yourself, the better you will do on the exam.
Video Solution: Watch the video solution “19-1: Analyzing Test Questions.”