

Chapter 14
Configuring and Using Laptops
CERTIFICATION OBJECTIVES
![]() 1101: 1.1 Given a scenario, install and configure laptop hardware and components
1101: 1.1 Given a scenario, install and configure laptop hardware and components
![]() 1101: 1.2 Compare and contrast the display components of mobile devices
1101: 1.2 Compare and contrast the display components of mobile devices
![]() 1101: 1.3 Given a scenario, set up and configure accessories and ports of mobile devices
1101: 1.3 Given a scenario, set up and configure accessories and ports of mobile devices
![]() 1101: 5.5 Given a scenario, troubleshoot common issues with mobile devices
1101: 5.5 Given a scenario, troubleshoot common issues with mobile devices
![]() 1102: 1.4 Given a scenario, use the appropriate Microsoft Windows 10 Control Panel utility
1102: 1.4 Given a scenario, use the appropriate Microsoft Windows 10 Control Panel utility
![]() Two-Minute Drill
Two-Minute Drill
Q&A Self Test
Laptop sales surpassed the sales of desktop PCs in 2005, as the public demanded greater portability and convenience for their computing. Today’s laptops are not much more expensive than desktop PCs and offer screen sizes, processor power, RAM configuration, and hard disk size and performance equivalent to desktops. Consequently, as a technician you may spend quite a bit of time configuring and servicing laptop PCs. You may also be frequently called upon to configure and troubleshoot smaller computing devices too, such as tablets and smartphones.
In Chapter 12 you learned about hardware troubleshooting and maintenance in general, but with a focus on desktop systems. This chapter extends this discussion to include laptops, looking at replacing some of the most common laptop components. It also explores Windows power option settings and laptop-related special features. Coming up in Chapter 15, we’ll look at even smaller mobile devices, such as tablets and smartphones, and their unique challenges for use, maintenance, and troubleshooting.
CERTIFICATION OBJECTIVES
![]() 1101: 1.1 Given a scenario, install and configure laptop hardware and components
1101: 1.1 Given a scenario, install and configure laptop hardware and components
![]() 1101: 1.2 Compare and contrast the display components of mobile devices
1101: 1.2 Compare and contrast the display components of mobile devices
In this section, we cover CompTIA A+ 1101 exam Objective 1.1, describing how to install and configure laptop components. This includes information about laptop-specific expansion slots; laptop devices; and how to replace those devices, including keyboards, HDD and SSD storage, RAM, wireless cards, and batteries. To prepare for CompTIA A+ 1101 exam Objective 1.2, be sure that you understand the components of a laptop display and how to replace a display and its associated parts, such as webcams and Wi-Fi antenna. (You also need to know the different technologies of laptop displays, which were covered in Chapter 10.)
Repairing, Upgrading, and Configuring Laptops
This section defines laptop computers, as distinguished from other portable computers, and then provides an overview of laptop disassembly and reassembly. Finally, it introduces you to some laptop-specific components and peripherals, describing installation and upgrading procedures where applicable. In all cases, when you consider installing a new component or replacing an old one, you should first check with the manufacturer for any firmware upgrades. If one is available, install it before you proceed.
What Is a Laptop?
A portable computer is any type of computer that you can easily transport and that has an all-in-one component layout. In addition to the size difference, portable computers differ from desktop computers in their physical layout and their use of battery power when not plugged into an alternating current (AC) outlet. Portable computers fall into two broad categories: laptops (by several different names) and handhelds, but they all are integral to mobile computing.
A laptop (also called a notebook) generally weighs less than seven pounds, fits easily into a tote bag or briefcase, and has roughly the same dimensions as a one- to two-inch-thick stack of magazines. The top contains the display, and the bottom contains the keyboard and the rest of the computer’s internal components. A typical laptop uses a liquid crystal display (LCD) and requires small circuit cards that comply with modified versions of the bus standards found in full-size PCs.
Initially, people called most portable computers “laptops” because they could fit on the user’s lap, although early laptops were a little heavy to do this comfortably. As technology improved, laptops became smaller and lighter, and the term “notebook” came into use to reflect this smaller size. As circuitry shrinks, we discover smaller and smaller portable computers and newer terms, such as ultra-portable for a laptop that weighs less than three pounds and gives up features to keep the weight down and maintain the highest battery life. A two-in-one laptop, also called a convertible laptop, is an ultra-portable laptop with a screen that rotates and folds backwards, covering the keyboard, so the device can be used as a tablet.
At the other extreme, many purchase laptops as full-featured desktop replacements in which performance is more important than battery life. These have large screens and weigh in at the top of the range.
Regardless of the size and type of portable computer, throughout this book we use the term “laptop” to encompass all these types to match the CompTIA A+ exam objectives’ wording.
One key feature of laptops is the ability to run the same basic OS as their desktop counterparts. For example, a Windows laptop uses the same Windows product as a Windows desktop, and the same goes for Linux and Macintosh laptops. Some ultra-portable devices like tablets and smartphones use other operating systems or special scaled-down OS editions; these devices are covered in Chapter 15.
Opening a Laptop Case
Many laptop configuration and installation tasks are software or firmware based, but occasionally you’ll need to do something that involves partially or fully disassembling a laptop, like upgrading the memory or replacing a screen or keyboard. If you do need to open the case, make sure you follow the safety precautions outlined in Chapter 1.
The tricky part about opening a laptop case is that there’s not much standardization among brands and models. Components aren’t located in standard places, and the disassembly procedures can vary widely. For example, on one model you might be able to access the hard disk drive from an access panel on the bottom of the laptop, whereas on another model you might have to remove the keyboard and touchpad to find it. Consequently, you should arm yourself with a service manual for the particular model before getting started. (Service manuals are typically available online for most laptops.) A service manual will show you where all the screws are and will tell you which ones you need to remove to replace specific components.
A laptop has two sources of power: the AC adapter and the battery. Therefore, for your own safety, ensure that there is no power to components. Always unplug the AC adapter and remove the battery (if possible) before opening the case in any way.
Use Appropriate Hand Tools
After reading the manufacturer’s documentation and before beginning, assemble all the hand tools you expect to use. Refer to Chapter 8 for a list of tools. Most laptops use standard Phillips screws, although a few may use Torx or flathead.

Don’t use magnetic screwdrivers when working on PCs, including laptops. If you have no choice, take care to keep the screwdriver tip well away from anything other than the screws.
Organize Parts
Have containers ready to temporarily hold the screws and other parts that you will remove (small pill bottles work well), and have antistatic bags handy for any circuit boards you remove. After you reassemble the laptop, you should not have any extra parts except for those that you replaced.
If there are multiple types of screws used in various spots, find a way to keep each type separate, and make notes about which type goes where. For example, there might be long screws holding parts of the case together and short screws that mount a disk drive.
Document and Label Cable and Screw Locations
This important step is also one that many people would rather skip. For internal component replacements, you will begin by removing screws from the body of the laptop. Before you open the laptop compartment, take photos with a digital camera or make a rough sketch of the exterior portion involved, and label cable and screw locations. You don’t have to be an artist to do this—simple lines and shapes, carefully labeled, will suffice. Once you have removed any panels, photograph or sketch the inside, labeling any components and their cables so you will be able to reassemble the laptop after replacing or adding a part.
Replacing Laptop Components
Laptop components that distinguish one manufacturer’s models from others are at least partially proprietary, but most manufacturers use at least some generic components, such as the CPU, memory, and hard drives. Therefore, if a laptop component fails, a carefully worded query in an Internet search engine should reveal sources for an appropriate replacement part or the name of a company that will replace the part for you. Both interior and exterior replacement parts are available, even plastic exterior components, such as the case, LCD lid, LCD bezels, palm rest, button panels, doors, and compartment covers for some popular laptop models. Always research whether replacing the part is more cost-effective than replacing the entire laptop.
Power and Electrical Input Devices
Laptops come with two sources of electrical input: an AC adapter for when AC power is available and a built-in battery for when external power is not available.
Battery When not plugged into a wall outlet, a laptop computer gets its power from a rechargeable battery. The typical laptop today has a lithium ion (Li-Ion) battery. These rechargeable batteries have a battery life between recharges in the range of five to eight hours. Previous generations of laptops used other types, such as nickel cadmium (NiCad).
Laptop batteries have only a few years of life, so expect to replace a laptop battery as it approaches two years of age. Purchase replacement batteries from the laptop manufacturer or other sources that specialize in laptop parts or batteries.
Removing a laptop’s battery is a very basic skill that you’ll need to do most of the other repairs outlined in this chapter. You should remove the battery before working inside the case because the laptop will automatically draw power from the battery when it is unplugged, even if it appears to be off. (For example, some low-power modes such as Sleep continue to draw a small amount of power from the battery.) Removing the battery will also prevent you from accidentally hitting the power button and powering on the system in the middle of a repair. Removing the battery can also perform a “hard off” on the hardware, which can sometimes fix problems related to not waking up from Sleep or Hibernate modes.
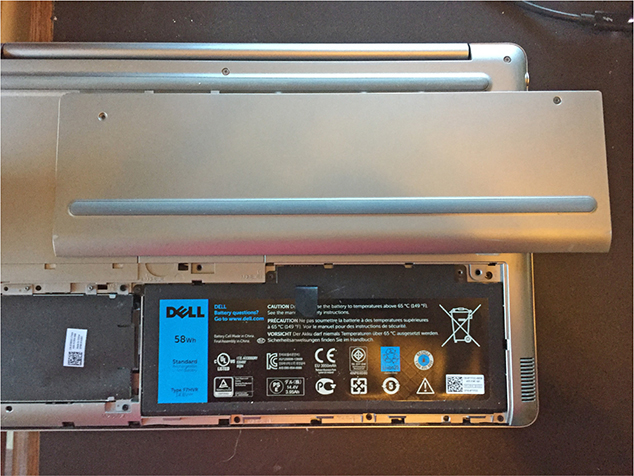
Battery removal differs greatly between models. On some models (mostly older ones) there is a battery compartment on the bottom of the laptop and an easy-to-operate button or switch that releases it. Lucky you if this is the case! On newer models, especially the small, thin ones, batteries are more difficult to access, and you may need to remove several screws and perhaps a plastic panel as well to access it. The battery shown in Figure 14-1 was under a cover secured with two screws, for example, and now that the cover is off, access is available to yet another screw that must be removed. There is a black plastic tab sticking out of the battery in Figure 14-1, which is designed to be used as a pull to lift the battery out. Check the laptop’s user manual or service manual to find out the details for your model.
FIGURE 14-1
A battery on a large laptop
AC Adapter As described in Chapter 10, the AC adapter is your laptop’s external power supply that you plug into an AC power source. Like the power supply in a desktop PC, it converts AC power to DC power. If you must replace an external adapter, simply unplug it and attach a new one that matches the specifications and plug configuration of the adapter it is replacing. Furthermore, AC adapters have different output wattages. An AC adapter will show its wattage on its label; if you are using an AC adapter other than the one that came with the laptop, read the label first and make sure it matches the wattage of the original AC adapter for that unit. An AC adapter with a lower wattage than the original may not work at all, or it may partially work but be lacking in some way (such as powering the laptop but not charging its battery).
There are different diameters to the round power plug that connects to the power jack on the laptop, depending on the wattage provided, and in some cases this prevents the wrong adapter from being used on a laptop (for example, if you have a workstation where several laptops are used at various times and different AC power cords for each of them). However, sometimes a power connector will physically fit into a laptop but not provide enough power to keep it charged. The laptop may be able to partially use the power from an incompatible adapter, but the battery won’t charge, and the battery charge may gradually dwindle as it supplements the incoming AC with whatever extra is needed.
Wireless Cards
Laptop computers are designed for portability, so it is only natural that they should have built-in wireless communication. Wi-Fi is a given, of course, but most laptops also support Bluetooth, and some support less common wireless standards as well, such as WiMAX and/or cellular wireless (4G or 5G).
Most new laptops today come with a Wi-Fi adapter built in. For those laptops without built-in Wi-Fi, you can purchase Mini PCIe or USB add-ons. We will describe Wi-Fi in more detail in Chapter 17 and talk about configuring a Wi-Fi adapter in Chapter 18.
The switch to enable or disable a wireless adapter is often very easy to accidentally trigger, causing the wireless to turn off. If you support laptop users, educate yourself on the method used on each laptop so that you can help a client who accidentally disables the wireless adapter.
Some laptops come with a Bluetooth adapter built in. If not, you can purchase one—often along with one or more wireless devices that use the Bluetooth standard. A popular peripheral package is a Bluetooth keyboard and mouse bundled with a Bluetooth transmitter adapter using a USB interface. Many cell phones have Bluetooth built in for use with wireless headsets and for communicating with a Bluetooth-enabled computer to share the phonebook and other data stored in the phone.
Some laptops have one or more expansion slots inside the case for installing add-on components. These are typically Mini PCIe or M.2. Unlike on a desktop system, these expansion slots have no connection to the outside of the computer, so you cannot use them to install components that add new ports to the system. Consequently, they are limited in purpose to components that are internal-only, such as wireless cards.

Make sure you know how to install and remove wireless cards, per 1101 exam Objective 1.1.
Mini PCIe Mini PCIe is based on the full-size PCIe expansion bus found in a desktop PC. They are both 64-bit interfaces; the Mini PCIe is just smaller. Depending on the manufacturer, this is also called PCI Express Mini Card, Mini PCI Express, Mini PCI-E, or simply MiniCard.
One of the most common uses for the Mini PCIe slot is for wireless network cards, such as Wi-Fi or Bluetooth. A cellular wireless card can also be Mini PCIe. Unlike on a desktop PCIe expansion card, there is no external access to a Mini PCIe card, so you can’t use it to add new external ports. There is usually a cover on the bottom of the laptop that you can remove to expose the Mini PCIe slot. There may be just a single connection for a card, or it may accept multiple Mini PCIe cards. Power down the laptop and remove the battery. Then expose the slot, pull an installed card straight out of the slot, and insert a new one straight in, keeping in mind that the card typically sits parallel to the motherboard and the slot is perpendicular to that.
Figure 14-2 shows a Wi-Fi wireless LAN adapter installed in a Mini PCIe slot. This particular adapter is actually two in one, as it is both a Wi-Fi adapter and a Bluetooth adapter. The antennas for this card run through the small black cable visible on the upper right of the card and running to the upper left. It leads up through the lid hinge into the lid behind the screen. If the antenna fails, it requires dismantling the screen of the laptop.
FIGURE 14-2
A Mini PCIe WLAN card installed in a laptop

M.2 The M.2 interface, which you learned about in Chapter 8, is virtually the same on a laptop motherboard as on a desktop one. Refer to Chapter 8 to learn about its specifications and how to install and remove M.2 cards. M.2 is used for both wireless cards and solid-state storage.
Memory
Laptop memory modules come in small form factors. The most commonly used is Small Outline DIMM (SODIMM), which measures about 2-5/8", or about half the size of a Dual Inline Memory Module (DIMM). First-generation SODIMMs had 30 pins. That number of pins has been increasing steadily with every advance in technology, with DDR3 SODIMMs using 204 pins, DDR4 SODIMMs using 260 pins, and DDR5 SODIMMs using 262 pins.
As with DIMMs, SODIMMs have notches in them so that they only fit into the properly keyed SODIMM slots. When selecting SODIMMs for a system, as with desktop DIMMs, pay attention to the generation (for example, DDR3 vs. DDR4), the speed, and the capacity. If all those factors align with the laptop’s needs, the compatibility should take care of itself.
Figure 14-3 shows a laptop with the battery removed and the access panel open to expose two 204-pin DDR3 SODIMMs, each populated with 4 GB of RAM. The top one (at bottom) has eight chips on it, and it covers up half of the module under it, showing only its top four chips. Visible near them are 102 of the top module’s 204 pins, as well as the module notch. Also visible on the sides of each module are the clips used to secure them in place.
FIGURE 14-3
A laptop with access panel removed to expose the two DDR3 SODIMMs

MicroDIMM, a RAM module designed for smaller laptops, is half the size of a SODIMM and allows for higher-density storage.
You can add RAM to most laptops if there is a RAM slot available. If none is available, you must swap out the existing RAM module or modules for denser modules. Some systems include extra RAM slots within the chassis, which requires either opening the computer’s case or removing the compartment cover and inserting the RAM module in an available slot. Exercise 14-1 describes the steps for installing memory in a laptop and for verifying that the system recognizes it.
EXERCISE 14-1
Installing SODIMM Memory
For this exercise, you will need a way to ground yourself and/or your work area. You will also need a new module of SODIMM memory appropriate for your laptop in an antistatic bag, the user’s manual, a spare antistatic bag, and a small nonmagnetic screwdriver for opening the case. If you do not have a new module, simply remove an already installed module and reinstall it. In this case, you will just need an antistatic bag in which to place the module should you need to set it down.
1. Ground yourself using one of the methods described in Chapter 1.
2. Turn off the computer and all external devices.
3. Unplug power to the computer and disconnect all exterior cables and devices. Remove the laptop battery.
4. Following the instructions in the laptop user manual, open the compartment containing the SODIMM slots. Be careful, since the cover may have retaining tabs that break off easily.
5. Your laptop may have one or two memory slots. Look for numbers near any open slots and fill the lowest-numbered slot first.
6. If you are replacing memory, remove the module or modules you are replacing. To remove a module, press down on the retaining clips located on the sides, lift the edge of the module to a 45-degree angle, and gently pull it out of the slot, being careful to hold it by its edges without touching the contacts or chips.
7. Place the old module in an antistatic bag. Remove the new module from its antistatic bag, being careful to hold it by its edges without touching the contacts or chips.
8. Align the notch of the new memory module with that of the memory slot, as shown next, and gently insert the module into the slot at a 45-degree angle. Carefully rotate the module down flat until the clamps lock it in place.

9. Close the memory compartment, reinstall the battery, and reconnect the power cable.
10. Power up the computer, and, if necessary (according to the user manual), configure memory in BIOS/UEFI setup, although this is not normally required.
11. Perform a normal startup in Windows, and check the Settings app’s About screen to see if it recognized the new memory.
You may notice the memory amount reported does not add up to the total memory installed, which means your laptop may be using some of your system RAM for the video adapter, which often is the case with integrated video adapters if they do not have their own video RAM (VRAM). Main RAM memory used in this way is shared video memory and is not available to the operating system.
Storage Drives
The biggest change in laptop mass storage in the last several years has been large-capacity SSDs replacing hard disk drives (HDDs) at all price points of the newer ultra-portable models. SSDs in laptops are desirable because they are faster than HDDs, lighter, and less vulnerable to damage from impacts or excess motion. Today’s laptops and other mobile devices may use a mass-storage interface designed for mobile devices called mSATA (or Mini-SATA), as described in Chapter 8. Introduced in 2009, the SATA 3.1 standard is a scaled-down form factor of the SATA mass storage interface with added support for SSDs in mobile devices. Alternatively they may use the newer M.2 interface, also described in Chapter 8. If they use the M.2 interface, the “hard drive” is actually a circuit board, as you saw in Figure 8-7.
Make sure you know how to remove and install laptop RAM.
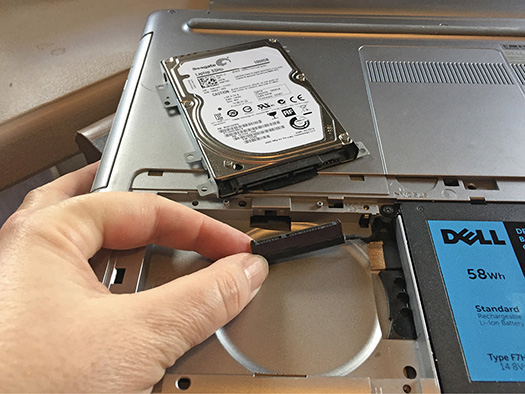
Laptops that still use magnetic hard drives have small versions of them, typically with 2.5" or 1.8" platters, rather than the 3.5" hard drives used in desktop PCs. These connect to the SATA interface in the laptop, but not using the same type of cable and connector as in a desktop; the internal SATA interface on a laptop consists of a small flat or round cable. That cable may supply both power and data to the drive, even if it doesn’t connect to the power connector on the drive itself. Figure 14-4 shows an example.
FIGURE 14-4
A 2.5" hard drive removed from a large laptop
HDD/SSD Replacement After you power down the computer, use the same precautions you would use with a PC case before proceeding. Accessing an internal storage device may be as simple as removing a plastic access cover on the bottom or side of the laptop. In that case, simply slide the drive out and then replace it with a new drive and replace the cover. On the other hand, replacing a storage device may involve removing the keyboard or the entire bottom of the case. This is where the service manual comes in handy to find out where the hard drive is located and how to access it.
EXERCISE 14-2
Replacing a Hard Drive
For this exercise, you will need a way to ground yourself and/or your work area. You will also need a replacement hard drive (or you can remove and reinstall the same one if it’s just for practice) and a small nonmagnetic screwdriver for opening the case.
1. Review the documentation or service manual for the laptop to learn how to access the hard drive. Depending on the model, it may be as simple as sliding a cartridge out from the side or as complicated as removing the keyboard and perhaps other components too.
2. Unplug power from the laptop and remove its battery. Again, consult the documentation or service manual to learn how to remove the battery. Some come out very easily; others not so much.
3. Prepare your work area. Lay down an antistatic mat if you have one, and have a small cup ready to hold screws.
4. Follow the service manual instructions to remove the screws and plastics necessary to access the hard disk drive. When you get to it, carefully note how it is connected.
5. Check for any screws holding the hard disk drive in place, and remove them. Then gently pull to disconnect the cable from the drive and lift it out. There might not be separate data and power cables, even if the drive has a connector for a separate power cable.
6. Insert the new hard drive, and reverse the process to secure it into the laptop and close things up.
7. Replace the battery, reconnect the power cord, and power up the unit to test it.
HDD/SSD Migration
Migration refers to moving the contents of a laptop’s current hard drive to a new one so that the user will not lose their data and applications.
If you are migrating to a drive of the same or a larger size, you can use Windows’ system imaging tool for this. You will create a system image in a temporary location, such as on an external hard drive or USB flash drive, and then install the new HDD or SSD in the laptop, and then use Windows’ System Image Recovery to image the new drive. Here’s an article that walks you through the process step-by-step: https://helpdeskgeek.com/windows-10/how-to-migrate-windows-10-to-a-new-hard-drive.
When migrating to a new storage device, you may run into a Windows activation issue, because Windows may interpret the hardware change as the copy of Windows being used in a different PC. Here’s an article that explains how to resolve that: https://www.windowscentral.com/how-re-activate-windows-10-after-hardware-change.
Display Screens and Associated Components
A laptop has a flat-panel display integrated into the “lid” of the case and connected to the integrated video adapter. A laptop display is usually some form of LCD display as described in Chapter 10—most often lit with light-emitting diodes (LEDs). Many small-screen laptops or touch screen tablets have organic LED (OLED) or active-matrix OLED (AMOLED). An older LCD screen requires an internal inverter to convert the DC current from the power adapter or battery to the AC current the display requires. Newer LCDs use LEDs, which do not require an inverter. Some laptops also include a touch screen, so the screen functions as both an input device and an output device. The implementation of touch screen hardware depends on the model; use the service manual to get details.
Make sure you know how to perform HDD/SSD replacement and migration.
Laptop display screens are rather delicate and often become damaged over the course of the laptop’s life, so replacing a screen is a commonplace task for a technician. The procedure varies somewhat depending on the model, but the basics are the same.
The first step is to remove the bezel that holds the display panel in place. This is often the trickiest part of the whole process because it’s not always obvious how the bezel is held on and how to get it loose without cracking the plastic. Refer to the service manual. A common way that laptops hide the display screws is to put rubber caps over the screw tops; these serve another purpose as well: providing a gap that protects the screen from directly touching the keyboard when the laptop is closed. Pry these caps off with your fingernails, and then glue them back in place afterwards if they don’t stick anymore. Another common way a bezel is attached is via the hinges that connect the lid to the base. You might have to remove the hinge covers to expose screws or clips that hold the bezel in place. A service manual is your friend here!
If you are going to reglue the rubber caps over screws when reassembling, don’t use a thick heavy glue that will interfere with the screw’s usability later. Use a very thin coat of a very thin adhesive, such as a glue stick.
Once the bezel is removed, discover how the display is held in place (perhaps with additional screws, or perhaps there’s a clasp) and carefully remove it. There may be multiple cables or connectors to the display, especially if it’s a touch screen. Replace it with the new display, and then reverse the process to put things back together. As you are working, make sure you don’t inadvertently dislodge any of the associated parts such as the webcam or Wi-Fi antenna connector.
When working with an unfamiliar laptop model, we find it helpful to watch YouTube videos that demonstrate how to perform specific tasks for that specific laptop model. YouTube is full of videos for performing nearly every repair task on every make and model.
Replacing a display is no longer an exam objective, but a technician should still know how to replace one. In addition, several other components adjacent to the display are covered in 1101 exam Objective 1.2, including Wi-Fi antenna, microphone, and webcam, so you should still know your way around it.
EXERCISE 14-3
Replacing a Display Screen
This exercise carries with it the risk of cracking the plastic bezel on the laptop if you aren’t careful, so don’t do this exercise on your best machine (unless, of course, it actually needs its display replaced). For this exercise, you will need a way to ground yourself and/or your work area. You will also need a replacement display screen and a small nonmagnetic screwdriver for opening the case. You might also need a small flat-head screwdriver or a flat piece of metal for prying the display bezel away from the lid.
1. Review the documentation or service manual for the laptop to learn how to replace the display. The main challenge will be to get the bezel off without damaging it.
2. Unplug the laptop and remove its battery. Consult the documentation or service manual to learn how to remove the battery.
3. Prepare your work area. Lay down an antistatic mat if you have one, and have a small cup ready to hold screws.
4. Look in the upper corners of the display bezel for screws. They may be behind rubber caps. If you find screws, remove them. If you don’t find any screws, consult the service manual to learn where and how to pry the bezel off without causing damage, and do so.
5. Examine the display to figure out how it is connected to the laptop. There is probably a small connector near the bottom of the screen. There may be multiple connectors, especially if it’s a touch screen. Carefully disconnect them and lift out the display panel.
6. Insert the new display panel and reverse the process to secure the new display panel and replace the bezel. Don’t forget to reattach the rubber caps if there are any. Their adhesive is usually strong enough to withstand being removed and replaced once.
7. Replace the battery and restart the laptop to check your work.
Replacing Other Parts Associated with the Display Several other components are also closely associated with the display due to their placement inside the laptop case. The Wi-Fi antenna, for example, is usually a wire that wraps around the edge of the display and is covered by the display bezel. The webcam, if present, is usually mounted in the plastic at the top of the display. The microphone may be built into the display lid as well. Replacing these components is usually a matter of prying off the bezel (gently) or removing the screens that hold it in place and then carefully removing and replacing the components behind it. Use the standard precautions for preventing electrostatic discharge (ESD), and make sure you keep your screws and other removed parts well-organized.
1101 exam Objective 1.2 asks that you be able to identify the following display components of mobile devices: Wi-Fi antenna connector/placement, camera/webcam, microphone, touch screen/digitizer, and inverter. All these parts are either built into or adjacent to the display on a laptop.
Keyboards
Due to size constraints, the built-in keyboard in a laptop has thinner keys that do not have the vertical travel that those on traditional keyboards do, so they do not give the same tactile feedback. If you often work in low-light environments, you may want a laptop with a keyboard backlight, a feature that gently lights the keyboard for ease of use. Just a few years ago, this feature was in only a few premium laptops, but in the last several years manufacturers have created more models with this feature or offer it as an upgrade option. If you choose a laptop with a backlit keyboard, accept the fact that using it will be yet another draw on the battery. (There may be an fn key combination you can press to toggle the backlighting on/off.) You can also purchase an external keyboard with this feature.
A laptop keyboard has the alphanumeric keys, ENTER key, function keys (F1, F2, … F12), and some of the modifier keys (SHIFT, CTRL, ALT, and CAPS LOCK) in the same orientation to one another as on a full-size keyboard. But many of the special keys—the directional arrow keys and the INSERT, DELETE, PAGE UP, and PAGE DOWN keys—are in different locations.
The separate numeric keypad disappeared a long time ago from most laptops. (You’ll still find them on large business laptops now and then.) On most laptops the keypad is completely absent or the function integrates into the alphanumeric keys, and small numbers on the sides of keys or in a different color on the top of each key indicate what number they are. Each alphanumeric key normally produces two characters—one when pressing the key alone and another when num lock is toggled on to enable the keypad. On many mobile keyboards an indicator light illuminates when num lock is on. On some laptops the keypad characters may be controlled by pressing the function-modifying fn key while pressing certain marked keys.
Like other laptop components, you can replace the built-in laptop keyboard if you can find a suitable replacement. If a laptop keyboard became damaged and you decide that you must replace it, and you have determined that it is cost-effective to do so, follow the manufacturer’s instructions. Alternatively, you might just decide to use an external keyboard—a very inexpensive alternative since you simply plug it into a USB port.
Replacing a laptop keyboard is similar to replacing any other component (unfortunately), in that the procedure for doing so isn’t standardized, so you must rely on the service manual to tell you how to access it. We’ve seen some keyboard replacements that were extremely easy (basically just pop it out by applying force with a flat screwdriver blade to a few specific areas around the keyboard), and some that were a huge pain in the neck, involving removing almost every other component in the system to get to it. Use standard safety precautions for ESD, keep your screws and tools organized, and follow the instructions.
Touch Screen/Digitizer
A touch screen/digitizer is a touch-sensitive input device that allows you to input data and commands using your finger or a stylus pen. If the laptop has a touch screen, the screen has a built-in digitizer. A touchpad is technically also a digitizer, although it isn’t commonly lumped into that category.
A touch screen’s digitizer hardware is a separate feature from the output component of the screen (that is, the display image). It’s a transparent, built-in overlay on top of the screen. The digitizer could be broken while the screen is just fine, and vice versa. However, it’s difficult to find them separated as replacement parts, so when one goes bad, you usually end up replacing the entire touch screen unit.
Multimedia Components
Laptops have much the same multimedia components as desktop PCs, although smaller, of course, and more difficult to get to if they must be replaced.
Camera/Webcam A built-in video camera, or webcam, typically appears at the top of the screen on a laptop, embedded in the bezel. Webcams have a variety of uses, including facial recognition, motion detection, and video chatting, depending on the software used with them.
The webcam may not be separable from the screen or from the lid of the laptop; you may need to replace the entire screen if the webcam isn’t working or resort to using an external USB webcam replacement. Check the service manual for the laptop to determine how to access and replace the webcam if needed.
Microphone A laptop will have a built-in microphone, which the user can employ for voice pattern recognition security, speech recognition for data input, and audio recordings, among other things. The quality of the built-in microphone generally isn’t very good, so power users of those features (especially those who convert speech to written text) may prefer to add an external microphone. An external microphone may plug into the Mic port on the laptop (if there is one) or to a USB port.
To access and replace the built-in microphone, consult the service manual for the laptop. It is probably located somewhere toward the front of the keyboard (that is, close to the person using the laptop), but designs vary greatly.
Physical Privacy and Security Components
Sign-ins with user names and passwords have traditionally been the primary user authentication method on mobile devices. However, many laptops and mobile devices now include hardware and software features that enable users to authenticate themselves based on who they are (biometrics) or what they have (a smartcard or other physical item).
The hardware for biometrics consists of some type of reader or camera that can scan body characteristics (like fingerprints, retinas, or facial features) and compare them to an internal database of allowed users. The hardware for a near-field communication (NFC) scanner consists of a type of radio transmitter that searches for nearby radio frequency ID (RFID) tags and interacts with them.
Both of those authentication types are covered in detail in Chapter 20, which looks at security.

CERTIFICATION OBJECTIVE
![]() 1102: 1.4 Given a scenario, use the appropriate Microsoft Windows 10 Control Panel utility
1102: 1.4 Given a scenario, use the appropriate Microsoft Windows 10 Control Panel utility
CompTIA A+ 1102 exam Objective 1.4 contains a long list of Windows Control Panel utilities with a wide range of functionality. We discuss most of these in other chapters as appropriate, but here we will address an important subset for use on laptops: the Power Options. In this section you’ll learn about Windows power management features that power down the screen and hard drive when it detects no activity and power-saving modes called Hibernate and Sleep (also called Suspend or Standby). You’ll also learn about various power plans and options, as well as when and under what circumstances they are used.
Although this objective specifically references the Control Panel, Microsoft continues to move features from the Control Panel to the Settings app with each new update, so by the time you read this, some of the Control Panel features discussed may redirect to the Settings app, especially in Windows 11. Stay flexible, and make sure you know the current method of changing each setting.
Power Options
Nearly every component in a modern laptop has some sort of power management feature, a group of options in the hardware and the operating system that allows you to minimize the use of power—especially, but not exclusively—to conserve a laptop’s battery life. In fact, even desktop computers come with power-saving features. Many devices, like the hard drive, will power down when not in use, and CPUs and other circuitry will draw less power when they have less demand for their services. Displays will power down after a configurable amount of time during which there was no activity from the mouse or keyboard. If a component is not drawing power, it is not creating heat, so power management and cooling go hand-in-hand.
Placing a PC in a Low-Power Mode
Depending on the power management settings (explained shortly), the PC may place itself in a lower power mode when certain conditions are met (such as a certain amount of idle time or a certain battery drain level). You can also manually place a PC in low power mode by clicking the Power icon on the Start menu in Windows and then choosing a power mode such as Sleep from the menu that appears. If one or more of the power modes you are expecting don’t appear here, see the section “Displaying or Hiding Power Modes on the Power Menu” later in this chapter.
Configuring Power Management in Windows
Getting the most out of your laptop battery depends on how you manage the use of the battery’s power. Using the Power Options Control Panel utility in Windows, you can configure the power management settings to minimize the power usage of laptop components.
On some versions of Windows that come preinstalled on the PCs, the PC manufacturer will add their own custom power options. For example, on a Dell laptop you might see a Dell power plan or a Dell Battery Meter application.
While the Power Options settings are available in Windows on all computers, you will find some differences in it when you compare Windows installations on desktops versus laptops. For example, a laptop will have separate settings for being on AC vs. battery power, and will enable you to control what happens when you shut the laptop lid. You will also see a battery meter that lets you know how much time is left on the battery’s charge.
To access the power management options in Windows, open the Control Panel and navigate to Hardware And Sound | Power Options.
Power management can be configured in either the Control Panel or the Settings app, but because power options are covered under 1102 exam Objective 1.4, which explicitly references the Windows 10 Control Panel, that is the method we look at in this chapter.
Using Power-Saving Modes
Power-saving modes let you set the computer to use little or no power without shutting it down completely. The computer’s current state (including all OS settings and open applications) is preserved so that when you resume work, the computer comes back up to full operation within seconds. You can configure these power modes via the Power Options applet in the Control Panel or from the Settings app.
Sleep Mode Sleep mode uses just enough power to keep the RAM powered on the computer and shuts down everything else (CPU, disk drives, display, and so on). The computer appears to be off, but it springs back to life, already booted up, when you press the power button. Sleep mode extends the length of the battery charge considerably, while keeping the machine state preserved so you don’t have to close applications and shut down (and then restart everything later). You might use Sleep mode when packing up your work PC to go home if you plan on working when you get home, for example.
1102 exam Objective 1.4 combines Sleep/Suspend in a single line, nodding to the fact that the terms are synonymous, but it lists Standby on a separate line, implying it is something different. It is not. Standby is another synonym for sleep that was used in some older versions of Windows (Windows XP and Windows 95, for example).
Sleep mode is good for short-term pausing (less than a day or so), but for longer stretches of time, if the PC is on battery power, the battery eventually runs out of power. What happens at that point depends on the power management settings configured in Windows. It could shut down (not optimal, because you lose any unsaved work), or it could switch over into Hibernate mode (described next). That automatic switchover is called emergency hibernate.
Hibernate Mode The Hibernate power-saving mode uses hard drive space to save all the programs and data that are in memory at the time you choose this mode. The computer then completely shuts down, using no power while it is hibernating. Like Sleep, Hibernate lets you stop work on your computer but quickly pick up where you left off. It takes slightly longer to go into and out of Hibernate than it does to go into and out of Sleep. Hibernate is a safer option if you aren’t sure how long you’ll be away from your computer, as it does not require any power since everything is saved to disk.
Choosing What Closing the Lid or Pressing the Power Button Does
On laptops, people are likely to be on the go, and they may quickly pack up their things by closing the laptop lid and placing it in a backpack or briefcase. Windows enables you to specify what happens when the lid closes (such as shutting down or entering Sleep or Hibernate) or the Power button is pressed, so users do not need to remember to issue a command before packing up.
To control the lid’s behavior:
1. Open the Control Panel and navigate to Hardware And Sound | Power Options.
2. Click Choose What Closing The Lid Does (or click Choose What The Power Button Does—both commands lead to the same screen).
3. Open the When I Close The Lid drop-down list and click what you want to happen. Your choices are Do Nothing, Sleep, Hibernate, and Shut Down.
On a laptop there will be separate settings for On Battery and Plugged In, as shown in Figure 14-5. On a desktop there will be only one setting. On a laptop with multiple buttons (for example, a Power button and a Sleep button), there will be separate controls for them.
FIGURE 14-5
Control the power button and lid behaviors.

4. Open the When I Press The Power Button drop-down list and click what you want to happen. The choices are the same as in step 3.
5. Click Save Changes.
Enabling or Disabling Fast Startup
When you shut down a Windows computer using the Shut Down command, Windows uses a form of hibernation—not the entire saving-all-your-programs-and-data-to-disk hibernation, but a saving to disk of the Windows OS kernel as it appears in memory at the moment you shut down. This feature is called Fast Startup. As a result, Windows startup is very fast because it brings the Windows kernel out of hibernation, fully configured and ready to run.
To enable or disable Fast Startup:
1. Open the Control Panel and navigate to Hardware And Sound | Power Options.
2. Click Choose What The Power Button Does. See Figure 14-5.
3. Click Change Settings That Are Currently Unavailable. The check boxes under the Shutdown Settings heading become editable.
4. Clear or mark the Turn On Fast Startup check box.
5. Click Save Changes.
Displaying or Hiding Power Modes on the Power Menu
On some systems, Hibernate causes problems. The PC may not resume correctly from Hibernate, requiring a hard reboot, for example. On such systems, it’s a good idea to hide the Hibernate command so the end user doesn’t use it. On some systems, it is even disabled by default.
To hide Hibernate or Sleep on the Power icon’s menu, follow the steps in the previous section for enabling or disabling Fast Startup, but instead of the Turn On Fast Startup check box in step 4, mark or clear the Hibernate check box.
Configuring Low-Battery Options
On a laptop, the Windows notification area of the taskbar displays a tiny battery icon that serves as an indicator of battery charge level. Hover the mouse pointer over this icon to see battery charge status.
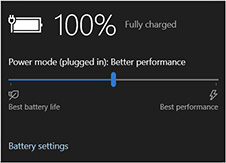
Click the icon to display a pop-up panel (see Figure 14-6 for the Windows 10 version) that shows you the current power mode. From here you can click Battery Settings to open the Battery settings in the Settings app, and then adjust the Turn Battery Saver On Automatically At setting. (The default is 20%, meaning that when your battery has 20% or less power left, Battery Saver mode will activate automatically.) Battery Saver mode uses various power-saving techniques, such as lowering the screen brightness, turning off keyboard backlighting, and stopping HDDs from spinning when not in use.
FIGURE 14-6
Switch power plans via the Battery meter.
Exploring Power Plans
Windows has preconfigured power settings, called power plans. Of the preconfigured plans, the Balanced power plan is a good bet for most laptop users because it balances power savings with performance. However, if better performance is more important to you than battery life, select the High Performance power plan. If you need every minute of battery power you can squeeze out of your laptop while away from the office, select the Power Saver plan.
Exercise 14-4 will guide you as you create a new plan.
EXERCISE 14-4
Creating a Power Plan
For this exercise, you will need a computer with Windows 10 or 11 installed. It is not necessary to have a laptop for this, although there will be some differences. For instance, the screen brightness and lid-closing settings will not be available.
1. Open the Control Panel and click Hardware And Sound | Power Options.
2. Notice which plan is selected.
3. In the left pane, click Create A Power Plan.
4. In the Create A Power Plan window, select one of the default plans on which to base your new plan, and click Next.

5. If you are using a laptop, notice the two groups of settings—one for when you’re on battery and one for when the laptop is plugged in. If using a desktop, you’ll see only one set of settings.

6. Make changes to the settings.
7. Click Create to save the new plan.
8. The new plan is now listed in Power Options.
Adjusting Power Settings on the Battery Meter
In Windows 10, you can quickly choose a power plan by dragging the slider on the battery meter. See Figure 14-6. To display the battery meter, click the battery icon in the notification area. Then drag the slider in the box that appears to choose Best Battery Life, Best Performance, or a middle setting between the two.
Changing Advanced Power Settings
To dig even deeper into power settings, open Power Options in the Control Panel, and click Change Plan Settings for the current power plan. Then, in the Edit Plan Settings window, click Change Advanced Power Settings. This will display the Advanced Settings tab of the Power Options dialog box, shown in Figure 14-7, where you can scroll through a long list of settings, each of which varies based on whether the computer is on battery or plugged in. The actual items in this list may vary, based on the Windows version and on what hardware is present. Different Windows versions may list some of the options in a different order than listed here.
FIGURE 14-7
Fine-tune power settings.

![]() Hard Disk Control how long the system waits after no activity before turning off the hard disk.
Hard Disk Control how long the system waits after no activity before turning off the hard disk.
![]() Internet Explorer Select power management settings for when JavaScript is running in Internet Explorer. (Not that anyone still uses Internet Explorer. It’s not even included in Windows 11.)
Internet Explorer Select power management settings for when JavaScript is running in Internet Explorer. (Not that anyone still uses Internet Explorer. It’s not even included in Windows 11.)
![]() Desktop Background Settings If the desktop background is a slideshow, this setting will control whether it is available or paused.
Desktop Background Settings If the desktop background is a slideshow, this setting will control whether it is available or paused.
![]() Wireless Adapter Settings Save power by enabling the power-saving mode for the wireless adapter.
Wireless Adapter Settings Save power by enabling the power-saving mode for the wireless adapter.
![]() Sleep Several settings control what length of inactive time will trigger sleep and which sleep mode is used (Sleep, Hybrid Sleep, or Hibernate). You can also configure wake timers.
Sleep Several settings control what length of inactive time will trigger sleep and which sleep mode is used (Sleep, Hybrid Sleep, or Hibernate). You can also configure wake timers.
1101 exam Objective 1.4 specifically mentions USB Selective Suspend. Make sure you remember how to find and change it.
![]() USB Settings Enable or disable USB Selective Suspend, a USB feature whereby a device driver can send a message to Windows requesting that the OS put the device into an idle (suspended) state. If this is disabled, Windows puts the device into suspend when the rest of the OS is suspended.
USB Settings Enable or disable USB Selective Suspend, a USB feature whereby a device driver can send a message to Windows requesting that the OS put the device into an idle (suspended) state. If this is disabled, Windows puts the device into suspend when the rest of the OS is suspended.
![]() Intel Graphics Settings If present, select an Intel power plan for the Intel graphics adapter.
Intel Graphics Settings If present, select an Intel power plan for the Intel graphics adapter.
![]() Power Buttons And Lid Select what action will occur when (1) the lid is closed, (2) the power button is pressed, and (3) the sleep button (if physically present) is pressed.
Power Buttons And Lid Select what action will occur when (1) the lid is closed, (2) the power button is pressed, and (3) the sleep button (if physically present) is pressed.
![]() PCI Express Enable or disable Link State Power Management implementation of ASPM power plans.
PCI Express Enable or disable Link State Power Management implementation of ASPM power plans.
![]() Processor Power Management Configure several power management settings for the system CPU.
Processor Power Management Configure several power management settings for the system CPU.
![]() Display Configure power management settings for the display to control when the display is dimmed and by how much. Also enable or disable automatic (adaptive) brightness on systems with ambient light sensors.
Display Configure power management settings for the display to control when the display is dimmed and by how much. Also enable or disable automatic (adaptive) brightness on systems with ambient light sensors.
![]() Multimedia Settings Control power management under two sets of circumstances: (1) when an external device is playing media shared from this computer and (2) when this computer is playing video.
Multimedia Settings Control power management under two sets of circumstances: (1) when an external device is playing media shared from this computer and (2) when this computer is playing video.
![]() Battery Define what constitutes critical and low battery levels, the actions taken when the critical level is reached, and the notification settings for when a low battery level exists. Also, set the level at which the battery will go into reserve power mode. A smart configuration will issue a warning sound for both low and critical and place the computer into Sleep or Hibernate (better choice) when the critical level is reached.
Battery Define what constitutes critical and low battery levels, the actions taken when the critical level is reached, and the notification settings for when a low battery level exists. Also, set the level at which the battery will go into reserve power mode. A smart configuration will issue a warning sound for both low and critical and place the computer into Sleep or Hibernate (better choice) when the critical level is reached.
Power management isn’t just for laptops, although some features, such as battery management, only apply to laptops. However, minimizing power usage of desktop computers is important to both individuals and big organizations. Therefore, you will want to apply what you learn here to the desktop computers that you support.

CERTIFICATION OBJECTIVE
![]() 1101: 1.3 Given a scenario, set up and configure accessories and ports of mobile devices
1101: 1.3 Given a scenario, set up and configure accessories and ports of mobile devices
In this section, we review some ports and accessories common to laptops, per 1101 exam Objective 1.3. Some of these are also relevant to other mobile devices such as smartphones and tablets, which are covered in Chapter 15.
Laptop Connection Methods and Accessories
This section looks at two important topics: the various ports and technologies for connecting laptops to other devices and networks and the accessories you might want to connect to them.
Connection Methods
Laptops have a variety of ways that they connect with peripherals and accessories and with networks such as local area networks (LANs) and the Internet. Many of these you may already be familiar with from Chapter 9, but here’s a quick round-up of the interfaces you need to be able to identify and use:
![]() USB As you learned in Chapter 9, there are various types of USB. Most laptops have at least one USB-A connector, and some have USB-C (Thunderbolt) connectors too. Some smaller mobile devices (like smartphones and tablets) may also have Mini-USB or Micro-USB connectors for data transfer and/or charging.
USB As you learned in Chapter 9, there are various types of USB. Most laptops have at least one USB-A connector, and some have USB-C (Thunderbolt) connectors too. Some smaller mobile devices (like smartphones and tablets) may also have Mini-USB or Micro-USB connectors for data transfer and/or charging.
![]() Lightning Lightning is not a common interface on Windows PCs; it’s mainly found on older Apple mobile devices, like tables and iPhones, for data transfer and charging. Newer iPads and Macs use USB-C instead.
Lightning Lightning is not a common interface on Windows PCs; it’s mainly found on older Apple mobile devices, like tables and iPhones, for data transfer and charging. Newer iPads and Macs use USB-C instead.
![]() Serial interfaces Very few laptops have a serial interface anymore; it’s odd that serial interfaces are still listed in 1101 exam Objective 1.3. Refer to the “DB-9 Serial Port” section in Chapter 9.
Serial interfaces Very few laptops have a serial interface anymore; it’s odd that serial interfaces are still listed in 1101 exam Objective 1.3. Refer to the “DB-9 Serial Port” section in Chapter 9.
![]() Near-field communication (NFC) This technology, covered in Chapter 16, creates an ad hoc wireless network on-the-fly for devices in close proximity to one another. It’s used in point-of-sale terminals to create chip-based credit cards, for instance, and some mobile devices can use NFC to share files with one another.
Near-field communication (NFC) This technology, covered in Chapter 16, creates an ad hoc wireless network on-the-fly for devices in close proximity to one another. It’s used in point-of-sale terminals to create chip-based credit cards, for instance, and some mobile devices can use NFC to share files with one another.
![]() Wi-Fi This is the most popular connection type for a laptop to access a LAN or the Internet. As you will learn in Chapter 16, it uses radio frequency (RF) signals to communicate with an access point.
Wi-Fi This is the most popular connection type for a laptop to access a LAN or the Internet. As you will learn in Chapter 16, it uses radio frequency (RF) signals to communicate with an access point.
![]() Bluetooth Also covered in Chapter 16, Bluetooth is another short-range wireless networking technology for connections between individual devices. Laptops may use Bluetooth for connecting peripherals such as headphones, printers, wireless keyboards and mice, and so on.
Bluetooth Also covered in Chapter 16, Bluetooth is another short-range wireless networking technology for connections between individual devices. Laptops may use Bluetooth for connecting peripherals such as headphones, printers, wireless keyboards and mice, and so on.
![]() Hotspots A hotspot is a Wi-Fi access point, as you will learn in Chapter 16. Most laptops contain Wi-Fi adapters that enable you to connect to a hotspot to access the Internet or other networks.
Hotspots A hotspot is a Wi-Fi access point, as you will learn in Chapter 16. Most laptops contain Wi-Fi adapters that enable you to connect to a hotspot to access the Internet or other networks.
Make sure you can physically identify each of these connections (except for the wireless ones, of course) and explain how a laptop might use them. If one of them isn’t working on a laptop, you should be able to suggest some troubleshooting procedures for it.
Port Replicators and Docking Stations
The laptop owner who uses a laptop while traveling but also as a desktop replacement usually has a “base of operations” office. This office is where the owner will use external devices such as a keyboard, printer, display, mouse, and external hard drive storage. The user must connect and disconnect the laptop from these components every time he or she returns to or leaves the office with the laptop. The solution to that inconvenience is a port replicator or docking station.
A port replicator, a device that remains on the desktop with external devices connected to its ports, can make this task less time consuming by providing a single connection to the laptop and permanent connection to these external devices.
A more advanced (and more expensive) alternative to the port replicator is a docking station. In addition to the ports normally found on a port replicator, a docking station may include full-size expansion slots and various drives. In the past, port replicators and docking stations were always proprietary—often only fitting one model of laptop. If the manufacturer did not make one of these devices to fit your laptop, you had no options. Now you can easily find an inexpensive “universal” port replicator or docking station that interfaces with a laptop via a Thunderbolt or USB port. Whether you have a proprietary device that fits your laptop or one that uses a generic connector, be sure to read the documentation that comes with the docking station or port replicator and follow the instructions for connecting and disconnecting the device.
Laptop Accessories
You can expand a laptop’s capabilities and versatility with a variety of accessories. 1101 exam Objective 1.3 explicitly lists several such accessories, which you should be able to set up and configure. The installation for each of these typically involves connecting it to the laptop via a wired or wireless port and then running its setup software. (Some devices don’t need the setup software to function; the OS detects them automatically.)
![]() Touch pen A touch pen is sometimes used with a touch screen for more precise selection and movement. There are active touch pens that have buttons on them you can press to issue commands or access special functions, and there are passive touch pens that are basically just soft-tipped styluses.
Touch pen A touch pen is sometimes used with a touch screen for more precise selection and movement. There are active touch pens that have buttons on them you can press to issue commands or access special functions, and there are passive touch pens that are basically just soft-tipped styluses.
![]() Headset A headset is a combination of headphones and a microphone; people who spend a lot of time talking on the phone (or the computer equivalent of that) use headsets to keep their hands free for typing. Because a headset is a combination input (mic) and output (speakers) device, the operating system sees it as two separate components in some cases. Most headsets work at a basic level immediately when you connect them to the PC, but advanced features may require software setup.
Headset A headset is a combination of headphones and a microphone; people who spend a lot of time talking on the phone (or the computer equivalent of that) use headsets to keep their hands free for typing. Because a headset is a combination input (mic) and output (speakers) device, the operating system sees it as two separate components in some cases. Most headsets work at a basic level immediately when you connect them to the PC, but advanced features may require software setup.
![]() Speakers A laptop typically has a built-in speaker (or multiple speakers); you can also connect external ones. Some external speakers connect via USB; others connect to the 3.5" round jack on the laptop that doubles for both audio input and audio output. Speakers do not require any special setup to function, but their setup software or driver properties may enable you to configure a speaker set in different ways. For example, a Dolby 5.1 set of speakers may let you choose which speakers are front vs. back.
Speakers A laptop typically has a built-in speaker (or multiple speakers); you can also connect external ones. Some external speakers connect via USB; others connect to the 3.5" round jack on the laptop that doubles for both audio input and audio output. Speakers do not require any special setup to function, but their setup software or driver properties may enable you to configure a speaker set in different ways. For example, a Dolby 5.1 set of speakers may let you choose which speakers are front vs. back.
![]() Webcam Many laptops have a built-in webcam, but you can also add an external webcam (usually via USB port). Most webcams do not require software setup.
Webcam Many laptops have a built-in webcam, but you can also add an external webcam (usually via USB port). Most webcams do not require software setup.
![]() Trackpad Most laptops have a built-in trackpad (also called a touchpad) that you can use as a pointing device, moving your finger across it to move the on-screen pointer. External trackpads are also available, usually connecting via USB.
Trackpad Most laptops have a built-in trackpad (also called a touchpad) that you can use as a pointing device, moving your finger across it to move the on-screen pointer. External trackpads are also available, usually connecting via USB.
![]() Drawing pad A drawing pad uses the same basic technology as a trackpad, except that instead of moving the on-screen pointer, a drawing pad enables you to use a touch pen or stylus to “draw” on the pad surface to create artwork on the computer screen. Drawing pads may require special software setup to enable all their features, and may require a special drawing application that supports the drawing pad hardware.
Drawing pad A drawing pad uses the same basic technology as a trackpad, except that instead of moving the on-screen pointer, a drawing pad enables you to use a touch pen or stylus to “draw” on the pad surface to create artwork on the computer screen. Drawing pads may require special software setup to enable all their features, and may require a special drawing application that supports the drawing pad hardware.
Touchpad Configuration
Most laptop touchpads (called trackpads in 1101 exam Objective 1.3) do not require configuration to operate; they work as a pointing device automatically. However, there are several options you can set to fine-tune touchpad behavior.
There are two types of touchpads: standard (normal) and precision. Precision touchpads have more adjustable options, including sensitivity settings. To find out which type a PC has and to access the touchpad controls, complete the following exercise.
EXERCISE 14-5
Exploring Touchpad Settings
1. Select Start | Settings | Devices | Touchpad.
2. Look at the top of the window, under the Touchpad heading. If you see Your PC has a precision touchpad, as in the following illustration, then you have one. If you don’t see that message, you don’t.
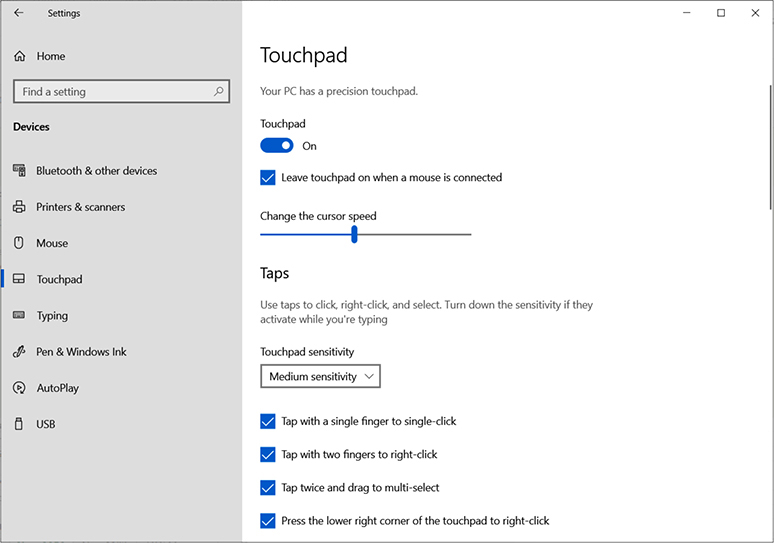
3. Adjust any settings as desired, as explained in the next sections.
From the Touchpad screen in the Settings app, choose Most Sensitive, High Sensitivity, Medium Sensitivity, or Low Sensitivity. Sensitivity is the only option available on a standard touchpad.
If you have a precision touchpad, you can also adjust the settings described in the following table.


CERTIFICATION OBJECTIVE
![]() 1101: 5.5 Given a scenario, troubleshoot common issues with mobile devices
1101: 5.5 Given a scenario, troubleshoot common issues with mobile devices
This section addresses some of the common problems and symptoms of malfunctioning mobile devices covered in CompTIA A+ 1101 exam Objective 5.5. In this objective, we assume that the term “mobile device” refers generically to laptops, tablets, and smartphones, the full gamut of portable devices. We assume this because some of the topics can reasonably be assumed to refer only to laptops (such as sticking keys, since tablets and phones don’t have hardware keys for the most part). Some of these topics are also covered in Chapter 15 in the context of smartphones and tablets.
Troubleshooting Laptop Problems
Laptops live in that gray area between desktops and mobile devices. They have many of the same problems as desktop PCs, which you learned about in Chapter 12, along with many of the same problems as tablets and smartphones, which are coming up in Chapter 15. This section touches on some of the most common laptop problems you may encounter, overlapping somewhat with those other two chapters’ coverage but also hitting some unique topics.
Broken Parts
Physical damage to a laptop is not so much a troubleshooting issue as it is an evaluation of whether the damage can be economically repaired to bring the device back into full functionality versus recycling and replacing it. Some of the most common types of physical damage include broken screens and physically damaged ports. Broken plastic parts are also common.
Broken plastic parts are sometimes not essential to the laptop’s operation. You may be able to tape or glue them back into place, or just leave them off.
The important thing to remember about repairing physical damage is to consult the service manual for the device to find out how each part should be removed and replaced. There are many different laptop designs, each one with its own unique design and disassembly procedure.
Liquid Damage
Another type of physical damage comes from liquids, such as a beverage, spilled on a keyboard or a laptop being dropped into a body of water (bathtubs, fountains, lakes…it happens more than you might think). Water and electronics don’t mix, because water is a very good conductor of electricity, and when a component gets wet, the electricity stops traveling through its normal pathways and jumps through the liquid instead, creating short-circuits that can damage circuit boards.
The first thing to do is to get the power off to the device immediately when water comes into the picture to stop further damage.
After that, the next step is to take the device apart (if possible) and let it dry. If the device cannot be disassembled, put it into a bag with some dry rice, which can help absorb the moisture.
You may need to clean some parts if the liquid had any sugar in it. Alcohol works best, but when cleaning up a sticky or dirty liquid, a mild soap and water can also be used as long as you make sure everything is bone-dry before you try to power it on. A hair dryer (on low heat only) can speed the drying process. If relying on air drying, give it at least 72 hours. Then reassemble the device and power it up to assess whether there is any permanent damage.
Touchpad and Mouse Troubleshooting
A malfunctioning touchpad is usually the result of a missing, corrupted, or out-of-date driver or improper configuration settings. If the touchpad is properly installed, it’s fairly foolproof.
First, confirm that the touchpad appears in Device Manager and there are no problems with it. Try updating its driver from the Driver tab in its Properties box. The touchpad may be listed under Mice And Other Pointing Devices or under Human Interface Devices, and it may appear either as an entry with the word touchpad in its name or as HID-compliant mouse.
If that doesn’t work, try uninstalling it in Device Manager and then refreshing the hardware list or restarting the PC. Also check out the touchpad in the Settings app (see Exercise 14-5) and make sure that the Touchpad setting is On.
If that doesn’t work, you might try using the generic driver for the touchpad in Windows. To do that, in Device Manager, right-click your touchpad driver and choose Update Driver | Browse My Computer For Drivers | Let Me Pick From A List Of Available Drivers On My Computer. Select HID Compliant Mouse, select Next, and follow the prompts.
Cursor drift or ghost cursor describes the condition where the on-screen pointer seems to move all by itself. In very rare cases, this can indicate malware infection (i.e., someone is remotely controlling the computer), but it’s much more likely that the touchpad sensitivity is set too high and the user’s hands are brushing against it when typing. It also may need calibration, explained in the next section. Another common cause for this is conflicting device drivers. Try removing any custom drivers for external pointing devices and sticking with the general Windows-provided drivers to see if that solves it.
Touch Screen/Digitizer Troubleshooting
If a touch screen is completely nonresponsive, try using the keyboard and mouse. If they don’t work either, the device is locked up. If they work okay, try rebooting. You’d be amazed (or maybe you already know) how often that fixes whatever problem you’re having. Still no luck? Make sure the connections inside the laptop to the monitor are snug. There may be two separate cables connecting the display to the motherboard—one for the touch screen and one for the display output.
1101 exam Objective 5.5 lists touch screen problems as “digitizer issues.” A digitizer is a transparent touch-sensitive sheet of film over a display screen that senses touch activity.
Calibration is also occasionally an issue. If where you touch and where the touch is registered don’t match up, you might need to calibrate the screen. This is more common on tablets and phones than on laptops but you can still use the calibration utility on a touch screen laptop. The main reason you might calibrate a laptop touch screen is because you’ve just replaced it.
In Windows 10, open the Settings app, and in the Find A Setting search box, type calibrate. Then click Calibrate The Screen For Pen Or Touch Input. This opens the Tablet PC Settings dialog box. (If you don’t see that option, the PC doesn’t have a touch screen.) From there, click the Calibrate button to run the Digitizer Calibration Tool utility. Follow the prompts from there, which involve touching various spots on the screen marked by a crosshair.
Keyboard Troubleshooting
If you press one key and the character for another appears instead, the keyboard map has gotten confused. Rebooting should fix the problem. If it doesn’t, try using compressed air to blow out the space under the keys, if you can get to it.
If a key is physically sticking and you can’t get access to the space under the key without tearing up the keyboard, consider replacing the keyboard. Laptop keyboards are not very expensive (under $50 usually).
Here’s a less obvious fix for keyboard issues that we stumbled upon a few years ago by accident. We had a laptop keyboard where the period key stopped working. All other keys were fine. The solution we finally found was to do a hard reboot on the machine by holding down the hardware Power button for five seconds so Windows booted from scratch (not just into and out of Fast Startup’s hibernation mode). Problem solved.
Another common problem (well, not really a problem but an annoyance) that users have with keyboards is the Num Lock indicator being stuck on or off. Many laptop keyboards don’t have a NUM LOCK key that you can easily press to toggle it. Look for an FN key combination that operates the NUM LOCK. You might also find a BIOS/UEFI firmware setup setting that controls the initial state of the num LOCK KEY at startup.
Display Troubleshooting
If you don’t see anything on the display screen, try rebooting. Do you see anything at all, like a hardware startup logo, when it first starts booting? If so, the display is fine and the OS is to blame. If not, the display may be defective or its connector to the motherboard may have come loose. Try plugging in an external monitor; if it works, the display screen hardware is at fault.
Here are some other display issues you may need to troubleshoot:
![]() Dim display A dim display could be the result of defective hardware, but it is more likely caused by a setting that is telling the device to conserve battery power by placing the display in a low-power-consumption mode. Check the device’s power management settings, and do a hard reboot (power completely off and then back on again) before you assume that your display is defective. When a battery gets below a certain charge level, the OS may dim the display automatically.
Dim display A dim display could be the result of defective hardware, but it is more likely caused by a setting that is telling the device to conserve battery power by placing the display in a low-power-consumption mode. Check the device’s power management settings, and do a hard reboot (power completely off and then back on again) before you assume that your display is defective. When a battery gets below a certain charge level, the OS may dim the display automatically.
![]() Flickering display A severely flickering display on a laptop device is probably experiencing a hardware issue. Try rebooting the device. The display may need to be replaced if that doesn’t work. If it’s just flickering slightly, try increasing the display refresh rate.
Flickering display A severely flickering display on a laptop device is probably experiencing a hardware issue. Try rebooting the device. The display may need to be replaced if that doesn’t work. If it’s just flickering slightly, try increasing the display refresh rate.
![]() Can’t project to external monitor If you can’t project to an external monitor, first make sure that Windows recognizes the external monitor. Open the Display settings in the Settings app or Control Panel and click Identify to see which monitors Windows sees. Try clicking Detect to detect additional monitors. Then press windows key-p to open the Project task panel, and click Extend to extend the display onto the external monitor.
Can’t project to external monitor If you can’t project to an external monitor, first make sure that Windows recognizes the external monitor. Open the Display settings in the Settings app or Control Panel and click Identify to see which monitors Windows sees. Try clicking Detect to detect additional monitors. Then press windows key-p to open the Project task panel, and click Extend to extend the display onto the external monitor.
Sound Troubleshooting
If you aren’t hearing any sound from your laptop’s speakers, here are some possibilities to look at:
![]() Right-click the speaker icon in the notification area and choose Open Sound Settings. Make sure your speakers are chosen under Choose Your Output Device.
Right-click the speaker icon in the notification area and choose Open Sound Settings. Make sure your speakers are chosen under Choose Your Output Device.
![]() Make sure the Master Volume is not set to Mute. Click Troubleshoot under the Master Volume slider in the Sound section of the Settings app.
Make sure the Master Volume is not set to Mute. Click Troubleshoot under the Master Volume slider in the Sound section of the Settings app.
![]() Check in Device Manager that the sound support’s drivers are correctly installed. Reinstall or update them if needed.
Check in Device Manager that the sound support’s drivers are correctly installed. Reinstall or update them if needed.
![]() If you’re using external speakers, make sure they are plugged in and turned on.
If you’re using external speakers, make sure they are plugged in and turned on.
Overheating
Just like with a desktop PC, a laptop can overheat when its cooling fans and other cooling mechanisms (like heat sinks and air vents) aren’t adequate. The first line of troubleshooting overheating in a laptop is to clean all the air vents; often over time they become clogged with dust and debris. Next, make sure all the fans are working, and make sure the heat sink(s) on the CPU, GPU, and other major chips on the motherboard have not become detached as the thermal paste dries out and degrades over time.
Check in BIOS/UEFI setup to see if there is a setting that controls the fan speed or the cooling mode. You may be able to control how often and how loudly the internal fans operate by selecting Cool mode or Quiet mode in the setup utility. If a laptop is overheating, setting it to Cool mode will force the fans to work harder and more consistently.
Battery Health
If the battery isn’t charging, the battery may be worn out and unable to hold a charge. There are free battery testing utilities you can use to check that out. However, the most common reason a laptop battery doesn’t charge is that the wrong AC adapter is being used, generally one with not enough wattage, or the AC adapter is faulty. You might see a system message letting you know that the system cannot identify the AC adapter, or the battery simply might not charge.
If the laptop won’t start up at all (no power), the battery could be completely drained and the laptop isn’t receiving AC power. Another reason you might not see anything when you press the Power button is that the laptop has gotten hung up in Sleep or Hibernate mode. Hold down the Power button for five seconds or more and then release it to do a hard shutdown that clears out any sleep or hibernation.
Occasionally when a battery goes bad physically, it becomes swollen or distended, sometimes even making the plastic on its cover bulge. Remove a swollen battery immediately and dispose of it, recycling it if possible.
CERTIFICATION SUMMARY
Most PC technicians will need to understand laptop technologies and how to replace components in them, since use of these portable computers remains widespread in both the workplace and the home—even as the sales of newer tablet computers cut into the number of laptops sold each year. Laptops come in many sizes, from the very lightweight ultra-portables or netbooks to desktop replacements.
Although laptops are basically compatible with standard PC operating systems like Windows, macOS, and Linux, they use smaller integrated components that, for the most part, do not conform in either form or size with the standard PC components.
A technician should know how to disassemble a laptop and replace its components as needed. Often this knowledge comes from a review of the laptop’s service manual. Some of the key components you may need to replace include memory, storage devices, keyboards, wireless cards, and digitizers. You may also need to troubleshoot to determine whether a problem has a hardware or software origin and to narrow down the cause and perform the fix.
 TWO-MINUTE DRILL
Here are some of the key points covered in Chapter 14.
Repairing, Upgrading, and Configuring Laptops
![]() A laptop is a portable computer that can run the same operating systems as a desktop PC, with a keyboard in the base and a display in a hinged top.
A laptop is a portable computer that can run the same operating systems as a desktop PC, with a keyboard in the base and a display in a hinged top.
![]() Internal and integrated laptop hardware, such as the display, keyboard, pointing device, motherboard, memory, hard drives, and expansion bus, has special scaled-down form factors, but a laptop can use most standard external PC peripherals.
Internal and integrated laptop hardware, such as the display, keyboard, pointing device, motherboard, memory, hard drives, and expansion bus, has special scaled-down form factors, but a laptop can use most standard external PC peripherals.
![]() Your laptop disassembly and reassembly processes should include consulting the manufacturer’s documentation, using appropriate hand tools, organizing parts, and documenting and labeling cable and screw locations.
Your laptop disassembly and reassembly processes should include consulting the manufacturer’s documentation, using appropriate hand tools, organizing parts, and documenting and labeling cable and screw locations.
![]() Although laptop components are at least partially proprietary, you can find replacement parts from the original manufacturer or from other sources. Always research the cost-effectiveness of replacing parts rather than replacing the entire laptop.
Although laptop components are at least partially proprietary, you can find replacement parts from the original manufacturer or from other sources. Always research the cost-effectiveness of replacing parts rather than replacing the entire laptop.
![]() Internal expansion slots include Mini PCIe, mSATA, and M.2.
Internal expansion slots include Mini PCIe, mSATA, and M.2.
![]() You add memory to a laptop in the form of SODIMMs installed into slots inside the case.
You add memory to a laptop in the form of SODIMMs installed into slots inside the case.
![]() Most older laptops use 2.5" HDDs, but some smaller models use 1.8" hard drives. Drives can be either magnetic or solid state. Newer laptops often use SSDs, often connecting with the mSATA or M.2 interface.
Most older laptops use 2.5" HDDs, but some smaller models use 1.8" hard drives. Drives can be either magnetic or solid state. Newer laptops often use SSDs, often connecting with the mSATA or M.2 interface.
![]() The flat-panel display built into a laptop is likely some form of LCD, backlit with LEDs or CCFL, or organic LED (OLED). To extend the display to an external monitor, use the appropriate fn key combination or a command in the OS or press windows key-p and choose Extend.
The flat-panel display built into a laptop is likely some form of LCD, backlit with LEDs or CCFL, or organic LED (OLED). To extend the display to an external monitor, use the appropriate fn key combination or a command in the OS or press windows key-p and choose Extend.
![]() Laptops have many of the same I/O ports and adapters that desktops have, including one or more display ports (such as HDMI), multiple USB ports, and audio ports.
Laptops have many of the same I/O ports and adapters that desktops have, including one or more display ports (such as HDMI), multiple USB ports, and audio ports.
![]() Laptops often come with built-in communications adapters—including Wi-Fi and Ethernet for LAN connections, Bluetooth for short-distance wireless communications, and cellular adapters for connecting to cellular networks.
Laptops often come with built-in communications adapters—including Wi-Fi and Ethernet for LAN connections, Bluetooth for short-distance wireless communications, and cellular adapters for connecting to cellular networks.
![]() A laptop comes with two sources of electrical power: a rechargeable battery and an AC adapter.
A laptop comes with two sources of electrical power: a rechargeable battery and an AC adapter.
![]() A laptop will usually have a built-in microphone and one or more built-in speakers. There will be ports for external sound input and output as well.
A laptop will usually have a built-in microphone and one or more built-in speakers. There will be ports for external sound input and output as well.
Power Options
![]() You can use the Windows Power Options utility to configure power management settings in laptops that comply with power management standards through the operating system to shut down the display, the hard drive, and even the entire system after a period of inactivity and/or when the battery is low.
You can use the Windows Power Options utility to configure power management settings in laptops that comply with power management standards through the operating system to shut down the display, the hard drive, and even the entire system after a period of inactivity and/or when the battery is low.
![]() Hibernate is a Windows state that uses hard drive space to save all the programs and data that are in memory at the time you choose this mode. The computer then completely shuts down and requires no power while it is hibernating.
Hibernate is a Windows state that uses hard drive space to save all the programs and data that are in memory at the time you choose this mode. The computer then completely shuts down and requires no power while it is hibernating.
![]() Sleep is a state that conserves power while saving your desktop in RAM memory in a work state; it requires a minimum amount of power.
Sleep is a state that conserves power while saving your desktop in RAM memory in a work state; it requires a minimum amount of power.
Laptop Connection Methods and Accessories
![]() Laptop connection methods include USB, Lightning, Serial, NFC, Bluetooth, and Wi-Fi.
Laptop connection methods include USB, Lightning, Serial, NFC, Bluetooth, and Wi-Fi.
![]() Port replicators and docking stations provide permanent connections for external devices used in the laptop user’s office. Universal docking stations and port replicators have USB interfaces and therefore connect in the same manner as other USB devices.
Port replicators and docking stations provide permanent connections for external devices used in the laptop user’s office. Universal docking stations and port replicators have USB interfaces and therefore connect in the same manner as other USB devices.
![]() Laptop accessories you should be able to install and configure include touch pen, headset, speakers, webcam, trackpad, and drawing pad.
Laptop accessories you should be able to install and configure include touch pen, headset, speakers, webcam, trackpad, and drawing pad.
Troubleshooting Laptop Problems
![]() Touchpad problems are most often the result of a missing, corrupted, or out-of-date driver or improper configuration settings.
Touchpad problems are most often the result of a missing, corrupted, or out-of-date driver or improper configuration settings.
![]() Broken parts should be physically replaced when practical (and when it is not cheaper to replace the entire device). Refer to the service manual for disassembly instructions.
Broken parts should be physically replaced when practical (and when it is not cheaper to replace the entire device). Refer to the service manual for disassembly instructions.
![]() In the event of liquid damage, power off the device immediately and let it dry for at least 72 hours.
In the event of liquid damage, power off the device immediately and let it dry for at least 72 hours.
![]() If the pointer appears to move by itself (cursor drift), try turning off the touchpad; your hands may be activating the touchpad by accident as you type.
If the pointer appears to move by itself (cursor drift), try turning off the touchpad; your hands may be activating the touchpad by accident as you type.
![]() Touch screens may occasionally need to be calibrated using the Digitizer Calibration Tool utility in Windows.
Touch screens may occasionally need to be calibrated using the Digitizer Calibration Tool utility in Windows.
![]() Keyboard problems are often solved by rebooting. Keyboard replacement is not uncommon on a laptop and not expensive.
Keyboard problems are often solved by rebooting. Keyboard replacement is not uncommon on a laptop and not expensive.
![]() A dim display may result from improper brightness settings; rebooting can also sometimes fix it. For no-display problems, try an external monitor to help diagnose.
A dim display may result from improper brightness settings; rebooting can also sometimes fix it. For no-display problems, try an external monitor to help diagnose.
![]() Sound problems may result from driver problems or the sound being accidentally muted in the operating system.
Sound problems may result from driver problems or the sound being accidentally muted in the operating system.
![]() Overheating is usually caused by blocked vents, dead fans, and firmware settings that prefer quiet operation over cool operation.
Overheating is usually caused by blocked vents, dead fans, and firmware settings that prefer quiet operation over cool operation.
![]() If a battery isn’t charging, it may be worn out, or you may be using the wrong AC adapter for the laptop’s wattage needs.
If a battery isn’t charging, it may be worn out, or you may be using the wrong AC adapter for the laptop’s wattage needs.
Q SELF TEST
The following questions will help you measure your understanding of the material presented in this chapter. Read all the choices carefully because there might be more than one correct answer. Choose all correct answers for each question.
Repairing, Upgrading, and Configuring Laptops
1. How many pins does a DDR4 SODIMM have?
A. 102
B. 200 or 204
C. 260
D. 262
2. What is the name for system memory used by the video adapter and therefore unavailable to the operating system?
A. VRAM
B. SODIMM memory
C. Shared video memory
D. SRAM
3. What type of battery is most common on a modern laptop?
A. Coin-style
B. 9-volt
C. Nickel-cadmium
D. Lithium-ion
4. Which types of expansion slots are common on modern laptops? (Choose two.)
A. Mini PCIe
B. M.2
C. PCI
D. VGA
5. Which of the following is a laptop component used to convert the DC power from the power adapter or battery to the AC power required by the LCD display?
A. Inverter
B. Converter
C. Power switch
D. Generator
6. What is the most common laptop memory module?
A. SORIMM
B. MicroDIMM
C. SODIMM
D. DIMM
7. Which is a common size for a laptop hard disk drive (HDD)?
A. 2.5"
B. 5"
C. 3.5"
D. 1"
8. Which of the following allows you to attach nearly any type of desktop component to a laptop?
A. Port replicator
B. Enhanced port replicator
C. Extended port replicator
D. Docking station
9. What utility in Windows could you use to migrate an HDD to a new SSD in Windows?
A. Activation
B. System Image Recovery
C. Windows Preinstallation Environment
D. System Restore
10. How is a Mini PCIe card in a laptop different from a PCIe card on a desktop?
A. Larger card
B. 64-bit data bus
C. Not an externally accessible card
D. All of the above
11. Where is the hard disk located on a laptop?
A. Under the keyboard
B. On the side, in a removable slot
C. On the underside, next to the battery
D. Varies depending on the model
12. Which wireless communications standard is used between a laptop and nearby devices and is limited to devices within a few meters of the computer?
A. Cellular
B. Wi-Fi
C. Bluetooth
D. Wired Ethernet
13. On a touch screen, what component allows the screen to function as an input device?
A. Video adapter
B. Shared memory
C. Digitizer
D. Touchpad
Power Options
14. How can you manually place a PC in Sleep mode?
A. Power icon on Start menu
B. alt-f4 keyboard shortcut
C. ctrl-s keyboard shortcut
D. BIOS/UEFI setup
15. What Windows utility can you use to configure low-battery options for a laptop?
A. Power Options
B. System Properties
C. Battery Options
D. BIOS/UEFI setup
16. Which low-power mode uses the least amount of electricity?
A. Sleep
B. Suspend
C. Hibernate
D. Jumpstart
17. Which of these is not one of the actions you can assign to the act of closing a laptop’s lid?
A. Sleep
B. Hibernate
C. Do nothing
D. Restart
Laptop Connection Methods and Accessories
18. Which of these is not a common connection interface for a modern laptop?
A. USB
B. Wi-Fi
C. Bluetooth
D. Serial
Troubleshooting Laptop Problems
19. What is the most urgent concern when a laptop comes in contact with water?
A. Clean off any sticky parts with alcohol.
B. Disconnect external peripherals.
C. Dry out the circuit boards.
D. Cut the power to the laptop.
20. How can you clear a laptop out of Sleep mode if it gets stuck in sleep and won’t wake up?
A. Press ctrl-alt-delete.
B. Press and hold the Power button for five seconds or more.
C. Press ctrl-alt-insert.
D. Shake the laptop vigorously.
A SELF TEST ANSWERS
Repairing, Upgrading, and Configuring Laptops
1. ![]() C. A DDR4 SODIMM has 260 pins.
C. A DDR4 SODIMM has 260 pins.
![]() A is incorrect because at this writing, this is not a valid number for pins on any SODIMM. B is incorrect because 200 or 204 is the number of pins for a DDR3 SODIMM. D is incorrect because 262 is the number of pins for a DDR5 SODIMM.
A is incorrect because at this writing, this is not a valid number for pins on any SODIMM. B is incorrect because 200 or 204 is the number of pins for a DDR3 SODIMM. D is incorrect because 262 is the number of pins for a DDR5 SODIMM.
2. ![]() C. Shared video memory is the name for system memory used by the video adapter and therefore is unavailable to the operating system.
C. Shared video memory is the name for system memory used by the video adapter and therefore is unavailable to the operating system.
![]() A is incorrect because volatile RAM (VRAM) is the type of memory used on a video adapter. A video adapter with VRAM installed does not need to use system memory. B is incorrect because although a SODIMM is the physical memory module used in most laptops, the name for the portion of this memory used by the video adapter is what the question asks for. D is incorrect because SRAM (static RAM) is simply a type of very high-speed RAM.
A is incorrect because volatile RAM (VRAM) is the type of memory used on a video adapter. A video adapter with VRAM installed does not need to use system memory. B is incorrect because although a SODIMM is the physical memory module used in most laptops, the name for the portion of this memory used by the video adapter is what the question asks for. D is incorrect because SRAM (static RAM) is simply a type of very high-speed RAM.
3. ![]() D. Modern laptops use mostly lithium-ion batteries.
D. Modern laptops use mostly lithium-ion batteries.
![]() A is incorrect because a coin-style battery is common on desktop motherboards. B is incorrect because 9-volt batteries are not used in modern computers. C is incorrect because nickel-cadmium batteries were used in earlier generations of laptops.
A is incorrect because a coin-style battery is common on desktop motherboards. B is incorrect because 9-volt batteries are not used in modern computers. C is incorrect because nickel-cadmium batteries were used in earlier generations of laptops.
4. ![]() A and B. Mini PCIe and M.2 are both common expansion slot types on modern laptops.
A and B. Mini PCIe and M.2 are both common expansion slot types on modern laptops.
![]() C is incorrect because PCI is a much older type of expansion slot. D is incorrect because VGA is a video connector.
C is incorrect because PCI is a much older type of expansion slot. D is incorrect because VGA is a video connector.
5. ![]() A. An inverter converts DC power to the AC power required by an LCD panel.
A. An inverter converts DC power to the AC power required by an LCD panel.
![]() B is incorrect because a converter does just the opposite, converting AC power to DC power. C is incorrect because the power switch simply turns the main power to the laptop on and off. D is incorrect because this is not a component of a laptop. A generator generates power using an engine powered by fuel such as gasoline or diesel.
B is incorrect because a converter does just the opposite, converting AC power to DC power. C is incorrect because the power switch simply turns the main power to the laptop on and off. D is incorrect because this is not a component of a laptop. A generator generates power using an engine powered by fuel such as gasoline or diesel.
6. ![]() C. SODIMM is the most common laptop memory module. It is a scaled-down version of the DIMM memory module used in desktops.
C. SODIMM is the most common laptop memory module. It is a scaled-down version of the DIMM memory module used in desktops.
![]() A is incorrect because SORIMM is a now-obsolete memory module form not discussed in the book. B is incorrect because the MicroDIMM module is half the size of SODIMM and is used in handheld computers and, less often, in laptops. D is incorrect because DIMM is a full-size memory module for desktop PCs.
A is incorrect because SORIMM is a now-obsolete memory module form not discussed in the book. B is incorrect because the MicroDIMM module is half the size of SODIMM and is used in handheld computers and, less often, in laptops. D is incorrect because DIMM is a full-size memory module for desktop PCs.
7. ![]() A. 2.5" is the most common size of a laptop hard disk drive (HDD).
A. 2.5" is the most common size of a laptop hard disk drive (HDD).
![]() B is incorrect because 5" is a very large size not used in laptops. C is incorrect because 3.5" is also a large size that is not used in laptops but is common in desktop PCs. D is incorrect (at this writing) because 1" is not a size commonly used in laptops.
B is incorrect because 5" is a very large size not used in laptops. C is incorrect because 3.5" is also a large size that is not used in laptops but is common in desktop PCs. D is incorrect (at this writing) because 1" is not a size commonly used in laptops.
8. ![]() D. A docking station allows you to attach nearly any type of desktop component to a laptop. The docking station can remain on the desk with all the desired devices installed or connected to it. To access these devices, simply plug the laptop into the docking station.
D. A docking station allows you to attach nearly any type of desktop component to a laptop. The docking station can remain on the desk with all the desired devices installed or connected to it. To access these devices, simply plug the laptop into the docking station.
![]() A and B are incorrect because neither a port replicator nor an enhanced port replicator allows access to the number and variety of devices that a docking station does. C is incorrect because an extended port replicator is not a real type of portable system component.
A and B are incorrect because neither a port replicator nor an enhanced port replicator allows access to the number and variety of devices that a docking station does. C is incorrect because an extended port replicator is not a real type of portable system component.
9. ![]() B. You can use System Image Recovery to copy a saved system image of the old drive onto the new one.
B. You can use System Image Recovery to copy a saved system image of the old drive onto the new one.
![]() A is incorrect because activation is an anti-piracy check when installing an application. C is incorrect because Windows PE is the setup program used to install or repair Windows. D is incorrect because System Restore is a Windows utility that restores backups of system files only.
A is incorrect because activation is an anti-piracy check when installing an application. C is incorrect because Windows PE is the setup program used to install or repair Windows. D is incorrect because System Restore is a Windows utility that restores backups of system files only.
10. ![]() C. Mini PCIe is not externally accessible, unlike the desktop PCIe version.
C. Mini PCIe is not externally accessible, unlike the desktop PCIe version.
![]() A is incorrect because Mini PCIe in laptops is smaller than PCIe used in desktops. B is incorrect because they are both 64-bit. D is incorrect because A and B are incorrect.
A is incorrect because Mini PCIe in laptops is smaller than PCIe used in desktops. B is incorrect because they are both 64-bit. D is incorrect because A and B are incorrect.
11. ![]() D. Hard disk placement varies depending on the model. It can be in any of the locations listed or in a different place.
D. Hard disk placement varies depending on the model. It can be in any of the locations listed or in a different place.
![]() A, B, and C are incorrect because although they are all possible locations, there is no guarantee. You must consult the service manual to find the correct location or, if the manual is not available, disassemble the laptop and locate the hard drive visually.
A, B, and C are incorrect because although they are all possible locations, there is no guarantee. You must consult the service manual to find the correct location or, if the manual is not available, disassemble the laptop and locate the hard drive visually.
12. ![]() C. Bluetooth is for short-range communications only. The others listed have longer ranges.
C. Bluetooth is for short-range communications only. The others listed have longer ranges.
![]() A is incorrect because cellular technology can be used to connect a laptop to the Internet from cell towers several miles away. B is incorrect because Wi-Fi connects a laptop to a wireless local area network (WLAN) at distances of several hundred feet. D is incorrect because wired Ethernet requires a cable.
A is incorrect because cellular technology can be used to connect a laptop to the Internet from cell towers several miles away. B is incorrect because Wi-Fi connects a laptop to a wireless local area network (WLAN) at distances of several hundred feet. D is incorrect because wired Ethernet requires a cable.
13. ![]() C. The digitizer is the part of the display that is touch sensitive and enables touch input.
C. The digitizer is the part of the display that is touch sensitive and enables touch input.
![]() A is incorrect because a video adapter allows the screen to function as an output device. B is incorrect because shared memory is system RAM, not an input device. D is incorrect because although a touchpad is an input device, it has no connection with the touch screen.
A is incorrect because a video adapter allows the screen to function as an output device. B is incorrect because shared memory is system RAM, not an input device. D is incorrect because although a touchpad is an input device, it has no connection with the touch screen.
Power Options
14. ![]() A. Click the Power icon on the Start menu and then click Sleep.
A. Click the Power icon on the Start menu and then click Sleep.
![]() B and C are incorrect because there are no keyboard shortcuts in Windows for placing the PC in Sleep mode. D is incorrect because BIOS/UEFI setup cannot be used to put the PC in Sleep mode.
B and C are incorrect because there are no keyboard shortcuts in Windows for placing the PC in Sleep mode. D is incorrect because BIOS/UEFI setup cannot be used to put the PC in Sleep mode.
15. ![]() A. Power Options is the utility where you can configure low-battery options for a laptop.
A. Power Options is the utility where you can configure low-battery options for a laptop.
![]() B is incorrect because you cannot configure low-battery options in System Properties. C is incorrect because there is no such utility as Battery Options in Windows. D is incorrect because BIOS/UEFI setup is not in Windows, but at the system level of the computer.
B is incorrect because you cannot configure low-battery options in System Properties. C is incorrect because there is no such utility as Battery Options in Windows. D is incorrect because BIOS/UEFI setup is not in Windows, but at the system level of the computer.
16. ![]() C. Hibernate uses no power at all when in use.
C. Hibernate uses no power at all when in use.
![]() A and B are incorrect because they both refer to the same Sleep mode, which keeps memory and the CPU active by using a small amount of electricity. D is incorrect because Jumpstart is not a term discussed in this book.
A and B are incorrect because they both refer to the same Sleep mode, which keeps memory and the CPU active by using a small amount of electricity. D is incorrect because Jumpstart is not a term discussed in this book.
17. ![]() D. Restart is not an action to be performed when shutting the lid; that would be counterproductive.
D. Restart is not an action to be performed when shutting the lid; that would be counterproductive.
![]() A, B, and C are incorrect because these are all actions you can assign to that act.
A, B, and C are incorrect because these are all actions you can assign to that act.
Laptop Connection Methods and Accessories
18. ![]() D. Serial is an obsolete type of connection that is seldom found on laptops today.
D. Serial is an obsolete type of connection that is seldom found on laptops today.
![]() A, B, and C are incorrect because they are all common connection interfaces on a modern laptop.
A, B, and C are incorrect because they are all common connection interfaces on a modern laptop.
Troubleshooting Laptop Problems
19. ![]() D. Cutting the power is the most urgent step because water conducts electricity and could cause a short-circuit.
D. Cutting the power is the most urgent step because water conducts electricity and could cause a short-circuit.
![]() A is incorrect because cleaning sticky parts quickly will cause no damage. B is incorrect because not disconnecting peripherals quickly will cause no damage. C is incorrect because although drying is necessary before using the device, it is not urgent.
A is incorrect because cleaning sticky parts quickly will cause no damage. B is incorrect because not disconnecting peripherals quickly will cause no damage. C is incorrect because although drying is necessary before using the device, it is not urgent.
20. ![]() B. Holding down the Power button clears out any low-power-state modes the laptop might be holding in.
B. Holding down the Power button clears out any low-power-state modes the laptop might be holding in.
![]() A and C are incorrect because no keyboard keypresses can be recognized while the computer is in a low-power or off state. D is incorrect because shaking a laptop is not an effective solution for any problem and can damage it.
A and C are incorrect because no keyboard keypresses can be recognized while the computer is in a low-power or off state. D is incorrect because shaking a laptop is not an effective solution for any problem and can damage it.