

THE FOLLOWING COMPTIA IT FUNDAMENTALS EXAM OBJECTIVES ARE COVERED IN THIS CHAPTER:
- 2.1 Identify basic wired and wireless peripherals and their purpose
- Output devices
- Printer
- Laser
- Inkjet
- Thermal
- Display devices
- Flatscreen
- CRT
- Projector
- Speakers
- Printer
- Input devices
- Keyboard
- Pointing devices
- Mouse
- Touchpad
- Joystick
- Stylus pen
- Trackball
- Scanner
- Microphone
- Webcam
- Input & Output devices
- Fax
- External storage devices
- Flash drive
- External hard drive
- CD/DVD/Blu-Ray
- Network Attached Storage
- Memory card
- Mobile media players
- Smartphone
- Touchscreen display
- Output devices
- 2.2 Compare and contrast common computer connector types
- Video
- VGA
- DVI
- HDMI
- Display port/Thunderbolt
- USB
- S-video
- Component – RGB
- FireWire
- eSATA
- Thunderbolt
- USB
- PS/2
- Parallel
- Serial
- RJ–45
- RJ–11
- Audio
- Video
 The hardware inside your computer's case is critical for operation, no doubt about it. By contrast, the peripheral hardware outside the case is optional. Your computer doesn't need a monitor or a keyboard to work properly. Granted, these devices add functionality that you really want. No one is going to bother using a computer without a monitor for very long.
In this chapter, you'll learn about three different categories of computer peripherals: those that provide output, those that give input, and those that do both. I will group the peripheral devices the best I can, but one challenge you will run into is that some devices, such as the multifunctional printer, fall into multiple camps.
Along with the devices themselves, there are lots of different connector types to talk about. Even though I have many to discuss (16 to be exact), the good news is it's hard to plug something into the wrong spot. I'm not saying you can't do it (I know some of you like a good challenge), but it's pretty tough to do. At the end, I'll summarize all of the connectors and important features you will probably need to know.
Audio, Video, and Printers
In this first section, you'll look at devices that are generally classified as output devices. Now, this designation doesn't completely hold true, as you will see. For example, sound cards have connections for microphones, which allow users to input, and many printers today are multifunctional devices that provide scanning or faxing services as well. Regardless, most of what I cover here will be specifically related to computer output, and I'll talk about the exceptions as I move through the chapter objectives.
Audio Connectors
Audio and audio connectors are a pretty easy topic in the grand scheme of computers, so let's tackle it first and get it out of the way. As you learned in Chapter 1, computers can have internal sound cards (or audio cards) that will let the computer produce music, sound for games, or even the voices of your friends and loved ones.
In order to hear the sound, though, you need speakers. Speakers come in a variety of shapes and sizes, from very simple and cheap headphones to complex speaker systems that rival those found in high-end home theaters. Depending on what you want to use your computer for, you can choose the right kind for your needs. Laptops almost always have speakers built into them.
Figure 2.1 shows you the back panel connectors of a desktop system. You can tell that these connectors are all built into the motherboard because of their location. If this system had a separate sound card, it would be in an expansion slot. On the right side you see three round audio connectors, designed for ⅛″ (3.5 mm) plugs. This system also gives you a handy icon next to each plug, letting you know which one is for audio input, which one is for speakers (it's usually green), and which one is for the microphone (usually pink).

The example in Figure 2.1 is pretty basic. Some sound cards give you a few more plugs, such as the one in Figure 2.2. In this one, the black plug is for a subwoofer (if you have one), green is for speakers, and pink is still for the microphone. It's really hard to see, but on sound cards such as this, there are small icons scratched into the metal plate to let you know what should be plugged into each port. To me, decoding them is a little like trying to read hieroglyphics. This sound card also has a DA15 connector on the right, called a game port, which can be used to plug in older-style joysticks.
FIGURE 2.2 Sound card with game port


Game ports have been made obsolete by USB ports, which I will talk about shortly. Joysticks you find today will most likely be USB.
So, this is the first example of a component (the sound card) handling both input and output duties. Speakers most definitely provide output, and microphones and joysticks are input devices. But they both plug into the same device—either the sound card or the audio ports built into the motherboard.
Display Devices and Connectors
Can you imagine not having monitors on computers? Well, the earliest computers didn't have video output, and academics and scientists still used them. Granted, they also took up the entire room and had a fraction of the computing power of your wristwatch, but they were still computers. It's a good thing that technology has come a long ways since then. It's doubtful that computers would enjoy the popularity they have today if they weren't visual.
In Chapter 1 you learned about video cards. Here, I'll talk about the other end of that system, which is the display device. After that, I'll spend some time talking about the types of connectors that you will use to join the display and computer together. Finally, you will look at how to configure some common video settings on your computer.
Display Devices
When it comes to display devices, you have quite a few choices in the marketplace. In many ways, choosing a display device for a computer is much like shopping for a television. They use similar technologies and give you similar features. Here, I'll group display devices into four broad categories:
- CRTs
- Projectors
- Flatscreens
- Touchscreens
In the next sections I'll discuss each one, in order from oldest to newest technology.
CRTs
Legacy monitors and a few specialty monitors contain a cathode ray tube (CRT). In a CRT, a device called an electron gun shoots a beam of electrons toward the back side of the monitor screen (see Figure 2.3). Color CRTs often use three guns, one each for red, green, and blue image components. The back of the screen is coated with special chemical dots called phosphors (often zinc sulfide combined with other elements for color variation, but no phosphorus, ironically) that glow when electrons strike them. Each pixel on the monitor is formed by a triangle of a red, green, and blue phosphor called a triad. Each electron gun works only on dots of a certain color. So, for example, if a certain pixel is supposed to be purple, the red and blue guns will fire at it, but the green gun won't.
The beam of electrons scans across the monitor from left to right, as you face it, and top to bottom in a raster pattern to create the image on the screen. There are two ways to measure a CRT monitor's image quality: dot pitch and resolution. Dot pitch is a physical characteristic of the monitor hardware, but resolution is configurable through software.
Dot Pitch Dot pitch is the measurement between triads on the display. Expressed in millimeters or dots per inch, the dot pitch tells how sharp the picture can be. The lower the measurement in millimeters or the higher the number of dots per inch, the closer together the phosphors are, and as a result, the sharper the image can be. An average dot pitch is 0.28 mm to 0.32 mm. Anything closer than 0.28 mm is considered exceptional.
FIGURE 2.3 Cutaway of a CRT monitor

Resolution Resolution is defined by how many software picture elements (pixels) are used to draw the screen. An advantage of higher resolutions is that more information can be displayed in the same screen area. A disadvantage is that the same objects and text displayed at a higher resolution appear smaller and might be harder to see. Resolution is described in terms of the visible image's dimensions, which indicate how many rows and columns of pixels are used to draw the screen. For example, a resolution of 1024×768 means 1024 pixels across (columns) and 768 pixels down (rows) were used to draw the pixel matrix. Resolution is a software setting that is common among CRTs, LCDs, and projection systems as well as other display devices.
Projectors
Another major category of display device is the video projection system, or projector. Portable projectors are incredibly useful if you travel a lot or if you can't afford projectors for every conference room in your office. Interactive whiteboards have become popular over the past decade to allow presenters to project an image onto the board as they use virtual markers to electronically draw on the displayed image. Remote participants can see the slide on their computer, as well as the markups made by the presenter. The presenter can see the same markups because the board transmits them to the computer to which the projector is attached, causing them to be displayed by the projector in real time.
Another popular implementation of projection systems has been the rear-projection television, in which a projector is built into a cabinet behind a screen onto which the image is projected in reverse so that an observer in front of the TV can view the image correctly. Early rear-projection TVs as well as ceiling-mounted home-theater units used CRT technology to drive three filtered light sources that worked together to create an RGB image. Today's projectors are more likely to use liquid crystal display (LCD) technology.
Projection systems are required to produce a lighted image and display it many feet away from the system. The inherent challenge to this is that ambient light tends to interfere with the image's projection. The best way to fight this problem is to ensure that your projector has a high brightness rating, which is measured in lumens. Projection systems are usually rated and chosen for purchase based on lumens of brightness, once a maximum supported resolution has been chosen. In a relatively darkened room a projector producing as little as 1300 lumens is adequate. However, in a very well-lit area, you may need 5000 to 6000 lumens for the image to be readily visible to viewers. By way of comparison, a 60W standard light bulb produces about 800 lumens.

Bulb replacements tend to be relatively expensive, so treat your projector with care when moving it!
Flat Screens
Flat screen monitors are by far and away the most popular type of display device you will encounter today. Flat screens are much thinner and lighter than conventional CRTs, and they also consume significantly less power.
The rise of flat screen displays coincides with the rise in popularity of laptops. Said a better way, it's very likely that flat screen technology—which made laptops far smaller and more portable than they ever had been—helped laptops explode in popularity.
Flat screen devices can use one of several technologies to produce their image. The most common types of flat screens you will find are these:
Liquid Crystal Display Monitor A liquid crystal display (LCD) monitor has two polarized filters, between which are liquid crystals. In order for light to appear on the display screen, it must pass through both filters and the crystals. The second filter, however, is at an angle to the first, so by default nothing passes through. By applying current to the crystal, you can cause it to twist, which also twists the light passing through it. If the light twists so that it matches the angle of the second filter, it can pass through the filter and light up an area of the display. On a color LCD, an additional filter splits the light into separate cells for red, green, and blue.
Light-Emitting Diode Monitor If you can't tell the difference between an LCD display and a light-emitting diode (LED) monitor, you're not alone. LED displays are just LCD panels with light-emitting diodes (LEDs) as light sources instead of the fluorescent bulbs used by conventional LCD monitors. LED displays rival plasma displays in clarity and variations in luminance.
Plasma From a functional standpoint, plasma monitors offer the greatest clarity and color variation. Their technology is a little more complicated, though. Plasma display panels (PDPs) create a cloud from an inert gas, such as neon, by placing electrodes in front of and behind sealed chambers full of the gas and vaporized mercury. This technology of running a current through an inert gas to ionize it is shared with neon signs and fluorescent bulbs. The downsides to plasma are that they can wear out quicker than LCDs or LEDs and they have a history of “burning” images into the screen. Technology advances have reduced this, but it can still be an issue.
Touchscreens
Touchscreens have exploded in popularity in recent years. They are pretty much standard fare for smartphones, and they are becoming more and more popular for tablet and laptop computers as well. The idea is pretty simple; it looks like any other display device, but you can touch the screen and the system senses it. It can be as simple as registering a click, like a mouse, or it can be more advanced such as capturing handwriting and saving it as a digital note. It's both an output device and an input device.
Although the technical details of how touchscreens work are beyond the scope of this book, there are a few things to know. One is that some touchscreens will work with any object touching them, whereas others require a conductive input, such as your finger. iPhones are a great example of this, as anyone who lives in cold climates and wears gloves can attest to. The second thing is that some touchscreens are coated with a film that is sensitive to touch. Cleaning these screens with regular glass cleaner can ruin the touchscreen nature of the device. It's best to clean those devices only with a damp cloth as needed.
What about Webcams?
Since I'm discussing video devices in this section, this is probably the best place to talk about webcams. A webcam is a small camera attached to your computer that allows you to capture video. It does not record it itself but transmits the video signals to the computer for displaying or processing. Those signals can be recorded or streamed live in a webcast or web chat. A lot of laptops now have webcams built in to their cases, while desktop webcams generally connect to the computer via USB or FireWire.
Video Connectors
Now that I have talked about the characteristics of different display devices, let's discuss how to plug them into a computer. The CompTIA IT Fundamentals exam lists seven different types of video connectors you need to know. I will start with the oldest technologies and work toward the present, and I'll show you what each connector looks like.
Component Video: RGB
Component video has been around as an analog video technology since the 1950s. (There's a digital version of it today as well.) The concept behind component video is that you get better-quality video by separating the video channels into three: red, green, and blue. Consequently, component video cables are easy to identify because they have three RCA-style plugs, often color-coded as red, green, and blue, as shown in Figure 2.4.
FIGURE 2.4 Component video cable

You're more likely to find component video on A/V (audio/video) equipment than you are on PCs, but there are video cards with RGB plugs on them. At best, they're rare in the PC world.
VGA
The Video Graphics Array (VGA) connector was the de facto video standard for computers for years and is still in use today. First introduced in 1987 by IBM, it was quickly adopted by other PC manufacturers. The term VGA is often used interchangeably to refer to generic analog video, the 15-pin video connector we're talking about here, or a 640×480 screen resolution. Figure 2.5 shows you a VGA connector, as well as the male connector that plugs into the monitor.
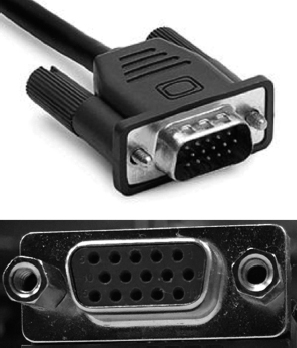
VGA technology has been superseded by newer digital standards such as DVI and was supposed to be phased out starting in 2013. A technology this widely used will be around for quite a while, though, and you'll still see a lot of these in the wild.
S-video
S-video is a component video technology that was introduced around the same time VGA came out. It's analog component video, like composite video, but because it combines the three color channels into one, the video quality is not quite as high as that of composite. It was used a lot with older analog video cameras.
An S-video connector is shown on a video card in Figure 2.6. It's the round, seven-pin mini-DIN (small round) connector on the left. It also comes in other configurations, but seven-pin and four-pin are the only official standards.
FIGURE 2.6 Video card with three video connectors

All of the video connector types introduced from here on are digital standards.
DVI
Digital Visual Interface (DVI) was introduced in 1999. It's the first widely used digital video standard for computers, but it also supports analog signals. It's shown in Figure 2.6—it's the white blocky connector in the middle. Figure 2.7 shows you what the connector looks like coming from the monitor.

The designers of DVI were smart to make it compatible with analog signals, as well as VGA technology. If you have a monitor with a DVI cable but a computer with only a VGA port (or vice versa), you can buy an adapter to connect the two together.
USB
Universal Serial Bus (USB) is the ubiquitous connector, so it should come as no surprise that there are USB display devices. The first widely used standard was USB 1.1, which was released in 1998, but it was pretty slow (only 12 Mbps) so it was really only used for keyboards, mice, and printers. When USB 2.0 came out in 2000 with a high-speed transfer rate of 480 Mbps, video devices were possible. I am guessing that everyone has seen USB, but if not, look back at Figure 2.1; the four identical connectors in the bottom center of the picture are USB.
Throughout this chapter, I will refer to speeds in terms of bits per second (bps). In the case of USB, it's megabits per second (Mbps).
Perhaps the nicest feature of USB display devices is that they can draw their power from the USB cable, so you do not need to plug in a separate power cord for the display.
HDMI
One of the newest standards, and a very popular one in the home theater market today, is High-Definition Multimedia Interface (HDMI). It was introduced in 2002, which makes it seem kind of old in technology years, but it's a great, fast, reliable connector that will probably be around for several more years to come. An HDMI cable and port on a motherboard are shown in Figure 2.8.
FIGURE 2.8 HDMI cable and connector

The HDMI standard is very fast; the most current version, HDMI 2.0 (released in 2013), has a data rate of 18 Gbps. Like USB, HDMI also has an advantage over DVI and other older standards in that it can carry audio signals as well as video.
DisplayPort/Thunderbolt
The way that DisplayPort and Thunderbolt are listed in the objectives makes them seem like they're one and the same, but they're actually not. DisplayPort was introduced in 2008 by the Video Electronics Standards Association (VESA); it was designed to be an industry standard and replace VGA and DVI. It's also backward compatible with VGA and DVI by using adapters. A display port on a laptop is shown in Figure 2.9. A display port is intended to be for video devices only, but like HDMI and USB, it can transmit audio and video simultaneously.

Thunderbolt was developed as an offshoot of the DisplayPort technology. The short history is that Apple announced a mini display port (MDP) standard in late 2008 and that the standard would have no licensing fee. In early 2009, VESA responded by saying that MDP would be included in the upcoming display port 1.2 specification. Apple was not pleased about this and teamed up with Intel to rework the specification. They added in support for PCIe, renamed it Thunderbolt, and launched it in 2011. Thunderbolt supports not only video devices but also several other types of peripherals. In terms of versatility, it's really only second to USB. We'll talk more about Thunderbolt in the “External Storage Connectors” section later in the chapter. All Apple laptops made right now contain a Thunderbolt port; other laptops can too if the manufacturer licenses the technology from Apple. It looks a lot like a DisplayPort, only smaller, and has the characteristic lightning bolt icon, as shown in Figure 2.10.
FIGURE 2.10 2 Thunderbolt ports

Adjusting and Configuring Displays
Now that we've talked about the different types of display devices and how you can hook them up to your computer, let's shift gears a bit and talk about how to keep monitors behaving properly once they're connected. First, we'll start with the adjustments on the monitor itself.
When you change the monitor resolution (via the display driver properties in the Control Panel in Windows, for example), the onscreen image may shift in one direction or become slightly larger or smaller than it was before. Most monitors have onscreen controls that can be used to adjust the image size, image position, contrast, brightness, and other factors. Inexpensive or old CRTs may have just a couple of thumbwheels or knobs for monitor adjustment; newer and more sophisticated monitors will have a complete digital menu system of controls that pop up when you press a certain button. You then move through the menu system by pressing buttons on the monitor or moving a wheel or stick on the front or back of the monitor. If you're unsure of what the buttons do, check the monitor's manual to figure out how the controls work; they're different for each model. Exercise 2.1 will give you practice in adjusting a monitor.
On a CRT, there may be a Degauss button. You press this button to discharge a built-up magnetic field within the monitor that may be causing the picture to be distorted. LCDs don't have this problem, so they don't have a Degauss feature. It's named after Carl Friedrich Gauss, a researcher who studied magnetism.
Adjusting a Desktop Monitor
- Locate the buttons on your monitor that control its image.
- Experiment with the buttons to see if you can determine what they do. Or, look up the buttons in the monitor's documentation or on the manufacturer's website.
On a notebook PC's built-in monitor, adjustment controls are usually not on the monitor itself but built into the keyboard. Several of the keys on your keyboard, most often the F keys near the top of the keyboard, will have extra symbols, sometimes in a contrasting color. In Figure 2.11, you can see several of these on a laptop's F3–F8 keys.
FIGURE 2.11 Video adjustment keys including F4 (LCD toggle), F7 (dim), and F8 (brighten)

Pressing these keys in combination with the Function (Fn) key, as shown in Figure 2.12, activates that special function. For example, there may be a key with a picture of the sun with an up arrow that increases the display brightness like the F8 key in Figure 2.11.

It's fairly common for laptop users to plug in an external display device such as a larger monitor or a projector. When you do this, you might need to toggle your video output to the correct device. In the example of Figure 2.11, you would press Fn and F4 at the same time. Options usually include displaying on the internal or external monitor only, displaying the same image on both, or extending the desktop to stretch across both devices. Figure 2.13 shows you what these options might look like on your laptop.
FIGURE 2.13 Laptop video toggle

Some older laptops just cycle through the choices without giving you this visual, but many newer laptops show you what's happening. Once you have a second monitor attached, you can configure various aspects of it, such as if it's the primary or secondary display and if it appears to the left or the right of your laptop monitor (so if you move your mouse to the edge of one screen, it automatically flows to the other screen). Exercise 2.2 walks you through some multiple-monitor configuration options.
Changing the Settings for Multiple Monitors
- Right-click a blank portion of the Desktop.
- Click Screen Resolution, as shown in Figure 2.14. You will see a screen similar to the one in Figure 2.15.

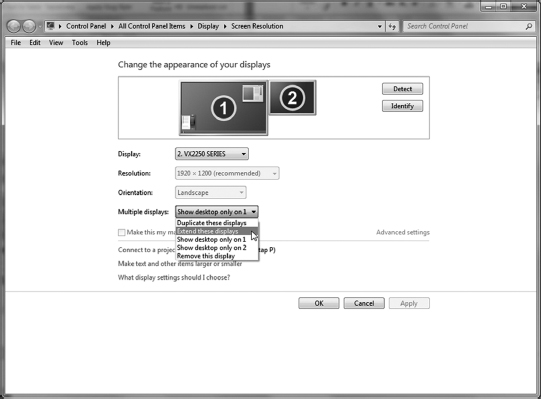
- Click the picture of the monitor with the number 2 on it.
- Pull down the menu labeled Multiple Displays, select Extend These Displays, and click Apply to produce an appropriate image of the second display's size and shape.
- Click Keep Changes in the pop-up dialog that appears, like the one in Figure 2.16, before the 15-second timer expires.
FIGURE 2.16 Keep Changes button

- Click and drag the second monitor to the desired virtual position around the primary monitor. This affects the direction in which you drag objects from one display to the other. You can see in Figure 2.17 that I placed one on top of the other. This affects how your mouse will move between the two screens.
FIGURE 2.17 Rearranging monitors

- Click OK to save your changes and exit.
Also notice that on the Screen Resolution screen you saw in Exercise 2.2 you can also configure the resolution of your monitor, as well as the refresh rate if you have a CRT display.
Printers
Printers are electromechanical output devices that are used to put information from the computer onto paper. They have been around since the introduction of the computer. Other than the monitor, the printer is the most popular peripheral purchased for a computer because many people want to have paper copies of the documents they create. Even though our society keeps inching farther toward electronic documents, there are times when a paper copy makes more sense or is required.
In this section, I will discuss the details of three major printer technologies, including inkjet printers, laser printers, and thermal printers. I will also talk about additional functionality that many printers now have built in, such as scanning and faxing. Once I cover printer technologies, I'll talk about how to connect your printer and some basics on installing and configuring it.
Printer Technologies
At the end of the day, all the printer needs to do is make an image appear on paper. Most of the time this is done with ink, but there are other ways too. You can use several different technologies to get an image on paper; the list of printer types includes impact, solid ink, dye-sublimation, inkjet, thermal, laser, and plotters. The IT Fundamentals exam wants you to focus on three of the most common ones used today, which are inkjet, laser, and thermal printers.
Inkjet Printers
One of the most popular types of printers in use today is inkjet printers. You might also hear these types of printers referred to as bubble-jet printers, but the term Bubble Jet is copyrighted by Canon. These printers spray ink on the page to form the image. Older inkjet printers used a reservoir of ink, a pump, and a nozzle to accomplish this. They were messy, noisy, and inefficient. Bubble Jet printers and newer inkjet printers work much more efficiently and are much cheaper. For all practical purposes, consider them one and the same because their components and printing processes are nearly identical.
Inkjet printers are simple devices. They contain very few parts and thus are inexpensive to manufacture. It's common today to have a $40 to $50 inkjet printer with print quality that rivals that of basic laser printers. These types of printers can use normal copy paper, and most of them can print fairly high-quality photos on glossy photo paper as well.
The primary consumable for inkjet printers is the ink cartridge. This is a small plastic container that holds the liquid ink the printer uses to create images. Printers that print only in black and white need only a black cartridge, whereas color printers need black in addition to cyan, magenta, and yellow. Color printers can have one of three cartridge configurations:
- All ink in one cartridge. These are often referred to as CMYK (cyan, magenta, yellow, black) cartridges.
- One black cartridge and a separate CMY color cartridge.
- Four cartridges total, one for each color.
From a print-quality standpoint, it doesn't matter that much which configuration you get. From a money standpoint, though, it can matter quite a bit. Most people use a lot more black ink than color ink. If you have a CMYK cartridge and run out of black, you'll need to replace the entire cartridge even if there are other colors remaining. In Figure 2.18, you can see that my printer has two cartridges: one color and one black.
FIGURE 2.18 Inkjet printer cartridges

Ink cartridges are held in place by plastic clips. They are folded back above the cartridges in Figure 2.18. To replace a cartridge, you release the clip, slide out the old cartridge, slide in the new one, and lock it into place. Make sure that the ink cartridges are the right size for your printer—in Figure 2.18 you can see that these are HP 61.
Laser Printers
A laser printer works much like a photocopier. The main difference is that a photocopier scans a document to produce an image, whereas the laser printer receives digitized data from a computer. Laser printers are generally bigger, faster, and more expensive than inkjet printers. Thus, you're more likely to find them in office settings than in homes. Laser printers also do not use ink. They use a dry powdery plastic resin called toner, which is stored in a replaceable toner cartridge. Toner cartridges are more expensive than ink cartridges, but they produce many more pages and are generally more cost-effective on a per-page basis.
A laser printer contains a large cylinder known as a drum, which carries a high negative electrical charge. During the print process, the printer directs a laser beam to partially neutralize the charge in certain areas of the drum. When the drum rotates past a toner reservoir, the toner clings to the areas of lesser charge, and the page image is formed on the drum. Then the drum rotates past positively charged paper, and the toner jumps off onto the paper. The paper then passes through a fuser that melts the plastic particles of the toner so that they stick to the paper.
Laser printers are available in color or monochrome models. To print in color, a laser printer must make four passes across the same page, laying down a different color each time. Such a printer has four separate toner cartridges: cyan, magenta, yellow, and black.

Although you're unlikely to do so, if you spill any toner, let it settle before you clean it up. Toner is a fine powder and is carcinogenic. A carcinogen is a product that, with long-term continued exposure, may cause cancer. Also, don't use a normal vacuum cleaner to try to pick up toner. The powder is so fine that it will pass through the vacuum's filters and out the vent. Use a special computer vacuum that is designed with finer filters to catch the toner.
Thermal Printers
The two types of printers you have already learned about, inkjet and laser, comprise the vast majority of printers you will see in the market. Thermal printers are unique because they don't actually use ink. They use a special heat-sensitive paper.
Inside the printer is a print head the width of the paper. When it needs to print, a heating element heats certain spots on the print head. The paper below the heated print head turns black in those spots. As the paper moves through the printer, the pattern of blackened spots forms an image on the page of what is being printed. Another type of thermal printer uses a heat-sensitive ribbon instead of heat-sensitive paper. A thermal print head melts wax-based ink from the ribbon onto the paper. These are called thermal transfer or thermal wax-transfer printers.
Thermal printing technology is used in many point-of-sale terminals and older fax machines (newer fax machines usually use inkjet or laser technology). Thermal printers typically have long lives because they have few moving parts. The only unique part that you might not be as familiar with is the paper feed assembly, which oftentimes needs to accommodate a roll of paper instead of sheets. The paper is somewhat expensive, doesn't last long (especially if it is left in a very warm place, like a closed car in summer), and produces poorer-quality images than most of the other printing technologies.
Other Technologies Often Bundled with Printers
A lot of the printers you see on the market today combine printing with additional features, such as scanning and faxing. Such printers are called multifunctional printers or all-in-one printers. Adding in additional features changes the printer from being solely an output device to being an input device as well.
You will rarely see stand-alone scanners, which are input devices, or fax machines, which can be input and output devices.
Connecting Printers
For your printer to work properly, you must have a connection to it. The printer can be connected directly to your computer, or you can connect to one via the network. In this section, we'll look at various types of connectors that have been popular for printers over the years.
Serial Connections
When computers send data serially, they send it 1 bit at a time, one after another. The bits stand in line like people at a movie theater, waiting to get in. In Chapter 1 I talked about how old-time serial connections were painfully slow, but that new serial technology makes it a more viable option than parallel. In this particular instance, the serial I'm talking about is the old-school variety.
Specifically, older-style serial connectors were based on a standard called RS-232 and were called serial ports. They came in 9-pin (DE9) and 25-pin (DB25) varieties; the male DE9 is shown in Figure 2.19. It's conveniently labeled “Serial.”
FIGURE 2.19 Back-panel connectors, including serial and parallel ports

Serial connections like this really aren't used for printers any more. Modems used serial connectors too, but they have also gone the way of the dinosaur. About the only time you will see serial connections used today are for server, router, and switch consoles that can be used for management and diagnostics.
Parallel Connections
When a printer uses parallel communication, it is receiving data 8 bits at a time over eight separate wires (one for each bit). Parallel communication was the most popular way of communicating from computer to printer for many years, mainly because it's faster than serial. In fact, the parallel port became so synonymous with printing that a lot of companies simply started referring to parallel ports as printer ports. In Figure 2.19, the 25-pin parallel port has a printer icon above it.
A parallel cable consists of a male DB25 connector that connects to the computer and a male 36-pin Centronics connector that connects to the printer. Parallel cables work best when they are less than 10′ long, and they should be IEEE 1284 compliant. Figure 2.20 shows a typical printer cable, with the parallel connector on the left and the Centronics connector on the right.

USB
Earlier in the chapter you learned that USB stands for Universal Serial Bus, but the U could as easily stand for “ubiquitous.” USB is everywhere and seemingly connects everything. Printers are no exception. USB is the most common connector type you will see used with printers today.
Networked Printers
Rather than connect the printer to your computer, you can connect it to the network. This setup is very popular in businesses and is becoming more popular in home networks as well. When connecting a printer to the network, you have two choices. The first is to connect it via a network cable, which typically uses an RJ-45 connector. (It looks like a bigger telephone plug, and I'll talk about them in the “Communications Connectors” section later in this chapter.) The second is to connect it via wireless networking. You'll examine that topic in detail in Chapter 6, “Network Sharing and Storage.”
In addition to connecting the printer, you need to install a special piece of software called a printer driver so the operating system knows how to talk to the printer. I will talk about drivers and how to install them in Chapter 4, “Software Applications.”
Input Devices
Even though artificial intelligence has made rapid strides in recent years, computers are still unable to truly “think” for themselves. This is probably a good thing, but my goal isn't to kick off a debate on cyber-ethics here. My point is that computers don't do anything until they are given input telling them what to do. The input can be as simple as a single keystroke or click or as complicated as millions of lines of computer code. Either way, input is critical.
The very earliest computers used punch cards as input; for example, ENIAC (which is recognized as the first electronic general-purpose computer) used punch cards for input and output in 1946. Keyboards were already widely available in the form of typewriters and were introduced as computer input devices by 1948. Pointing devices actually preceded them, with the trackball being invented in 1946. (Mice didn't really become popular until much later, in 1984.) Today, keyboards and pointing devices are still the two most common types of input devices, so we'll discuss both of them in the upcoming sections.
Other input devices you need to be aware of for the IT Fundamentals exam are scanners, microphones, and webcams, but I already covered them when I talked about printers, audio connectors, and video.
Keyboards
The keyboard owes its history to that of the typewriter. The typewriter was first patented in 1868, and as of 1877 they were in mass production. In the 1930s the keyboard was combined with the telegraph and also with punch card systems to create keypunches. For entering data, the typewriter keyboard was the technology of choice. So it shouldn't come as a surprise that computer makers adopted the technology as well.
The most common keyboard configuration for Latin script languages is called QWERTY, named for the first six letters on the top row, from left to right. Keys were laid out as they were to minimize jamming of the metal arms within mechanical typewriters; the most commonly used letters were spaced farther apart to avoid issues. The Remington company, which was the leader in typewriter production in the 1870s, popularized the design, and the rest, as they say, is history.
Today, of course, we still use keyboards that have this configuration even though we don't need to worry about mechanical arms running into each other in the inner workings of our typewriters. Even when keyboards are built into devices such as the Blackberry or reproduced on our smartphone screens, the default layout has not changed. After video displays, keyboards are pretty much the most essential thing we plug into our computer.
Connecting Keyboards
The most common way to connect keyboards today is through your USB port. But wait, what about wireless keyboards, you ask? They're also usually connected via USB, just with a wireless USB receiver, as shown in Figure 2.21.
FIGURE 2.21 Wireless USB receiver

Prior to USB, the standard for several years was the PS/2 port (also known as a mini-DIN 6 connector), which was a keyboard and mouse interface port first found on the IBM PS/2 (hence the name). It is smaller than previous interfaces (the DIN 5 keyboard port and serial mouse connector), and thus its popularity increased quickly. It's shown in Figure 2.22. You'll notice that in addition to having an icon next to each port, the keyboard port is usually purple and the mouse port is usually green.
FIGURE 2.22 Keyboard and mouse PS/2 ports

Keyboard Configuration Options
There are two directions I am going to take this. First, let's take the physical configuration of your keyboard. Keyboards haven't changed a great deal over the last 140 or so years, but newer advances in ergonomics have led to some more comfortable (and interesting-looking) typing options. If your wrists or arms get sore or numb from typing too much, you might have bad form, and typing on a standard keyboard (or especially a small laptop keyboard) can actually be part of the problem. One design that's been out for several years is called the natural keyboard. It's shown in Figure 2.23 and is designed to promote more natural hand and arm positions.
FIGURE 2.23 A natural keyboard

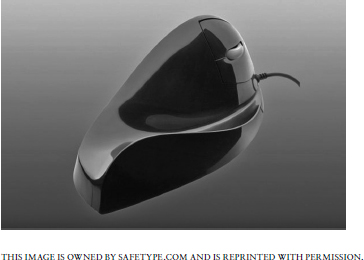
A newer option is simply called an ergonomic keyboard, and it looks kind of futuristic, if you ask me. The example shown in Figure 2.24 is available from www.safetype.com. If the natural keyboard still does not help ease the pain in your wrists, this one might do the trick. If nothing else, it's a great conversation starter!
FIGURE 2.24 Ergonomic keyboard from safetype.com

Second, you have some configuration options within your operating system. One of the more interesting ones is that you can change your keyboard layout. If you have programs in which you type using a different alphabet than Latin-based, you can change it to a different character type. In addition, there's another Latin-based layout called Dvorak, which is an alternative to QWERTY. It's designed to place more commonly used letters in better spots, increasing your typing speed. After all, we don't need to worry about mechanical keys sticking together on our typewriters any longer! Personally, I think it would take a lot of frustrating time to get used to it, but a former boss of mine used it and swore by its efficiency. It could also be fun to change it on an unsuspecting co-worker, not that I would recommend that. Exercise 2.3 shows you how to change your keyboard layout in Windows 7.
Changing Your Keyboard Layout in Windows 7
- Click Start
 Devices And Printers. (If your keyboard is not shown in the Devices and Printers window, open the Region and Language app in Control Panel, and then skip to step 3.) You will get a window similar to the one in Figure 2.25.
FIGURE 2.25 Devices And Printers window

- Right-click your keyboard, and choose Region And Language.
- Select the Keyboards And Languages tab.
- Click the Change Keyboards button, like the one shown in Figure 2.26.

- In the Text Services And Input Languages dialog, like the one shown in Figure 2.27, click Add.
FIGURE 2.27 Text Services And Input Languages

- The Add Input Language dialog will appear. Scroll down to English (United States) and choose United States-Dvorak, as shown in Figure 2.28.
FIGURE 2.28 Add Input Language

- If you want to see what the layout looks like, click the Preview button, and you'll see the screen shown in Figure 2.29. Otherwise, click OK.

- The Text Services And Input Languages dialog will now be back up. In the Default Input Language drop-down, choose Dvorak. Click OK.
- Exit out of the dialogs, and Dvorak is your keyboard layout.
Pointing Devices
Pointing devices are so named because they allow you to move your cursor around the screen and point at what you want; they're a convenient handheld tool that lets you easily navigate onscreen. Pointing devices have been in use since the beginning of mankind, if you include the index finger. They've pretty much been available for computers as long as computers have existed. For example, the trackball was developed in 1946 to replace the joystick as an input device for an early electronic radar-plotting system. The mouse came along in the 1960s but didn't gain much popularity until Apple came out with the Macintosh 128K in 1984.
You might think that a mouse or another pointing device is basically required for today's PCs, but it's not. When I teach classes for computer technicians, one of the activities I like to have them do is disconnect their mouse and then navigate through Windows with just their keyboard. It can be difficult to get used to, but it's a very helpful skill if you find yourself stuck with a broken mouse at some point.
You should open up Solitaire on your computer and play a game without the mouse. Hint: use your arrow keys and the Enter key.
Mice are the most popular pointing device you'll see today, although touchpads are a close second. I'll talk about both of those, as well as joysticks, stylus pens, and trackballs in the next section.
Types of Pointing Devices
There are five different types of pointing devices in the CompTIA IT Fundamentals exam objectives. I'll cover each of them here.
Mouse
The mouse is the most common pointing device in use today. It's named because the original mice that were created had the connector cord (a tail) leading from the rear of their body, pointing toward the user. Later designs put the cord at the head of the unit, but by then the name had stuck.
For most of its existence, the mouse had a ball inside it that touched two rollers, one positioned to detect vertical movement and one positioned to detect horizontal movement. By moving the mouse around on a solid surface, the ball would roll, causing movement in the rollers, which would get translated into electrical signals and move the cursor on your screen. Slippery surfaces would cause the ball to skid, making the mouse less useful, so people started using mouse pads to compensate.
The progression of technology allowed mice to lose their tails and their balls (replaced by a light that senses movement), and so most mice you see today are wireless or optical or both. Figure 2.30 shows a typical wireless optical mouse.
FIGURE 2.30 Wireless optical mouse

Mice come in a variety of shapes, sizes, and styles. Some are very small, designed to be more portable and used with laptops and tablets. As with keyboards, ergonomic designs exist as well. The ergonomic mouse in Figure 2.31 is one such option, courtesy of www.safetype.com. Most mice will have two or more buttons for left- and right-clicking, as well as a wheel to scroll up and down. You'll find some variance, such as mice for Macs, which have historically had only one button.
Touchpad
Instead of using an external device such as a mouse, you can do as our ancient ancestors did and point at something using your finger. Granted, they didn't have a touchpad to use, because touchpads didn't rise to prominence until the laptop computer became commonplace. Functionally, a touchpad works just like a mouse, in that you can move your finger around to control your cursor, and you'll often have two buttons, one for left-clicking and one for right-clicking. Many touchpads also let you tap the pad itself to indicate a click. Figure 2.32 shows a typical touchpad.

You'll notice that the touchpad is conveniently placed right below the laptop keyboard, which happens to be where your palms rest when you type. Sometimes this will cause problems, because you can inadvertently cause your mouse cursor to do random things like jump across the screen. Most touchpads today have settings to allow you to control the sensitivity, and they will also differentiate between a palm touching them and a finger. In addition, if you have a sensitive touchpad that is giving you trouble, you can disable it altogether. Let's do that in Exercise 2.4.
Disabling a Touchpad
- Open the Hardware And Sound window within Control Panel. You can do so by clicking Start Control Panel, and then clicking Hardware And Sound, as shown in Figure 2.33.
- Click Mouse near the top of the screen, and then go to the Device Settings tab, as shown in Figure 2.34.
- Highlight your touchpad. In this example, it's named LuxPad. If you are curious to see what the configuration options are, click the Settings button to get a screen similar to the one shown in Figure 2.35.
FIGURE 2.33 Hardware and Sound

FIGURE 2.34 Device Settings tab of the Mouse Properties window
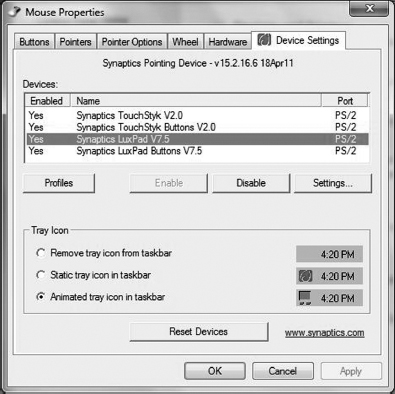
FIGURE 2.35 Touchpad configuration options

- On the Device Settings tab, with your touchpad highlighted, click the Disable button.
- Click OK to close this window.
Although touchpads are primarily used with laptop computers, you can also buy external touchpads that connect to a computer just as a mouse would.
Joystick
Joysticks were used in aviation before computers were invented; the first electrical joystick was patented in 1926. There were a few early, specialized computers that used joysticks in the 1940s. Back then those systems were mostly for military use, and the joysticks were pretty simple—a stick and a button or two to indicate action. Modern joysticks can get a lot more complicated in terms of the buttons and triggers on them, and today joysticks are mostly used for game playing (especially games like flight simulators). They're not normally an everyday pointing device like a mouse or a touchpad. Game controllers such as those used on the PlayStation or Xbox are offshoots of the joystick.
Stylus Pen
In terms of history, the stylus pen has been around a lot longer than other computer pointing devices—centuries in fact. The ancient Romans used small stylus-like devices to write on wax tablets.
A stylus can come in any number of shapes and sizes, just like a pen. Most of them are similar looking to normal writing pens, although you will find smaller variants for gaming devices and things like the PalmPilot.
For purposes of computing, the stylus is treated a little differently than other pointing devices for three reasons. One, it doesn't generally need to be connected to the computer in any way. Two, it's mostly used for writing and not moving a cursor around. Three, the screen that you are touching with it needs to be some variation of a touchscreen for it to work.
You may be wondering, what about the credit card machines in the supermarket or convenience stores, where the stylus used to sign the screen is connected to the machine? In most cases, that's purely a security measure to keep people from walking away with the stylus. Some do have a very slight electrical charge, which is how the screen senses where the pen is touching.
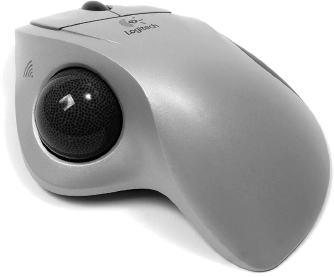
Trackball
As noted in the introduction to pointing devices, the trackball has been around for quite some time—since 1946. The original trackball used the same size ball that's used in Canadian five-pin bowling: it's about 5 inches (12.7 cm) in diameter and weighs around 3.5 pounds (1.6 kg). Hardly convenient by today's standards! Later versions used a standard-sized billiard ball, and newer ones use smaller balls yet.
You can think of a trackball as a sort of inverted mouse with a ball. It uses sensors like a mouse with a ball did; it's just that the ball is exposed and you roll it around with your thumb and/or fingers. Figure 2.36 shows a common trackball. From a usage standpoint, the trackball functions just as a mouse or a touchpad would. Many people who use them claim that they're more ergonomic than the traditional mouse.
Connecting Pointing Devices
This section can almost be summed up with one acronym: USB. By far and away, USB is the most common connector you will see used with pointing devices.
Before USB was invented, mice would be connected via PS/2 ports, just as keyboards were. For a refresher on what that looks like, refer back to Figure 2.22. The mouse port is the green one at the top. Prior to PS/2, mice and other pointing devices were connected via RS-232 serial ports. A serial port is shown in Figure 2.19.
Remember that joysticks used to connect through the 15-pin (DA15) game port, which was often built into soundcards.
Pointing Device Configuration Options
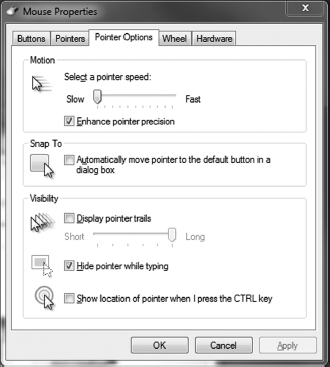
For as simple as pointing devices such as mice are, there are actually quite a few configuration options you can set on them. For example, you can change the button configuration so that the mouse becomes more natural for left-handed people. You can also change how fast the cursor moves across the screen, what it looks like, and how quickly you need to click for the system to register it as a double-click. In Windows, all of these settings are configured through Mouse Properties in the Hardware And Sound app within Control Panel. Exercise 2.5 walks you through a few of the convenience-related options. Note that some of these are purely aesthetic, but others are very useful to some people with disabilities or who otherwise have difficulty using the pointing device.
Configuring a Mouse
- Open the Hardware And Sound window within Control Panel. You can do so by clicking Start Control Panel and then clicking Hardware And Sound.
- Click Mouse, and the Mouse Properties window will appear, similar to the one shown in Figure 2.37.
- Under Button Configuration, check the Switch Primary And Secondary Buttons check box.
- Click the Pointer Options tab (you will need to use the other button now!), as shown in Figure 2.38.
- In the Motion section, drag the pointer speed all the way to the Slow end. Notice how slowly the mouse moves. Slide the bar all the way to Fast to see what the difference is.
- Click OK to save the changes if you want, or click Cancel.

External Storage and Other Connectors
In this section, you will look at two types of technologies: external storage and communications connectors. It might seem like an odd combination of technologies, and it's true that they don't always go together. External storage devices are pretty common to use today, and they require their own dedicated high-speed connections to work. I'll talk about the types of devices as well as those connections. Many external devices are network-compatible though, so that relates closely to communications (network) connections. I'll cover them both here to put the finishing touches on this chapter.
External Storage Devices
On first glance, it might seem like external storage devices are a relatively new technology in the computer world. The truth is, external storage was all computers had before internal hard drives were created. When PCs started becoming popular in the early 1980s, internal storage was more the exception than the rule. Practically every computer had two external floppy disk drives, usually of the 5¼″ variety. To boot your computer, you would put a boot disk in the primary floppy drive and turn the computer on. It would read the floppy drive and load the operating system into memory from there. Once the operating system was loaded, then you could take that disk out and put another one in with the program or data you needed. External storage was the norm, but it didn't resemble the external storage options we have today.
Now if you said that high-speed, ultra high-capacity external storage was relatively new to personal computing, you would be right. It's only really been since the early 2000s that external connection speeds were fast enough to support the data requirements of external hard drives. As speeds have increased, so have the options available for external storage. In this section, I will talk about several common types of external storage options, as well as the primary connectors you will see used with them.
All of the external storage devices covered here should be considered both input and output devices.
Types of External Storage
As I have said before, we've come a long ways since the days of floppy disk drives. Even the smallest external storage devices used today hold one thousand or more times the data that the best floppy disks did. It's just another indication of how technology has progressed. We need the larger storage spaces because we have lots of pictures, videos, and presentations on our computers and we need to easily store and transfer them. These devices help us do just that.
Flash Drives
Flash drives have, for all practical purposes, replaced floppy disk drives in computers. You'll also hear them called thumb drives because they are roughly the size of someone's thumb. They're compact and cheap, store a lot (up to 256 GB at the time of writing), and are easy to use. As you can see in Figure 2.39, they have USB connectors. All you have to do is plug in the drive and wait for the system to detect it, and away you go. Most flash drives have a small light on them that illuminates when it's ready for use and blinks when data is being written to or read from it.

Internally, flash drives use the same technology that solid-state drives (SSDs) use. There are no moving parts. Flash drives have about a 10-year shelf life, which I guess is a downside. In 10 years, the flash drive you have will be so hopelessly outdated you will want a new one anyway.
Memory Cards
From an internal comparison standpoint, memory cards works the same way that flash drives do. They look a little different, though (see Figure 2.40), and they require a special card reader. A lot of desktops, laptops, and printers have memory card readers built into them, like the desktop computer in Figure 2.41 does. If your system doesn't have a memory card reader, you can buy an external one that plugs into a USB port.


As you can see in Figure 2.41, there are several different standards of memory cards, and they're all slightly different sizes. The four standards shown here are:
- Smart Media
- Compact Flash
- Secure Digital (SD)
- Duo
Of the four, SD is the most popular and the one most likely to be built into your laptop or other device today. The standard SD cards are tiny—barely over an inch long (32 mm) and 0.08″ (2.1 mm) thick. You can easily find SD cards up to 256 GB in size, although the theoretical maximum for the current standard (called SD eXtended Capacity, or SDXC) is 2 TB. Memory cards are more expensive than flash drives of the same capacity.
SD cards also come in two smaller sizes, the mini SD and the micro SD. Smaller cards will fit into devices built for larger cards.
Memory cards are capable of storing any type of data, but their small size makes them popular for inserting into devices such as digital cameras and video cameras, as well as small portable gaming devices.
External Hard Drives
An external hard drive is basically the same thing as an internal hard drive, except that it's enclosed in a protective case and connects via an external connector. External drives can be conventional HDDs or SSDs. You can see that the one in Figure 2.42 has a USB connector on the back. This example is a little older; it's about six inches tall and can be set upright as pictured or laid flat. It has a light on the front to let you know it's working, and the light flashes when the drive is reading or writing.
FIGURE 2.42 External hard drive

External hard drives will connect via USB, FireWire, eSATA, or Thunderbolt connectors. I'll discuss the differences in the “External Storage Connectors” section later in this chapter.
With current technology, regardless of the type of external hard drive connection you have, an external drive will be slower than using an internal SATA hard drive. USB 3.0, Thunderbolt, and eSATA are faster than internal PATA hard drives, however.
External Optical Drives
In the “External Hard Drives” section, I said that external drives are basically just like internal drives but with different connectors. The same holds true for external optical drives, whether they are CD, DVD, or Blu-ray devices. Like their external hard drive cousins, they will connect via USB, FireWire, eSATA, or Thunderbolt.
Network Attached Storage
A network attached storage (NAS) device takes hard drive storage to the next level. Based on its name, you can probably guess that it's attached to the network, which it is, but that's just the beginning. First, take a look at a simple NAS device in Figure 2.43.
FIGURE 2.43 NETGEAR NAS device

Looking at Figure 2.43, you can see that this is a self-enclosed unit that can hold up to four hard drives. Some hold more; some hold less. Nicer NAS systems will allow you to hot-swap hard drives, meaning that if one fails, you can remove it and replace it without shutting the NAS down. And remember RAID from Chapter 1? Most NAS systems will run that for you with very little intervention required. In addition to the hardware, the NAS device contains its own operating system, meaning it acts like its own file server. In most cases, you can plug it in, do some very minor configuration, and have instant storage space on your network.
As far as connectivity goes, NAS systems will connect to a PC through a USB, FireWire, or eSATA port, but that is primarily so you can use that PC to run the configuration software for the NAS. The NAS also connects to the network, and that is how all of the network users access the storage space.
If you are running a small office and need additional centralized storage, a NAS system is a good way to go.
Accessing a NAS server over the network will generally be slower than having an external hard drive on your computer. The advantage is that if you have multiple users on a network, everyone can easily get to it.
Mobile Media Players
There are a lot of different types of mobile media players on the market today. Some of them contain their own hard drives for storage, whereas others are simply wireless network-enabled devices that let you stream media online. Odds are you've heard of one or more of the examples here:
- Roku
- Apple TV
- Amazon Fire TV/TV Stick
- Google Chromecast
- PlayStation 4
- Slingbox
Most of those that I listed are streaming devices. That is, you hook them to your TV or computer, usually with an HDMI connection, and then you connect the device to your wireless network. Once on the network, you can stream (download in real time) the content.
There are other mobile media players that are basically high-capacity external hard drives, with software installed on them that allows you to play movies and see TV shows. Again, these typically attach to your TV or computer via HDMI cables.
Smartphones
Finally, we have smartphones. A smartphone is really a small computer masquerading as a telephone. Usually they have a touchscreen interface and built-in Internet connectivity to download files and apps. Oh—and you can use them to make telephone calls too. Popular examples include the iPhone, Samsung Galaxy, and Google Nexus series of phones.
While you can use your smartphone for external storage for your computer, that's not the most practical thing to do. For one, storage space on smartphones is far more limited than it is on computers. Second, viewing files on a smaller smartphone screen isn't as convenient as seeing them on a full-size laptop screen or desktop monitor. Granted, smartphones are getting bigger and bigger, and the line between smartphones and tablet computers is getting increasingly blurry.
Where external smartphone storage makes the most sense is for music and pictures. Those are items you typically want to take with you and have on the go, and they don't take up a ton of space.
Smartphones are connected to your computer (for downloads, uploads, and synchronization) via USB cable.
External Storage Connectors
In this section I want to focus on the four types of connectors you're most likely to see with external hard storage devices, specifically external hard drives. I've mentioned their names throughout this chapter, and we've already covered USB in a bit of depth. It's important, though, to cover all of them in the same place so you're able to compare and contrast the benefits of each, as well as differentiate what they look like.
USB
USB is the one I have talked about the most, but it's such a critical connector that it's good to review again. And here, I'll get into a bit more depth than I did before.
Like all other standards, USB has gone through several stages of evolution. The first published standard was USB 1.0, released in 1986. Because of some technical limitations, it didn't really catch on. Those limitations were fixed by 1998 when USB 1.1 was released. It caught fire in a hurry. It was slow by today's standards (only 12 Mbps), so it was primarily used for keyboards, mice, and printers. Since 1998, there have been three major upgrades to the USB standard; Table 2.1 shows the dates and important facts.

USB 3.0 and USB 3.1 have people really excited. You can see the dramatic jump in speed between the USB 2.0 and USB 3.0 standards, and that jump put USB in the same ballpark as FireWire, eSATA, and Thunderbolt. USB 3.1 has a theoretical maximum of 10 Gbps, which would be faster than its competitors, but the overhead associated with it limits the actual throughput to about 7.2 Gbps. Still, that's fast.
The vast majority of USB ports you see in the market today are still USB 2.0. If you have a USB 3.x device, it will work while plugged into a USB 2.0 port, but it will just run at the slower speed. SuperSpeed cables and connectors are all supposed to be colored blue to easily differentiate them from older versions.
Regardless of the standard, low-power devices can get their power from the USB port itself. Devices with higher power requirements (such as the external hard drive shown back in Figure 2.42) can still use their own power sources. Up to 127 devices can be connected to one USB bus at once. As far as the types of devices that can be connected to USB, it's almost limitless. If you can think of a computer peripheral, odds are it comes in a USB version.
FireWire
Around 1986, engineers at Apple started playing with the idea of a high-speed serial digital connection. They named it FireWire after some of the thermal “noise” created in the connections when they ran it at high speeds. In 1995, Apple presented the standard to the Institute of Electrical and Electronics Engineers (IEEE), which is the group that ratifies electronics standards. The standard was confirmed as IEEE 1394. Right around that same time, Sony finalized its trademark iLink technology, which was also based on the same standard. Today, there are no practical differences between IEEE 1394, FireWire, and iLink. Figure 2.44 shows a FireWire connector on a laptop.
FIGURE 2.44 FireWire connector

As of 2000 Apple had incorporated it into its entire line of desktop and laptop computers. FireWire found a niche home with digital video cameras, but there were also plenty of FireWire hard drives out there as well. In addition, if you had workstations running the Macintosh OS X or Linux operating systems, you could create a small network using FireWire cables.
FireWire tops out at 3200 Mbps, and you can connect up to 63 devices on a single bus. As of 2011, Apple started replacing FireWire connections with Thunderbolt ones, and as of 2014 all new Macs have Thunderbolt instead of FireWire.
eSATA
In Chapter 1, I talked about the internal Serial ATA (SATA) hard drive connector. The external SATA (eSATA) connector is the same technology, only in an external connection. Figure 2.45 shows an eSATA connector. It came into the market in 2003, is mostly intended for hard drive use, and can support up to 15 devices on a single bus.

Table 2.2 shows some of the eSATA specifications.
TABLE 2.2 eSATA specifications

You will commonly see the third generation of eSATA (and SATA) referred to as SATA 6 or SATA 6Gb/s. This is because if they called it SATA 3, there would be confusion with the second generation, which had transfer speeds of 3.0 Gbps.
An interesting fact about eSATA is that the interface does not provide power, which is a big negative compared to its contemporary high-speed serial counterparts. There is another eSATA port that you might see, which is called Power over eSATA, eSATA+, eSATAp, or eSATA/USB. It's essentially a combination eSATA and USB port. Since the port is combination of two others, neither sanctioning body officially recognizes it (which is probably why there are so many names—other companies call it what they want to). This port is shown in Figure 2.46.

You can see that this port is slightly different than the one in Figure 2.45, and it's also marked with a USB icon next to the eSATA one. On the market, you can purchase cables that go from this port to an eSATA device and provide it with power, via the eSATAp port.
Thunderbolt
I already talked about Thunderbolt a bit in the context of video connectors, because the technology was developed as an offshoot of display port technology. As a quick review, remember that Apple partnered with Intel and launched Thunderbolt in 2011. Figure 2.10 has a picture of the port, which has a lightning bolt next to it. And in terms of versatility, Thunderbolt is second to only USB in the types of devices made for it. You will find video devices, hard drives (both HDD and SSD), printers, laptop docking stations, audio devices, and PCIe expansion enclosures that use Thunderbolt.
Thunderbolt's speed will likely entice you to want to get it. The first generation of the technology boasted a 10 Gbps data rate. Thunderbolt 2, which was released in late 2013, joins two 10 Gbps channels together for 20 Gbps throughput. Apple has also announced plans for Thunderbolt 3, which will again double the throughput to 40 Gbps. Apple says it expects to start shipping products with Thunderbolt 3 connectors in late 2015 or early 2016.

Choosing the Right Connection Technology
After reading about external storage connectors, you can see that you have several viable choices if you need to choose a technology. So which one do you choose?
A few factors to consider are compatibility, price, and future needs. First, think about compatibility. There are two vectors of this. The first one is compatibility with devices. What do you need to hook up? If it's basic devices such as a keyboard and a printer, then USB is the right way to go. It's plenty fast and cheap. If you need a considerable amount of external storage at lightning-fast speeds, then Thunderbolt is probably a better choice, although USB 3.1 and eSATA can also meet your needs. (Then it might come down to cost.) The second compatibility vector is with your existing hardware. If you are looking to connect devices to your existing computer, what types of connectors do you have? That could make the decision for you, unless you're in the market for a new system as well.
Price can also be a consideration. USB is generally the cheapest, although since USB 3 is relatively new, those devices will be more expensive for a while.
Last, think about future expansion needs. Is this for your home office, and you aren't planning on adding extra devices for another five years or so? Then this isn't a big deal. But if you're working in a small business environment that is growing rapidly, you will want to think about future hardware needs and the speeds at which those devices need to run.
Many people are asking which one will win, Thunderbolt or USB? It's too early to tell, and really, maybe there shouldn't be one winner. Both technologies are great, and there's probably a place for both moving forward.
There's one last side note to this conversation. The blazing-fast speed of Thunderbolt and USB 3 is great, but if you use external HDDs, you're underutilizing the connection bandwidth. Mechanical HDDs simply can't spin fast enough to transfer data as fast as those connections will allow. The fastest conventional HDDs top out at just over 1500 Mbps—any of the technologies I talked about here (with the exception of USB 2.0) can easily handle that. If you want to truly take advantage of these fast speeds, you need to upgrade to SSDs, which will also cost you a lot more money per megabyte.
Communications Connectors
The last two connectors I have to talk about in this chapter are for communications. One will get you onto a network, and the other is designed to use telephone lines.
Network Connectors
To be fair, there are over a dozen different types of network connectors in existence. The connector used depends on the type of network cable you're using. For example, old-school coaxial cable (similar to cable TV cabling) uses different connectors than does twisted pair, and there are probably a dozen different fiber-optic cables alone. The good news for the CompTIA IT Fundamentals test is that there's only one they want you to know about, which is RJ-45.
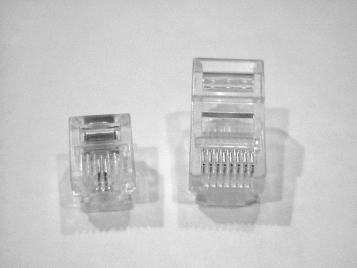
The RJ in the connector name stands for registered jack. You'll find RJ-45 connectors on the ends of twisted-pair network cables, which you will hear people call Ethernet cables or sometimes Cat 5 or Cat 6 cables (Cat is short for category). It looks like a telephone plug, except that it's wider. A twisted-pair cable has four pairs of wires, so there are eight leads on the connector. You plug it in just as you would a telephone cord. The maximum speed depends on a lot of factors, such as the communication standard you are using and distance, but generally speaking the maximum you'll get from twisted pair is 1 Gbps. Figure 2.47 shows you two RJ connectors: RJ-11 on the left and RJ-45 on the right.
FIGURE 2.47 RJ-11 and RJ-45 connectors
Telephone Connectors
The telephone connector you will see in use is called RJ-11. Telephone cables often have two pairs of wires, but only one is used. An RJ-11 is shown in Figure 2.47, and in Figure 2.48, you can see the two connectors on a laptop.

To use a telephone line, your computer must have a modem. As I talked about in Chapter 1, modems are all but extinct today. The biggest reason is lack of speed. The fastest modems ever produced had a transfer rate of 56 Kbps, but in practice the most you ever really got out of the connection was around 40 Kbps. That's barely fast enough to download text files without pulling out your hair, never mind music or videos!
Both RJ-45 and RJ-11 connectors have been in existence for over 50 years, but they were mandated as standards in 1976.
Reviewing Connector Types
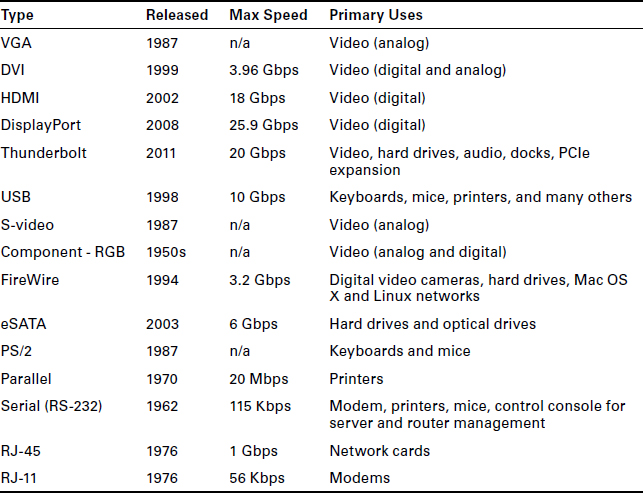
We've covered a lot of different types of connectors in this chapter. Instead of having you bounce around between pages to compare and contrast them to each other, Table 2.3 lists them all. In it, I've included the approximate release date, the maximum speed of the newest standard in that family, and the types of devices that you will commonly see associated with the connector. For some of the maximum speeds I have listed n/a, because no one ever really talks about the speed of those connections. In cases like that, just assume that they're slow!
TABLE 2.3 Summary of connectors
Summary
In this chapter, I talked about external peripheral devices and the connector types used to hook them to your computer. Broad categories of external peripherals are output devices, input devices, and input and output devices. Some devices, such as the printer, are output devices, but when you bundle in extra functionality such as scanning, you now have a device that does both input and output.
First, I covered output devices. To hear sound, you need a sound card in your system, as well as a set of speakers or headphones. To put ink on paper, you need a printer. Printers are one example of a device that can fall into multiple camps as far as input and output goes. A basic printer is just for output, but a multifunctional printer that also has scanning or faxing capabilities can be an input device as well. Video devices were our last group of output devices; I talked about different types of monitors and projectors, as well as the different video connectors that have been used or are used today.
Second, I shifted the focus to devices that are used primarily for input. These include keyboards and pointing devices like the mouse, touchpad, and trackball.
Finally, you learned about external storage and communications devices. There are many different types of external storage devices you'll use, from tiny memory cards and small thumb drives, to large-capacity network-attached storage, to mobile devices such as media players and smartphones.
Exam Essentials
Know which devices are considered output devices. The list includes printers, display devices, and speakers.
Know which devices are input devices. Keyboards, pointing devices, scanners, microphones, and webcams are input devices.
Know which devices can provide input and output. These devices are faxes, external storage devices, and touchscreen displays.
Understand the features of common video connectors. The video connectors you need to know are VGA, DVI, HDMI, DisplayPort, Thunderbolt, USB, S-video, and Component–RGB.
Understand the way in which each printer type creates images. Laser printers use a powdery toner, inkjet printers use liquid ink in small cartridges, and thermal printers use heat-sensitive paper.
Know which connection types are used for external storage. Connections that are used for external storage devices are USB, FireWire, eSATA, and Thunderbolt.
Know how to best connect keyboards and mice to computers. Keyboards and mice today all use USB. In the past, the PS/2 connector was used. Before PS/2, mice could use serial ports.
Written Labs
You can find the answers to the written labs in Appendix A.
Your friend Elise comes to you looking for help. You know that she is talented at producing videos and has recently started her own company to make videos for local restaurants and entertainment venues to put on their websites.
Elise tells you that business is growing quickly, and she's very excited. She's had so much business that she needed to bring in another friend, James, to do some work for her, and both of them have been very busy. Elise had purchased an external hard drive for additional storage, but now she is running out of room, and she needs a better solution, preferably one she and James can both use. Elise uses a MacBook Pro. James has some sort of Mac as well, but it's a few years old.
Elise's goals are, in order, to increase storage space, to make it easily available for her and James, and to have some protection against losing all of the data she has. She also doesn't want to spend a fortune, because she needs to keep costs down for her business to keep growing.
- What types of hardware does Elise need to accomplish her goals?
- Are there any peripherals that would let her accomplish all of her goals with one device?
- How much will that option cost if she wants to get 1 TB of storage space?
- Are there other options that Elise has that might save her money?
Feel free to use the Internet to research and come up with at least two options for Elise.
Review Questions
You can find the answers to the review questions in Appendix B.
- Which of the following ports was developed by Apple and is found on MacBooks?
- eSATA
- S-video
- Thunderbolt
- Mac Video
- If you want to plug in a keyboard, which types of connectors might you use? (Choose two.)
- Parallel
- Serial
- USB
- PS/2
- What is the name of the connector that you are likely to find at the end of a twisted-pair network cable?
- RJ-11
- RJ-45
- HDMI
- FireWire
- You want to use the video connector with the best resolution. Which one should you pick?
- HDMI
- HEMI
- DVI
- Component
- What are the colors used by component video? (Choose three.)
- Red
- Blue
- Yellow
- Green
- White
- Black
- Which type of printer uses a powdery substance to create images on paper?
- Powder
- Thermal
- Inkjet
- Laser
- Rebecca points at a flat square below her keyboard on her laptop and asks what that is. What is it?
- Launchpad
- Touchpad
- Touchstick
- Webcam
- Which of the following devices are both input and output devices? (Choose two.)
- NAS
- Flat screen
- Scanner
- Webcam
- Smartphone
- What is the name of the round connector that is used for keyboards and mice?
- USB
- PS/2
- DIN
- Serial
- You want to install a device in your office that allows for extra storage and has built-in fault tolerance. Which device do you need?
- NAS
- RAS
- SAS
- External hard drive
- One of your friends asks you if you have any SuperSpeed devices. What type of device is she talking about?
- SSD
- CRT
- USB
- eSATA
- You have a color inkjet printer. What type of ink cartridge does it most likely use?
- CMYB
- CMYK
- RGB
- ROYGBIV
- In your office, you need to set up your computer for a video teleconference with another office. What peripheral do you need to make this work?
- Scanner
- CRT
- Projector
- Webcam
- What type of connector do you plug into a modem?
- RJ-11
- RJ-15
- RJ-41
- RJ-45
- Which type of printer uses a fuser that gets hot and melts the image into the paper?
- Thermal
- Inkjet
- Laser
- Fusing
- Which of the following types of monitors is most likely to have a Degauss button on it?
- CRT
- Flat screen
- Touchscreen
- Projector
- Your friend discovered a joystick in a box of his brother's items in the attic. What type of connector might this joystick have? (Choose two.)
- PS/2
- USB
- RS-232
- DA15
- Which of the following statements is true about DVI connectors?
- They are digital only.
- They are analog only.
- They are digital and analog.
- They support hybrid video technology.
- You have two Mac computers running OS X, and you want to connect them into a network. Which two types of connectors can help you accomplish this?
- RJ-11
- RJ-45
- FireWire
- eSATA
- Robert complains that the cursor on his laptop screen often jumps around unexpectedly when he's typing. What can he do to solve the problem?
- Reinstall the mouse driver
- Reinstall the video driver
- Reboot the computer
- Disable the touchpad
- Stop typing