

THE FOLLOWING COMPTIA IT FUNDAMENTALS EXAM OBJECTIVES ARE COVERED IN THIS CHAPTER:
- 5.3 Given a scenario, implement basic support concepts
- Check for external issues
- Loose cables/connections
- Power
- Physical damage
- Manufacturer documentation
- Manufacturer websites
- Technical community groups
- Internet search engine
- Contact technical support
- Check for external issues
- 5.4 Explain basic backup concepts
- Importance of backups
- Scheduling
- Frequency
- Storage mediums
- Locally attached storage
- Offsite/cloud-based
- Network attached storage
- Backup verification and testing
 Computer systems, whether they are powerful servers or portable handheld devices, have become an omnipresent part of society today. People use them for business, recreation, entertainment, to stay in touch with friends and family, and multiple other reasons. Ten to fifteen years ago, it was becoming more common for households to have PCs. Now, if you include mobile devices (which you should), most households have several. Computers are so common that we tend to take them for granted—until they don't work like they're supposed to.
This chapter covers two key topics related to dealing with computer problems—troubleshooting and support, and backups. When that inevitable problem happens, you need to be familiar with the best methods to isolate and fix the problem to get the computer up and running as quickly as possible. If the problem is with the hard drive, then what do you do? Hopefully the user backed up their data. Many of us consider data, whether it is financial data or family pictures or something else, to be our most important and irreplaceable assets. Without that backup, a hard drive failure can cause catastrophic loss. In this chapter, you'll learn proper methods for troubleshooting and how to manage computer backups.
Basic Computer Support Concepts
Computer support isn't typically thought of as one of the sexy jobs in IT, but it's definitely one of the most critical and visible jobs. Users don't care how elegant your network design is, how bulletproof your security model is, or how user-friendly your website is if their computer won't boot up. And when it won't boot up, their best friend is the computer support person.
Sometimes you will fix computers in person, while other times you'll deal with challenging situations over the phone. In either case, you need to be prepared to quickly diagnose the problem and implement a solution. The user will be counting on you—and you get to be the hero! Okay, so maybe the user won't treat you like a hero, and there probably won't be a parade in your honor, but you will definitely know that they appreciate your help.
Computer support is synonymous with troubleshooting. To troubleshoot well, you need to understand the theory and process of troubleshooting. This includes the basic concepts and resources that apply in most situations. In addition, there are common scenarios you will encounter—knowing how to solve the common issues will help you think about how to solve the difficult ones as well.
Understanding Troubleshooting Theory
When troubleshooting, you should assess every problem systematically and try to isolate the root cause. Yes, there is a lot of art to troubleshooting, and experience plays a part too. But regardless of how “artful” or experienced you are, haphazard troubleshooting is doomed to fail. Conversely, even technicians with limited experience can be effective troubleshooters if they stick to the principles. The major key is to start with the issue and whittle away at it until you can get down to the point where you can pinpoint the problem—this often means eliminating, or verifying, the obvious.
Although everyone approaches troubleshooting from a different perspective, a few things should remain constant. First, always back up your data before making any changes to a system. Hardware components can be replaced but data often can't be. For that reason, always be vigilant about making data backups.
Second, establish priorities—one user being unable to print to the printer of their choice isn't as important as a floor full of accountants unable to run payroll. Prioritize every job and escalate it (or de-escalate it) as you need to.
Third, but perhaps most important, document everything—not just that there was a problem but also the solution you found, the actions you tried, and the outcomes of each.
Troubleshooting theory can be broken down into the following steps to follow:
- Identify the problem.
- Establish a theory of what's wrong.
- Test the solutions.
- Establish a plan of action to fix the problem.
- Verify functionality.
- Document the findings.
In the next few sections I will take you through each step of the troubleshooting process.
Identifying the Problem
While this may seem obvious, it can't be overlooked: If you can't define the problem, you can't begin to solve it. Sometimes problems are relatively straightforward, but other times they're just a symptom of a bigger issue. For example, if a user isn't able to connect to the Internet from their computer, it could indeed be an issue with their system. But if other users are having similar problems, then the first user's difficulties might just be one example of the real problem.

Ask yourself, “Is there a problem?” Perhaps “the problem” is as simple as a customer expecting too much from the computer.
Problems in computer systems generally occur in one (or more) of four areas, each of which is in turn made up of many pieces:
- A collection of hardware pieces integrated into a working system. As you know, the hardware can be quite complex, what with motherboards, hard drives, video cards, and so on. Software can be equally perplexing.
- An operating system, which in turn is dependent on the hardware.
- An application or software program that is supposed to do something. Programs such as Microsoft Word and Excel are bundled with a great many features.
- A computer user, ready to take the computer system to its limits (and beyond). Sometimes it's easy to forget that the user is a very complex and important part of the puzzle.
Talking to the Customer
Many times you can define the problem by asking questions of the user. One of the keys to working with your users or customers is to ensure, much like a medical professional, that you have good bedside manner. Most people are not as technically hip as you, and when something goes wrong they become confused or even fearful that they'll take the blame. Assure them that you're just trying to fix the problem but that they can probably help because they know what went on before you got there. It's important to instill trust with your customer. Believe what they are saying, but also believe that they might not tell you everything right away. It's not that they're necessarily lying; they just might not know what's important to tell.

Is the Power On?
It's a classic IT story that almost sounds like a joke, but it happens. A customer calls technical support because their computer won't turn on. After 20 minutes of troubleshooting, the technician is becoming frustrated...maybe it's a bad power supply? The technician asks the user to read some numbers off of the back of his computer, and the user says, “Hold on, I need to get a flashlight. It's dark in here with the power out.”
Help clarify things by having the customer show you what the problem is. The best method I've seen of doing this is to say, “Show me what ‘not working’ looks like.” That way, you see the conditions and methods under which the problem occurs. The problem may be a simple matter of an improper method. The user may be performing an operation incorrectly or performing the operation in the wrong order. During this step, you have the opportunity to observe how the problem occurs, so pay attention.
Here are a few questions to ask the user to aid in determining what the problem is:
Can you show me the problem? This question is one of the best. It allows the user to show you exactly where and when they experience the problem.
How often does this happen? This question establishes whether this problem is a onetime occurrence that can be solved with a reboot or whether a specific sequence of events causes the problem to happen. The latter usually indicates a more serious problem that may require software installation or hardware replacement.
Has any new hardware or software been installed recently? New hardware or software can mean compatibility problems with existing devices or applications. For example, a newly installed device may want to use the same resource settings as an existing device. This can cause both devices to become disabled. When you install a new application, that application is likely to install several support files. If those support files are also used by an existing application, then there could be a conflict.
Has the computer recently been moved? Moving a computer can cause things to become loose and then fail to work. Perhaps all of the peripherals of the computer didn't complete—or weren't included on—the move, meaning there's less functionality than the user expects.
Has someone who normally doesn't use the computer recently used it? That person could have mistakenly (or intentionally) done something to make the computer begin exhibiting the irregular behavior.
Have any other changes been made to the computer recently? If the answer is yes, ask if the user can remember approximately when the change was made. Then ask them approximately when the problem started. If the two dates seem related, there's a good chance the problem is related to the change. If it's a new hardware component, check to see that it was installed correctly.
Be careful of how you ask questions so you don't appear accusatory. You can't assume that the user did something to mess up the computer. Then again, you also can't assume that they don't know anything about why it's not working.
The Social Side of Troubleshooting
When you're looking for clues as to the nature of a problem, no one can give you more information than the person who was there when it happened. They can tell you what led up to the problem, what software was running, and the exact nature of the problem (“It happened when I tried to print”), and they can help you re-create the problem, if possible.
Use questioning techniques that are neutral in nature. Instead of saying, “What were you doing when it broke?” be more compassionate and say, “What was going on when the computer decided not to work?” Frame the question in a way that makes it sound like the computer did something wrong and not the person. It might sound silly, but these things can make your job a lot easier!
While it's sometimes frustrating dealing with end users and computer problems, such as the user who calls you up and gives you the “My computer's not working” line (okay, and what exactly is that supposed to mean?), even more frustrating is when no one was around to see what happened. In cases like this, do your best to find out where the problem is by establishing what works and what doesn't work.
Gathering Information
Let's say that you get to a computer and the power light is on and you can hear the hard drive spinning, but there is no video and the system seems to be unresponsive. At least you know that the system has power and you can start investigating where things start to break down. (It sound like there is a reboot in your future!)
The whole key to this step is to identify, as specifically as possible, what the problem is. The more specific you can be in identifying what's not working, the easier it will be for you to understand why it's not working and fix it. If you have users available who were there when the thing stopped working, you can try to gather information from them. If not, you're on your own to gather clues. It's like CSI but not as gory.
So now instead of having users to ask questions of, you need to use your own investigative services to determine what's wrong. The questions you would have otherwise asked the user are still a good starting point. Does anything appear amiss or seem to have been changed recently? What is working and what's not? Was there a storm recently? Can I reboot? If I reboot, does the problem seem to go away?

If a computer seems to have multiple problems that appear to be unrelated, identify what they are one at a time and fix them one at a time. For example, if the sound is not working and you can't get on the Internet, deal with those separately. If they seem related, such as not being able to get on the Internet and you can't access a network file server, then one solution might solve both problems.
The key is to find out everything you can that might be related to the problem. Document exactly what works and what doesn't and, if you can, why. If the power is out in the house, as in the story related earlier, then there's no sense in trying the power plug in another outlet.
DETERMINING IF THE PROBLEM IS HARDWARE OR SOFTWARE RELATED
This step is important because it determines the part of the computer on which you should focus your troubleshooting skills. Each part requires different skills and different tools.
To determine whether a problem is hardware or software related, you can do a few things to narrow down the issue. For instance, does the problem manifest itself when the user uses a particular piece of hardware (a DVD-ROM or USB hard drive, for example)? If it does, the problem is more than likely hardware related, which can also mean a problem with the device driver.
This step relies on personal experience more than any of the other steps do. You'll without a doubt run into strange software problems. Each one has a particular solution. Some may even require reinstallation of an application or the operating system. If that doesn't work, you may need to resort to restoring the entire system (operating system, applications, and data) from a data backup done when the computer was working properly.
DETERMINING WHICH COMPONENT IS FAILING (FOR HARDWARE PROBLEMS)
Hardware problems are usually pretty easy to figure out. Let's say the sound card doesn't work, you've tried new speakers that you know do work, and you've reinstalled the driver. All of the settings look right but it just won't respond. The sound card is probably the piece of hardware that needs to be replaced.
With many newer computers, several components such as sound, video, and networking cards are integrated into the motherboard. If you troubleshoot the computer and find a hardware component to be bad, there's a good chance that the bad component is integrated into the motherboard and the whole motherboard must be replaced—an expensive proposition, to be sure.
Laptops and a lot of desktops have components (network card, sound card, video adapter) integrated into the motherboard. If an integrated component fails, you may be able to use an expansion device (such as a USB or PC Card network adapter) to give the system full functionality without a costly repair.
Establishing a Theory
Way back when, probably in your middle school or junior high school years, you learned about the scientific method. In a nutshell, scientists develop a hypothesis, test it, and then figure out if their hypothesis is still valid. Troubleshooting involves much the same process.
Once you have determined what the problem is, you need to develop a theory as to why it is happening. No video? It could be something to do with the monitor or the video card. Can't get to your favorite website? Is it that site? Is it your network card, the cable, your IP address, DNS server settings, or something else? Once you have defined the problem, establishing a theory about the cause of the problem—what is wrong—helps you develop possible solutions to the problem.
Eliminating Possibilities
Theories can either state what can be true or what can't be true. However you choose to approach your theory generation, it's usually helpful to take a mental inventory to see what is possible and what's not. Start eliminating possibilities and eventually the only thing that can be wrong is what's left. This type of approach works well when it's an ambiguous problem; start broad and narrow your scope. For example, if the hard drive won't read, there is likely one of three culprits: the drive itself, the cable it's on, or the connector on the motherboard. Try plugging the drive into the other connector or using a different cable. Narrow down the options.
A common troubleshooting technique is to strip the system down to the bare bones. In a hardware situation, this could mean removing all interface cards except those absolutely required for the system to operate. In a software situation, this usually means booting up in Safe Mode so most of the drivers do not load.
Once you have isolated the problem, slowly rebuild the system to see if the problem comes back (or goes away). This helps you identify what is really causing the problem and determine if there are other factors affecting the situation. For example, I have seen memory problems that are fixed by switching the slot that the memory chips are in.
Using External Resources
Sometimes you can figure out what's not working, but you have no idea why or what you can do to fix it. That's okay. In situations like those, it may be best to fall back on an old trick called reading the manual. As they say, “When all else fails, read the instructions.” The service manuals are your instructions for troubleshooting and service information. Virtually every computer and peripheral made today has service documentation on the company's website, or on a DVD, or although unlikely, even in a paper manual. Don't be afraid to use them!
The Internet can be your troubleshooting friend as well. I've joked before that Google knows everything, but if you have a problem or a specific error message, a Google search may give you a solution or point you in the right direction. Besides the manufacturer's documentation and website (which should generally be your first resources), there may be technical community groups that can help. If a similar question to yours has been posted, there could be an answer. If you don't see your problem, post the question on the board. Always remember to be as clear as possible about the problem, and be polite and friendly. No one is going to answer a question if they think you are a troll. If none of that works out, you can always call the manufacturer's technical support line to seek help.
Finally, if you're lucky enough to have experienced, knowledgeable, and friendly co-workers, be open to asking for help if you get stuck on a problem.
Before starting to eliminate possibilities, check the vendor's website for any information that might help you. For example, if you are getting an error message saying, “PC Load Letter” and you don't know what it means, typing it into the vendor's website might take you directly to specific steps to fix the problem.
Testing Solutions
You've eliminated possibilities and developed a theory as to what the problem is. Your theory may be pretty specific, such as “the power cable is fried,” or it may be a bit more general, like “the hard drive isn't working” or “there's a connectivity problem.” No matter your theory, now is the time to start testing solutions. Again, if you're not sure where to begin to find a solution, the manufacturer's website is a good place to start!
Check the Simple Stuff First
This step is the one that even experienced technicians overlook. Often, computer problems are the result of something simple. Technicians overlook these problems because they're so simple that the technicians assume they couldn't be the problem. Here are some examples of simple problems:
Is it plugged in? And plugged in at both ends? Cables must be plugged in at both ends to function correctly. Cables can easily be tripped over and inadvertently pulled from their sockets. Rule number one is to always check the cables first.
“Is It Plugged In?” and Other Insulting Questions
Think about how you feel if someone asks you this question. Your likely response is, “Of course it is!” After all, you're not an idiot, right? You'll often get the same reaction to similar questions about the device being turned on. The reality is, making sure it's plugged in and turned on are the first things you should always do when investigating a problem.
When asking these types of questions, it's not what you say but how you say it. For example, instead of asking if it's plugged in, you could say something like, “Can you do me a favor and check to see what color the end of the keyboard plug is? Is that the same color of the port where it's plugged into on the computer?” That generally gets the user to at least look at it without making them feel dumb. For power, something like, “What color are the lights on the front of the router? Are any of them blinking?” can work well.
Ask neutral and nonthreatening questions. Make it sound like the computer is at fault, not the user. These types of things will help you build rapport and be able to get more information so you can solve problems faster.
Is it turned on? This one seems the most obvious, but we've all fallen victim to it at one point or another. Computers and their peripherals must be turned on to function. Most have power switches with LEDs that glow when the power is turned on.
Is there physical damage? Sometimes physical damage is obvious, such as if someone hit a computer with a hammer. Other times it will be more subtle. For example, you might see a brown patch on a motherboard where it got burnt due to a power issue.
Is the system ready? Computers must be ready before they can be used. Ready means the system is ready to accept commands from the user. An indication that a computer is ready is when the operating system screens come up and the computer presents you with a menu or a command prompt. If that computer uses a graphical interface, the computer is ready when the mouse pointer appears. Printers are ready when the Online or Ready light on the front panel is lit.
Do the chips and cables need to be reseated? You can solve some of the strangest problems (random hang-ups or errors) by opening the case and pressing down on each socketed chip, memory module, and expansion card (known as reseating). This remedies the chip-creep problem, which happens when computers heat up and cool down repeatedly as a result of being turned on and off, causing some components to begin to move out of their sockets. In addition, you should reseat any cables to make sure they're making good contact.

Always be sure you're grounded before operating inside the case! If you're not, you could create a static charge (ESD) that could damage components. You will learn more about ESD in Chapter 12, “Environmental and Safety Concepts.”
Check to See If It's User Error
User error is common but preventable. If a user can't perform some very common computer task, such as printing or saving a file, the problem is likely due to user error. As soon as you hear of a problem like this, you should begin asking questions to determine if the solution is as simple as teaching the user the correct procedure. A good question to ask is, “Were you ever able to perform that task?” If the answer is no, it could mean they are doing the procedure wrong. If they answer yes, you must ask additional questions to get at the root of the problem.
If you suspect user error, tread carefully in regard to your line of questioning to avoid making the user feel defensive. User errors provide an opportunity to teach the users the right way to do things. Again, what you say matters. Offer a “different” or “another” way of doing things instead of the “right” way.
Problems Faxing
Several years ago when I was doing computer support over the phone, I had a user call with a problem with their fax modem. (I told you it was a long time ago!) He said he tried faxing several times, but nothing would ever go through.
I started with the basics, like determining if the computer was on (it was) and the phone line was connected (it was). We even checked the modem to be sure it picked up the line properly and dialed numbers. The hardware seemed fine. My thoughts turned to an issue in the fax software. I had him open the application, verify that he typed in the right phone number, and confirm several other options. Just like with the hardware, everything seemed fine. I was getting really confused as to why it wasn't working.
Finally I started asking the right questions. When I asked what he was trying to fax, he said it was a piece of paper he needed to send to his insurance company. Okay, that's a good start... a piece of paper? I followed up by asking him to walk me through the steps of how he was trying to fax it. He responded by telling me that he opened the fax program and typed in the number. He then held the piece of paper up to the monitor and clicked the Send button on the fax program. And—he thought it was difficult to click the Send button when he couldn't see it because the paper was in the way. But it didn't work.
Clearly, the process he was following wasn't going to work, so it was an opportunity for user education. And while it's always good to start with the basics, such as checking the connections, the moral of the story is to always understand what the user is actually doing when they try to accomplish a task.
Restart the Computer
It's amazing how often a simple computer restart can solve a problem. Restarting the computer clears the memory and starts the computer with a clean slate. If restarting doesn't work, try powering down the system completely and then powering it up again (rebooting). More often than not, that will solve the problem.
If you (or the user) experience a problem on a computer for the first time, reboot the computer and see if the problem goes away. If it does, then you've finished fixing it. If the problem is a persistent one, though, it indicates a larger issue that needs further investigation. There could be failing hardware or an application that needs to be reinstalled.
Establishing a Plan of Action
If your fix worked, then you're brilliant! If not, then you need to reevaluate and look for the next option. After testing possible solutions, your plan of action may take one of three paths:
- If the first fix didn't work, try something else.
- If needed, implement the fix on other computers.
- If everything is working, document the solution.
Try, Try Again
So you tried the hard drive with a new (verified) cable and it still doesn't work. Now what? Your sound card won't play and you've just deleted and reinstalled the driver. Next steps? Move on and try the next logical thing in line.
When trying solutions to fix a problem, make only one change to the computer at a time. If the change doesn't fix the problem, revert the system to the way it was and then make your next change. Making more than one change at a time is not recommended for two reasons: One, you are never sure which change actually worked. Two, by making multiple changes at once, you might actually cause additional problems.
When evaluating your results and looking for that golden “next step,” don't forget other resources you might have available. Use the Internet to look at the manufacturer's website. Read the manual. Talk to your friend who knows everything about obscure hardware (or arcane versions of Windows). When fixing problems, two heads can be better than one.
Spread the Solution
If the problem was isolated to one computer, this step doesn't apply. But some problems you deal with may affect an entire group of computers. For example, perhaps some configuration information was entered incorrectly into the router, giving everyone the wrong configuration. The router is now fixed, but all of the clients need to renew their IP configuration information.
Document the Solution
Once everything is working, you'll need to document what happened and how you fixed it. If the problem looks to be long and complex, I suggest taking notes as you're trying to fix it. It will help you remember what you've already tried and what didn't work. I'll discuss documenting in more depth in the section “Documenting the Work” later in this chapter.
Verifying Functionality
After fixing the system, or all of the systems, affected by the problem, go back and verify full functionality. For example, if the users couldn't get to any network resources, check to make sure they can get to the Internet as well as internal resources.
Some solutions may actually cause another problem on the system. For example, if you update software or drivers, you may inadvertently cause another application to have problems. There's obviously no way you can or should test all applications on a computer after applying a fix, but know that these types of problems can occur. Just make sure that what you've fixed works and that there aren't any obvious signs of something else not working all of a sudden.
Another important thing to do at this time is to implement preventive measures, if possible. If it was a user error, ensure that the user understands ways to accomplish the task that don't cause the error. If a cable melted because it was too close to someone's space heater under their desk, resolve the issue. If the computer overheated because there was an inch of dust clogging the fan...you get the idea.
Documenting the Work
Lots of people can fix problems. But can you remember what you did when you fixed a problem a month ago? Maybe. Can one of your co-workers remember something you did to fix the same problem on that machine a month ago? Unlikely. Always document your work so that you or someone else can learn from the experience. Good documentation of past troubleshooting can save hours of stress in the future.
Documentation can take a few different forms, but the two most common are personal and system based.
Probably the best thing you can do is to always carry a personal notebook and take notes. The type of notebook doesn't matter—use whatever works best for you. The notebook can be a lifesaver, especially when you're new to a job. Write down the problem, what you tried, and the solution. The next time you run across the same or a similar problem, you'll have a better idea of what to try. Eventually you'll find yourself less and less reliant on it, but it's incredibly handy to have!
System-based documentation is useful to both you and your co-workers. Many facilities have server logs of one type or another, conveniently located close to the machine. If someone makes a fix or a change, it gets noted in the log. If there's a problem, it's noted in the log. It's critical to have a log for a few reasons. One, if you weren't there the first time it was fixed, you might not have an idea of what to try and it could take you a long time using trial and error. Two, if you begin to see a repeated pattern of problems, you can make a permanent intervention before the system completely dies.
There are several different forms of system-based documentation. Again, the type of log doesn't matter as long as you use it! Often it's a notebook or a binder next to the system or on a nearby shelf. If you have a rack, you can mount something on the side to hold a binder or notebook. For client computers, one way is to tape an index card to the top or side of the power supply (don't cover any vents!) so if a tech has to go inside the case, they can see if anyone else has been in there to fix something too. In larger environments, there is often an electronic knowledge base or incident repository available for use; it is just as important to contribute to these systems as it is to use them to help diagnose problems.
Troubleshooting Examples
There isn't one single book you can read to learn everything you need to know to troubleshoot every situation. There are just too many pieces of hardware, software applications, operating systems, and security configurations in the market for there to be one comprehensive guide. A lot of what you will know comes from experience. Remember though, even if you're relatively inexperienced, you can still do a good job of troubleshooting by following a disciplined and methodological approach. It isn't always the fastest way but it's the best, and you will get faster as you gain experience.
Knowing that there isn't one book that can cover all troubleshooting scenarios, I am still going to provide some basic examples of issues you might run into and possible solutions. This will give you a good foundation for working on problems. Here, I've created four groups of common types of problems:
- Computer won't boot up
- Operating system errors
- Application failures
- Hardware failures
Computer Won't Boot
Telling someone that a computer won't boot is a pretty general statement. It can mean anything from a hardware failure to an operating system problem. In these scenarios, the key is that the OS won't load. And because the operating system provides the platform from which you launch all the activities you do with a computer, nothing productive can happen until you fix it. Depending on the OS and version, the steps involved for troubleshooting will vary. The following sections present some general guidance and introduce some troubleshooting tools that may be useful.
Nothing on the Monitor
If you turn on the computer and nothing happens—no fan spinning, no nothing—you probably have some type of power problem. Check that the computer is plugged in. A bad motherboard or CPU can also cause the computer to appear dead. Those failures, however, are less likely if the computer has been working in the past than if you're assembling a new one from scratch.
If you hear fans spinning but nothing shows up onscreen, there's probably an issue with the monitor, display adapter, memory, or motherboard. It can be difficult to figure out which of these may be faulty without an error message to guide you. If you have a spare display adapter or memory module, you can try swapping it out, but it may be easier to take the computer to a repair shop at this point.
If you're determined to troubleshoot on your own, a device called a POST card may be useful. POST stands for “power-on self-test.” Most desktop computers will beep once after a successful POST, where all critical components are checked. If you hear no beeps, or a series of beeps, you might have a hardware problem. A POST card is a circuit board you insert into an open slot in the motherboard, which can help you diagnose the issue. The card displays a two-digit numeric code on its LED to tell you where the system is in the booting process. A book that accompanies the POST card tells what each number represents. When the boot process stalls, read the code on the POST card and look it up to figure out where the boot process has broken down, and that may tell you which component has failed.
Black-Screen or Blue-Screen Error Message
A plain-text error message (gray text on a black screen) is usually a message from the BIOS prior to the OS load. A failed or soon-to-be-failed hard disk most often triggers such a message. The exact wording of the BIOS-thrown error messages varies depending on the BIOS company and version; you may see a message like “Disk Drive Failure” or “No Boot Disk Found.”
Although hard-disk errors are the most common errors that appear before the OS load, they aren't the only possible errors at this point. You may see a message that the keyboard has a key stuck, for example, or that there is an error involving RAM.
If the error message appears as gray or white text on a bright blue background, that's a STOP error. It's called a STOP because the first word on the screen is usually STOP, and the PC freezes up when it appears, requiring you to power the PC off and back on again to continue. Some techie types call this error a Blue Screen of Death (BSOD). This type of error often means that a piece of hardware (usually something like a network adapter, sound card, or modem) is defective or incompatible with your Windows version, but there are also other reasons for STOP errors, specific to the error code that displays.
To diagnose a STOP error, look up the error code on a website that provides a directory of such errors. Here are a few good sources to get you started:
http://www.aumha.org/a/stop.php
http://pcsupport.about.com/od/findbyerrormessage/tp/stop_error_list.htm
Based on what you discover, you may need to remove or replace a hardware component or reinstall or repair the OS.
Windows Won't Load
Windows requires certain files to be present, usable, and in the expected location in order to start up. These files are mostly stored in the C:WindowsSystem32 or C:WindowsSysWOW64 folder, and they include WinLoad.exe, Ntoskrnl.exe, Hal.dll, WinLogon.exe, and others. If any of these files are unavailable, Windows won't load, and an error message will tell you what's missing. You may need to reinstall or repair Windows in order to fix the problem. If you have the setup DVD available for your version of Windows, you may be able to boot into the Recovery Environment (Windows Vista or newer) or the Recovery Console (Windows XP) to repair Windows. (See the section “Using the Recovery Environment” later in this chapter for details.)
Assuming Windows has all the critical files it needs to load, it reads information from the Registry as it boots up. The Registry informs it of the settings to use, what device drivers to load, and what programs should start up automatically in the background. If any of the files called for during this process are unavailable, an error message appears or the boot process simply hangs, usually after the Windows logo has briefly appeared onscreen.
You may be able to boot the PC using Safe Mode, which bypasses all noncritical startup options; if the problem is with one of the noncritical files, that problem will be temporarily disabled enough to start the system. After starting up Windows (in Safe Mode if necessary), if the problem was caused by a recently installed item of hardware or software, you may be able to use System Restore to return the system configuration to its earlier state, undoing whatever action caused the problem to occur.
USING SAFE MODE
When Windows won't start normally, you can often boot into Safe Mode for access to your Windows Desktop. Safe Mode is a low-functionality mode that bypasses all optional components, both hardware and software, loading only the minimum required to display the Desktop. You shouldn't use the computer for normal tasks in Safe Mode because of its limited functionality; stay in Safe Mode only long enough to implement whatever fixes are needed to allow Windows to boot normally again.
To enter Safe Mode, restart the computer and, as soon as you see any text on the screen, begin pressing the F8 key. Doing so displays the Advanced Options menu, a text-based menu system. Using the arrow keys, select Safe Mode (or Safe Mode With Networking) from the menu, and press Enter to start the computer in Safe Mode. Or, you can use MSCONFIG (discussed later in this chapter) to boot into Safe Mode as well.
In Safe Mode, the display adapter uses a generic driver, so the screen resolution is very low and uses only a limited color set. Nonessential hardware doesn't work, such as sound cards and modems; and unless you chose Safe Mode With Networking at the Advanced Options menu, the network doesn't work either (and that includes the Internet).
If the computer starts fine in Safe Mode but doesn't start normally, you can assume that the startup problem lies in one of the nonessential hardware drivers or software applications that Safe Mode blocks from starting. From here it's just a matter of elimination.
Here are some things to try once you're in Safe Mode:
- Disconnect all nonessential external hardware devices, such as modems, external hard disks, webcams, and so on. Try to boot normally. If you can, then plug the devices back in one at a time, rebooting after each one, until you find the one with the problem.
- If you've recently installed new internal hardware, remove it and see if the problem goes away.
- If you've recently installed a new application, remove it using the Control Panel (see Chapter 4, “Software Applications”) and reboot to see if the problem goes away.
- Use System Restore, as described in the next section, to return your computer to an earlier configuration point before the problem started.
- Run the System Configuration utility (MSCONFIG), as described later in this chapter, to prevent all noncritical applications from loading at startup. Then re-enable them one by one, rebooting each time, until you find the problem.
Exercise 11.1 shows you how to boot into Safe Mode.
Booting into Safe Mode in Windows 7
- Restart your PC, and as soon as you hear the single beep and see text on the screen, start pressing the F8 key. The Advanced Options menu opens.
- Press the down-arrow key to highlight Safe Mode With Networking, and press Enter. The system starts up in Safe Mode.
- Explore Safe Mode, looking for differences from normal operation.
- Restart the computer normally.
USING SYSTEM RESTORE
The System Restore feature in Windows makes a backup copy of the important system configuration files once a day (by default), called a restore point. You can also make additional copies at any time, such as immediately before you install new and untried hardware or software. Then, if the system doesn't work anymore after you install the new item, you can revert the system files to the earlier versions, removing all traces of anything the new item may have brought with it.
System Restore backs up Windows configuration files only, not personal data files!
If Windows won't start normally, or if it runs poorly all of a sudden after previously running fairly well, it's often easier to revert to a System Restore point than to spend a lot of time trying to pinpoint what happened. Start System Restore from the Start menu (Start ![]() All Programs
All Programs ![]() Accessories
Accessories ![]() System Tools
System Tools ![]() System Restore). Then follow the prompts to select a previously saved restore point and restore that copy. Exercise 11.2 provides an opportunity to try this.
System Restore). Then follow the prompts to select a previously saved restore point and restore that copy. Exercise 11.2 provides an opportunity to try this.
Using System Restore in Windows 7
- Open the System app in Control Panel (it may be in System And Security
 System).
 - In the navigation pane at the left, click System Protection. The System Properties dialog box opens with the System Protection tab displayed, as shown in Figure 11.1.

- Click the Create button. A System Protection dialog box opens.
- Type Test 1 in the text box.
- Click Create to create the restore point, and wait for the restore point to be created. It should take a minute or two.
- Click Close to close the message box that tells you the restore point was created.
- Close all open windows and dialog boxes.
- Right-click the Desktop, and click Personalize.
- Choose a different Desktop background, and then close Control Panel.
- Choose Start All Programs Accessories System Tools System Restore. The System Restore application opens.
- Click Next to continue.
- In the list of restore points, click Test 1, as shown in Figure 11.2.
FIGURE 11.2 Choosing a restore point

- Click Next, and then click Finish. A warning appears that once started, System Restore can't be interrupted. Click Yes.
- Wait for your system to restart. After it restarts, click Close to dismiss the dialog box that tells you the System Restore operation completed successfully.
- Choose Start All Programs Accessories System Tools System Restore. The System Restore application opens.
- Click Next to continue.
- In the list of restore points, click Restore Operation. Notice that its type is Manual; you're going to undo the System Restore you just did.
- Click Next, and then click Finish. A warning appears that, once started, System Restore can't be interrupted. Click Yes.
- Wait for your system to restart. After it restarts, click Close to dismiss the confirmation dialog box.
USING THE SYSTEM CONFIGURATION UTILITY
The System Configuration utility, also known by its executable filename of MSCONFIG, allows Windows users to selectively disable certain applications and services that automatically load at startup. This can be a great benefit when you're trying to troubleshoot a startup problem that you're fairly sure involves one of your startup applications, but you have no idea which one.
This utility isn't found in the Windows menu system, so you have to run it using its name. Click the Start button, type MSCONFIG, and press Enter to open the System Configuration window shown in Figure 11.3. It's available in Safe Mode too.
FIGURE 11.3 System Configuration utility

Notice that by default, Normal Startup is selected. That means everything that the Registry specifies should be loaded is loaded. The alternatives are Diagnostic Startup (which turns off everything nonessential and is useful in determining, in general, whether something loading at startup is causing the problem) and Selective Startup (which starts up using only the specific items you haven't excluded).
The Startup tab is the main feature of this utility. Click Startup to see a list of all the programs that load at startup. The length of the list may surprise you. You can drag the column widths to widen them so that you can see the text in them more clearly. The names, manufacturers, and commands can give you clues as to each program's origin and purpose. You can also use an online resource, such as the Task List reference found at www.answersthatwork.com. Exercise 11.3 walks you through how to use System Configuration.
Using the System Configuration Utility in Windows 7
- In Windows 7, click Start, type MSCONFIG, and press Enter. The System Configuration window opens.
- Click the Startup tab.
- Widen the Startup Item column by dragging the divider between the column headings until you can see all the names in that column, as shown in Figure 11.4.
FIGURE 11.4 MSCONFIG Startup tab

- Clear the check mark next to one of the items. Pick any one you like, because you aren't actually going to apply your changes.
- Click the General tab. Notice that Selective Startup has been marked. It became marked when you cleared the check box in step 4. Notice that Load System Services is still checked, and the Load Startup Items check box is solid blue, indicating that some but not all startup items are marked.
- Click the Services tab, and clear one of the check boxes there.
- Click back to the General tab. Notice that now the Load System Services check box is solid blue too, indicating that some but not all services are marked.
- Click the Normal Startup option button to clear the changes you made.
- Click the Tools tab, as shown in Figure 11.5. Notice that many of the troubleshooting tools available in Windows 7 are also available here from the central point, including Action Center, Windows Troubleshooting, and Event Viewer.
FIGURE 11.5 MSCONFIG Tools tab

- Click Cancel to close the System Configuration utility without making any changes.
You might want to go through the list of items on your Startup tab to see what's loading when you boot. There might be applications starting that you are unaware of and might not want on your computer. In addition, the more items you load on startup, the slower your operating system will boot. Some items are critical, but if they're not, you can speed up the boot process by disabling them from starting up automatically.
This utility not only provides easy access to your startup options but also offers links to many of the most commonly used troubleshooting utilities in Windows. Therefore you may want to create a shortcut for it on your Desktop. Exercise 11.4 shows you how.
Creating a Desktop Shortcut for MSCONFIG
- Right-click the Desktop, and choose New Shortcut. The Create Shortcut dialog box opens.
- In the Type The Location Of The Item text box, type MSCONFIG. Click Next.
- In the Type A Name For This Shortcut text box, type System Configuration Utility, replacing the default name that's there.
- Click Finish. A shortcut appears on the Desktop.
- Double-click the shortcut to confirm that it opens the System Configuration utility. Then close the utility window.
USING THE RECOVERY ENVIRONMENT
Windows XP came with a rather difficult-to-use command-line interface called the Recovery Console, which you could use to access the hard disk and run a limited set of troubleshooting and recovery commands when Windows wouldn't start. The Recovery Console has been replaced in Windows Vista and newer Windows versions with the Windows Recovery Environment (Windows RE).
To access Windows RE, boot from the Windows setup DVD. (You may need to change the boot sequence in BIOS Setup so that it boots from the DVD drive rather than the hard disk.) The Windows Setup utility runs as if you were installing a new copy of Windows. When prompted, click the Repair Your Computer option. Follow the prompts until you get to System Recovery Options, and then click Startup Repair. Follow the advice that Startup Repair gives to repair your Windows installation.
Mac OS X Won't Load
Macs go through the same basic process for startup as PCs. If there's a disk error, such as the ones on the black screen that a PC's BIOS may display, you'll see a flashing question-mark icon.
The flashing question-mark icon means the startup process can't find a hard disk or can't find a system folder on the hard disk. The hard disk may be disconnected, its driver may be bad, or its cable may be loose; or if it's an old enough system to still have a floppy disk drive, there may be a disk in that drive that the OS is trying to boot from instead of the hard disk.
On a Mac, the hard drive must have a System folder that contains such items as accessories, fonts, and system utilities, plus the System file and Finder. Without these, the computer won't boot. The question-mark icon appears if this folder is missing or corrupted or doesn't contain the needed files.
Any other OS problem on a Mac results in a red circle with a diagonal line through it, called a prohibition icon. (Earlier versions of the Mac OS used a “sad Mac” icon in these cases.) Along with this icon, you'll see an error code that you can look up online. Try a Google search or the Apple support website.
Operating System Error Messages
Each OS has its own error messages that it displays in various circumstances. In most cases, you can look up these error messages online at the OS maker's website or third-party sites to determine what they mean.
For example, to troubleshoot issues with Mac OS X, see the article “Isolating Issues in Mac OS X” on Apple's support knowledge base: https://support.apple.com/en-us/HT203161.
Other OS manufacturers will have their own support sites as well, listing common error messages and fixes. Here are a few Windows error messages you may encounter and what they mean:
Windows Has Recovered From A Serious Error This message means something major has crashed, and Windows has restarted itself as a result. If you see this error once, it's probably a fluke; but if you see it frequently, you may need to repair Windows or take a critical look at what programs are loading at startup that may be causing the error.
The System Is Low On Virtual Memory. Windows Is Increasing The Size Of Your Virtual Memory Paging File. This message describes what is happening when your system has run out of memory. Do you have too many applications running for the amount of memory installed? As a result, Windows increases the paging file size so that it won't happen again (presumably). If the PC is running slowly, try rebooting.
Data Error Reading/Writing Drive This message means Windows is having trouble reading from or writing to whatever drive letter it lists in the error message. Run CHKDSK (it's called Error Checking on the drive's Properties dialog box on the Tools tab), and select the Scan For And Attempt Recovery Of Bad Sectors check box to assess the drive.
A Runtime Error Has Occurred. Do You Wish To Debug? This is an Internet Explorer error message, normally caused by badly written code being delivered from the website. It isn't your PC's fault. If you find this message annoying, you can change a setting in Internet Explorer to prevent it from appearing. From Control Panel, choose Network And Internet, and then Internet Options. On the Advanced tab, in the Browsing section, select the Disable Script Debugging (Internet Explorer) check box.
The Event Viewer utility in Windows can sometimes provide information about an error event that has occurred, helping you to narrow down what may have caused it. You can access the Event Viewer from the Control Panel in the Administrative Tools section.
OS Slowdown or Lockup
Sometimes you may be working along in your OS when, all of a sudden, everything slows to a crawl. Simple things like opening an application and closing a window take much longer than usual. There are two basic reasons why slowdowns happen. One is that the physical memory is mostly used up, so the system is relying more on its paging file than usual. Because the paging file is on the hard disk, and the hard disk is slower than real RAM, operations involving heavy use of the paging file take longer. The other reason is that the CPU is being heavily used, so each operation that needs the CPU's attention has to wait its turn.
That begs the question: what causes the RAM and/or the CPU to be used heavily? They can be legitimately used by applications if you run a lot of applications at once, especially those that require a lot of processing power. Big graphics-editing programs like Photoshop qualify, for example. The RAM and CPU can also be improperly hijacked by a malfunctioning program or by a virus or other malware application.
When you first start up the OS, it's normal for application-related activities to take longer than normal, because the OS continues to finish loading behind the scenes for up to several minutes after the OS interface becomes usable. If you try to start up several applications immediately after starting the PC, and they don't start up quickly enough to suit you, be patient. Within a few minutes, your computer should be running normally.
To check the memory and CPU usage in Windows, use the Task Manager. Right-click the taskbar, and choose Start Task Manager. Then, on the Processes tab, sort by the Memory column and look for a process that is using an inordinate amount of memory. Terminate it if necessary to get back normal control of your computer. You can also look on the Performance tab to see the RAM and CPU usage statistics.
If the OS locks up completely, usually including the mouse pointer, the most common cause is overheating. If the CPU or another chip on the motherboard overheats, the system locks up. The OS can lock up like that for other reasons than overheating, such as a corrupted system file (repair the OS to fix that), but that's less likely. By halting rather than continuing to operate in an overheated state, the motherboard preserves the valuable CPU chip, which may be damaged if it continued to run. The monitor may go blank, or it may keep displaying the last information it was sent, so the image on the screen appears frozen in time.
If your OS has locked up, shut off the PC if it didn't shut itself down. Open the case, and let the PC sit for 10 to 15 minutes so everything cools off. Then, with the case open, turn on the computer again and see whether any fans aren't spinning. The problem may be as simple as a faulty fan. There should be a fan inside the power supply, a fan on (or very near) the CPU, and possibly other fans that circulate air through the case. No faulty fans? Let the PC boot up the OS again, and let it sit. Don't run any applications. If it boots up just fine but then locks up after a few minutes without you doing anything to it, something is definitely overheating.
Application Failures
Applications are more likely to cause problems than OSs, because there are so many different applications, all made by different manufacturers, and all expected to play nicely with each other, with your hardware, and with different versions of the OS.
Application Fails to Install or Fails to Run
Usually, when an application fails to install or fails to run, it's because it's somehow incompatible with your system. It could be that your OS version isn't supported or the application doesn't like a piece of hardware you've installed (most likely the sound or display adapter). The hardware may be inadequate (check the minimum requirements for the application) or simply incompatible.
Check the application's specs to make sure your system meets the minimum requirements in every way. If your system meets the requirements but the application still won't install, check out the Support section of the application manufacturer's website. There may be a patch you can download that will fix the problem, or there may be suggestions regarding workarounds. For example, in some cases, installing an updated driver for your display adapter or sound card can make an application work that previously didn't.
If the program meets all the hardware requirements but not the OS requirements, you can try running the Setup program in compatibility mode (in Windows). Compatibility mode tricks the application into thinking you have a different version of the OS than you actually have, bypassing any version requirements that may be built into the software. It doesn't always work, because different applications implement version requirements in various ways, and some of those ways have nothing to do with the version-specific bits and pieces that compatibility mode offers the application.
Another possible source of trouble when installing applications is overzealous security. The OS itself may prevent you from installing an application, for example. If you're logged in as a standard user, you may need to log out and then log in again as an administrator. If the application being installed requires Internet access to complete the installation, you may need to tell your firewall that it's OK to let that application through. And finally, the application may make a system change that your antivirus program or security suite detects as a threat (falsely), causing the security program to prevent the change from being made. Exercise 11.5 shows you how to run an application in compatibility mode in Windows 7.
Running an Application in Compatibility Mode
- In Windows, choose Start All Programs, and then right-click an application and choose Properties. The Properties dialog box opens for that shortcut. You should not choose an application that is preinstalled with the OS (such as Paint or Calculator) because for these you may not be able to set Compatibility.
- Click the Compatibility tab.
- Select the Run This Program In Compatibility Mode For check box.
- Open the drop-down list below the check box, and examine the available OSs. Click Windows 98 / Windows Me.
- In the Settings area, select the Run In 256 Colors check box, as shown in Figure 11.6.
FIGURE 11.6 Configuring an application for compatibility mode

- Click OK.
- Select Start All Programs again, and click the program to run it. It may run, or it may not. It doesn't matter; you're just testing.
- Close the application (if it ran).
- Choose Start All Programs, and then right-click the same application and choose Properties again.
- Click the Compatibility tab, and clear the Run This Program In Compatibility Mode For check box.
- Clear the Run In 256 Colors check box.
- Click OK to close the Properties box.
A Previously Working Application Won't Work Anymore
If an application stops working that previously worked, something has changed on your system—obviously. But what was it? If any of the files belonging to the application have been deleted, you may need to reinstall the application. To save yourself some time, though, look in the Recycle Bin first and see if you may be able to restore the deleted files from there. If you put all the files back where they belong, the application may start working again.
A virus infection can cause programs to run slowly, poorly, or not at all. Many viruses affect the entire system, though, not just one program. Thus, if you're having troubles with only one application, a virus isn't likely to be the cause. There's one exception to that: viruses sometimes target antivirus software specifically, so if everything's working other than your antivirus software, you're probably infected.
Some programs have limited-time licenses, so it's possible that an application that previously worked may stop working due to a license expiration. In such cases, though, a helpful dialog box will usually appear to let you know how to pay the software maker, so there's not much doubt what's happening.
If you've recently installed an OS or application update, and then suddenly an old familiar application won't work anymore, it's probably the update's fault. You can try removing the update (if possible), or contact the application manufacturer's support department for help.
Application Crashes
Crash is the term used to describe a situation when an application stops working. It may stop working due to a programming error in its own code or due to a conflict or compatibility issue with a device driver, with the OS, or with another application.
When an application stops working, it may terminate all by itself, or you may have to terminate it manually. To do so in Windows, right-click the taskbar and choose Start Task Manager. Then, in the Task Manager window, on the Applications tab, click the application. The task may have Not Responding in the Status column. Click End Task.
On a Mac, to force-quit an application, choose Force Quit from the Apple menu (or press Command+Option+Esc) and then select the unresponsive application in the Force Quit window and click Force Quit.
If an application crashes only once, it may be a fluke. However, if the same application keeps crashing repeatedly, it's time to do a little detective work to try to figure out what may be the problem. If an error message appears, make a note of it. Try closing all other applications, including any background applications you don't need, and running the application again to see if that helps. If it does, the problem stems from a conflict with some other program. You may need to uninstall and reinstall the crashing application or check the manufacturer's website for troubleshooting tips.
Device Failures
Any hardware component can fail, and the longer you keep your computer, the more likely it is that you'll experience at least one hardware failure. Usually you'll know a device has failed simply because functionality you were expecting to work doesn't work.
Hardware/Driver Compatibility
A driver is a file (or set of files) that contains information needed for the OS to communicate with a hardware device. One way to think of a driver is as a language translator between the OS, which speaks one language, and the hardware, which speaks an entirely different one.
The skill of the interpreter makes all the difference in any communication, and a driver that can accurately translate between the OS and the hardware is essential for satisfactory hardware functionality. Therefore, it's important to pick the best driver available. If an unsatisfactory driver is installed (perhaps one that's not designed specifically for the OS or device being used or one that has been corrupted), the device may behave strangely or not work at all.
The best driver is one that is (1) specifically for that device (most important), (2) specifically for that OS (moderately important), and (3) the most recent version available (least important).
When you install a hardware device, you have a choice of drivers, and your challenge is to figure out which of them fits the criteria the best. Your choices may include the following:
- The OS may supply a driver for the device and install it automatically.
- The device may come with a setup CD or DVD that contains an appropriate driver.
- A driver may be available on the device manufacturer's website that is even more current than the one that came with the device.
If the device has never worked, the driver is a good place to start. If it was working but just stopped, it's more than likely not a driver issue, unless the driver was somehow uninstalled.
Malfunctioning Input Devices
An input device, such as a keyboard or mouse, may malfunction for a variety of reasons. For example, the wrong driver may be installed for it (see the previous section), or it may be incompatible with your OS. For example, some mice and trackballs are specifically designed for Macintosh computers, and they won't work if you plug them into a Windows-based PC.
After you've eliminated incompatibility and bad drivers as the cause of an input device malfunction, next look at the device itself. Is there anything physically wrong with it? If it's an optical mouse, does the light turn on? (It could be a dead battery.) If it's a keyboard, will all the keys press? Is the cord or connector damaged? Has something spilled on the device? Has it been dropped or hit?
If there's nothing physically wrong with the device, try plugging it into a different computer if possible. If it works there, then the problem is the relationship between the device and the original computer and not the device itself. Investigate things like driver issues, incompatibility, and the connector on the PC into which the device connects. If it doesn't work on the other computer, the device is probably defective.
An input device that gradually stops working well over time or that malfunctions only in a specific way (such as a certain key not working on a keyboard or a mouse that moves in only one direction) may be dirty. Try cleaning the device.
Troubleshooting Network Connectivity
Hardware is often, but not always, to blame when a user can't log onto the local network or can't connect to the Internet. Here are some general troubleshooting tips:
- If you can't browse network resources:
- Confirm that the computer's network adapter is installed and working. In Windows, look in Device Manager to make sure it's there and doesn't report any errors.
- Confirm that a cable or wireless connection is established between the network adapter and the router, switch, or wireless access point. If it's a wired connection, trace the cable from the PC to the router or switch. If wireless, check to make sure the OS recognizes the wireless connection.
- Make sure the right networking protocols are in place (TCP/IP being the most common). Exercise 11.6 shows you how to do this in Windows and how to use TCP/IP to troubleshoot an Internet connection problem.
- If your network login keeps getting rejected on a corporate network:
- Check that Caps Lock isn't on and that you're typing your username and password accurately.
- Check with your network administrator to make sure there are no known problems with the network that may be preventing everyone from logging on (not just you).
- Check with the network administrator to ensure that the account has not been locked out, for example, due to a number of incorrect login attempts.
- If the problem is lack of Internet connectivity:
- You may need to reset or power-cycle your cable or DSL modem.
- Your Internet service provider (ISP) may be temporarily unavailable. Sometimes there are brief outages with even the most reliable services. Wait it out for a few hours before contacting your ISP.
- The Internet itself may be experiencing temporary delays or outages. This is likely the case if you can get to some but not all websites, or you can get email but not web access, or vice versa.
Checking TCP/IP Connectivity
- In Windows, open a command prompt window. To do so, click Start, type cmd, and press Enter. You can also do this exercise on Linux or Mac systems by opening a command prompt.
- At the command prompt, type ping 127.0.0.1 and press Enter, as shown in Figure 11.7. 127.0.0.1 is the loopback address, that is, the IP address that refers to the machine that is issuing the command. If you get a reply from this command, you know your network adapter is working. This eliminates all problems within the PC from the troubleshooting process. You can also type ping localhost to get the same results.
FIGURE 11.7 Pinging the loopback address

- At the command prompt, type ipconfig and press Enter. The IP addresses for all the network adapters in your system appear. Some of them may show Media Disconnected, meaning that adapter isn't in use. (Mac and Linux computers will use ifconfig instead.)
- Find the network adapter you use to connect to the network, and look at the IPv4 address for it. For example, in Figure 11.8, it's 192.168.1.144. IP addresses that begin with 192.168 are common on small home networks.

- For that same network adapter, make a note of the default gateway. That's the address of the router that provides the exit point from the local network and connects you to the larger network (for example, the Internet). In the previous figure, it's 192.168.1.1.
- Ping the default gateway to make sure it's reachable. To do this, type ping, a space, and then the address of the default gateway that you noted in step 5—for example, ping 192.168.1.1. If the default gateway is reachable, you should get back multiple Reply lines. If not, you'll get back multiple Timed Out lines.
- Ping a website to see if you have web connectivity. To do so, type ping, a space, and then either an IP address or a URL of a website. For example, type ping www.google.com and press Enter, as shown in Figure 11.9.
FIGURE 11.9 Successful ping results

If you don't get a reply from the first site you try, try some other addresses. Some websites block ping inquiries as a matter of company policy.
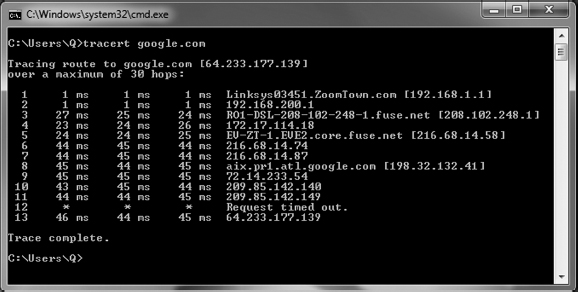
- If you can't get through to a particular website, you can use another command, tracert (short for “trace route”), to see the hops the message takes from router to router across the Internet. This can help you see where the transmission is breaking down. Type tracert google.com, and press Enter. Information comes back about each of the routers the message passes through on the way, up to a maximum of 30 hops. Your results will look different than the one shown in Figure 11.10, because your computer will take a different path to Google's servers than mine did.
FIGURE 11.10 Successful tracert results
- Close the command prompt window.
Computer Backups
Simply put, your data is probably the most important thing you have. Hardware can be replaced, but if you lose your data, you could be in serious trouble. From a personal standpoint, you could lose important pictures or other information you can never replace. For businesses, large-scale data losses often lead to catastrophic results.
The way to prevent total data loss is to ensure that you are backing up your data. A backup is a restorable copy of any set of data that is needed on the system. Sometimes you will hear people call it an archive, but technically an archive is any collection of data that is removed from the system because it's no longer needed on a regular basis.
If you work for a company, that organization's backup policy dictates what information should be backed up and how it should be backed up. If you are only concerned with your own system, you should still create a plan for backups, including what type you will make and how often you'll make them. Along with making the backup, you also need to consider who can get to the backup. If data is valuable enough to spend the resources required to back it up, it is clearly important enough to protect carefully.
When considering a backup solution, the following questions are pertinent:
- How often do you plan to back up? For business-critical data, every day is appropriate. For casual home users and their personal files, once a week or even once a month may be enough.
- How large are the files? Backing up a large amount of data takes more time and takes up more disk space. You may choose to back up large files like videos and music less often than other files for this reason.
- What backup software is available? Many different applications will do local and online backups and system images. Some have more features and higher price tags than others.
- Should each backup recopy all files, or should there be smaller backups done that copy only files that have changed?
Understanding the Importance of Backups
Computer users often take their data for granted, forgetting the large quantity of important and irreplaceable documents, images, and music files they collect over the years. A hard disk failure or virus can wipe out years of stored memories, not to mention files of significant value to a business.
There are many ways to ensure that a system failure doesn't result in data loss. For example, you can use a multi-disk RAID system to protect against data loss caused by a physical hard disk failure by mirroring a drive (RAID 1) or striping data across multiple drives (RAID 5). RAID isn't enough, though, because multiple hard disk failures will still doom you. Even if you use RAID, you should perform backups of your data.
The Importance of Data
Several years ago when I did technical support, I received a call from a user with hard drive problems. After some quick troubleshooting, I determined that his hard drive had failed and would need to be replaced. After telling him the news, he asked, “So how do I get my data back?” I asked if he had backed up his data, and he had not.
He was a doctoral student in his final year, and his dissertation was stored on that hard drive. (Key word: was.) He had no backups. I could hear the desperation and agony in his voice as he frantically sought options to get his data back. He had spent years of his life hard at work on something that was now gone—simply gone. Had he taken a few moments to back up the data, there would have been no problems. At the time, data recovery cost several hundred dollars per megabyte.
Now, data recovery companies that will take damaged hard drives and attempt to recover data from them are not as expensive as they used to be, but their services are not cheap. Some of the least expensive online services cost $200–300, and others can cost several thousand dollars. Back up your data, and you won't have to feel the sting of paying that cost.
While the general theme of this section is “Back up your data,” it might not be necessary based on the situation. If what's on the hard drive is unimportant and it's not a big deal to lose it, then don't bother backing up. This could be the case for a public workstation. Otherwise, it's a critical step that most people forget to do.
Understanding How Backups Work
Backup programs generally work by looking at an attribute of the file known as an archive bit. When a file is created or modified, the archive bit is set to 1, indicating that the file has not been backed up in its current state. When a backup is made, that archive bit may be cleared—that is, set back to 0—to indicate that the file has been backed up. Some backup types do not clear the archive bit.
There are a couple of quick and easy ways you can see if the archive bit for a file is or is not set. The first is in Windows Explorer. Navigate to a file, such as a Word document, right-click it, and choose Properties. At the bottom of the General tab, you will see an Advanced button. Click the Advanced button to display a window like the one in Figure 11.11.
FIGURE 11.11 Advanced file attributes

If the File Is Ready For Archiving box is checked, that means that the archive bit is set. If you uncheck the box, then the archive bit is set back to 0.
The second way is from a command prompt. In a directory, type attrib and press Enter. You will see a directory listing. If off to the left of the filename you see the letter A, that means that the archive bit is set. The attrib command can be used to clear and set this bit. For help with this, type attrib /? at the command prompt.
Understanding Backup Options
When performing a data backup, you will have several decisions to make on various options. The first is which backup program you want to use. Windows comes with a backup utility, named Windows Backup, which will meet the needs of most users. There are also network-based backup programs that can back up multiple systems across a network. Finally, online and cloud-based backup utilities have gained significant popularity over the last few years.
Other options you will need to think about are the type of backup you want to perform, the location in which you will store the backup files, and frequency and scheduling of backups.
Backup Types
Some backup programs are rather simplistic in the types of backups they offer—you choose the files to back up, and they get backed up. Others give you far more options as to how you want to back things up. Windows Backup, for example, gives you two options (Figure 11.12): Let Windows Choose or Let Me Choose. The intent for most backup programs is to back up user files and not standard files that the operating system requires to run.
FIGURE 11.12 Windows Backup options

Other programs give you far greater options on the type of backup you want to do. In general, there are five different types of backups you can perform:
Normal Backs up selected files and clears the archive bit. Takes the longest to back up but is the fastest to restore.
Copy Backs up selected files but does not clear the archive bit.
Incremental Backs up selected files only if they were created or modified since the previous backup, and clears the archive bit. Tends to be the fastest in terms of backup speed but slower to restore.
Differential Backs up selected files only if they were created or modified since the previous backup, but does not clear the archive bit. In between Normal and Incremental on backup and restore speeds.
Daily Backs up files that were created or modified today. It doesn't look at the archive bit but only the date when the file was modified.
The most thorough backup is Normal, because it will back up everything you've selected. When you choose to back up files using Windows Backup, this is the type of backup performed. But since this backs up everything, it can take the longest amount of time. At one company where I used to consult, it took over 16 hours to make a full backup of one of their file servers! This is obviously something they couldn't do every night, nor did they need to since not all files changed every day. Their solution was to start a full (Normal) backup on Saturday evening and to make incremental backups every night during the week.
For security purposes, you must have administrative rights to be able to back up files belonging to people other than yourself.
There's one additional type of backup to discuss, and that's called a system image. Some backup utilities, including the one that comes with Windows 7, can make a system image, which is an exact copy of an entire hard disk. This includes user files as well as operating system files. You use a system image to create a snapshot in time of your system, and then you restore that copy if something ever happens to the original. There are two drawbacks. First, it's a whole-drive image, so it takes a long time to make. Second, when you restore, it doesn't let you choose what to restore—it restores everything. For these two reasons, it's not commonly used as a backup type.
Backup Locations
When you back up files, you need to choose where to back them up to. The one option you will not have is to back up files to the same hard drive that they are located on. Doing so wouldn't make a lot of sense, considering you would still be at a loss if the hard drive failed. Your choices boil down to the following:
- Locally attached storage, such as a hard drive or an optical drive
- Network attached storage, such as a hard drive on a server or an actual NAS device
- Internet or cloud-based
Local backups will always be the fastest. To back up your computer locally, you can use a second internal hard drive, an external hard drive, or an optical drive. Tape backup drives used to be fairly common but are rarely used anymore. If you are using an external hard drive or an optical drive, be sure to secure the drive or disc after the backup has been made. It could be very easy for someone to casually walk away with a DVD that contains all of your personal data.
Network backup solutions can be handy for corporate networks. These types of backups are generally configured by an administrator, and the user doesn't need to do anything. Security is also controlled centrally. As the end user, you probably don't know if it's being backed up on a server or a NAS device or somewhere else, but it really doesn't matter as long as you can get your files back when you need them. For a lot of companies, backing up everyone's local workstation is far too cumbersome, and they rely on the individual users to make backups of their own systems.
Internet and cloud-based backups have gained a lot of popularity over the last few years. You pay for a certain amount of storage space, and your cloud provider takes care of the backups and security. Before using one of these services, be sure you understand how often they perform backups and what security measures they have in place.
Frequency and Scheduling
This is one of the areas where most users, and even most companies, fail to manage properly. At the same time, it's one of the most important. Backups serve several key purposes, such as protecting against hard drive failure, protecting against accidental deletion, protecting against malicious deletion or attacks, and making an archive of important files for later use. Any time you make major changes to your system, including installing new software, you should perform a backup of important files before making those changes.
All Windows versions since Windows 2000 allow you to schedule backups, which is a great feature that not all versions of Windows have had.
Now that you know you can schedule backups to make your life easier, and of course you want to make backups because it's the right thing to do, the question becomes: How often do you need to back up your files?
The answer depends on what the computer does and what you do on the computer. How often does your data change? Every day? Every week or every month? How important are your files? Can you afford to lose them? How much time or money will it cost to replace lost files? Can they be replaced? By answering these questions, you can get an idea of how often you want to run scheduled backups. As a rule of thumb, the more important the data is and the more often it changes, the more often you want to back up. If you don't care about losing the data, then there's no need for backups—but most of us do care about losing our stuff. Exercise 11.7 walks you through setting up a backup in Windows 7, including scheduling.
Setting Up a Backup in Windows 7
- Open Windows Backup. In Control Panel, it's called Backup and Restore and is located in the System and Security section. Figure 11.13 shows what Backup and Restore looks like.

Notice in Figure 11.13 that the option to create a system image is on the left side.
- Click Set Up Backup. Windows will ask you to choose the location to save your backup, as shown in Figure 11.14.
FIGURE 11.14 Choosing a backup location

- Choose the destination and click Next.
- Select Let Me Choose (the screen was shown in Figure 11.12) and click Next.
- Check the boxes for types of files you want to back up, as shown in Figure 11.15. The Data Files section lets you select fairly broad areas to back up, such as your documents, music, pictures, and videos libraries. Additional locations contains items such as your contacts, Desktop, and favorites. If you want to get more granular on folders to back up, you can do so in the Computer section. Click Next.
FIGURE 11.15 Reviewing backup settings

- Review your backup settings and make sure they are correct. This screen also shows you the backup schedule. Click Change Schedule.
- Figure 11.16 shows the options for scheduling backups. Configure them as appropriate and click OK.
FIGURE 11.16 Backup scheduling options

One key thing to remember is that for the backups to run properly as scheduled, the computer needs to be on when the scheduled backup is supposed to take place.
- Click Save Settings and Run Backup to create the backup.
Different backup programs will have slightly different steps, but overall the process is the same: choose what you want to back up, decide where to back it up to, and set up a schedule. Backup programs will include options to restore folders and files from a backup as well.
Verifying and Testing Backups
Creating a backup should give you a feeling of security. Now if something happens to your system, at least your data is protected. Before feeling too comfortable, though, you need to complete one more step—verifying your backups. This is a step that many people completely forget, but it's critical. To understand why, it's probably best to share a real-world scenario.
Learning Lessons about Backups
People don't back up data enough, plain and simple. Scheduling regular backups is a good protective measure, but just because you are backing up your data doesn't mean you're completely saved if something goes wrong.
Several years ago, one of my former students related a story to me about a server crash at his company. A server had mysteriously died over the weekend, and the technicians were greeted with the problem first thing Monday morning. Not to worry, they thought, because they made regular backups.
After several attempts to restore the backup tape, a second, more serious problem was readily apparent. The backup didn't work. They couldn't read the data from the tape, and it was the only backup tape they had. It wasn't going to be a very good Monday. Ultimately, they ended up losing extensive data from the server because their backup didn't work.
How do you prevent tragedies like this from happening? Test your backups. After you make a backup, ensure that you can read from it. If you've just backed up a small amount of data, restore it to an alternate location and make sure you can read it. If you are backing up entire computers, a good idea is to run a test restore on a separate computer. No matter what your method, test your backup, especially when it's the first one you've made after setting up backups or you have made backup configuration changes. It isn't necessary to fully test each single backup after that, but it is a good idea to spot-check backups on occasion.
Here are two more ideas that will help if you back up locally. One, rotate backup discs. Alternate discs every other backup period, or use a separate disc for each day of the week. This lessens the risk of having a bad disc bring you down. Two, store your backups offsite. If your backup is sitting on top of the server, and you have a fire that destroys the building, then your backup won't do you any good. There are data archiving firms that will, for a small fee, come and pick up your backup tapes and store them in their secure location.
Be vigilant about backing up your data, and in the event of a failure, you'll be back up and running in short order.
Summary
In this chapter, you learned about computer support and backup concepts. First, you learned about troubleshooting theory. Troubleshooting can be a combination of art and science, but if you follow some basic concepts, you can be a very effective troubleshooter even without much experience.
In troubleshooting theory, the first step is to identify the problem. This includes talking to the customer, gathering information, and isolating the issue. After that, establish a theory as to what is causing the problem. Sometimes the theory is very easy to identify. Other times, you need to eliminate possibilities to narrow down the problem or use external resources such as the manufacturer's website, technical community groups, or the Internet to help. Once you have established a theory about what caused the problem, test possible solutions. Start with the simple stuff first, such as loose cables or connections, loss of power, or physical damage. It could also be user error or simply require a reboot.
Establish a plan of action to solve the problem—you might need to fix one computer or one hundred computers with this issue. Then verify functionality, and finally document your work.
Next, you reviewed some common troubleshooting examples. Groupings of problems you read about included the computer not starting, operating system errors and slowdowns, application failures, and device failures.
The final section of the chapter covered backing up computers. Backups are critically important yet often overlooked. Of course, the problem is that users don't always realize how important backups are until it's too late and they have lost data. Backups often work by utilizing the archive bit on a file. When you set up a backup, you need to choose the type of backup, the location (such as local storage, a network server, or the Internet/cloud), and the frequency and schedule. Finally, always verify your backups by testing them, so you don't get a very bad surprise when trying to restore them.
Exam Essentials
When given a scenario, know the right steps to take to identify and solve a problem. The steps include identifying the problem, establishing a theory of probable cause, testing solutions, establishing a plan of action, verifying functionality, and documenting the work.
When given a scenario, know some of the basic external issues to check. Always check the easy stuff first, such as loose cables or connections, if the system has power, and if there is physical damage.
Know the external resources you can use to help troubleshoot a problem. The manufacturer's documentation and website should always be at the top of your list. In addition, you might find help from online technical community groups, Internet searches (Ask Google!), or technical support.
Know the common locations to store backup files. Common locations are local storage (external hard drives or optical drives), network locations, or offsite or in the cloud.
After backing up, know the next step to take. Don't consider a backup complete until it has been tested and verified that it will work if it's needed.
Understand the importance of data backups and how it relates to scheduling and frequency. The more important data is, the more important backups are. The more frequently the data changes, the more frequently it should be backed up. Scheduling backups is a good idea to keep people from forgetting to do them.
Chapter 11 Lab
Chapter 11 covered troubleshooting concepts and computer backups. It's challenging to write a lab about troubleshooting—breaking your computer (or a friend's computer) just for the sake of fixing it can be risky. Instead, this lab will focus on establishing and enacting a good backup plan.
Step 1: Determine the scope of your backup plan. Are you backing up just one computer? Or do you have a small group of computers to back up? The answers here will determine many of the answers for future steps.
Step 2: Understand the importance of the data. Does anyone care if the data is lost? Or on the other end of the spectrum, would a business fail or your life be ruined if you were to lose the data?
Step 3: Understand how much data there is to back up and how often the files change. Perhaps there are terabytes of data on the system or systems you need to back up, but only a few hundred megabytes of data change frequently. Or maybe if it's your local computer, there are only a few hundred megabytes you are concerned with.
Step 4: Where do you want to store the backup files? In general, your choices are local media (such as external hard drive or optical disc), a network server, or in the cloud. The answer will likely depend on how important the data is, how often it changes, and how much there is.
Step 5: Decide on backup software. If it's just your computer, perhaps the OS backup program is fine. Or you can purchase an external hard drive backup system and use its software. Third-party backup solutions are needed for bigger jobs, or you might find a viable cloud solution online.
Step 6: Configure the backup and run it. Simple enough, right? Run the backup based on the solution you chose in Step 5. Also note that if the backup is difficult to configure or run, you might want to re-evaluate your choice of backup software.
Step 7: Test and verify the backup. Don't forget this step! Restore some files from your backup just to make sure that it's working properly.
Step 8: Schedule recurring backups. How often depends on the needs. If the data is critical and changes daily, then daily backups may be in order. Once a week tends to be a common schedule, as does once per month for less-critical data.
Step 9: Document the backup process and schedule. If you're just backing up your own computer, this step probably isn't needed. If it's multiple systems, though, and if multiple people are involved, documentation is critical. Write down the software, the settings, and the overall plan so others know what is happening and when. If other administrators are involved, you will also need to share critical security information such as backup passwords so they can perform backup and restoration tasks as needed.
Review Questions
- When troubleshooting a computer problem, which of the following are steps you can take to identify the problem? (Choose two.)
- Use external resources such as the Internet.
- Talk to end users.
- Isolate the issue.
- Attribute it to user error.
- You are troubleshooting a MacBook Pro. When it turns on, you receive a screen with a flashing question mark. What is the likely cause?
- Device driver failure
- Video card failure
- Memory failure
- Hard drive failure
- When providing computer support and testing solutions, what should you always do first?
- Assume user error.
- Test the simple stuff.
- Check Internet resources for solutions.
- Establish a plan of action.
- Your computer has been running backups for a year. Today, you make a change from backing it up to an external optical drive to backing it up to the cloud. What should you do next?
- Secure the cloud backup location.
- Schedule regular cloud backups.
- Destroy the old optical discs.
- Verify that the cloud backup works.
- You are troubleshooting a computer problem. After testing the solution, what should you do next?
- Establish a plan of action.
- Verify functionality.
- Document the work.
- Identify the problem.
- After installing several new software applications, your friend notices that her computer boots very slowly. Which tool can she use to disable programs from running on startup of Windows?
- Recovery Console
- System Configuration
- System Restore
- Safe Mode
- Raul has just installed an older application on his Windows 8 computer and it will not run. He asks you for advice. What should you tell him to try to make it run?
- Delete and reinstall.
- Run it as an administrator.
- Use Safe Mode.
- Use compatibility mode.
- You are troubleshooting a Windows PC that will not load the operating system. You insert the Windows DVD and reboot. Which utility can you use to repair Windows?
- Recovery Environment
- MSCONFIG
- System Restore
- Safe Mode
- What is the last step in the process of troubleshooting a computer?
- Verify Internet functionality.
- Document the work.
- Clean up the mess.
- Retest the solution.
- You have been asked to design a backup solution for your manager's workstation. Which option will be the fastest?
- Cloud storage.
- Network storage.
- Local storage.
- They are all the same speed.
- What type of computer backup will back up all selected files and then clear the archive bit?
- Normal
- Differential
- Incremental
- Copy
- You have just installed a new printer on your computer, and while it seems to be recognized by the operating system, it will not print. What is the first source to check for information on the problem?
- The OS manufacturer's website
- The printer manufacturer's website
- Google search
- Internet technical community groups
- You need to run an emergency backup of your computer, and you need it to finish as fast as possible. You just backed up about three weeks ago. Which backup option should you use?
- Normal
- Differential
- Incremental
- Copy
- While troubleshooting a Windows computer that may have a bad memory module, the computer freezes and displays a blue screen with white text and a STOP error. What generated that error message?
- The memory module
- Windows
- BIOS
- MSCONFIG
- Ron's computer behaves normally for a time, and then his screen completely freezes up. The mouse and keyboard do not respond. What is the most likely cause of his problem?
- Faulty video driver
- Faulty mouse or keyboard driver
- Failing hard drive
- Overheating
- You are troubleshooting a PC and see a gray text-based message about the boot disk on a black screen. What is the most likely source of this error message?
- Windows
- CHKDSK
- BIOS
- POST card
- David is using a laptop that is about four years old. Recently he installed a few new applications, and the system performance is now very slow. Which components are the most likely ones being overworked?
- HDD and RAM
- RAM and video card
- RAM and CPU
- CPU and NIC
- You are asked to troubleshoot a computer, and your friend recommends you take a POST card with you. What can the POST card help you diagnose?
- Application problems
- Overheating problems
- Startup problems resulting in a BIOS error message
- Startup problems where nothing is displayed on the screen
- What type of backup will make a copy of all files on the computer, including user files and operating system files, to use in the event of a complete failure?
- System image
- Full backup
- Incremental backup
- Complete backup
- You're asked to troubleshoot a PC that's not working properly. You push the power button but don't see anything on the screen or hear any fans spinning. What is the most likely reason?
- Defective monitor
- Defective power supply
- Broken fan
- Defective network adapter driver